13. Determining Chipsets and Drivers
Il chipset di una scheda Wi-Fi e il driver corrispondente sono entrambi importanti quando si tratta di penetration testing. In questo modulo esamineremo rapidamente come determinare chipset e driver di un adattatore Wi-Fi, anche quando non è possibile accedere fisicamente all'hardware. Queste informazioni possono essere utili anche per individuare l'hardware giusto da acquistare in anticipo.
Sebbene possiamo preferire attenerci a un elenco di chipset noti per funzionare,1 può capitare di dover lavorare con un adattatore sconosciuto durante un penetration test. Conoscere il produttore del chipset wireless ci permette di determinare quali sistemi operativi sono supportati, quali driver serviranno e quali limitazioni sono associate ad esso.
Tutte le schede wireless riportano il marchio del produttore, come Netgear, Ubiquiti, Linksys e D-Link. Queste schede contengono un chipset wireless, il cui produttore è diverso, ad esempio Mediatek, Ralink, Atheros, Qualcomm o Marvell. Purtroppo per noi, il produttore del chipset è sia più importante sia più difficile da determinare. Questo perché i produttori di schede generalmente non vogliono rivelare cosa utilizzano all'interno dei loro prodotti. Persino versioni diverse dello stesso modello di adattatore possono avere chipset differenti.
1 (Aircrack-ng, 2021), https://aircrack-ng.org/doku.php?id=faq#what_is_the_best_wireless_card_to_buy ↩︎
13.1. Determining the Wireless Chipset
Per prima cosa dobbiamo determinare quale chipset wireless utilizza il nostro adattatore. Esistono diverse tecniche che possiamo usare.
Partiamo dal presupposto di avere accesso fisico all'adattatore. Non sarà sempre così, ma è la situazione ideale perché ci permette di leggere le informazioni stampate sul dispositivo.
Una cosa che possiamo verificare sul dispositivo è l'FCC ID, che può essere stampato su un'etichetta oppure, se l'adattatore è molto piccolo, inciso sul rivestimento metallico della porta USB.
Possiamo inserire queste informazioni su fcc.gov1 e poi consultare le foto interne del dispositivo. Quelle immagini dovrebbero mostrare il chip Wi-Fi sul dispositivo, e sul chip dovrebbe essere stampato il produttore del chipset. Spesso è indicato anche il numero di modello.
Possiamo usare la stessa tecnica anche per qualsiasi altro dispositivo con capacità wireless, come Access Point Wi-Fi e telefoni cellulari.
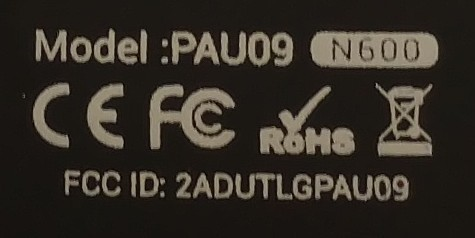
Figura 1: Esempio di etichetta FCC ID
Possiamo anche collegare l'adattatore per ottenere informazioni su di esso. Se siamo fortunati, vengono caricati driver (e firmware) e, quando eseguiamo airmon-ng senza parametri, dovrebbe visualizzare il nome del driver e del chipset.
Se l'output di airmon-ng non mostra alcuna interfaccia, dobbiamo prima verificare i moduli, o driver, caricati. Se si tratta di un dispositivo USB, possiamo semplicemente esaminare la differenza tra i moduli caricati prima e dopo aver collegato il dispositivo. Per farlo useremmo lsmod, che esploreremo più avanti in questo modulo. Potrebbe essere necessario anche un riavvio, poiché un modulo può rimanere caricato dopo che l'adattatore è stato collegato e poi scollegato. Questo metodo funziona anche quando l'adattatore è sul bus PCI/PCIe con adattatori PCI/MiniPCI,2 PCIe/MiniPCIe,3 o NGFF/M2.4 Tuttavia, collegare un dispositivo mentre il sistema è in esecuzione è rischioso e potremmo danneggiarlo.
Se non ci sono moduli caricati, possiamo esaminare l'output di dmesg prima e dopo aver collegato il dispositivo. Questo può indicare quale sia il chipset e se ci sono errori (ad esempio firmware mancante). Possiamo anche filtrare con grep usando termini come ieee80211, mac80211, cfg80211, wireless o wifi.
Possiamo anche ispezionare l'output di lsusb -vv per descrizioni o un ID USB. Per la maggior parte dei dispositivi interni, che si trovano sul bus PCI/PCIe, i comandi sono lspci e lspci -n.
Eseguiamo sudo lsusb -vv e controlliamo l'output per informazioni che ci aiutino a identificare il nostro chipset.
kali@kali:~# sudo lsusb -vv

Bus 001 Device 065: ID 148f:5370 Ralink Technology, Corp. RT5370 Wireless Adapter
Device Descriptor:
  bLength                18
  bDescriptorType         1
  bcdUSB               2.00
  bDeviceClass            0
  bDeviceSubClass         0
  bDeviceProtocol         0
  bMaxPacketSize0        64
  idVendor           0x148f Ralink Technology, Corp.
  idProduct          0x5370 RT5370 Wireless Adapter
  bcdDevice            1.01
  iManufacturer           1 Ralink
  iProduct                2 802.11 n WLAN
  iSerial                 3 1.0
  bNumConfigurations      1
Listing 1 - Esecuzione di lsusb -vv su un adattatore economico
In questo esempio, il chipset è relativamente ovvio. Si tratta di un rt5370 di Ralink. Le informazioni importanti qui sono sia l'ID del vendor sia l'ID del prodotto, 0x148f:0x5370, che produrranno molti risultati su Google.
I nomi a destra di entrambi questi ID sono accurati. lsusb ha cercato sia idVendor sia idProduct in un file di testo (/var/lib/usbutils/usb.ids), quindi ha visualizzato i risultati. Esiste un file simile per i dispositivi PCI/PCIe, pci.ids, in /usr/share/misc/.
Sono disponibili risorse aggiuntive per cercare di scoprire il chipset di un particolare dispositivo. DeviWiki,5 talvolta chiamato WikiDevi, è un ottimo punto di partenza. Deviwiki è un database facile da usare, mantenuto dagli utenti, di adattatori wireless e dei relativi chipset. Possiamo provare anche la Wireless Adapter Chipset Directory,6 e, per i dispositivi Atheros 802.11a/b/g più datati, possiamo provare Rapla.7
Possiamo anche consultare il sito web del produttore e cercare informazioni sul prodotto per un modello specifico. Queste informazioni non includono sempre il chipset, però. Possiamo anche cercare su Internet "<card model> chipset", "<card model> linux" o "<card model>. Come ulteriore vantaggio di questo approccio, a volte possiamo anche scoprire l'esperienza di altri utenti con un determinato prodotto.
I nomi dei file dei driver Windows possono essere una risorsa inaspettata. Spesso questi nomi contengono il nome del chipset o del driver da utilizzare. Se il driver è compresso in un eseguibile (con estensione .msi o .exe), dovremo estrarlo. In effetti, potremmo doverlo fare più volte, come quando è incluso in un gestore Wi-Fi. Universal Extractor 2 (UniExtract2)8 è uno degli strumenti di estrazione più utili per farlo.
1 (FCC, 2021), https://www.fcc.gov/oet/ea/fccid ↩︎
2 (Wikipedia, 2021), https://en.wikipedia.org/wiki/PCI_Express ↩︎
3 (Wikipedia, 2021), https://en.wikipedia.org/wiki/Conventional_PCI ↩︎
4 (Wikipedia, 2021), https://en.wikipedia.org/wiki/NGFF ↩︎
5 (DeviWiki, 2019), https://deviwiki.com/ ↩︎
6 (H.J. Heins, 2020), http://linux-wless.passys.nl ↩︎
7 (Rapla.net, 2009), http://atheros.rapla.net/ ↩︎
8 (William Engelmann, 2021), https://github.com/Bioruebe/UniExtract2 ↩︎
13.2. Determining the Wireless Driver
Una volta determinato il chipset, individuare il driver è abbastanza semplice. Se DeviWiki non ha le informazioni, una ricerca sulla wiki Linux-wireless1 dovrebbe aiutare a capire quale driver usare. Google resta l'ultima risorsa.
Non dovremmo preoccuparci se troviamo risultati contrastanti. Su Linux possono esistere diversi driver per la stessa scheda wireless.
Uno di questi driver sarà il driver del vendor, talvolta closed source. Quasi sempre non è utilizzabile per la monitor mode. Il Wi-Fi integrato nella maggior parte dei sistemi embedded, o System on Chips (SoC), rientra in questa categoria e solo in rari casi offre la monitor mode. Alcuni esempi di driver del vendor con capacità di monitor mode sono il driver r8187,2 il driver rtl8812au,3 e il driver nexmon.4 r8187 si è evoluto in un driver con mac80211. rtl8812au è disponibile come pacchetto su Kali. L'ultimo, nexmon, è un driver per alcuni Raspberry Pi e altri SoC con vari chipset Broadcom.
Potremmo anche cercare un driver open source, poiché è probabile che supporti la monitor mode. Purtroppo, se il chipset o il driver è abbastanza recente, potrebbe non essere incluso nel kernel e la monitor mode potrebbe non essere ancora supportata. Inoltre, se il chipset ha alcune funzioni Wi-Fi di base integrate (note come FullMAC5), la monitor mode sarà raramente supportata anche in presenza di un driver open source. Questi si trovano tipicamente nei sistemi embedded, o SoC, ma non sempre.
1 (Kernel.org, 2021), https://wireless.wiki.kernel.org/en/users/drivers ↩︎
2 (Aircrack-ng, 2017), https://www.aircrack-ng.org/doku.php?id=r8187 ↩︎
3 (Aircrack-ng, 2021), https://github.com/aircrack-ng/rtl8812au ↩︎
4 (Seemoo Labs, 2021), https://github.com/seemoo-lab/nexmon ↩︎
5 (Linux-Wireless, 2019), https://wireless.wiki.kernel.org/en/developers/Documentation/Glossary#fullmac ↩︎
13.3. Example: Alfa AWUS036AC
Immaginiamo uno scenario in cui abbiamo un adattatore Wi-Fi USB Alfa AWUS036AC. Dobbiamo trovare chipset e driver, quindi potremmo iniziare cercando su Google "Alfa AWUS036AC wikidevi". Questo ci porta al seguente URL: https://deviwiki.com/wiki/ALFA_Network_AWUS036AC
Il riquadro a destra della pagina contiene tutte le informazioni necessarie per identificare produttore e modello del chipset. In questo caso, RTL8812AU.
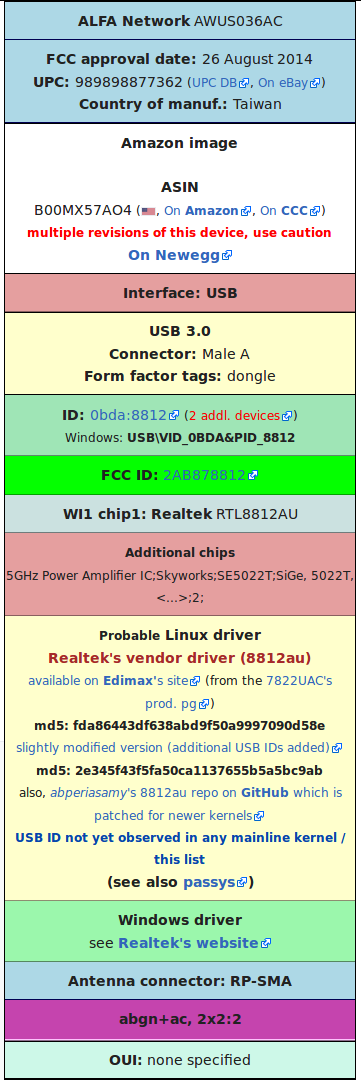
Figura 2: AWUS036AC in DeviWiki
Questa pagina elenca anche gli ID (0bda:8812), che corrispondono all'output del comando lsusb in linux.
kali@kali:~$ lsusb
Bus 003 Device 002: ID 0bda:8812 Realtek Semiconductor Corp. RTL8812AU 802.11a/b/g/n/ac 2T2R DB WLAN Adapter
...
Listing 2 - Esecuzione di lsusb per Realtek 8812au
In questo caso, DeviWiki indica che il driver non è nel kernel ma esiste un driver per esso. Il driver si trova nel riquadro "Probable Linux driver".
Se i moduli sono caricati, possiamo usare airmon-ng da solo e ottenere le stesse informazioni in un formato diverso.
kali@kali:~$ sudo airmon-ng

PHY     Interface       Driver          Chipset

phy0    wlan0           88XXau          Realtek Semiconductor Corp. RTL8812AU 802.11a/b/g/n/ac 2T2R DB WLAN Adapter
Listing 3 - Esecuzione di lsusb per Realtek 8812au
L'output elenca chiaramente il driver (88XXau) e il suo chipset (RTL8812AU).
In questo caso, il comando dmesg, sudo dmesg | egrep "ieee80211|mac80211|cfg80211|wifi|wireless", non produce alcun risultato perché questo driver non fornisce molte informazioni quando il suo modulo è caricato.
Se siamo su Windows, possiamo controllare il device manager. L'ID si trova nel riquadro Details del dispositivo stesso, nella proprietà "Hardware IDs". Nel nostro caso troveremo USB\VID_0BDA&PID_8812. È lo stesso degli ID su Linux, ma il formato è leggermente diverso. Qui l'ID è in maiuscolo e contiene testo aggiuntivo, incluso USB per un dispositivo USB, VID per "Vendor ID" e PID per "Product ID".
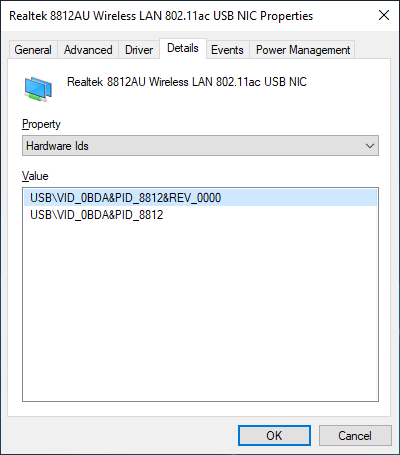
Figura 3: AWUS036AC in Windows
Cercare questi ID su WikiDevi o su qualsiasi motore di ricerca aiuterebbe anche a trovare chipset e driver necessari. Possiamo ottenere più risultati poiché più adattatori condividono lo stesso USB ID.
Se abbiamo esaurito tutte le altre opzioni e non abbiamo accesso al dispositivo stesso, possiamo provare a scaricare il driver. È molto utile quando si cercano laptop troppo recenti per comparire nei risultati dei motori di ricerca.
In questo caso, possiamo scaricare il driver Windows per l'AWUS036AC. Non importa davvero quale versione di Windows. Le parti importanti sono i nomi dei file e il contenuto.
A volte il nome dei file (con una delle seguenti estensioni: .cat, .inf o .sys) può indicare il codename del chipset. Nella maggior parte dei casi non è così e il file .inf va aperto in un editor di testo (che supporti UTF-16). Ci saranno elenchi di ID supportati da quel driver. In questo esempio, il driver supporta dispositivi Realtek sia PCI sia USB, il che aiuterà a restringere la compatibilità da cercare su Linux.
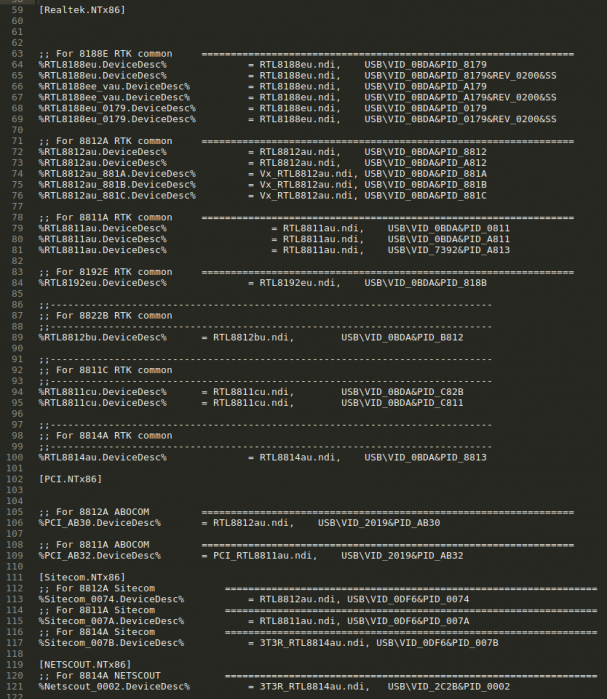
Figura 4: Estratto del file INF del driver Windows
In questo esempio, ogni approccio ci ha fornito informazioni sufficienti per individuare gli hardware ID, che, con un piccolo aiuto da Google, possono aiutarci a trovare il driver, rtl8812au. Questo driver supporta la monitor mode e può essere installato manualmente seguendo le istruzioni sulla sua pagina GitHub, oppure con sudo apt install realtek-rtl88xxau-dkms.