14. Kiosk Breakouts
Interactive kiosks are computer systems that are generally intended to be used by the public for tasks such as Internet browsing, registration, or information retrieval. They are commonly installed in the lobbies of corporate buildings, in airports and retail establishments, and in various other locations.
As publicly used systems, kiosks are designed with restrictive interfaces and offer limited functionality which is designed to prevent malicious behavior. However, these unattended systems are generally connected to back-end systems or corporate networks and as such can act as a platform for compromise.
Similarly, a thin client provides a limited interface to a powerful back-end system. This type of client may be physical, such as a self-contained Wyse Client or virtual, such as the Citrix virtual desktop.
The attack methodology used against kiosks and thin clients is similar.
In this module, we'll focus on Porteus Kiosk as a case study in exploiting a locked-down kiosk to escape the limited user experience and fully compromise the system. The kiosk could then be used to explore and eventually compromise the back-end network and connected systems.
14.1. Kiosk Enumeration
Since these interfaces are designed with limited functionality, it is important to first enumerate what is available. During this process, we will generally not have the luxury of using specialized tools like those found on our Kali Linux machine. Instead, we will be "living off the land", using (or misusing) tools already installed on the system to gain ever-increasing access to the system and its back-end networks.
There are several projects dedicated to enumerating useful binaries for this purpose such as the Windows-based Living Off The Land Binaries and Scripts (LOLBAS) project or the Unix/Linux-based GTFOBins project. These projects could supplement the tactics we use in this module.
Caution
The most cost-effective approach to kiosk software design is to simply apply a thin restrictive veneer over a standard operating system. However, this is advantageous to an attacker since mainstream operating systems prioritize the user experience, providing tools and access needed by the typical user. This type of aftermarket kiosk interface can be difficult to properly secure.
As we begin our exploration of the console, we must remember that in a real situation, we would be physically interacting with the kiosk through a touch screen, a mouse or trackpad, and in some cases, a keyboard. However, for the purposes of this lab, we'll simulate physical access to the kiosk with VNC. Since we'll rely on a variety of keystroke combinations, we'll use XTigerVNCViewer which provides excellent keyboard shortcut support. We'll install this with apt from our Kali terminal:
Listing 1 - Installing the tigervnc client
When the installation is complete, we can run it:
Listing 2 - Running the tigervnc client
Once the client is running, we can enter the IP address of the kiosk VM and connect with the password "lab". To enter fullscreen view, we'll press * to open the preferences menu and select Full screen. This will ensure that all our keystrokes will be directed to the kiosk.
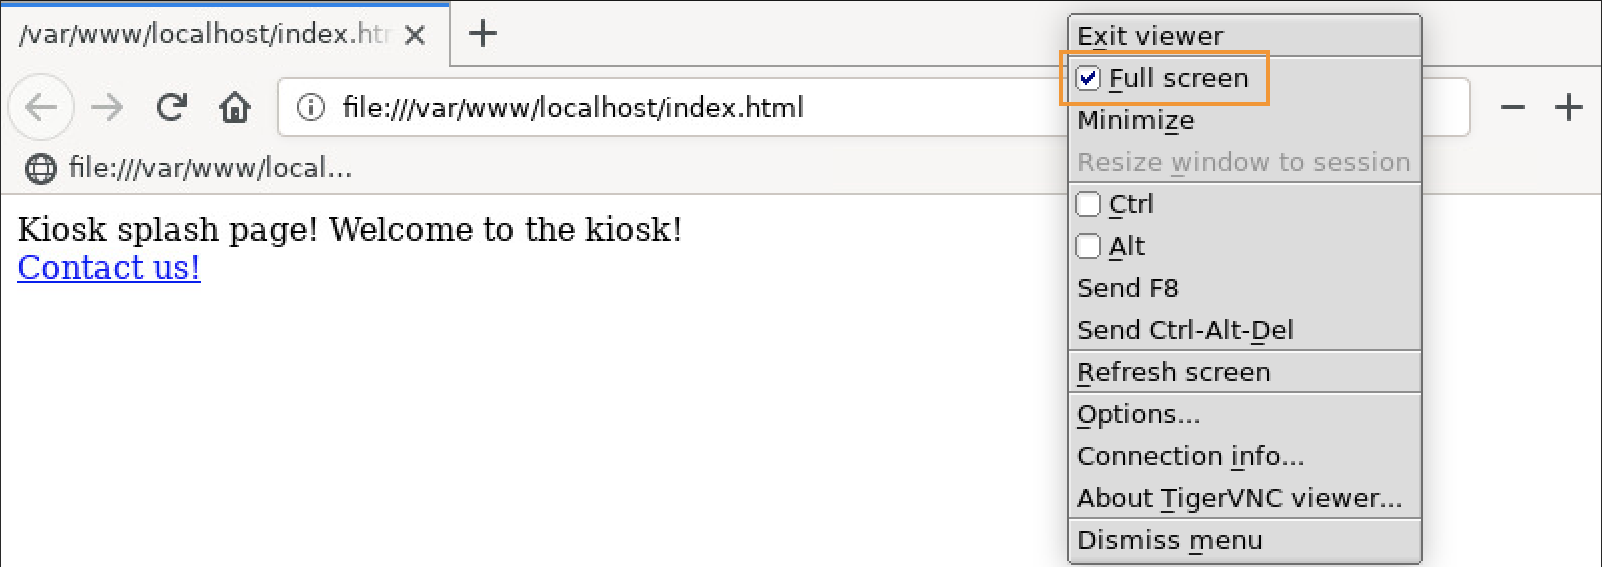
Figure 1: VNC menu to set the full-screen option
Once connected, we're presented with the initial kiosk interface shown in (Figure 2). This interface consists of a limited functionality browser window:
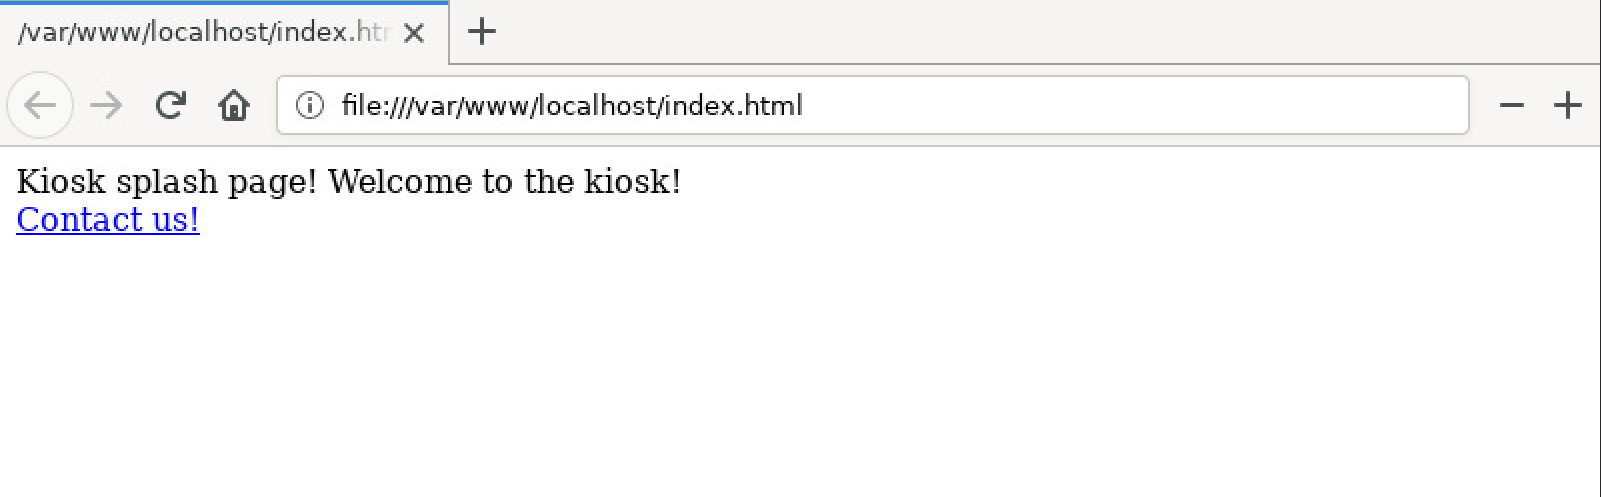
Figure 2: Kiosk interface
Let's begin navigating the kiosk's displayed pages. In this case, the only link is the "Contact us" email link which doesn't seem to do anything when clicked.
Although this link didn't reveal much, in some situations a link like this could reveal a vulnerable contact form or may even launch an email client. Regardless, it's best to thoroughly investigate the kiosk app before leveraging more interesting techniques.
Now that we've navigated the various pages presented by the kiosk, we'll attempt to "break out" of the expected user experience. The first, and most obvious avenue is to use the right mouse button, which, under normal circumstances, would present various submenus or context menus we could explore. Unfortunately for us, right-clicking is disabled, at least in this application. If we gain access to another application, we may try this again, but for now, we'll move on.
Next, we'll try various combinations of left, right, and middle-clicking combined with B and C keys on various items in the interface such as links or menu options. In this case, these combinations don't seem to do much.
Taking another approach, we'll try to escape our maximized browser session with built-in keyboard shortcuts. For example, we can use E+A to attempt to switch tasks and discover that Firefox is the only running application (Figure 3). This is unfortunate as task switching could open other avenues of exploration.
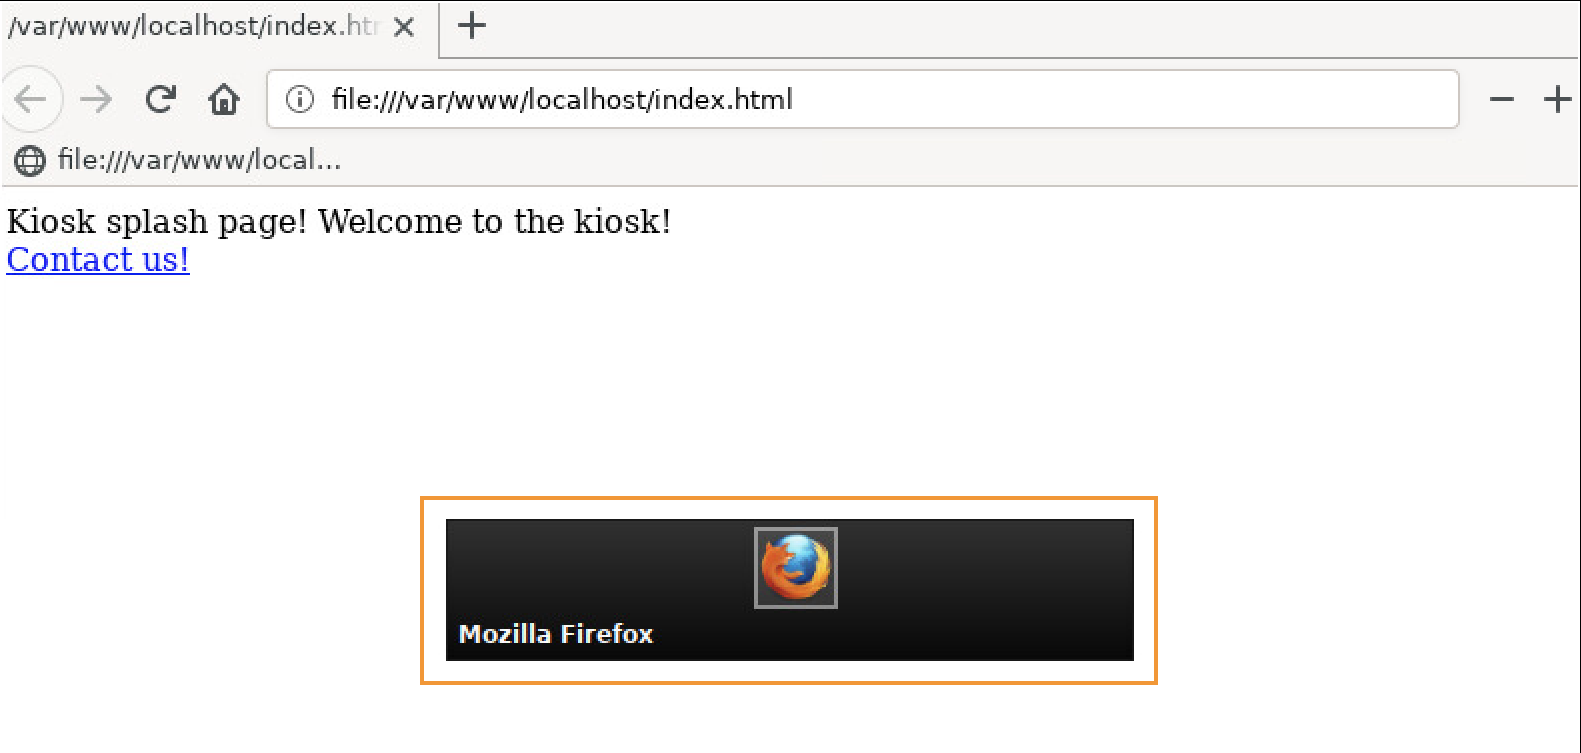
Figure 3: Switching active applications using Alt-Tab
To be thorough, we'll attempt a variety of other keyboard shortcut combinations.
Note
Keyboard shortcut lists are available online for a variety of operating systems including Windows and Linux window managers such as Gnome and KDE.
Unfortunately, this kiosk doesn't seem to accept most keyboard shortcuts. We'll need to try another approach.
14.1.1. Kiosk Browser Enumeration
At this point, since we only have access to Firefox, we'll carefully explore the browser interface itself. In some instances, we may have access to various menu items which would warrant careful exploration. However, in this case, there are no menus to explore so we'll begin exploring the various buttons (presented as icons) and other elements of the user interface.
We can move backward and forward through the history with the arrow keys, refresh the page, return home, zoom in and out and load a new (blank) tab using the respective buttons.
Clicking and holding down on the back button can show the browser history or any pages previously visited. However, in this case, there is no saved history.
In addition to the available buttons, we can also interact with the URL/address bar. By entering text into the URL bar, we are presented with suggested links for keywords that we type. Unfortunately, trying to click these results only displays an error page with a lock icon indicating that the pages are not available.
We can also interact with the preferences icon (displayed as a small gear shown in the suggestions bar (Figure 4). However, clicking this icon simply opens about:preferences in a blank page, again indicating that this functionality is restricted.
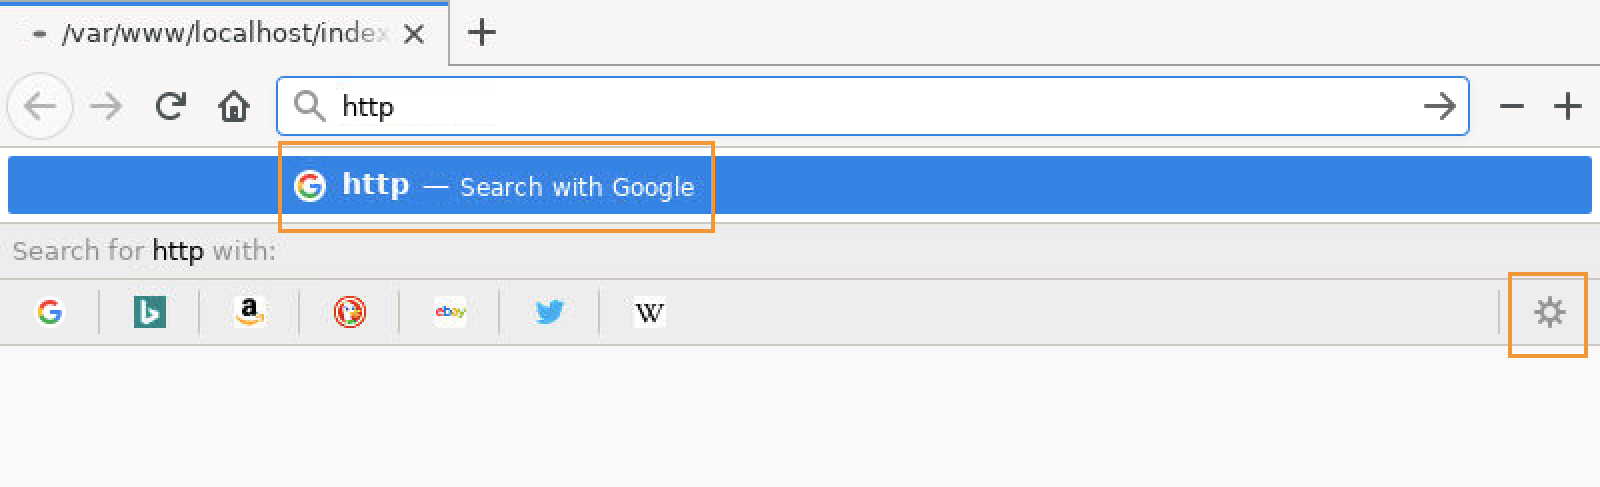
Figure 4: Browser suggestions and preferences icon
This development suggests another angle to consider. Many browsers include keyword addresses which provide access to various functionality. However, none of the various Firefox internal keywords, such as about:config, seem to work.
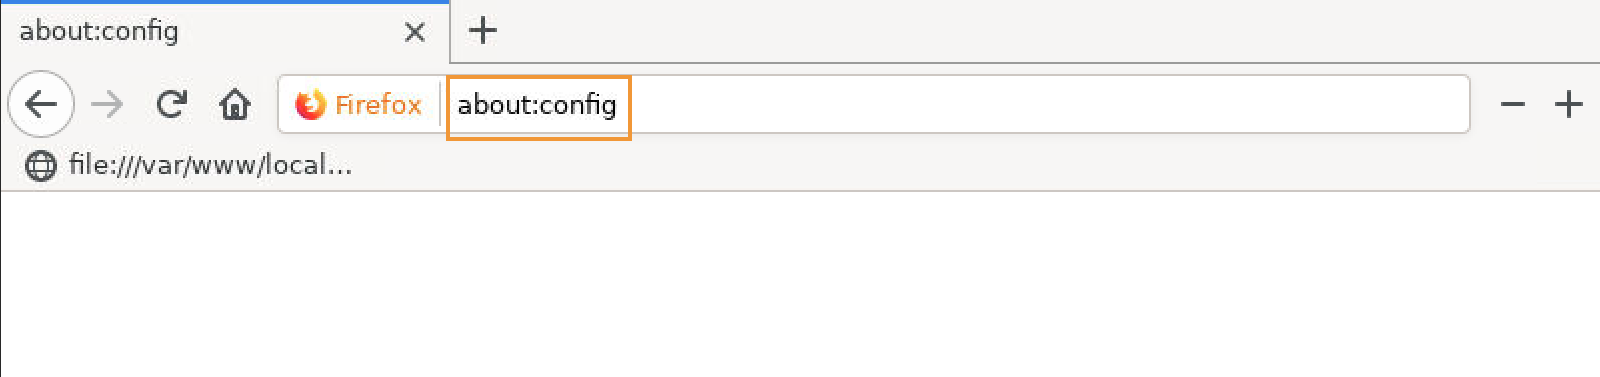
Figure 5: Firefox keywords result in a blank page
In this case, the only obvious way to interact with this kiosk is through the address bar.
The kiosk's home page URL begins with "file://". This indicates that content is stored locally in the kiosk's filesystem. Examining the home page URL (file:///var/www/localhost/index.html) reveals the home page path (file:///var/www/localhost/). Let's remove index.html from the URL to browse the directory's contents. This presents a directory listing:
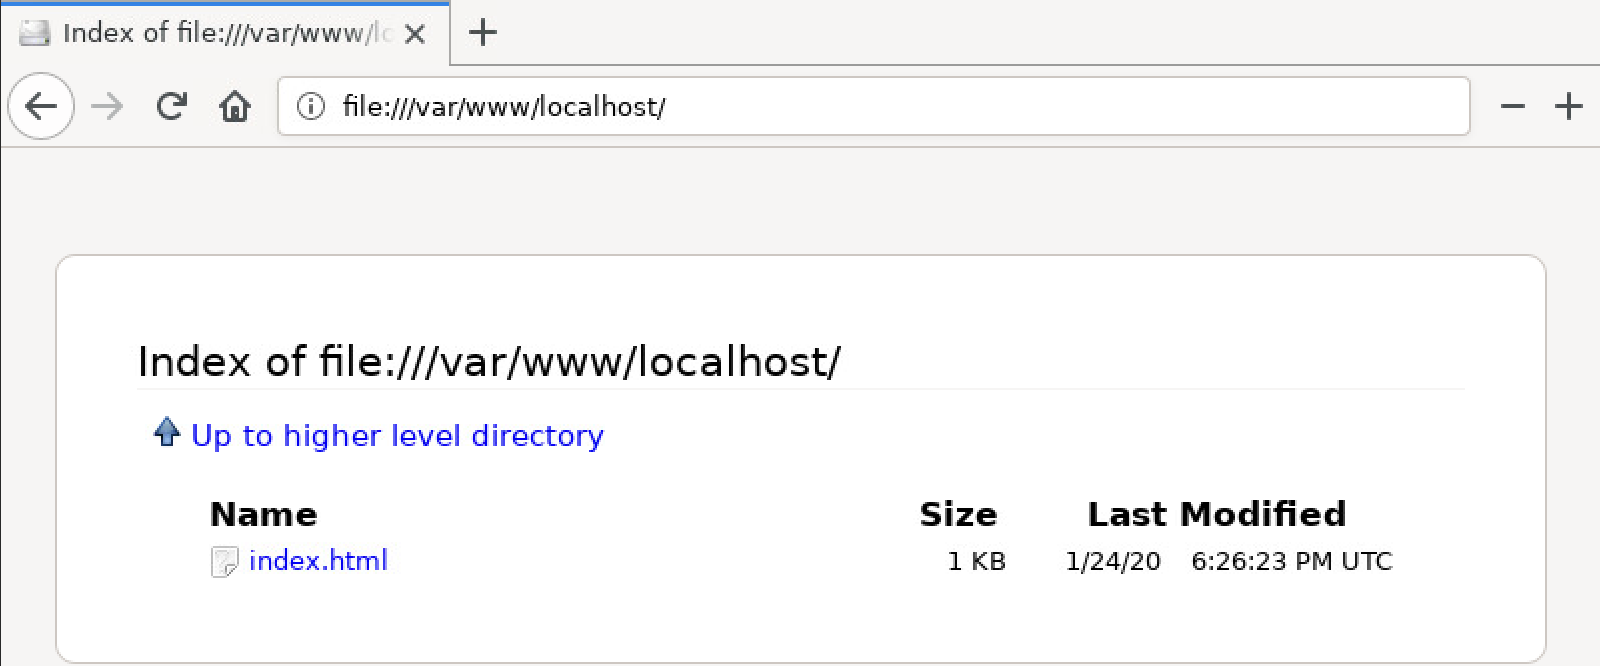
Figure 6: Viewing the parent folder contents
Unfortunately, this directory listing doesn't reveal much.
In some cases, we may be able to leverage directory listings or error messages caused by erroneous requests to gain information about the server process hosting the pages.
Unfortunately, any attempt to browse higher-level directories or other locations is denied, and we discover no meaningful information.
So far this kiosk implementation is rather formidable and doesn't offer many obvious avenues for exploration. However, each kiosk offers various challenges, so we'll move beyond the more obvious techniques and press on with a focus on the address bar.
We already know that the browser renders HTML files and likely accepts standard HTTP and HTTPS URLs. However, there are a variety of protocols we can access with Uniform Resource Identifiers (URIs). For example, the kiosk's interface presents locally stored pages with the file:// URI. Let's explore other URIs.
Several URI schemes, including chrome://, ftp://, mailto:, smb:// and others are blocked by the web filtering mechanism and our lack of external Internet access.
However, the irc:// URI, which uses the irc protocol to connect to text-based Internet Relay Chat (IRC) servers, presents an interesting dialog as shown in (Figure 7):
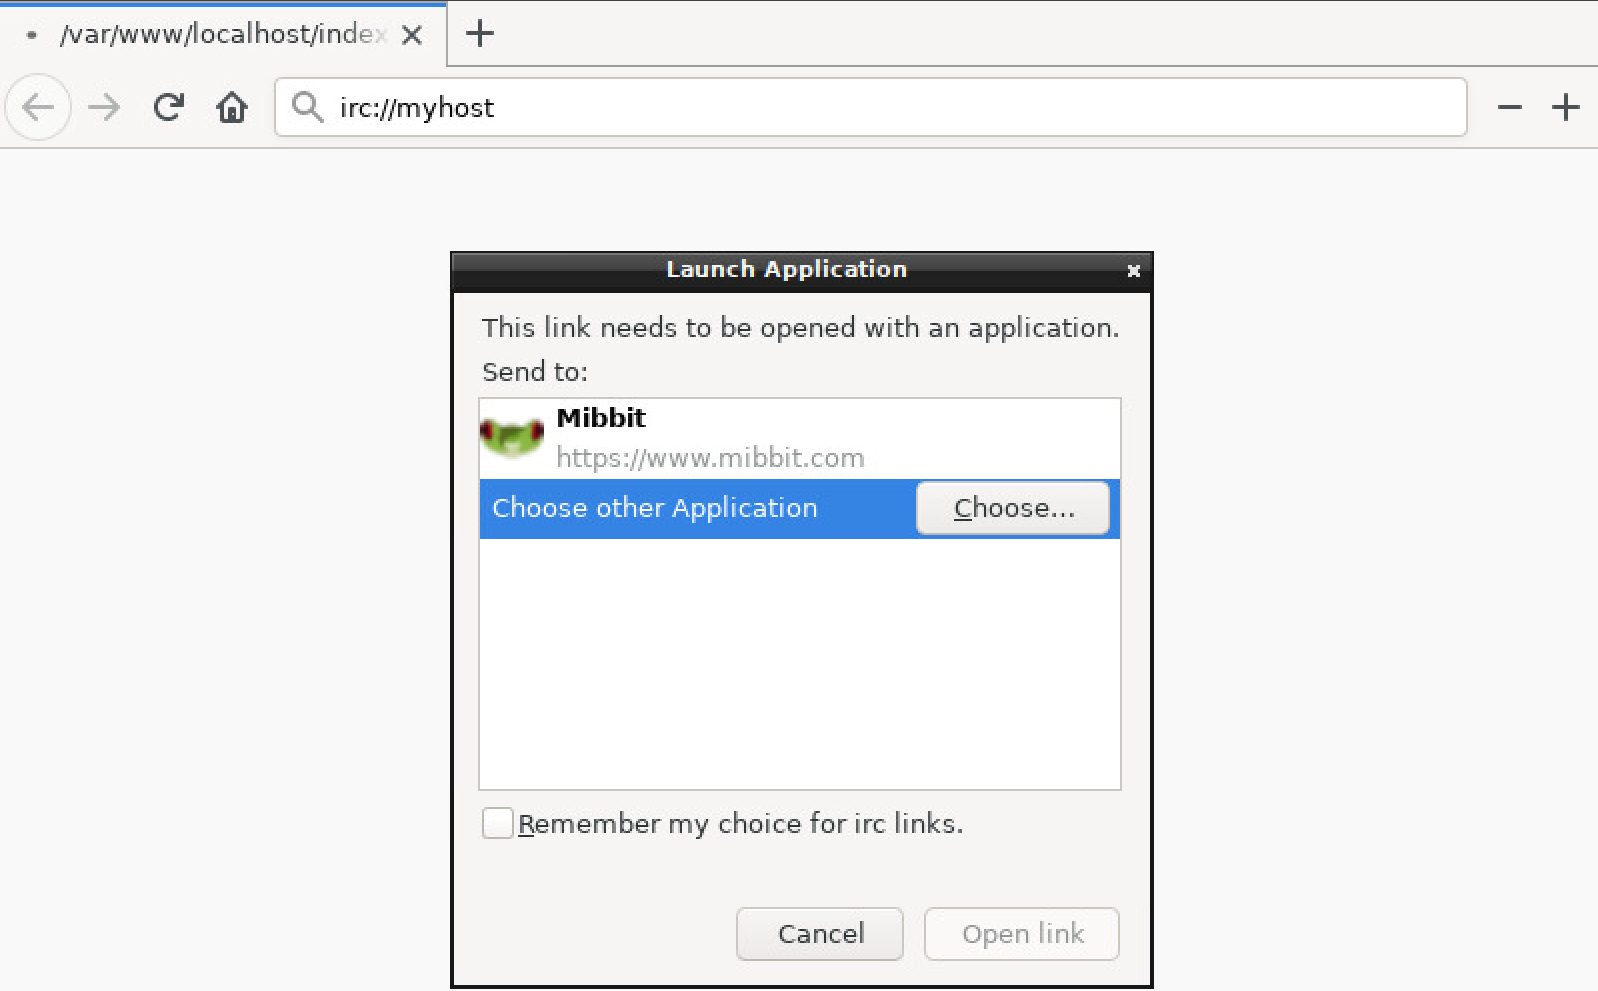
Figure 7: Launching an external application using the irc protocol
This dialog prompts for an application to handle the protocol. This is a significant breakthrough which represents the first crack in this kiosk's defenses.
Exercises
- What additional information can be discovered about the kiosk? What type of OS is it running?
- Examine the kiosk interface and try different Firefox-specific "about:" keywords and other inputs in the address bar to see what feedback the kiosk interface provides and what information can be gathered.
14.2. Command Execution
Now that we have a potential bypass of the kiosk's restrictions, we can use this dialog box to browse the filesystem. However, we must not select Remember my choice for... which will prevent us from being able to choose new programs in the future (Figure 8):
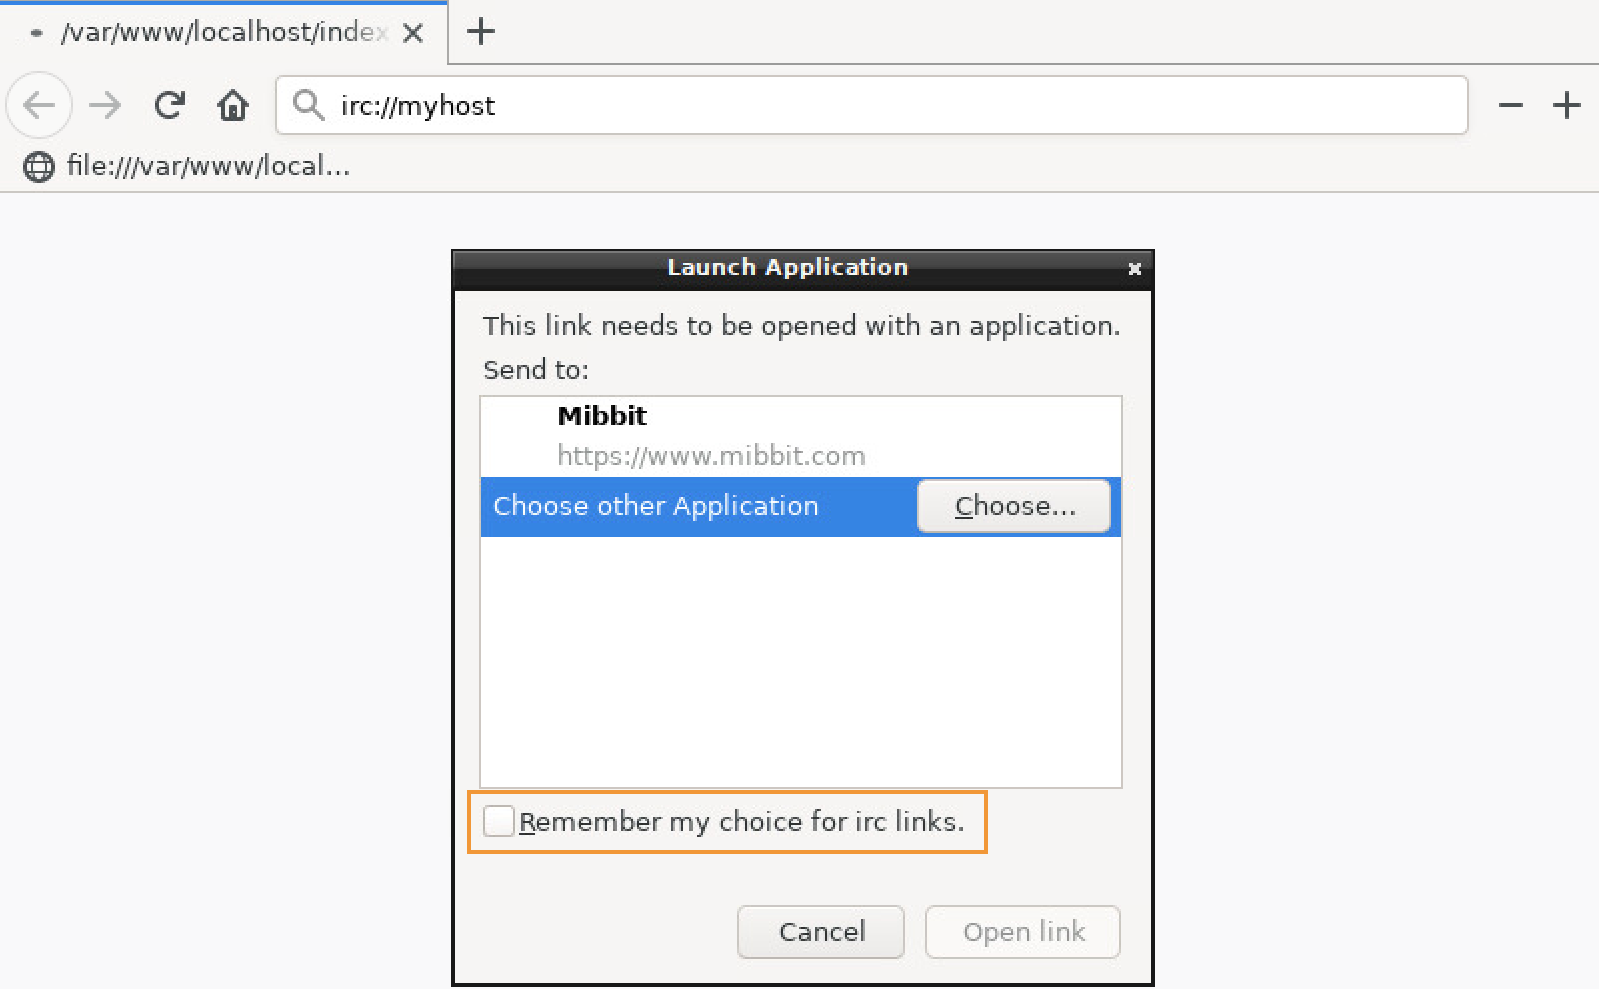
Figure 8: Ensure the "Remember my choice for..." option is unchecked
14.2.1. Exploring the Filesystem
When we Select Choose..., the kiosk presents a common file browser interface. We'll first click on Home in the left pane:
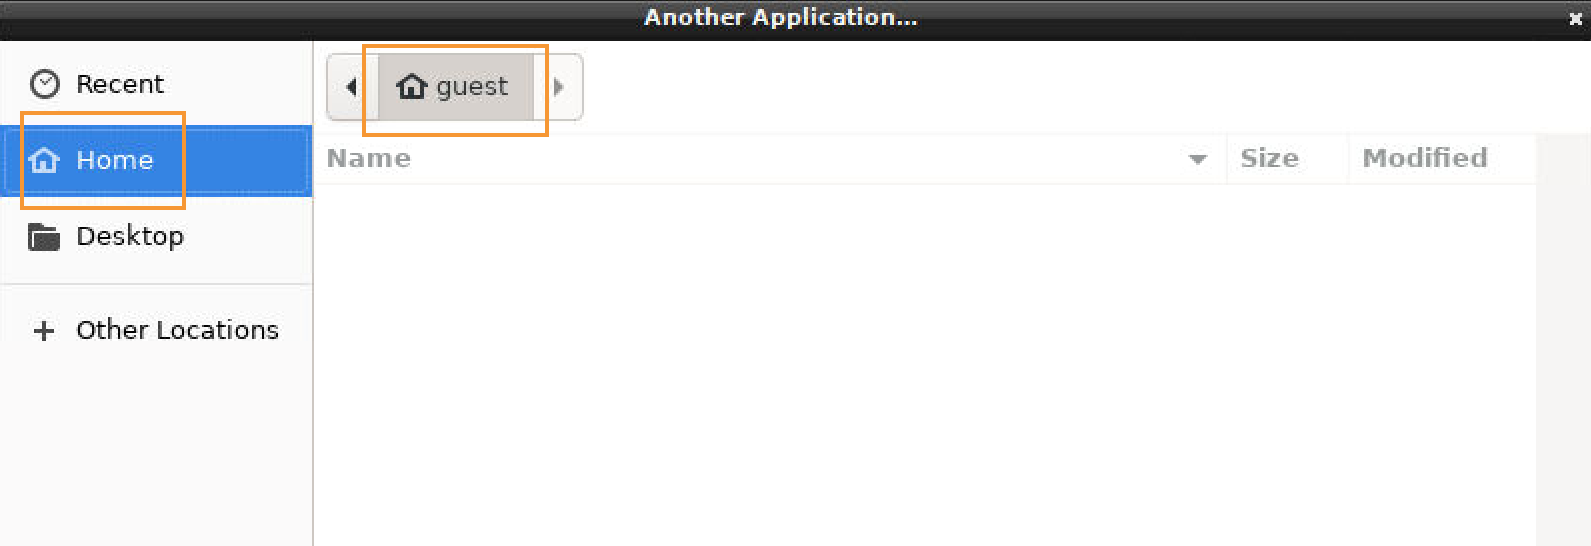
Figure 9: Firefox's Launch Application file explorer
This directory is named guest, revealing that our current username is guest. This is the account the kiosk software is running as.
Now that we have another interface at our disposal, we will attempt various keystroke combinations and attempt to right-click on the interface and the various icons. Unfortunately, this doesn't produce any results.
Caution
In some restricted interfaces, it is possible to right-click or middle-click to open a file explorer or create shortcuts to applications which we could then run.
The Home menu option seems to be empty, and we can't select the Desktop menu item. However, we can browse the filesystem by clicking Other Locations in the left pane and then Computer in the right pane as shown in Figure 10:
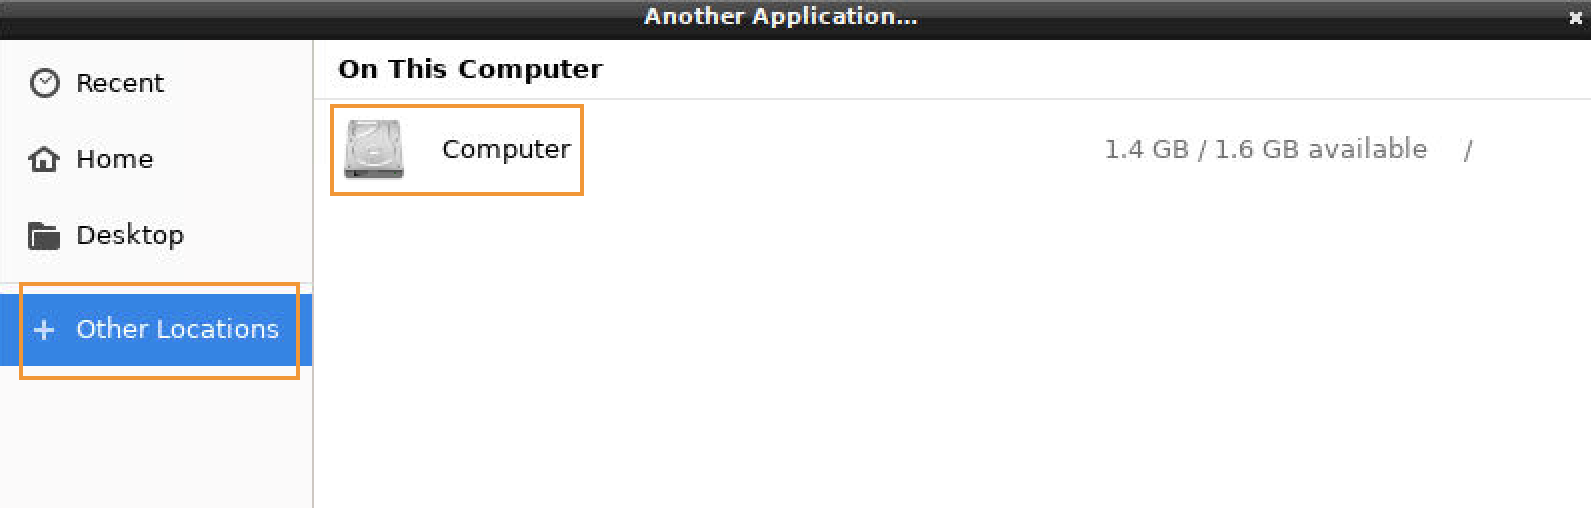
Figure 10: Browsing the "Other Locations" option in the launch dialog
This presents the kiosk's top-level directory:
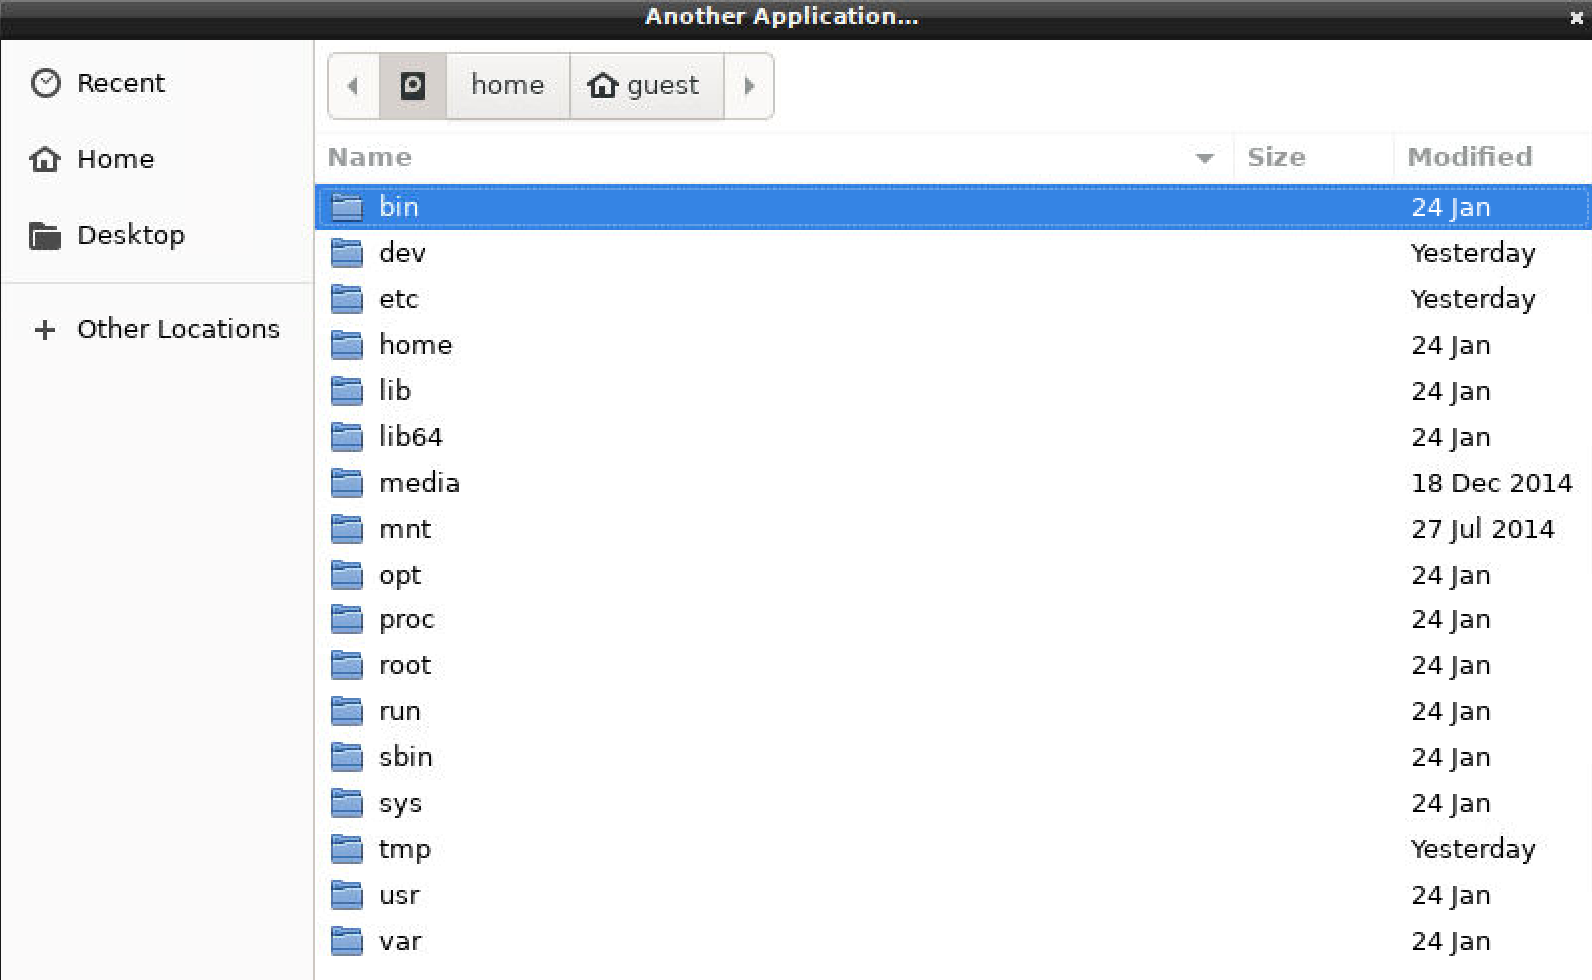
Figure 11: Linux filesystem on the kiosk
The naming convention of the root filesystem confirms what we certainly guessed by now: this is a Unix or Linux-based system. At this point, we will peruse the filesystem in search of a program to run when the browser encounters an irc:// URI. We'll search a variety of folders that often contain Linux binaries, including /bin, /usr/bin, /usr/share, /sbin, /usr/sbin, /opt and /usr/local.
For example, /bin/bash, the Linux Bash shell, is a tempting choice, but when we select it as our application to launch, then click the Open Link button to open our link with it, nothing happens, and we're returned to our browser interface. To try another application, we'll need to repeat the process of entering irc://myhost into the URL bar and selecting a new application.
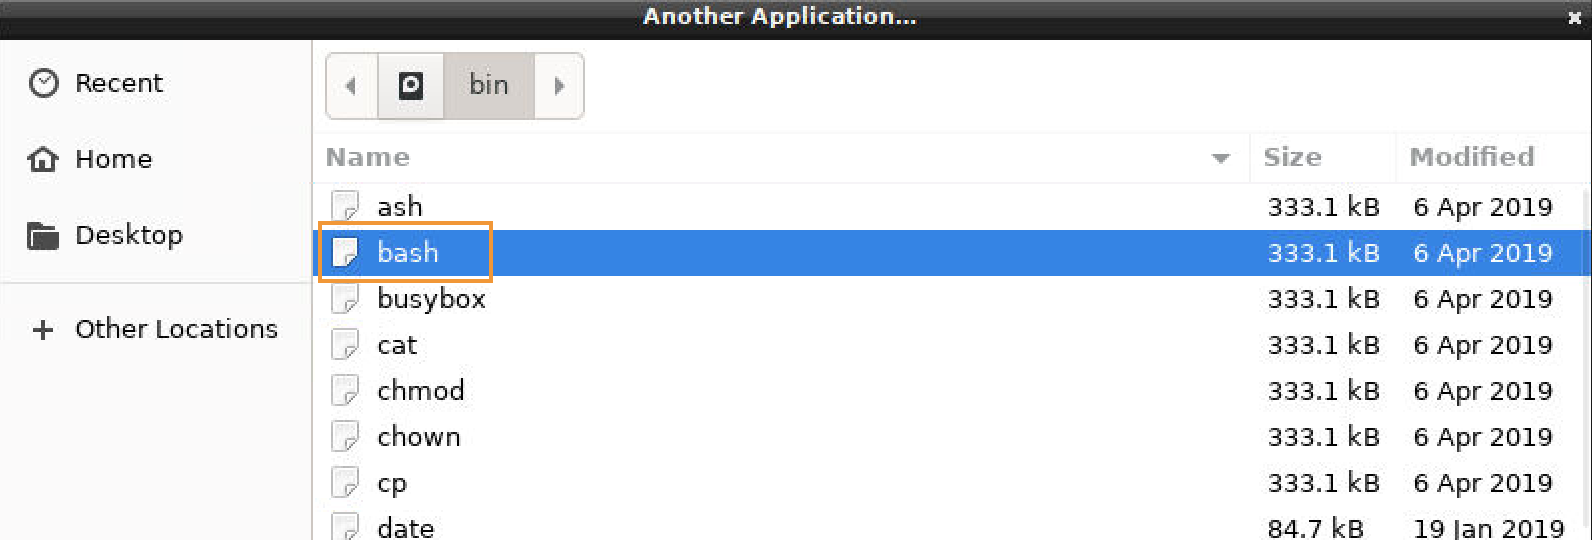
Figure 12: Attempting to run /bin/bash
Since this is a command-line program, it won't work in our graphical environment. Instead, we should use a common graphical terminal emulator such as xterm, gnome-terminal or konsole. Since terminal emulators present an obvious security risk, they are often removed from kiosk builds, and as expected, there are none installed on this system. This could severely limit our ability to interact with the shell.
However, there are several other programs that may be helpful, including /bin/busybox which combines common Linux/Unix utilities into a single binary. This could come in handy later.
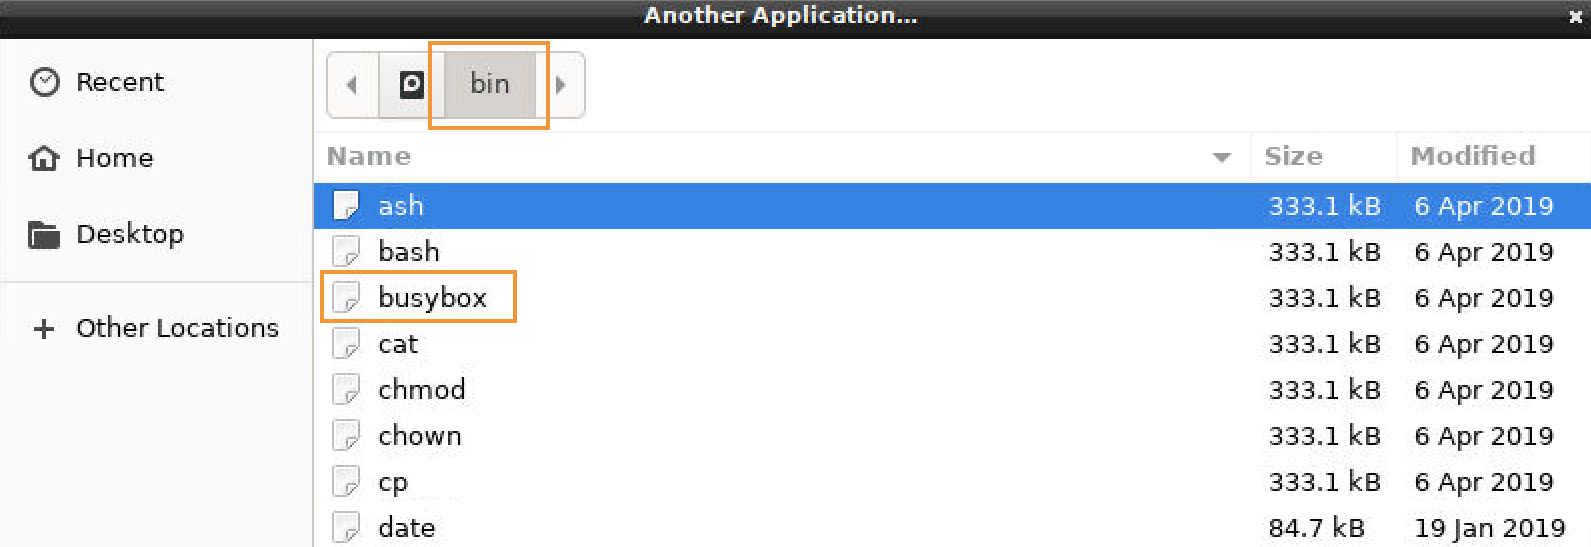
Figure 13: /bin folder
In addition, /usr/bin/dunstify displays quick pop-up messages that disappear after a short period of time. Let's select this program to determine if Firefox will load it.
We'll select dunstify in the Launch Application dialog box and allow it to run:
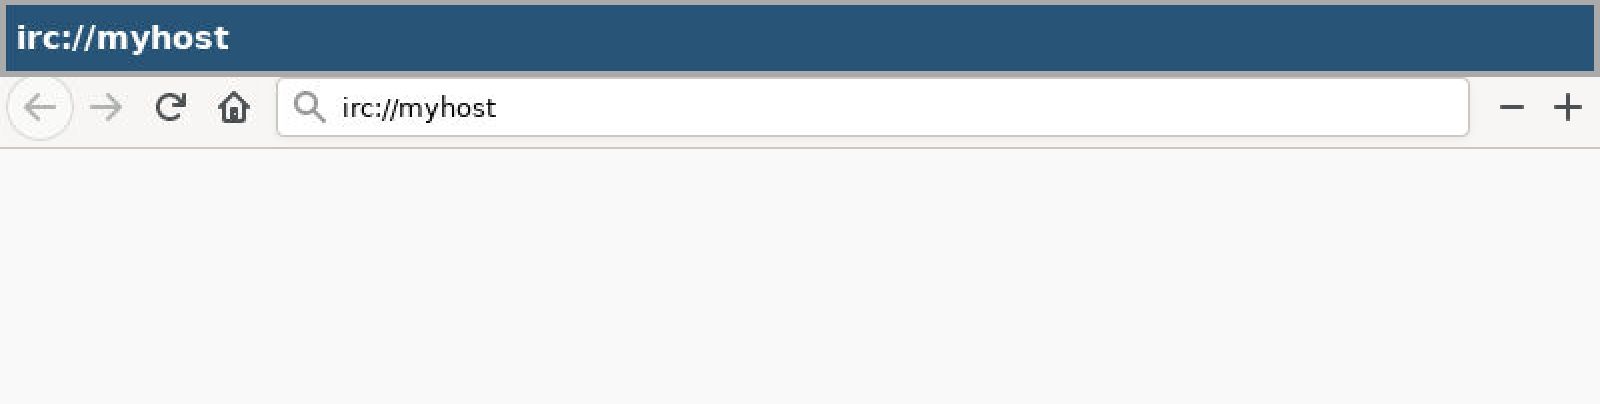
Figure 14: Displaying a message with dunstify
This created a simple drop-down notification that simply reads "irc://myhost". This is important for two reasons. First, there does not appear to be a protection mechanism in place that blocks external applications. Second, we have discovered that the URI ("irc://myhost") was passed as an argument to dunstify on the command line. We can safely assume that Firefox ran a command similar to:
Listing 3 - Dunstify command line call from Firefox
This could explain our earlier difficulty running applications. If they are being run with a first parameter of irc://myhost and the program doesn't accept that as valid, our attempt will fail. We can test this with various applications in /bin on our Kali Linux command line. For example, let's test /bin/bash with this argument:
kali@kali:~$ /bin/bash irc://myhost
/bin/bash: irc://myhost: No such file or directory
kali@kali:~$
Listing 4 - irc command as first parameter failing in Kali
Because of the invalid argument, /bin/bash returns an error and does not run properly.
We could get around this with /usr/bin/env, which we can use to set the first parameter as an environment variable and cancel out the first parameter when calling our target program. The syntax would be similar to:
Listing 5 - Negating the first parameter using env
This would create an environment variable named "irc://myhost" with a value of "something" and then run /bin/bash. If we test this on Kali, it works fine, but when run on the kiosk through Firefox, it fails (Figure 15). As with our attempt at running Bash, this is likely due to the lack of terminal emulator programs on the system.
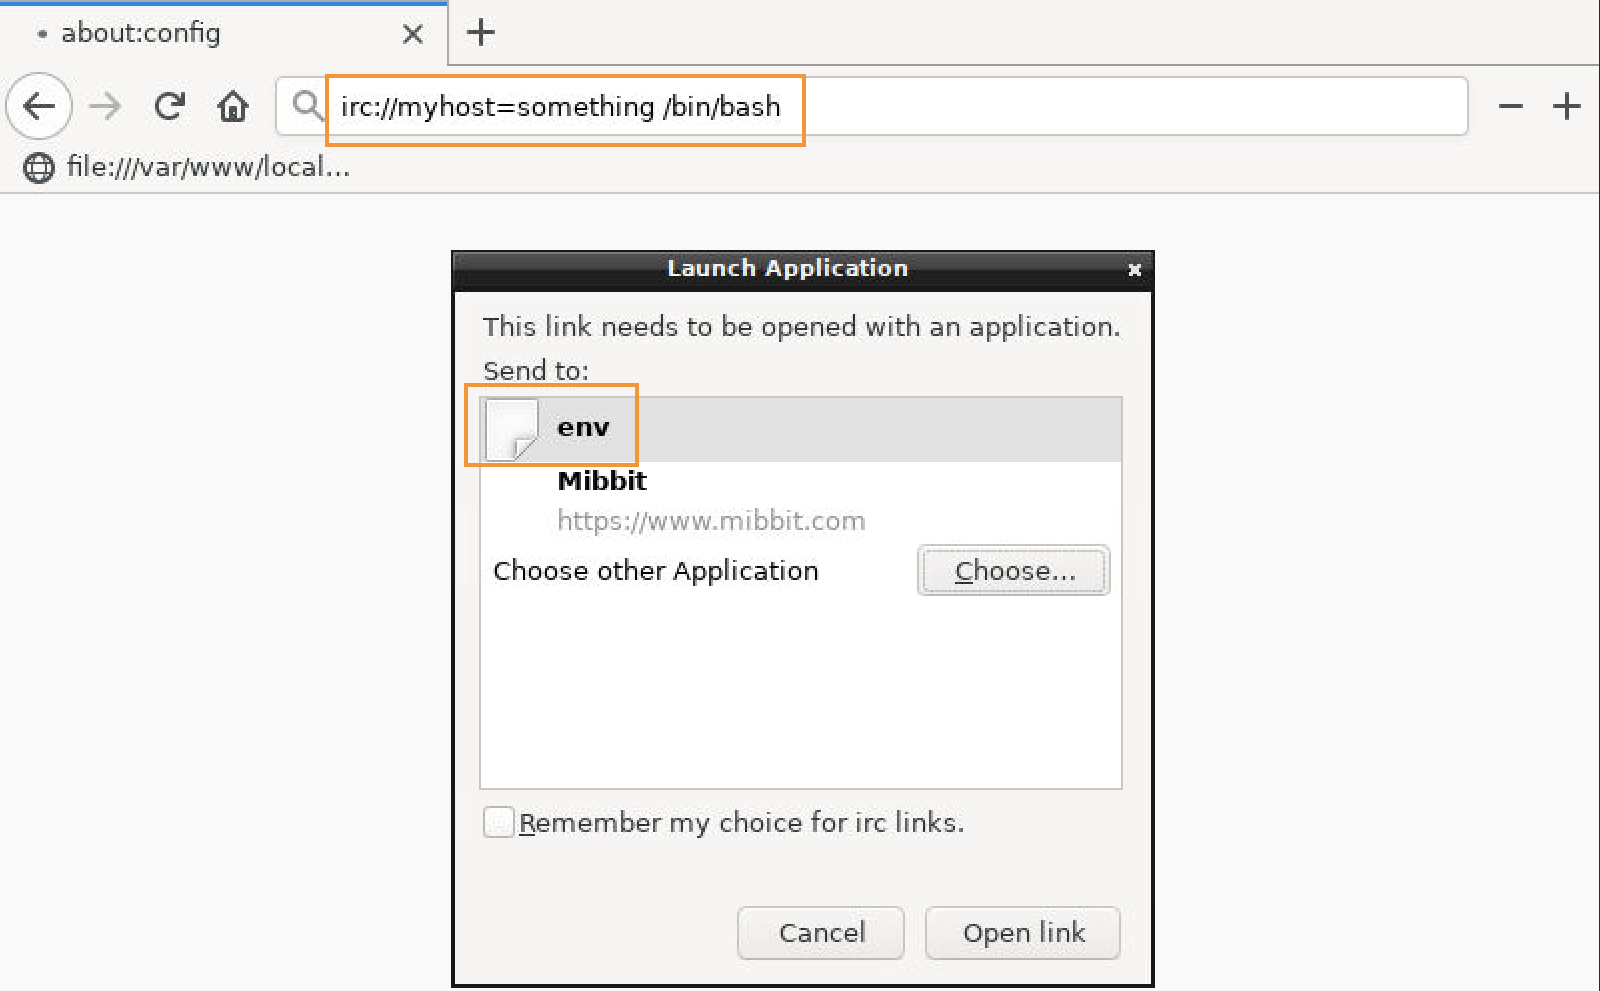
Figure 15: /usr/bin/env attempt
Although we could spend a great deal more time experimenting with various system programs, we should take a step back at this point and remember that one program in particular, Firefox, runs perfectly fine on this kiosk and accepts parameters. We could use this to our advantage.
As documented, the first parameter to Firefox is a URL (or URI). Knowing that Firefox accepts irc://myhost as a valid URI, we could launch Firefox itself with that parameter. However, that doesn't seem like a step forward until we consider Firefox's other command-line parameters.
14.2.2. Leveraging Firefox Profiles
As we already know, Firefox is running in a restricted mode likely set in a specially configured profile. We may be able to break out of these restrictions by loading a different profile configuration.
According to the documentation, the command-line argument for specifying a new profile is -P "profilename". We'll try this out with a new URI (irc://myhost -P "haxor") and select /usr/bin/firefox as the application to run in the Launch Application dialog (Figure 16).
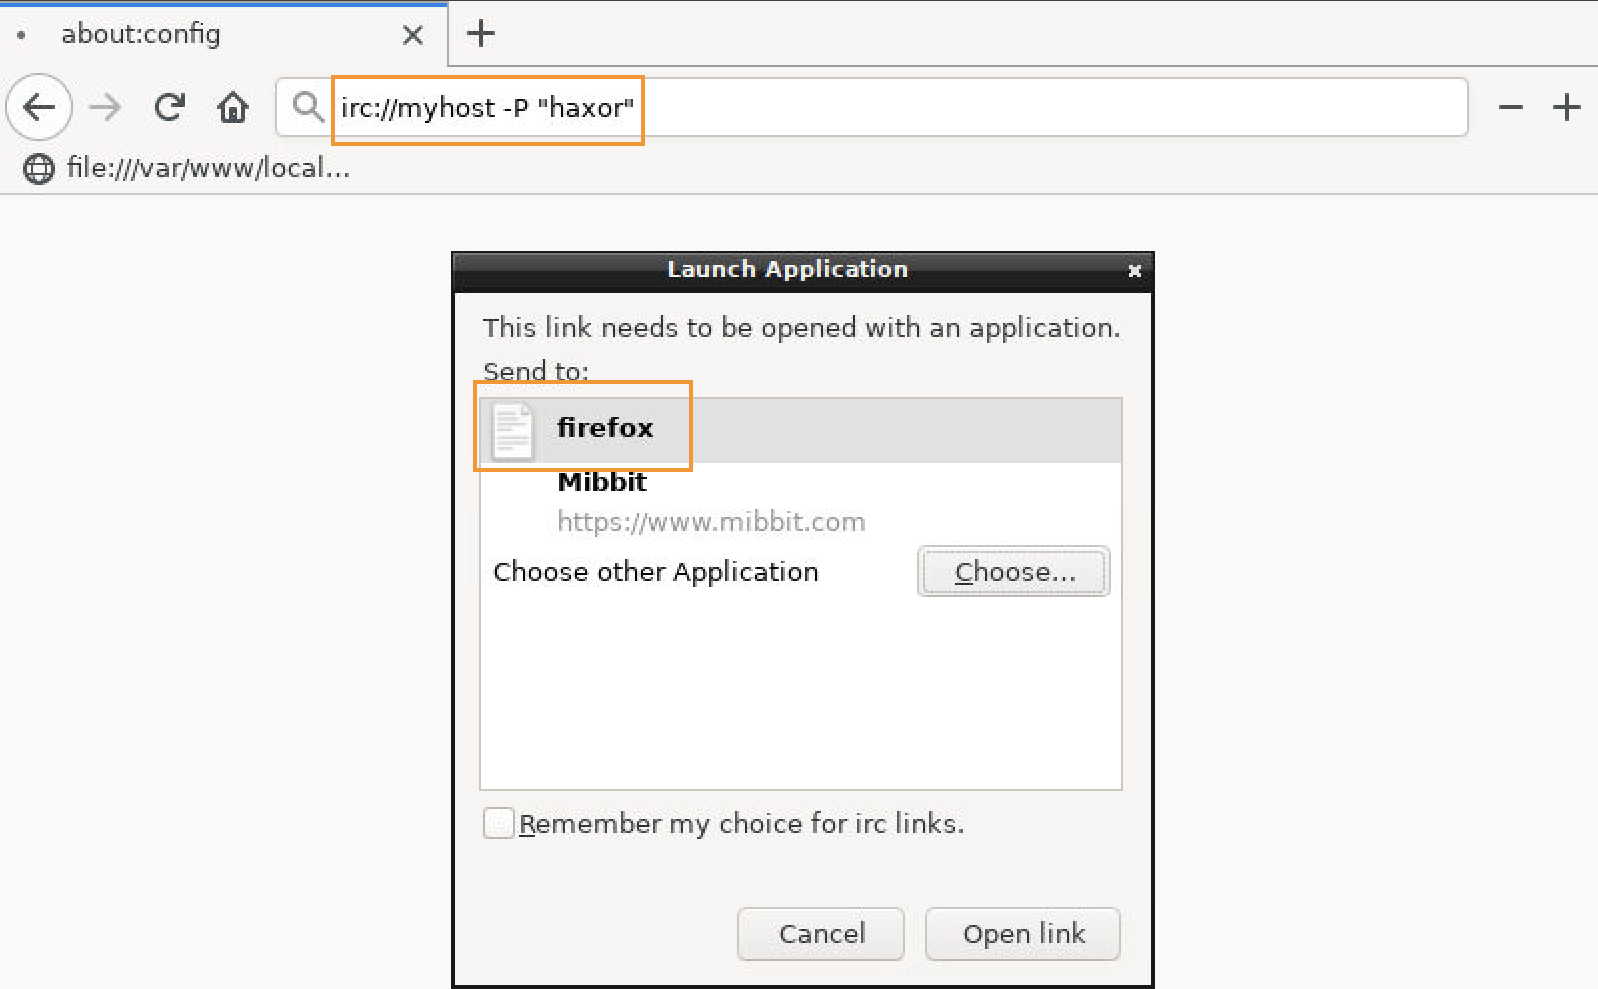
Figure 16: Running Firefox from Firefox with a specific profile
This launches a new Firefox instance which presents us with the Firefox profile manager: (Figure 17):
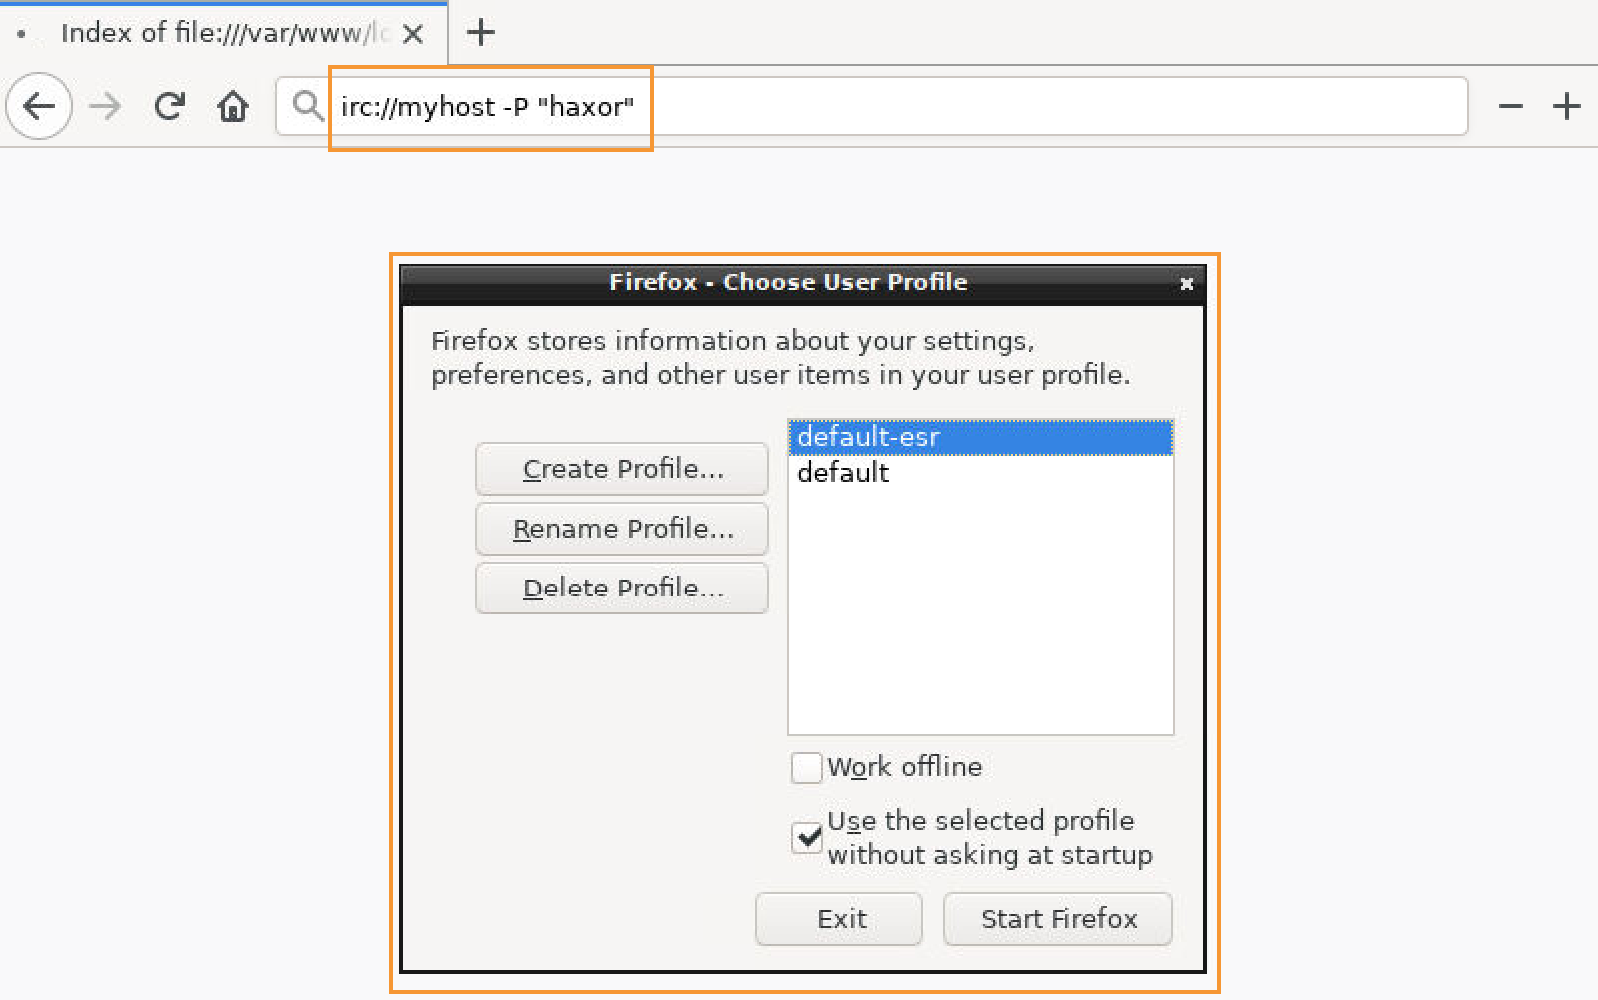
Figure 17: Firefox Profile Manager
From here, we can create our own profile, in this case named "haxor" (Figure 18):
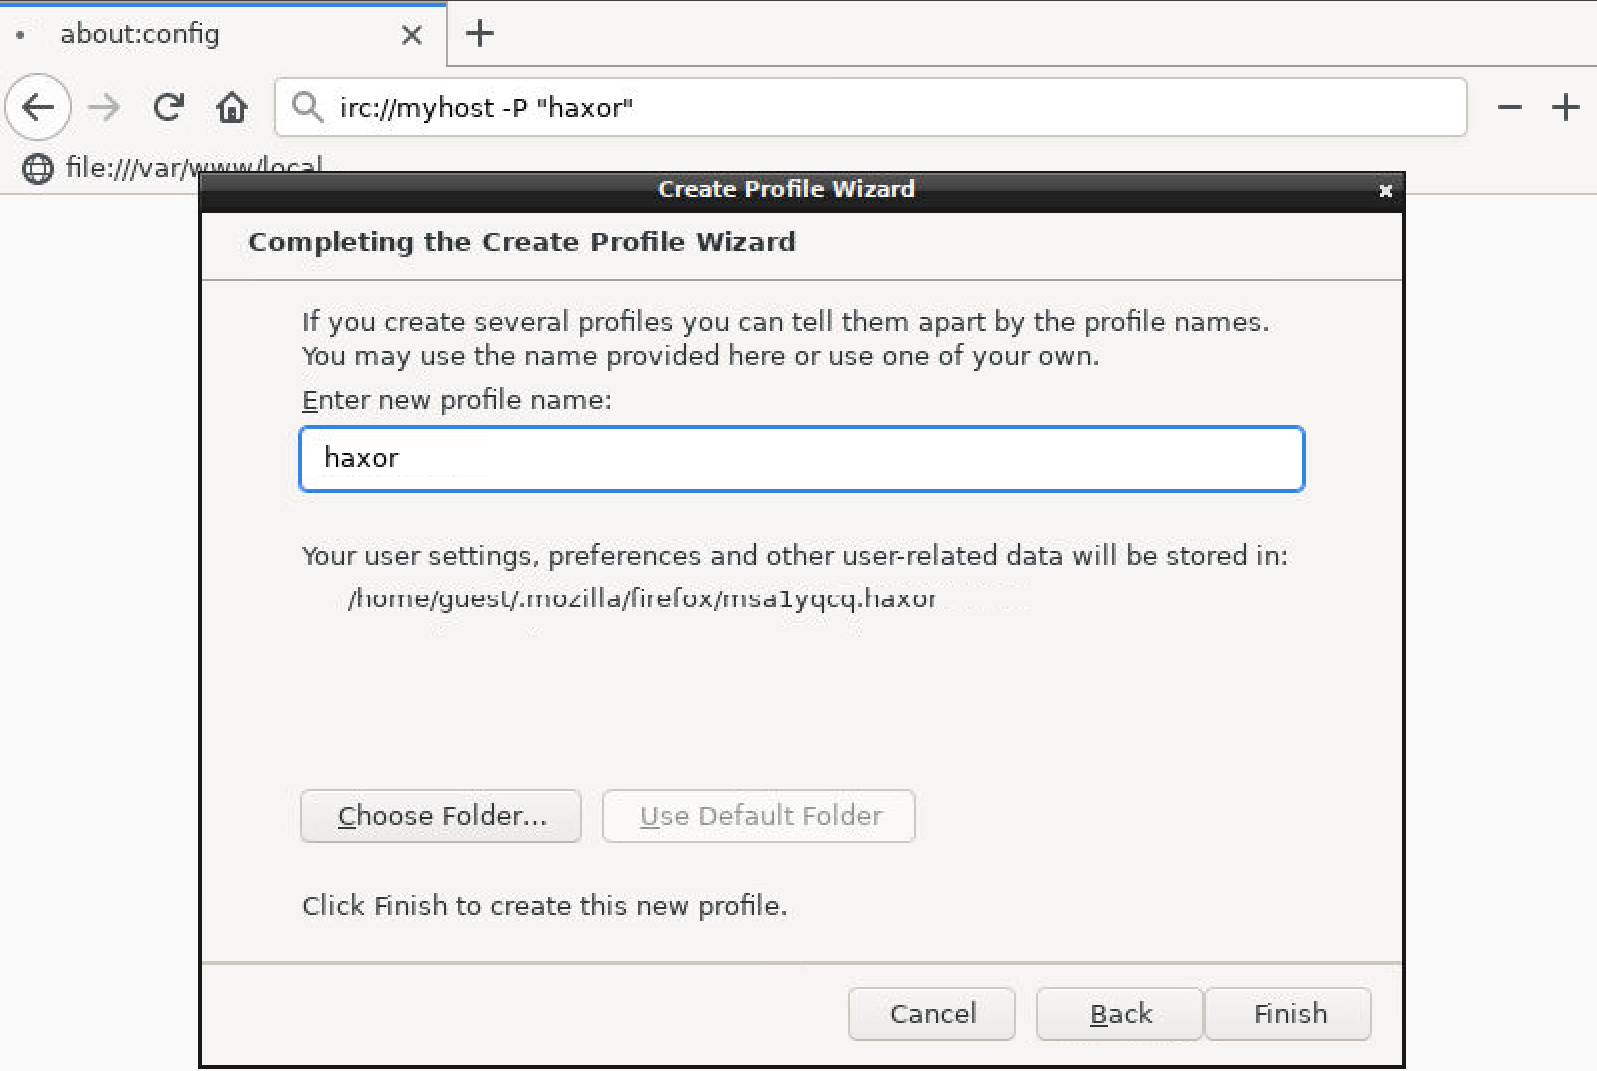
Figure 18: Creating the new Firefox profile
Once our profile is created, Firefox opens a new window and again displays the Launch Application dialog box, which we can dismiss. This instance of Firefox presents a new set of menus:
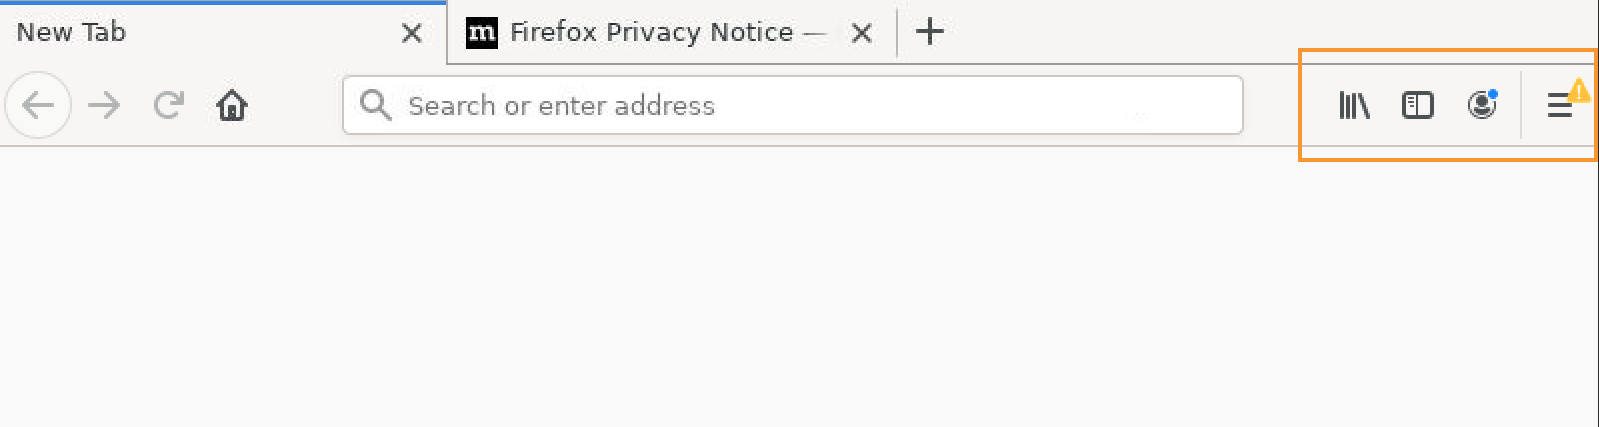
Figure 19: Firefox is unrestricted and previously unavailable menu icons are now available
We have broken out of the restricted instance of Firefox. Very nice. We're making progress.
14.2.3. Enumerating System Information
At this stage, if the kiosk were Internet-connected, we would have a host of options available to us. With an unrestricted browser, we could install add-on components such as terminal emulators or file browsers. We could connect to online tools such as text editors, which could help us write local files. In fact, we could even leverage highly specialized kiosk pentesting tools like iKAT. (Warning: the iKat website may contain content that is not safe for work.)
However, since we do not have Internet connectivity, we will instead begin with some basic read-only enumeration using the file:/// URI.
We'll begin with the /etc/passwd file which reveals valuable information (Figure 20):
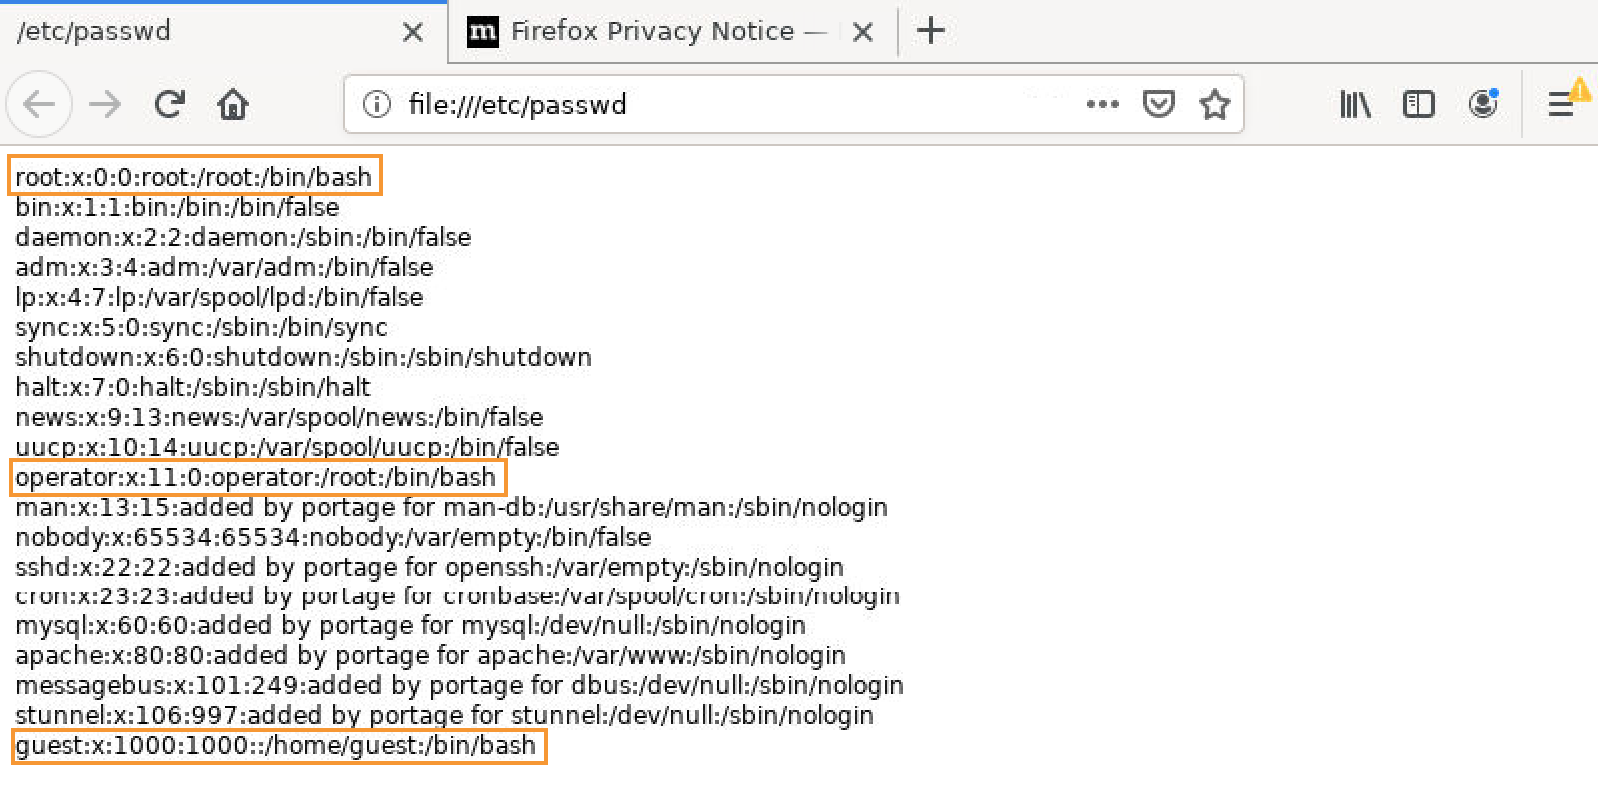
Figure 20: Viewing /etc/passwd
Based on the login shell (the final column of each line), there are only three valid login users: root, operator, and guest. Root and operator share the same home folder, so operator is likely a utility account of some sort, perhaps for remote management. Guest is the user the kiosk interface is currently running under, which we know is limited.
Moving on, the version file at file:///proc/version reports that the system is running a recent kernel version, which means direct kernel exploitation may be difficult:
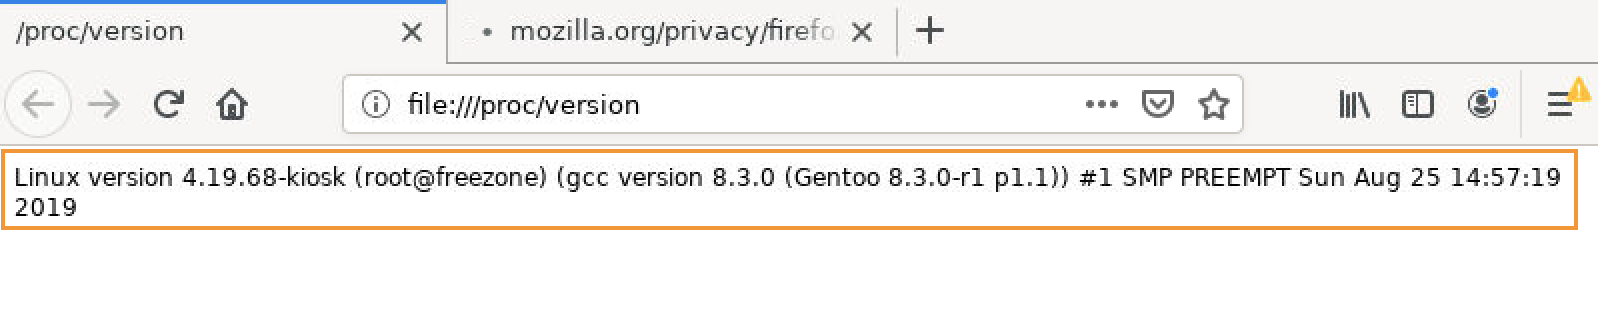
Figure 21: /proc/version file contents
Next, an examination of the guest user's home folder reveals that there are no SSH private keys:
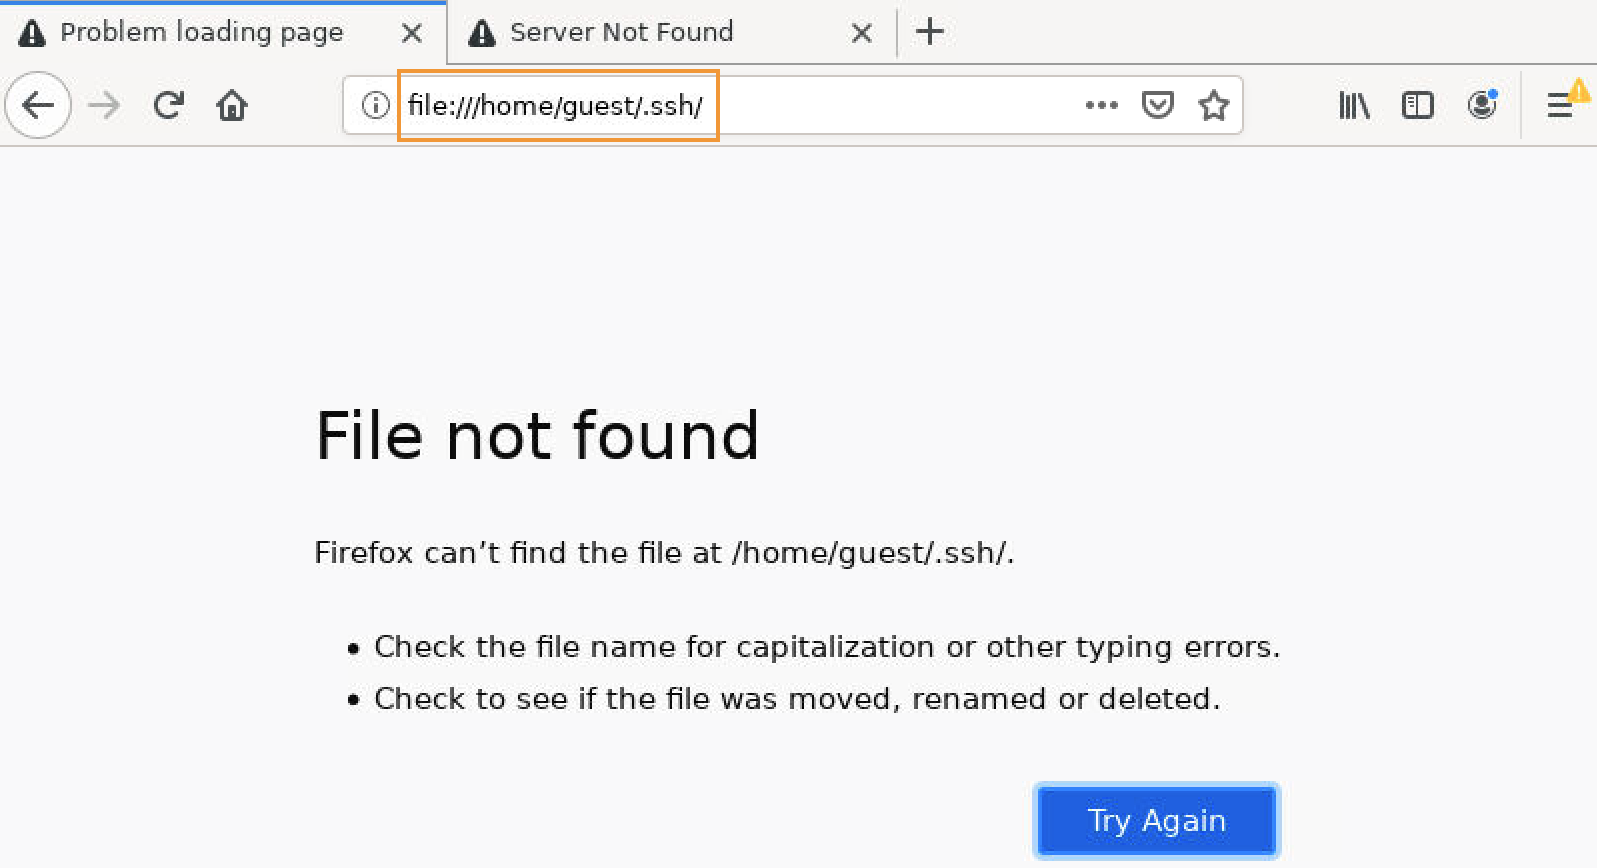
Figure 22: No private keys in guest user's home folder
However, even if we did find keys, we could not leverage them without access to a terminal application or graphical SSH client.
Since our read-only exploration is returning few results, we'll move in a new direction leveraging our unlocked browser profile. Let's select the Show Downloads Folder option to gain access to some sort of file explorer (Figure 23):
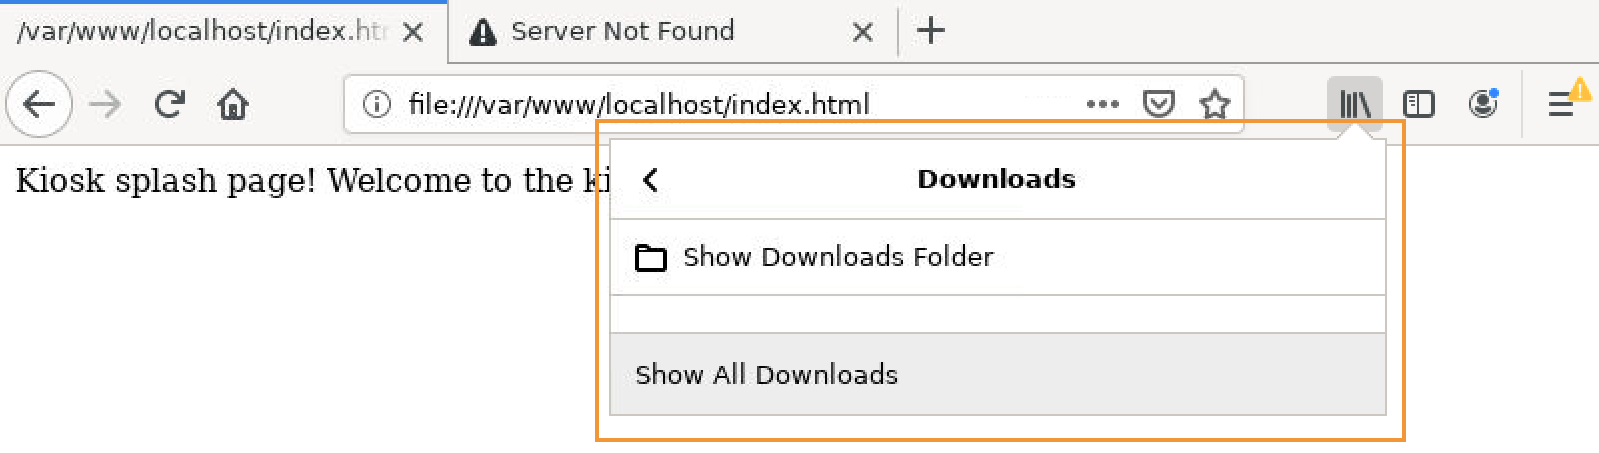
Figure 23: Attempting to view downloads folder
This presents another Launch Application dialog box, indicating that a desktop file browser utility isn't available. A search for a suitable program yields no results.
Since we have access to neither a terminal application nor a file browser, we are severely limited in our ability to interact with the underlying operating system.
However, Firefox includes various Web Developer tools that could be useful, each located under the "hamburger" menu:
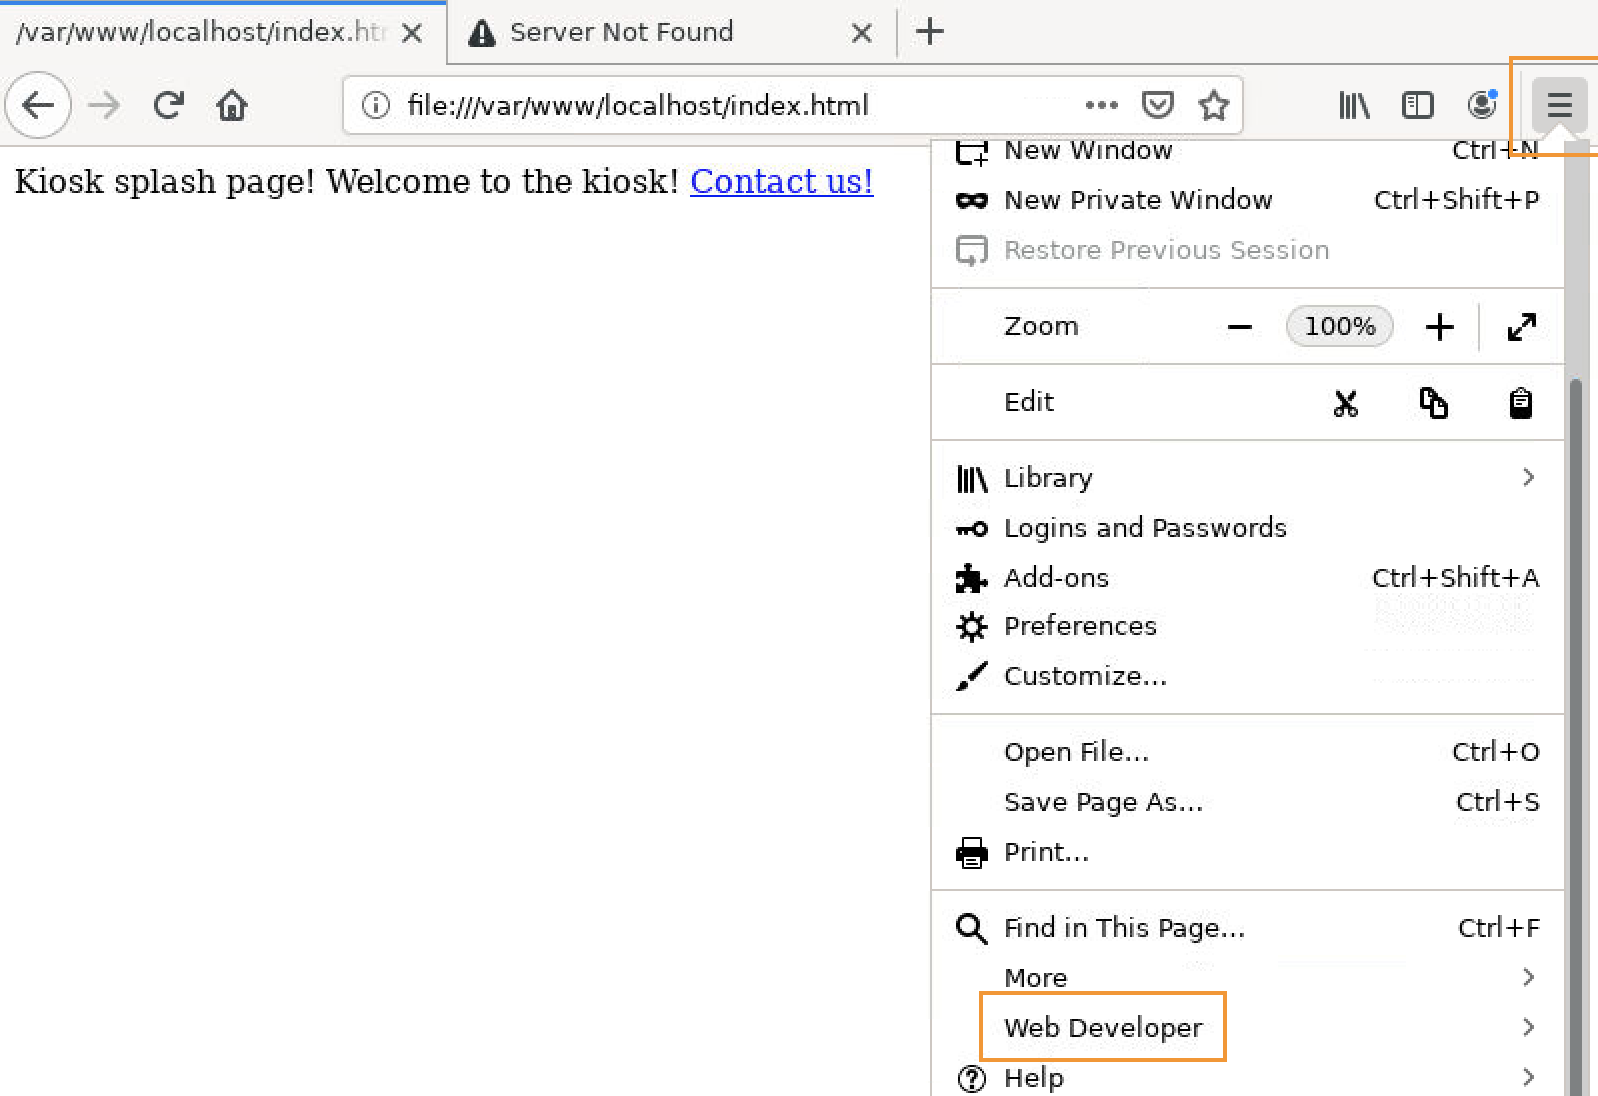
Figure 24: Hamburger menu and Web Developer menu options
Logins and Passwords, although enticing, is unfortunately empty. Many of these tools could be useful, but we'll begin with Scratchpad:
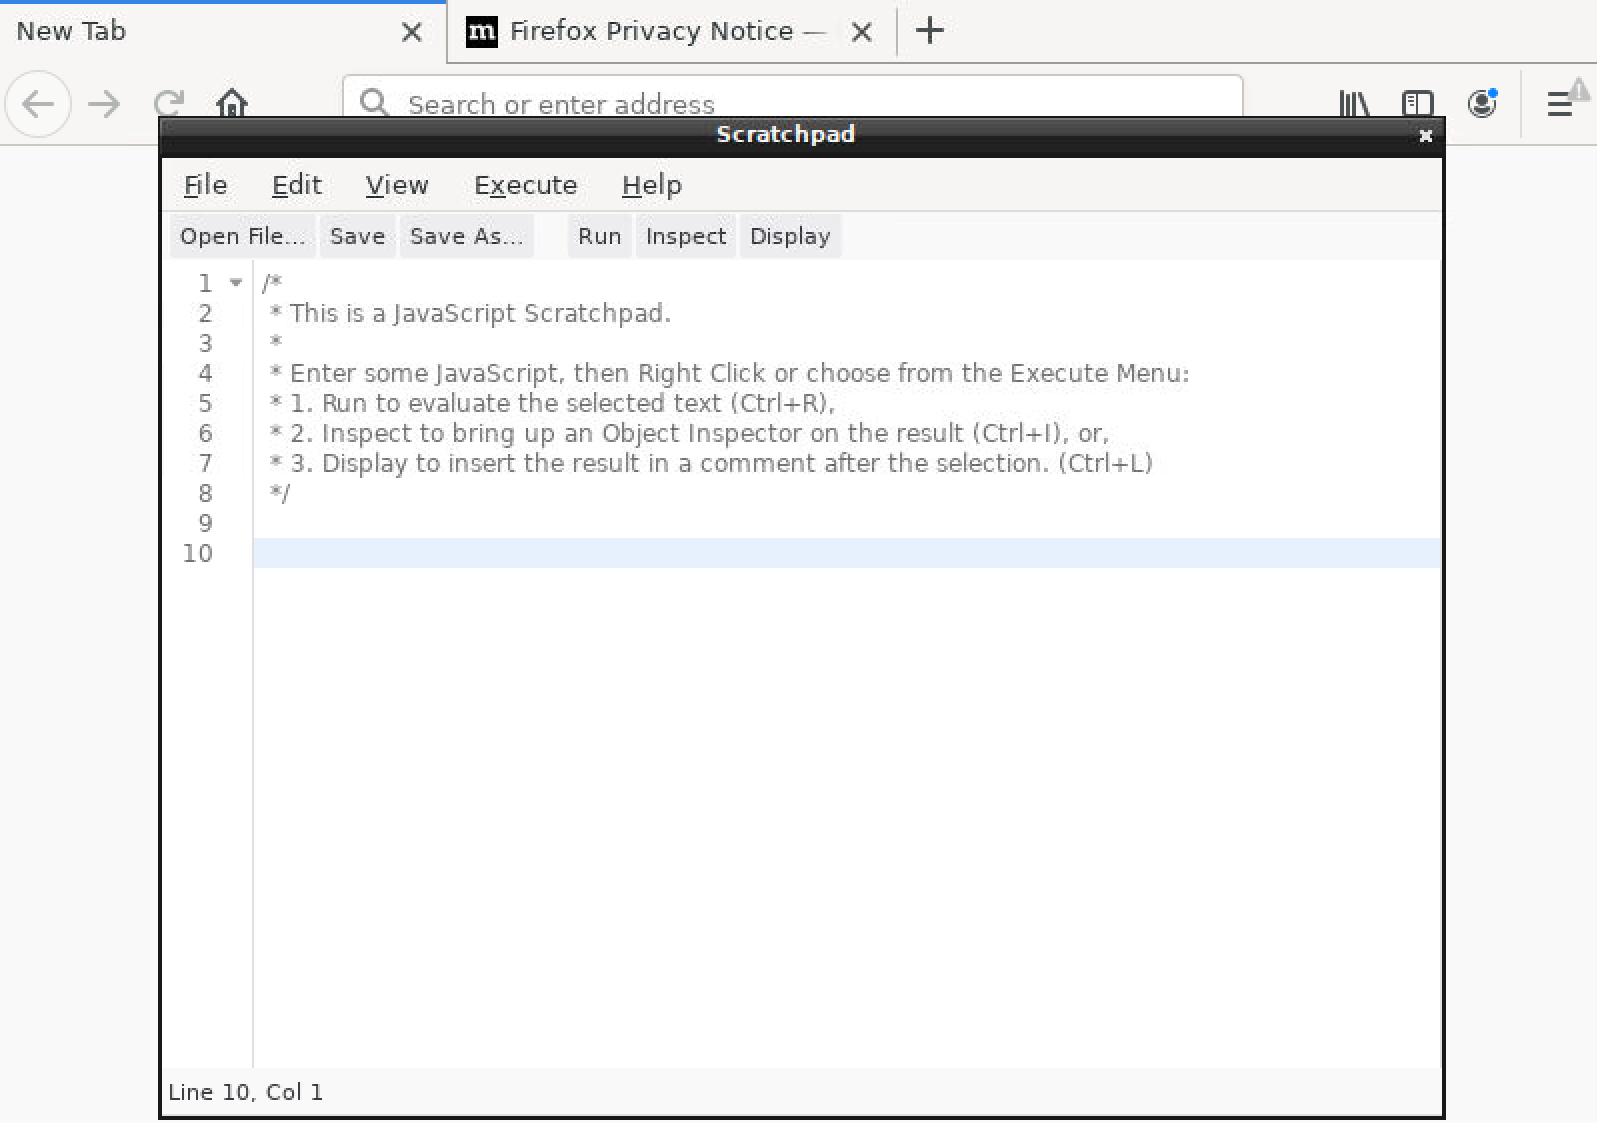
Figure 25: Scratchpad utility in Firefox
14.2.4. Scratching the Surface
Scratchpad is a built-in text editor intended for running and debugging JavaScript but can also load and save plain-text files.
Caution
Scratchpad is now deprecated but is still included in the kiosk's version of Firefox.
For example, we can use Scratchpad to save a mytest.txt file to our home directory. Browsing that location in Firefox indicates that the file creation was successful:

Figure 26: File written successfully with Scratchpad
This is all well and good, but it seems we are still limited to running programs through the irc://myhost method, which severely limits our abilities.
However, one application in particular, /usr/bin/gtkdialog, may be useful in this situation. A quick Google search reveals that this application builds interfaces with an HTML-style markup language. This could be especially useful since this machine doesn't seem to have any other build tools such as gcc or g++.
We can load build scripts with the -f parameter.
Let's build a simple initial dialog box for testing:
<window>
  <vbox>
    <frame Description>
      <text>
        <label>This is an example window.</label>
            </text>
        </frame>
        <hbox>
            <button ok>
            <action>echo "testing gtk" > /tmp/gtkoutput.txt</action>
            </button>
            <button cancel></button>
        </hbox>
    </vbox>
</window>
Listing 6 - Test window markup code
Note that when typing a left angled bracket character, the kiosk replaces it with a right-angled bracket character. We can open the splash page HTML file at /var/www/localhost/index.html and copy the left angle bracket character and paste into this document to be used when we need it.
We'll briefly walk through this example. An interface is represented by a combination of tags that define its various parts. A window tag represents the main window, and anything between the tags is considered a sub-component of the window. A vbox element is a vertical box that holds other elements. An hbox is a horizontal box. A frame acts as a simple container for elements such as text or graphics. Text elements display text and label elements specify the actual text strings being placed in the text element. Button objects allow the user to trigger an action such as a shell or other executable command.
In the example above, when we click the button, our echo command will be executed and the output written to a file via the Linux redirect operator (>).
Caution
For further reference, consult the extensive list of gtkdialog elements on the GtkDialog Google Code Archive page.
Using Scratchpad, we'll save our sample dialog box code to the guest user's home folder as mywindow, making sure to change the pulldown in the bottom right corner of the save dialog from "JavaScript Files" to "All Files" as shown in Figure 27:
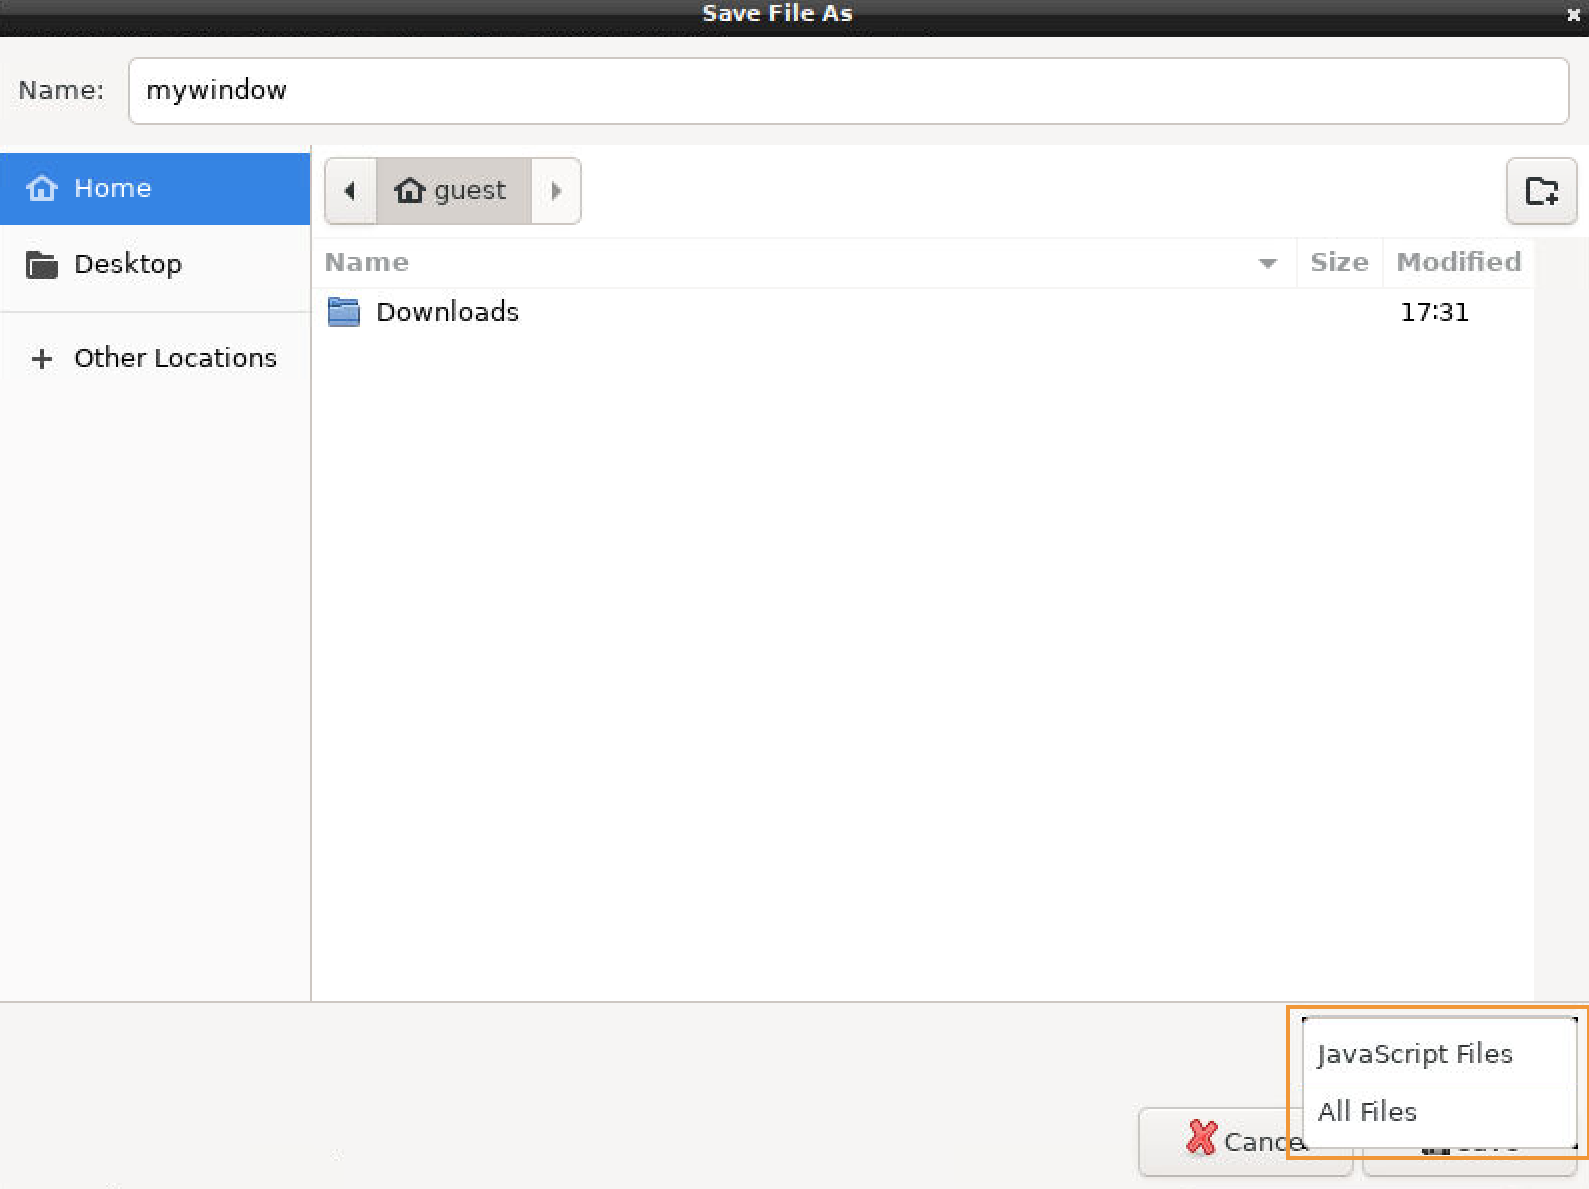
Figure 27: Saving sample dialog and changing file type
Now, let's run our sample dialog window with the following URI:
Listing 7 - Running the sample dialog from Firefox
This again presents the "Launch Application" dialog, where we'll select gtkdialog as our helper application:
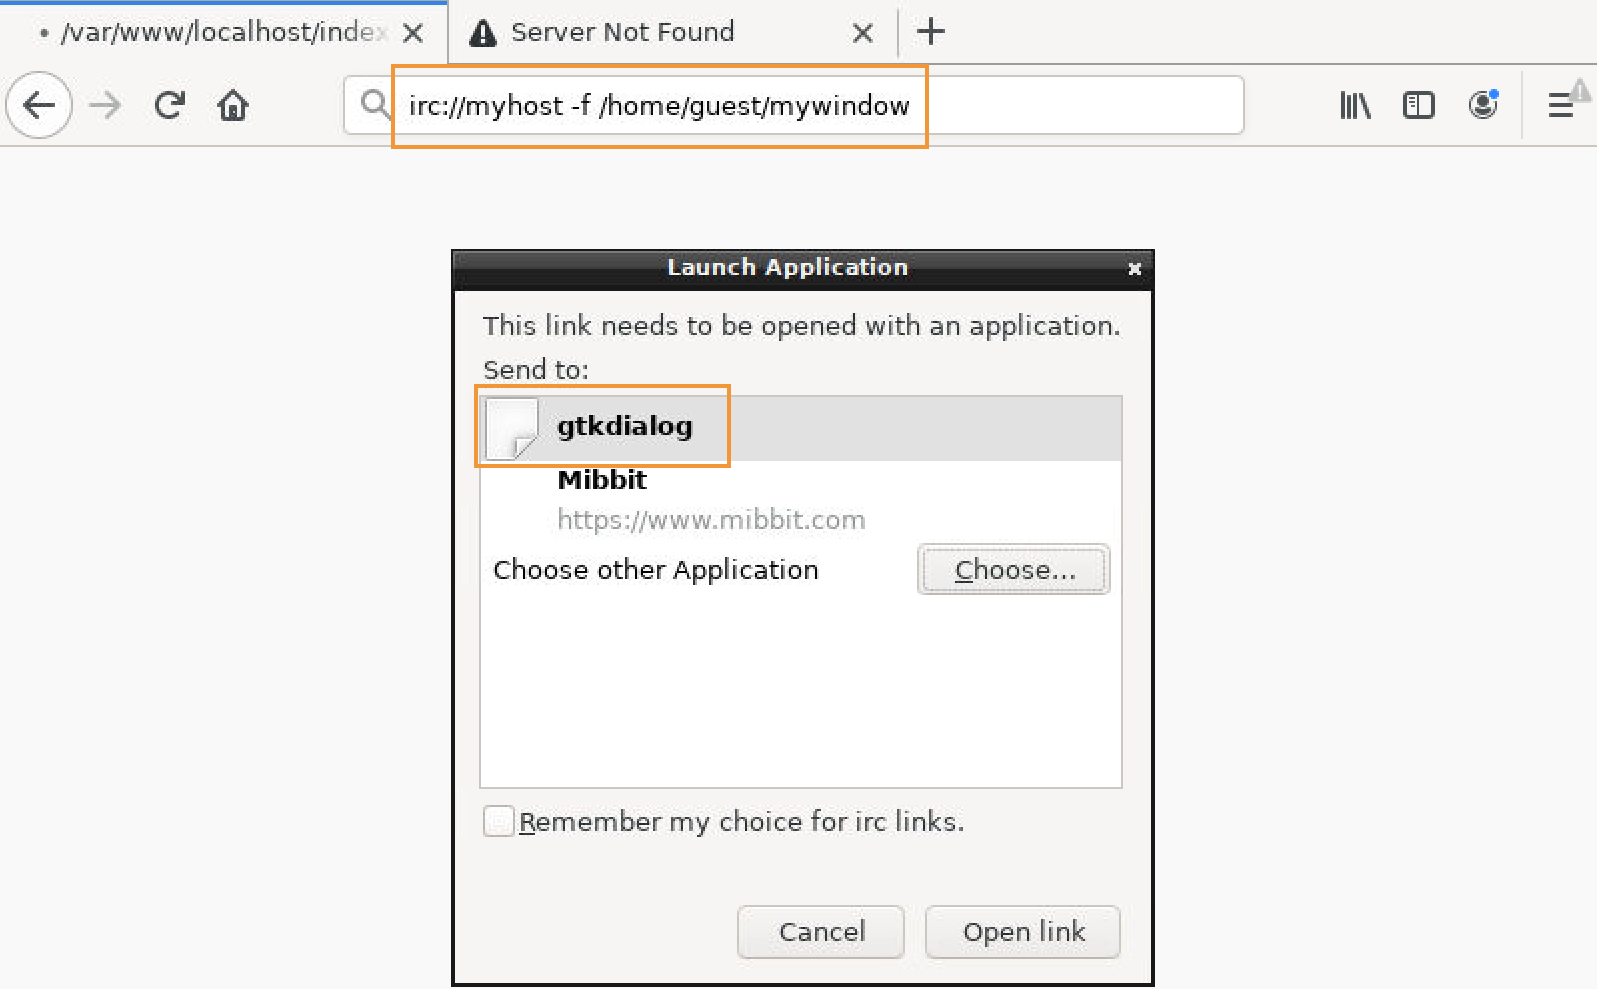
Figure 28: Running our sample GTK dialog with Firefox
This produces a window titled "gtkdialog":
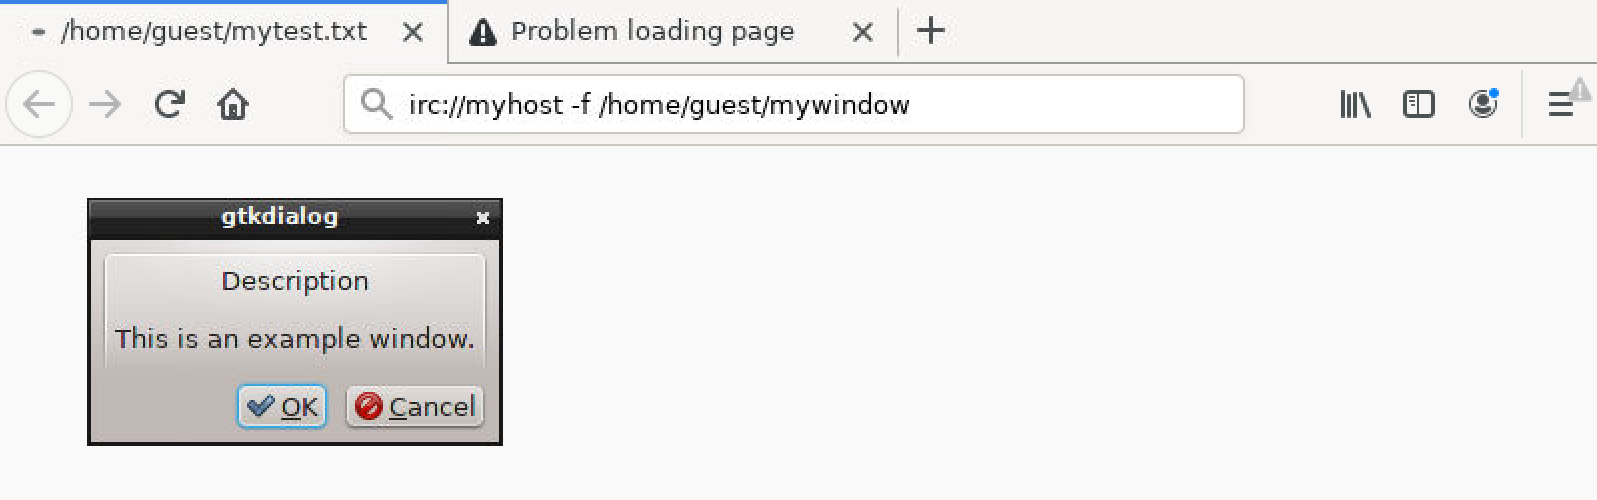
Figure 29: Our sample GtkDialog window
Nothing appears to happen when we click the OK button, but if we browse to file:///tmp/gtkoutput.txt in a new Firefox tab, we'll find that the action triggered and wrote our text to the output file. This means we have command execution on the system, and we are no longer restricted by the initial irc://myhost parameter issue. Very nice.
This is a great start, but it's an awkward solution. For every command we want to execute, we must edit a file, save it, relaunch our gtkdialog application, click the button, and then browse to the result through Firefox. In the next section, we'll Try Harder.
Exercises
- Browse around the filesystem using the "Launch Application" dialog and gather as much useful information about the system as possible.
- Try out various programs via the "Launch Application" dialog. Which ones seem useful for information gathering or potential exploitation when launched from Firefox?
Extra Mile
Find a way to write user-provided text to a file on the file system without Scratchpad. One potential option might include the JavaScript console.
14.3. Post-Exploitation
At this point, we have compromised the kiosk, although we are still running as a limited user and our command input method is inconvenient. Although our gtkdialog trick was useful, running commands and receiving instant feedback would be preferable. Although we have no build tools, no Internet access, and the system has no terminal applications, we may be able to better leverage gtkdialog by building our own custom terminal.
Surprisingly, there is an actual terminal element for gtkdialog. Sadly, it produces the following message:
Listing 8 - Missing libraries for "terminal" element
The version of gtkdialog on the kiosk is missing critical libraries used for terminal emulation, so this won't work.
We'll have to find another way. The terminal must have the ability to accept input and produce output. There are many good examples of complex interfaces created in gtkdialog with input and output capability. The entry and edit elements allow user input into a single-line text box or large text field, respectively, and both can produce output. The text element, which displays static text, can produce output as well.
Let's use these, and other elements, to build our interactive shell.
14.3.1. Simulating an Interactive Shell
Many elements in gtkdialog accept an input file sub-element. If we provide a text, entry, or edit element with an input file, it will autopopulate the element's text with the file's contents. However, this happens when the element is initially created, so we must use a refresh action to update the text after our command has run. To do this, we must store our text in variable elements. Specifically, we'll associate a variable with a particular element by putting the variable tag inside the opening and closing tags of the element. If we do this for an element that displays text and gets its input from a file, and then execute a refresh action on the variable, the text-displaying element will refresh its content from the current version of the file.
Similarly, if we use an element that accepts text input from the user and embed a variable tag within it, the element will store the content of the text input in the variable. We can then reference these variables using Bash-style variable substitution in our button actions.
Combining all of this, we can write a functional pseudo-terminal interface. We'll need a command input box that will store the command the user enters in a variable. We'll also need an edit element that will display the output of the commands, which by design will also allow copy and paste operations. This element will be populated by an input file, which will contain the results of the command output. We'll then use a button element that will take the shell command variable from the entry box, run it via an action, and write the results to the command output file. A second action embedded in the button will then refresh the edit element's embedded variable object. This will trigger the display content in the edit box to refresh, giving the illusion of a dynamic terminal window.
This code is shown in Listing 9.
<window>
  <vbox>
    <vbox scrollable="true" width="500" height="400">
        <edit>
          <variable>CMDOUTPUT</variable>
          <input file>/tmp/termout.txt</input>
        </edit>
    </vbox>
    <hbox>
      <text><label>Command:</label></text>
      <entry><variable>CMDTORUN</variable></entry>
      <button>
          <label>Run!</label>
          <action>$CMDTORUN > /tmp/termout.txt</action>
          <action>refresh:CMDOUTPUT</action>
      </button>
    </hbox>
  </vbox>
</window>
Listing 9 - Terminal window markup code
We'll save our terminal window markup as /home/guest/terminal.txt and then run it as we did the previous gtkdialog example.
When we enter commands into our text element and click Run!, the output of the command is displayed as if we had entered it from a standard terminal window:
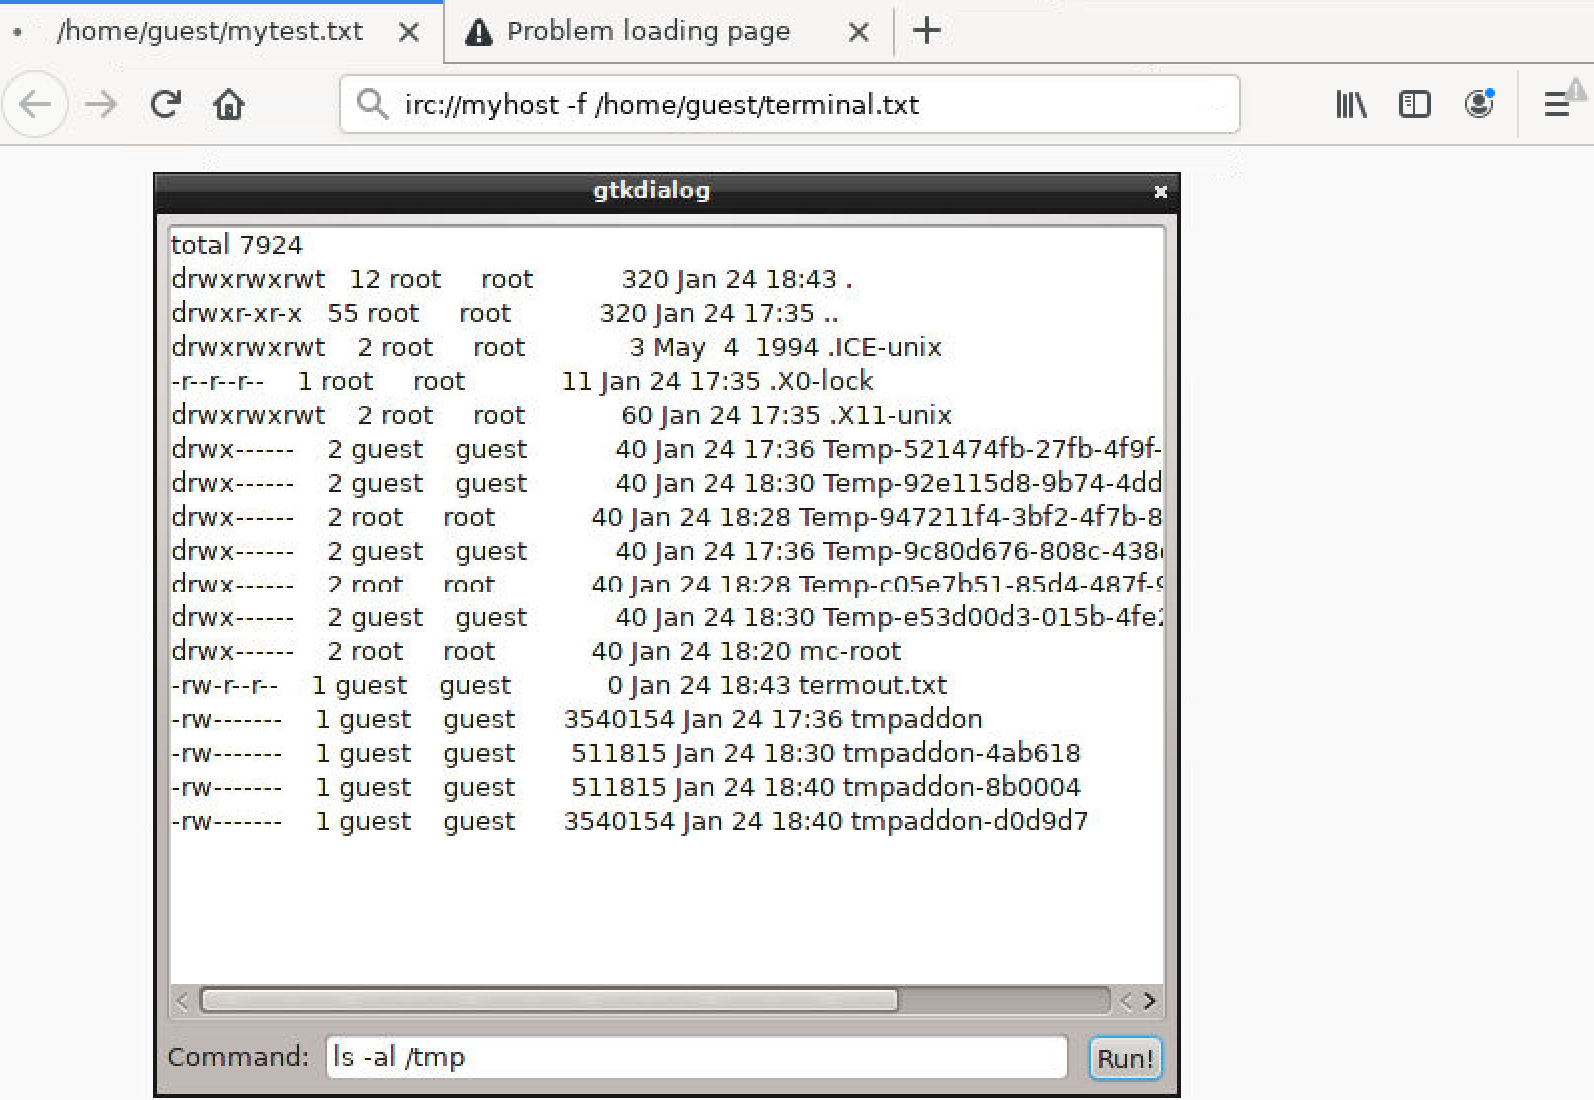
Figure 30: Our homemade terminal
This is a very effective solution given the limitations of this kiosk and demonstrates the potential effectiveness of "living off the land" with native tools.
Exercises
- Improve the terminal, making it more effective or more reliable. Integrate standard error output.
- Explore the other widgets and elements of gtkdialog. What other useful features can be created with it that might be useful for interacting with the system?
Extra Mile
Experiment with creating simple applications with gtkdialog to streamline the exploitation process. One potential project is a text editor based on our terminal application.
14.4. Privilege Escalation
Now that we have developed an efficient way of interacting with the system, we should focus our attention on escalating our privileges to gain root access. Unfortunately, without build tools or the ability to transfer files (because we're simulating a disconnected physical kiosk), this may prove to be difficult.
One approach is to leverage the Basic Linux Privilege Escalation techniques outlined by [g0tmi1k]https://blog.g0tmi1k.com/2011/08/basic-linux-privilege-escalation/). In this document, the author lists several commands we can use for enumeration, including a find command (find / -perm -u=s -exec ls -al {} +) that locates suid binaries:
-r-sr-xr-x    1 root     root        101787 Sep  7 12:19 /opt/Citrix/ICAClient/ctxusb
-rws--x--x    1 root     bin        1560160 Jul 13  2017 /usr/bin/xlock
-rws--x--x    1 root     root        396000 Sep 14 13:24 /usr/lib64/misc/ssh-keysign
-rws--x--x    1 root     root         67128 Dec 29  2016 /usr/sbin/mtr
-r-s--x--x    1 root     root        339544 Mar 29  2019 /usr/sbin/pppd/root
Listing 10 - SUID binaries
Upon further examination, only /usr/sbin/mtr and /usr/bin/xlock have recent vulnerabilities. However, none of those vulnerabilities affect our specific versions.
It would be difficult and time-consuming to exploit these binaries without debugging tools so we'll try another approach.
The ps aux command lists all running processes:
PID   USER     TIME   COMMAND
 1    root       0:03 init [4]
 2    root       0:00 [kthreadd]
 ...
 1083 root       0:00 /usr/sbin/acpid -n
 1120 root       0:00 {xdm} /bin/sh /usr/bin/xdm
 1123 root       0:00 -bash -c /usr/bin/startx -- -nolisten tcp vt7 > /dev/null 2>&1
 1138 root       0:00 {startx} /bin/sh /usr/bin/startx -- -nolisten tcp vt7
 1186 root       0:00 xinit /etc/X11/xinit/xinitrc -- /usr/bin/X :0 -nolisten tcp vt7 -auth /root/.serverauth.1138
 1187 root       0:14 /usr/bin/X :0 -nolisten tcp vt7 -auth /root/.serverauth.1138
 1193 root       0:00 {xinitrc} /bin/sh /etc/X11/xinit/xinitrc
 1196 root       0:01 /usr/bin/openbox --startup /usr/libexec/openbox-autostart OPENBOX
 1199 root       0:00 dbus-launch --exit-with-session /usr/bin/openbox-session
 1200 root       0:00 /usr/bin/dbus-daemon --syslog --fork --print-pid 5 --print-address 7 --session
 1344 root       0:00 x11vnc -rfbauth /root/.vnc/passwd -auth /root/.serverauth.1138 -display :0 -nomodtweak -noxdamage -shared -forever -loop5000 -bg
 ...
23310 guest      0:00 ps aux | grep root
Listing 11 - Finding root-owned processes
Based on this output, it seems the kiosk is running several root processes which we may be able to use to escalate our privileges. One of these processes is "openbox", the X window manager used by the kiosk's custom interface.
This finding warrants further investigation.
14.4.1. Thinking Outside the Box
Openbox supports a command-line option (--replace) which will replace the currently running window manager instance:
Syntax: openbox [options]

Options:
  --help              Display this help and exit
  --version           Display the version and exit
  --replace           Replace the currently running window manager
  --config-file FILE  Specify the path to the config file to use
  --sm-disable        Disable connection to the session manager

Passing messages to a running Openbox instance:
  --reconfigure       Reload Openbox's configuration
  --restart           Restart Openbox
  --exit              Exit Openbox

Debugging options:
  --sync              Run in synchronous mode
  --startup CMD       Run CMD after starting
  --debug             Display debugging output
  --debug-focus       Display debugging output for focus handling
  --debug-session     Display debugging output for session management
  --debug-xinerama    Split the display into fake xinerama screens

Please report bugs at http://bugzilla.icculus.org
Listing 12 - Openbox help output
If we run the following command in our custom terminal, the current X windows session is stopped and restarted:
Listing 13 - Command to kill the X windows session
This kills all currently running graphical programs including our VNC connection. However, the kiosk system itself is not restarted, which means we won't lose changes made since the last reboot. This is very interesting. We seem to have reloaded openbox, which was started by root, even though we requested the restart as the guest user.
This certainly warrants further investigation.
We know that as the guest user, we should have control over the files in our home folder. Our current kiosk interface is the Firefox browser which stores the user's profile folder in /home/guest/.mozilla/firefox/c3pp43bg.default.
When we edit files in this folder and force an openbox restart, openbox recreates the Firefox bookmark configuration file (/home/guest/.mozilla/firefox/c3pp43bg.default/bookmarks.html) each time it restarts. We can demonstrate this with a simple test.
This file contains the default bookmarks including the kiosk's main page address:
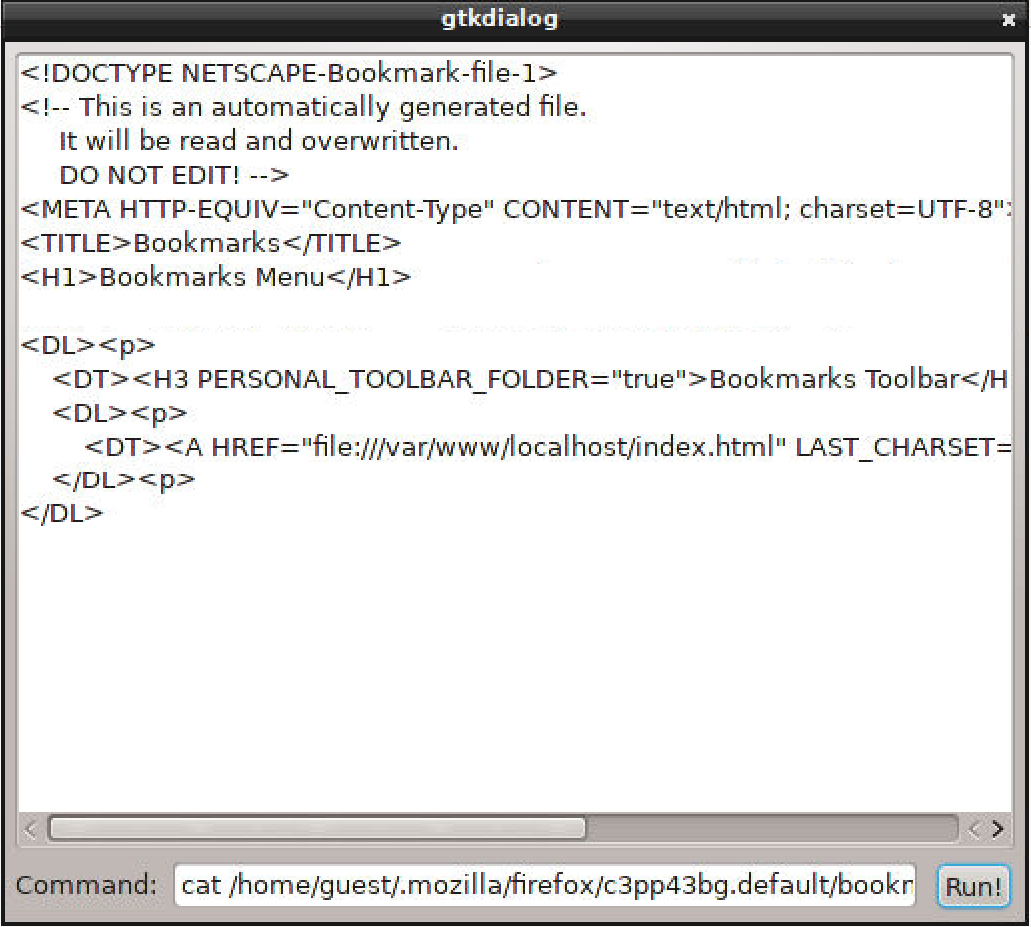
Figure 31: Bookmarks.html file contents
If we delete this file and again run openbox --replace, the bookmark file is recreated:
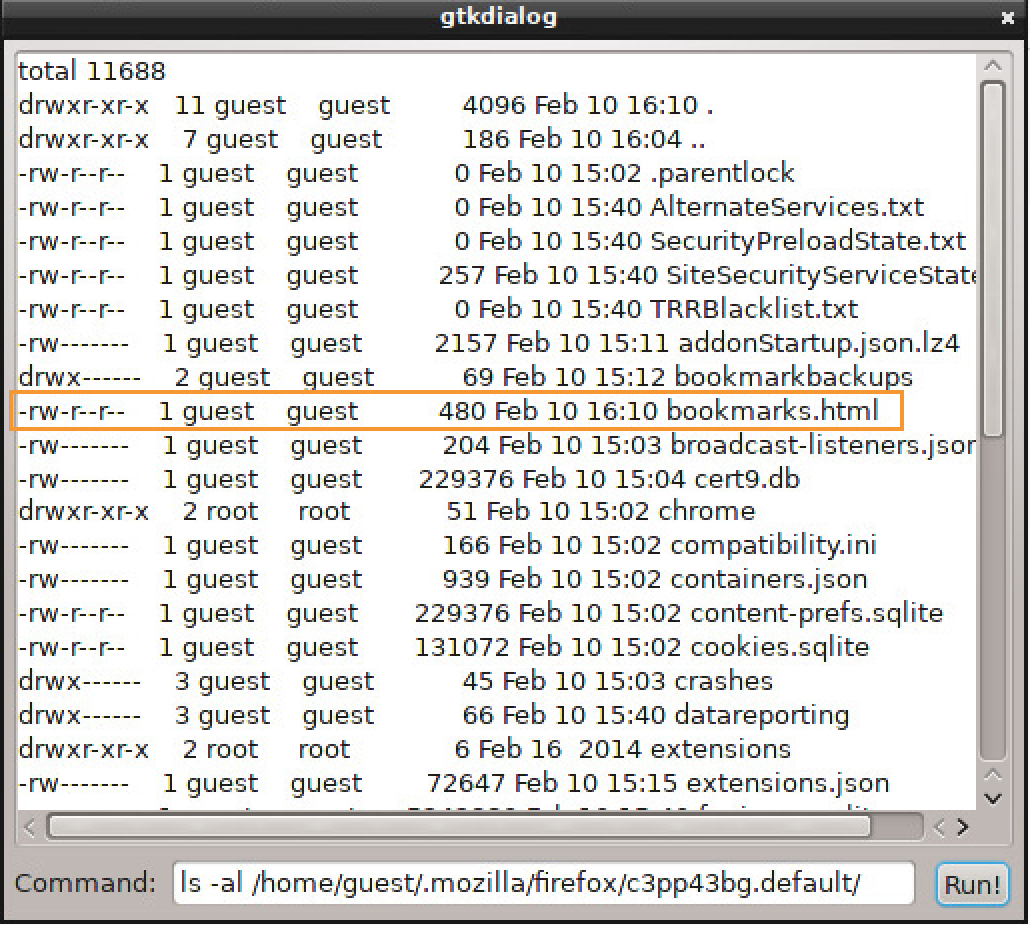
Figure 32: Bookmarks file automatically rebuilt
This tells us that the kiosk software is rebuilding the bookmarks file every time the X session restarts. According to the permissions on the file, it is owned by the guest user. However, it stands to reason that the kiosk operates at a higher privilege level, so a second simple test may be in order.
Since the kiosk is configured to write the bookmarks file in the c3pp43bg.default folder, let's replace that folder with a symlink in an attempt to force the kiosk to write the bookmarks file to a different location. If the underlying kiosk refresh script raises privileges, we may be able to redirect it to write in a privileged directory.
Before we test this, let's backup our profile folder:
Listing 14 - Backing up the old profile folder
Next, we'll create a symlink to /usr/bin, a folder the guest user can not normally write to.
Listing 15 - Creating a softlink
The symlink looks like this:
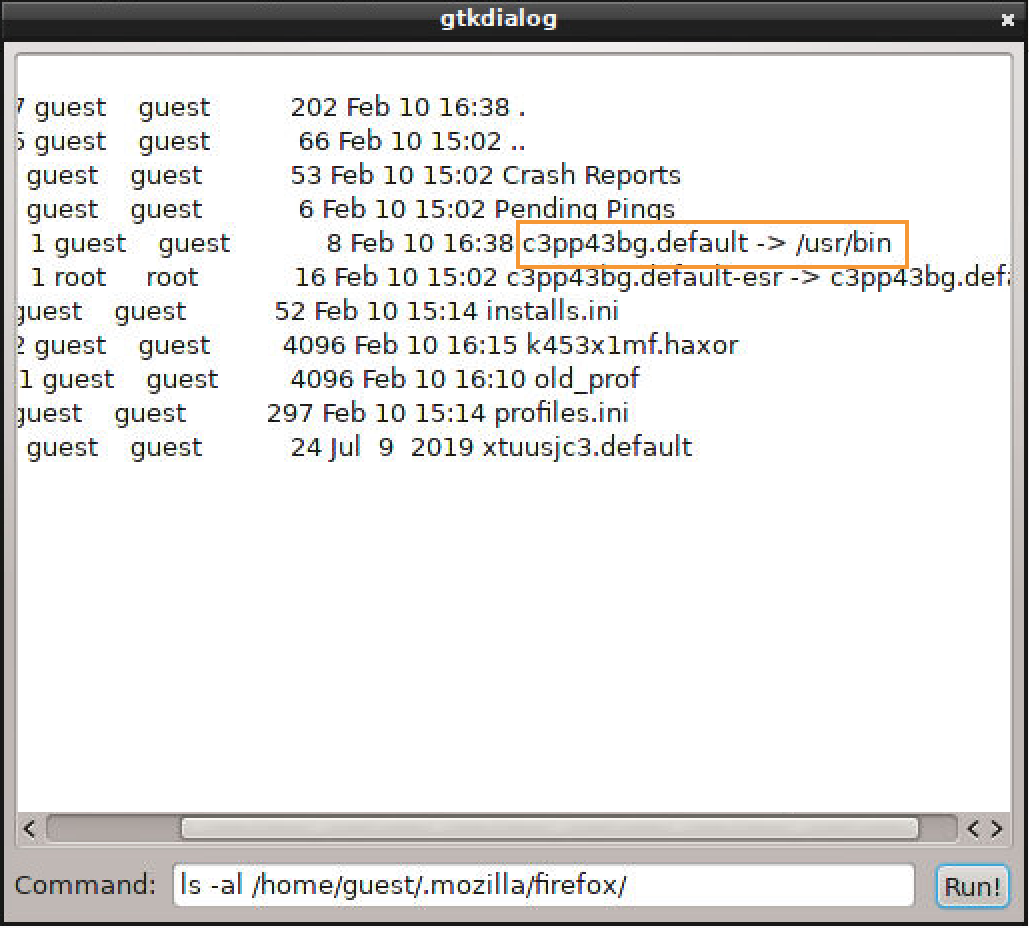
Figure 33: Soft link created
Now that the symlink is created, let's run openbox --replace to attempt to regenerate bookmarks.html.
Once reconnected to the kiosk, we find that the bookmarks file has been written to /usr/bin, indicating that the process creating it is in fact privileged (Figure 34):
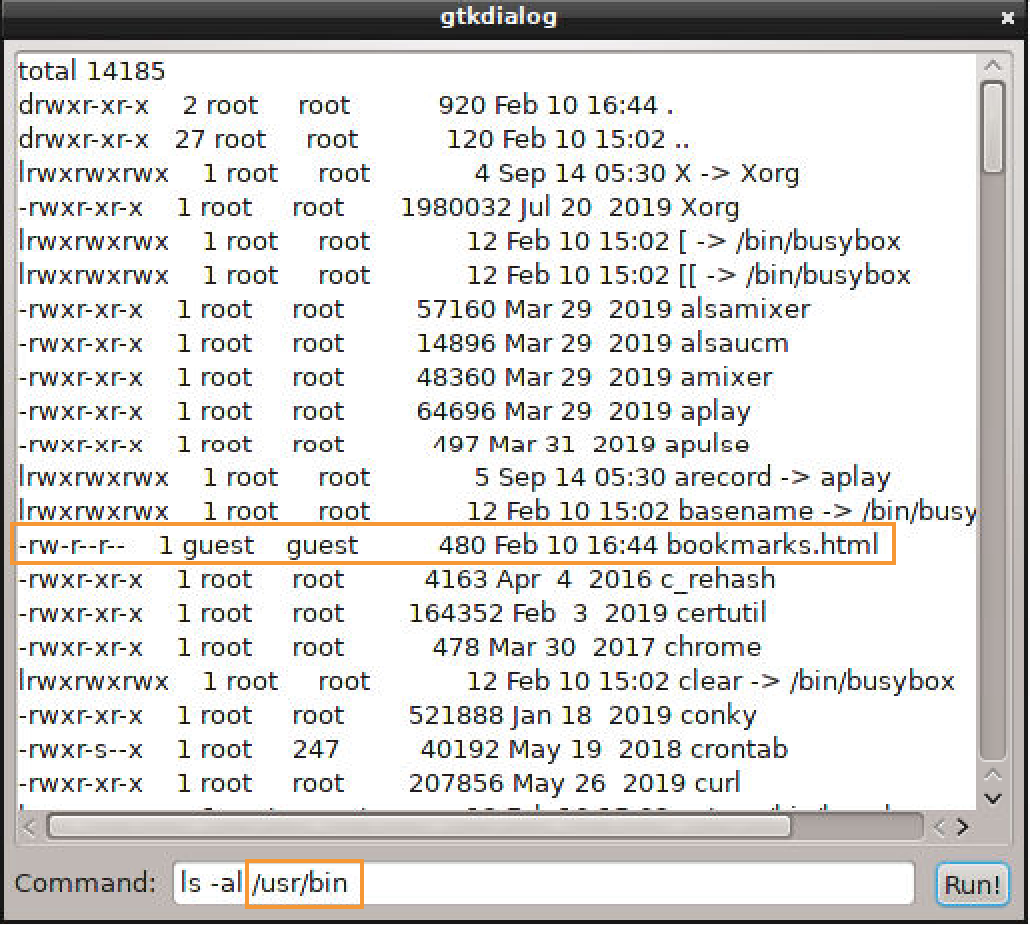
Figure 34: Bookmarks.html written in /usr/bin
This is a huge breakthrough. We can write files to privileged directories!
However, to escalate our privileges, we need to make the file executable, and we must write executable commands to the file. We own the file, so let's try to make it executable with chmod. If we check the file's permissions, we find that the permissions have changed.
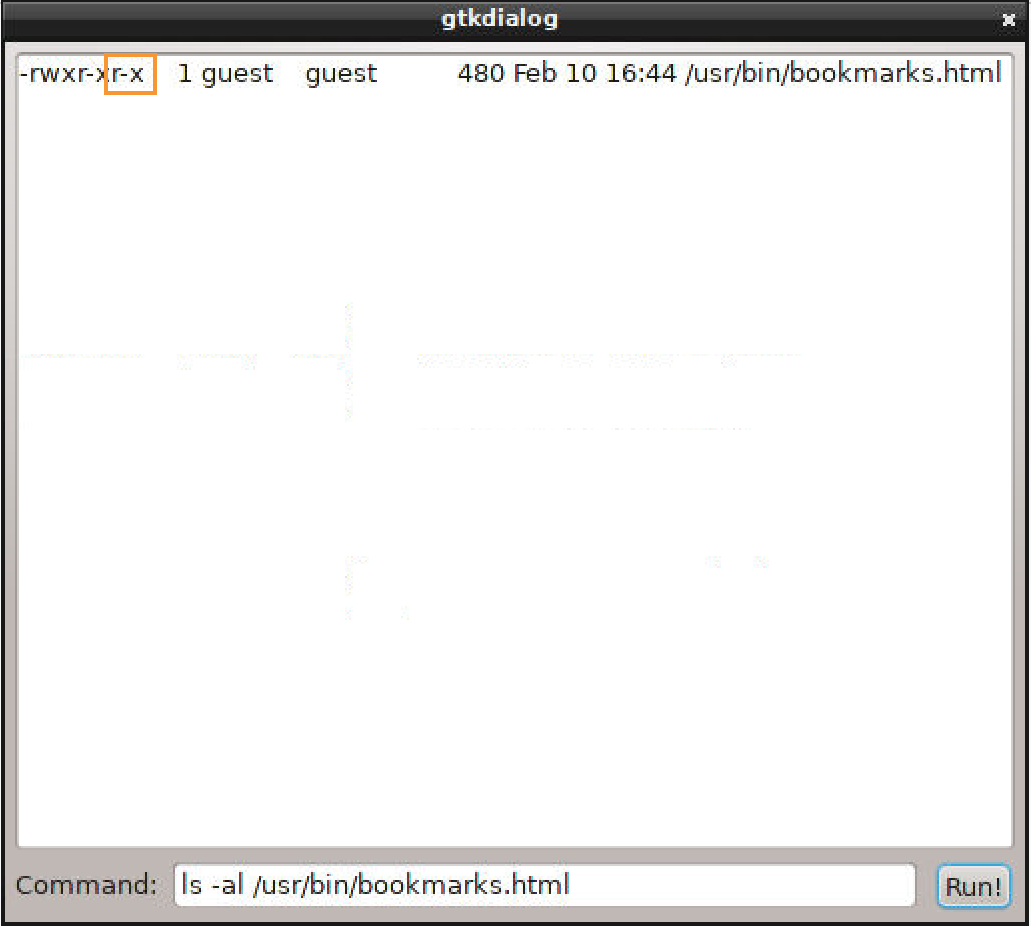
Figure 35: Bookmarks.html made executable
This is promising. We can modify the file after creation. However, even though we own the file, we cannot rename it. This is dictated by the permissions of the containing folder.
Now, we need to add executable instructions to the file. Our previous method of text editing, ScratchPad, won't allow us to save changes to the file:
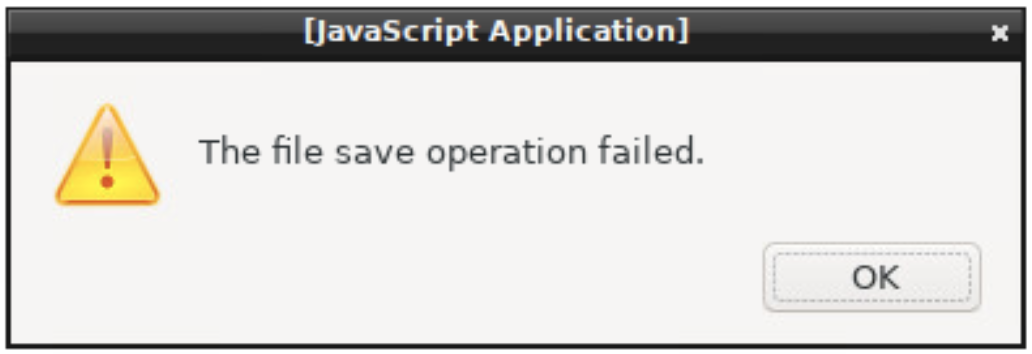
Figure 36: ScratchPad fails trying to save to bookmarks.html
This is likely due to the permissions on the parent folder.
Ordinarily, we could use a command-line editor, but since our makeshift gtkdialog terminal is non-interactive, this won't work. We could also consider using a graphical editor, but there are no graphical editors installed on the system.
We might also consider building the file one line at a time with echo commands and standard bash redirects. However, our gtkdialog terminal uses a bash redirect when processing our command ($CMDTORUN > /tmp/termout.txt). If our terminal command contains another redirect, it would be canceled out by the redirect to /tmp/termout.txt.
To get around this, we'll use Scratchpad to create testscript.sh in our home directory:
echo "#!/bin/bash" > /usr/bin/bookmarks.html
echo "gtkdialog -f /home/guest/terminal.txt" >> /usr/bin/bookmarks.html
Listing 16 - Script content to write into bookmarks.html
This simple script will overwrite the contents of our bookmarks file:
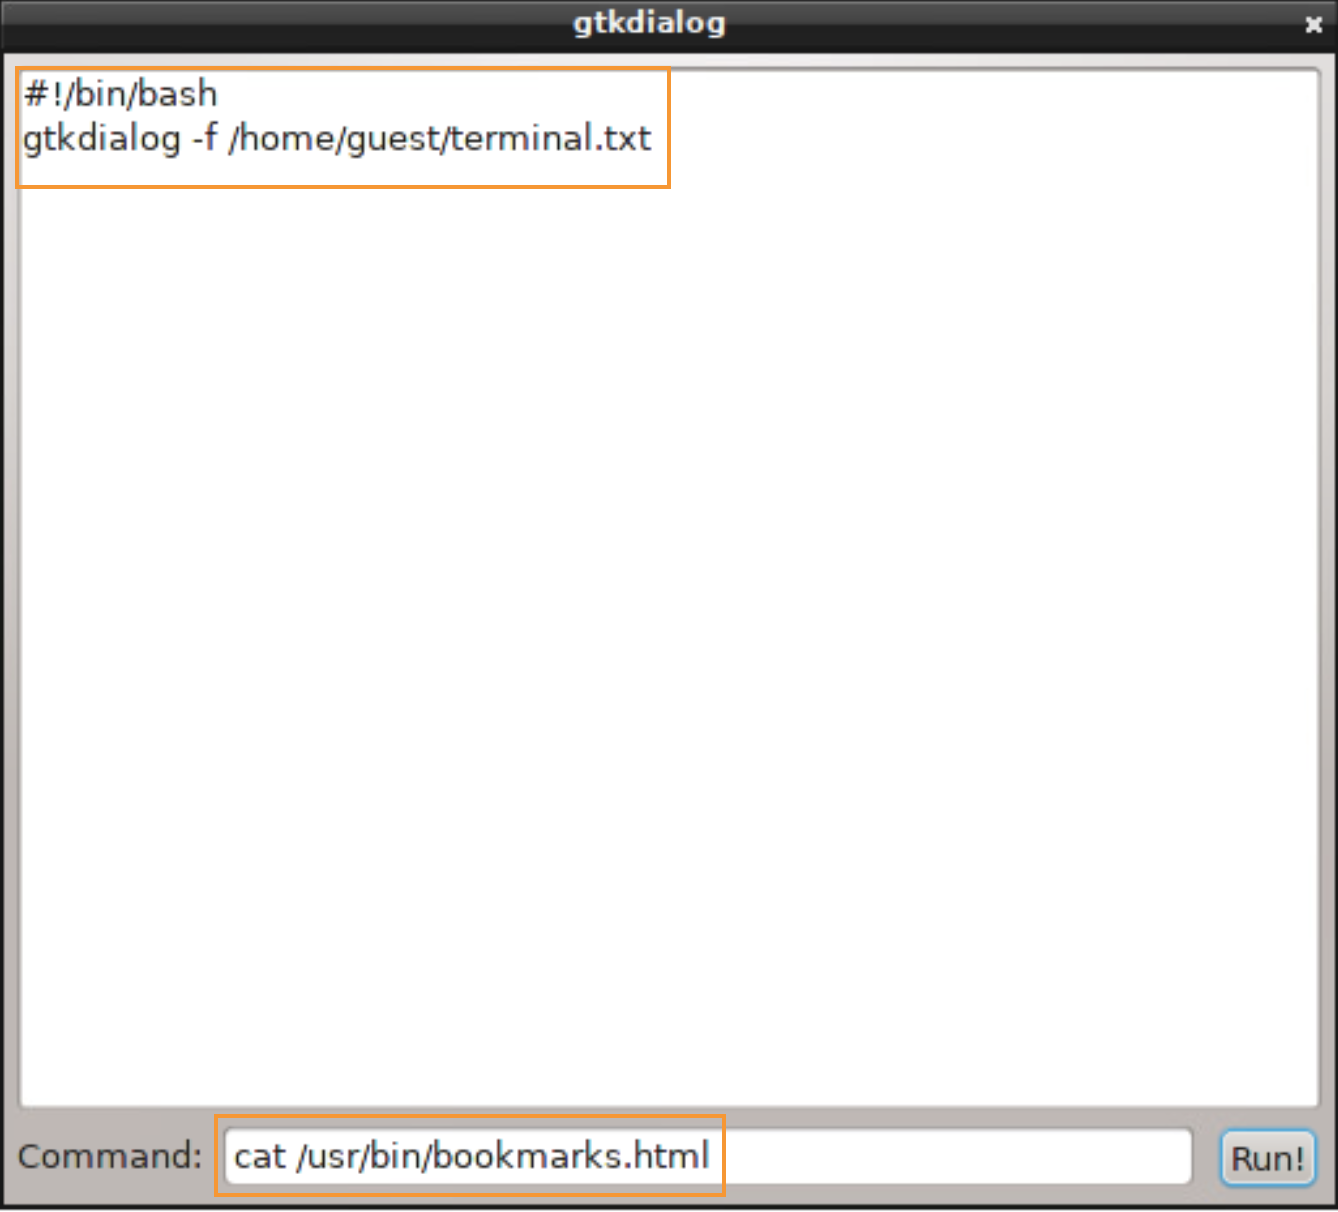
Figure 37: Our script written to /usr/bin/bookmarks.html
The bookmarks file has been overwritten by a simple script that will launch our gtkdialog terminal. Our goal is to get the system to run this as root, giving us a root shell.
With the script in place, we need to get the system to run it as a privileged user. Normally, we could leverage several privilege escalation techniques.
For example, the scripts in the protected /etc/profile.d/ folder, all of which must have an .sh extension, are run at user login. If we wrote our bookmark file to that directory, and added a .sh extension, our terminal would run as root when that user logged in. Unfortunately, we cannot rename the file. We'll face this restriction on all other privileged directories on the system. This means we're stuck with the bookmarks.html filename.
There is another potential option. The /etc/cron.d directory is a part of the Cron job scheduler. Any scripts placed in this folder would be run as root. However, as with /etc/profile.d, there is a catch. Files placed in /etc/cron.d must be owned by the root user or they will not run. Since we cannot change the ownership of the file, we cannot leverage this attack vector either.
However, according to the reference above, certain cron directories including /etc/cron.hourly, /etc/cron.daily, /etc/cron.weekly, and /etc/cron.monthly do not have such stringent requirements and will accept non-root-owned files. Given the obvious timing benefits, /etc/cron.hourly is our best option. Let's focus on this attack vector.
14.4.2. Root Shell at the Top of the Hour
To begin, we'll symlink our bookmark file to /etc/cron.hourly and again run openbox --replace. Note that we need to delete the existing symlink before defining the new one.
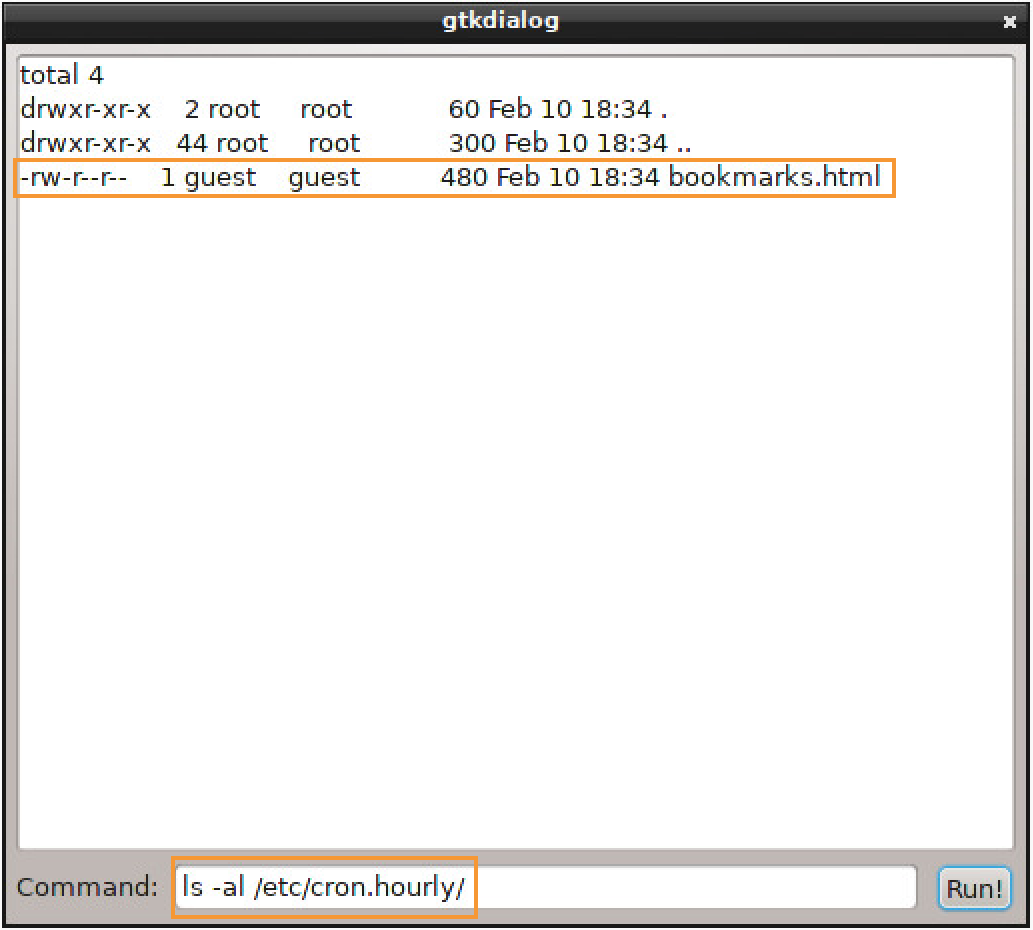
Figure 38: Our bookmarks.html file written to /etc/cron.hourly
We should be able to run a gtkdialog terminal via this script and it should run as root. However, if our terminal is closed or crashes, we'll need to wait another hour to get another one. Let's give ourselves a backdoor to root access instead.
Earlier in the enumeration process, we discovered /bin/busybox which provides various Unix utilities in a single file, including command shells such as Bash and sh. Let's copy this to /home/guest using our gtkdialog terminal to preserve the original and create a cron script that will change the ownership of the file to root and set it to SUID. If this script is run as root, it will allow us to run busybox with root privileges.
We'll create the following script with Scratchpad...
echo "#!/bin/bash" > /etc/cron.hourly/bookmarks.html
echo "chown root:root /home/guest/busybox" >> /etc/cron.hourly/bookmarks.html
echo "chmod +s /home/guest/busybox" >> /etc/cron.hourly/bookmarks.html
Listing 17 - Code to set SUID bit on our local busybox file
and again, write the contents of our bookmarks file, this time in /etc/cron.hourly, by running the above script:
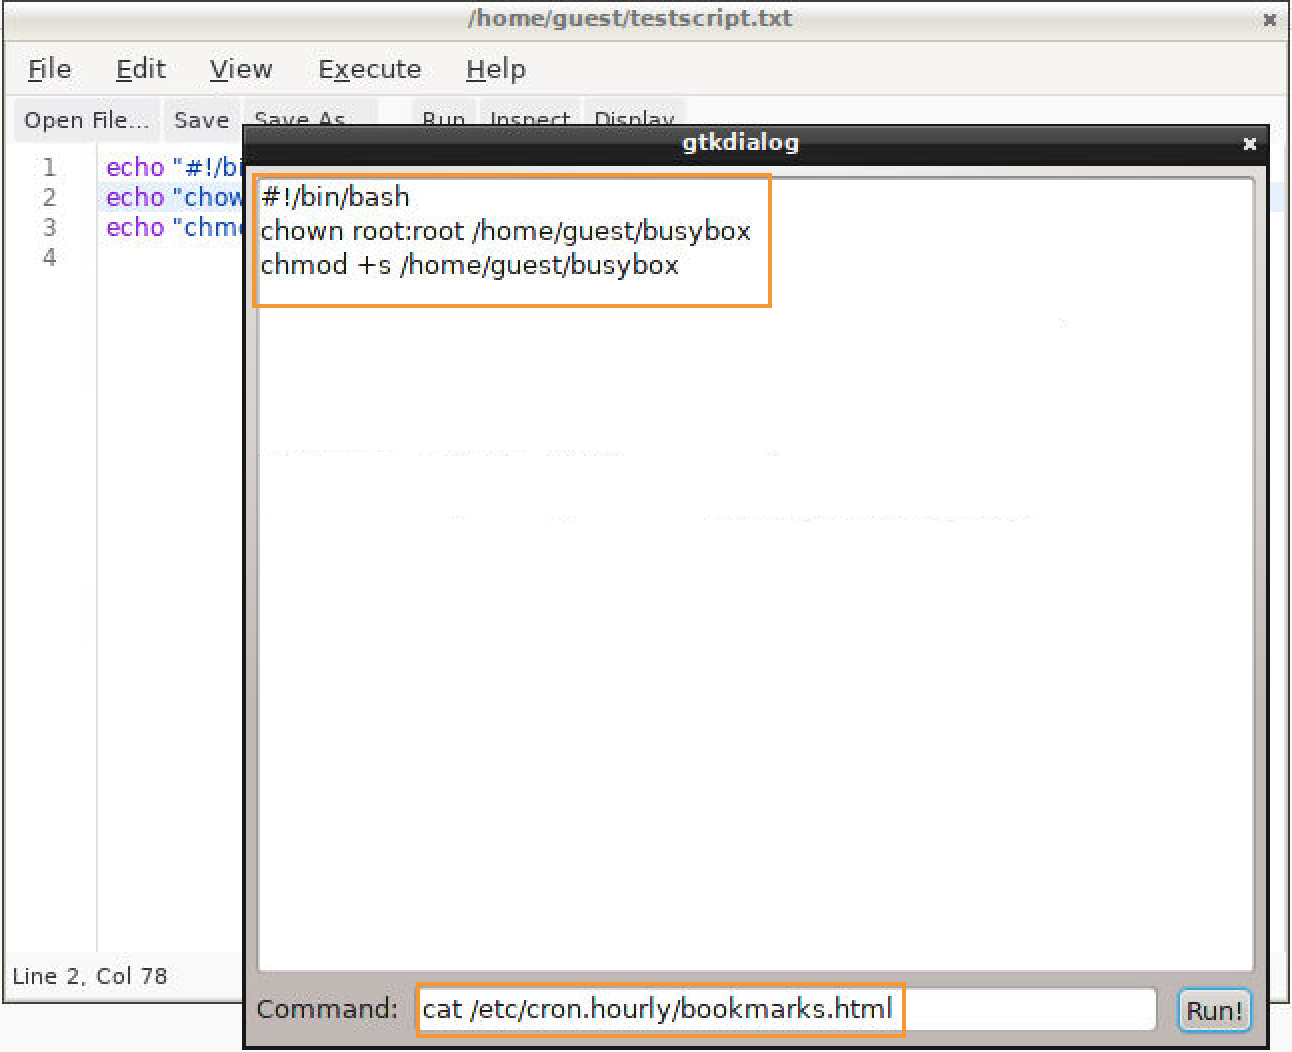
Figure 39: Bookmarks.html set to change busybox to SUID
After making our bookmarks.html script executable, it will execute at the top of the next hour, making our copy of busybox root-owned and SUID:
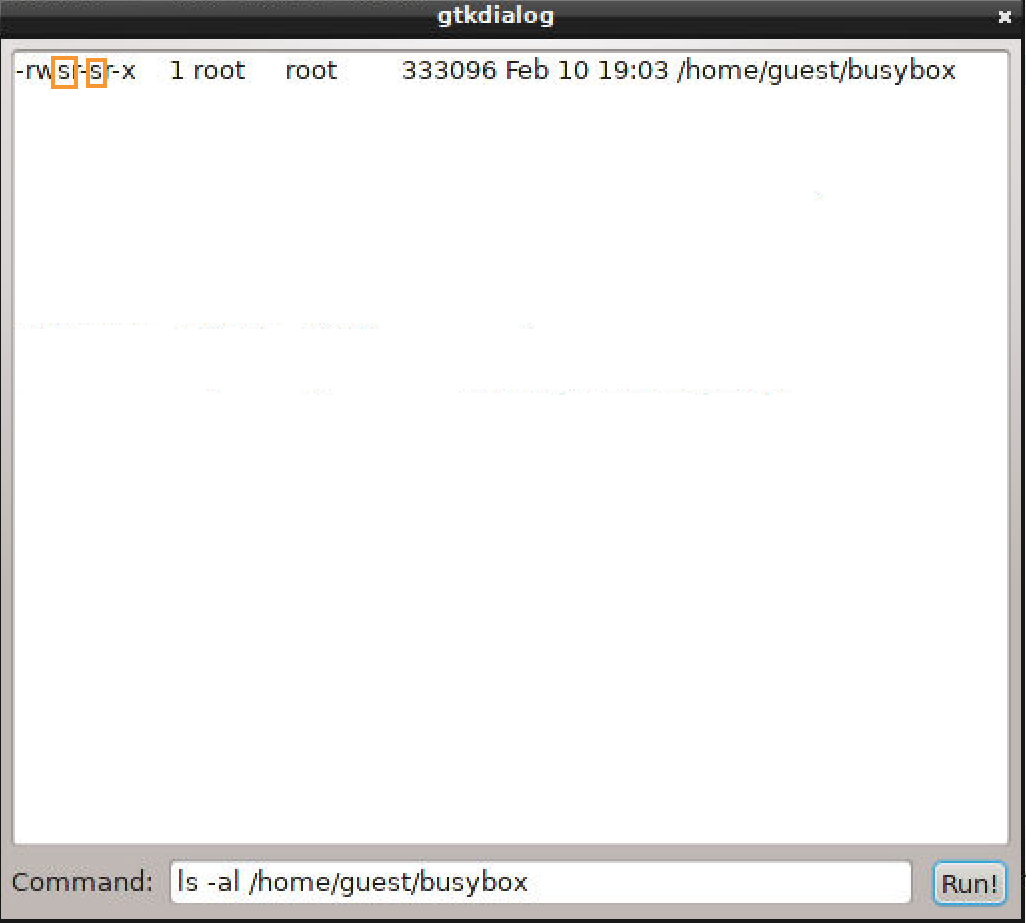
Figure 40: Busybox now has SUID bit set
Good. Let's try out our new, "upgraded" busybox. According to the help output, we can run shell commands with the following syntax:
Listing 18 - Busybox syntax
Trying to call gtkdialog directly using this method doesn't seem to work. We receive no response in our terminal and no gtkdialog window is displayed. It's possible this has to do with the way the commands are being interpreted by the gtkdialog action and passed to the shell but since we don't receive any output or errors, it's difficult to know.
To get around this, we'll create a runterminal.sh script with Scratchpad that will launch our terminal:
Listing 19 - Script to fire a terminal
Then, we'll execute it with busybox:
Listing 20 - Running the script via busybox
This will display a new gtkdialog terminal window. Let's run whoami in our new terminal:
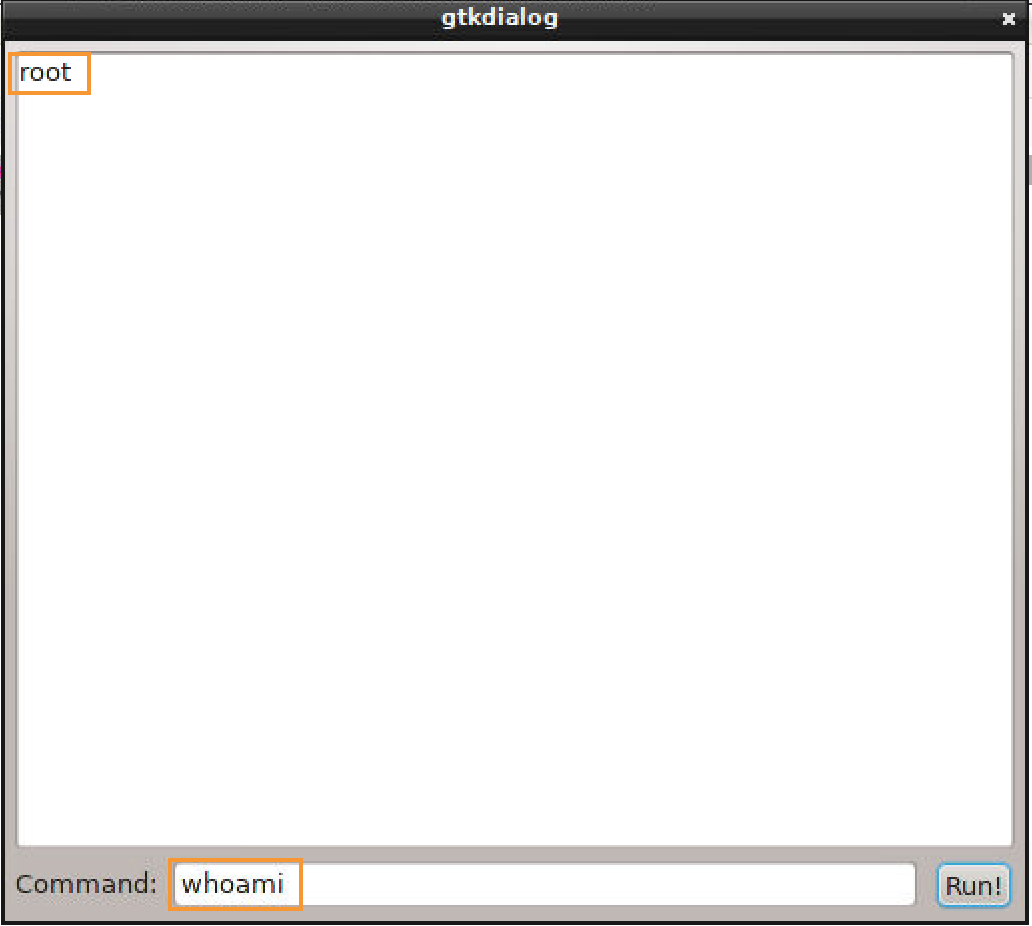
Figure 41: We now have root access
Excellent! We have a root shell!
14.4.3. Getting Root Terminal Access
Now that we have a root shell, we can attempt to add some "quality of life" improvements. As useful as our homemade terminal is, a full-blown terminal session would be even better. As mentioned previously, we are limited by the fact that we don't have access to terminal emulators. However, Linux systems have built-in console sessions called TTYs or virtual console/terminals. This is normally accessed from a Linux desktop with the keyboard shortcuts of C+E+# through ^, with each function key presenting a different session. However, if we try these key combinations in our kiosk session, they don't work.
We can use /usr/bin/xdotool to programmatically send keyboard shortcuts via the command line and verify that the shortcuts are actually being delivered to the X windows environment.
Let's use the following command in our gtkdialog terminal to test the shortcut:
Listing 21 - Sending keyboard shortcuts via the command line
In this case, the kiosk doesn't respond, which means virtual terminals may be disabled in this restricted kiosk environment. If this is the case, we should be able to change this with our root privileges. However, this may require a system restart, which will trigger the kiosk's "self-healing" mechanism and revert the system. Let's investigate this option further.
Inspection of the /etc/X11/xorg.conf.d/10-xorg.conf configuration file reveals that "DontVTSwitch" is uncommented, which means VT switching is disabled. VT switching refers to the ability to switch dynamically between virtual terminal interfaces.
To modify this, we'll copy the original file from /etc/X11/xorg.conf.d/10-xorg.conf to a temporary file in our home folder, /home/guest/xorg.txt:
Listing 22 - Copying the Xorg configuration file
Then we'll adjust the permissions so we can edit it in Scratchpad:
Listing 23 - Fixing the Xorg configuration file permissions
One important note is that if we make changes using Scratchpad to scripts and files, the permissions are often modified by Scratchpad to be 600. It's necessary to use chmod to revert them back to their proper permissions after editing is complete.
We can then open Scratchpad to comment out "DontVTSwitch" in the /home/guest/xorg.txt file:
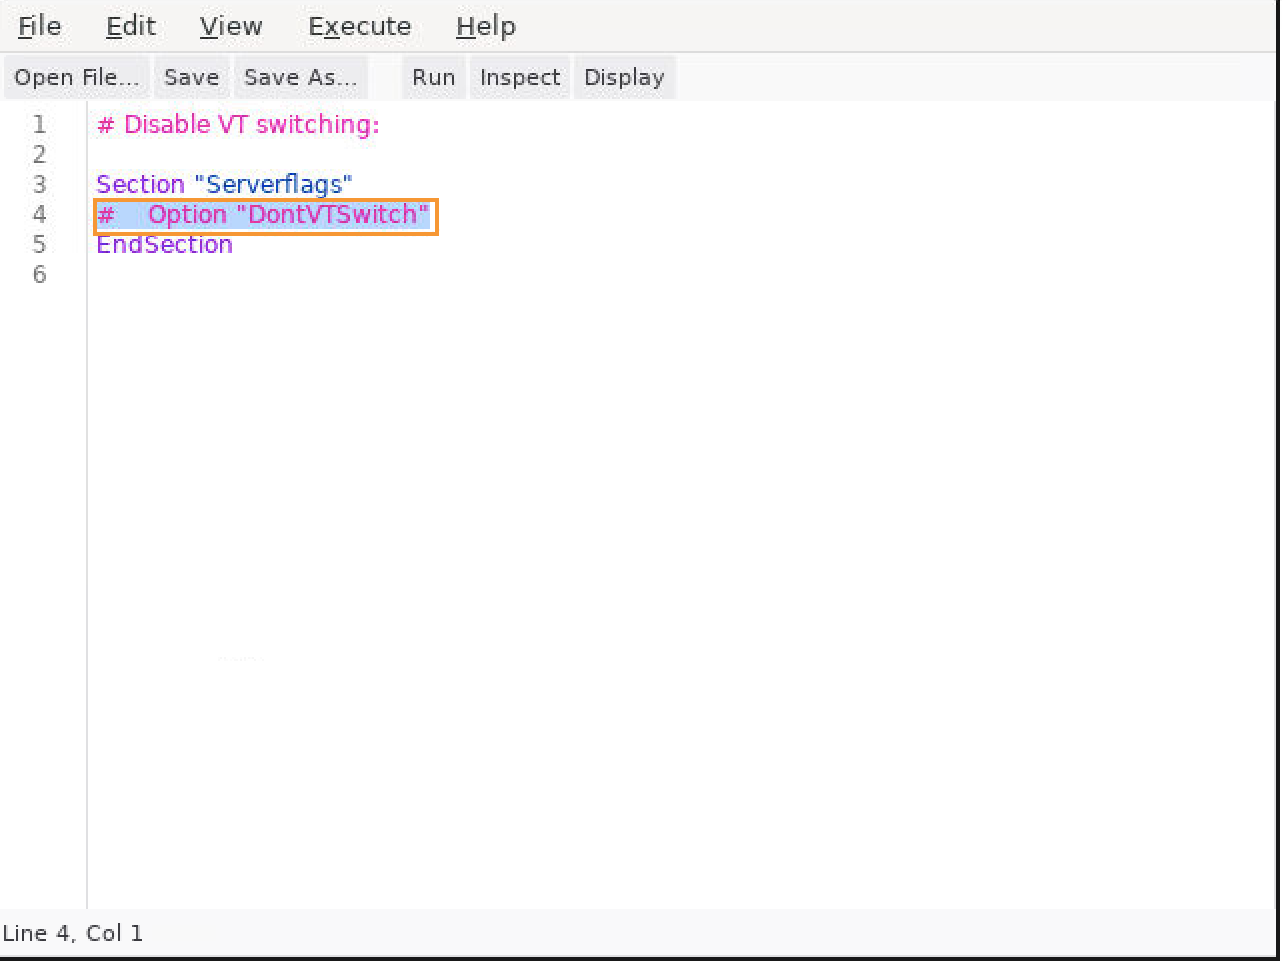
Figure 42: Editing the Xorg configuration
We can then save the file and copy it back to its original location:
Listing 24 - Copying the Xorg configuration file back
Then we'll change the permissions back to their original state:
Listing 25 - Fixing the Xorg configuration file permissions
After replacing the file, we can again use openbox --replace to restart the X session. We'll also need to reopen a new root Gtk terminal instance.
Once we have VT switching enabled, we need to define a TTY for the system in the /etc/inittab file.
We can copy this file as we did with our Xorg configuration file to a temporary file in our home folder:
Listing 26 - Copying the inittab file
We'll need to modify the permissions on this file to 777 as we did with our Xorg configuration file so Scratchpad can write to it:
Listing 27 - Fixing the temporary inittab file permissions
In the "Standard console login" section we discover that the two consoles are commented out and none are defined for TTYs 3-6 (Figure 43):
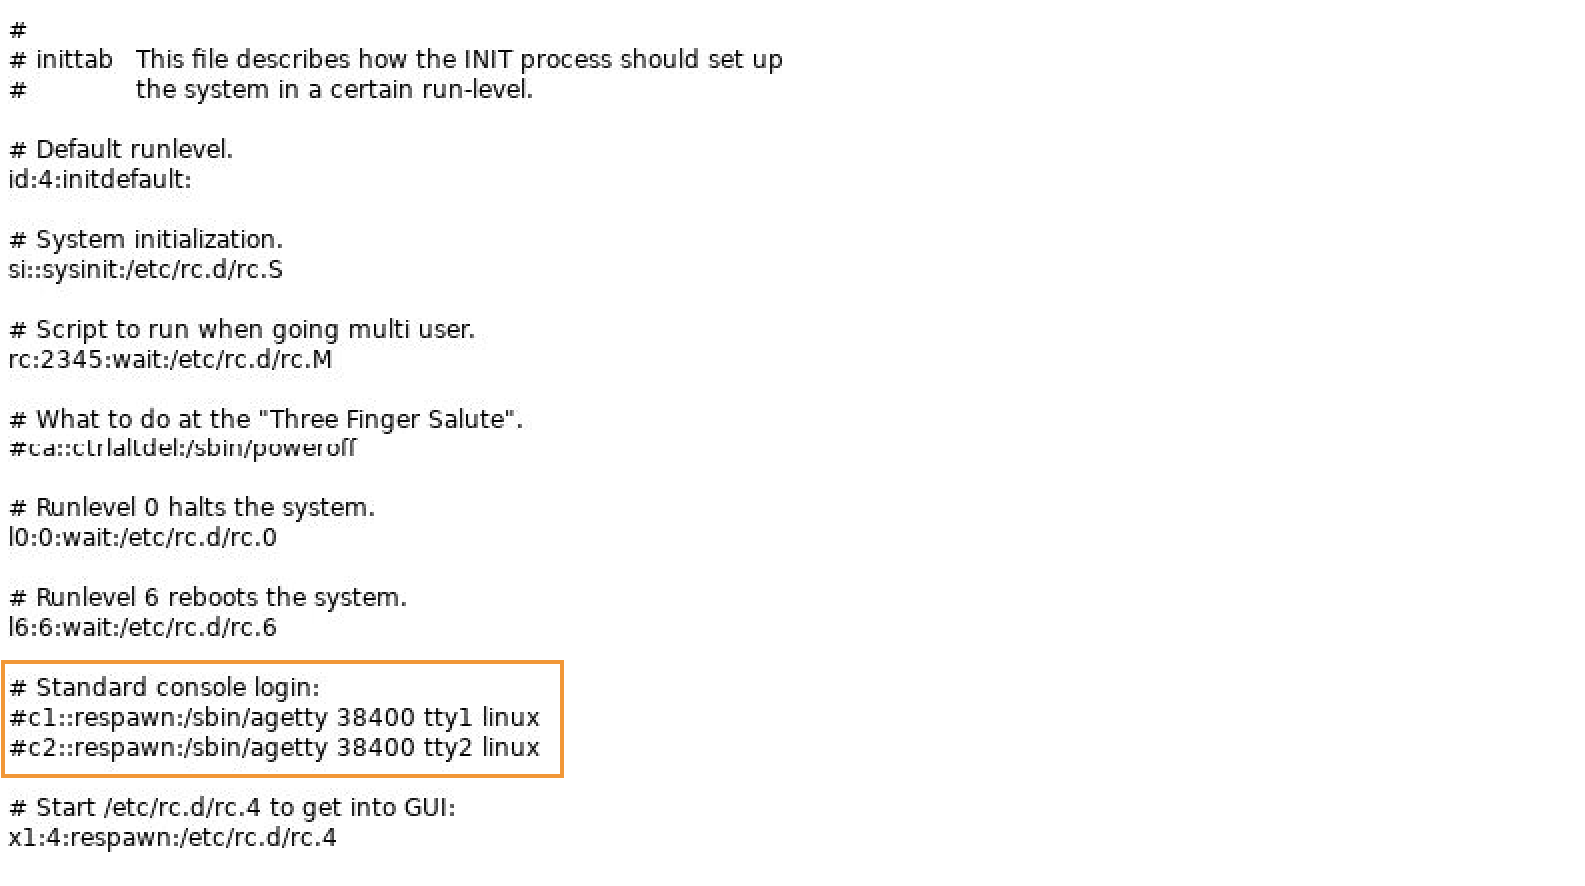
Figure 43: Unmodified /etc/inittab file in Scratchpad
We'll add a TTY by adding the following line to the "Standard console login" section under the two commented lines:
Listing 28 - Entry for a new TTY in /etc/inittab
This instructs the TTY to automatically log in as the root user (Figure 44).
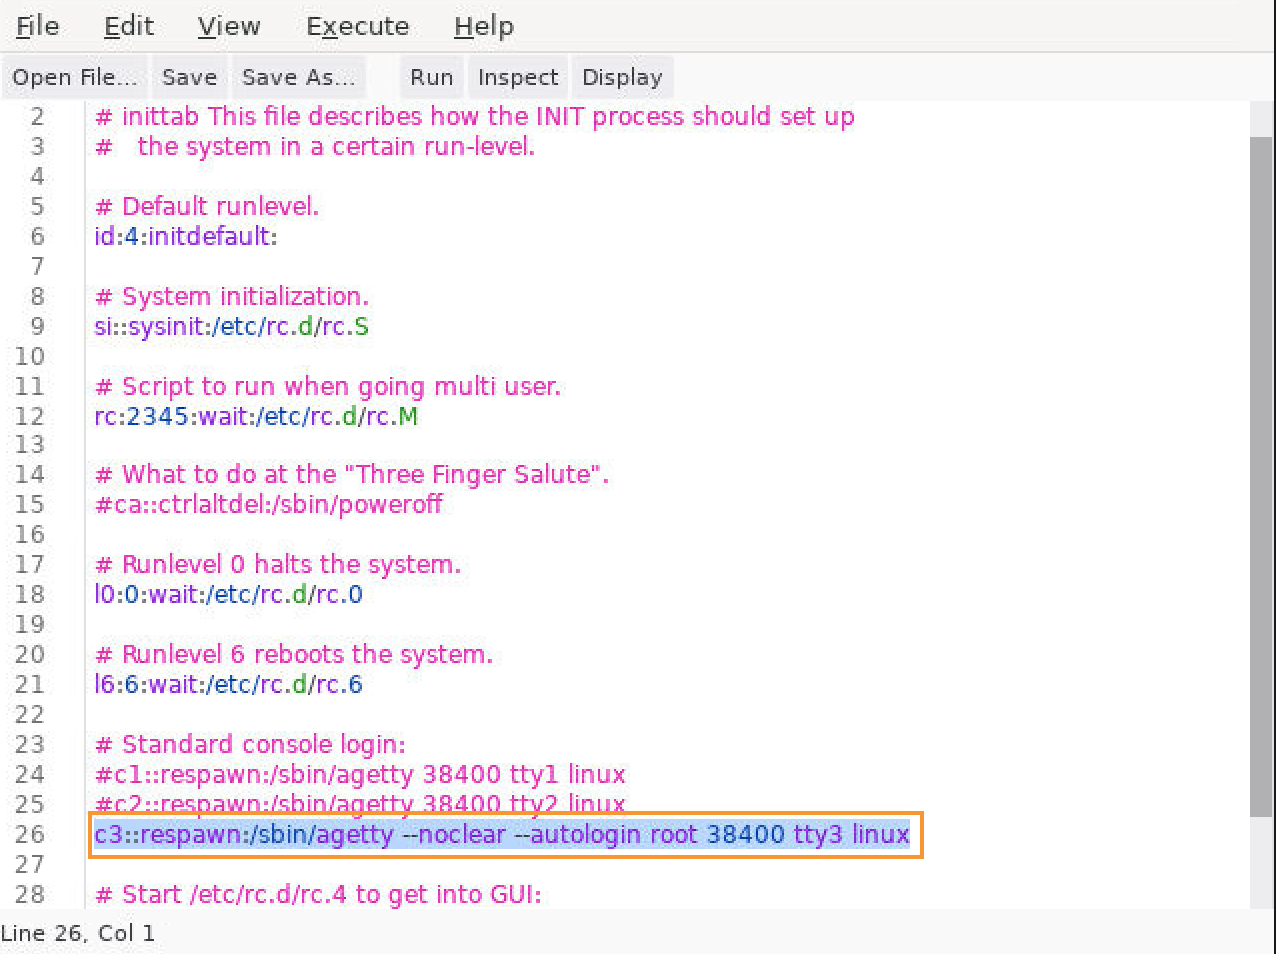
Figure 44: Adding a console to inittab
We can then save the file and copy it back to /etc/inittab:
Listing 29 - Copying our edited inittab over the old one
and replace the permissions as before:
Listing 30 - Restoring inittab permissions
The following command will dynamically reload the settings without rebooting the system:
Listing 31 - Command to reload inittab file dynamically
At this point, if we were physically located at the kiosk, we could use xdotool key Ctrl+Alt+F3 to switch to a TTY terminal session. However, because we are accessing the kiosk through VNC, we must perform a few extra steps. Using Scratchpad, we can create a script containing the code in Listing 32.
Listing 32 - getmeatty.sh script
This will kill the existing VNC server instance and start a new one connected directly to the virtual terminal.
After making the file executable, we can run the script and after a few seconds, we're kicked out of our VNC session. If we reconnect, we are immediately presented with a text terminal interface, logged in as the root user (Figure 45):

Figure 45: Logged into TTY session as root
At this point, we have full root access to the system in an actual terminal session. Next, we could begin moving laterally within the internal network.
Exercises
-
Determine which locations we can write to as a normal user.
-
Get a list of root-owned processes running on the system and determine their purpose/use.
-
What cron jobs are running on the system currently?
-
Try to determine the mechanism by which the kiosk refresh scripts are replacing bookmarks.html. Why does it only work when setting a symlink to a directory and not just pointing to the bookmarks.html file instead?
14.5. Windows Kiosk Breakout Techniques
Although this module primarily focused on a Linux-based kiosk, there are several valuable concepts and techniques we could leverage against Windows-based kiosks.
First, Windows Explorer is often tightly integrated into applications, which can be a benefit to app developers, but a liability for kiosk security. By extension, each application inherently supports myriad options for accessing resources. This is especially true of Internet Explorer, which serves as the foundation for many kiosks. Kiosk developers must exercise extreme vigilance as the smallest oversight can expose the system to compromise.
Windows supports many different environment variables that can act as shortcuts to different locations on the system. As a result, kiosk developers sometimes forget about or disregard them when creating input restrictions. If a browser-based kiosk accepts text input, we could substitute environment variables for full file paths. For example, the %APPDATA% variable translates to a local folder that stores data created by programs. If the kiosk has restricted filesystem browsing, we may be able to use this environment variable to browse the otherwise-protected locations on the filesystem:
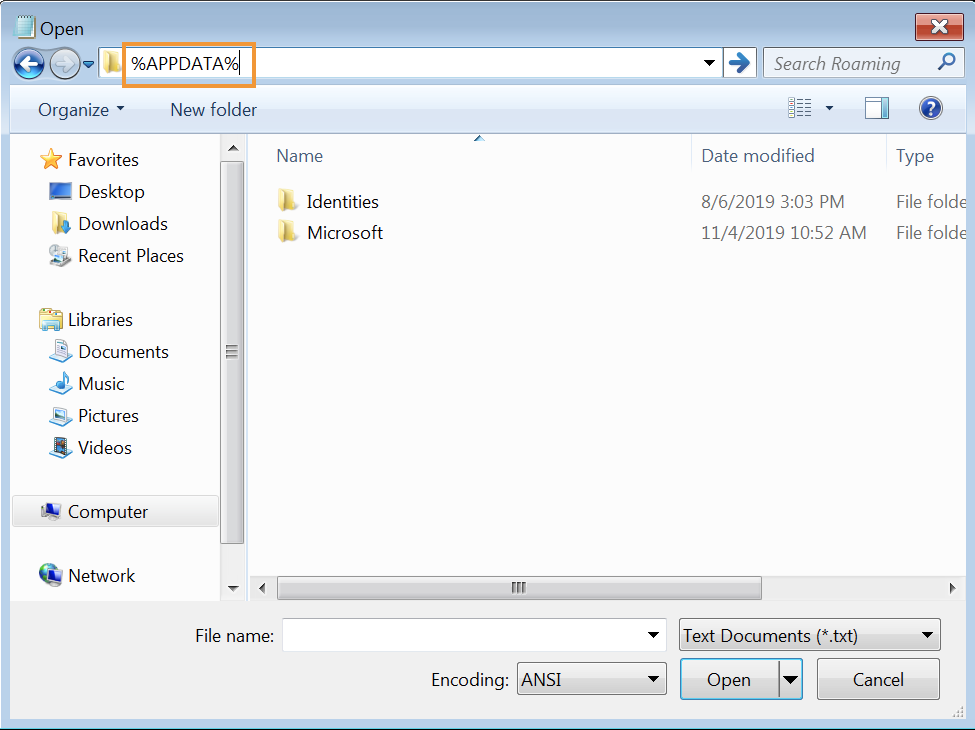
Figure 46: Using Windows environment variables in user input
A few other useful environment variables include:
| Enviroment variable | Location |
|---|---|
| %ALLUSERSPROFILE% | C:\Documents and Settings\All Users |
| %APPDATA% | C:\Documents and Settings\Username\Application Data |
| %COMMONPROGRAMFILES% | C:\Program Files\Common Files |
| %COMMONPROGRAMFILES(x86)% | C:\Program Files (x86)\Common Files |
| %COMSPEC% | C:\Windows\System32\cmd.exe |
| %HOMEDRIVE% | C:\ |
| %HOMEPATH% | C:\Documents and Settings\Username |
| %PROGRAMFILES% | C:\Program Files |
| %PROGRAMFILES(X86)% | C:\Program Files (x86) (only in 64-bit version) |
| %SystemDrive% | C:\ |
| %SystemRoot% | C:\Windows |
| %TEMP% and %TMP% | C:\Documents and Settings\Username\Local Settings\Temp |
| %USERPROFILE% | C:\Documents and Settings\Username |
| %WINDIR% | C:\Windows |
Table 1 - Environment Variables
Similarly, we may be able to enter full UNC paths in user input boxes or file browsers as shown in Figure 47.
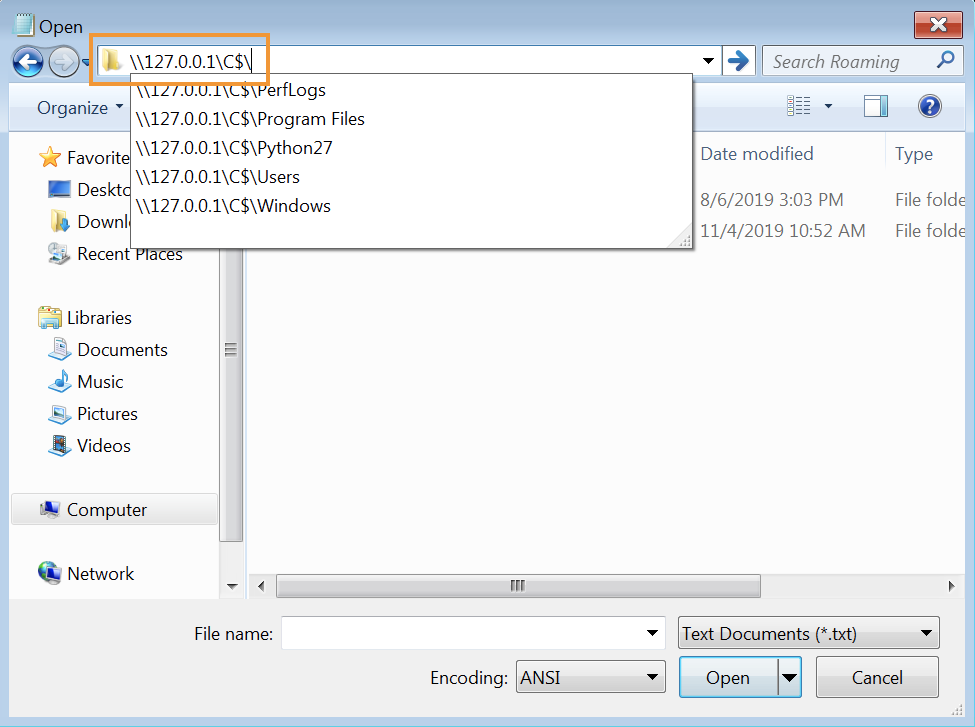
Figure 47: Using UNC paths in user input
Specifically, we may be restricted from accessing C:\Windows\System32, but \\127.0.0.1\C$\Windows\System32\ may be allowed.
Windows also allows the use of the "shell:" shortcut in file browser dialogs to provide access to certain folders.
Although there are many shell commands available, a few useful examples include:
| Command | Action |
|---|---|
| shell:System | Opens the system folder |
| shell:Common | Start Menu Opens the Public Start Menu folder |
| shell:Downloads | Opens the current user's Downloads folder |
| shell:MyComputerFolder | Opens the "This PC" window, showing devices and drives for the system |
Table 2 - Shell Commands
We may also be able to use other browser-protocol style shortcuts such as file:/// to access applications or to access files that may open an application.
Aside from inputting paths manually, it may be possible to search for files that we can't access directly. For example, entering a path to a specific file may be blocked, but an embedded search box may allow an unfiltered search which we can use to navigate to a file from the search results as shown in Figure 48.
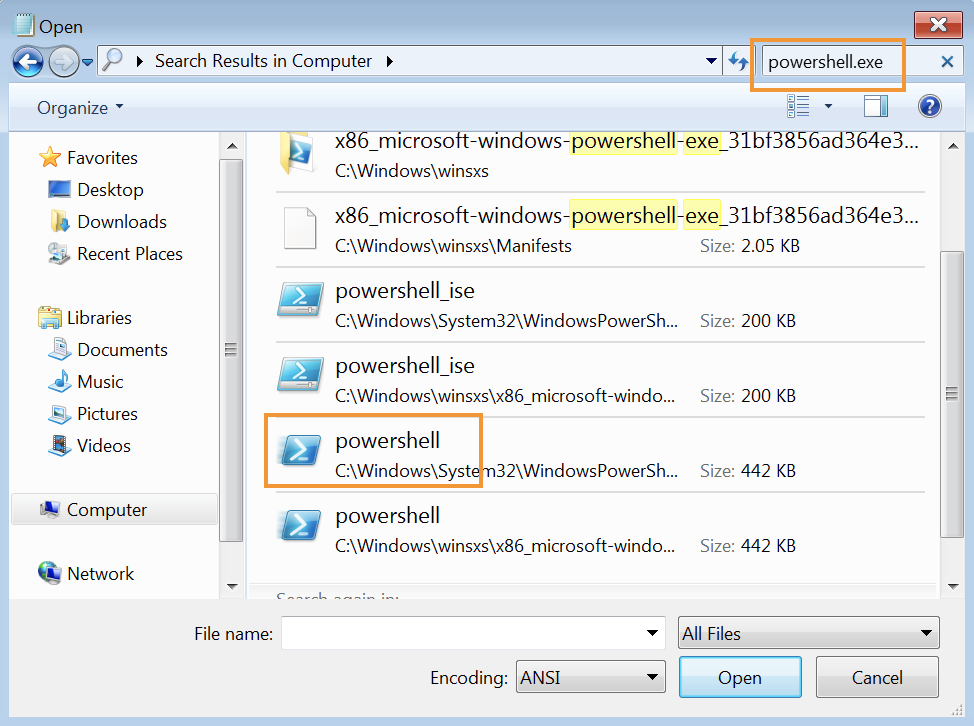
Figure 48: Using Windows search functionality to access applications
Similarly, if we can get access to a help dialog, we may be able to search for specific utilities such as Notepad, cmd.exe, or PowerShell. The help entries for these will often contain embedded shortcuts we can click to run various programs:
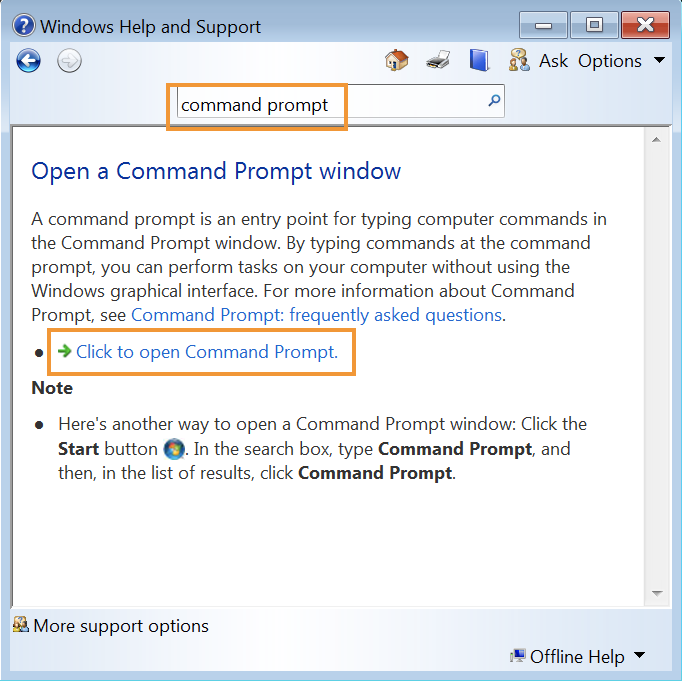
Figure 49: Using help dialog to access applications
This strategy works for a variety of dialog boxes. If a clickable link is available in a search utility, we should try to take advantage of that by exploring the link and attempting various combinations of mouse-clicks and function-key clicks on the link. Many of these aren't (or can't) be properly restricted.
File shortcuts also offer interesting avenues for expansion as they may provide access to files and locations that are normally restricted. For example, when using a file browser dialog in a kiosk, we may be able to create shortcuts by right-clicking on files and locations and choosing Create shortcut (Figure 50).
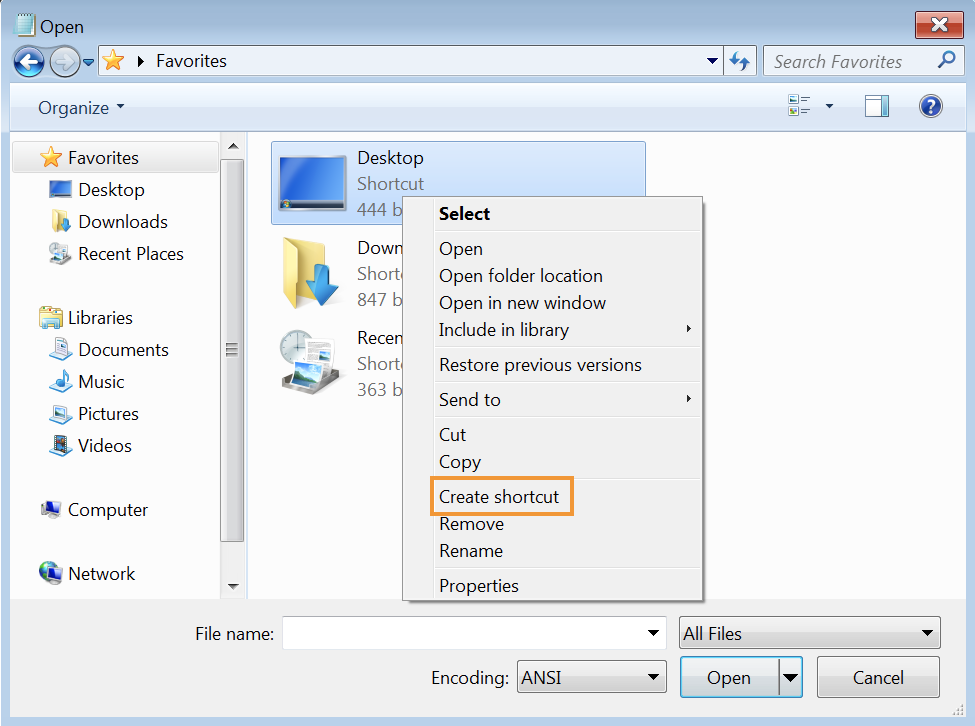
Figure 50: Creating shortcuts through an Open File dialog window
If this works, we may be able to modify the shortcut and change the target application in the shortcut properties to an application like cmd.exe or powershell.exe which could launch an interactive shell on the system.
This approach also works with various special-use folders in file browser dialog windows. Right-clicking files in the file browser may present an option to add the file or a shortcut to "Favorites" or send it to a particular location. Because right-click functionality is widely used in Windows applications, it is difficult to restrict in a kiosk environment and should be attempted frequently as we increase our latitude on the system. These right-click menus are a common weakness in kiosk systems.
If we can browse the filesystem, such as through a file open or save dialog, but right-clicking is disabled, it may be possible to start an application by dragging and dropping files onto it. Good candidates for this are cmd.exe and powershell.exe, if they are available on the kiosk, as they can provide a system shell. If the filetype being dragged is associated with the program, the program will likely open it.
With cmd.exe and powershell.exe, any file should be enough to open a command window:
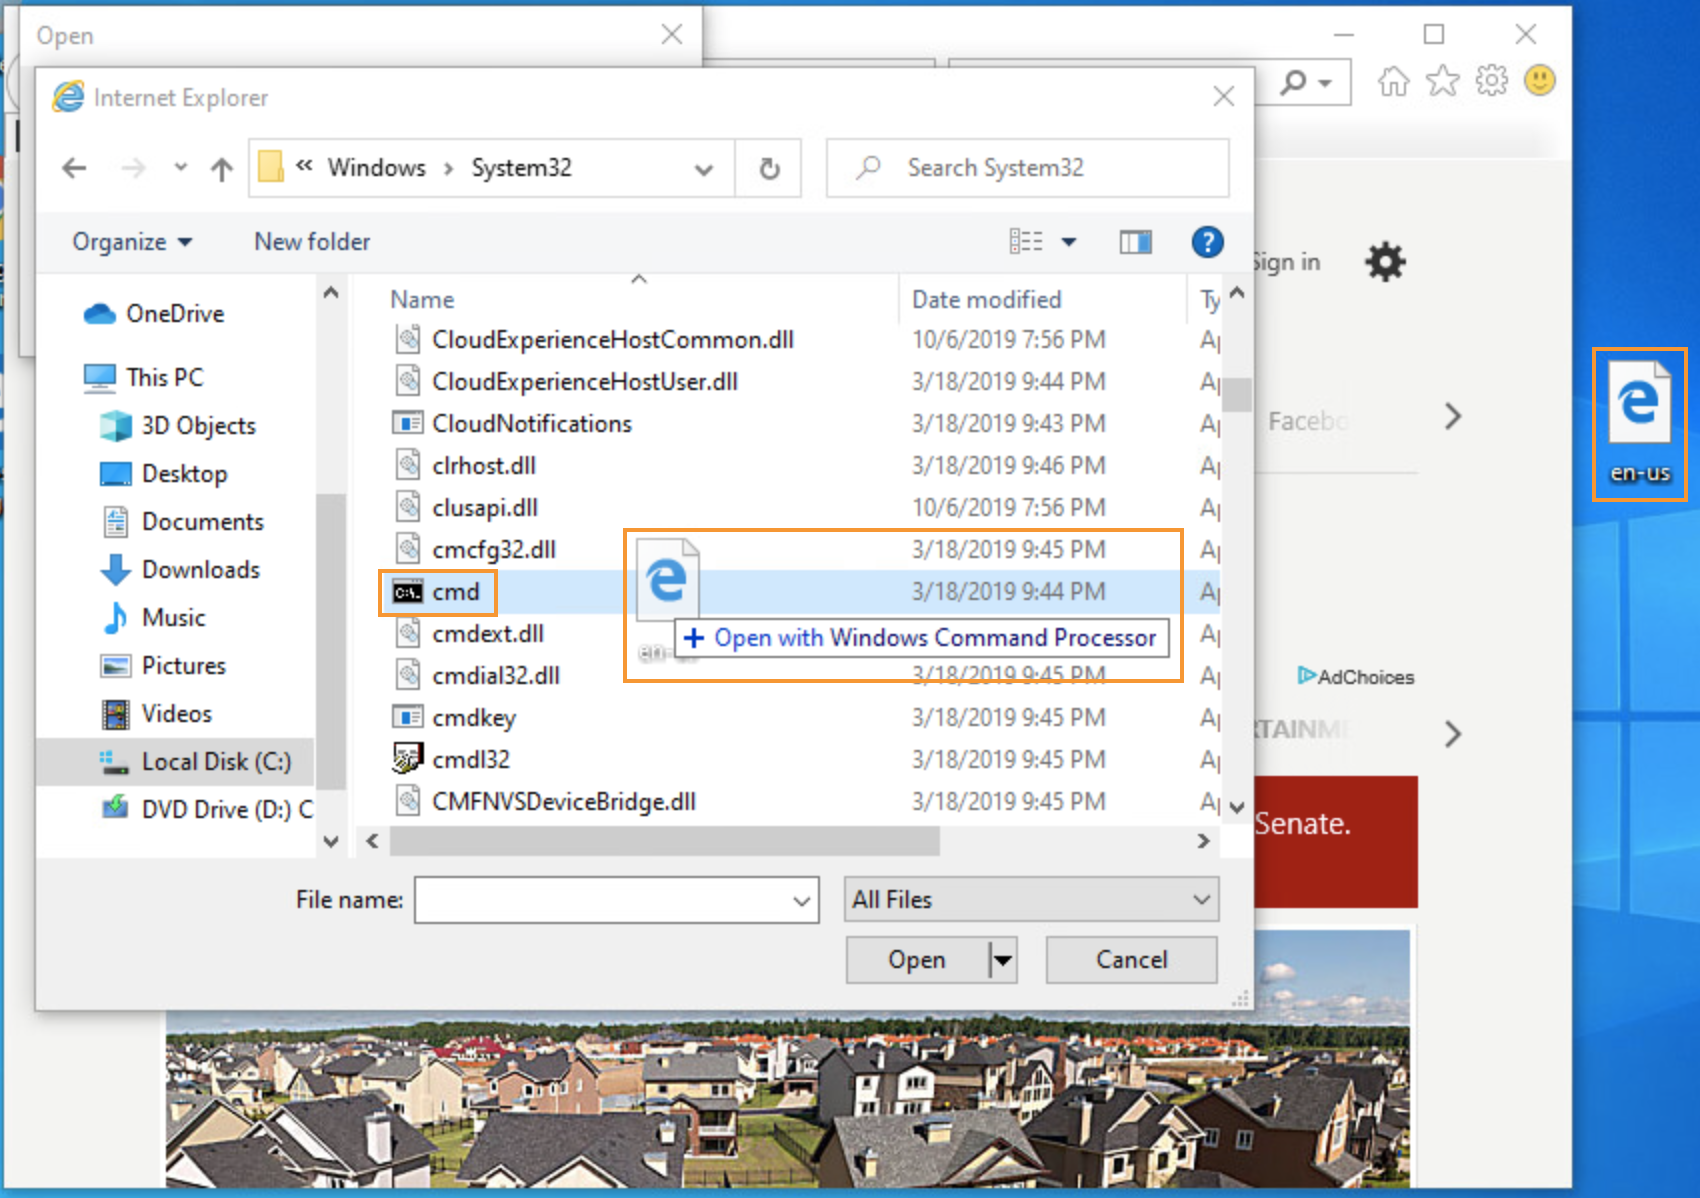
Figure 51: Dragging a file to cmd.exe
The print dialog, if available in the kiosk, can provide a useful and often-overlooked avenue to a working file browser dialog, even in extremely locked-down systems. Once a file browser is activated, we can use techniques similar to those we previously discussed in this module to escape from the dialog and run applications or manipulate the filesystem (Figure 52). Note that this may work on Linux systems as well.
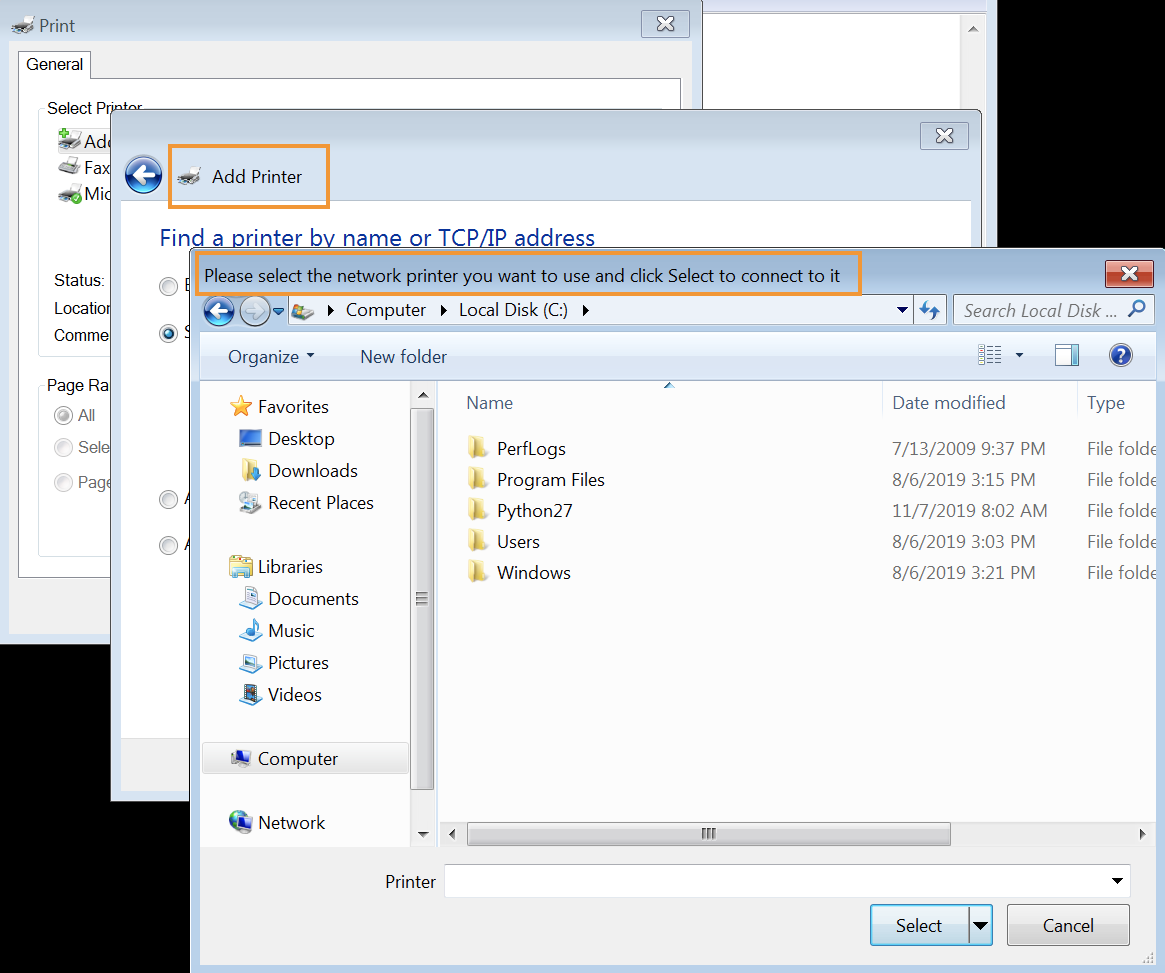
Figure 52: Using Print dialog to access Windows Explorer features
We should also attempt to use various keyboard shortcuts to expand our level of access. For example, C+E+H can potentially launch the lock screen menu, which can allow us to log in as a different user or start Task Manager (Figure 53).
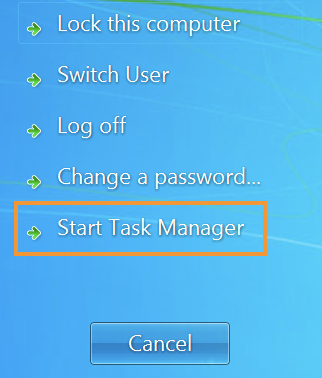
Figure 53: Windows lock screen with option to start Task Manager
Task Manager can be started directly with C+E+~. There are also many combinations using the Windows key that can be useful if they aren't blocked. Some other frequently useful shortcuts include:
| Key | Menu/Application |
|---|---|
| ! | Help |
| C+P | Print Dialog |
| E+A | Task Switcher |
| G+R | Run menu |
| C+~ | Start Menu |
Table 3 - Shortcuts
In addition to kiosk interface-focused restrictions, Windows systems may also include various application whitelisting or blacklisting strategies. There are many potential bypasses for these, which are out of the scope of this module. However, a simple option is to copy and paste binaries, rename them, and attempt to run them. Some systems may restrict powershell.exe but a copied and renamed version will run without issue (Figure 54).
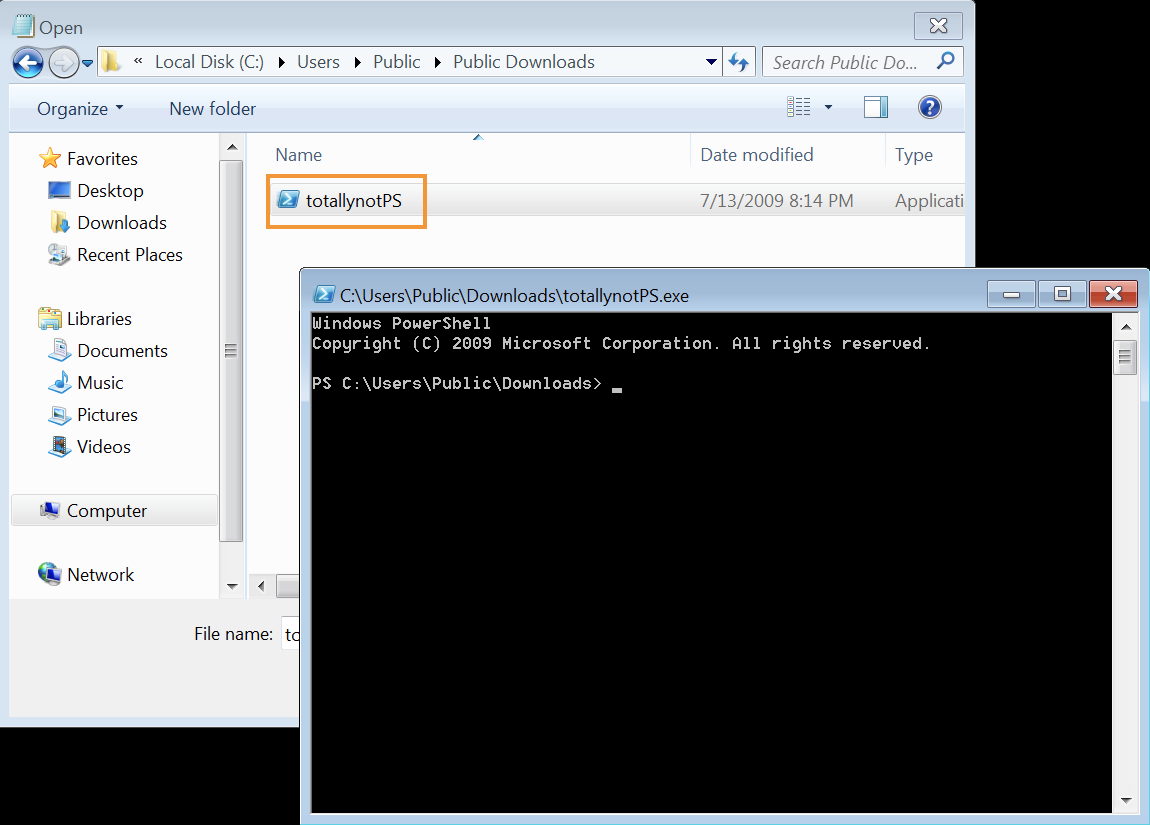
Figure 54: Running a restricted binary by copying and then renaming it
Many blacklists/whitelists work on either a hash of the file, the filename, or the file path. Modifying any one of these will bypass blacklists. The reverse is true for whitelisting. If we have write access to a known whitelisted file, we can replace it with a binary that is normally restricted.
Most of the strategies in this module are operating system-agnostic. The philosophy of kiosk breakouts is to explore any available functionality and attempt to misuse it to free ourselves from the "guided experience" of the kiosk system. Because locking down all dialog windows, embedded links and shortcuts in an operating system is a monumental task, with enough time we will likely find a weakness in the defenses and escape.
Exercises
- Using Notepad on a Windows machine, open the help dialog and search for different utilities that might expand our capabilities in a restricted environment. Expand on the examples in this section to get a direct link through the help pages to open an application. What applications are available via this method?
14.6. Wrapping Up
In this module, we have demonstrated how, by thinking outside the box and exploiting existing and intended functionality, a dedicated attacker can escape a restricted kiosk or thin client user interface and compromise the system. We've also demonstrated the importance of working with tools natively available on a system to create openings, rather than relying on external utilities and access.